Framing is layout, cuts, and sequence. Get those right and the wall stands straight, holds load, and takes finishes clean. This guide covers the core parts, measurements, and field moves that keep walls true.
New to the bigger picture? Start with a quick primer on full-house framing flow in House Framing 101 or scan a fast breakdown of framing types in the 2026 framing guide.
Safety and Setup
Clear the floor, set a cut station, and stage studs by length. PPE on. Check your nailer, compressor, hose, and cords. Confirm lumber count before you start layout so you don’t stop mid-wall.
Working over crawlspace or piers? Read a short overview of pier and beam methods so you understand how loads land at the foundation.
MUST READ
Framing Floors, Walls & Ceilings (For Pros By Pros)
Clear drawings, real job logic. Great for first builds and refreshers.
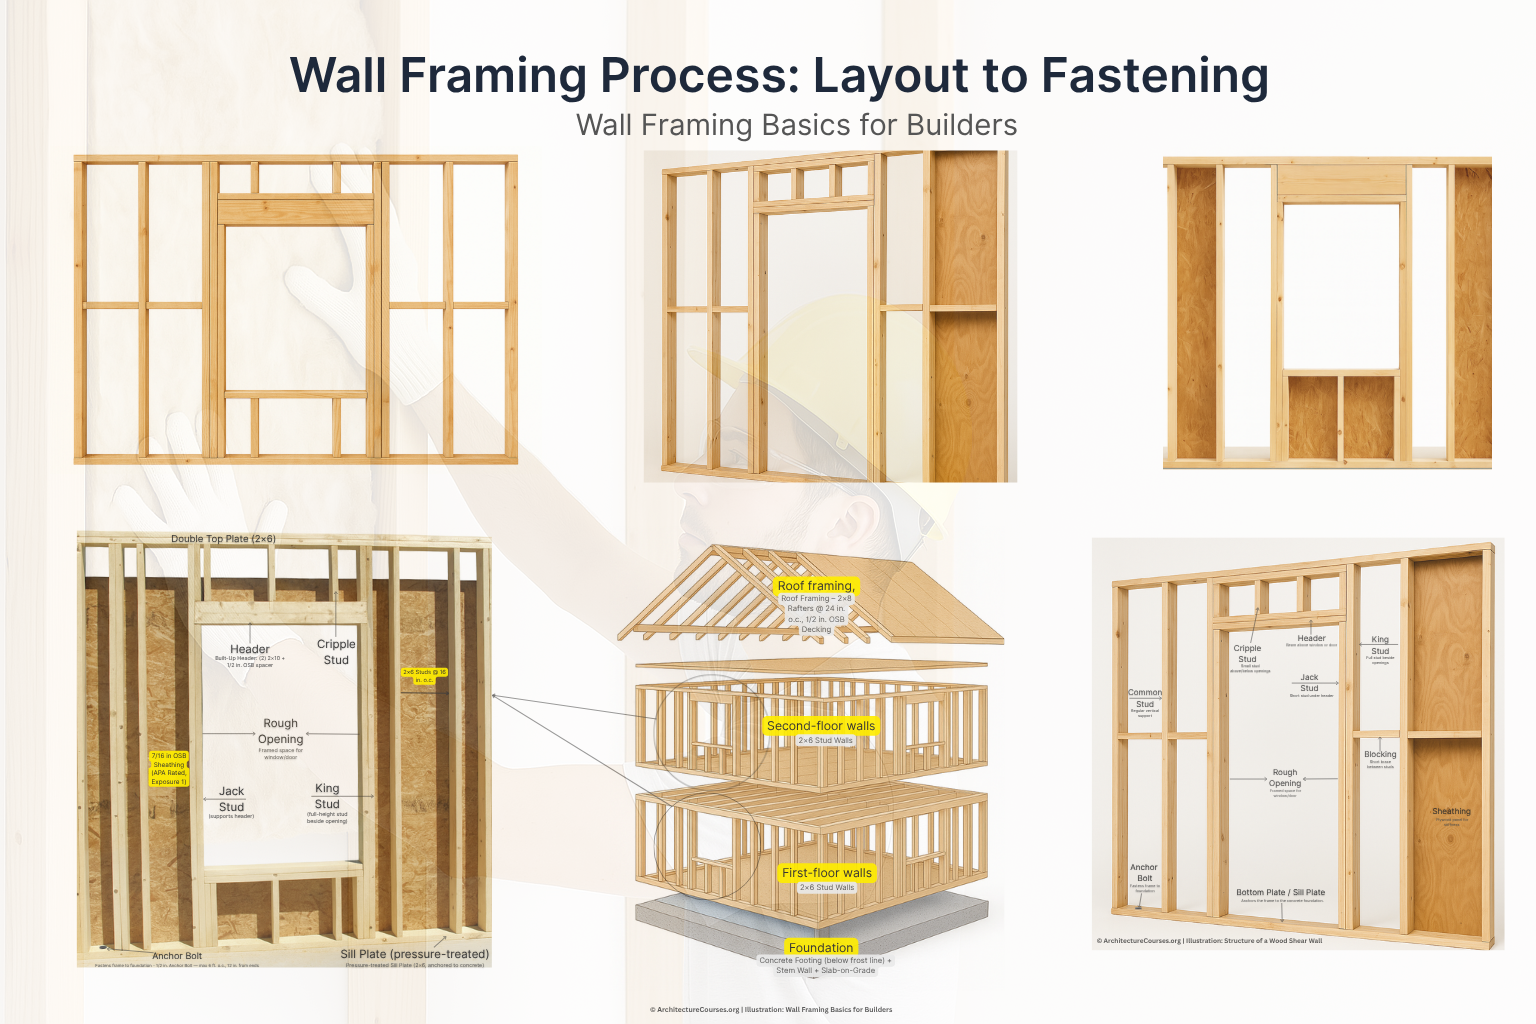
Basic Parts of a Wall
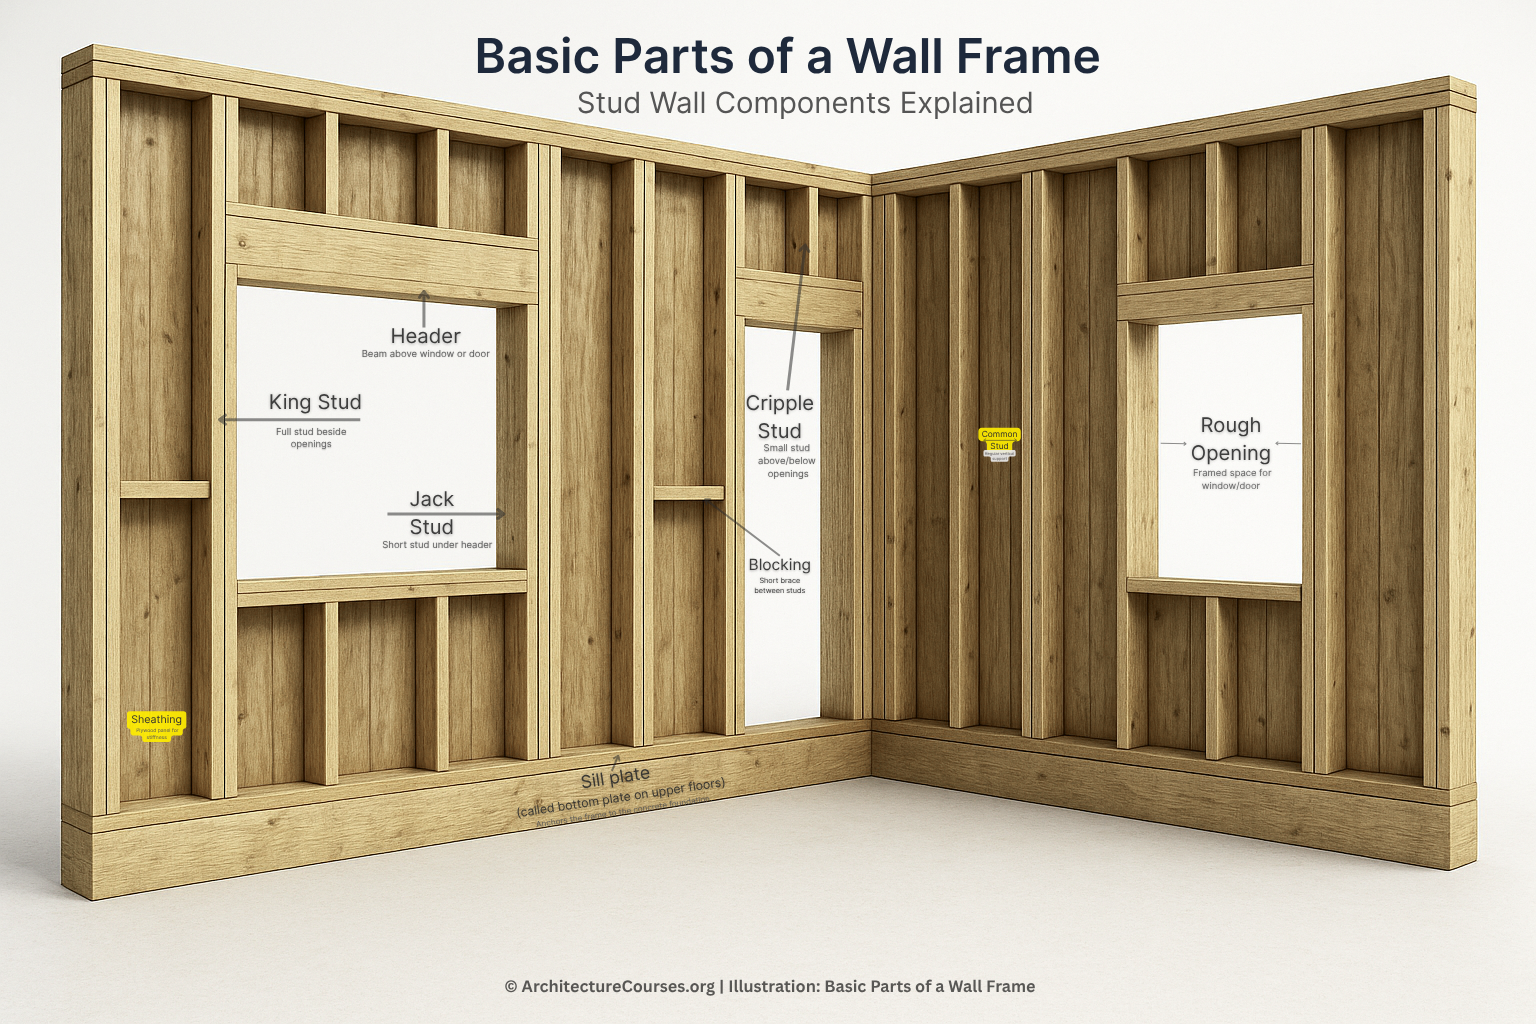
- Bottom plate sits on the floor. Treated plate where moisture is possible.
- Top plate caps the studs. Double plate ties walls together.
- Studs carry load and form the nailing plane for finishes.
- Headers, king studs, jack studs transfer load around openings.
- Cripples support header or sill as needed.
- Blocking adds stiffness and gives backing for finishes and hardware.
If you need a quick refresher on each piece, skim this plain-language walk-through: wall framing basics.
Layout: Square, Straight, Plumb
Snap lines for wall position. Check for square with the 3-4-5 method or a large framing square. Mark stud layout on plates at 16 in. o.c. unless plans say otherwise. Use the “X” on the keep side so the stud lands on the layout consistently.
Not sure how this wall interacts with floors and roofs in a two-level house? Here is a practical comparison of single-story and two-story framing that shows where plates, joists, and ties change.
RECOMMENDED TOOL
Tandefio 16″ Framing Set
Keeps stud layout consistent. Handy for repetitive marking.
Cut and Assemble Plates
Cut bottom and top plates to wall length. Transfer layout marks across both plates together. Note door and window rough openings on the plates so you don’t nail a stud where a jack needs to land later. Where walls intersect, extend layout for tying.
Exterior walls often get a treated sill or bottom plate. See how exterior sheathing thickness affects plate flush and nail patterns in this overview of exterior wall sheathing choices.
Studs: Length, Crown, Placement
Stand studs crown the same way. Cut to the exact height required for the plate stack. Land every stud on its mark. For long runs, sight the line and nudge before nailing so the wall stays straight.
If the wall is non-bearing, your stud sizing and header strategy can change. Here’s a quick read on bearing vs non-bearing walls.
FIELD PICK
Heavy-Duty Carpenter’s Square
The simplest tool that prevents the most mistakes in layout and cuts.
Openings: Doors and Windows Done Right
Frame openings with king studs full height, jacks under the header, and cripples above or below to carry load and catch finishes. Keep rough openings per manufacturer specs. Nail header tight to jacks. Check diagonals so the opening is square.
Need a fast refresher on the parts around a window? Here is a focused guide to king and jack stud placement. Planning a retrofit? See framing a new window in an existing wall and a homeowner-level overview of wood window frame replacement.
Inside Corners and Intersections
Choose a corner build that gives drywall backing and limits thermal bridging. Two-stud California corners save material and reduce cold spots, but make sure finishes have solid nailing.
If this wall supports roof framing at a gable or changes direction, plan bracing early. These two short reads help you decide what goes where: roof bracing fundamentals and types of roof bracing.
RECOMMENDED TOOL
Metabo HPT Framing Nailer
Smooth trigger control and reliable depth. Built for daily framing.
Blocking and Backing
Add solid blocks for cabinet runs, handrails, and hardware loads. Keep blocks flush so drywall sits flat. Mid-height blocking helps stiffness in tall walls. Use fire blocking where code requires to stop concealed draft paths.
For exterior skins, confirm your sheathing schedule and nail pattern. A quick check on sheathing thickness and materials will save call-backs later.
Bracing and Shear
Walls need racking resistance. In high-wind or seismic zones, follow the shear schedule. Use panel nailing patterns, hold-downs, and drag elements as specified. Metal T-bracing helps in specific conditions but does not replace a shear wall unless designed.
Get a feel for where and how to stiffen with these short primers: T-brace installation basics and a field note on drag struts in framing. For roof-to-wall continuity, skim roof tie beams.
MUST READ
Complete Book of Framing
Headers, bracing, layout math. Written like you’re on site with the author.
Mechanical Paths: Don’t Hack the Structure
Plan plumbing and electrical routes before you sheath. Keep holes within code limits and away from high-stress zones near ends. Add nail plates to protect wiring at edge conditions. For stacked baths in two-story houses, coordinate stud packs and chases early. If you are comparing one-level vs two-level distribution, this quick comparison of single- and two-story layouts is useful context.
Sheathing and Straightening
Stand the wall, plumb the corners, and tack it off. Sight the face and push to line before you sheath. Nail per schedule. Check diagonals again. Tie double top plates where walls meet and lap the joint over a stud.
Exterior skins vary. Read up on roof-edge sheathing details that don’t fail and a broader roofing materials overview if this wall ties into a complex roof edge.
FIELD PICK
Tyvek Protec 200 Underlayment
Grippy, cuts clean, and holds up. Worth it even on small jobs.
Bearing Checks and Load Paths
Before you close the wall, trace the load path above. Does the wall catch joists or trusses. Do headers land on jacks and continue to bearing. Are there breaks at door clusters that need posts or squash blocks. If you are unsure whether the wall is truly carrying load, verify with these quick reads: spotting bearing walls without removing drywall and an attic check method in how to tell from above.
Exterior Connections and Moisture
At exterior walls, coordinate sheathing, WRB, flashing, and window sequencing. Keep fasteners at the right edge distances. Back-caulk where specified. Tie corners clean so membranes shed water.
For retrofit work that touches foundations, skim foundation wall construction basics or, for older houses, fixing wet basement walls to avoid traps.
MUST READ
A Roof Cutter’s Secrets to Framing the Custom Home
Great for tricky roof and wall tie-ins. Lots of time-saving moves.
Doors, Windows, and Trim Prep
Confirm roughs before ordering units. Keep sills level and shims ready. Layout studs to catch casing and drywall returns. Mark backing for shades and hardware now so you do not fish for it later. If you need a refresher on window systems, this overview of wood window frames and aluminum options helps with planning.
Quality Control: Quick Punch List
- Studs aligned and crowned the same way.
- Openings square, level, plumb, and to spec.
- Blocking where cabinets, rails, and accessories will land.
- Nail patterns match the schedule.
- Bracing and hold-downs installed where required.
- Top plates lapped and tied at intersections.
RECOMMENDED TOOL
Metabo HPT Framing Nailer
Reliable daily driver. If you frame often, this one pays back fast.
Common Problems and Fast Fixes
Wave in the wall. Sight line, loosen nails, push to string, re-nail. Add a mid-span stud if spacing slipped.
Header sag or bounce. Recheck span and species. Add a jack if it was missed. Verify bearing below.
Racking under push. Confirm shear panel and nailing pattern. Install T-brace or blocking as designed. See T-brace notes and drag strut placement for transfer paths.
Keep Learning
If you want a big-picture refresher, skim this framing overview and a focused walk-through of studs, plates, and blocking. For exterior skins and nailing, the sheathing guide is a quick check before you close the wall. Planning multi-level work. Compare key differences in one- vs two-story layouts before you place that top plate.
MUST READ
Complete Book of Framing
Solid reference you will return to. Cuts, spans, details, and workflow.
FAQ
Wall Framing, Builder-Level Answers
Do I need treated lumber for bottom plates?
Yes, if the bottom plate is in contact with concrete or a slab. Code requires pressure-treated lumber anywhere moisture is expected.
How far apart should wall studs be?
16 inches on center is standard. Some non-load-bearing walls go 24 inches o.c., but don't assume—check the plans and code.
What’s the standard height for a framed wall?
8-foot walls use 92-5/8" studs with plates. 9-foot walls use 104-5/8". That’s before drywall and floor finish numbers come into play.
How do I know if the wall is load-bearing?
If it runs perpendicular to joists or supports a ridge or roof truss, it’s usually bearing. Still, confirm through plans or a structural check. Don’t guess—damage is expensive.
Can I frame over a concrete floor?
Yes. Use treated plate on the concrete, add sill sealer if you're in a moisture-prone area, and anchor per code (typically 6 ft o.c.).
Do I need a double top plate?
Yes for structural walls. The double plate overlaps to tie walls together and carry joists or rafters.
Should I crown studs?
Yes. Always install studs with the crown facing the same direction. It keeps the wall straight when you line it up.
What’s a California corner?
Three studs instead of four at inside corners. Saves lumber and leaves room for insulation. Still gives drywall backing on both sides.
Do I need blocking in the wall?
Only where finishes or fixtures need backing—like cabinets, railings, or grab bars. Also use fire blocking to stop vertical airflow in tall walls.
Can I drill holes through studs?
Yes, but follow code: holes can't exceed 40% of the stud width (unless you reinforce). No holes within 5/8" of the stud edge.
Should I sheath the wall before standing it?
On slabs—yes. On framed floors—depends on layout, space, and manpower. Some framers stand walls first to align and brace, then sheath.
What nails do I use for framing?
Common nailer setup is 3-1/4" clipped or 16d commons if hand-driving. Don’t use roofing nails—wrong head and shank strength.
Do I need a header in every opening?
No. If the wall is non-bearing, the header can be sized down or omitted (check code). In bearing walls, headers spread loads around openings.
Why do my walls rack when I stand them?
Probably no tack bracing or out-of-square plates. Fix with temporary diagonal braces, pull it straight before sheathing.
How do I frame a wall for a basement?
Stay 1" off concrete, use treated bottom plates, shim plumb, add blocking for ledgers, and seal against moisture paths.
How tall can I frame a wall?
Standard codes allow up to 10 feet with 2x4 studs at 16" o.c. Longer spans or high walls need engineering or bigger studs.
References & Building Standards
- National Building Code of Canada (NBCC 2020) – Wall Framing Requirements
Published by National Research Council Canada - Canadian Wood-Frame House Construction – Complete Guide
Canada Mortgage and Housing Corporation (CMHC) - International Residential Code (IRC 2021) – Wall Bracing and Bearing Wall Requirements
International Code Council (ICC) - International Building Code (IBC 2021) – Chapter on Wood Framing Systems
International Code Council (ICC) - U.S. Building Permit Regulations for Structural Framing
United States Census Bureau - U.S. National Building Handbook – Wood Wall Assemblies
National Institute of Building Sciences (NIBS)