
Wood rot repair starts before the rotten board ever comes out.
If the water source is still active, the new wood just becomes the next rotten board. That is where most of these repairs go wrong. Somebody cleans out the soft corner, fills it, primes it, paints it, and the trim looks fine for a season — then the same edge opens up again, because the leak or the splashback or the failed caulk or the gutter that never drained right was the real problem, and nobody touched it.
So the first question is not “what filler should I buy?” It is simpler than that: where is the water coming from, and does this piece of wood carry anything important?
Start With the Water Source
Rot needs moisture. The name “dry rot” is misleading, because wood does not decay in genuinely dry conditions. It may look bone-dry by the time you find it, but it was wet long enough at some point for the decay fungus to take hold.
A practical rule from the wood-science side: wood that can dry out and stay below roughly 20 percent moisture content is fairly safe from decay. Once it stays wetter than that, the risk climbs, and around the 30 percent range it gets serious, especially where the wood stays shaded, trapped, or poorly ventilated and never gets a chance to dry.
That is why the repair begins with the wetting pattern, not the board.
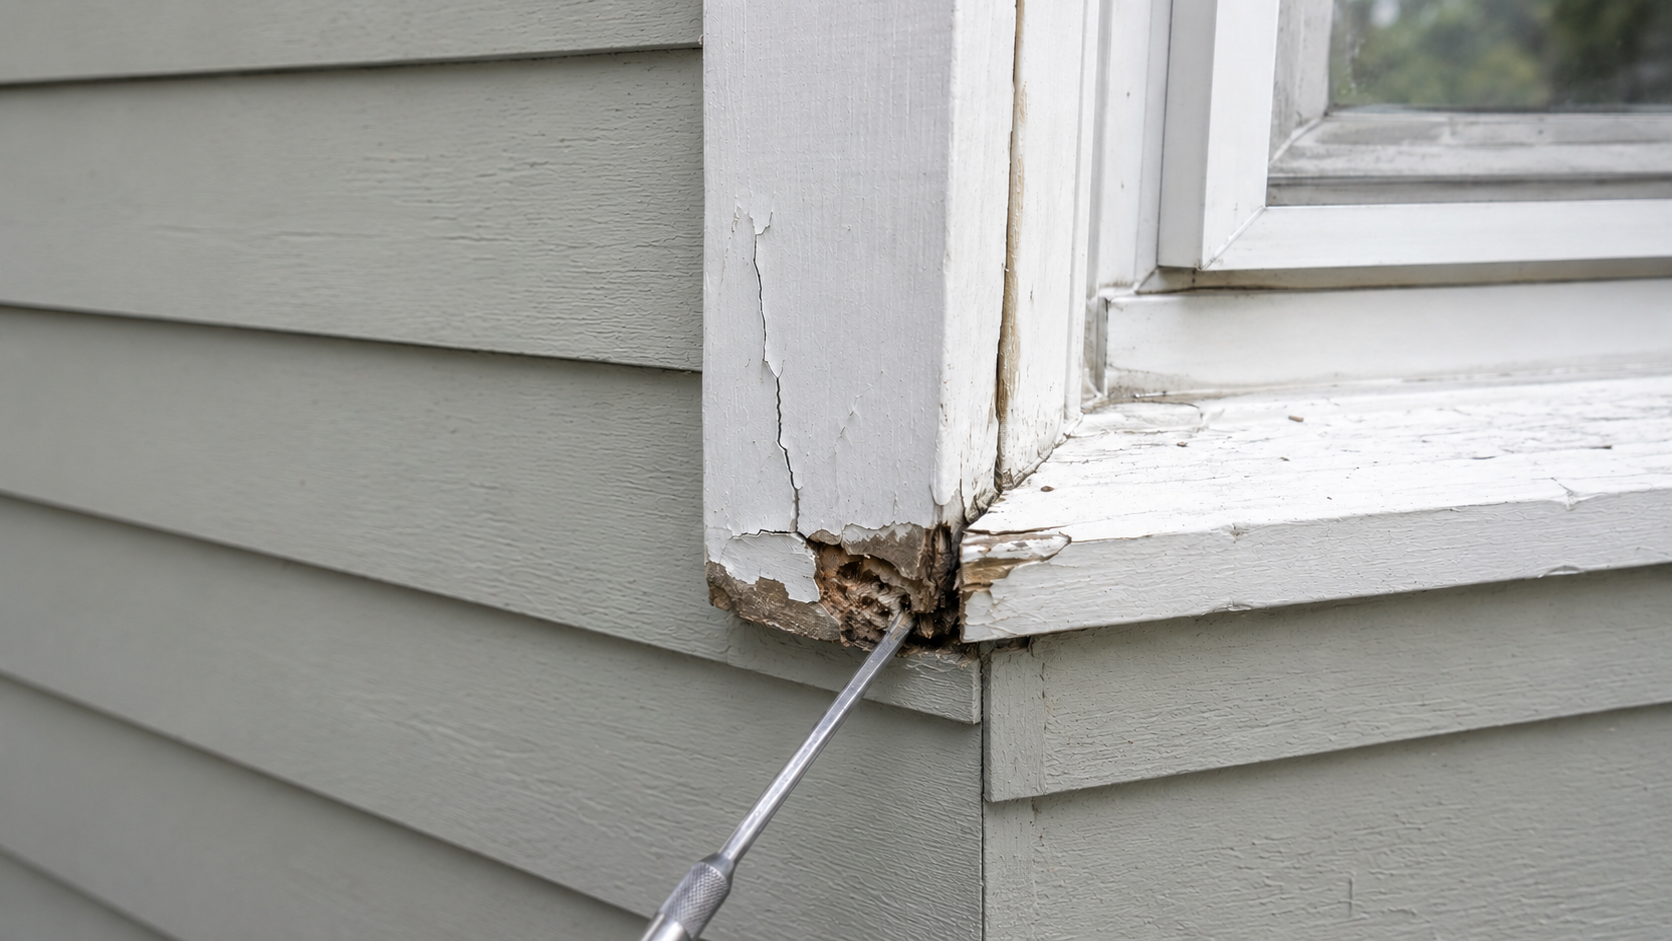
- At a window corner, look for failed caulk, bad flashing, a missing drip cap, or paint failure at the sill.
- At fascia or soffit, check the gutters, the roof-edge metal, the shingles, and the way water actually leaves the roof.
- At siding bottoms, check grade clearance, splashback, sprinklers, and water trapped behind the trim.
- At floors and subfloors, check plumbing leaks, exterior doors, bathroom fixtures, and damp crawl spaces.
- At joists, sill plates, and beams, check crawl-space humidity, foundation leakage, insect damage, and poor ventilation.
Paint hides all of this for a while. A glossy, freshly painted surface tells you nothing about whether the wood underneath is still sound.
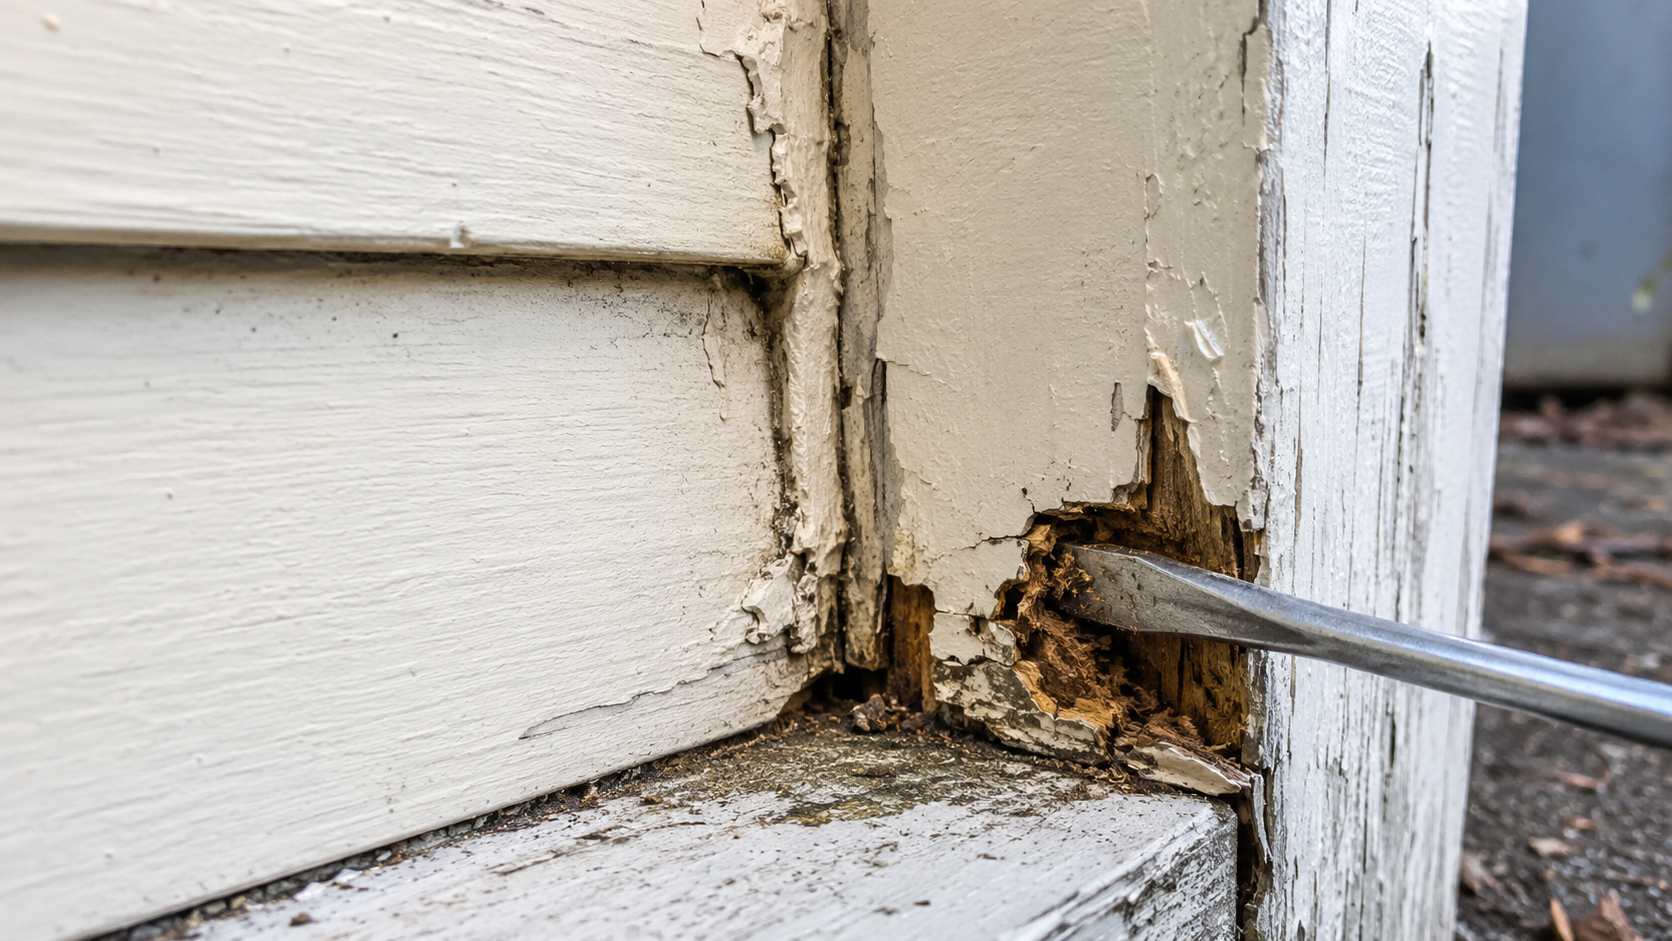
The test is a small awl, a screwdriver, or a probe. Press gently — you are not trying to wreck the board, just to feel whether the wood under the paint is firm, fibrous, hollow, punky, or wet. I have pushed an awl clean through a windowsill that looked perfectly painted from three feet away. If the tool sinks in under light pressure, the repair has already moved past paint, and no amount of filler is going to fix that.
FIELD PICK: A basic pin-type wood moisture meter helps separate a dry old stain from an active damp spot. It does not replace judgment, but it gives you one more honest reading before you cut into trim, siding, or flooring.
Is It Rot, or Is It Insects?
Here is the question almost every rot guide skips, and it is the one that quietly costs people the most: soft, hollow, crumbling wood is not always rot. Carpenter ants and termites leave damage that looks a lot like decay from across the room, and the fix is completely different. Replace insect-chewed wood without dealing with the colony, and the fresh board just becomes its next meal.
The reason it matters even more than it sounds: rot and insects usually travel together. Both carpenter ants and dampwood termites prefer wood that moisture has already softened, so finding rot does not rule out bugs — it actually raises the odds something moved in behind it. More than once I have started chasing what I was sure was plain rot and found ants had hollowed out the soft wood ahead of me.
You can usually tell them apart in a minute or two by what is left behind.
| What you find | Likely cause | What it means for you |
|---|---|---|
| Spongy or stringy wood, or wood that cracks into little cubes; darker or lighter than sound wood; sometimes tiny mushroom or shelf-like growths or a cottony film; musty smell; no tunnels | Fungal rot (what people call wet or dry rot) | A wood-repair problem. Fix the moisture, then patch, splice, or replace. |
| Clean, smooth, almost sanded tunnels inside the wood, with small piles of coarse, shredded “sawdust” (frass) below, often with insect parts in it | Carpenter ants | Call a pest pro for the colony and a carpenter for the wood. They are two jobs. |
| Pencil-width mud tubes on the foundation, piers, or joists; galleries packed with mud and soil; wood that looks fine on the surface but sounds hollow | Subterranean termites | Stop. Do not break the tubes open. Call a termite professional first. |
| Tiny, hard, gritty pellets (about a millimeter) in small piles below pinhole “kick-out” holes | Drywood termites | Pest inspection before any wood repair, or the repair is temporary. |
The shortcut: rot has no tunnels and no frass, and it follows the water. Tunnels, galleries, mud tubes, or little piles of debris mean something is living in there, and a carpenter alone will not solve it. If you see mud tubes, that is the one case where the right next move is to stop poking and pick up the phone.
Patchable Rot vs Replacement Rot
Some rot can be patched. Some needs a splice, some needs the whole board pulled, and some needs to be opened up before anyone puts a price on it.
The deciding factor is not the size of the ugly spot. It is moisture, depth, location, and whether the wood is carrying load.
| Condition | Likely Repair | Watch For |
|---|---|---|
| Small dry surface damage on non-structural paint-grade trim | Clean out loose fibers, consolidate if needed, fill, prime, and paint | Water source must be fixed first |
| Damaged trim profile with sound wood around it | Splice or Dutchman repair | Matching old trim profiles can take time |
| Soft board, deep decay, loose fasteners, or repeated wetting | Replace the board | Prime cut ends and correct flashing or drainage |
| Rot at joists, beams, sill plates, roof deck, subfloor, or hidden wall cavities | Open the area and call the right pro | May need structural judgment, not surface repair |
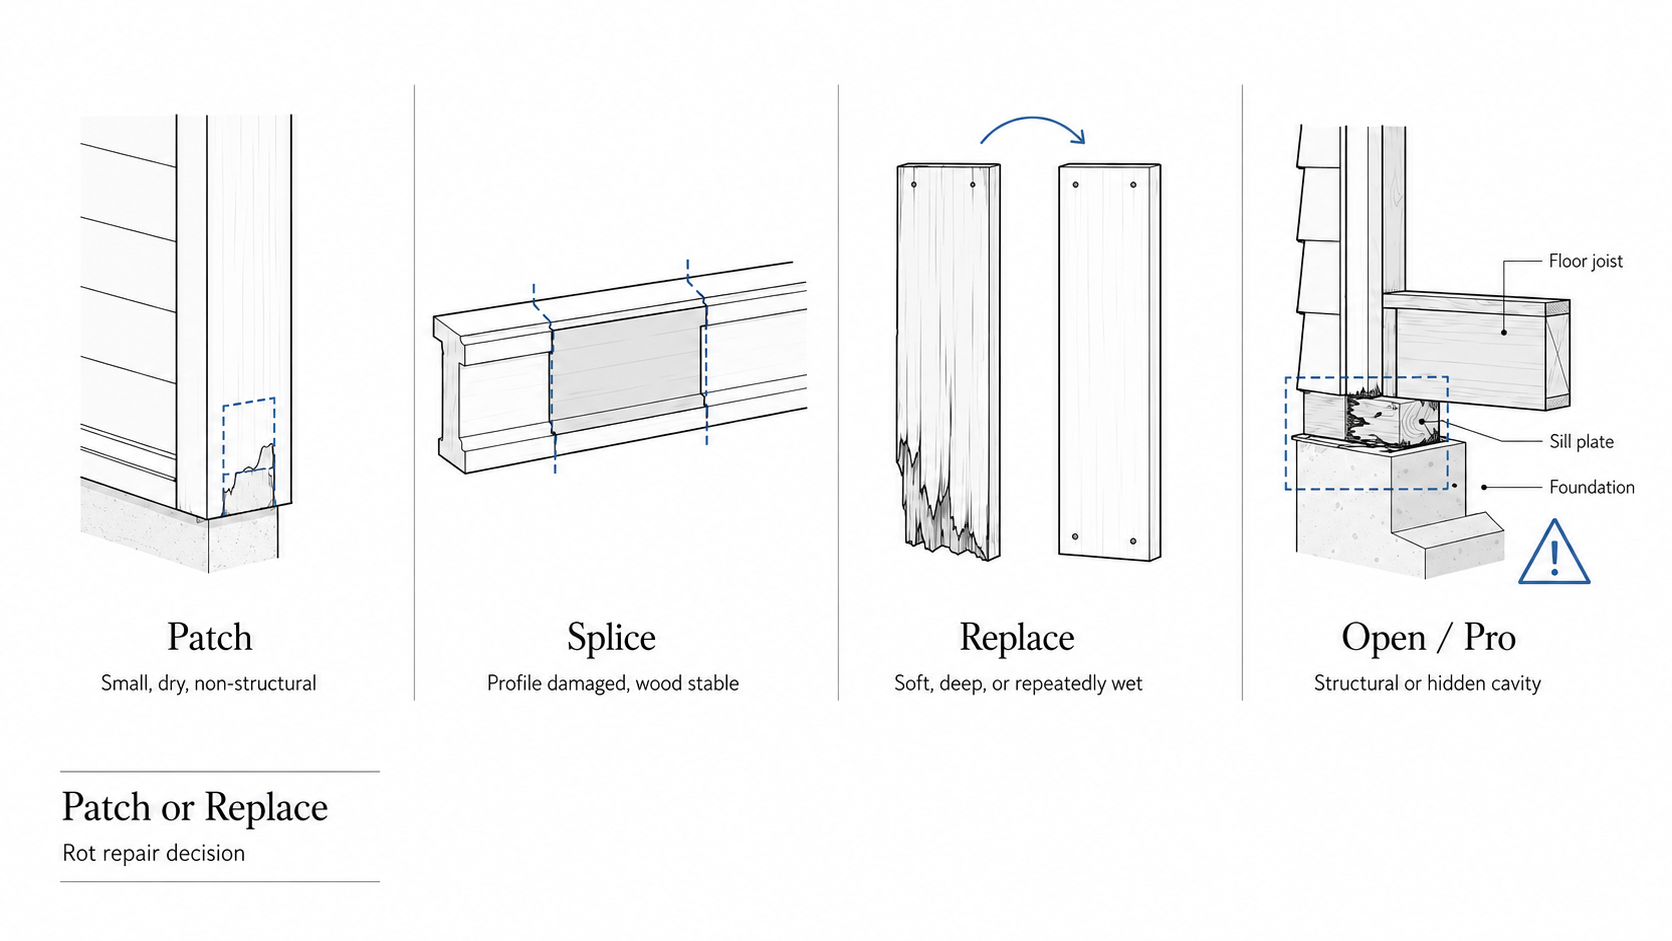
Filler belongs in the first row of that table. It has no business in the last one.
Where Rot Shows Up
The repair changes with the location. Rotten window trim, rotten fascia, a soft bathroom subfloor, and a rotted sill plate are all “wood rot,” but they are not the same job, and they are not the same risk.
| Rot Location | What It Often Means | First Check |
|---|---|---|
| Exterior trim | Paint, caulk, cut-end, or flashing failure | Bottom edges, joints, and the water path above |
| Window frame or sill | Water is entering at the opening | Drip cap, sill slope, caulk, flashing, and lower corners |
| Door jamb base | Threshold, landing, porch, or splashback issue | Bottom of jamb, threshold seal, and exterior drainage |
| Fascia or soffit | Roof-edge or gutter issue | Gutters, drip edge, shingles, and rafter tails |
| Siding | Water may be trapped behind the cladding | Clearance above grade, joints, flashing, and sheathing |
| Subfloor | Leak or repeated wetting from above or below | Toilets, showers, exterior doors, crawl-space moisture |
| Joist, sill plate, rim joist, beam | Possible structural or moisture-control problem | Crawl space, foundation edge, insects, bearing points |
| Roof sheathing | Leak, poor ventilation, or roof-covering failure | Soft decking, stains, nail holding, and attic moisture |
If the damage is near windows, start with the opening. A window page such as windows in construction helps explain why sills, trim, flashing, and wall openings have to work together. If the damage is at the base of an exterior door, read water damaged door frame repair before filling or replacing the jamb. If the damage is roof-related, the follow-up is usually replacing roof sheathing, because soft decking changes the roofing job in a hurry.
When Wood Filler Is the Wrong Repair
Wood filler is for shape, not for strength.
On a small, dry, non-structural trim defect — after the loose material is gone and the water source is fixed — it can be exactly the right call. That is a narrow window. It is not how you repair a beam, a joist, or a sill plate, and it is not a way to avoid opening a wall that smells damp or feels soft when you lean on it. If the rot keeps crumbling away as you scrape, the wood is telling you the repair just got bigger.
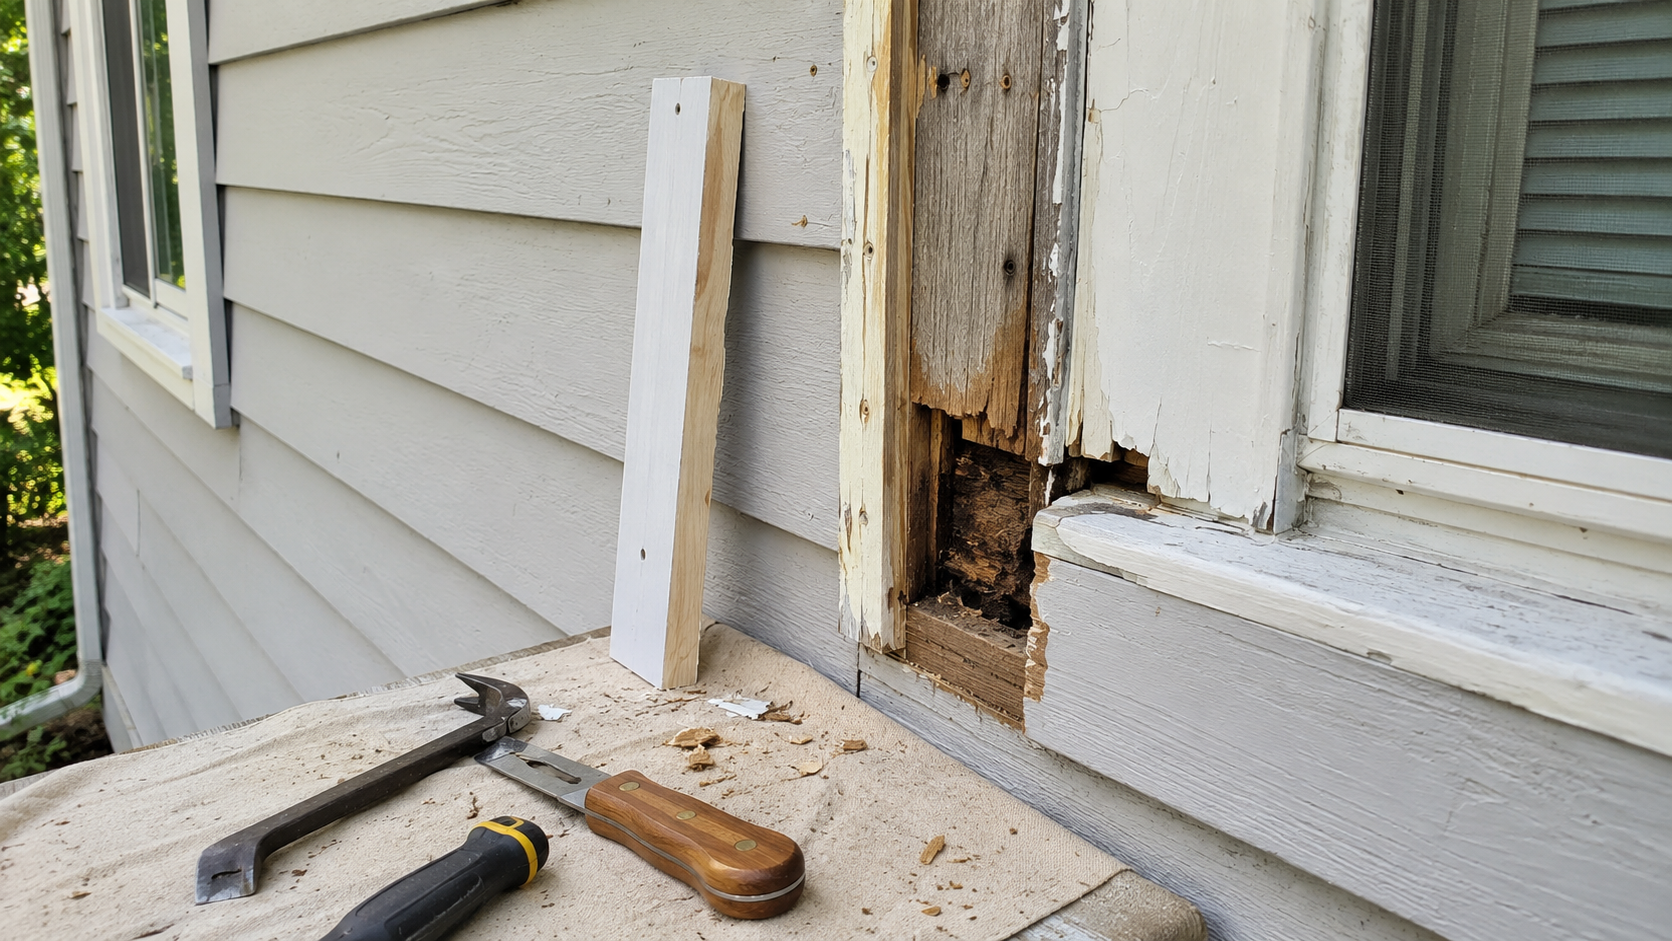
The expensive version of this is filling the face of a board while wet sheathing sits behind it. You get a smooth patch over an active problem, and the active problem keeps working. I have pulled one loose piece of trim expecting a ten-minute patch and found the sheathing behind it gone soft halfway up the wall. The board on the face was the smallest part of that job.
This is where one small exploratory opening earns its keep. Take off a single piece of trim, one siding board, or one section of finish, and you usually learn whether the damage is local or running. The honest trouble is that nobody can tell you in advance how far to open. Open too little and you seal a live problem back into the wall; open too much and you have torn up sound finish chasing damage that quit a foot back. Even after years of doing it, that call is part judgment and part gamble, and a contractor who pretends it is anything cleaner is guessing too. The most I will commit to is that sealing rot back into a wall is the more expensive of the two mistakes.
What Drives Wood Rot Repair Cost
Wood rot repair cost is hard to read from the surface, because the visible damage is usually only the first layer. A small dry trim patch is a modest carpentry job. Rot that reaches framing, floor structure, roof sheathing, or a sill plate turns into demolition, structural repair, finish repair, and moisture correction all at once.
For 2026 planning, a contained dry-rot repair commonly runs somewhere around $590 to $1,110, and a small, dry, non-structural filler patch on accessible trim often stays under about $150. By area, most dry-rot work falls in the rough range of $5 to $40 per square foot, with small spots costing more per foot than large ones. Treat all of that as planning ranges, not quotes — where the rot sits is what really moves the number.
| Cost Driver | Why It Changes the Price |
|---|---|
| Access | Rot behind siding, roofing, tile, cabinets, or finished floors costs more to reach. |
| Structural role | Joists, beams, sill plates, rim joists, and roof framing need more judgment than trim. |
| Hidden spread | Soft sheathing or framing behind a visible board expands the repair boundary. |
| Matching old material | Old trim profiles, siding exposure, and wood species can slow the job. |
| Finish work | Primer, paint, caulk, flooring, drywall, or tile may be part of the final cost. |
| Moisture correction | Gutters, flashing, crawl-space humidity, roof leaks, or plumbing leaks must be fixed or the rot returns. |
| Permits or engineering | Load-bearing repairs, roof structure, and major framing repairs may need local approval or engineering. |
The bad bid is the one that prices only the board and ignores why the board rotted.
Which Pro To Call
The right person depends on where the damaged wood sits.
| Problem | Who To Start With | When To Escalate |
|---|---|---|
| Small exterior trim rot | Finish carpenter or exterior repair carpenter | If the backing, sheathing, or wall framing is soft |
| Window or door frame rot | Window/door repair carpenter | If the opening needs flashing, sill, or wall repair |
| Siding rot | Siding contractor or exterior carpenter | If sheathing behind the siding is soft or wet |
| Fascia, soffit, or roof-edge rot | Roofer or exterior carpenter | If rafter tails, roof decking, or gutters are involved |
| Floor joist, sill plate, rim joist, or beam rot | Structural repair contractor | If load path, bearing, settlement, or major sistering is involved |
| Crawl-space wood rot | Crawl-space repair company plus structural judgment | If the company sells only encapsulation but never addresses the damaged wood |
A handyman is fine for a small trim patch. The same handyman has no business guessing on a rotted beam, and a good one will tell you so before you ask.
For crawl-space work, keep two jobs separate in your head: moisture control and wood repair. Crawl-space humidity covers the moisture side. Crawl-space foundation repair is closer to the structural side. One company may handle both. Plenty handle only one and quietly leave the other for you to discover later.
The Repair Is Not Done When the Wood Is Replaced
This is the part that gets missed.
A carpenter can pull the rotten board and put in clean wood, and the repair can look flawless. But if the cut end went in unprimed, the flashing is still wrong, the gutter still spills, the grade still splashes the siding, or the crawl space still runs damp, the job is not finished — it is just paused until the new wood catches up to the old.
Rot repair has two boundaries. The physical one is how much bad wood comes out. The moisture one is whatever let the wood stay wet in the first place. The second is the one that protects the first, and it is the one that gets skipped.
Watch the transition points, because that is exactly where water lands, pools, or cannot dry: the lower corners of windows, the bases of door jambs, fascia ends, siding bottoms, deck connections, porch posts, bathroom subfloors, rim joists. New wood should go back in with that wetting pattern in mind — prime the cut ends, keep the siding up off grade, flash it properly, and leave the drainage paths open instead of caulking them shut. And fix the cause before the symptom, every time: the roof edge before the fascia, the leak before the subfloor, the crawl space dried out before anyone sisters a joist. Good material dropped into the wrong water path just becomes bad material on a delay.
What To Ask Before Hiring
Ask direct questions. The answers tell you fast whether the contractor is fixing the cause or only the symptom.
- What caused the wood to rot?
- How far will you open the area before final pricing?
- What happens if the sheathing or framing behind it is soft?
- Is primer, paint, caulk, or finish repair included?
- Are cut ends sealed or primed before installation?
- Is flashing, drip edge, gutter work, or drainage correction included?
- Who handles structural damage if joists, beams, sill plates, or roof framing are involved?
- What is excluded from the quote?
The exclusion list is where the truth hides. A low number that leaves out painting, finish repair, hidden sheathing, flashing, and moisture correction is not low by the end of the job.
Can You DIY Wood Rot Repair?
Small exterior trim defects can be DIY work when the area is dry, shallow, non-structural, and easy to inspect — meaning you can see the damage, remove the loose fibers, confirm the wood around it is firm, fix the water source, and finish it properly. DIY gets risky the moment the rot disappears behind a finished surface.
- Do not guess on floor joists.
- Do not patch a sill plate without knowing what bears on it.
- Do not cover soft roof decking during a roof job.
- Do not fill a door frame base if the threshold still sends water into it.
- Do not seal up a crawl-space problem without checking the wood that stayed wet.
If the wood carries load, holds a door or window opening, supports roofing, supports a floor, or ties the wall to the foundation, treat it as structural until someone qualified tells you it is not.
Dry Rot, Wet Rot, and Homeowner Language
Homeowners call almost any crumbly rotten wood “dry rot.” Contractors do it too. That is fine for conversation, but the repair still comes back to moisture, so the label is not what matters.
What matters is the condition: Is the wood still wet? Can it dry? How deep does the decay go? Is the wood around it firm? Does the damaged piece carry load? And what keeps wetting the area? The answers to those six questions decide the repair far more than the phrase written on the estimate.
FAQ
Can rotted wood be repaired without replacing it?
Yes, but only when the damage is small, dry, shallow, non-structural, and the water source has been corrected.
How do I tell wood rot from termite or carpenter ant damage?
Rot has no tunnels and no debris piles, the wood is spongy or stringy or cracks into cubes, and it follows the moisture. Insects leave tunnels or galleries, frass that looks like sawdust or hard pellets, or pencil-width mud tubes on the foundation. If you see mud tubes, stop and call a pest professional before any wood repair.
Is dry rot really dry?
No. The name causes confusion. Rot needs moisture at some point. The wood may look dry when you find it, but it was wet when the decay started.
When is wood filler a bad repair?
Filler is the wrong repair when the wood is structural, still damp, deeply soft, loose around fasteners, or hiding damage behind trim, siding, flooring, or sheathing.
Who fixes wood rot?
It depends on the location. A carpenter may handle trim, a roofer may handle roof-edge damage, a siding contractor may handle siding rot, and a structural repair contractor or engineer may be needed for joists, beams, sill plates, or major framing.
Does insurance cover wood rot?
Sometimes, but long-term rot is often treated differently from sudden water damage. Read the policy and document the source before assuming coverage.
How do I know if wood rot is structural?
If the damage affects joists, beams, sill plates, rim joists, rafters, roof decking, subfloor, wall framing, or bearing points, treat it as structural until proven otherwise.
Can I paint over wood rot?
No. Paint may hide the surface for a while, but it does not restore rotten wood or stop the moisture source.
Read This Next
For the broader material decision, start with wood materials in construction and design.
If the problem started with water, home moisture, leaks, and water damage is the next place to look.
For movement, drying, and why wood changes after it gets wet, read wood moisture content, acclimation, and movement.
For roof-edge or decking damage, continue with replacing roof sheathing.
If the rot is under the house, start with crawl-space humidity before pricing structural wood repair.
If the rot is at the bottom of an exterior door jamb or threshold, read water damaged door frame repair.