A crawl-space vapor barrier sounds cheap until the quote breaks down.
The plastic is only part of the cost. The real price usually comes from the crawl space itself: low clearance, wet soil, pipes, piers, old torn liner, dirty ground, seam taping, wall turns, and cleanup before new material goes down.
That is why quotes vary so much. A basic liner over fairly clean soil is one job. Thick reinforced liner with taped seams, pier cuts, wall attachment, and old liner removal is another. Once the quote starts including sealed vents, wall coverage, or humidity control, you are getting close to encapsulation, not a simple vapor-barrier install.
Keep that split clear from the start. Liner-only cost and full encapsulation cost are different numbers because they are different jobs.
Typical Cost Range
For a straightforward professional install, a crawl-space vapor barrier often lands around $1,000 to $4,000. Smaller or simpler jobs can come in lower. Dirtier, tighter, thicker, or more detailed installs climb fast. If the contractor is removing old liner, taping seams carefully, wrapping piers, sealing around penetrations, or using heavier reinforced material, the number moves upward.
That broad range is where the confusion starts. A basic ground cover in a relatively open crawl space is one job. A thick liner installed neatly in a low crawl space full of obstacles is another.
| Project Type | Typical Range | What That Usually Includes | What It Usually Does Not Include |
|---|---|---|---|
| Basic liner install over open dirt floor | $1,000 to $2,000 | Ground coverage, basic overlap, light fastening | Heavy seam taping, pier wrapping, wall sealing, major cleanup |
| Standard professional vapor barrier install | $1,500 to $3,000 | Ground liner, overlaps, seam tape, turns at edges, typical labor | Drainage system, sump pump, dehumidifier, full vent sealing |
| Heavier liner with more detail work | $2,500 to $4,000+ | Thicker liner, taped seams, piers, harder access, old liner removal | Full encapsulation package |
| Old liner replacement | $1,000 to $3,000 | Removing torn or dirty plastic and installing new liner | Major mold cleanup, insulation replacement, structural repair |
| DIY materials only | $150 to $900+ | Plastic, tape, pins or fasteners | Labor, cleanup, crawl-space prep, mistakes, wasted material |
What the Quote Is Really Paying For
People look at a roll of plastic and assume the quote is inflated. Sometimes it is. A lot of the time, they are pricing the wrong thing in their head.
A vapor-barrier install usually includes some mix of these:
- the liner material itself
- a thickness upgrade from light plastic to reinforced membrane
- seam tape and termination tape
- fasteners, anchors, or wall attachment materials
- labor in a cramped crawl space
- working around ducts, plumbing, wires, and piers
- soil prep or light smoothing
- old liner removal
- bagging debris before the new liner goes down
- detail work around columns and penetrations
The plastic is visible, so people fixate on it. The labor is where the number usually moves.
Basic Ground Cover vs Better Install
This is the split that matters most.
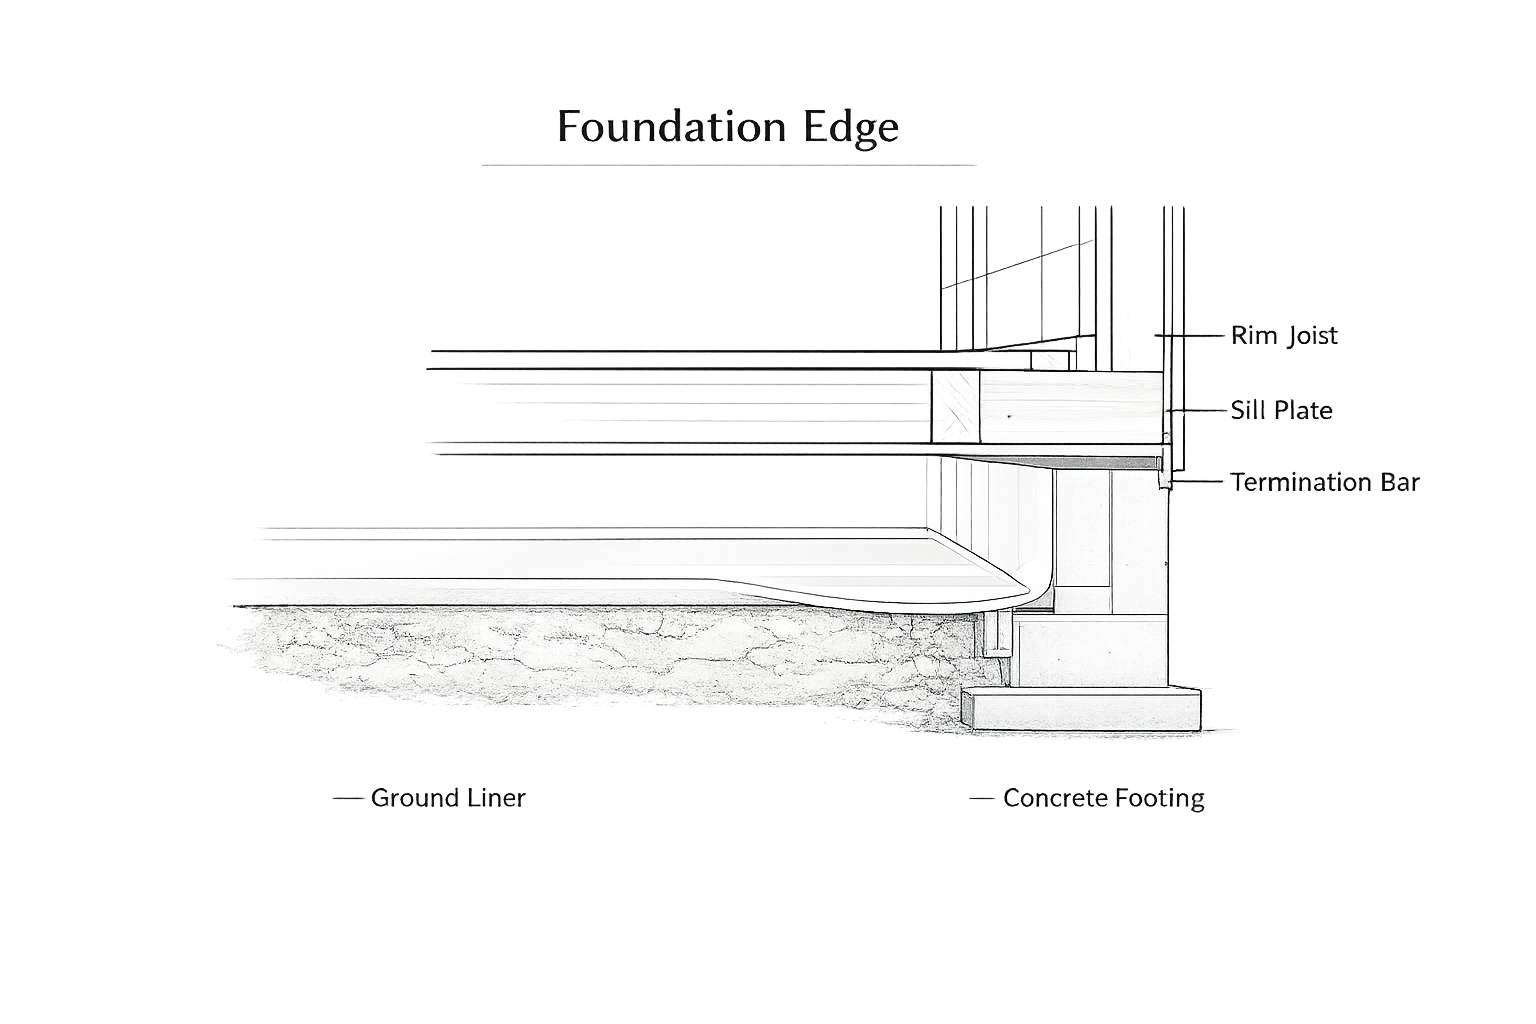
Illustration by ArchitectureCourses.org. Simplified floor-edge section showing framed floor bearing at a crawl-space foundation wall with ground liner turned up and sealed at the inside face.
A cheap job may mean a thin sheet rolled out over the dirt with light overlap and not much attention to seams, piers, or wall edges. That can still help in the right crawl space. It is not fake work by default. It is simply a lighter scope.
A stronger install usually means thicker material, more careful layout, cleaner seam work, better fastening, more wall turn-up, and more attention around posts, corners, and obstacles.
Those are not cosmetic differences. They affect how long the liner lasts and how much trouble it gives you later.
How Thickness Changes the Cost
Thickness is one of the first things that pushes the quote around.
Light 6-mil plastic is cheap. Heavier 10-mil, 12-mil, or 20-mil material costs more, but it also handles crawl-space reality better: workers crawling over it, rough soil, stored debris, future service work, and the general abuse that happens under a house.
That does not mean every crawl space needs 20-mil liner. It does mean the cheapest material is often false economy if the crawl space gets service traffic, has rough conditions, or needs to hold up for the long run.
| Thickness | Typical Use | Cost Direction | What Usually Happens Later |
|---|---|---|---|
| 6 mil | Light-duty ground cover | Lowest | Tears more easily, shorter service life, weaker in active crawl spaces |
| 10 mil | Common mid-range liner | Moderate | Better balance of price and durability |
| 12 mil | Stronger mid-range option | Moderate to high | Handles traffic and rougher conditions better |
| 20 mil | Heavy-duty premium liner | Highest | Best durability, but overkill in some crawl spaces |
Read This Next: if the real question is thickness and not total project cost, move to crawl space vapor barrier thickness guide.
What Makes the Price Jump Fast
Low clearance
A crawl space you can move through is cheaper than a crawl space you have to fight through. Low-clearance work is slower, harder, and more frustrating. The quote reflects that.
Too many piers, pipes, and obstacles
Every pier and awkward penetration adds cutting, fitting, and sealing work. A wide open rectangle is one thing. A busy crawl space with lots of interruptions is another.
Old liner removal
If torn plastic, dirty scraps, fallen insulation, boxes, or debris are still down there, the new barrier does not want to go on top of all that. Removal adds labor and bagging time.
Wet conditions
If the crawl space is muddy, damp, or actively taking on water, the job slows down. If it is taking on real water after rain, a vapor barrier may not even be the first spend.
Seam and edge detailing
This is where the quote can look high even though the extra labor is doing something real. Neater overlaps, better tape, cleaner turns, more secure fastening, and better detailing around edges and piers all take time.
Where Quotes Get Misread
Paying for plastic in your head
Most people assume they are mainly paying for material. Usually they are paying for installation conditions and detail work.
Mixing liner-only cost with encapsulation cost
This is one of the biggest pricing messes in the crawl-space world. Full encapsulation often includes much more than ground coverage: sealing, vent work, humidity control, sometimes insulation changes, and a much higher labor standard. That is a different job.
Taking the cheap quote at face value
Sometimes the cheap quote is perfectly fine. Sometimes it skips the very things that make the liner hold up and do anything useful.
Do This Instead of This
| Do This | Instead of This | Why |
|---|---|---|
| Compare scope before comparing price | Compare the bottom-line number only | Two vapor-barrier quotes can be pricing two different jobs |
| Pay for thicker liner when the crawl space is active or rough | Buy the thinnest sheet available | The cheap liner can tear early and force you to do the job twice |
| Remove trash and failed old plastic first | Roll new liner over a filthy crawl space | The result is sloppier, less durable, and harder to inspect later |
| Use liner when the crawl space is damp and vapor-driven | Use liner as the first answer to flooding | Bulk water problems need water management first |
| Keep liner-only and encapsulation pricing separate | Mix them together in one budget guess | You end up comparing one layer to a much bigger system |
When a Vapor Barrier Is the Right Spend
A crawl-space vapor barrier is usually a smart spend when the crawl space is more damp than flooded.
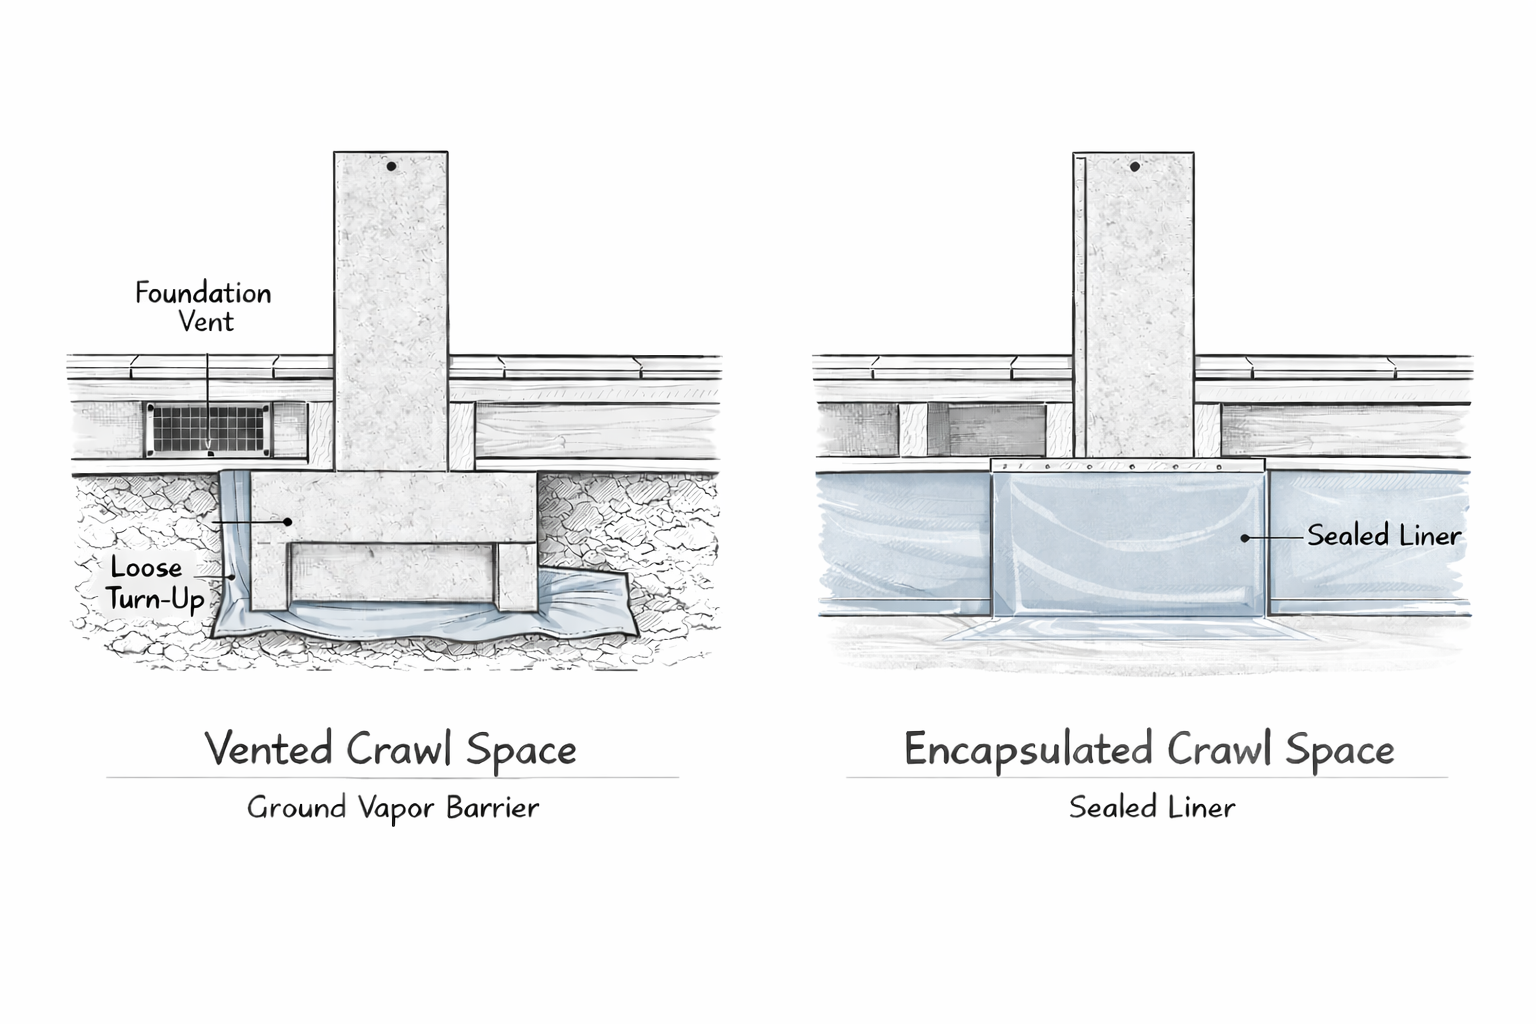
Illustration by ArchitectureCourses.org. Side-by-side section comparing a vented crawl space with a loose ground vapor barrier and an encapsulated crawl space with a sealed liner.
That means conditions like these:
- bare soil feeding moisture into the air
- musty smell without recurring standing water
- high humidity in a crawl space that does not flood after storms
- dirty or failing old plastic that needs replacement
- a crawl space moving toward better ground-moisture control without a full encapsulation scope yet
It is also a sensible middle-ground spend for homeowners who need a real improvement but are not ready for a full encapsulation bill.
When It Is the Wrong First Spend
This is where money gets burned.
If the crawl space is taking on storm water, holding puddles, staying muddy after rain, or collecting groundwater, a vapor barrier is not the first fix. It may still belong in the final system. It is simply not the first dollar.
That crawl space needs the water path understood first.
If that is the situation, start with water in a crawl space after rain, crawl space waterproofing, or crawl space drainage system.
Vapor Barrier Cost vs Full Encapsulation Cost
This comparison needs to stay clean or the whole page gets muddy.
| Scope | Typical Cost Direction | What You Are Paying For | What You Are Not Getting |
|---|---|---|---|
| Vapor barrier only | Lower | Ground liner, seams, basic moisture control from soil | Full sealing, vent strategy, humidity-control system, broader system integration |
| Encapsulation | Higher | Ground liner plus fuller sealing, often vent closure, air control, and more system work | A cheap partial fix |
One More Thing: if the real decision is liner-only versus a full sealed system, go straight to crawl space encapsulation vs vapor barrier only. That is the comparison page. This one stays with liner-only cost.
How Contractors Price It
Some contractors quote by crawl-space size. Some think in square feet. Some quote by scope and difficulty more than by exact area. That is why you can get different numbers even when the crawl spaces are close in size.
The usual cost drivers are:
- square footage
- liner thickness
- condition of the crawl space before work starts
- access difficulty
- amount of seam work and detail work
- old liner removal
- whether the quote quietly includes extras creeping toward encapsulation
If the quote is vague, make them spell out what is included.
What a Good Quote Should Spell Out
A useful quote should answer these questions clearly:
- What thickness liner is included?
- Is this ground coverage only or a more detailed install?
- Are seams taped?
- Are piers, posts, or penetrations included?
- How far up the walls does the liner go?
- Is old liner removal included?
- Is cleanup included before installation?
- Is this still liner-only, or is it drifting toward encapsulation?
If you cannot answer those questions from the estimate, the quote is not ready to compare.
DIY vs Pro Cost
DIY looks cheap because the materials can be cheap. Sometimes that is true. Sometimes the cheap part is all that stays cheap.
If the crawl space is open, reasonably dry, and the job is light-duty ground coverage, DIY can work for some people. Once the crawl space gets low, dirty, obstacle-heavy, or detail-heavy, the labor gets miserable fast.
That is why DIY material cost and pro install cost are not close. They are not pricing the same burden.
DIY also tends to hide the real cost of:
- wasted material from awkward cuts
- bad seam work
- poor fastening
- not cleaning the space first
- choosing too-light material
What Usually Makes Sense
For a crawl space that is mostly damp, not flooding, and clearly needs better ground-moisture control, a properly installed liner is often a smart spend.
For a crawl space that floods after rain, that same spend can be premature.
The right sequence usually looks like this:
- Figure out whether the problem is bulk water or vapor-driven dampness.
- Fix runoff, grading, or drainage problems first if they are present.
- Then decide whether liner-only is enough or whether the space is really heading toward encapsulation.
That keeps the money in the right order.
FAQ
How much does it cost to install a crawl-space vapor barrier?
In many cases, professional installation lands around $1,000 to $4,000, depending on thickness, crawl-space size, access, cleanup, and how detailed the install is.
How much does it cost to replace an old crawl-space vapor barrier?
Replacement often falls around $1,000 to $3,000, especially when old plastic has to be removed and the crawl space cleaned up first.
Is a vapor barrier cheaper than encapsulation?
Yes. A vapor barrier is usually much cheaper because it is a smaller scope focused on ground moisture control rather than a full sealed crawl-space system.
What makes vapor-barrier quotes vary so much?
Thickness, crawl-space access, old liner removal, seam work, piers, obstacles, and whether the quote is truly liner-only or sliding toward encapsulation all change the number.
Is 6-mil plastic enough?
Sometimes for light-duty use, but heavier material often makes more sense in crawl spaces that get traffic, rough treatment, or long-term use. Thicker liner costs more up front but can hold up better.
Will a vapor barrier stop crawl-space flooding?
No. It helps control ground moisture. It does not stop bulk water from entering after storms or groundwater from building up under the crawl space.
Is a DIY crawl-space vapor barrier worth it?
Sometimes in a simple, open, reasonably dry crawl space. In tighter or dirtier crawl spaces, pro installation often earns the money because the labor and detail work get ugly fast.
What should I ask before approving a vapor-barrier quote?
Ask what thickness is included, whether seams are taped, whether piers and wall turn-ups are included, whether old liner removal is included, and whether the quote is still liner-only or partly encapsulation in disguise.