A lot of crawl space advice collapses two very different jobs into one phrase. Someone says “just put plastic down.” Someone else says “you need full encapsulation.” Those are not the same thing. They do not cost the same, they do not solve the same level of problem, and they do not fail in the same way.
That is where people lose money.
A vapor barrier only approach can be the right answer. Sometimes it is the smart answer. But only when the crawl space is basically dry enough, the site is not feeding water under the house, and you are not pretending a ground-cover job is a full moisture-control system.
Encapsulation is the bigger move. More material. More labor. More details that have to connect. It can work very well. It can also turn into an expensive half-finished box if the crawl still gets wet or nobody ever sets up humidity control properly.
This page is the decision page between those two options. Not the soft version. The one that changes what you do next.
- What a vapor barrier only system actually does
- What full encapsulation adds
- When a barrier only approach is enough
- When full encapsulation is worth the cost
- What usually gets missed before either job starts
- How to avoid paying for the wrong level of fix
Worth knowing: if you need the wider foundation context first, keep Crawl Space Foundation Fundamentals nearby.
The Short Answer
Choose vapor barrier only when the crawl space is basically a ground-vapor problem, not a bulk-water problem. That usually means no repeated standing water, no active wall wetting, no obvious drainage failure, and no plan to turn the crawl into a sealed controlled space.
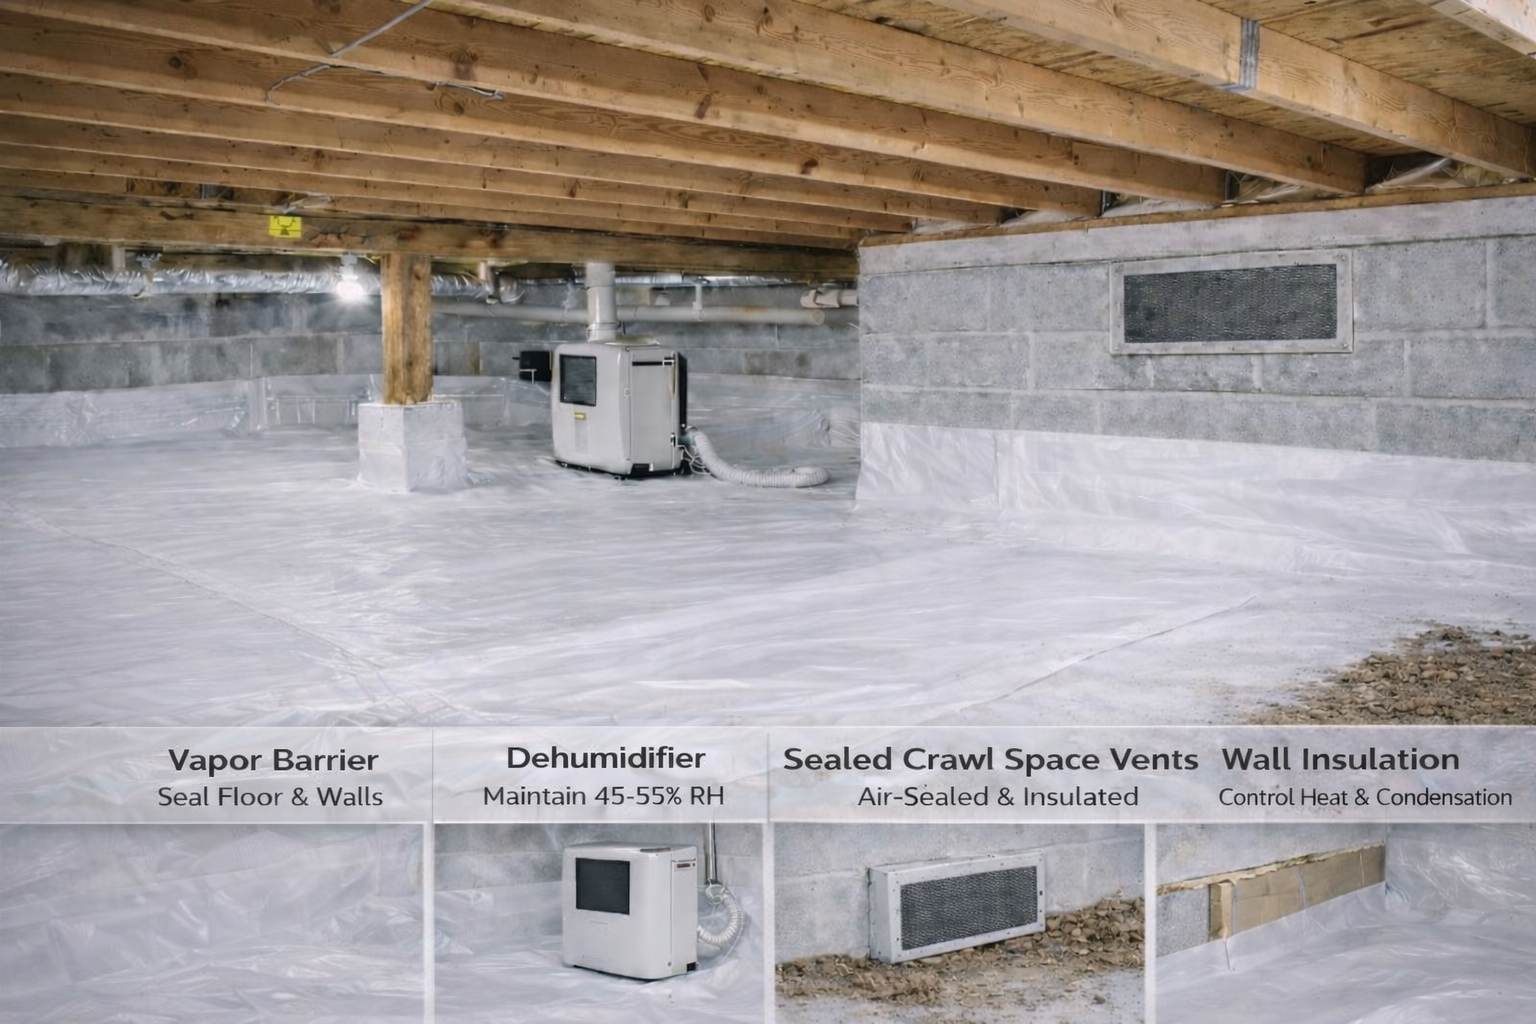
Choose encapsulation when you need the crawl space to behave like a managed mini-basement: sealed vents, continuous liner, perimeter connection, tighter air control, and a real humidity strategy.
The mistake is paying for one and expecting the other.
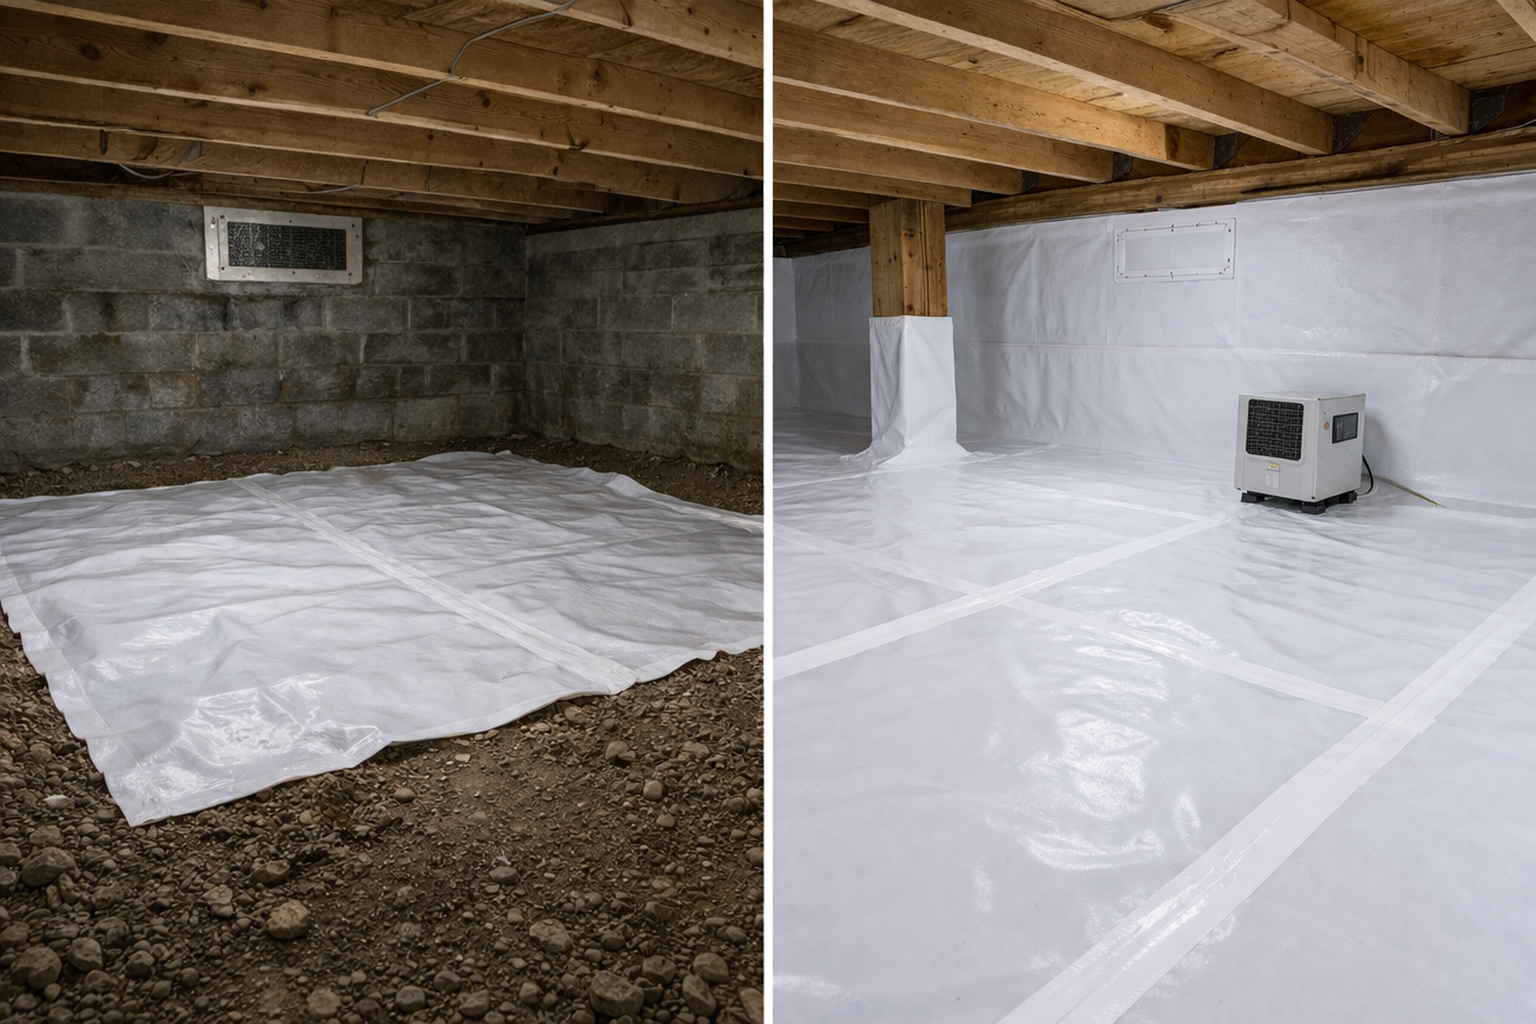
What a Vapor Barrier Only Job Actually Is
A vapor barrier only job is a ground-cover job. Its main job is to reduce moisture vapor moving off exposed soil and loading the crawl space with humidity.
That sounds small. It is not small. Bare soil can keep a crawl space damp for months even when you do not see puddles. That is why a decent ground-cover system can make a real difference in smell, humidity, and how the space behaves seasonally.
But be clear about what it is not.
It is not full encapsulation. It is not full air sealing. It is not a drainage system. It is not a promise that the crawl will now stay dry under all conditions.
A decent vapor barrier only scope usually means:
- covering exposed soil with a real liner
- overlapping and sealing seams
- wrapping piers and penetrations instead of leaving open dirt rings
- carrying the liner to the perimeter detail appropriate for the assembly
- leaving the overall crawl-space strategy otherwise vented unless you are intentionally changing it
Also useful: if you want the field detail broken out step by step, go to Crawl Space Vapor Barrier Installation: How to Do It Right the First Time.
What Full Encapsulation Adds
Encapsulation starts with the ground liner, but it does not stop there.
A real encapsulation scope usually means:
- full ground coverage with a sealed liner
- liner run up the walls and tied into the perimeter properly
- sealed vents or no open vents in the finished assembly
- air-sealed access points and cleaner perimeter continuity
- humidity control that is deliberate instead of accidental
- often, depending on assembly and code path, wall insulation and related details
That is why encapsulation costs more. It is not just “better plastic.” It is a different system.
And that is also why bad encapsulation jobs are so frustrating. Once the crawl is closed up, it no longer dries the old way. So if the perimeter still leaks, the liner stops at the wall base, the vents are only half-sealed, or the humidity plan never really arrives, you can spend real money and still keep the same smell.
Read this next: for the full system version, use Crawl Space Encapsulation Done Right: Moisture First, Air Second.
Do This Instead of Guessing
| If the Crawl Space Looks Like This | Better First Move | Why |
|---|---|---|
| Dry enough overall, but musty with exposed soil and no real liner | Vapor barrier only may be enough | You are mainly solving ground vapor, not rebuilding the whole crawl-space system |
| Standing water, muddy soil after storms, damp wall bands, repeated seepage | Fix water management first | Neither barrier only nor encapsulation solves active bulk-water entry by itself |
| Humid crawl, vent confusion, cold floors, recurring odors, mixed seasonal problems | Often full encapsulation | You likely need a deliberate closed-crawl strategy, not just plastic on dirt |
| Good site drainage, vented crawl, serviceable space, no major seasonal humidity spike | Barrier only can be a sensible lower-cost move | You may not need the bigger system if the crawl is otherwise behaving |
| Wet ducts, recurring high humidity, leaky access door, weak perimeter details | Usually encapsulation | The whole air-and-moisture system is underperforming |
The First Question Is Not Plastic vs Encapsulation
The first question is: is this a ground-vapor problem or a bulk-water problem?
That sounds obvious. It is not. People skip it all the time.
Here is what that looks like in real houses:
- Ground-vapor pattern: musty smell, elevated humidity, damp air, maybe some mild seasonal condensation, but no repeated pooling water and no obvious perimeter wetting after storms.
- Bulk-water pattern: muddy soil, standing water, damp wall bases, repeated seepage, wet insulation, stains after rain, or the smell getting noticeably worse after storms.
If you are in the second category, stop arguing about barrier only vs encapsulation for a minute. The first money belongs outside: runoff control, grading, drainage, perimeter waterproofing where needed, downspout discharge, sometimes sump work. If water still enters, you are trying to choose the finish before the structure is behaving.
Before you move on: if that sounds familiar, go straight to Exterior Foundation Waterproofing.
When Vapor Barrier Only Is Enough
This is the part people miss because the internet likes all-or-nothing answers. Sometimes a vapor barrier only job is the right answer.
It is usually enough when most of these are true:
- the crawl does not take on standing water after normal rain events
- there is no repeated damp band or visible seepage at the walls
- the main issue is exposed soil and elevated humidity, not obvious water intrusion
- the crawl is staying vented and that strategy still makes sense for the house and site
- you want a lower-cost improvement that addresses the biggest moisture source first
- the access and service conditions do not justify converting the whole crawl into a closed system
This is especially true on houses where the crawl is not glamorous, but it is serviceable. Dry enough most of the year. Good drainage outside. No major complaints except mustiness, dirty exposed earth, and seasonal humidity. In that case, a good liner job can be the right first move without forcing the house into a completely different crawl-space strategy.
The keyword there is good. Not thin plastic tossed on dirt. Not untaped overlaps. Not leaving the perimeter loose. Not skipping piers because they are annoying.
When Full Encapsulation Is Worth It
Encapsulation is worth it when the crawl needs real control, not just less vapor coming off the soil.
It usually makes sense when several of these are true:
- the crawl space has chronic humidity trouble even after obvious drainage fixes
- the vented strategy is underperforming for the climate and house conditions
- ducts or mechanical systems in the crawl are being punished by damp air
- the floor above is cold, drafty, and hard to control
- the house needs the crawl to act more like controlled interior-adjacent space
- you are already doing enough work that the bigger system makes sense now rather than later
It also makes sense when you are already dealing with the crawl deeply enough that doing the smaller fix first just delays the real one. If the vents are going to be sealed, the access is going to be tightened, the walls are going to become part of the strategy, and humidity control is going to be added anyway, then stop pretending this is still just a ground-cover job.
Spend Here, Not Here
| If This Is the Real Problem | Spend Here | Not Here |
|---|---|---|
| Bare soil and ground vapor | Better liner, sealed seams, pier wraps, cleaner field install | Random vent accessories and wishful gadgets |
| Outside water reaching the foundation | Grading, runoff control, drainage, waterproofing where needed | Trying to “out-plastic” active water |
| Closed-crawl strategy with no humidity control | A real air/moisture plan for the finished sealed crawl | Stopping after the liner and sealed vents |
| Recurring service traffic damaging the liner | Thicker liner, better protection at traffic zones, better detailing | Replacing torn thin plastic over and over |
| Wall/perimeter bypass at the edges | Better wall run-up and termination details | Pretending the middle field is the whole job |
The Detail People Miss
The middle of the crawl is not where most jobs fail. The edges are.
People do a decent job across the field. Then the liner stops too low at the perimeter. Or it peels off later because the wall was dusty or damp. Or the post wraps are rushed. Or the access opening stays leaky. Or the vent detail never really ties into the rest of the system.
That matters on both jobs.
A vapor barrier only approach still needs perimeter discipline or ground vapor just bypasses the field at the wall base. Full encapsulation needs even more continuity because once the crawl is being treated as a sealed system, those little gaps are no longer little.
That is one reason people get confused after paying for “encapsulation.” They bought a liner. What they needed was continuity.
What People Commonly Do Wrong
- Choosing encapsulation because it sounds more serious, even though the real issue is still outside water.
- Choosing vapor barrier only because it is cheaper, even though the crawl is really asking for a closed, managed system.
- Thinking liner thickness alone decides whether the job is good.
- Ignoring the piers, columns, corners, and penetrations.
- Sealing a crawl without deciding how humidity will be controlled afterward.
- Treating musty smell as proof that all vents should automatically be shut.
- Forgetting that soil gases, including radon in some areas, are a separate question from ordinary moisture.
That last one matters. A sealed ground cover can overlap with radon work, but it does not automatically replace radon diagnosis and mitigation. If the house is in a radon-prone area, test instead of guessing.
Cost Direction, Not Fake Precision
A vapor barrier only job is usually the lower-cost move. Less material. Fewer system changes. Less perimeter and air-boundary work. Less decision-making about conditioning and dehumidification.
Encapsulation costs more because it is a bigger scope. More liner continuity. More sealing. More detail labor. Sometimes vent closure and access upgrades. Sometimes insulation decisions. Sometimes dehumidification or conditioned-air strategy. Often more inspection and correction before the crawl can even be sealed properly.
Where people get burned is not by the higher price alone. It is by paying for the bigger scope when the water path was never fixed, or paying for the smaller scope when the crawl was clearly never going to behave as a vented space anymore.
The right way to think about cost is not “which one is cheaper?” It is “which one matches the real failure pattern of this crawl space?”
How to Decide in One Walkthrough
Do this on a normal day, then again after hard rain if possible.
- Look at the soil. Is it dusty-dry, mildly damp, muddy, or visibly wet?
- Check the wall bases. Any damp band, staining, tide marks, or seepage?
- Check the downspouts and grade. Is water clearly being sent away from the house?
- Check the liner situation. No liner, shredded liner, partial liner, or real sealed field?
- Check the vents and access. Is this crawl truly vented, half-sealed, or trying to become something else?
- Check humidity signs. Condensation, musty smell, wet ducts, sagging insulation?
- Ask the simple question: do I need less ground vapor, or do I need a controlled crawl-space system?
If the answer is mostly the first, vapor barrier only may be enough.
If the answer is the second, stop shopping for “good enough” plastic and price the real system.
Quick Checklist
- Do not choose either option until you know whether bulk water is still reaching the crawl.
- Choose vapor barrier only when the crawl is mainly a ground-vapor problem.
- Choose encapsulation when you need real air-and-moisture control, not just soil coverage.
- Do not stop either system at the easy middle field and ignore the edges.
- Do not seal a crawl and “figure out humidity later.”
- Test for radon where appropriate instead of treating all below-floor problems like generic moisture.
What To Do Next
This part matters: if you already know the crawl is staying vented and the liner is the weak point, go to Crawl Space Vapor Barrier Installation: How to Do It Right the First Time.
Also useful: if you are leaning toward the full system, go to Crawl Space Encapsulation Done Right: Moisture First, Air Second.
Before you move on: if you still are not sure whether vents help or backfire in your situation, use Crawl Space Vapor Barriers and Vent Covers: What Works, What Backfires.
If you still need the bigger picture: go back to House Foundations: What You Need to Know Before Construction and compare this crawl-space choice against the wider foundation lineup.
FAQ
Is crawl space encapsulation better than a vapor barrier?
Not automatically. Encapsulation is the bigger system. It is better when the crawl needs full air-and-moisture control. A vapor barrier only approach can be the smarter answer when the main problem is exposed soil and ground vapor in an otherwise manageable vented crawl.
Can a vapor barrier alone fix crawl space smell?
Sometimes, yes. If the smell is mainly coming from exposed soil and elevated humidity, a real ground-cover system can help a lot. If the smell is being driven by standing water, damp walls, wet insulation, or a bad vent strategy, the liner alone may not solve it.
Can I encapsulate a crawl space with standing water?
You can physically put liner in a wet crawl. That does not mean you solved the right problem. If water is still entering the crawl, fix the water path first. Otherwise you are encapsulating a wet problem, not correcting it.
Do I need a dehumidifier if I encapsulate?
You need a real humidity-control plan. In many houses that ends up meaning a dehumidifier, but the bigger point is that a sealed crawl cannot be left to guesswork after the vents are closed and the liner is sealed in.
Is thicker plastic the same as encapsulation?
No. Thicker liner can make a vapor barrier only job better and more durable, but thickness alone does not create perimeter continuity, sealed vents, air control, or humidity management.
Should I go straight to encapsulation to be safe?
Not always. That can be the right move, but it can also be overspending if the crawl really only needs a competent ground-vapor fix and the rest of the assembly is behaving. The safer move is matching the scope to the real failure pattern.
What is the biggest difference in real life?
Barrier only tries to cut off soil vapor. Encapsulation tries to control the crawl-space environment.
What is the biggest mistake?
Buying the smaller fix and expecting the bigger result, or buying the bigger fix before the water problem outside is actually under control.