How to Install a Crawl Space Vapor Barrier
People talk about crawl space liners like this is a plastic job. It is not. It is a moisture-control job that happens to use plastic.
Do it halfway and the smell usually comes back. Sometimes the wood stays damp. Sometimes the crawl looks cleaner but still behaves badly. That is the pattern this page is trying to stop.
The order matters more than the material list:
- keep bulk water away from the crawl space
- cover the soil fully
- seal seams and penetrations like they matter
- run the system to the perimeter correctly
- match the liner detail to a vented or sealed crawl strategy
Worth knowing: if you need the bigger context first, read Crawl Space Foundation Fundamentals.
The Most Common Misunderstanding
People think crawl spaces are mainly a vent problem. So they buy vent covers, block a few openings, and call it handled.
Sometimes that helps. Sometimes it traps moisture and makes the crawl space worse.
A crawl space is a moisture system first. Ground moisture turns into vapor. Outdoor air brings humidity. Plumbing leaks happen. Bulk water shows up at the perimeter when grading, gutters, or drainage are lazy.
The real order of operations:
- First: stop water from reaching the crawl space.
- Second: block ground vapor with a real ground-cover system.
- Third: decide whether the crawl is vented or sealed, then detail the perimeter accordingly.
Start With Water, Not Plastic
A crawl space can be humid without being visibly wet. That is normal. But if you have standing water, muddy soil, damp wall bands, or wet insulation sagging like a sponge, you are not in vapor territory anymore. You are in bulk-water territory.
That is the line people cross all the time. They pay for liner, tape, fasteners, maybe even dehumidification, and then the first hard rain turns the crawl into a shallow pond. Now the liner is a swimming-pool cover and the smell gets worse.
| Condition | Install Now? | Why |
|---|---|---|
| Dry soil, no standing water, no repeated wall dampness | Usually yes | You are closer to a real vapor-control job |
| Standing water or muddy soil after storms | No | Water management comes first |
| Damp block walls, efflorescence, or repeated tide marks | Usually not yet | The perimeter moisture path is still active |
| Known plumbing leak or wet insulation | No | Fix the leak before trapping conditions underneath |
Fast checks that tell you what category you are in:
- After heavy rain, does water collect anywhere under the house, even for a day?
- Do you see efflorescence, tide marks, or damp staining at the wall base?
- Are downspouts dumping near the foundation?
- Does the soil stay shiny wet even when the weather has been normal?
If any of that is true, your first spending should go outside, not under the house. Exterior Foundation Waterproofing is the right next read when perimeter water is still the real problem.
Choose the Strategy First
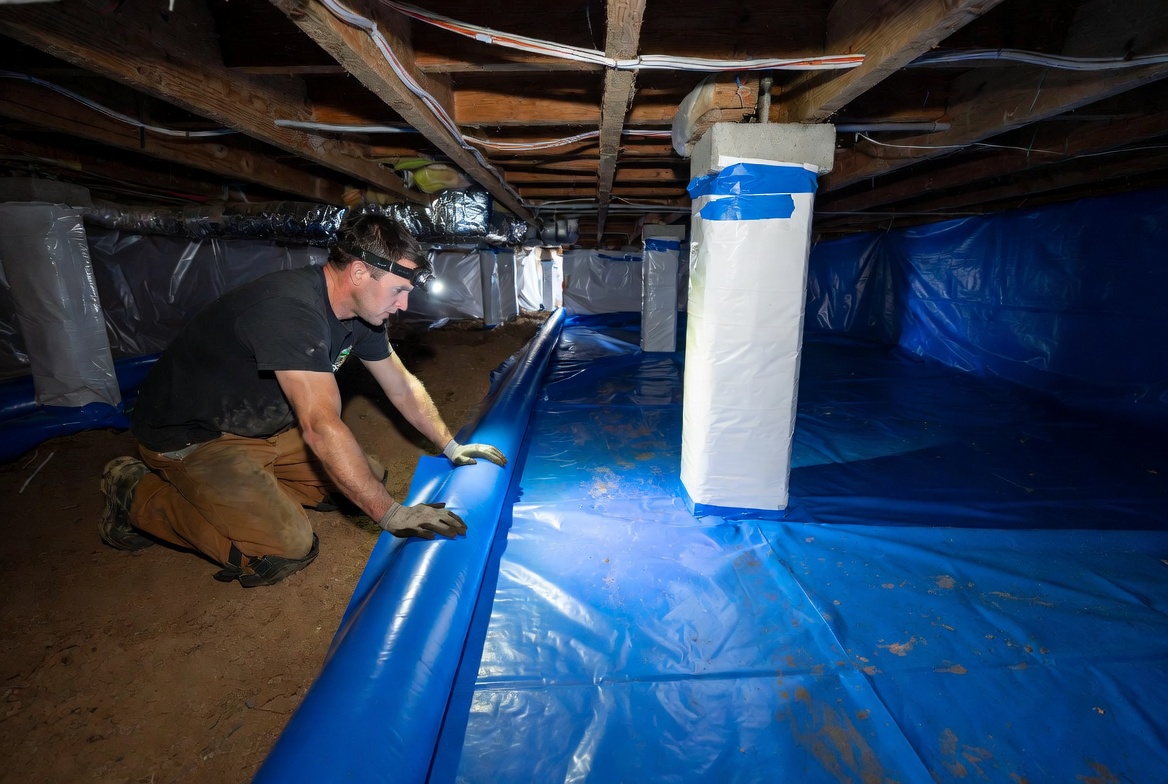
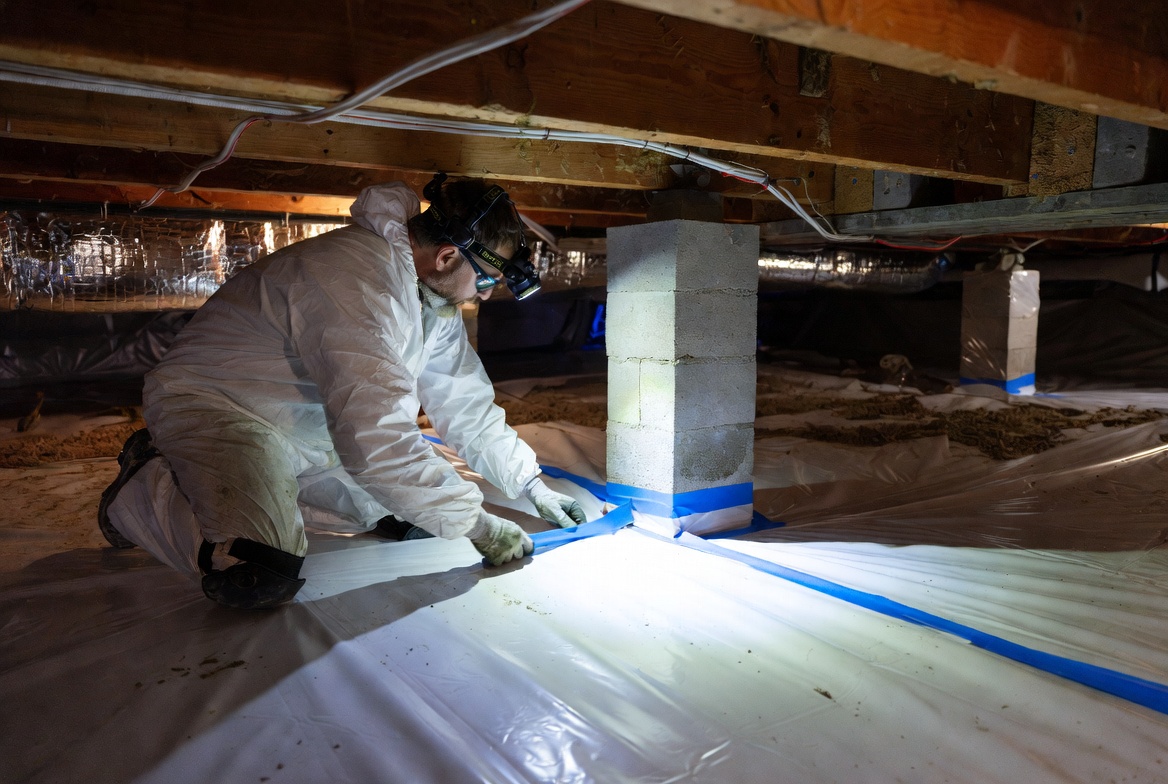
A crawl space vapor barrier liner being installed across the ground surface. Image by ArchitectureCourses.org.
You have two basic crawl-space strategies. A lot of bad installs happen because people build half of one and half of the other.
Vented Crawl Space
This can work on a dry site with good drainage, full soil coverage, and a climate that is not loading the crawl with warm wet air for months at a time.
It usually goes wrong in a familiar sequence: sloppy ground cover, lazy runoff, damp soil, humid summer air, then the smell starts and nobody agrees on why.
Sealed or Encapsulated Crawl Space
This is the more controlled setup. Vents are sealed. The ground gets a real liner. Leaks get tightened up. Humidity is handled on purpose instead of left to weather.
It costs more. It also asks for more discipline. A properly sealed crawl can work well. A half-sealed crawl is how people spend money and still keep the smell.
The practical difference: vented crawls ask the house and climate to cooperate. Sealed crawls ask you to build a controlled system and finish it properly.
Read this next: for the full vent decision, use Crawl Space Vapor Barriers and Vent Covers: What Works, What Backfires. For the full sealed-crawl version, use Crawl Space Encapsulation Done Right: Moisture First, Air Second.
What a Good Vapor Barrier Looks Like
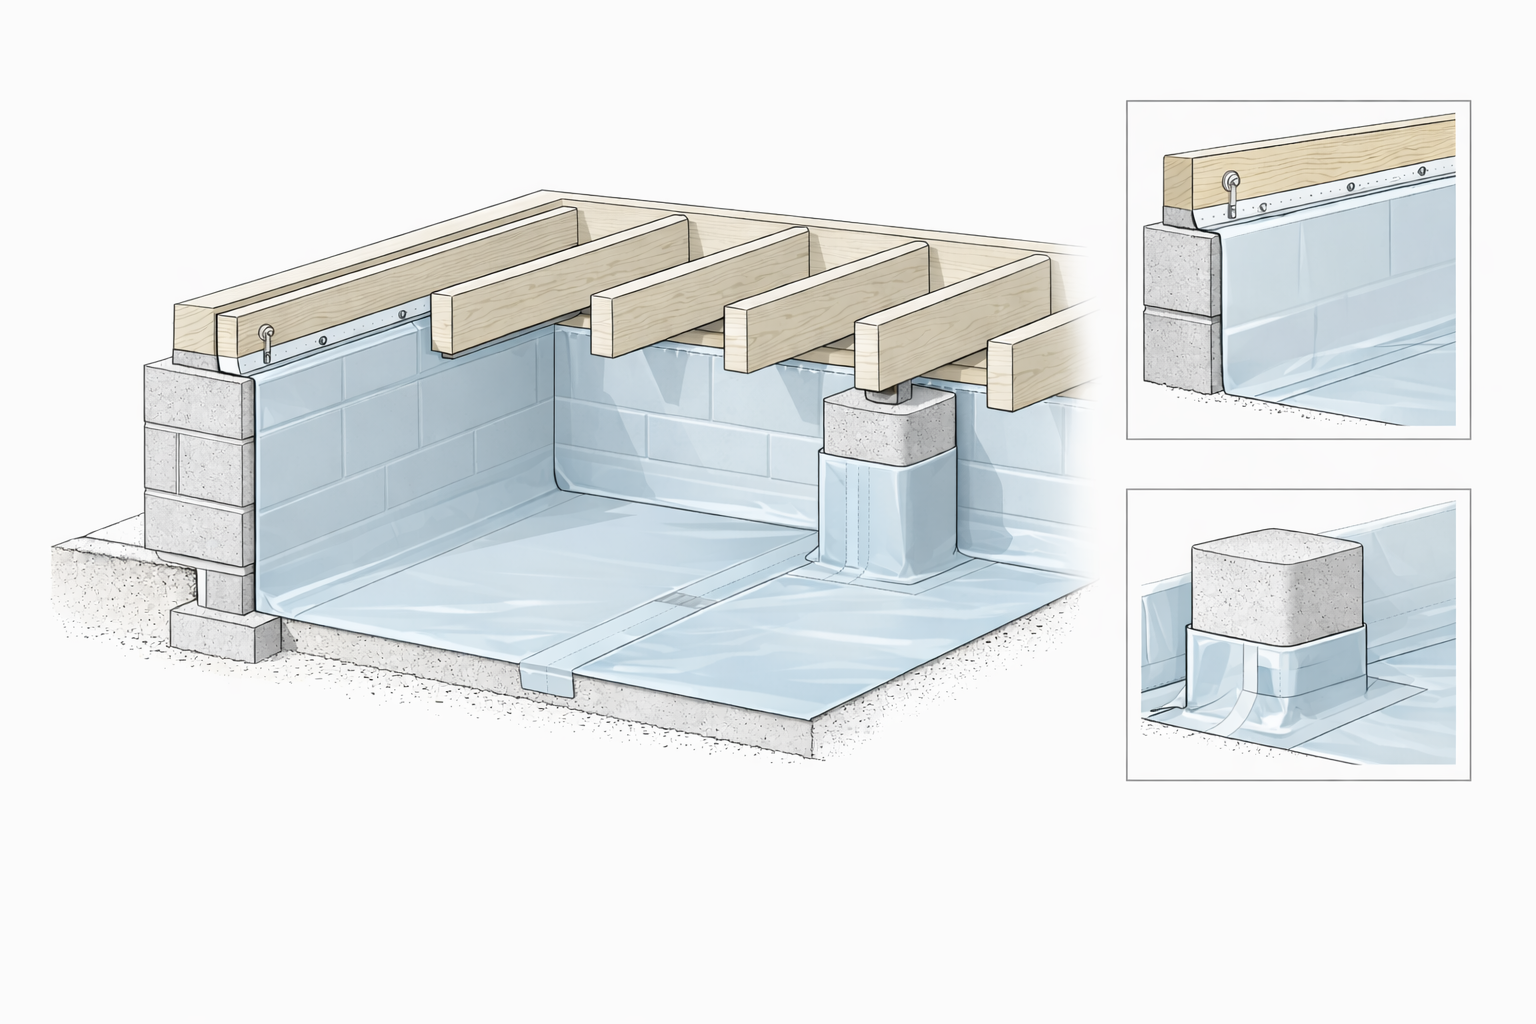
Proper crawl space vapor barrier installation showing ground liner continuity, sealed seam overlap, wall termination, and pier wrap detail. Illustration by ArchitectureCourses.org.
A crawl space vapor barrier is a ground-cover system. It is there to stop soil moisture from feeding mold, rot, and musty air.
Thin plastic tossed loosely on the dirt helps a little. It also tears fast and turns into trash under your joists.
- Thickness: 6 mil is a common minimum. If anyone will crawl on it or service equipment down there, thicker reinforced liners usually last longer.
- Coverage: cover all exposed soil, not “most of it.”
- Seams: overlap and tape them. If it is not taped, it is not a system.
- Piers and penetrations: wrap and seal around them instead of leaving neat little gaps.
One thing people get wrong: a liner does not make bulk water disappear. If water is flowing in, it will flow on top of the liner. That is not the liner failing. That is the wrong problem being solved.
Before You Crawl Under There
This is the part most DIY guides rush. It is also where a lot of decent installs start going bad before the liner even unrolls.
- Lighting: headlamp plus a work light. You will drop one.
- Respiratory protection: if you suspect mold or rodent droppings, treat the air like it matters.
- Hands and knees: gloves and kneepads. The ground wins otherwise.
- Electrical reality: watch for exposed wiring and open junctions. Crawl spaces collect bad DIY.
Clean the floor like you mean it. Every sharp scrap becomes a puncture later. Brick chips, cutoff nails, wire ends, little wood shards. They all end up in the liner.
If you can rake the soil reasonably flat, do it. Not for looks. Because a liner that lays flat is easier to tape, easier to seal, and less likely to tent over high spots.
Measure the job before you buy. Add extra for overlaps, wall run-up, and pier wraps. “Just enough” material is how people end up building the whole thing out of patchwork seams.
How to Install It So It Stays Put
Step 1: Get It as Dry as Practical
If the crawl is actively wet, stop and fix water first. If it is only damp, you can still install, but your seam tape and wall details will not forgive sloppy conditions.
Step 2: Plan the Seam Layout
Do not start at the hatch and improvise. Plan the direction you roll. Keep seams out of the main crawl path where you will be dragging your body, tools, and future service work.
Step 3: Roll Out Manageable Sections
Do not wrestle one giant sheet unless you enjoy making the job harder than it needs to be. Cut the liner into sections you can control, place them, then trim. Keep at least 12 inches of overlap at seams.
Step 4: Overlap and Tape Seams Like It Is a System
Overlap is not optional. Tape is not optional. Untaped seams are where the liner stops being a system and starts being plastic on dirt.
Most “the tape won’t stick” stories are really dirt-and-moisture stories. Clean the seam area. Dry it as much as practical. Press the tape in hard. Use a roller if you have one.
Step 5: Wrap Piers, Posts, and Penetrations
This is where a lot of otherwise decent installs get leaky. Big clean floor runs, then a neat little open ring around every pier.
The goal is simple: no exposed soil ring, no loose flaps, no gap you tell yourself you will come back to later.
Step 6: Run the Liner to the Perimeter
If you stop at the base of the wall, ground vapor can bypass the liner right at the perimeter, which is exactly where moisture loads are often strongest.
Run the liner up the wall high enough to get above the damp lower wall zone. In many crawl spaces, that means roughly 6 to 12 inches minimum. More if you are moving toward full encapsulation.
How the Wall Seal Usually Fails
This detail sounds minor until it is not. A lot of DIY vapor-barrier jobs look fine across the middle of the crawl and then fall apart at the perimeter.
- Run the liner high enough to get above the damp lower wall zone.
- Use a real termination detail, not just tape stuck to dusty masonry.
- Seal and fasten around corners, piers, and penetrations where leaks usually show up first.
The short version: the middle of the liner is easy. The edges are where the job proves whether it was built to last.
If local termite rules require an inspection gap, leave one. Do not guess your way into a detail that creates another problem later.
Step 7: Build a Service Path
This is one of those boring details that saves the whole job. Otherwise the first plumber, HVAC tech, or future repair visit shreds the liner you just installed.
Give the crawl a sacrificial path where people will actually move. Not everywhere. Just where traffic is predictable. The goal is simple: do not turn your new liner into confetti the first time someone has to service something.
Step 8: Recheck After the First Season Shift
Crawl spaces like to show their failures later, not on install day. Go back in after a few weeks and again after the first real seasonal shift.
Retape a seam if needed. Tighten a fastener. Fix one small edge failure before it becomes “the crawl smells again” six months later.
When to Stop DIY
DIY is reasonable when the crawl is dry enough to work in, the access is manageable, and you are just installing a real ground-cover system.
Stop and bring in help when you have:
- standing water that keeps coming back
- active wall wetting or obvious drainage trouble
- rot, mold, or insect damage
- structural movement, sagging, or failing piers
- a sealed-crawl plan but no real humidity strategy
Quick Checklist
- Check the crawl after heavy rain, not just on a dry day.
- Confirm downspouts discharge away from the house.
- Cover all exposed soil and tape seams.
- Seal around piers and penetrations instead of leaving gaps.
- Run the liner up the perimeter correctly.
- Do not install over an active bulk-water problem and call it solved.
- Recheck after the first season shift.
Read This Next
This part matters: if the real question is vented vs sealed, go to Crawl Space Vapor Barriers and Vent Covers: What Works, What Backfires.
Also useful: if you are moving beyond a liner into a full controlled system, read Crawl Space Encapsulation Done Right: Moisture First, Air Second.
Before you move on: if water is still reaching the crawl, read Exterior Foundation Waterproofing before spending more money under the house.
If you still need the bigger picture: go back to House Foundations: What You Need to Know Before Construction and compare this crawl-space decision against the wider foundation system.
FAQ
What Thickness Vapor Barrier Is Best for a Crawl Space?
6 mil is a common minimum. If anyone will crawl on it, store items, or service equipment there, thicker reinforced liners usually last longer and tear less.
Do I Remove the Old Plastic First?
If the old liner is shredded, muddy, or full of holes, remove it. If it is intact and you can lay a new liner cleanly over it, some people do that. Clean matters more than tradition here.
What Tape Works for Seams?
Use tape meant for vapor-barrier seams and apply it to clean, reasonably dry plastic. Seam tape is for plastic-to-plastic, not rough masonry.
Should I Staple the Liner to the Wood Sill?
Staples can help hold positioning during install, but they are not a durable seal. Long-term hold comes from the right perimeter detail, not wishful stapling.
Do Vent Covers Actually Help Moisture?
Not by themselves. They help with pests, wind, and wind-driven rain. Moisture control starts with water management and ground-vapor control.
Should I Cover Crawl Space Vents in Winter?
Sometimes. In colder climates it can help comfort and reduce freeze risk, but only if the crawl is already dry enough that you are not trapping moisture.
How Do I Keep the Wall Seal From Peeling Off?
Use mechanical fastening plus compatible sealant. Tape alone on rough concrete usually fails.
I Installed a Liner and It Still Smells Musty. What Happened?
You probably solved only one part of the moisture problem. Bare perimeter soil, wall moisture, leaks, humid air, or bulk water may still be feeding the crawl.