Crawl space encapsulation is not a plastic job. It is a moisture-control system.
That difference is where most bad jobs start. People seal vents, roll out liner, tape a few seams, and assume the crawl space is now “fixed.” Then the smell comes back, the wood still feels damp, or humidity stays high enough to keep feeding the same problem.
This page is about the version that holds up.
- What encapsulation is supposed to do
- What has to happen before the liner goes down
- Which details usually fail first
- When sealing the crawl makes sense
- When a vented crawl can still be the better call
Worth knowing: if you need the wider context first, keep Crawl Space Foundation Fundamentals open nearby.
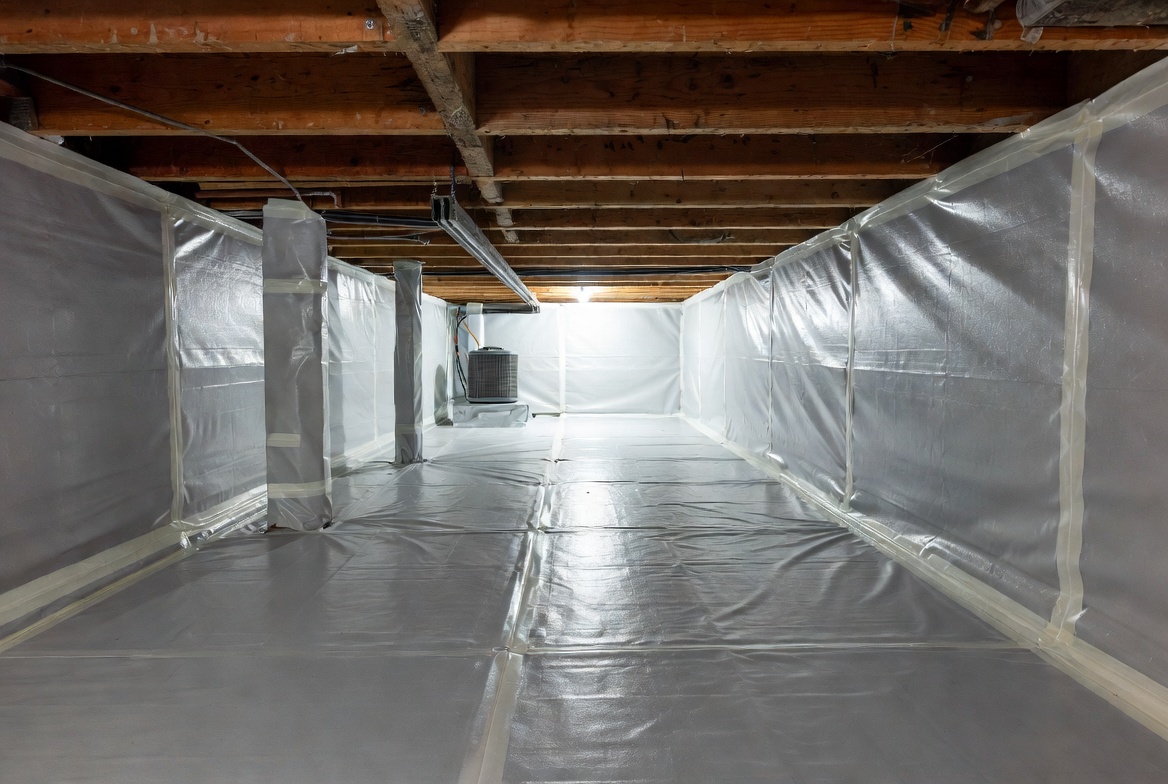
Encapsulation Is a Moisture-Control System
Encapsulated crawl space with bright white ground liner, sealed crawl space vents, dehumidifier, and wall insulation for moisture control. Illustration by ArchitectureCourses.org.
The most common misunderstanding is simple: people treat encapsulation like “seal vents + lay plastic.” Then they are surprised when humidity rises, wood stays damp, or mold shows up anyway.
The order matters more than the product list:
- stop bulk water first
- block ground vapor second
- control crawl-space air third
If you skip the first step, you are building a cleaner-looking wrapper around a wet problem.
Start With Water, Not the Liner
A liner does not beat bulk water. If you have standing water, muddy soil after rain, damp wall bands, or repeated seepage at the perimeter, that is the real problem. Encapsulation comes after that is under control, not before.
| Condition | Encapsulate Now? | Why |
|---|---|---|
| Dry soil, no standing water, no repeated wall wetting | Usually yes | You are closer to a real moisture-control job |
| Standing water or muddy soil after storms | No | Water management comes first |
| Damp walls, efflorescence, or tide marks at the perimeter | Usually not yet | The exterior moisture path is still active |
| Known plumbing leak or wet insulation | No | Fix the leak before you trap conditions underneath |
Walk the perimeter after hard rain. Watch where roof runoff lands. Look for wet wall bases, blocked drainage paths, or a slope that still feeds water toward the house. If outside water is still winning, spend your first money there. Exterior Foundation Waterproofing is the right next read when the perimeter is still the problem.
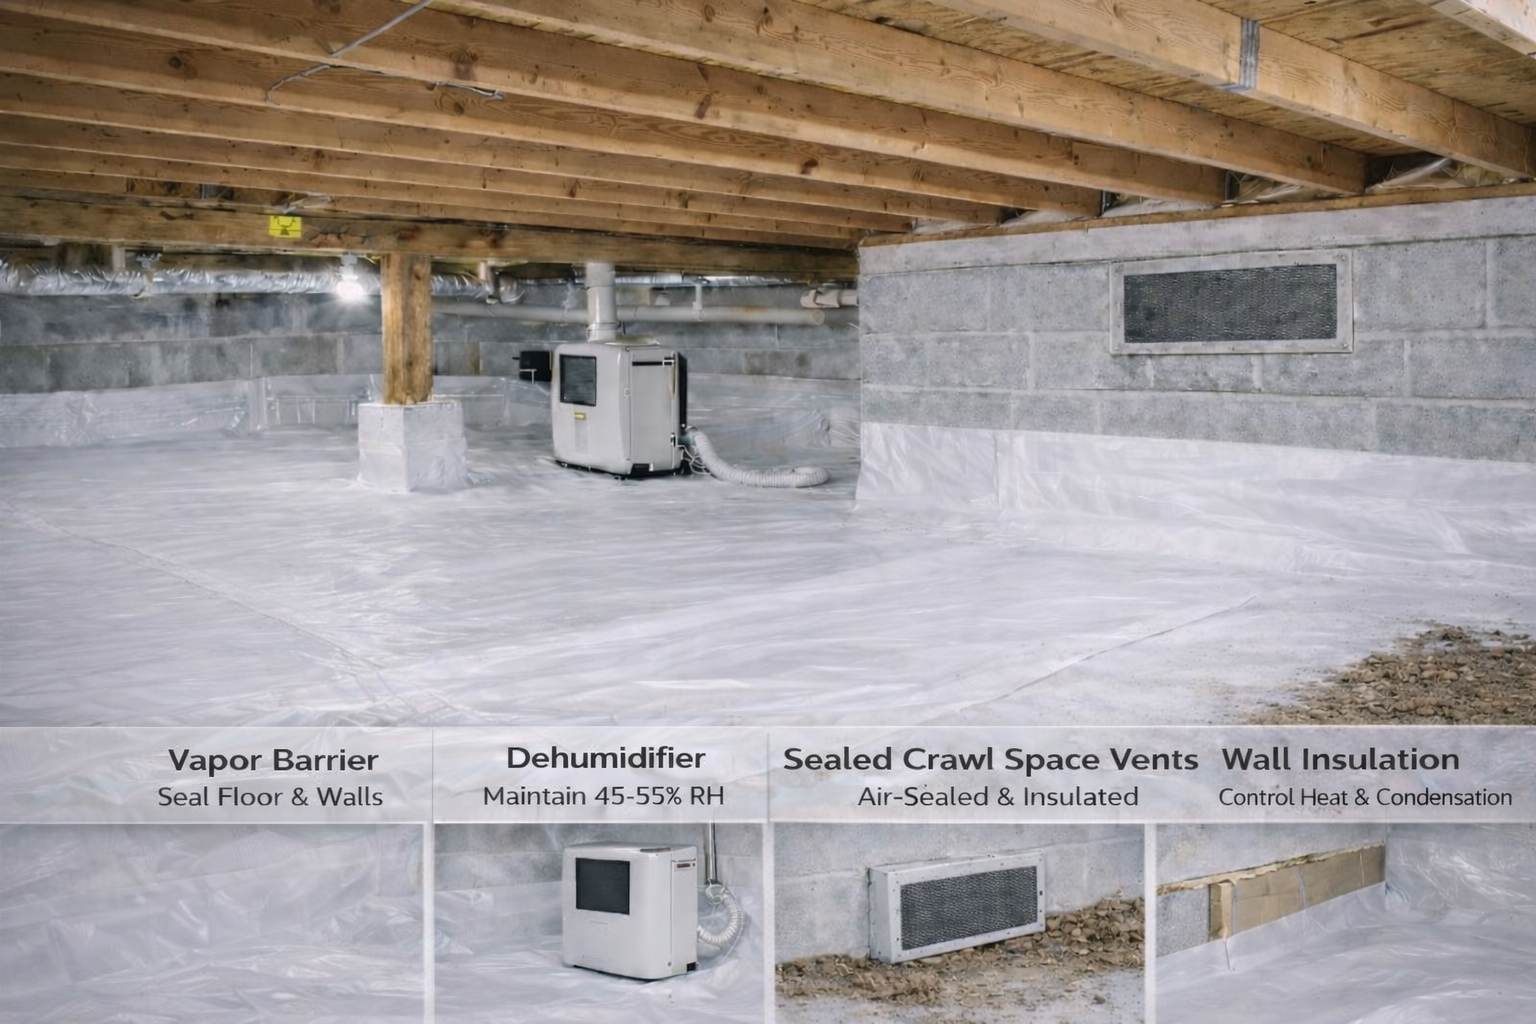
What Real Encapsulation Looks Like
A real encapsulation job is continuous. That is the part people underestimate.
| Element | What It Should Do | What Usually Goes Wrong |
|---|---|---|
| Ground liner | Cover all exposed soil | Too thin, torn, or patchworked together |
| Seams | Overlap and seal the field | Untaped seams or tape stuck to dirty wet plastic |
| Piers and penetrations | Keep vapor from bypassing the field | Neat little exposed-soil rings around every interruption |
| Wall run-up | Connect floor liner to the perimeter | Liner stops at the wall base or peels off later |
| Vent and access details | Keep the air boundary continuous | Half-sealed vents and leaky access doors |
| Humidity control | Manage moisture on purpose | “We’ll add a dehumidifier later” |
The short version: if the liner is loose, the seams are lazy, the piers are skipped, and the wall detail is wishful thinking, the job is not done just because the crawl looks cleaner.
Ground Liner Details That Hold Up
Thin plastic tossed loosely on dirt is not encapsulation. It may help a little. It also tears fast and stops behaving like a system as soon as people need to crawl on it.
- Coverage: cover all exposed soil, not “most of it.”
- Seams: overlap and tape them. If it is not sealed, it is not a system.
- Piers and posts: wrap and seal around them instead of leaving clean gaps.
- Wall run-up: carry the liner up the wall and fasten it with a real termination detail, not just tape hope.
- Durability: if the crawl will see service traffic, use a liner that can survive service traffic.
One thing people get wrong: a liner does not make incoming water disappear. If water still enters the crawl, it will move on top of the liner. That is not the liner failing. That is the wrong problem still being active.
Also useful: if you want the install detail broken out step by step, go straight to Crawl Space Vapor Barrier Installation: How to Do It Right the First Time.
Humidity Control Is Not Optional
Once the crawl is sealed, you have to control humidity on purpose. That can mean conditioned air, a dedicated dehumidifier, or another code- and climate-appropriate method. But it cannot mean “seal it first and figure it out later.”
This is where half-sealed crawl spaces go bad. The vents are closed, the liner is down, but the humidity strategy never really shows up. Now the crawl is no longer drying the old way, and it is not being managed the new way either.
If you install a dehumidifier, plan the drain path on day one. Condensate management is part of the system, not an afterthought.
When Vented Beats Sealed
Yes, sometimes a vented crawl is still the better call.
On a dry site, with good drainage, full ground coverage, and a climate that does not keep loading the crawl with warm wet air, a vented crawl can behave well enough. That is especially true when the alternative is a half-finished sealed crawl with no humidity plan.
The mistake is pretending every crawl space wants the same strategy. Some houses need a truly sealed crawl. Some need a better vented assembly with proper ground control. Some need outside water fixed before either conversation means much.
Read this next: for the vented-versus-sealed decision, use Crawl Space Vapor Barriers and Vent Covers: What Works, What Backfires.
The Detail That Usually Fails First
The field of the liner is the easy part. The perimeter is where the job proves itself.
This is where bad jobs peel, gap, or leak vapor back into the crawl:
- the liner stops too low on the wall
- the wall is dusty or damp and the tape never really bonds
- corners and penetrations get rushed
- the access opening stays leaky
- the vent closure never ties in cleanly with the rest of the air boundary
If local termite rules require an inspection gap, leave one. Do not guess your way into a detail that creates a second problem later.
What Backfires
Most crawl-space regrets are not mysterious. They follow a short list.
- Sealing vents before fixing grading, gutters, or perimeter water.
- Calling thin loose plastic “encapsulation.”
- Skipping seam tape or pretending loose overlaps are close enough.
- Stopping the liner at the wall base.
- Building a sealed crawl without a real humidity plan.
- Ignoring radon risk and assuming every below-floor problem is just moisture.
That last one matters more than people think. In radon-prone areas, test before and after. A sealed ground cover can overlap with radon work, but it does not automatically replace it.
See also: How Much Does Crawl Space Encapsulation Cost?
Quick Checklist
- Walk the perimeter after hard rain. Where does water sit?
- Make sure downspouts discharge away from the crawl zone.
- Cover all exposed soil.
- Overlap and tape every seam.
- Seal around piers, posts, and penetrations.
- Carry the liner up the wall and fasten it properly.
- Choose a truly vented strategy or a truly sealed strategy, not the weird half-state in between.
- Set the humidity plan before the crawl is closed up.
Read This Next
This part matters: if the weak point is still the ground liner itself, go to Crawl Space Vapor Barrier Installation: How to Do It Right the First Time.
Also useful: if the bigger question is vented versus sealed, read Crawl Space Vapor Barriers and Vent Covers: What Works, What Backfires.
Before you move on: if outside water is still reaching the crawl, fix that path first with Exterior Foundation Waterproofing.
If you still need the bigger picture: go back to House Foundations: What You Need to Know Before Construction and compare this crawl-space decision against the wider foundation lineup.
FAQ
Is encapsulation the same as a vapor barrier?
No. A ground vapor barrier is one component. Encapsulation is ground control, perimeter continuity, vent treatment, and humidity control working as one system.
Why do people say encapsulation made the crawl space worse?
Usually because the crawl was sealed without fixing bulk water, or the vents were closed without putting a real humidity strategy in place.
Do I still need drainage work if I encapsulate?
Yes, if water is still reaching the perimeter. Encapsulation manages ground vapor and crawl-space conditions. Drainage manages bulk water. Different job.
Do all encapsulated crawl spaces need a dehumidifier?
Not every house uses the exact same method, but every sealed crawl needs a real moisture-control plan. “We’ll see how it does later” is not a plan.
Should I test for radon before or after encapsulation?
In radon-prone areas, both can make sense. Test before so you know what you are dealing with, and test after if you change the crawl-space air and ground conditions.
Where should I start if I do not understand the assembly yet?
Start with Crawl Space Foundation Fundamentals. If the walls or perimeter are wet, pair that with Exterior Foundation Waterproofing.