A dry basement is usually won or lost outside the wall.
If water is sitting against the foundation, interior coatings, fans, and dehumidifiers are cleanup tools, not the main fix. Exterior waterproofing works because it deals with the problem at the source: wet soil, drainage failure, poor grading, hydrostatic pressure, and weak protection at the wall.
This page is about the full exterior system, not just one coating. If you want the wider foundation context first, see Basement Foundations Basics: Walls, Footings, Drainage, Waterproofing.
What This Covers
- What exterior foundation waterproofing really means.
- What a proper system includes.
- Waterproofing vs damp-proofing vs interior water management.
- When DIY makes sense and when excavation should stay professional.
- Typical cost ranges and the mistakes that waste money fastest.
What Exterior Foundation Waterproofing Actually Is

Exterior foundation waterproofing is a below-grade system installed on the outside face of the foundation wall to keep water from reaching the structure in the first place. On a good job, that usually means four things working together:
- wall preparation and crack repair
- a true waterproof membrane or coating
- drainage protection or a drainage mat
- a footing or perimeter drain that gives water somewhere to go
That last part gets missed all the time. A membrane without drainage still leaves water pressing against the wall. Drainage without proper wall protection still leaves openings, seams, penetrations, and cracks exposed.
What People Get Wrong
The common bad version goes like this: someone sees a damp basement wall, rolls something on the inside, maybe patches one crack, and calls the job done. The wall looks cleaner for a while. The pressure outside never changed. The leak comes back.
Another mistake is confusing damp-proofing with waterproofing. Damp-proofing slows moisture transfer. It does not do the same job as a true waterproofing system designed to handle persistent water exposure and hydrostatic pressure.
A third mistake is stopping the work too high. If the crew does not expose the wall down to the footing where needed, the weak area stays buried and the water simply finds the lower path.
Waterproofing vs Damp-Proofing vs Interior Systems
| Approach | What It Does Well | What It Does Not Fix | Best Use |
|---|---|---|---|
| Exterior waterproofing | Blocks outside water before it reaches the wall. | Does not solve structural movement by itself. | Repeated leaks, wet below-grade walls, major rehab, new work. |
| Damp-proofing | Reduces moisture migration in lighter conditions. | Not reliable for active leakage or strong water pressure. | Lower-risk exposure, code-minimum type applications, lighter soil moisture. |
| Interior drainage or interior coatings | Manages water after it gets in and helps keep the basement usable. | Does not stop exterior water from reaching the wall. | Supplemental control, partial mitigation, some retrofit situations. |
What a Proper Exterior System Includes
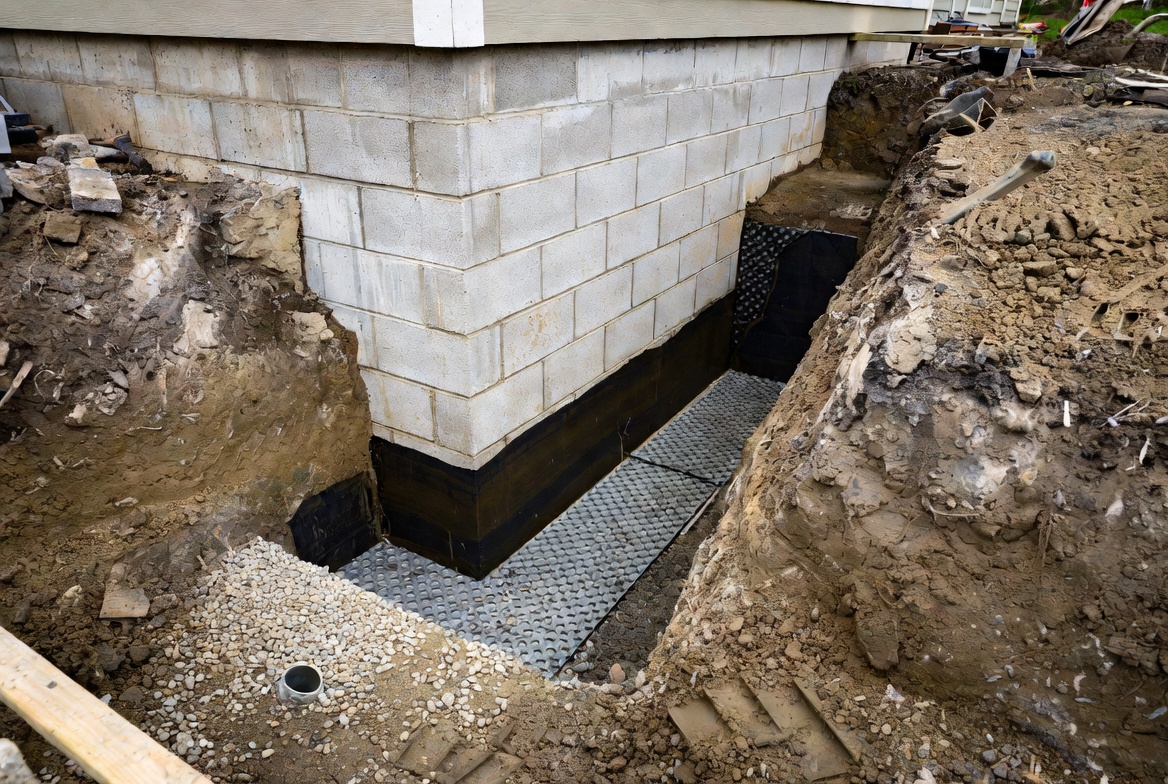
1. Excavation to the right depth
Excavation taken down to footing depth so the failed section of foundation wall can be fully exposed and repaired. Image by ArchitectureCourses.org.
The wall has to be exposed where the failure is happening. On many basement foundations that means digging to the footing, not just exposing the first couple of feet near grade. Access, utilities, porches, decks, paving, and neighboring property lines can change the method fast, which is why excavation is usually the hardest and most expensive part of the job.
For readers comparing methods and site constraints, Foundation Excavation Methods: Techniques, Tools, and Best Practices is the right follow-up.
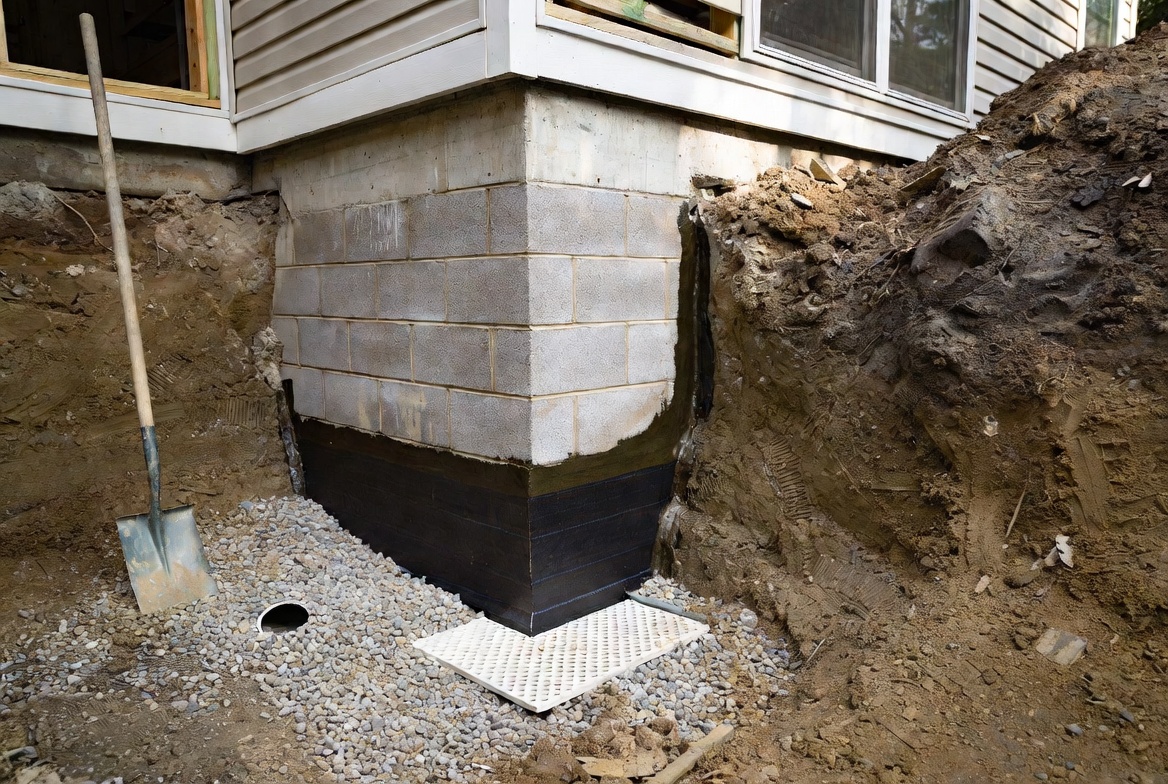
2. Cleaning and repair before waterproofing
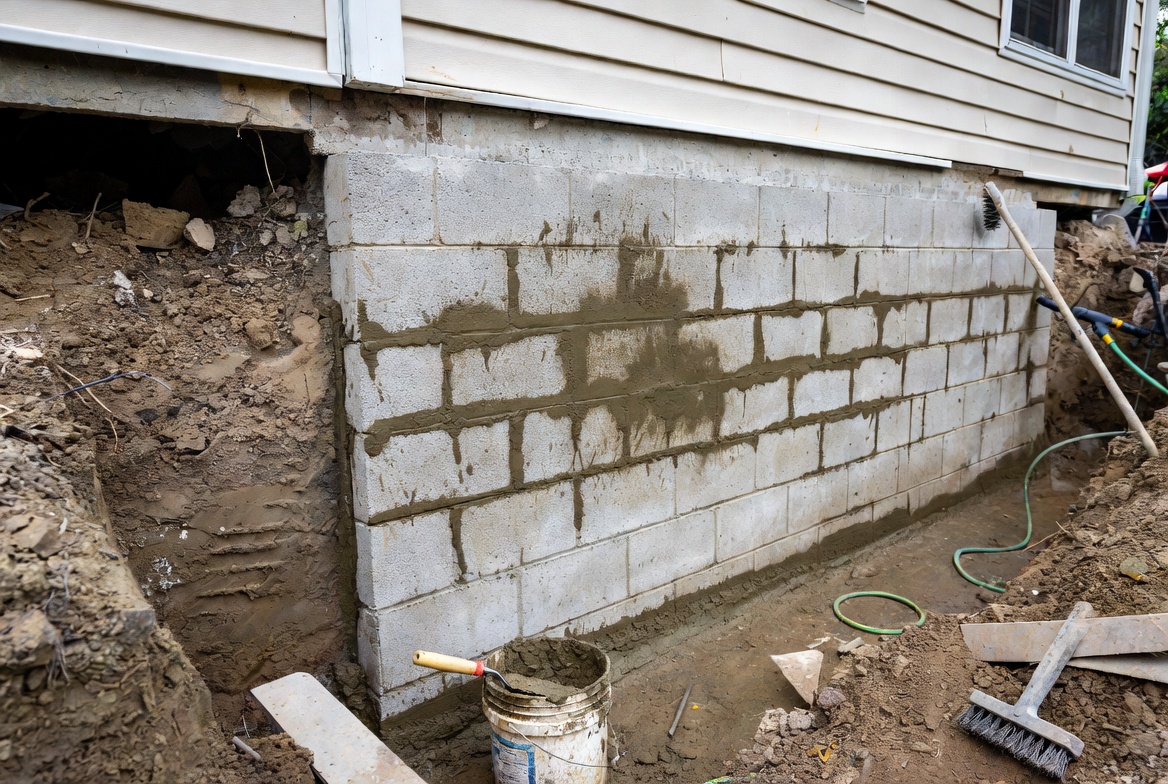
Exposed foundation wall repaired and prepared before the exterior waterproofing system goes on. Image by ArchitectureCourses.org.
Loose material, dirt, form-tie holes, honeycombing, failed parging, and open cracks all have to be dealt with first. Waterproofing over an unstable or dirty surface is how you get premature failure and peeled membranes.
If the wall has visible cracking, movement, or bowing, stop calling it a simple waterproofing job. That becomes a repair question too. A good companion page there is Foundation Cracks in Houses: When to Worry and When to Repair.
3. The actual waterproofing layer
Below-grade waterproofing layer installed continuously at the foundation corner, with drainage components sitting outside the membrane. Image by ArchitectureCourses.org.
This can be a liquid-applied membrane, a sheet membrane, or another below-grade system suited to the wall type and site conditions. The right choice depends on surface condition, expected water exposure, continuity at seams and penetrations, and how the drainage layer will sit over it.
What matters most is continuity. Corners, cold joints, penetrations, ledges, and membrane terminations are where jobs usually fail first.
4. Drainage protection
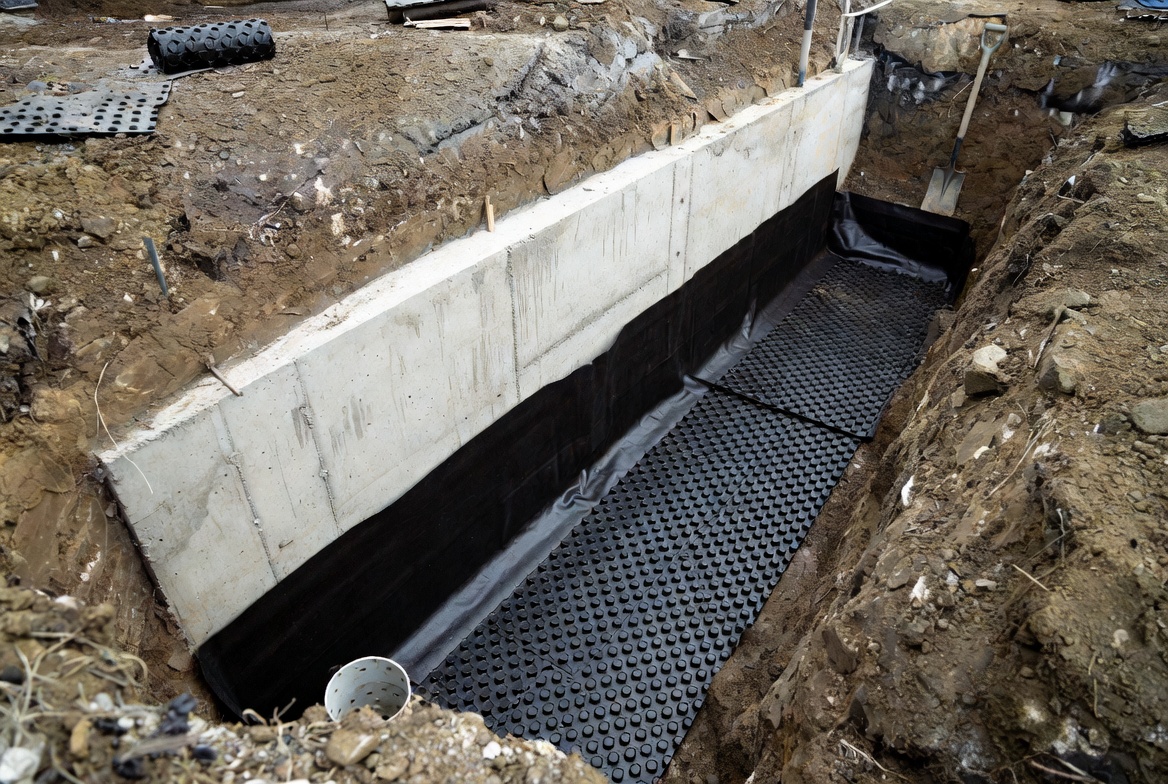
Waterproofed foundation wall with drainage protection and drain path in place before backfill. Image by ArchitectureCourses.org.
A drainage board or dimple mat protects the membrane during backfill and helps create a path for water to move downward instead of sitting against the wall. This is where many better assemblies separate themselves from cheap coating-only jobs.
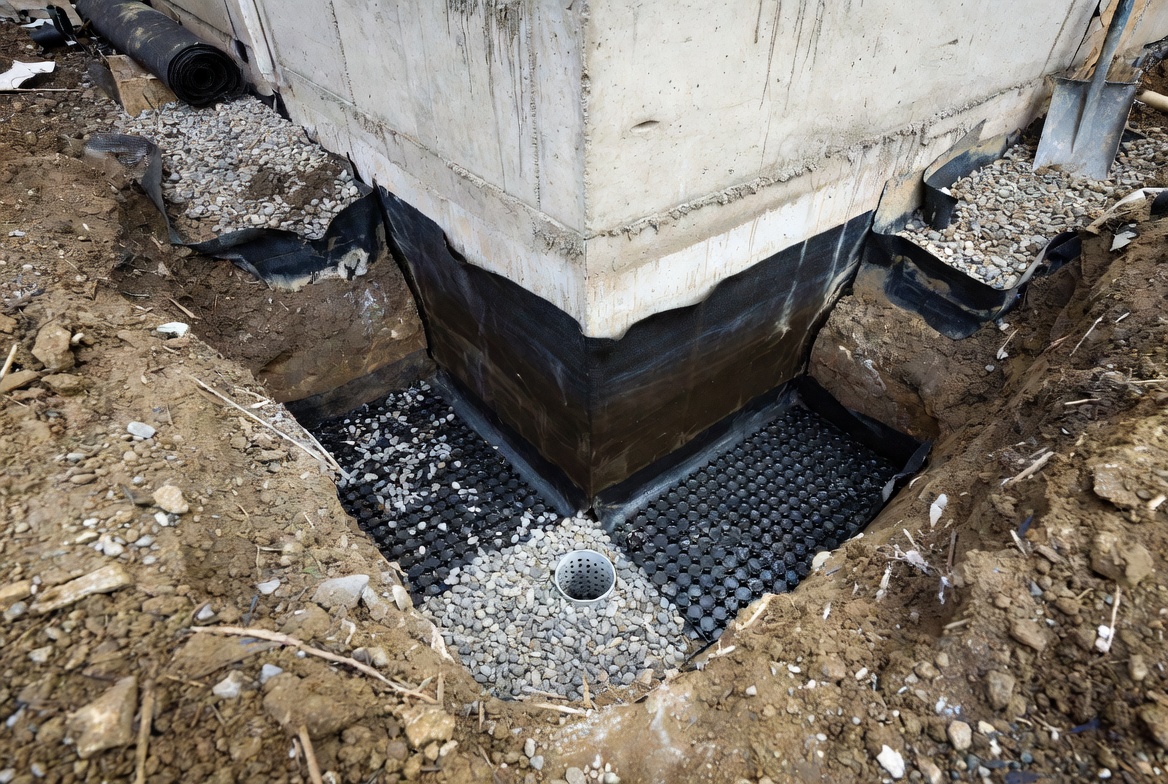
5. Footing or perimeter drainage
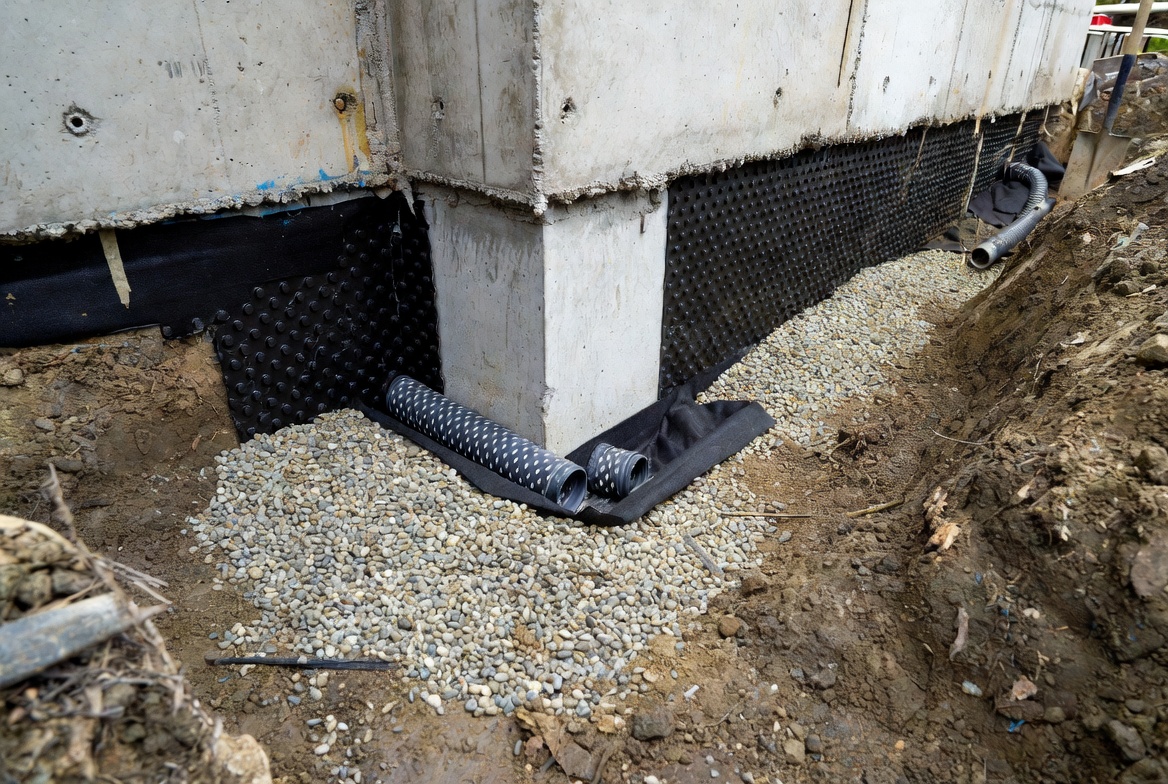
Footing-level drainage assembly with gravel, perforated pipe, and drainage layer at the base of the foundation wall. Image by ArchitectureCourses.org.
If you collect water at the base of the wall, it has to discharge somewhere. That usually means a perimeter drain to daylight where possible, or to a sump system where site conditions require it. The drain, filter strategy, outlet, and maintenance access matter. Buried pipe with no workable discharge plan is not a drainage strategy.
For that assembly, see How to Install a French Drain with a Sump Pump the Right Way.
6. Careful backfill and final grading
Bad backfill wrecks good waterproofing. Large debris, careless compaction, and poor final grading can damage the system or drive surface water right back to the wall. The ground should finish sloping away from the house, and roof water should discharge well away from the foundation line.
The Detail People Miss
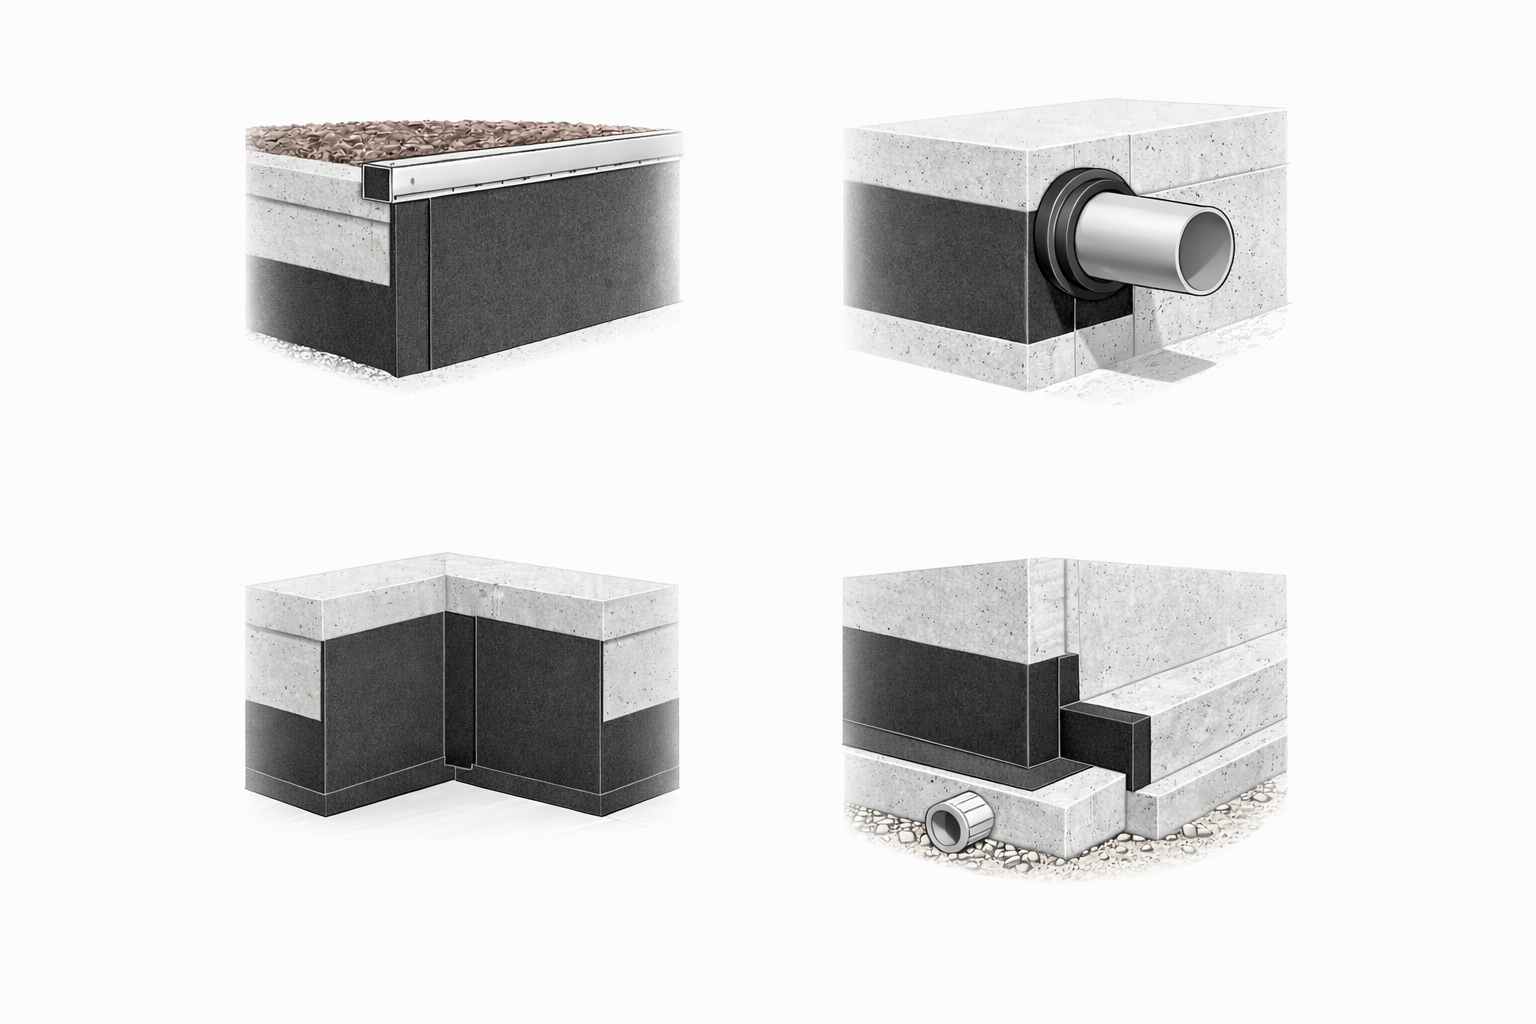
Exterior foundation waterproofing transition details showing continuity at key failure points. Image by ArchitectureCourses.org.
The weak point is often not the big field of wall. It is the transition.
Pipe penetrations, top-of-membrane terminations, window wells, porch attachments, inside corners, and the joint near the footing are the places where one missed seal, wrinkle, or gap can undo a lot of expensive work. That is why “what membrane did you use?” is not the only useful question. “How did you handle the transitions?” is often the better one.
When Exterior Waterproofing Is Worth It
- Water shows up after heavy rain, spring thaw, or long wet periods.
- The basement wall is wet below grade, not just humid.
- Interior finishes keep getting damaged or moldy.
- The outside grading and drainage are clearly wrong.
- You are already excavating for another reason and can address the wall properly.
- You want the long-term fix instead of repeated interior patching.
It is usually harder to justify full excavation for one small isolated seep at an accessible crack if the site drainage is otherwise good and the wall is stable. That kind of case may start with targeted repair, grading correction, and drainage improvements first.
DIY vs Pro
| Situation | DIY Possible | Call a Pro |
|---|---|---|
| Minor crack sealing at an exposed area | Yes, sometimes. | If cracks are widening, stepped, repeated, or structural. |
| Regrading soil and extending downspouts | Often yes. | If drainage needs major rework or the site is tight. |
| Full perimeter excavation to footing depth | Usually no. | Yes. |
| Installing a complete below-grade waterproofing assembly | Rarely a good homeowner project. | Yes, especially on occupied houses. |
| Bowing walls, settlement, large leaks, repeated flooding | No. | Yes, immediately. |
Small-scale work like improving grading, extending downspouts, or sealing a simple exposed crack is one thing. Digging 6 to 8 feet around an occupied house, protecting utilities, keeping the trench safe, handling water, and rebuilding the assembly correctly is another.
Typical Cost Range
Exterior foundation waterproofing is expensive because the real cost is usually access and excavation, not just material. Depth, soil type, access for equipment, landscaping, paving, decks, porches, attached steps, window wells, and how much of the perimeter needs work all change the number.
| Scope | Typical Range | What Changes the Number |
|---|---|---|
| Minor exterior crack repair at one area | Lower-cost job | Access, crack type, finish restoration. |
| Partial wall excavation and repair | Mid-range | Depth, obstructions, length of wall, drainage tie-in. |
| Full perimeter exterior waterproofing with drainage | High-cost job | Whole-house perimeter, footing depth, discharge method, restoration work. |
The supplied draft had full-system numbers ranging from roughly $8,000 to $25,000 for professional work. That broad range is believable as a rough frame, but the right way to use numbers here is as planning guidance, not as a universal quote. Site conditions swing this hard.
Spend Here, Not Here
- Spend here: excavation done safely, proper wall prep, continuous membrane detailing, drainage layer, discharge path, grading correction.
- Do not overspend here: interior paint-on fixes sold as a full answer to outside water pressure.
- Spend here: fixing the reason water is collecting at the wall.
- Do not overspend here: accessories and patch products before the drainage plan is even clear.
What to Ask a Contractor
- How deep are you excavating, and how much of the wall will be exposed?
- How are cracks, joints, and penetrations being repaired before the membrane goes on?
- What is the full assembly from wall face to backfill?
- How is water being collected and discharged at the base of the wall?
- What gets removed and restored: steps, paving, planting, decks, walkways?
- How are you protecting the membrane during backfill?
- What parts of the job are excluded from the quote?
FAQ
Is exterior foundation waterproofing better than interior waterproofing?
For stopping outside water from reaching the wall, yes. Interior systems can still be useful, but they usually manage water after entry rather than preventing contact in the first place.
Can I waterproof just the top part of the foundation wall?
Not if the failure is lower. Partial shallow work is a common way to spend money without solving the actual path of water.
Do I need both a membrane and a drain?
Often yes. The membrane protects the wall. The drain relieves water pressure and moves water away. One without the other is usually a weaker system.
How long should exterior waterproofing last?
A properly installed below-grade system should last a long time, but lifespan depends on membrane type, drainage performance, backfill damage, soil conditions, and whether surface water is still being driven toward the house.
Is this a good DIY project?
Usually not at full scale. Surface drainage improvements and small exposed repairs may be manageable. Deep excavation and full perimeter waterproofing are where homeowner confidence often gets expensive.
What if my basement is damp but not visibly leaking?
You may still need to separate humidity problems from bulk water problems. Start by checking grading, downspouts, and moisture patterns before assuming the wall needs full excavation.
What To Do Next
If the basement is wet after rain, start by checking whether this is a drainage problem, a crack problem, or a full outside-water-pressure problem. Those are not the same repair.
- Best Exterior Foundation Waterproofing Products if you want to compare membrane and material types before talking to contractors.
- Foundation Cracks in Houses: When to Worry and When to Repair if visible cracking is part of the story.
- How to Install a French Drain with a Sump Pump the Right Way if the bigger issue looks like drainage and discharge.