
Image by ArchitectureCourses.org. Planning layout, finishes, and materials before starting a home remodel.
A remodel usually goes bad early.
The plan is loose. The budget is fake. Demo starts before the layout is settled. One small change turns into three more. Then the room is open, the house is dusty, and every delayed decision starts costing money.
This free home remodeling course focuses on the parts that decide whether a project holds together: what to fix first, how to budget honestly, what to do yourself, what to hand off, how to sequence the work, and how to finish the room so it feels complete instead of just new.
Start With the Problem, Not the Mood Board
Not every remodel has the same job.
Some projects are about function. The kitchen does not work. The bathroom has no storage. The living room is dark. The bedroom has no closet space. Some are about age. Worn flooring, old wiring, weak insulation, bad windows, leaking trim. Some are about resale. Some are about staying in the house longer without fighting it every day.
You need to know which one it is before you spend money. If the problem is layout, a finish upgrade will not solve it. If the problem is water, decorating will not save you. If the problem is clutter, new cabinets may help, but only if they are better designed than the old ones.
Do This Instead of This
| Do This | Instead of This | Why |
|---|---|---|
| Fix water, safety, layout, and mechanical problems first | Start with paint, wallpaper, and decorative finishes | Pretty work gets torn back out when the hidden problem shows up later. |
| Lock the room plan before demolition | Open the room and decide as you go | That is how change orders and delays start. |
| Budget for permits, disposal, delivery, and surprises | Price only cabinets, tile, flooring, and fixtures | The hidden costs are what push the project off the rails. |
| Spend on storage, lighting, ventilation, and durable surfaces | Spend the money on statement finishes first | The room has to work before it gets to impress anyone. |
| Phase the work if the budget is tight | Open half the house at once | Too many open fronts turn one remodel into a long mess. |
Pick the Rooms in the Right Order
Homeowners often start with the room they are most tired of looking at. That is understandable. It is not always the right move.
Start with the areas that either hide the most risk or affect daily life the most.
- Kitchens: expensive, high use, full of layout and storage mistakes that show up fast.
- Bathrooms: smaller footprint, but moisture, ventilation, and waterproofing mistakes get expensive quickly.
- Living areas: good candidates for lower-cost upgrades if the structure, windows, and envelope are already sound.
- Bedrooms: easier wins when the work is storage, lighting, flooring, trim, or paint instead of wall moves.
- Exterior envelope: roof leaks, drainage trouble, rotten siding, bad windows, and water entry move to the front of the line whether you wanted them there or not.
If the house has age-related problems, start there. Common Problems in 1930s Houses is the kind of page worth reading before anyone starts talking about finishes.
Build a Budget That Can Survive the Job
A remodeling budget that only counts finish materials is not a budget. It is wishful thinking.
A working budget needs at least five buckets:
- construction and labor
- finish materials
- permits and inspections
- tool rentals, delivery, cleanup, and dump fees
- contingency money for what you do not know yet
Older houses need more contingency, not less. Open one wall and you may find bad wiring, patched plumbing, framing that wandered, a floor that is out of level, or hidden water damage around a window or tub. None of that is unusual. Budget like the house has a memory.
If lower utility bills are part of the remodel, Green Remodeling and Eco Renovation: Insulation, Windows, HVAC, and Materials are the better next reads. They help separate upgrades that actually pay back from ones that just sound efficient.

Image by ArchitectureCourses.org. Working through plans and room conditions before remodeling begins.
Before Demolition Starts
Do not start tearing out cabinets or tile because you are excited. That burst of energy gets expensive when the ordering and planning are still loose.
Get these decisions made first:
- scope: what is changing and what is staying
- measured plan: even a simple sketch with actual dimensions is better than guessing in dust
- material lead times: cabinets, windows, tile, flooring, fixtures, doors, appliances
- permit research: structural, electrical, plumbing, and layout changes often trigger permits
- living plan: where you cook, shower, sleep, and store things during the job
- dust control: barriers, floor protection, vent protection, cleanup routine
This is where Construction Planning and Scheduling starts to matter even on small residential jobs. The house may be domestic. The sequence still decides the outcome.
Before You Drill or Cut Into a Wall
Before you drill, cut drywall, or open a wall during a renovation, assume there is something behind it.
Most interior walls are not empty cavities. Even in simple houses, walls commonly contain electrical wiring, plumbing lines, vent stacks, duct runs, service chases, and framing that should not be cut casually. And these things do not always run where people expect. Wiring often passes horizontally through studs at outlet height, then turns vertically toward switches, fixtures, or junction boxes. Plumbing stacks can sit inside walls that do not look obviously connected to a bathroom at first glance.
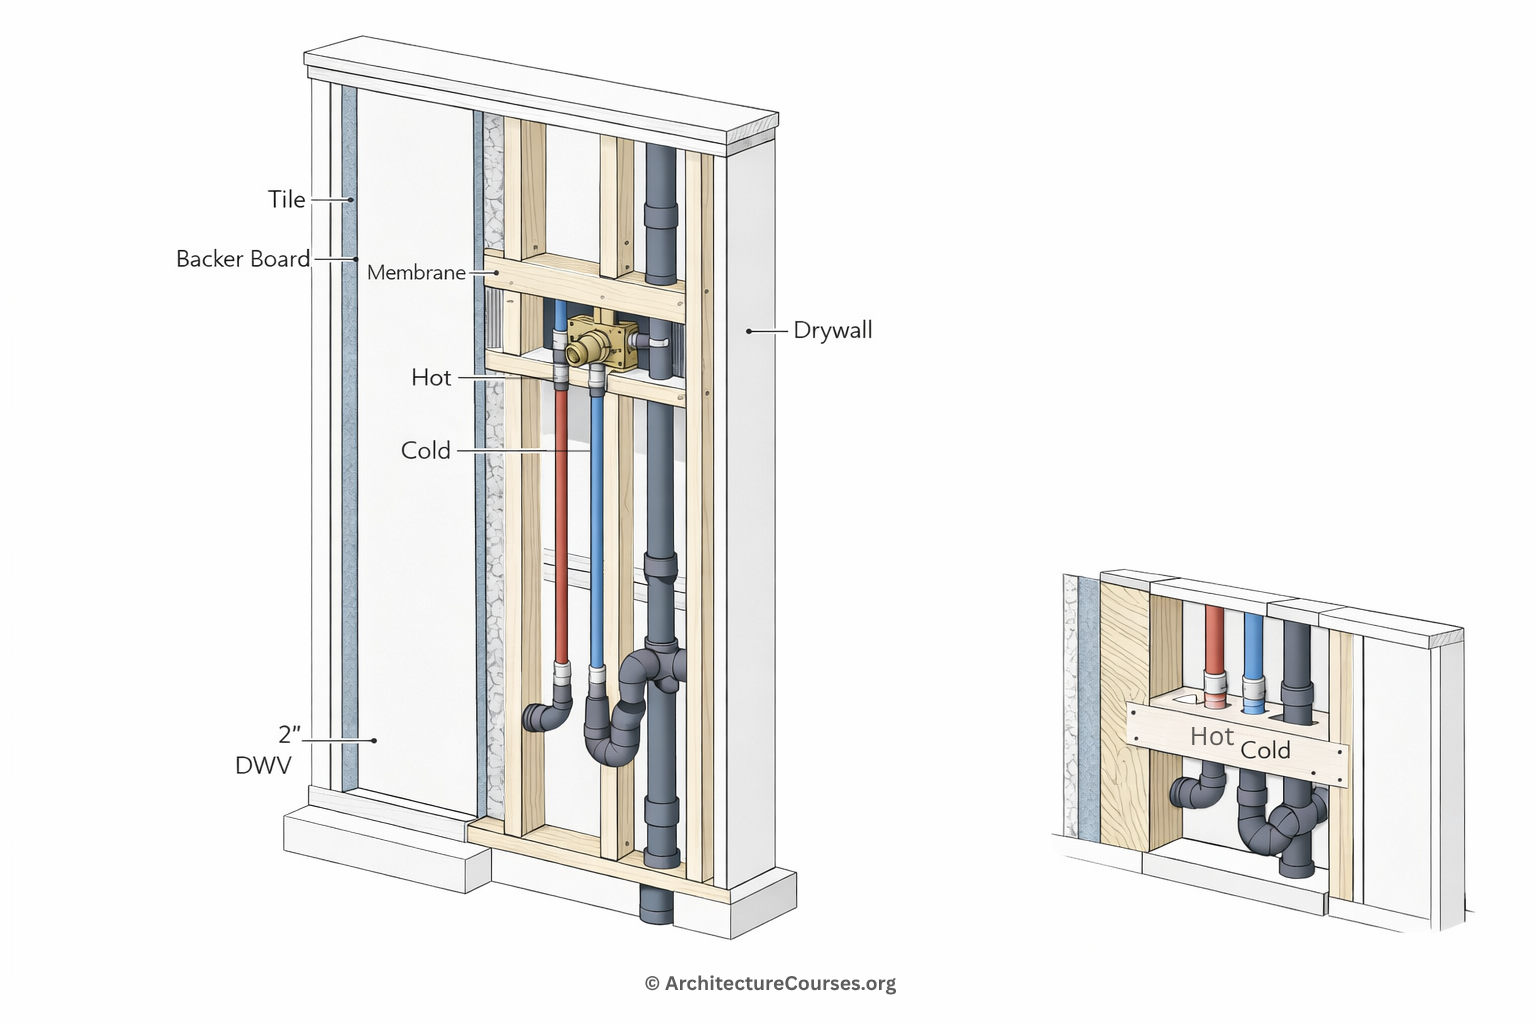
Illustration by ArchitectureCourses.org. Bathroom wet wall section showing tile, membrane, supply lines, DWV routing, and dry-side drywall.
This is where small mistakes turn expensive fast. Drill into a cable and you create a shock hazard. Cut into a supply or drain line and the repair is suddenly bigger than the original job. Cut or notch the wrong framing member and now the problem is structural, not cosmetic.

Illustration by ArchitectureCourses.org. Open wall safety map showing framing, wiring, plumbing, and hidden service paths before cutting or drilling.
The point of a diagram like this is not to pretend every house is the same. It is to remind you that a clean wall surface tells you very little by itself.
Before drilling or cutting:
- locate nearby outlets and switches
- consider where wiring might run between them
- check the rooms above and below for plumbing fixtures
- use a stud finder that includes electrical detection if possible
- cut small inspection openings first instead of large cuts
If there is real uncertainty about electrical, plumbing, or structure, stop and investigate further. In situations where building systems or framing could be involved, it is better to get a licensed contractor, electrician, or plumber involved before the wall is opened wider.
DIY, Contractor, or Both
DIY is not a badge of honor. It is a cost and risk decision.
Good DIY candidates for many homeowners:
- painting
- basic demolition of clearly non-structural finishes
- cabinet hardware
- shelving
- simple trim
- patching and caulking
- cleanup and room setup
Bad DIY candidates for most people:
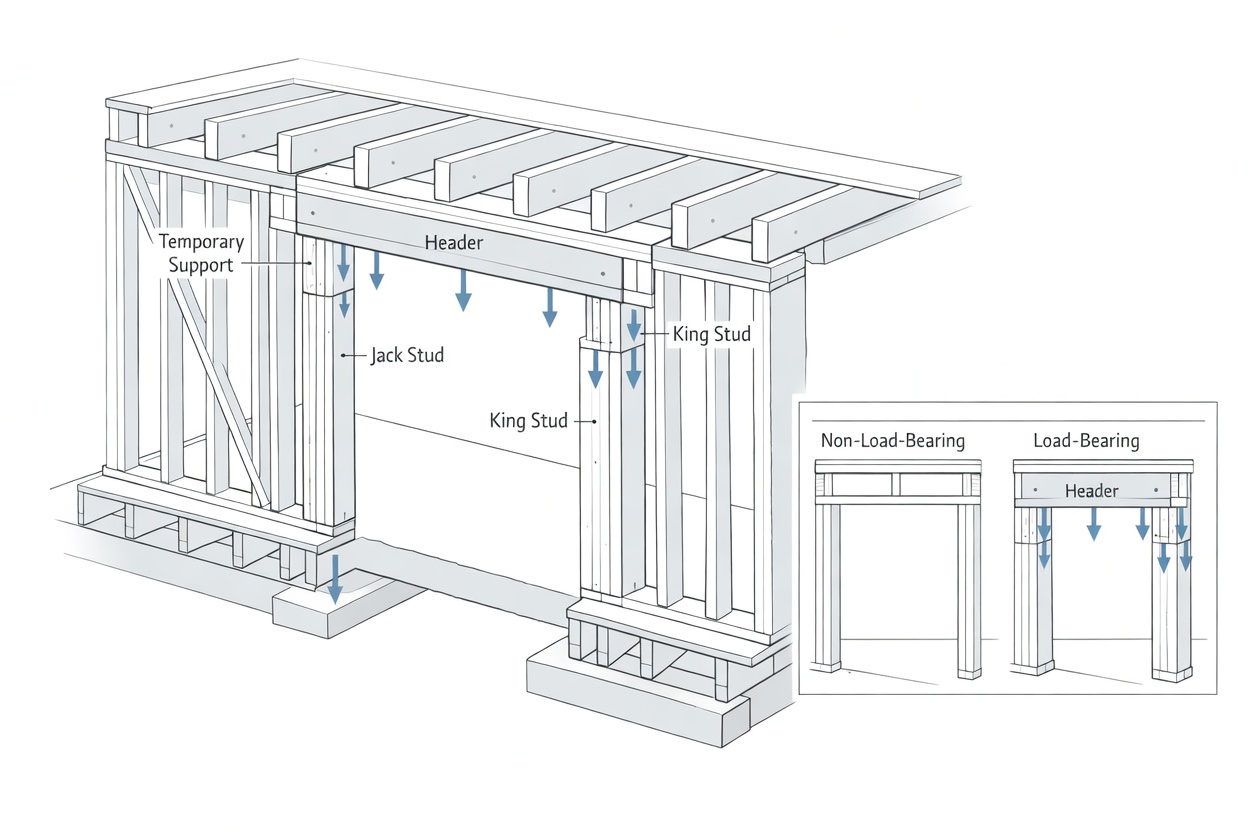
Illustration by ArchitectureCourses.org. Load-bearing wall opening detail showing temporary support, header framing, and transferred load.
- load-bearing wall changes
- new plumbing runs
- service-panel or major electrical work
- tile waterproofing done from scratch
- window replacement in damaged or out-of-square openings
- roof framing changes
- anything that can quietly fail behind a finished wall
Bad paint is annoying. Bad hidden work comes back in bills.
If the bathroom project is drifting into waterproofing, plumbing moves, permits, and multiple trades, Best Bathroom Remodeling Contractors is a better next step than guessing from photos.
Older Houses Change the Rules
Older houses are where budget optimism gets punished fastest.
You open one area to do a simple upgrade and find a second project hiding behind it. Maybe the wall is out. Maybe the subfloor near the tub is soft. Maybe the insulation is weak. Maybe the wiring is overdue for replacement. Maybe the materials you are disturbing are not as harmless as they look.
If you are working on a 1950s house, Asbestos in 1950s Houses: What You Need to Know Before Renovating belongs on the short list before demolition starts. And if you are trying to price a period kitchen honestly, How Much to Renovate a 1950s Midcentury Kitchen is more useful than generic cost talk.
One more thing: if you are trying to find hidden moisture, air leaks, or insulation failures before opening walls, FLIR ONE Pro Review for Home Renovation Work is worth a look. It is one of the few tools that can save money before demolition instead of after it.
Where Remodels Blow Up in Real Life
The repeated failure points are not glamorous.
Storage looked fine on the drawing but works badly once the room is full. The kitchen got fewer drawers than it needed. The bathroom vanity looks good but gives up too much usable room to a decorative sink. There are not enough outlets where appliances land. The vanity light is pretty but throws shadows right where you shave or do makeup. The new open plan carries noise farther than expected. The bathroom fan is weak, loud, or vented badly. Dust control was treated like an afterthought, so the whole house felt dirty for weeks.
That is how remodels disappoint. Not through one dramatic mistake. Through daily friction that could have been designed out earlier.

Image by ArchitectureCourses.org. Cabinet layout, finish samples, and hardware choices are easier to fix on paper than on site.
Kitchen Remodels: Spend on Function First
Kitchens eat budgets because they stack layout, cabinetry, lighting, appliances, plumbing, flooring, and finish decisions in one place.
If the layout is bad, fix that first. If the layout is sound, do not tear the whole room apart just to prove you remodeled it.
High-payoff kitchen moves:
- more drawers instead of deep lower cabinets
- better task lighting over counters and sink zones
- better venting over the range
- cabinet repainting or refacing when the boxes are still sound
- counter surfaces that are easy to maintain
- a pantry plan that keeps overflow off the counters
Lower-payoff moves on a tight budget:
- moving the sink because it looks cleaner on a sketch
- changing the layout for drama instead of workflow
- spending heavily on statement pendants while prep areas are still underlit
- buying premium finishes before the storage problem is solved
Worth knowing: 1930s Kitchens helps with layout and character. 1930s Kitchen Renovation is the better follow-up when the question shifts from style to what you should change and what you should leave alone. If the details are what is tripping you up, 1930s Kitchen Cabinets and 1930s Kitchen Sinks help with the finished look. If your project is period-specific in a different direction, Victorian Kitchen Remodeling is the better style-specific branch.
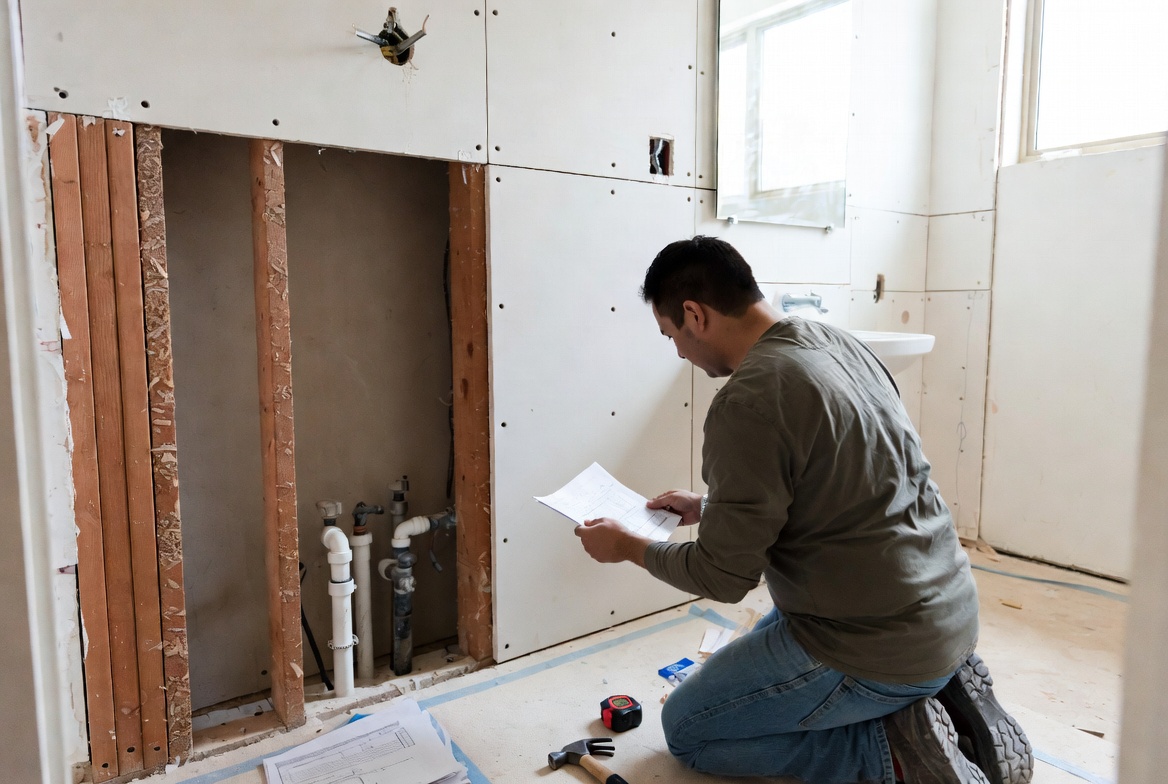
Image by ArchitectureCourses.org. Reviewing the layout against existing plumbing before bathroom work moves forward.
Bathrooms: Small Room, Expensive Mistakes
Bathroom work looks smaller on paper than it feels once the room is open.
This is where shortcuts age badly. You can change a mirror later. You do not want to rebuild a shower because the waterproofing was weak. You do not want a pretty bathroom that fogs up, traps moisture, and grows mildew because the fan was undersized or loud enough that nobody uses it.
Put money into the parts that control moisture, comfort, and use:
- proper waterproofing behind tile
- a fan that clears moisture and vents correctly
- lighting at the mirror, not just overhead
- storage that keeps counters clear
- a layout that leaves enough elbow room at the toilet, vanity, and shower
1930s Bathroom Design is a helpful reference here because bathrooms fail in small details: storage, clearance, lighting, materials, and how much of the old room was worth respecting in the first place.
Living Rooms and Bedrooms: Easier Wins, If You Stay Honest
These rooms tend to give better value when the structure and envelope are already sound.
Paint, flooring repair, better trim, built-ins, better lamps, cleaner furniture layout, and stronger window treatments can change the room without opening every wall. That is useful. But do not pretend surface work is enough if the windows leak, the floor sags, or the insulation is poor. Cosmetic work is worth doing when the bones are not fighting you.
Why the Room Still Feels Incomplete
This is where decorating stops being fluff and starts doing real work.
A lot of remodels stop too early. The cabinets are in. The walls are painted. The floors are done. Technically the room is finished. But it still feels flat or temporary.
The missing layer is often not another hard finish. It is the softening and framing layer that makes the room feel inhabited.
- Window treatments: these shape light, reduce glare, soften hard edges, and keep the room from feeling unfinished.
- Layered lighting: one central fixture almost never carries a room well by itself.
- Rug scale: too-small rugs make rooms feel chopped up.
- Art and vertical elements: blank walls make finished rooms feel like they are still waiting for something.
- Concealed storage: if everything lives on open surfaces, the room never settles.
Also useful: How to Modernize a 1930s Home the Right Way is a strong reminder that updating a room is not the same thing as flattening it. Good decorating finishes the remodel. It should not erase the house.
Living Through the Job Is Its Own Project
Trying to live through remodeling is often harder than the work itself.
You need one clean zone that is not part of the project. You need one functioning bathroom. You need some version of a temporary kitchen if the real one is down, even if that just means a microwave, coffee station, small fridge, and folding table. You need a place for tools, deliveries, and debris that does not take over the whole house.
You also need a dust plan. Not a hope plan. Plastic barriers, floor protection, frequent vacuuming, covered returns and vents in the work zone, and a routine for cleanup at the end of each day. Open too many fronts at once and the job stops feeling like progress and starts feeling like a low-grade emergency.
Sequence Matters More Than Style
A lot of wasted work comes from doing things in the wrong order.
- measure and plan
- price the work and order the long-lead items
- permit what needs permitting
- demo only what the next step is ready to replace
- do structural, plumbing, electrical, and HVAC rough work
- insulate and close the walls
- install substrate, cabinets, flooring, tile, and trim in the right order for the room
- finish with fixtures, hardware, paint touch-ups, and punch list work
Impatience makes projects cost more. Finish materials move faster once the hidden work is done and inspected.
What to Check Before You Call It Done
- Doors and drawers: open, close, and align properly.
- Fixtures: no leaks, no wobble, no missing trim plates, no loose caulk lines.
- Lights, switches, fans, outlets: all tested, not assumed.
- Tile and flooring: no bad transitions, obvious hollow spots, cracked grout, or lippage that should have been caught earlier.
- Paint and trim: touch-ups done before furniture comes back and everyone loses patience.
- Ventilation and exhaust: working, not just installed.
- Punch list: written down room by room, not left floating in conversation.
FAQ
What should I remodel first in a house?
Start with anything causing damage, safety risk, or daily frustration. Water, structure, electrical, layout, and ventilation problems come before cosmetic upgrades.
Is it cheaper to remodel one room at a time?
Often yes, especially when cash flow is tight. Phasing reduces chaos and lets you recover between jobs. The exception is when multiple trades need the same walls or floors open at once.
What parts of a remodel are worth doing yourself?
Painting, basic demolition, simple trim, hardware, shelving, and cleanup are common DIY wins. Structural, plumbing, electrical, waterproofing, and layout work carry more risk.
How much contingency should I keep?
Enough that one ugly surprise does not stop the job. Older houses need more breathing room than newer ones.
Do I need permits for remodeling?
Often for structural, plumbing, electrical, and layout changes. Check before work starts, not after the walls are open.
What gives the best payoff in daily use?
Better layout, better storage, better lighting, better ventilation, and fixing the things that already annoy you every day. Those improvements age better than trend-heavy finish swaps.
Read This Next
If the house is older and you are not sure whether to repair, preserve, or push harder, start with 1930s House Style for context, then use Common Problems in 1930s Houses to sort the issues that need attention first.
If your remodel is trying to update the house without scrubbing out its character, How to Modernize a 1930s Home the Right Way is the next step.
If the kitchen or bath is driving the project, go straight to 1930s Kitchens, 1930s Kitchen Renovation, and 1930s Bathroom Design for tighter room-by-room guidance.