Some 1930s kitchens look plain right up until someone ruins them.
The cabinets are simple, the sink wall is tight, the stove sits close to the counter, and the room can feel small next to a modern kitchen. Then one oversized refrigerator, one glossy floor, one island that never should have fit, or one full cabinet replacement flattens the whole thing.
A good 1930s kitchen update starts with restraint: keep the layout logic, the cabinet rhythm, the sink wall, the windows, and the durable materials that still work, and change only the parts that make the room dark, unsafe, cramped, leaky, or hard to clean.
Keep, Fix, Do Not Ruin
Before you choose paint, tile, cabinets, or appliances, sort the kitchen into three piles. This is the step that saves money, because it keeps the useful old parts out of the dumpster and sends the budget at the problems that actually make the room hard to use.
| Keep if sound | Fix first | Do not ruin |
|---|---|---|
| Built-in cabinet rhythm around the sink wall | Bad wiring, leaking plumbing, weak ventilation | Replacing every cabinet before measuring the old proportions |
| Deep enamel or cast-iron sink below a window | Slow drains, failed traps, leaking supply lines | Installing a trendy faucet or thick counter that fights the wall |
| Old tile, linoleum, or wood floor if stable | Loose layers, rot, trip edges, water damage | Covering the floor with glossy gray plank or fake distressing |
| Original trim, window placement, and modest scale | Dark corners, poor task light, broken storage | Adding an island or deep refrigerator that blocks circulation |
The question is not whether the kitchen should stay frozen in 1935 — it should not. The question is whether the update understands what gave the room its shape before it starts replacing everything in sight.
What Made 1930s Kitchens Different
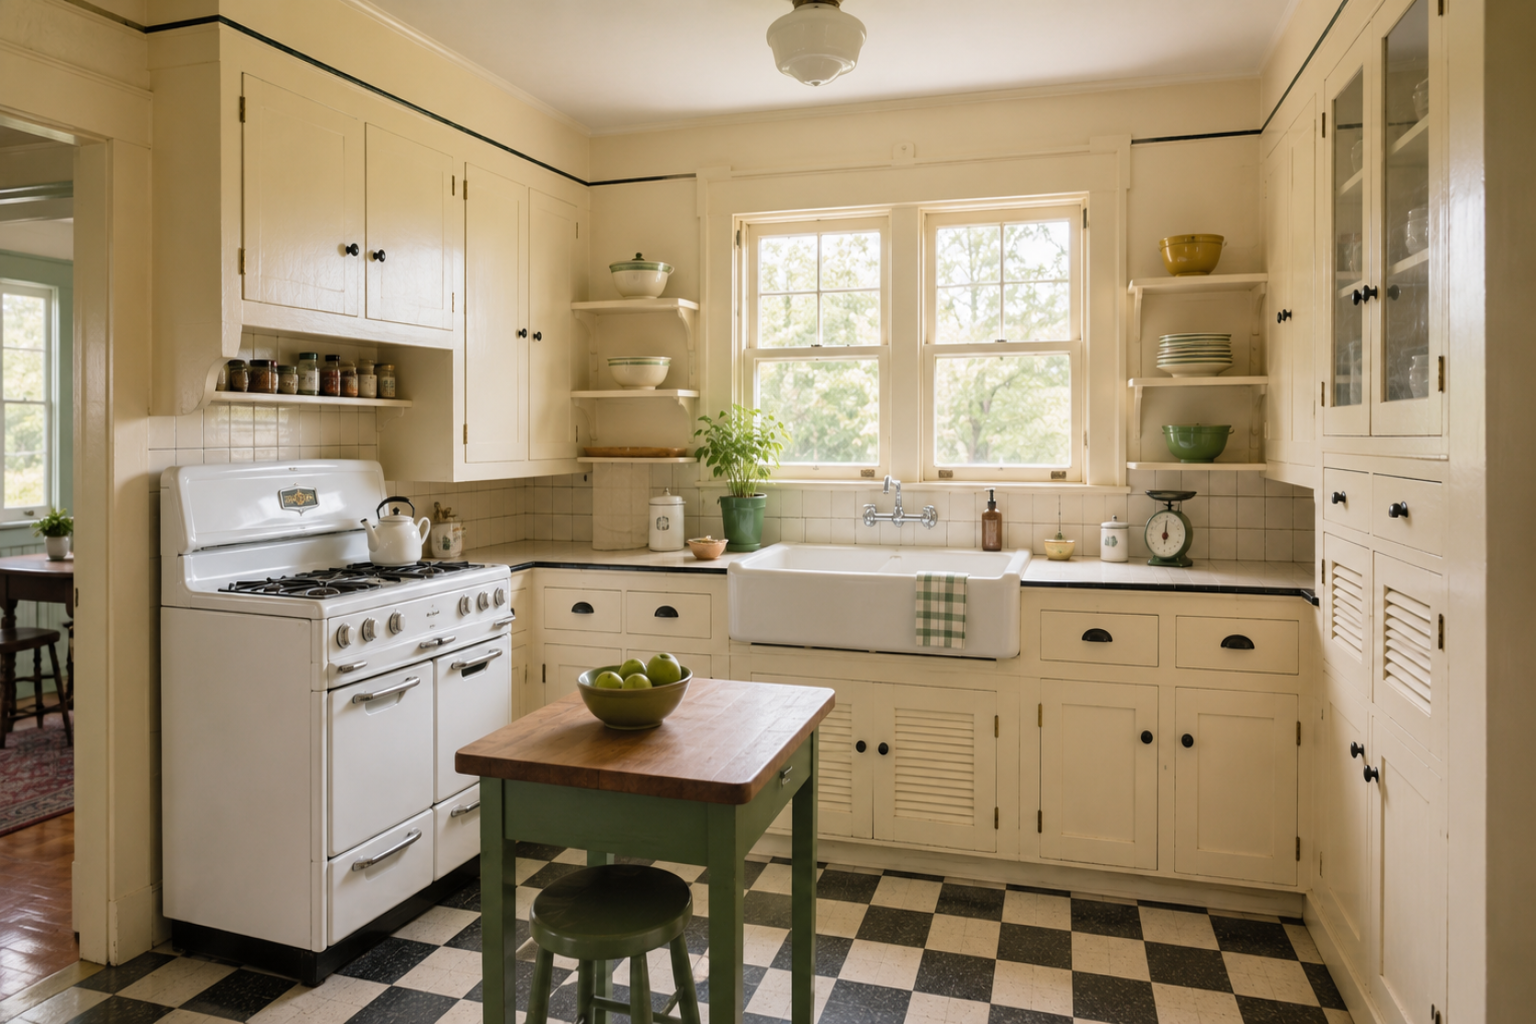
A 1930s kitchen was not built to be the social heart of the house. It was a compact workroom with short steps between washing, cooking, storing, and serving. That is exactly why the room so often feels wrong after a heavy remodel: the renovation adds size, shine, and convenience, but quietly removes the small decisions that made the kitchen work — a sink under the window, cabinets built to the wall, a modest range, a durable floor, counters that supported the job instead of dominating the room.
The strongest examples tend to share a few parts: painted built-in cabinets with simple doors, narrow rails, and modest hardware; a deep enamel or cast-iron sink, usually below the main window; durable floors like linoleum, tile, or surviving old wood; and a quiet Art Deco influence carried through geometry, tile, chrome, or controlled contrast. Those are not decoration. They are the room's working language, and lose all of them and the kitchen may still function while feeling cut loose from the house around it.
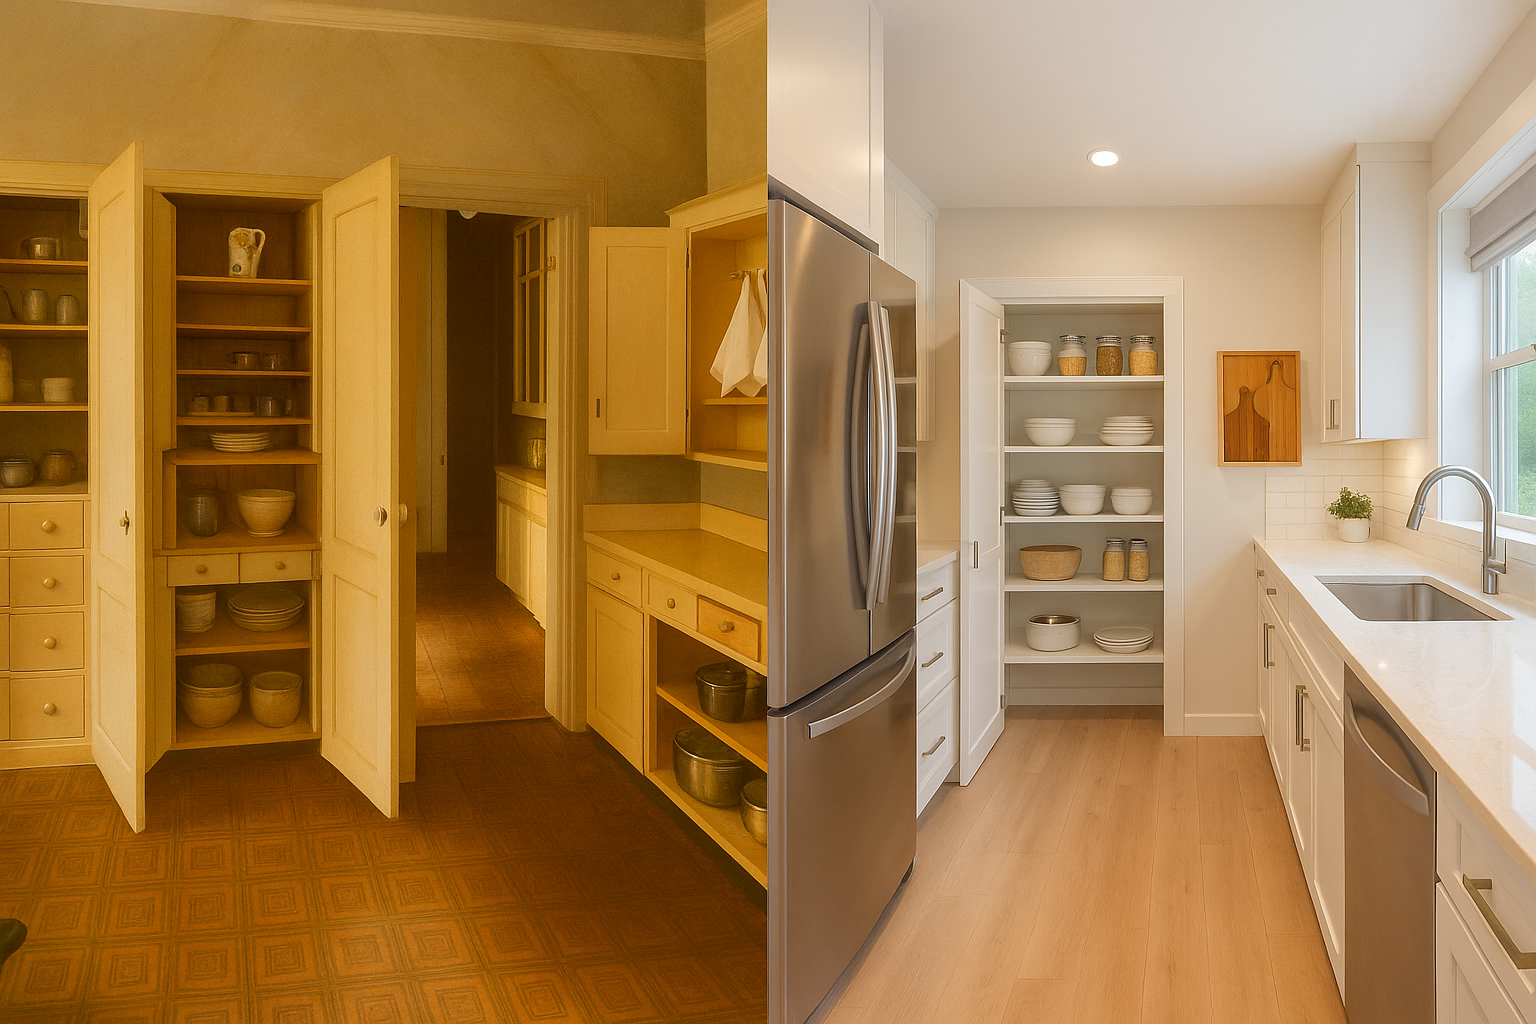
The Fitted Kitchen Is a Later Idea
Here is the part most 1930s kitchen advice gets backward, and it explains why so many "period" remodels still feel off.
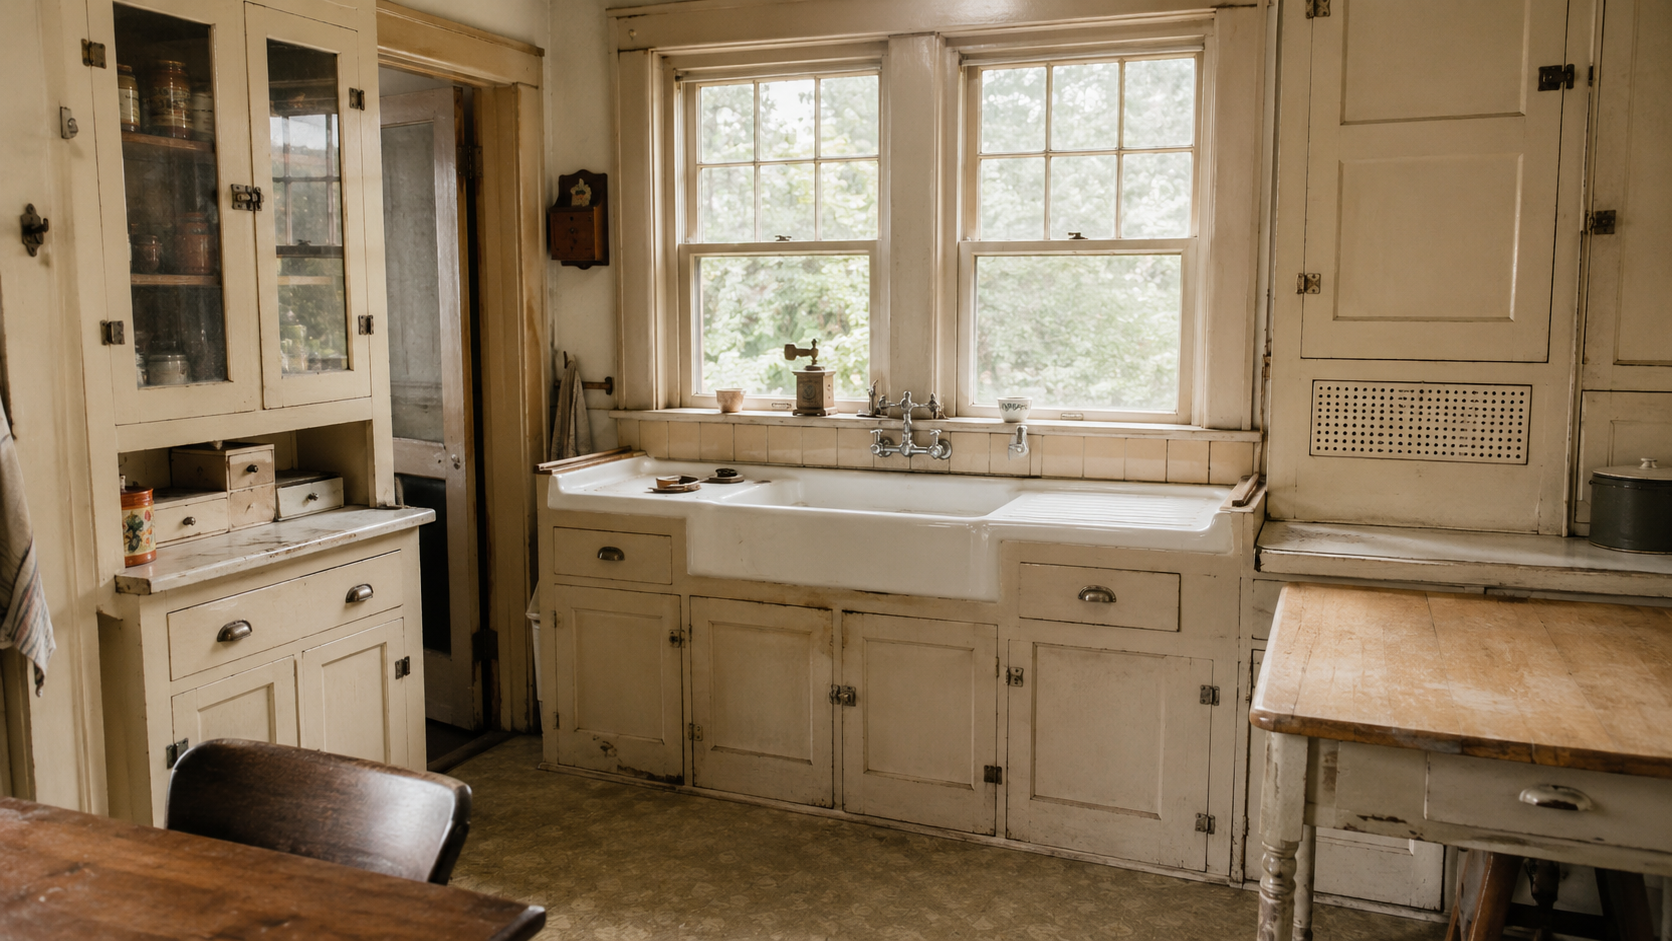
The seamless wall-to-wall run of matching cabinets we now picture when we say "a kitchen" is a later invention. Through the 1920s and into the 1930s, kitchens were furnished as much as they were built. The main work surface was often a freestanding piece — a Hoosier-style cabinet with a pull-out enamel top, or a plain enamel-top table parked out in the room — standing alongside whatever built-in cabinetry the house happened to have. The 1930s were the hinge: built-in runs were becoming standard, but the freestanding workhorse had not left yet, so a lot of genuine 1930s kitchens were a hybrid of the two.
That is why the 1930s kitchens that still read right to me are almost never a flawless bank of identical cabinets. They have a little mismatch built in — a painted run by the sink, an enamel-top table doing the prep, a stretch of open lower shelf, a freestanding cabinet holding the rest. Designers call that look "unfitted," and it is the look the period actually had.
So the most common way to wreck a 1930s kitchen is not a wrong color. It is installing a perfect modern fitted run, floor to ceiling and wall to wall, and then wondering why a brand-new "vintage" kitchen feels like a showroom corner instead of an old room. If you want the period, leave a seam in it. One freestanding piece, one length of open shelf, or one work table does more for the age of the room than any amount of retro hardware screwed onto a continuous run.
The Layout Was Small for a Reason
The small footprint is not always the problem. A lot of these kitchens worked precisely because the main tasks stayed close — sink, stove, prep surface, and storage gathered for daily work, with the center of the room left open to move through, rather than spread across a showroom.

In a narrow kitchen, a 36-inch aisle gets tight fast once cabinet doors, an oven door, and a second person are in the room; around 42 inches is more forgiving, but an older house does not always hand you that. The fix is usually shallower storage, better drawer planning, or a cleaner sink wall — not an island. And before opening a wall, ask what the removal actually solves. If the honest answer is only "the room will feel newer," that is not enough. A wider doorway, a better sightline, or a built-in breakfast area can do the job without erasing the kitchen's shape.
What People Notice Three Weeks Later
The first week after a kitchen update is about the look. Three weeks later, it is about the practical things, and that is where the wrong choices surface. The refrigerator door blocks the aisle. The new island makes the sink hard to reach. The cabinet that got pulled out had the only good storage for pans. The glossy floor shows every mark. The room photographs better and works worse.
That is why these kitchens need decisions in order: understand the layout, decide what to keep, fix the light and storage, then choose finishes. And if the work starts reaching past finishes — opening walls, disturbing old paint, moving plumbing, adding circuits — the project has left style behind and become a renovation, which is its own job. Read common problems in 1930s houses before you treat any of that as a surface-only project.
Cabinets Did Most of the Work
In a 1930s kitchen, the cabinets carry more than storage — they set the room's scale. Original ones often look tired because the paint is worn, the hardware is mismatched, or the drawers stick, and none of that means the run is bad. The proportions may still beat most replacement boxes.

So look at the boxes, not just the paint. Are the face frames solid? Do the cabinets meet the wall and ceiling like they belong there? Do the doors suit the room? Does the sink wall still make sense? If the answers are yes, repair usually beats replacement — new hardware, drawer fixes, better hinges, interior organizers, and a controlled paint color keep the 1930s rhythm while making the kitchen easier to live in.
If the cabinets are rotten, badly altered, or sitting on top of wiring and plumbing that has to be opened, replacement may be the right call. But copy the old rhythm before you tear it out: measure the door sizes, the rail widths, the cabinet height, the toe-kick depth, and the way the uppers sit around the window. Read 1930s kitchen cabinets before replacing a run that still gives the room its shape.
The Sink Wall Is the Anchor
The sink wall is where a 1930s kitchen either survives or gets erased, and when I look at one of these rooms it is the first place I check. A deep enamel sink, a square tile backsplash, a wall-mounted faucet, simple trim, and painted lower cabinets can hold the entire room together. Swap that wall for generic counters, a trendy faucet, and oversized cabinets, and the kitchen may still be useful but it loses its age.
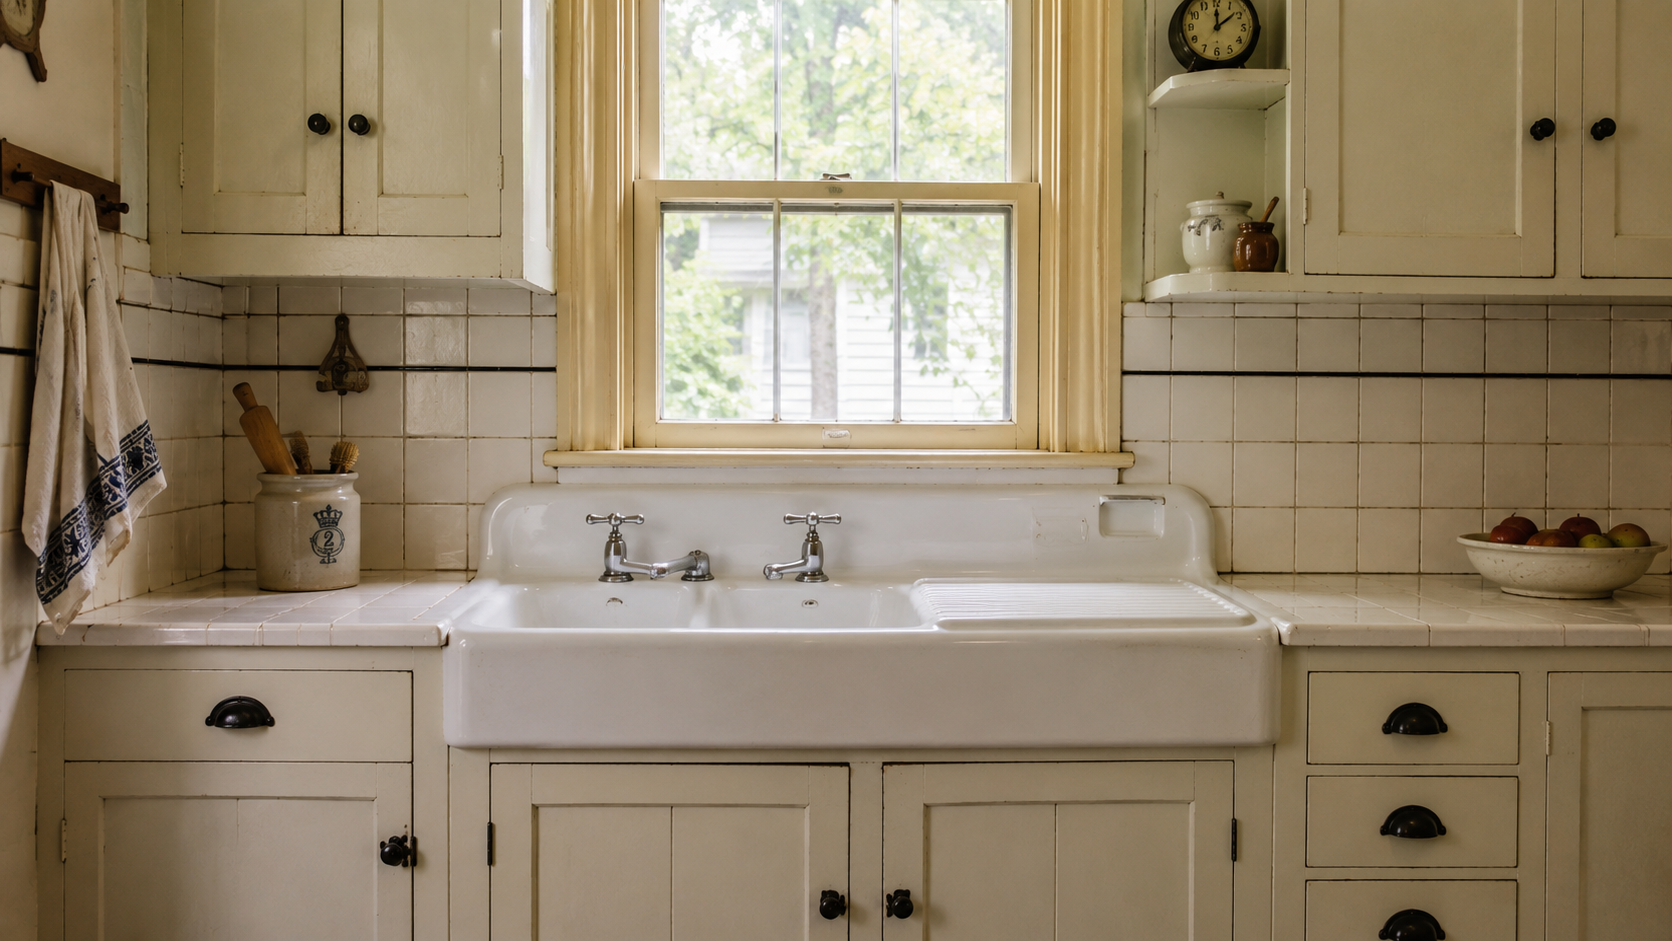
Check the sink itself before deciding anything. A good cast-iron or enamel sink is often worth keeping if there is no rust-through, major cracking, failed support, or layout conflict; faucet trouble, bad traps, slow drains, and leaking supply lines are plumbing problems, and they do not mean the sink is finished. This is also where small choices bite — a faucet that is too tall, a counter that is too thick, or tile that is too glossy can make the sink wall feel newly awkward. Keep those pieces quiet. Use 1930s kitchen sinks if the sink is one of the strongest features in the room.
Appliance Size Can Break the Whole Room
The fastest way to make a 1930s kitchen feel wrong is to force modern appliance depth into a room that was never planned for it. A refrigerator that sticks past the cabinet line changes more than the look — it narrows the aisle, blocks a door swing, interrupts the old cabinet rhythm, and makes the room feel smaller every single time someone walks through. The same goes for an oversized range, a bulky hood, a deep dishwasher panel, or an island dropped in because the room "needs more counter."
So choose appliances by depth, door swing, clearance, and sightline before you think about finish. A quiet modern appliance that fits the old wall beats a loud retro one that takes the room over.
Floors, Tile, and Color Should Work Hard
A 1930s floor had a job: take the wear, clean up easily, and keep a small room feeling orderly. That is why checkerboard, linoleum, small tile, and simple patterns still fit these kitchens. The mistake is picking a floor because it looks "retro" on its own, when it has to work with the cabinet color, the sink wall, the trim, and the light.
| Feature | Good direction | What can go wrong |
|---|---|---|
| Floor | Matte checkerboard, linoleum, simple tile, old wood where stable | Glossy tile, fake distressing, gray plank that fights the house |
| Cabinet color | Cream, ivory, pale green, muted blue, warm white | Cold gray, bright white everywhere, heavy black in a small room |
| Tile | Square tile, simple borders, quiet contrast | Busy backsplash patterns that overpower the sink wall |
| Hardware | Nickel, chrome, brass, cup pulls, simple knobs | Fake antique hardware that looks theatrical |
Let one feature lead. A patterned floor, colored cabinets, an original sink, a tile counter, and chrome lighting can all share a room — just not when every one of them is trying to be the main event.
Where Updates Start to Look Wrong
The room goes wrong when the update ignores scale. A 1930s kitchen can absolutely take modern appliances, better lighting, cleaner storage, and improved ventilation; it just does not need to become a 2020s kitchen wearing old hardware.
The failure points are easy to spot once you know them:
- The refrigerator is too deep. It pushes into the room and breaks the old cabinet line.
- The island is too large. It steals circulation from a kitchen that needed the open floor.
- The cabinets are too heavy. Tall pantry walls and thick doors overpower old windows and trim.
- The finish is too glossy. High shine turns a small old kitchen into a showroom corner.
The better update is quieter: improve the light, repair the cabinet run, add storage inside the boxes, choose a floor that belongs, and keep the sink wall readable.
Small 1930s Kitchen Ideas That Do Not Flatten the Room
Small kitchens need better inches, not louder features.
- Use vertical storage carefully. Tall, narrow storage often beats deep wall cabinets everywhere.
- Keep the sink wall calm. It is the visual anchor, especially under a window.
- Choose compact appliances. Depth matters as much as width in a tight room.
- Add light in layers. One ceiling fixture rarely covers prep, sink, and evening use.
- Protect the cabinet line. Do not let one oversized appliance or pantry tower overrun the old rhythm.
In a lot of these kitchens, a better drawer stack, a shallow pantry, a repaired cabinet run, and a brighter sink wall do more than a whole new layout.
When It Becomes a Remodel, Not a Style Update
There is a clean line between the two. A style update changes finishes, lighting, hardware, color, and storage without touching the room's working logic. A renovation moves systems, walls, plumbing, circuits, ventilation, or floor structure — and in a house this old, that can surface lead paint, old wiring, tired plumbing, asbestos-containing materials, or a rotten subfloor. Different job, different budget, different sequence.
If the kitchen needs that deeper work, keep the style lessons from this page but plan the project like a renovation. Use updating a 1930s kitchen when the work moves from style decisions into layout, systems, cost, and construction sequence.
1930s Kitchen Ideas by House Type
Bungalow Kitchens
Bungalow kitchens work best with compact cabinet runs, a strong sink wall, original trim, and useful built-ins. A small breakfast nook or a shallow pantry usually fits better than a large island.
Farmhouse Kitchens
A 1930s farmhouse kitchen can carry more warmth and wear — painted cabinets, simple open shelves, an enamel sink, wood windows, and practical counters all belong, as long as they do not tip into staged nostalgia.
Art Deco Kitchens
Art Deco influence works best in controlled doses: a geometric floor, a chrome light, a black border tile, a curved cabinet detail, a bit of crisp contrast. Too much Deco at once and the room reads like a set.
For the whole-house context, read 1930s house style before letting the kitchen drift away from the architecture around it.
FAQ
What are the main features of a 1930s kitchen?
Common features include compact layouts, painted built-in cabinets, enamel or cast-iron sinks, linoleum or tile floors, square tile backsplashes, modest stoves, simple hardware, restrained Art Deco influence, and often a freestanding work cabinet or table rather than a fully fitted run.
What colors work in a 1930s kitchen?
Cream, ivory, warm white, pale yellow, soft green, muted blue, and small black accents tend to fit the period better than cold gray, stark white everywhere, or high-gloss novelty colors.
Should I keep original 1930s kitchen cabinets?
Keep them if the boxes are solid, the proportions fit the room, and the layout still works. Repair, repaint, and upgrade the interior storage before assuming replacement is better.
Can a 1930s kitchen have modern appliances?
Yes. Choose appliances by size, depth, and finish before style. A quiet modern appliance that fits the old cabinet line usually works better than a loud retro one that dominates the room.
Is a checkerboard floor right for a 1930s kitchen?
It can be. Scale, finish, and contrast decide it. A matte checkerboard reads period-aware; a glossy or oversized version looks staged.
Should I open up a 1930s kitchen?
Only if the wall change solves a clear layout or light problem. A wider doorway, a better sightline, or a partial opening can protect more character than removing every boundary.
Read This Next
- Updating a 1930s Kitchen Without Flattening the Room
- 1930s Kitchen Cabinets: What to Keep, Fix, and Copy
- 1930s Kitchen Sinks: Keep It or Replace It?
- Common Problems in 1930s Houses