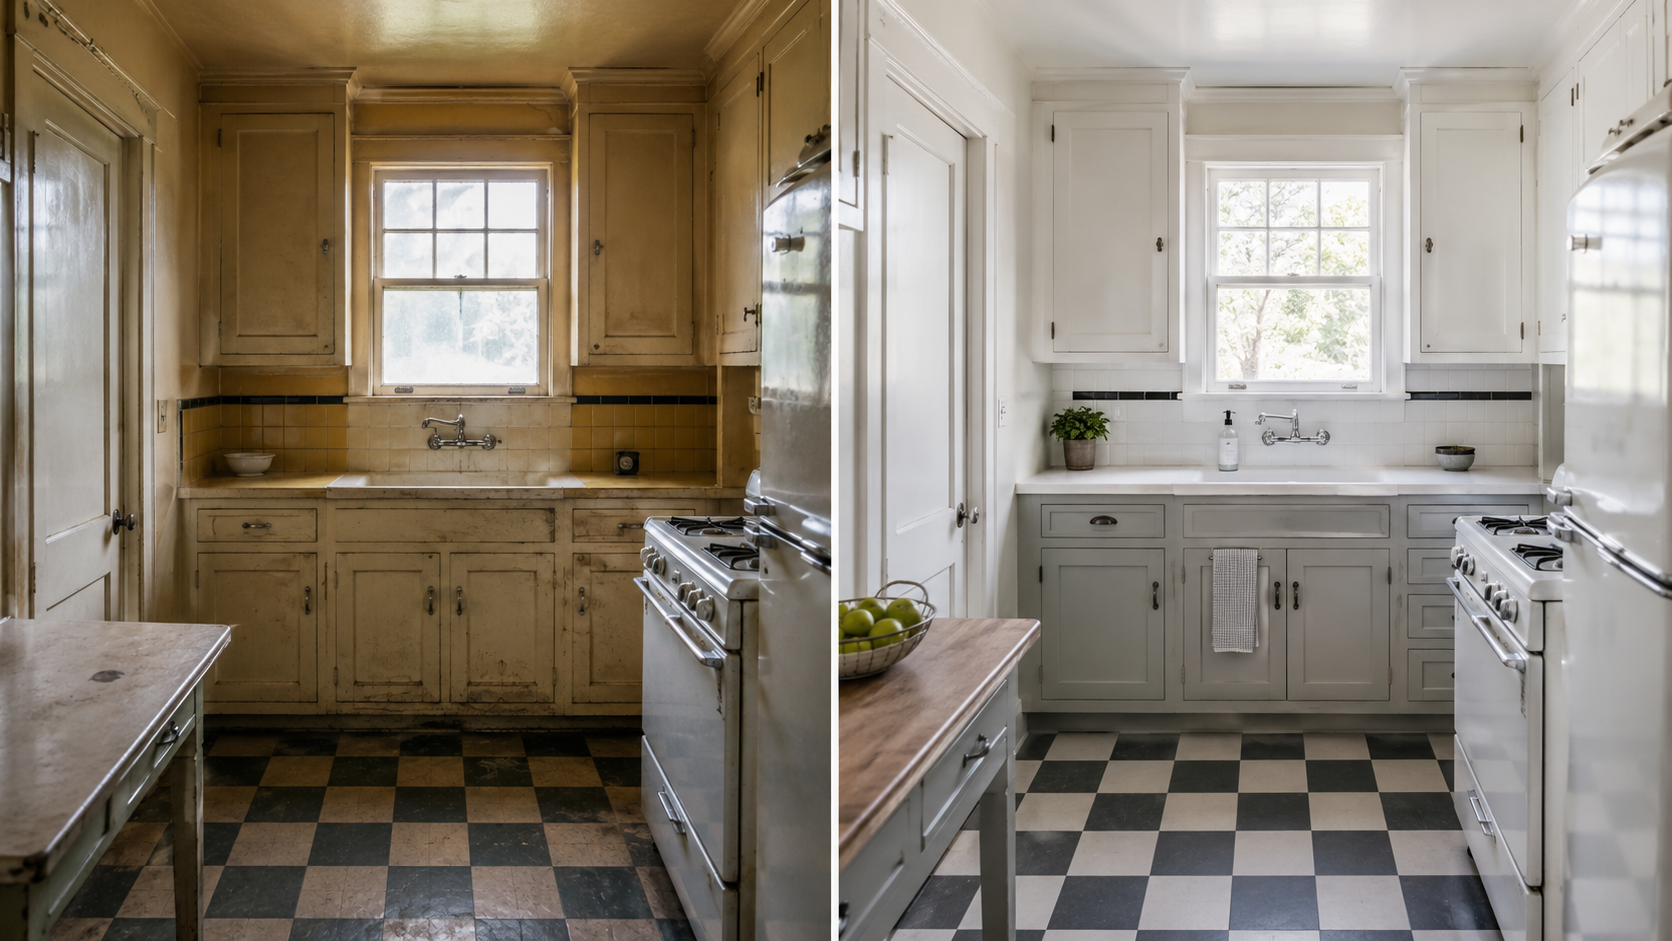
A 1930s kitchen remodel goes wrong when the visible work starts before the hidden work is understood.
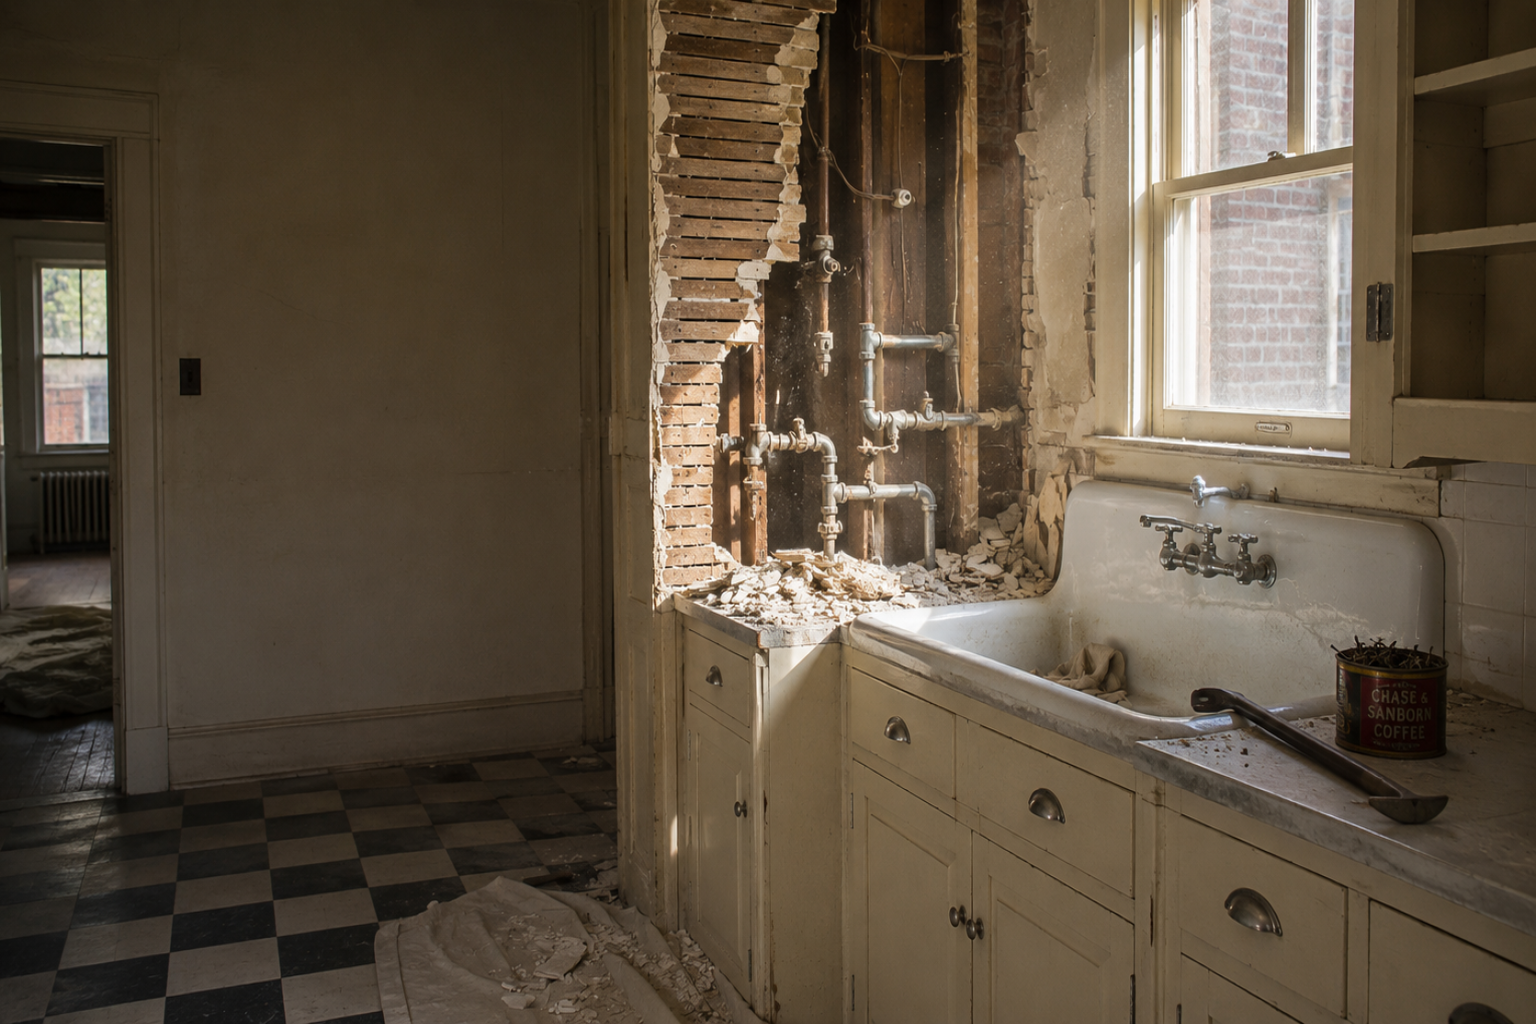
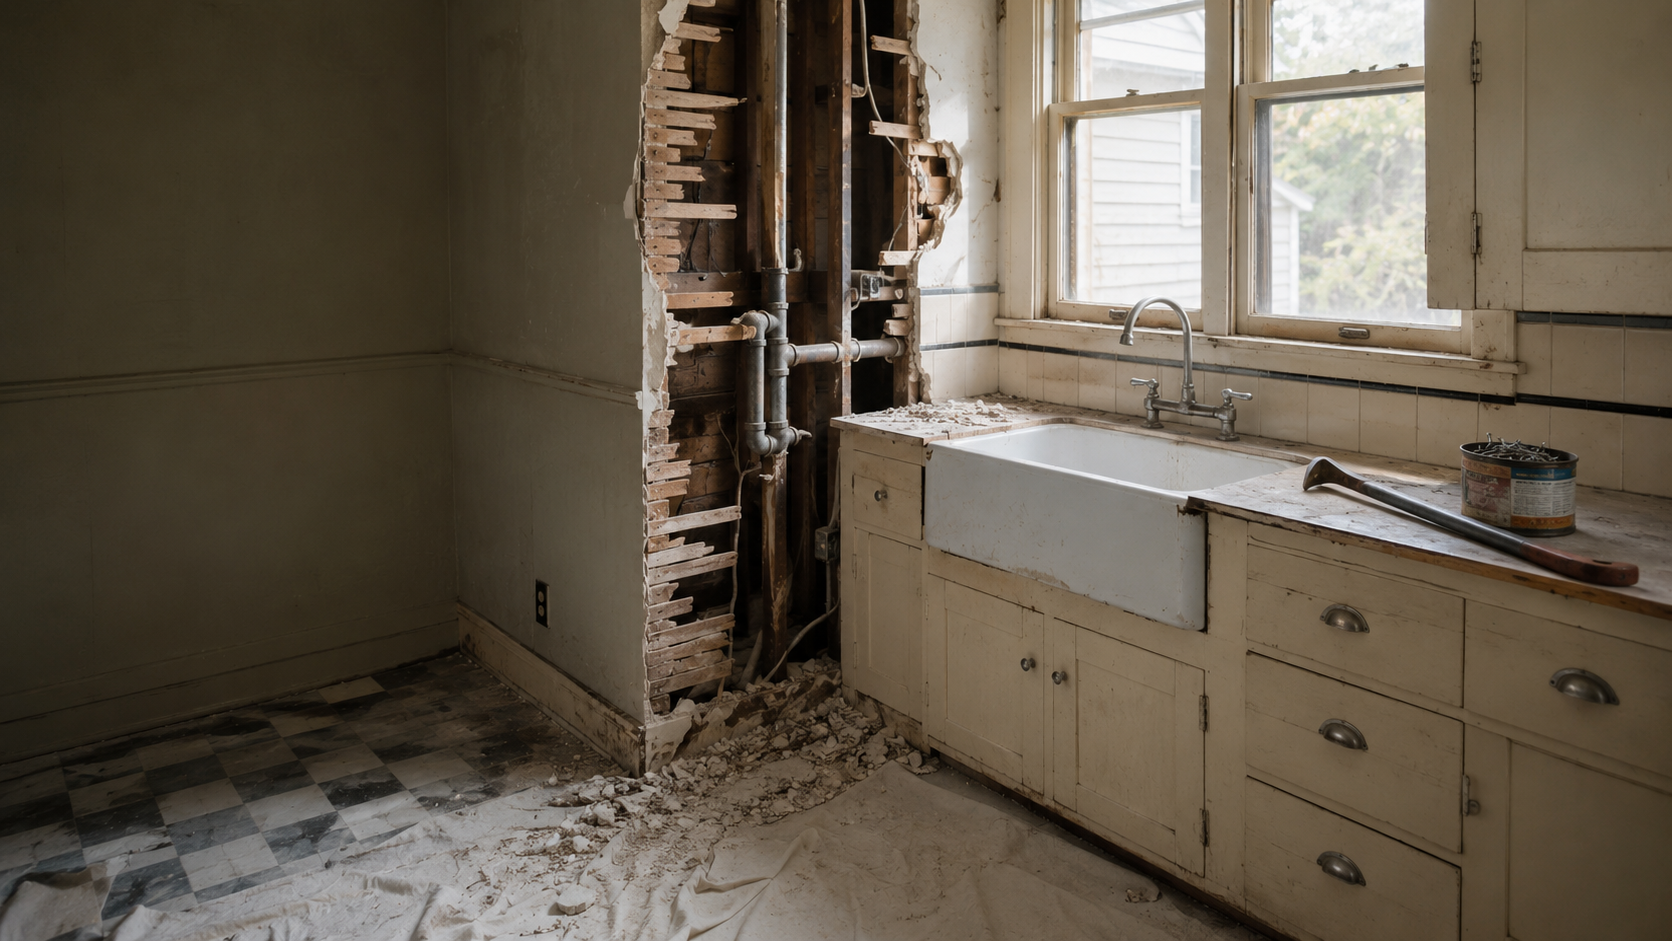
On paper it looks like a cabinet, counter, appliance, and flooring job. Then the first wall comes open on demolition day and the real decisions show up — old wiring, tired plumbing, a vent that goes nowhere, three layers of old floor, lead paint, missing blocking, a soft sink base, or a cabinet run that was holding the room together better than anyone gave it credit for. That is where the budget actually lives: not in the cabinet catalog, but behind the plaster.
The best remodel does not treat the kitchen like a blank slate. It keeps the cabinet rhythm, the sink wall, the windows, and the compact working layout where they still help the room, and it spends the money on the parts that make the kitchen unsafe, leaky, dark, cramped, or hard to clean.
For the style background — what a 1930s kitchen is and what is worth keeping for looks — start with 1930s kitchens. This page is the construction side: what to inspect, what to keep, what to replace, where the budget jumps, and what a wall hides until you open it.
Remodel the Room in the Right Order
The first thing I do in an old kitchen is leave the cabinet catalog closed and start measuring. Document what is there before deciding anything — photograph every wall, measure the cabinet runs, note the sink location, the window height, the floor layers, the door swings, the appliance depth, and where the old trim meets the cabinets. A 1930s kitchen is small enough that a four-inch mistake changes the whole room.
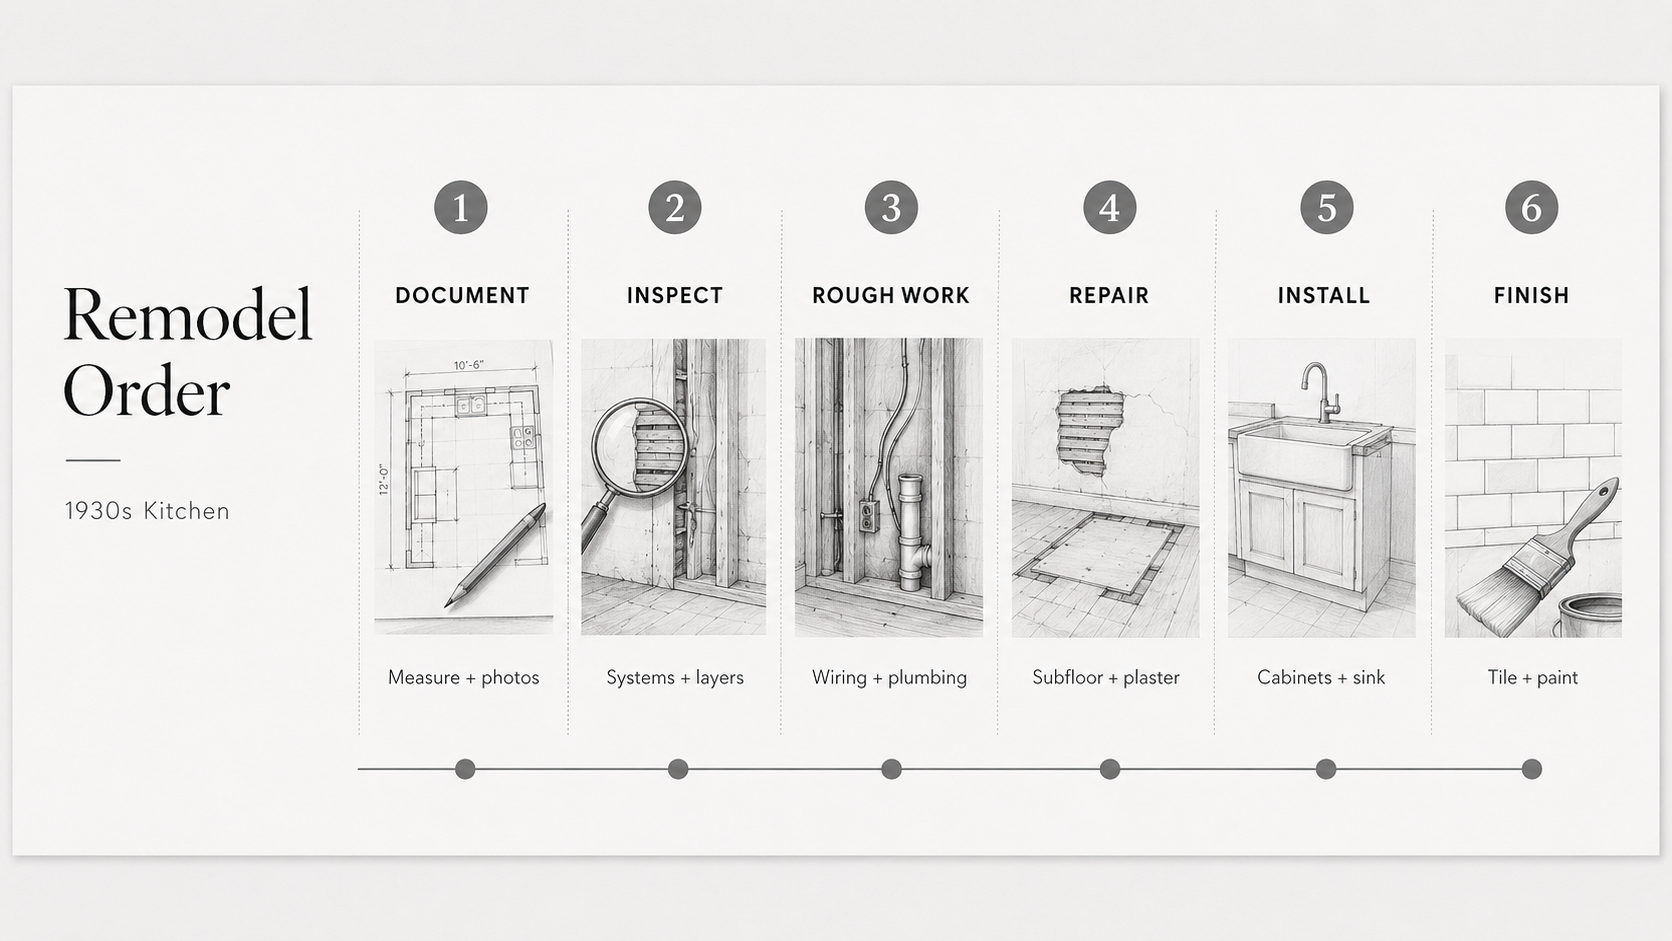
A safe sequence usually looks like this:
- Document the existing kitchen. Measure cabinets, sink wall, windows, doors, aisles, appliance openings, and floor transitions.
- Inspect the hidden work. Check wiring, plumbing, ventilation, floor structure, old paint, moisture, and wall condition before any finishes are chosen.
- Decide what stays. Keep sound cabinets, sinks, trim, tile, and floor areas only where they still help the room work.
- Do rough work before finish work. Electrical, plumbing, venting, subfloor repair, and wall repair come before cabinets, counters, and paint.
- Choose finishes last. Floors, counters, hardware, color, and lighting should support the room, not paper over a bad sequence.
Reverse that order and you get callbacks. New cabinets trap old wiring. New flooring hides a damp subfloor. New counters get cut before the sink decision is settled. The room looks finished, and then the leak, the dead outlet, the cracked finish, or the bad clearance turns up a month later.
What to Inspect Before Choosing Finishes
A 1930s kitchen can hide expensive work behind ordinary surfaces. Before anyone picks tile, paint, or cabinet color, check the systems that decide whether the remodel can even be done cleanly.
| Check first | What can be found | Why it changes the remodel |
|---|---|---|
| Electrical | Old wiring, overloaded circuits, missing grounding, too few outlets | May require new circuits, outlet layout changes, wall access, and inspection |
| Plumbing | Corroded supply lines, slow drains, bad traps, hidden leaks | Can change the sink plan, cabinet layout, floor repair, and wall work |
| Ventilation | No exterior vent, weak fan, grease buildup, moisture stains | May require a real duct route, cabinet changes, soffit work, or an exterior penetration |
| Floor layers | Old linoleum, tile, uneven subfloor, water damage, possible asbestos concern | Can change demolition method, containment, height transitions, and cost |
| Paint and trim | Pre-1978 paint layers on cabinets, windows, doors, and trim | Can require lead-safe work practices, containment, cleanup, and certified contractors |
This is not a scare list. It is the difference between a controlled remodel and a project that finds its real budget the hard way, after demolition.
What to Keep If It Is Sound
Do not keep something only because it is old. Keep it because removing it would make the room worse. Original or period-correct pieces are worth protecting when they still have structure, proportion, and use left in them — a worn cabinet door can be repaired, a tired finish repainted, and a sink with bad plumbing may still be a perfectly good sink.

- Cabinet rhythm: keep the run if the boxes are solid, the proportions fit the room, and the layout still makes sense.
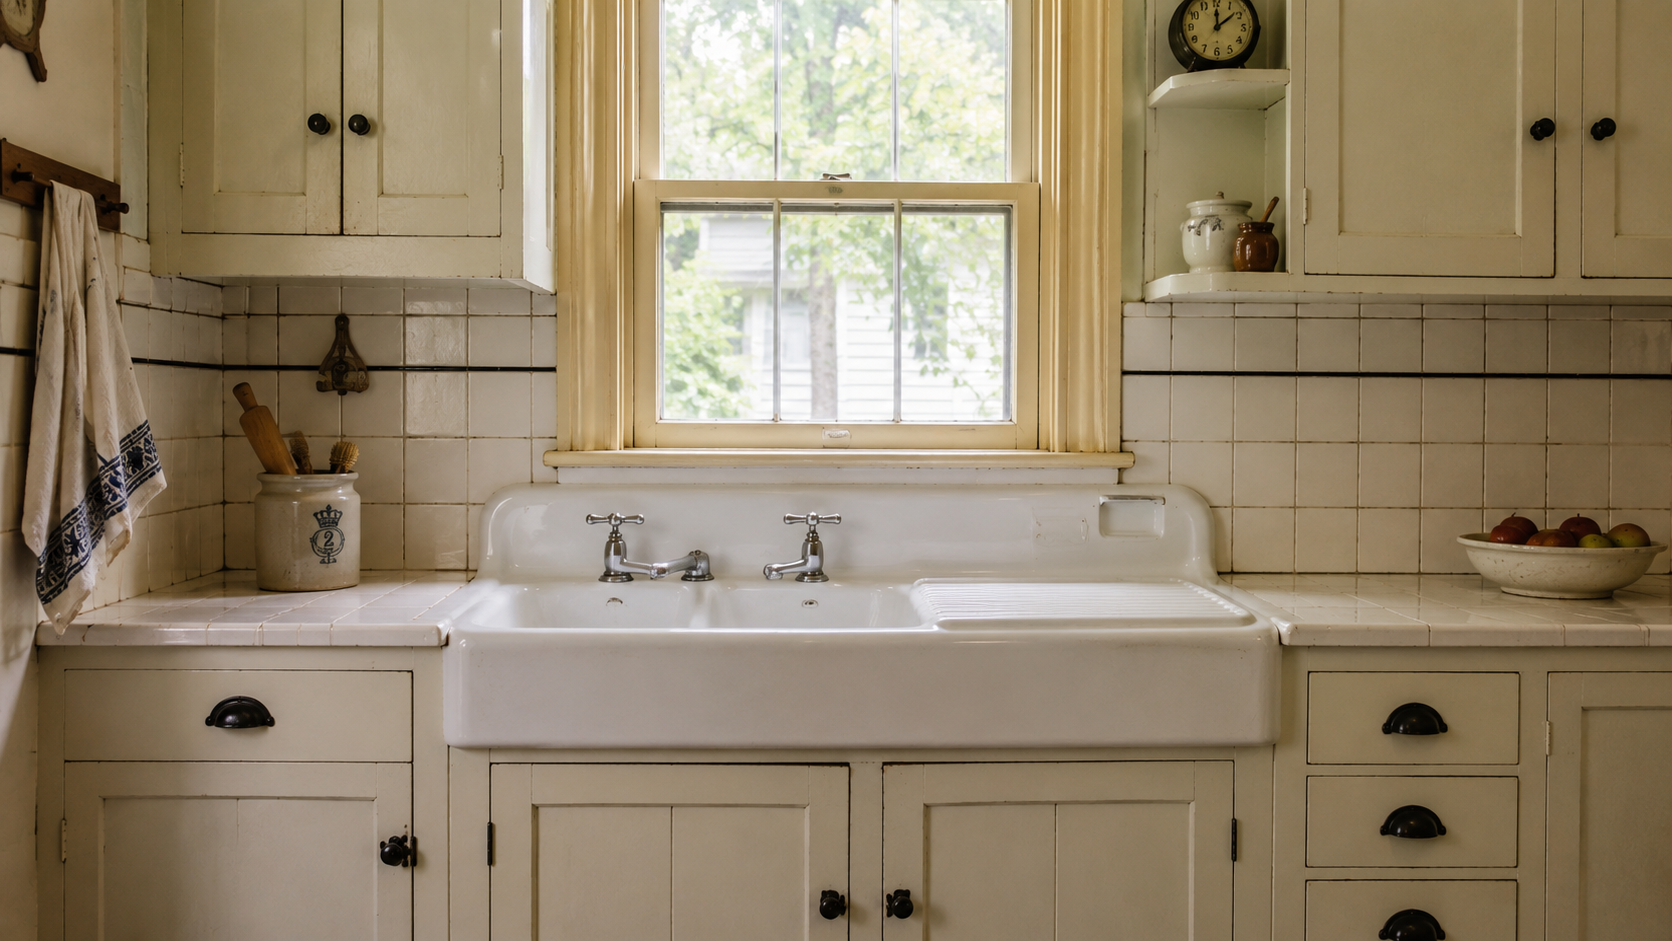
- Sink wall: keep a sound enamel or cast-iron sink if the support, basin, faucet plan, and plumbing can be made safe.
- Windows and trim: keep the original openings where they anchor the sink wall and tie the kitchen to the rest of the house.
- Stable floors or tile: keep them only where the substrate is sound and there is no moisture or hazardous-material concern.
Before removing anything, measure it. Door sizes, rail widths, cabinet depth, toe-kick height, window alignment, and sink position are all hard to recover once the dumpster leaves.
What to Replace Without Regret
Character does not excuse bad work. Some parts of a 1930s kitchen should be replaced or rebuilt because they create real risk or make daily life miserable, and the mistake there is not replacing them — it is replacing them with parts that ignore the room.
- Unsafe wiring needs proper review and correction before new cabinets and finishes close up the walls.
- Leaking plumbing needs to be fixed before new floors, sink bases, or counters go in.
- Poor ventilation needs a real exhaust plan, especially in a room with moisture, grease, or odor problems.
- Rotten cabinet bases should not be saved just because the doors look old.
- Failed flooring layers need proper removal or stabilization before a new finish floor goes down.
Replace the failed part, not the whole room by reflex.
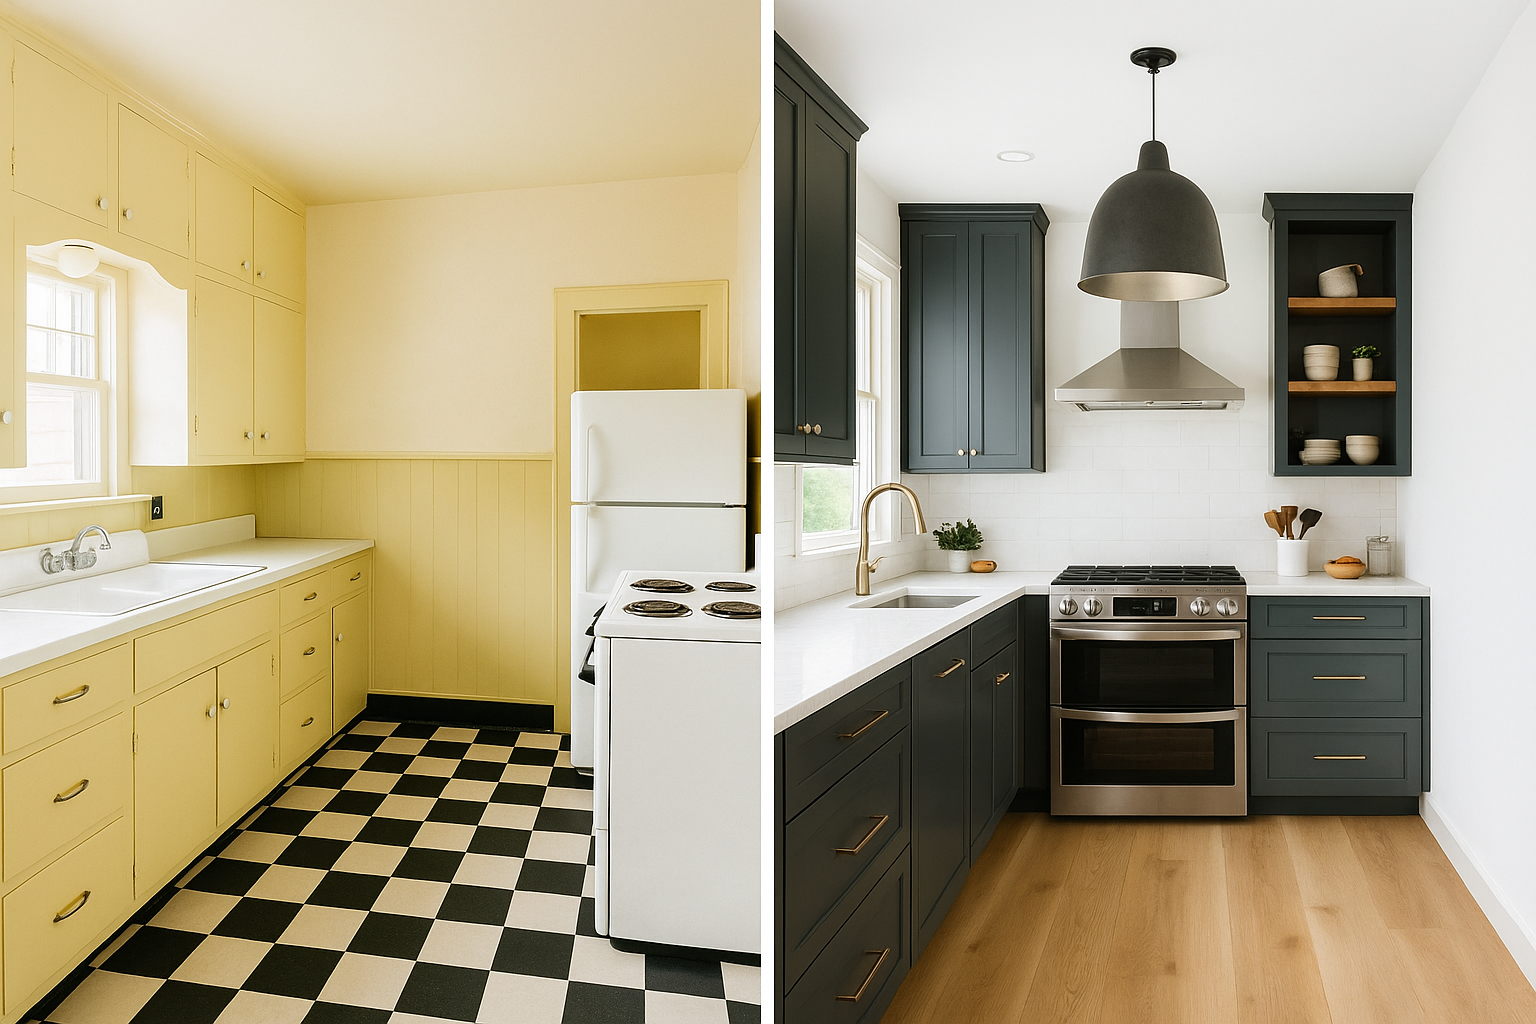
Cabinets Decide the Budget
Cabinets usually decide whether a 1930s kitchen remodel stays controlled or runs away from you. Repairing the existing ones can be cheaper, but only if the boxes are sound and the layout still works. Replacing them can solve storage, appliance, and plumbing problems at once — and it can also erase the room if the new cabinets come in too deep, too tall, too glossy, or too continuous.
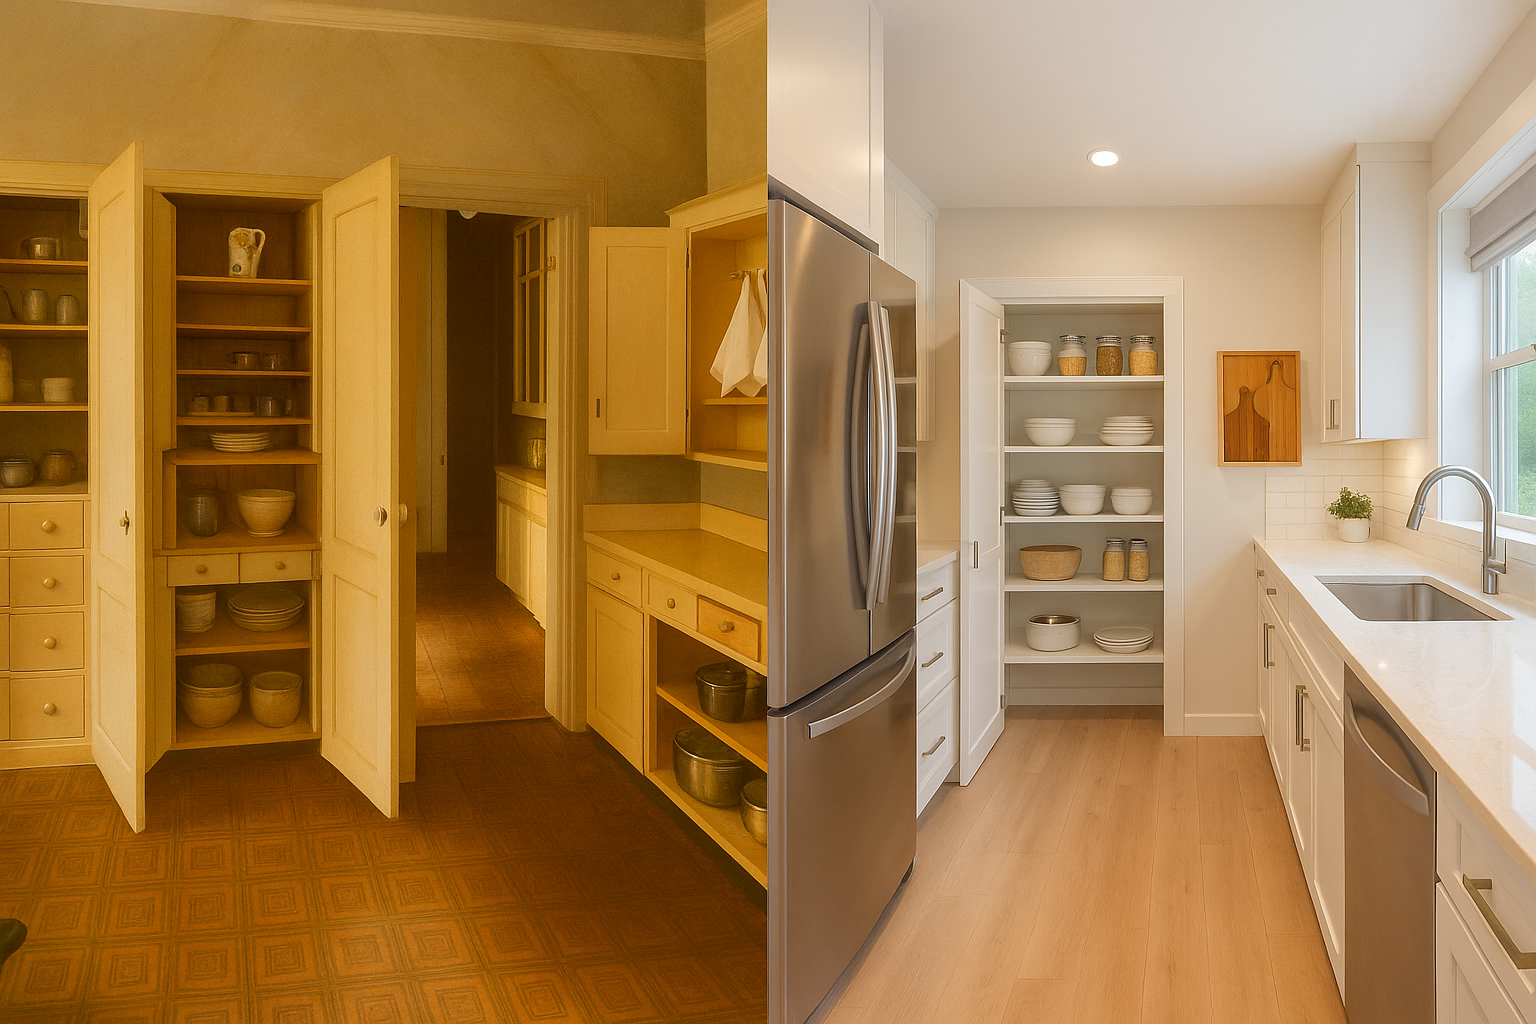
Cabinet repair usually means paint prep, drawer repair, hinge work, new hardware, interior organizers, and selective replacement of damaged parts. Full replacement means demolition, layout decisions, new boxes, finish panels, fillers, counters, appliance openings, electrical coordination, and often wall repair behind it all. That is exactly why the cheapest bid can mislead you: a cabinet tear-out that ignores plaster repair, floor gaps, old wiring, or a sink relocation is not the full cost — it is the part of the cost that fit on the estimate.
If the cabinets are the main decision, read 1930s kitchen cabinets before choosing repair, replacement, or a period-aware copy.
Sink, Counter, and Plumbing Decisions Are Tied Together
The sink is not just a fixture in these kitchens. It is often the wall that organizes the whole room. A deep enamel sink under a window grounds the space, but it also ties together the plumbing, the counter height, the cabinet support, the backsplash, the faucet reach, and the daily cleaning. Move one piece and the others move with it.
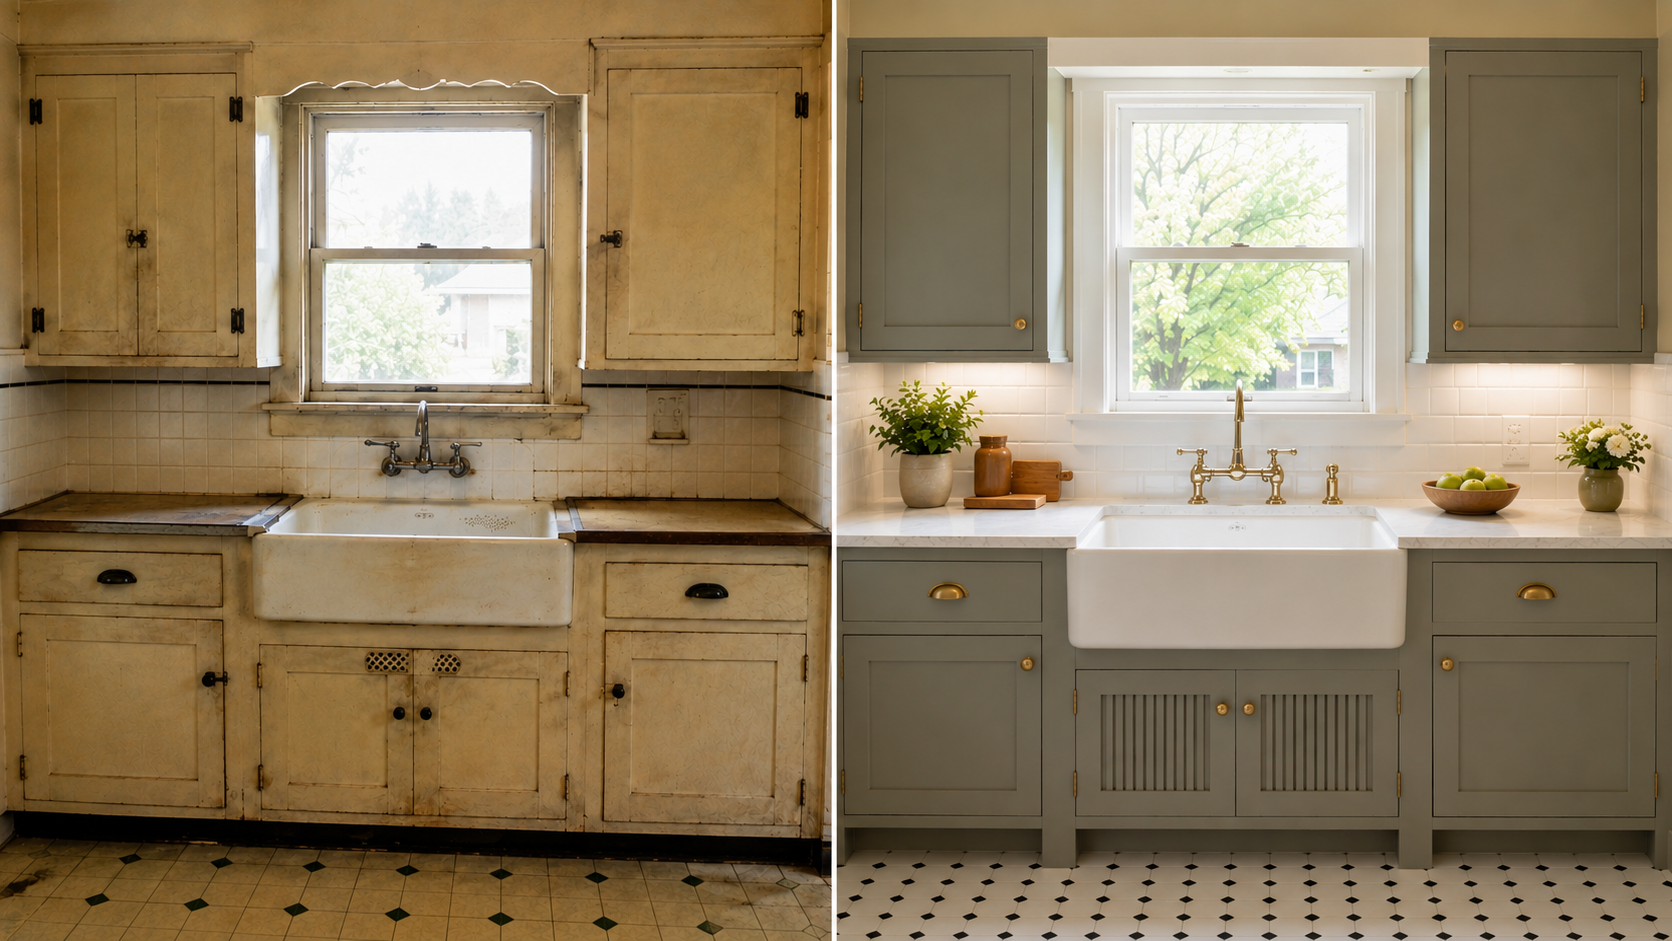
Keep the sink only after checking the cracks, the rust-through, the faucet condition, the trap layout, the shutoff valves, the cabinet support, and whether the plumbing can be updated without wrecking the wall. A chipped finish may be repairable; a leaking wall cavity is a different problem entirely. And keep the counter choices quiet — thick waterfall edges, glossy black stone, and loud faux-marble patterns overpower a modest 1930s room, while tile, restrained stone, durable laminate, and a little wood all work when the edge, sheen, and color stay controlled.
Use 1930s kitchen sinks before finalizing the sink, counter, faucet, and cabinet base together.
Appliance Depth Can Break the Layout
Appliance depth is one of the fastest ways to ruin a small 1930s kitchen. A refrigerator that sticks past the cabinet line narrows the aisle, blocks a door swing, dominates the window wall, and makes the kitchen feel smaller every single day. A large range does the same when the side clearance, the hood, and the counter space were not planned together.
In a compact room, look hard at:
- refrigerator depth against the cabinet line and the doorway path
- range width and whether there is real landing space beside it
- dishwasher door swing near the sink and cabinet openings
- hood size and duct route before the upper cabinets are ordered
A quiet modern appliance that fits the wall almost always beats a loud retro one that takes the room over.
Opening the Kitchen Without Erasing It
Some 1930s kitchens genuinely need more light or a better connection to the next room — but that does not mean every wall should disappear. A larger doorway, a widened arch, a pass-through, or a partial opening can improve movement while keeping the kitchen legible as a room, which matters in houses where the kitchen was built to have edges.
Before removing a wall, check what is above it, inside it, and below it. A kitchen wall can carry framing, ducts, pipes, wires, or old plaster transitions that change the whole job — the design decision is never separate from the structure. The better opened-up kitchen rarely looks forced open. It just works better than it did.
Flooring That Still Feels Right
Kitchen flooring has to take wear, moisture, cleaning, and old-house movement, and it quietly sets the temperature of the room. Matte checkerboard tile, good linoleum, simple tile, and repaired wood all work; the wrong floor makes every other careful decision feel less convincing.
Be careful with high-gloss tile, fake distressing, plastic-looking laminate, and gray wood-look products that fight the rest of the house. If the kitchen opens to older wood floors, a calm transition usually matters more than a loud "vintage" surface. And check the substrate before choosing the finish — old floor layers can hide uneven boards, moisture damage, adhesive residue, or material that needs special handling.
Where the Budget Usually Jumps
A 1930s kitchen remodel gets expensive when the project crosses from finish work into systems, structure, or layout changes. The jump is not always a bad thing — sometimes it is the work that makes the kitchen safe — but it should be planned, not discovered after the cabinets show up.
| Decision | Why the cost jumps | Safer planning move |
|---|---|---|
| Moving the sink | Drain, vent, supply lines, floor/wall access, cabinet changes | Keep the sink wall if it still works |
| Replacing all cabinets | Demolition, plaster repair, floor gaps, fillers, counters, appliance openings | Price repair and selective replacement first |
| Opening a wall | Structural review, hidden wiring/pipes, ceiling repair, flooring patches | Test a wider opening or partial connection |
| Changing appliance sizes | Cabinet redesign, clearances, circuits, hood route, plumbing conflicts | Choose appliances before cabinets are ordered |
| Replacing floors | Layer removal, leveling, subfloor repair, hazardous-material concern | Inspect layers before choosing finish material |
The First Demolition Day Is Where the Truth Shows Up
The first demolition day is where the project stops being theoretical. The wall behind the sink shows old leaks. The cabinet base is soft where the finish looked fine. The floor has three layers under it. The range hood turns out to vent into the cabinet above it instead of outside. An outlet is sitting on wiring that cannot carry the load anyone planned for.
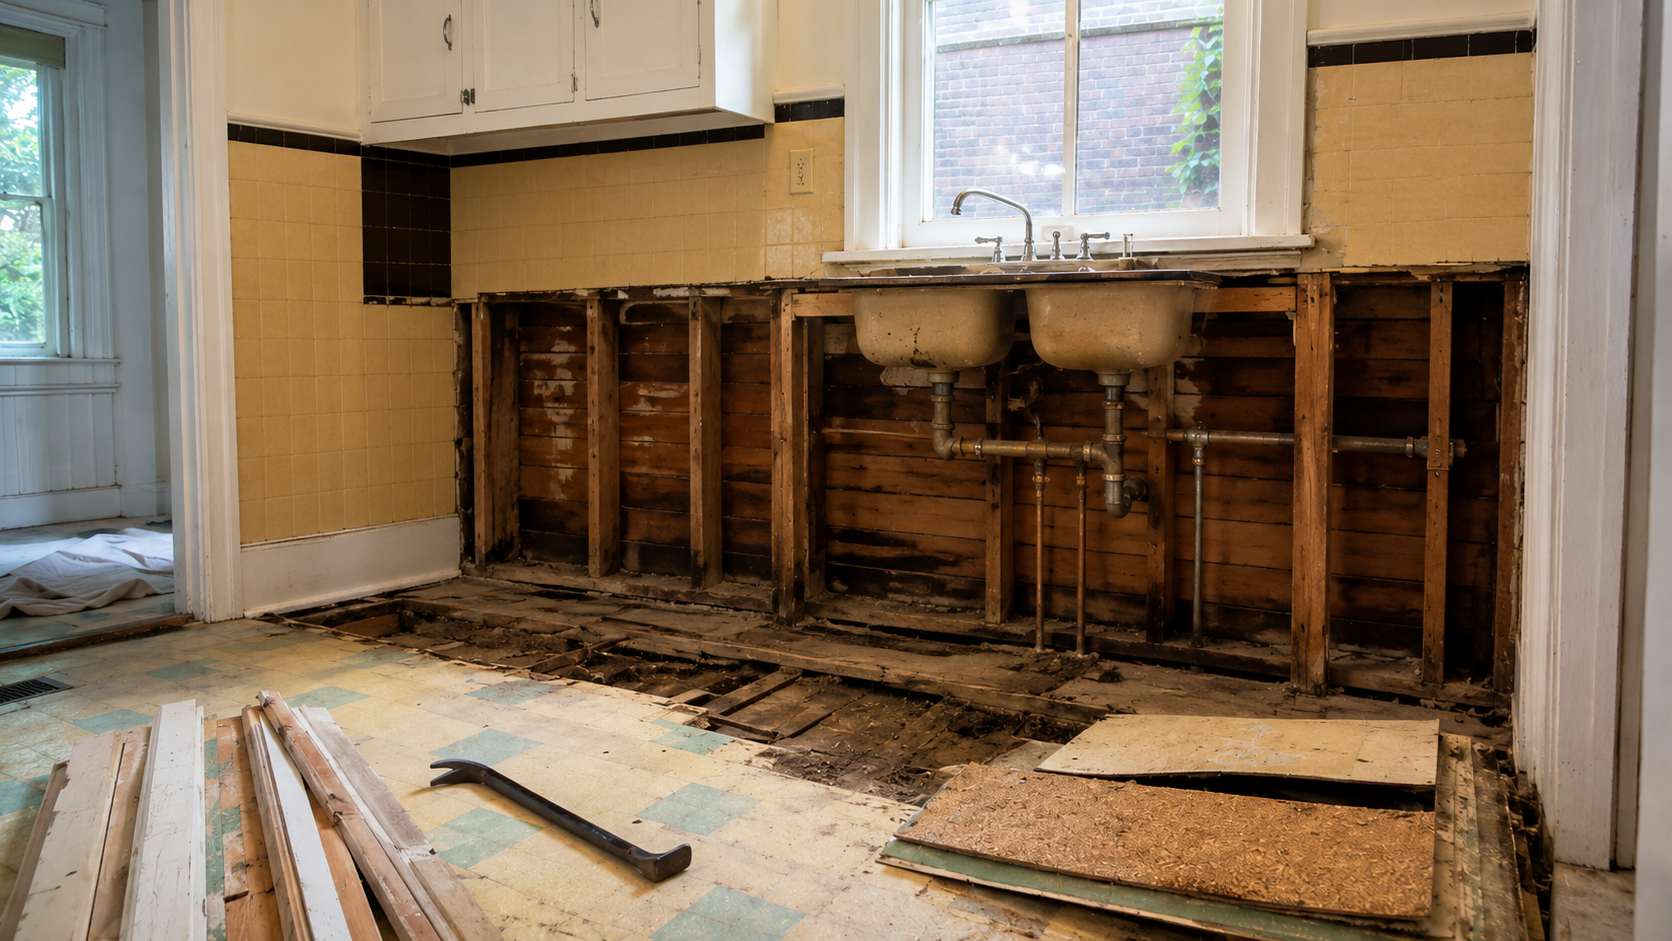
I have opened a sink wall that looked perfectly fine from the room and found the cavity behind it wet and soft, with the only honest fix running well past what the "sink wall refresh" was supposed to cost. That is why a good contractor will not promise a tight old-kitchen number before opening enough of the room to actually understand it. A small investigation phase usually saves money, because it keeps finished work from being installed over bad conditions and then torn back out.
So give the budget a contingency, and a real one. In an older kitchen, 10% is often too thin once walls, plumbing, wiring, or floors are being opened. The more you move, the more contingency the project needs.
1930s Kitchen Remodel Cost Ranges
These are 2026 planning ranges for typical U.S. conditions, based on current remodeling cost references and old-house risk factors — not quotes. Labor market, house condition, permit requirements, hazardous-material handling, cabinet quality, and how much of the room gets opened can all move the numbers fast. And because an old house adds lead paint, plaster, and aging systems on top of a normal remodel, a 1930s kitchen tends to land toward the higher end of each tier rather than the lower one.
| Scope | Planning range | Usually included | Usually excluded |
|---|---|---|---|
| Light update | $8,000-$25,000 | Paint, hardware, lighting, minor cabinet repairs, limited flooring or counter work | Major plumbing, full rewire, wall removal, full cabinet replacement |
| Selective remodel | $25,000-$60,000 | Cabinet repair or partial replacement, counters, sink work, lighting, flooring, appliance coordination | Major structural changes, extensive hidden damage, high-end custom cabinets |
| Full remodel | $60,000-$100,000+ | New or heavily rebuilt cabinets, plumbing/electrical upgrades, flooring, counters, appliances, ventilation, wall repair | Large additions, major structural rework, luxury finishes beyond the kitchen scope |
The lowest-cost good remodel is rarely the cheapest-looking one. It is the one that keeps sound original work, fixes the hidden problems, and avoids moving expensive systems without a strong reason to.
What to Avoid
Bad 1930s kitchen remodels tend to fail in the same handful of places:
- Replacing repairable cabinets with lower-quality new boxes that ignore the old proportions.
- Choosing appliances too late and discovering that depth, swing, or ducting breaks the layout.
- Opening the room without checking the load path, ceiling repair, floor patching, and mechanical conflicts.
- Using fake vintage details in place of durable materials, good scale, and quiet hardware.
- Installing finishes before systems are settled, which leads to rework, leaks, failed inspections, or damaged new surfaces.
The room does not need to look untouched. It needs to look like the remodel understood the house.
FAQ
What should I remodel first in a 1930s kitchen?
Start with inspection, not finishes. Check wiring, plumbing, ventilation, floor layers, moisture, paint, and cabinet condition before choosing cabinets, counters, or tile.
Should I keep original 1930s kitchen cabinets?
Keep them if the boxes are solid, the proportions fit the room, and the layout still works. Repair, repaint, and improve the interior storage before assuming full replacement is better.
How much does a 1930s kitchen remodel cost?
A light update may land around $8,000-$25,000, a selective remodel around $25,000-$60,000, and a full remodel $60,000-$100,000 or more once wiring, plumbing, cabinets, floors, ventilation, and hidden damage are involved. Old-house conditions tend to push toward the higher end.
Can I open up a 1930s kitchen?
Yes, but check structure, utilities, floor patching, ceiling repair, and the room's original shape first. A wider doorway or a partial opening often works better than removing every boundary.
Can I add modern appliances without ruining the kitchen?
Yes. Choose appliances by depth, door swing, clearance, finish, and ducting. A quiet appliance that fits the old cabinet line usually works better than a large retro one that dominates the room.
Is a checkerboard floor good for a 1930s kitchen remodel?
It can be, if the scale, finish, and contrast fit the room. A matte checkerboard or a quiet linoleum pattern usually works better than glossy tile or fake distressed flooring.
Read This Next
- 1930s Kitchens: What Still Works and What Gets Ruined
- 1930s Kitchen Cabinets: What to Keep, Fix, and Copy
- 1930s Kitchen Sinks: Keep It or Replace It?
- Common Problems in 1930s Houses
References
Sources used for this article
- National Park Service: Preservation Briefs
- National Park Service Preservation Brief 18: Rehabilitating Interiors in Historic Buildings
- EPA: Lead Renovation, Repair and Painting Program
- EPA: Protect Your Family from Sources of Lead
- Angi: How Much Does a Kitchen Remodel Cost? 2026 Data
- JLC: 2025 Cost vs. Value Report