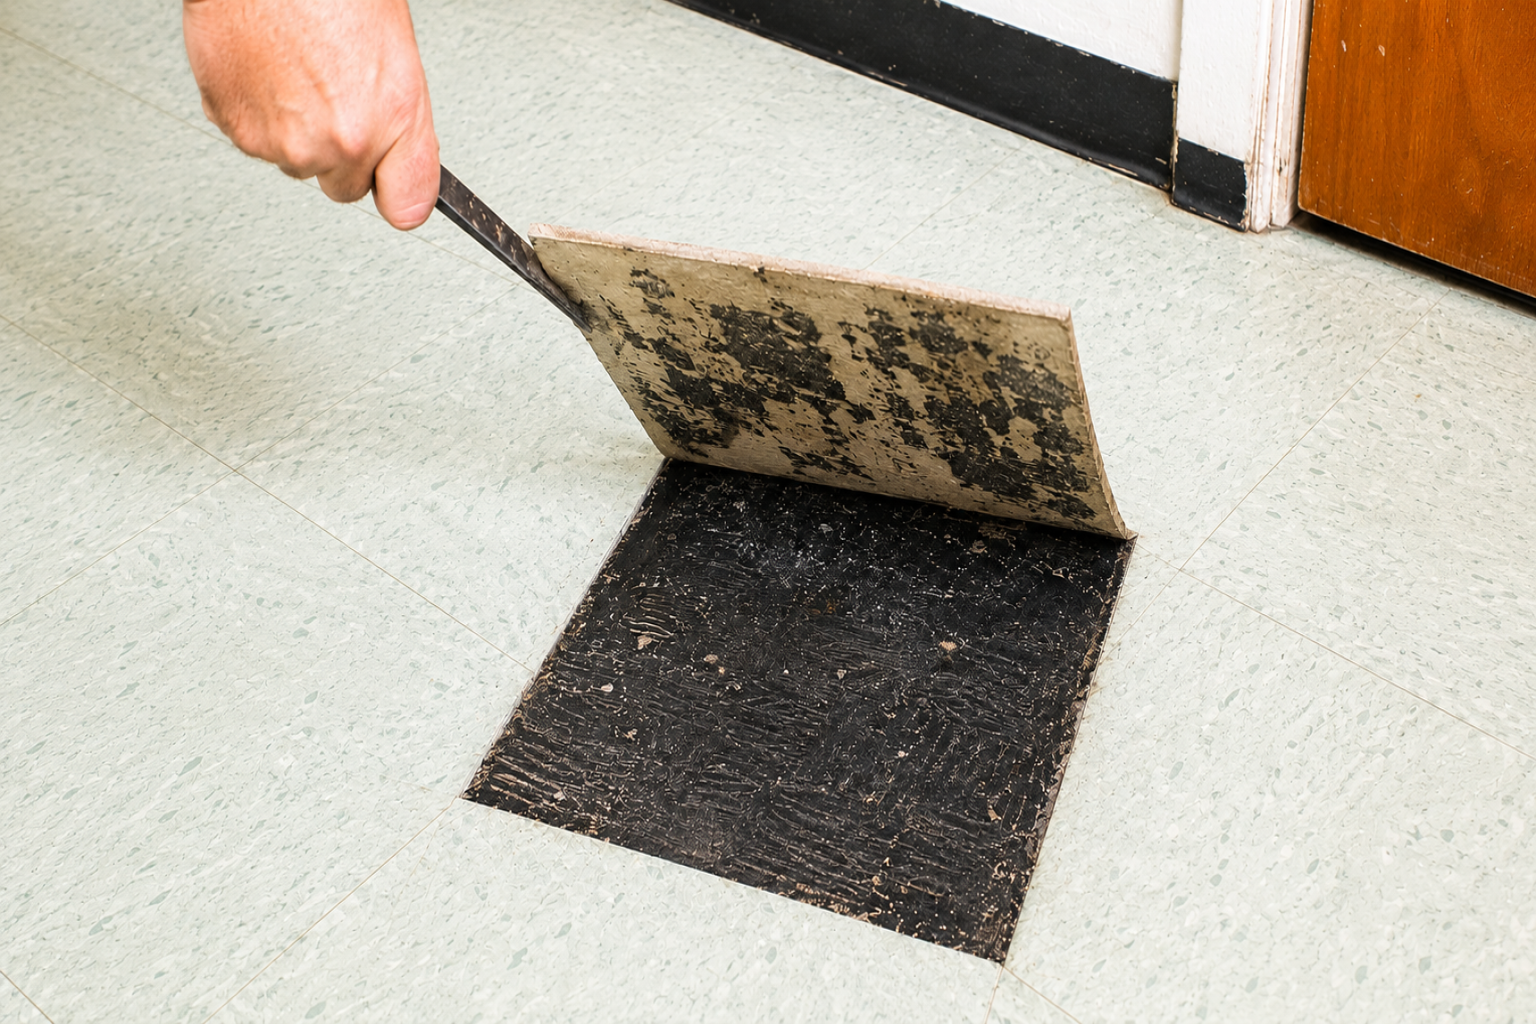
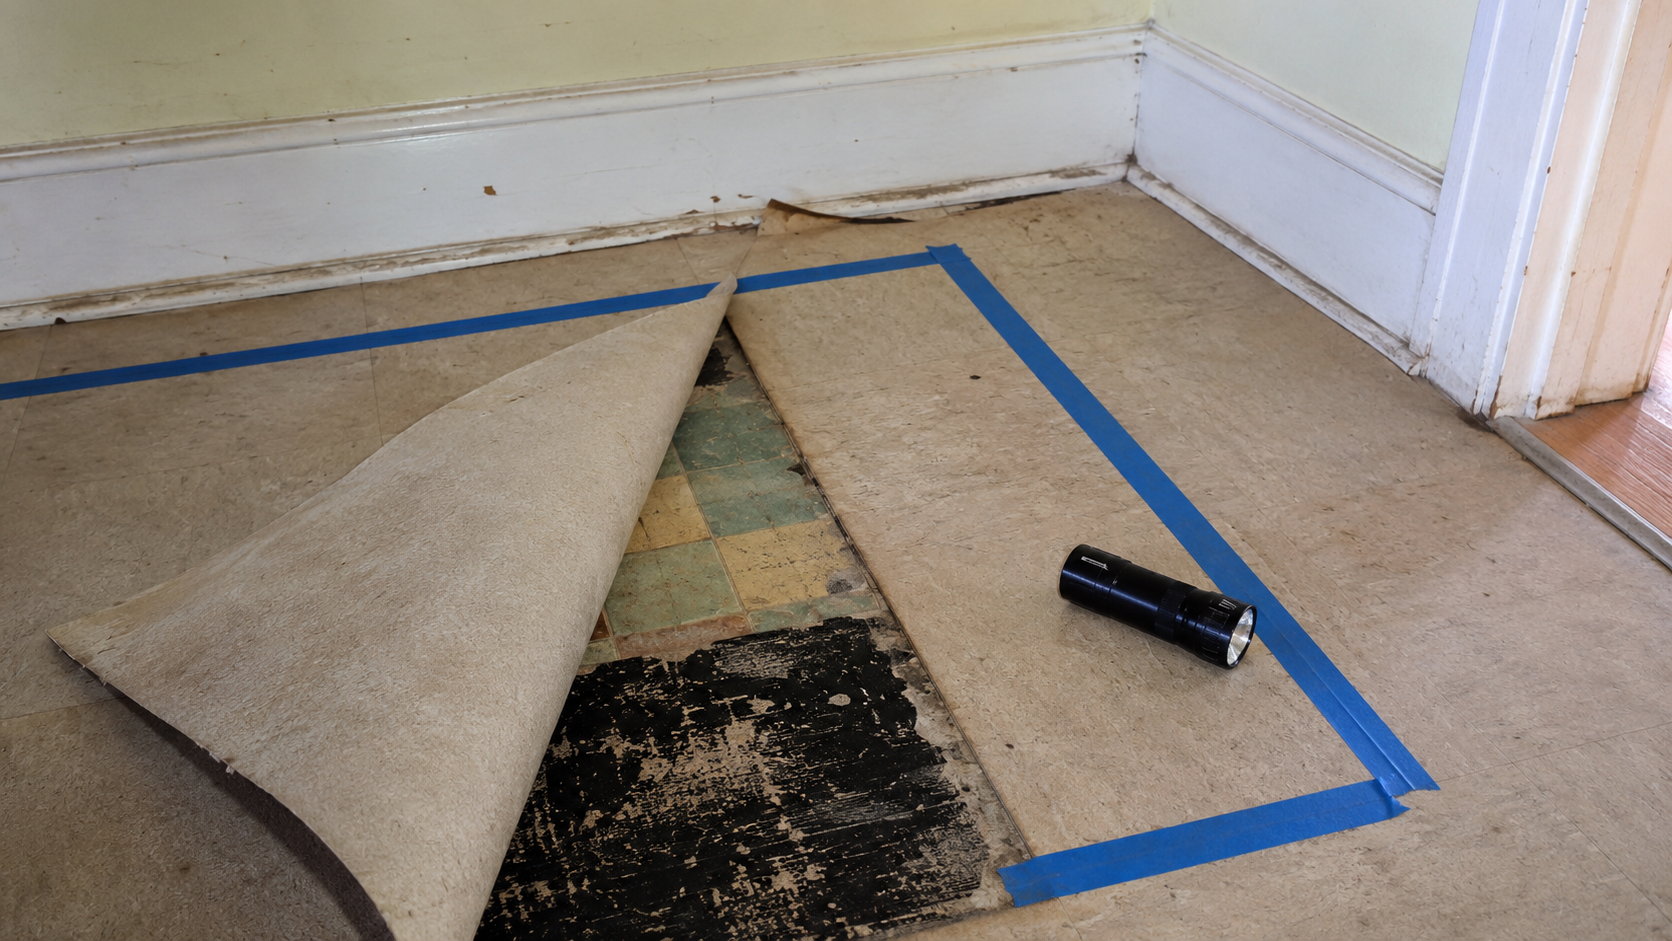
You pull up the carpet to check the subfloor. Underneath it is old square vinyl tile. Under the tile is black adhesive. You were not expecting either of them.
That is the moment most 1950s homeowners first think seriously about asbestos. Not when they buy the house. Not when they plan the renovation. When they are already into it and something unexpected is staring back at them from the floor.
This guide is for that moment — and for the smarter version of it, which is reading this before the floor comes up.
The goal is not to scare you away from renovating. It is to help you understand which materials in a 1950s house might contain asbestos, what happens if you disturb them, and how to make a reasonable plan before the work starts.
Start with the main rule: do not disturb suspect material
You cannot confirm asbestos by looking at it. Age, color, tile size, texture, or smell are clues at best. The only reliable answer comes from proper sampling and laboratory analysis, or from treating the material as presumed asbestos-containing until proven otherwise.
The safest working rule is simple:
- Do not scrape old flooring or adhesive.
- Do not sand textured ceilings.
- Do not cut pipe insulation or duct wrap.
- Do not break cement siding just to see what it is.
- Do not vacuum suspect dust with a household vacuum.
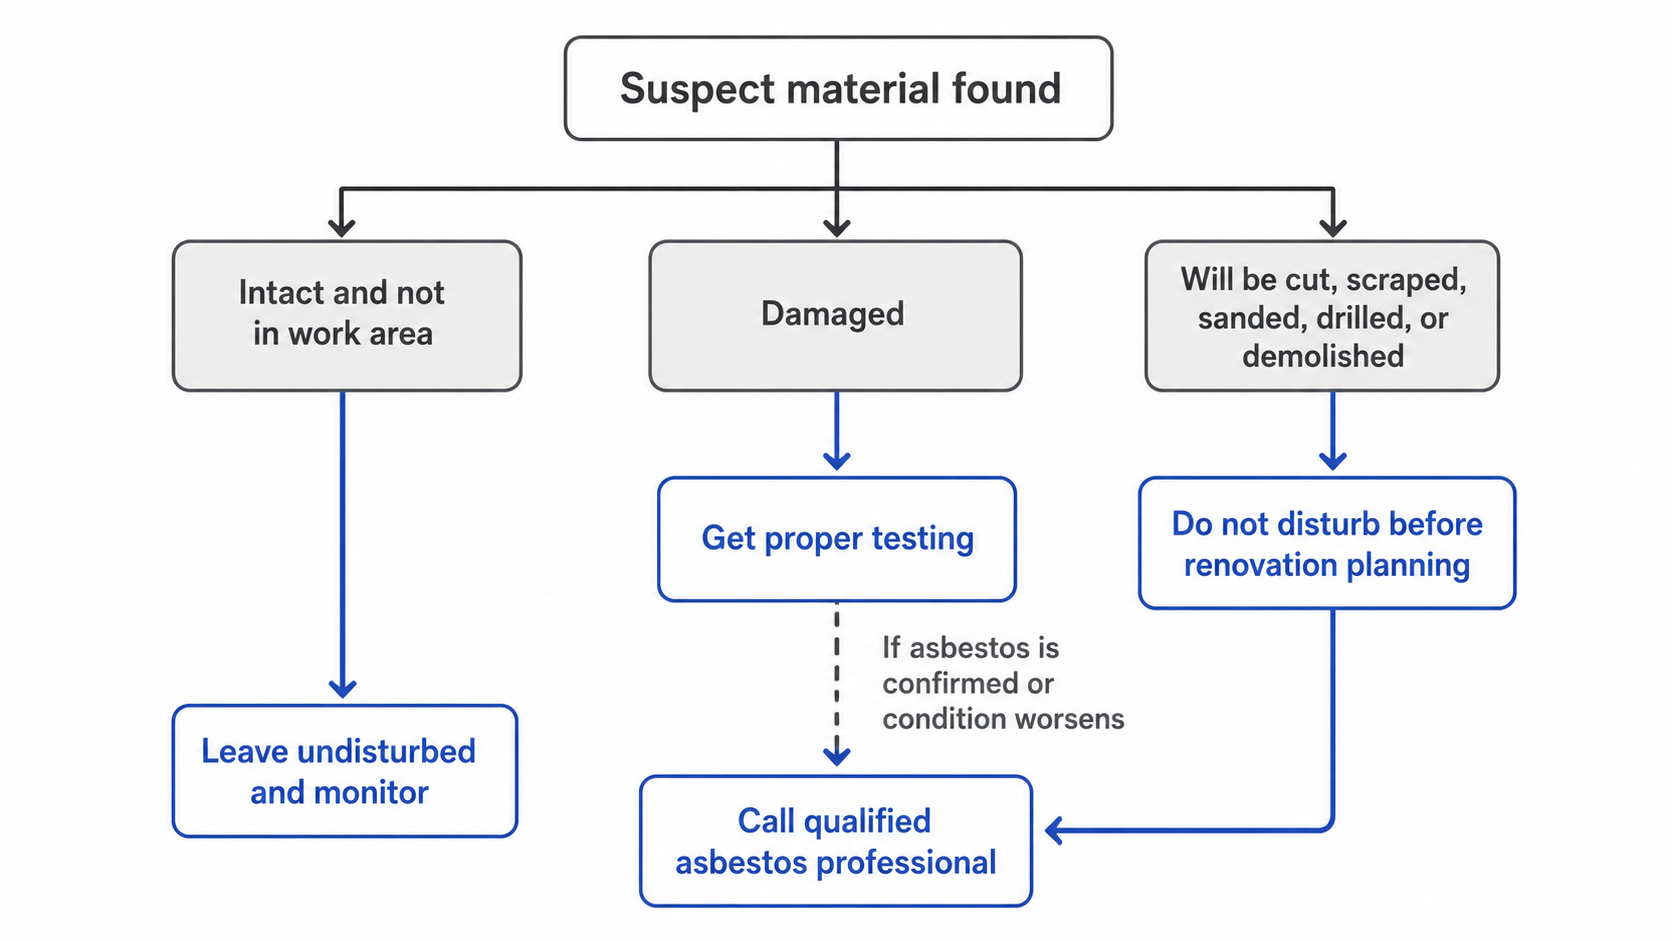
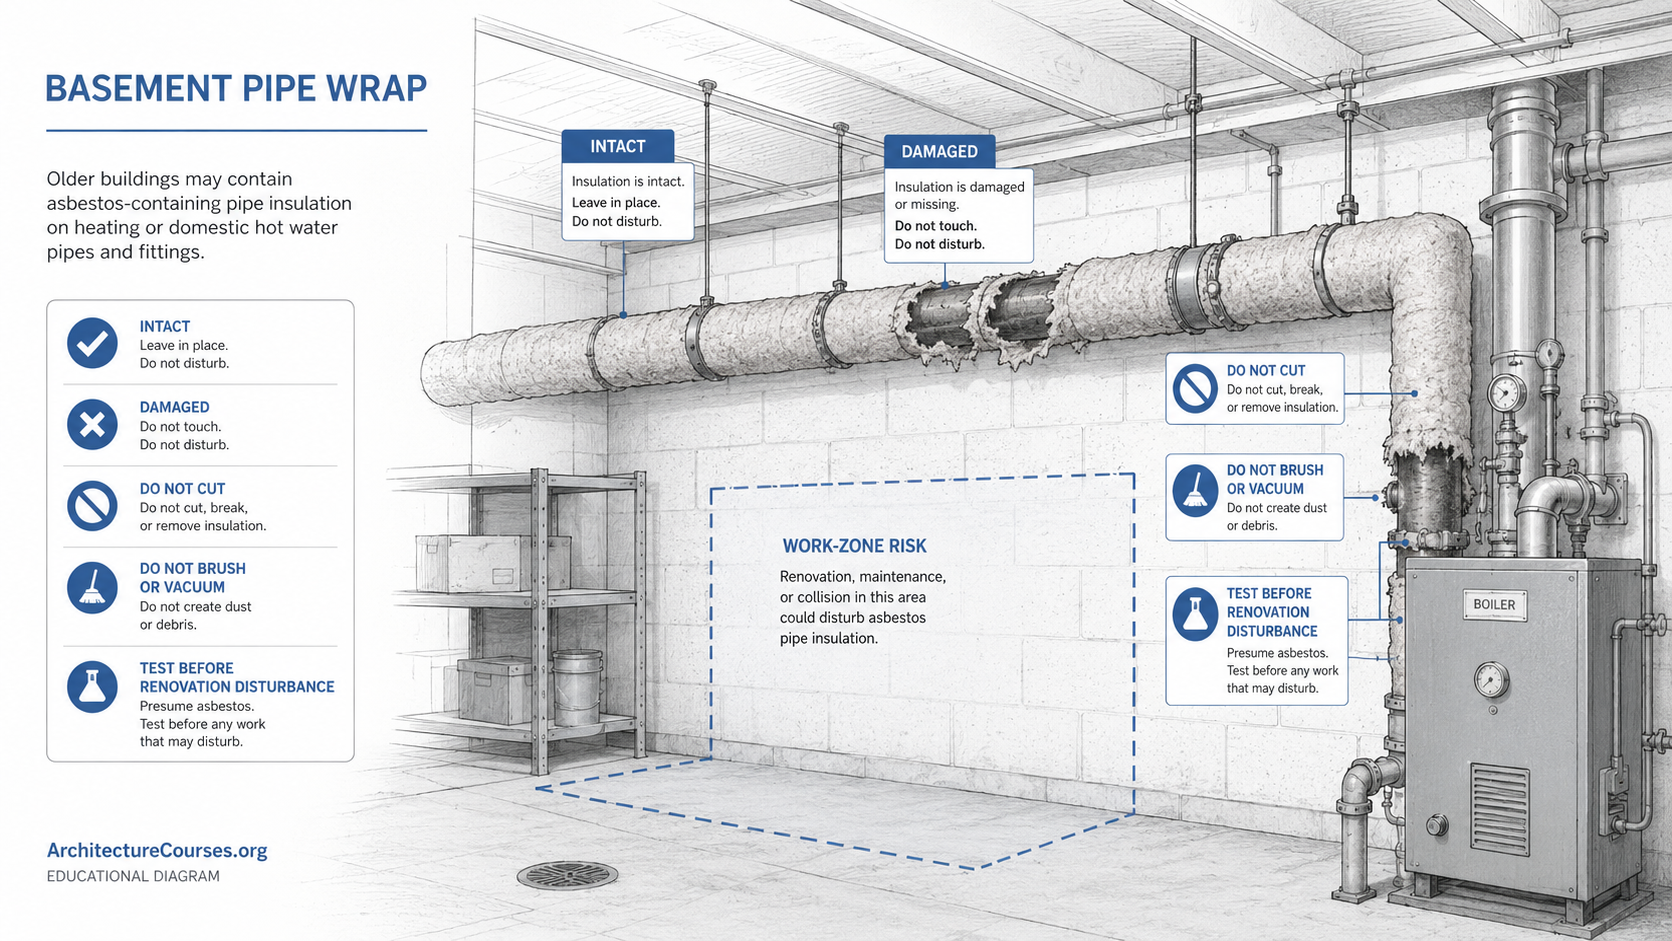
If the material is intact, out of the work area, and not likely to be disturbed, it may be better to leave it alone and monitor it. If it is damaged, crumbling, water-stained, or in the path of renovation work, stop and arrange proper testing or professional evaluation before continuing.
Why 1950s houses raise this question more than others
Asbestos was not a fringe product in the 1950s. It was mainstream. It was in flooring, ceiling finishes, pipe insulation, duct materials, siding, roofing, and wall compounds because it resisted heat, fire, and wear. Builders used it because it worked. Nobody was hiding it.
That does not mean every material in a 1950s house contains asbestos. Plenty do not. But the era is old enough, and the use was widespread enough, that renovation work in a 1950s house should account for the possibility before demolition starts.
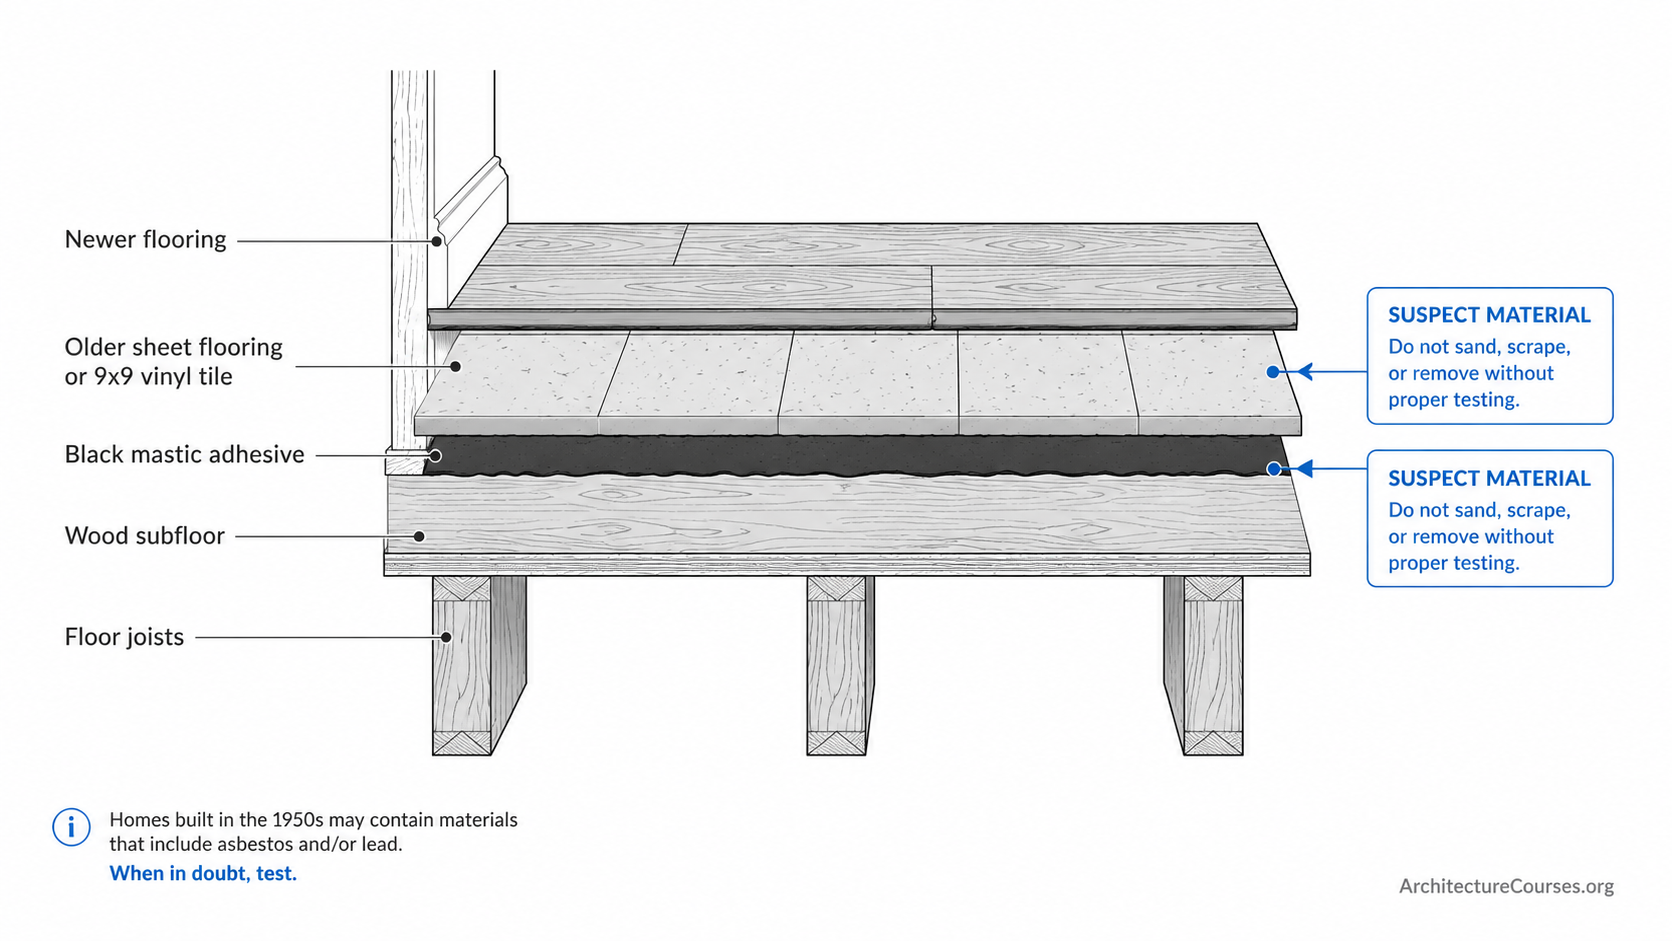
The assumption that catches people off guard is this: a previous remodel does not mean the problem was removed. A 1950s kitchen remodel may have newer flooring over older vinyl tile. A bathroom may have modern finishes over old adhesive. A basement may still have original pipe wrap even if the upstairs looks completely updated. Previous owners renovated around it, not through it.
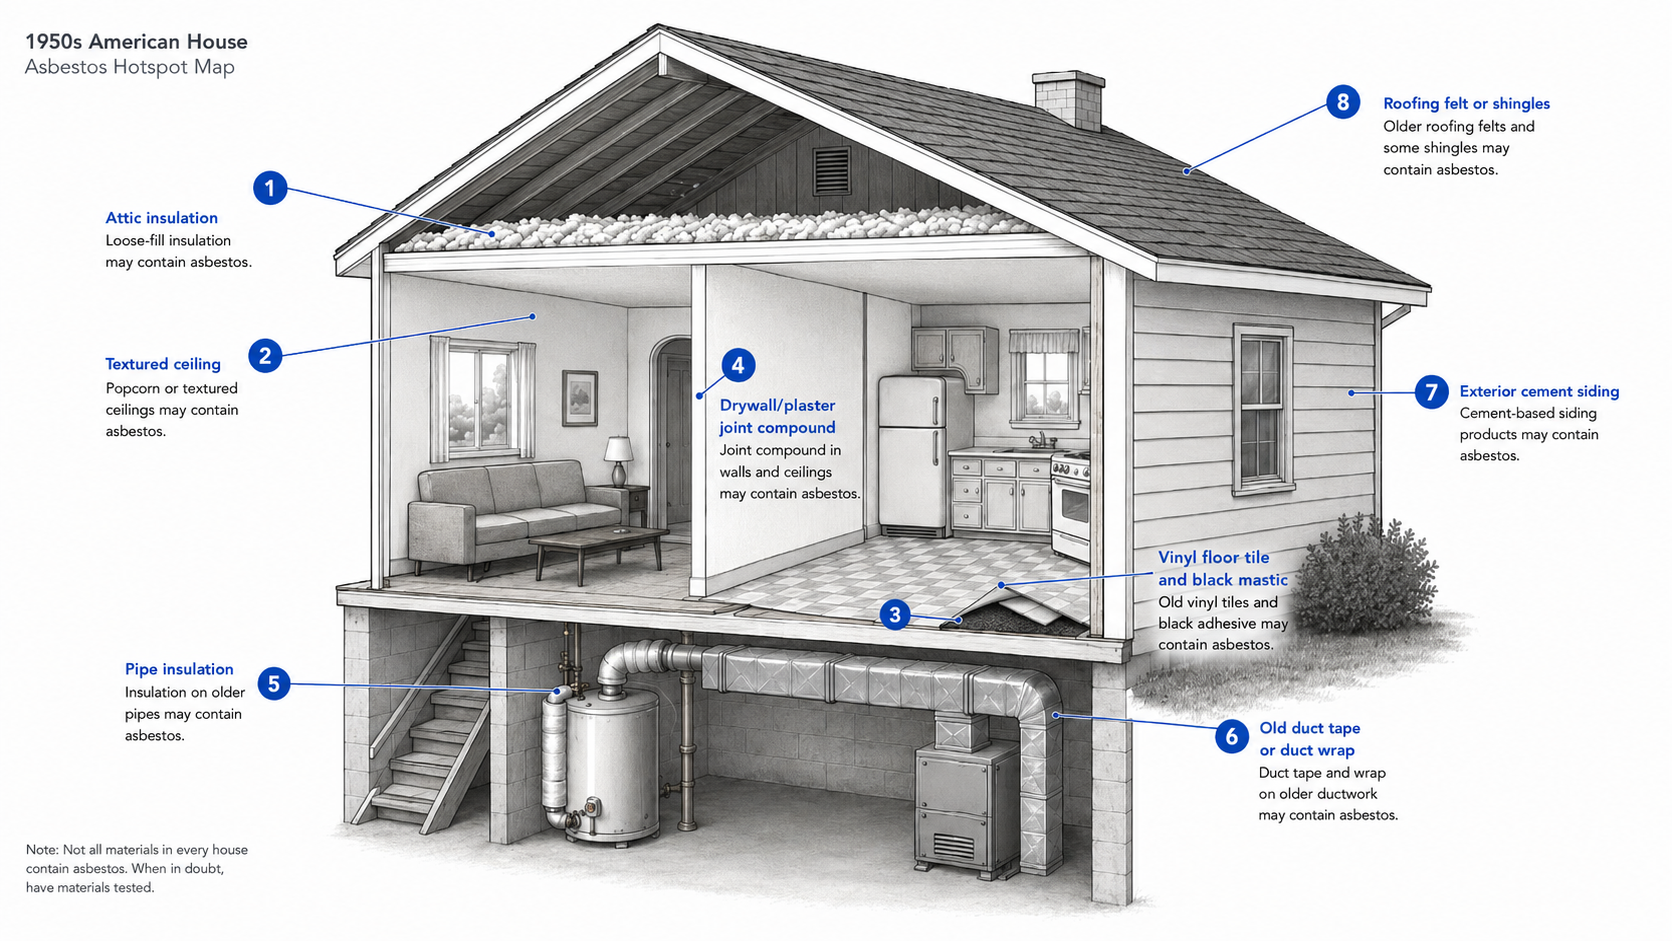
Where asbestos may hide in a 1950s house
Asbestos is part of a material, not a warning label. It may be under paint, below newer flooring, behind cabinets, around old pipes, inside ceiling texture, or on the exterior shell. You will not see it as a separate layer.
- Floors: old vinyl tile, sheet flooring, backing layers, and black mastic adhesive.
- Ceilings: textured ceiling material, acoustic treatments, and older patch compounds.
- Basements: pipe insulation, boiler-room materials, duct wrap, and old heat-resistant panels.
- Walls: plaster or drywall joint compound in some older assemblies and repairs.
- Attics: some loose-fill insulation, especially vermiculite-type insulation.
- Exterior: cement siding, roofing felt, shingles, and some older panels.
- HVAC areas: old duct tape, paper-like duct wrap, and mechanical-room insulation.
The renovation pause list
The practical question is not only where asbestos might be. It is whether the next phase of work will disturb it.
| Renovation work | Suspect material to check first | Why it changes the job |
|---|---|---|
| Kitchen remodel | Old vinyl tile, black mastic, wall patches, ceiling texture, pipe chases | Cabinet removal, flooring work, new lighting, and wall openings can expose older layers. |
| Bathroom remodel | Floor layers, old adhesive, pipe insulation, wall patching, ceiling texture | Plumbing access and floor repair can disturb materials that looked sealed before demolition. |
| Basement work | Pipe wrap, duct wrap, boiler-room panels, old heat-resistant materials | Mechanical rooms often hold older materials that were never removed during upstairs updates. |
| Ceiling work | Textured ceiling, acoustic material, patch compound, older joint compound | Scraping, sanding, recessed lights, fan work, and ceiling repair can create dust. |
| Exterior work | Cement siding, roofing felt, shingles, old panels, exterior patch materials | Cutting, drilling, grinding, breaking, or window replacement can disturb rigid exterior products. |
If the work does not touch the suspect material, leaving it alone may be the safest answer. If the work cuts into it, drills through it, scrapes it, sands it, breaks it, removes it, or exposes it, the project needs a testing and handling plan before anyone starts.
For room-specific planning, check the 1950s kitchen remodel and 1950s bathroom remodel guides before demolition reaches old floors, walls, ceilings, or plumbing chases.
Old vinyl floor tile and black mastic
Flooring is where most 1950s homeowners first run into this problem. You pull up carpet, laminate, or a floating floor and find old square vinyl tile underneath. Under the tile is black adhesive. Neither of them looks alarming, and that is exactly why people make the mistake of grabbing a scraper.
Old square vinyl tile and black tar-like mastic adhesive are among the most common suspect materials in postwar homes. They may or may not contain asbestos — you cannot tell by looking — but they should be treated as suspect until tested, especially if they are brittle, broken, water-damaged, or already coming loose.
Do not sand, grind, scrape, chip, or mechanically remove old flooring or black adhesive until the material has been properly identified. In some projects, intact flooring can be left in place and covered. In others, removal may be necessary because of damage, height buildup, moisture, or layout changes. The right answer depends on condition, disturbance risk, local rules, and the renovation scope.
If this shows up during a wet-room project, the 1950s bathroom remodel guide explains why flooring, plumbing, ventilation, and wall conditions should be checked before finishes are chosen.
Pipe insulation, boiler rooms, and old duct wrap
Basements in 1950s houses deserve careful attention. Older pipe insulation may appear as a white, gray, chalky, cloth-like, or layered wrap around hot-water pipes, steam pipes, boiler piping, or heating-system runs. It can look completely stable. It can also be damaged at elbows, fittings, hangers, or low ceilings where storage, tools, or previous renovation work has rubbed against it over the years. In my experience the surprise in these houses is rarely the floor everyone worries about; it is the duct wrap or pipe lagging in the basement that nobody thought to look at.
This is not a place for casual testing by poking or tearing. If old pipe insulation is damaged or near planned work, stop the project and get qualified help. Pipe insulation can be more friable than hard materials like cement siding or intact floor tile, which means it may release fibers more easily when disturbed.
Duct wrap and old duct tape can also carry risk. A 1950s heating system may have been altered several times over the decades, but original or early duct materials can remain in crawl spaces, basements, utility chases, and attic runs long after the upstairs was updated.
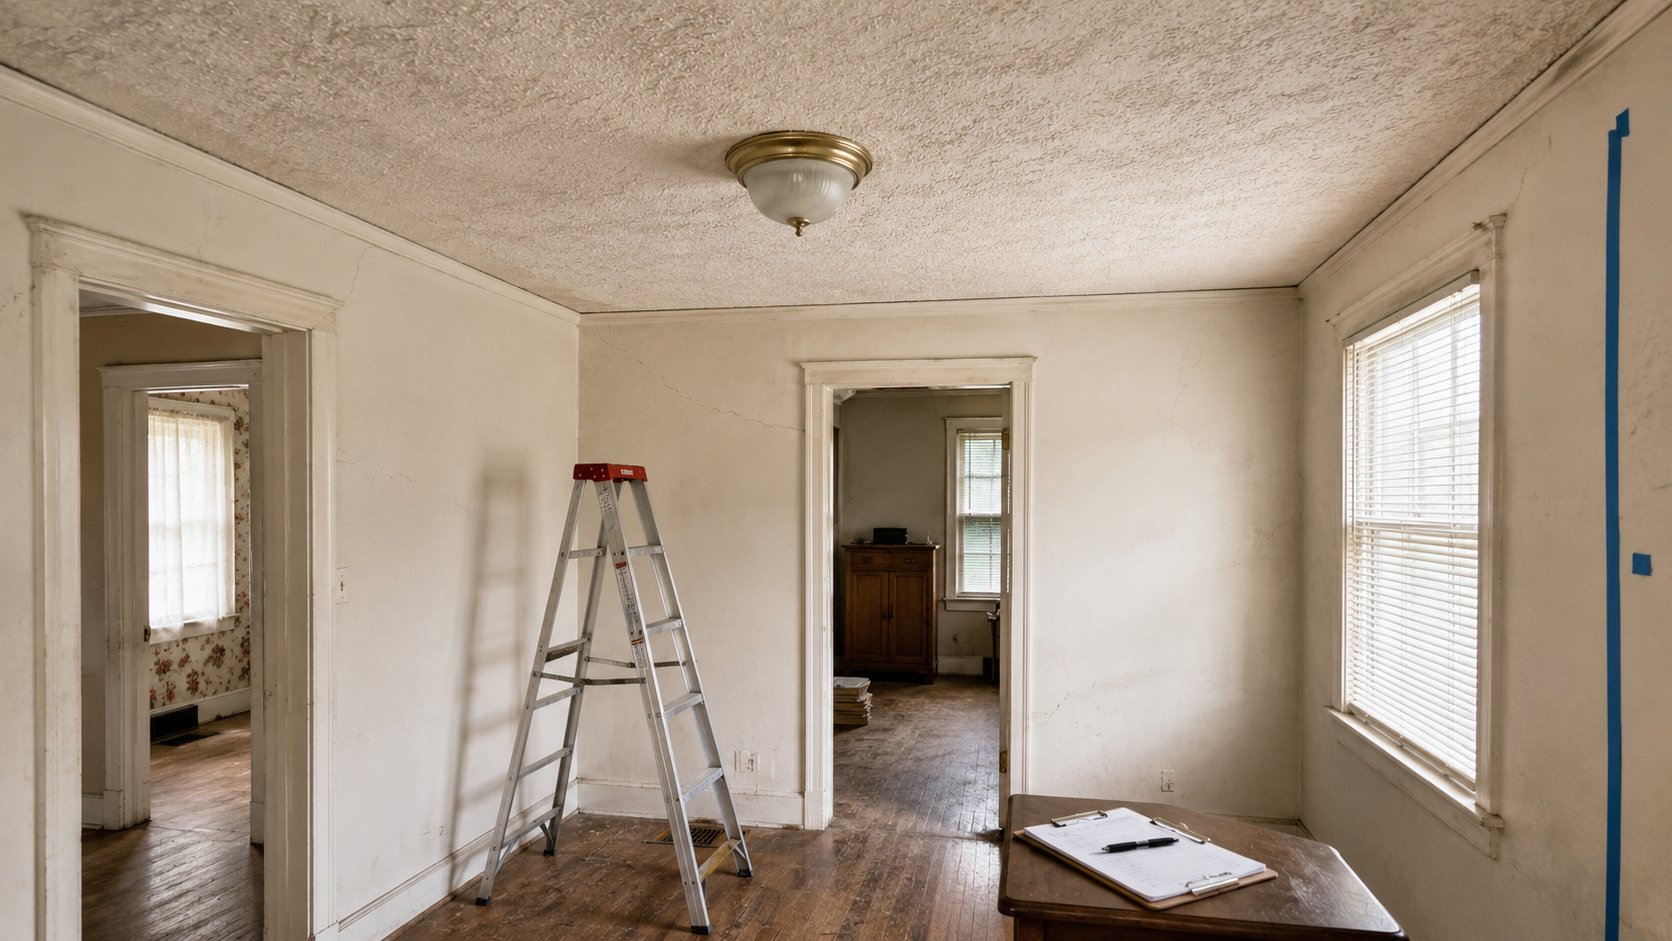
Textured ceilings and old wall patches
Textured ceilings are a common renovation trap. A homeowner plans to scrape a ceiling, add recessed lighting, open a wall, or patch old plaster — a reasonable project — without realizing the surface material or old joint compound may need testing first.
The risk is disturbance. Scraping, sanding, drilling, cutting, and aggressive demolition create dust. Even a small project like adding ceiling lights or widening a doorway can disturb older ceiling or wall materials if the house is old enough.
Before changing textured ceilings, old plaster repairs, or older drywall compounds, check the age of the work and consider testing. This is especially important when the surface is damaged, flaking, water-stained, or directly in the renovation path.
This is also why a simple-looking 1950s kitchen remodel cost can change once lights, ceilings, walls, floor layers, or old adhesives enter the scope.
Exterior cement siding and roofing materials
Many mid-century houses used cementitious exterior products. Some older cement siding and roofing materials may contain asbestos. These are more rigid than soft pipe insulation, but cutting, grinding, drilling, breaking, or pressure damage can still create dust and debris.
If the siding is intact and painted, maintenance, monitoring, or careful over-cladding may be the right option depending on local rules and wall assembly condition. If pieces are broken, missing, crumbling, or need removal for window, insulation, or wall repair work, get the material evaluated before work starts.
If this is part of a broader 1950s house exterior remodel, check the siding, roofing edges, trim, window openings, and drilling points before cutting into older exterior materials.
For more detail, read asbestos siding risks, removal, and replacement.
Is it dangerous if you leave it alone?
Often, no. The danger is not the age of the material. The danger rises when asbestos-containing material is damaged or disturbed and fibers can become airborne.
Intact, stable asbestos-containing material that is out of the work area and not deteriorating is often managed in place. That is not the same as ignoring it. It means knowing it is there, keeping track of its condition, and making sure future renovation work accounts for it.
Three conditions, three different answers:
- Intact and outside the work area: often monitored and left alone.
- Damaged or deteriorating: needs evaluation before anyone cleans, patches, or covers it.
- In the renovation path: needs testing or professional handling before cutting, scraping, sanding, drilling, demolition, or disposal.
Removing asbestos badly can create more exposure than leaving stable material alone. Covering damaged material without understanding its condition hides a problem that returns later during plumbing, flooring, electrical, or resale work.
What to do before renovating a 1950s house
- Walk the house by material, not by room. Check floors, ceilings, pipes, ducts, siding, roofing, wall patches, and attic insulation.
- Mark suspect areas. Use painter's tape, photos, or a written list. Do not disturb the material to inspect it.
- Decide what the renovation will touch. A material outside the work area is different from one that will be cut, drilled, scraped, or removed.
- Test before disturbance. Use a qualified inspector, accredited lab process, or local asbestos professional where required.
- Keep records. Save lab results, contractor documents, disposal records, and photos. Future renovations and resale will ask for them.
For ranch-specific projects, the 1950s ranch house remodel guide is the better place to plan wall openings, crawl-space checks, kitchen connections, and exterior updates before demolition starts.
What testing and abatement actually cost
Most homeowners want a number before they want a lecture, so here is the honest version. These are 2026 U.S. planning ranges, not quotes — they move with region, scope, the number of samples, the lab method, and local rules.
| Step | Typical range | Notes |
|---|---|---|
| Inspection and sampling | $300–$800 | A licensed inspector collects bulk samples from a typical single-family home; whole-house assessments cost more. |
| Lab analysis | $25–$75 per sample | Most projects need several samples; results usually take a few days to about a week. |
| Popcorn or textured ceiling abatement | $3–$7 per sq ft | Friable, so it is handled carefully under containment. |
| Floor tile and black mastic removal | $5–$15 per sq ft | Depends on the substrate and how the old adhesive behaves. |
| Pipe or duct insulation removal | $10–$20 per linear ft | Often the highest-risk and most labor-intensive material. |
| Whole-house abatement during a major renovation | $5,000–$30,000+ | Depends entirely on how much suspect material sits in the work area. |
The number that should actually shape the decision is the one for doing it wrong. Disturbing asbestos without testing — running a sander over a ceiling, scraping mastic, prying tile up dry — can put fibers into the air, and a running HVAC system can carry them through the entire house. Cleaning up a contaminated home, ductwork included, routinely runs well past $50,000, far more than a pre-renovation inspection would have cost.
That is the real argument for testing first, and it is not caution for its own sake. The cheap version of this problem is the lab work. The expensive version is the decontamination after skipping it.
How asbestos changes the schedule
Even when asbestos is not removed, it can change a project's timeline. Testing takes time. Lab results take time. Contractors may need to pause. A flooring, bathroom, kitchen, or basement job may need a revised sequence once suspect materials are identified.
Flooring choices may change if old layers stay in place. Plumbing work may need rerouting if pipe insulation is near the work area. Ceiling work may need testing before lights or fans can be installed. Exterior work may need a different sequence around old siding. And if the house is ever sold, buyers and their inspectors will ask about it.
The homeowners who handle this best are the same ones who handle demo-day surprises best: they built it into the plan instead of discovering it mid-project. A qualified pre-renovation inspection costs less than stopping a job halfway through because something unexpected turned up in a wall.
The same planning issue appears in later old-house work too; a 1960s house renovation may have different materials, but the rule is still the same: check what the work will disturb before the project is already open.
FAQ
Was asbestos used in all 1950s houses?
No. Not every material contains asbestos. But many 1950s homes include materials that may — especially flooring, adhesives, pipe insulation, duct materials, siding, roofing, textured finishes, and some patch compounds. The era is old enough that suspect materials deserve attention before renovation work disturbs them.
Can I identify asbestos by looking at it?
No. Tile size, color, age, and texture raise suspicion but do not confirm asbestos. Testing or professional evaluation is needed before disturbance.
Are 9x9 floor tiles always asbestos?
No. Some old 9x9 tiles contain asbestos and some do not. Treat them as suspect until tested, especially if they are brittle, damaged, or in the renovation path.
Is black mastic always asbestos?
No, but black mastic in an older house is one of the most common suspect materials. Do not scrape, grind, or sand it before testing.
How much does asbestos testing and removal cost?
Testing usually starts with a few hundred dollars for inspection and sampling plus lab fees per sample. Removal is priced by material and area — roughly a few dollars per square foot for tile or ceiling work and more per linear foot for pipe insulation — with whole-house abatement during a major renovation often running into five figures. Disturbing asbestos improperly and contaminating the home can cost far more to clean up than testing first would have.
Can I remodel a 1950s house without removing asbestos?
Sometimes, yes. If suspect material is intact and not in the work area, it may be left alone and monitored. If the renovation will disturb it, testing or professional handling should happen first.
Does asbestos hurt home value?
It depends on condition, documentation, and buyer expectations. Intact, managed, documented material is a different situation from damaged, exposed, or unknown suspect material with no records.
References
Sources used for this article
- U.S. Environmental Protection Agency: Protect Your Family from Exposures to Asbestos
- U.S. Environmental Protection Agency: Protect Your Family from Asbestos-Contaminated Vermiculite Insulation
- U.S. Consumer Product Safety Commission: Asbestos in the Home
- Occupational Safety and Health Administration: Asbestos Construction Standard
- Angi: Asbestos Removal and Testing Cost
- Health Canada: Asbestos and Your Health