A 1960s house can fool you at first. The ugly parts are easy to see — tired cabinets, dark paneling, old bathroom tile, bad carpet, a front entry that looks wrong from the curb. So the first plan is usually the simple one: paint it, open it up, replace the kitchen, tear out the bathroom, brighten the exterior.
Some of that may be right. A lot of 1960s houses renovate well, because the shapes are simple, the rooms are usable, and the framing is often solid. The budget usually turns somewhere else — old wiring, plumbing, ceiling texture, a wet crawlspace, a tile base, a kitchen soffit, a floor patch, a window opening, or the wall someone hoped was easy to remove.
Start there, before demolition. The listing photos show the ugly parts. The house hides the expensive ones.
Check Before You Disturb It
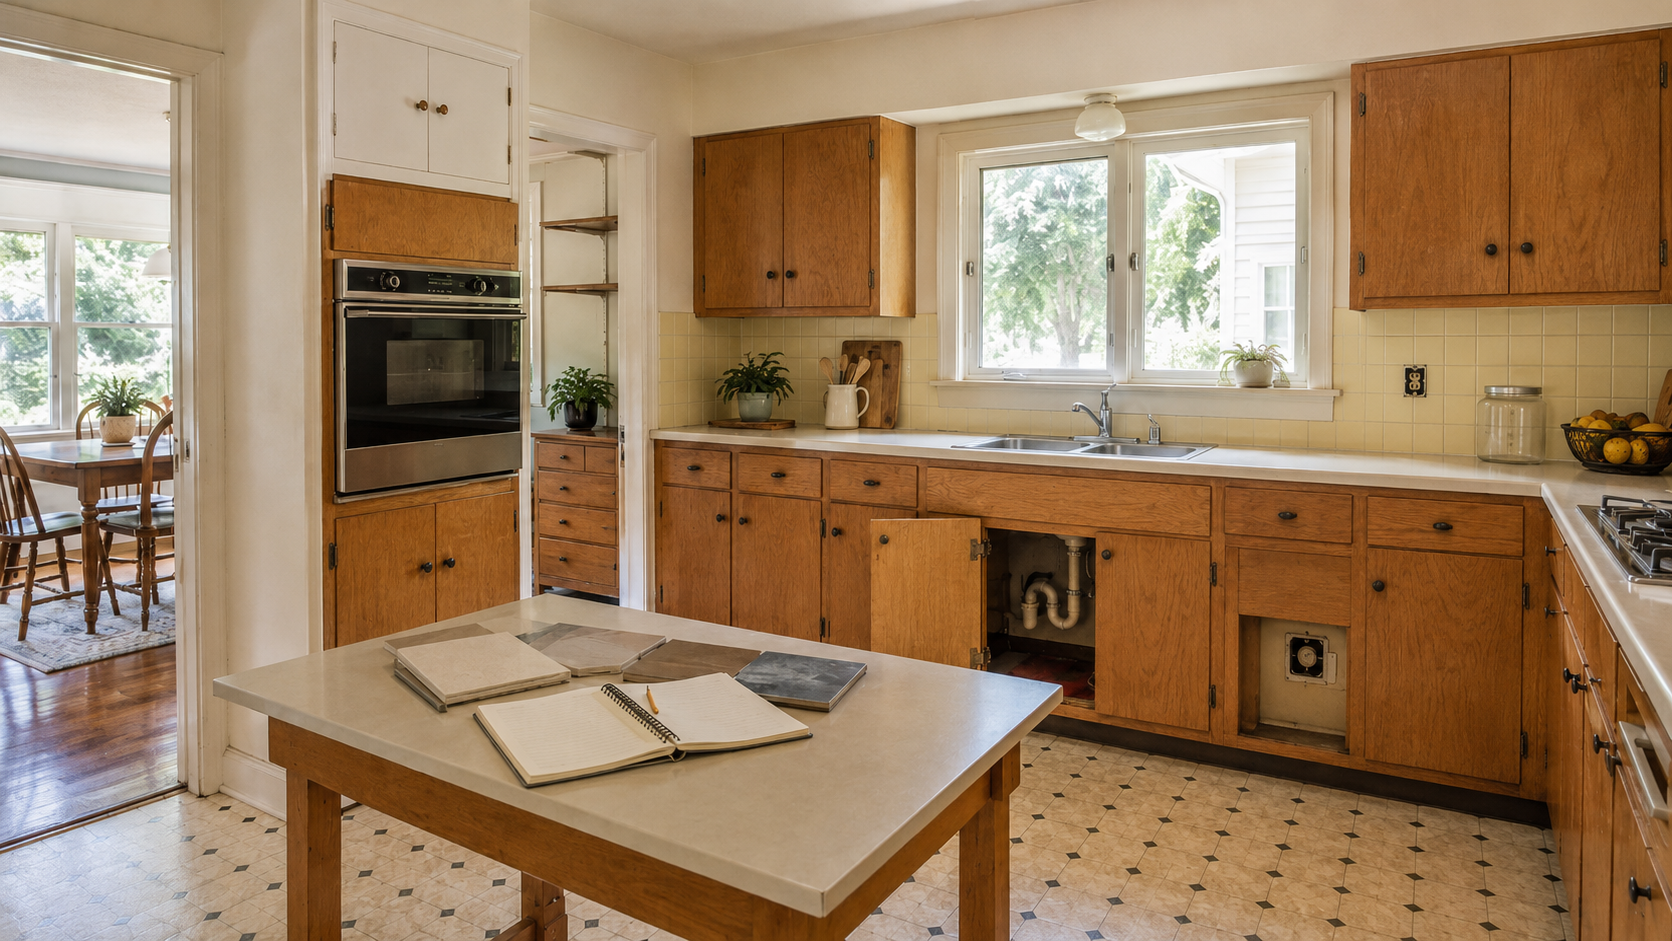
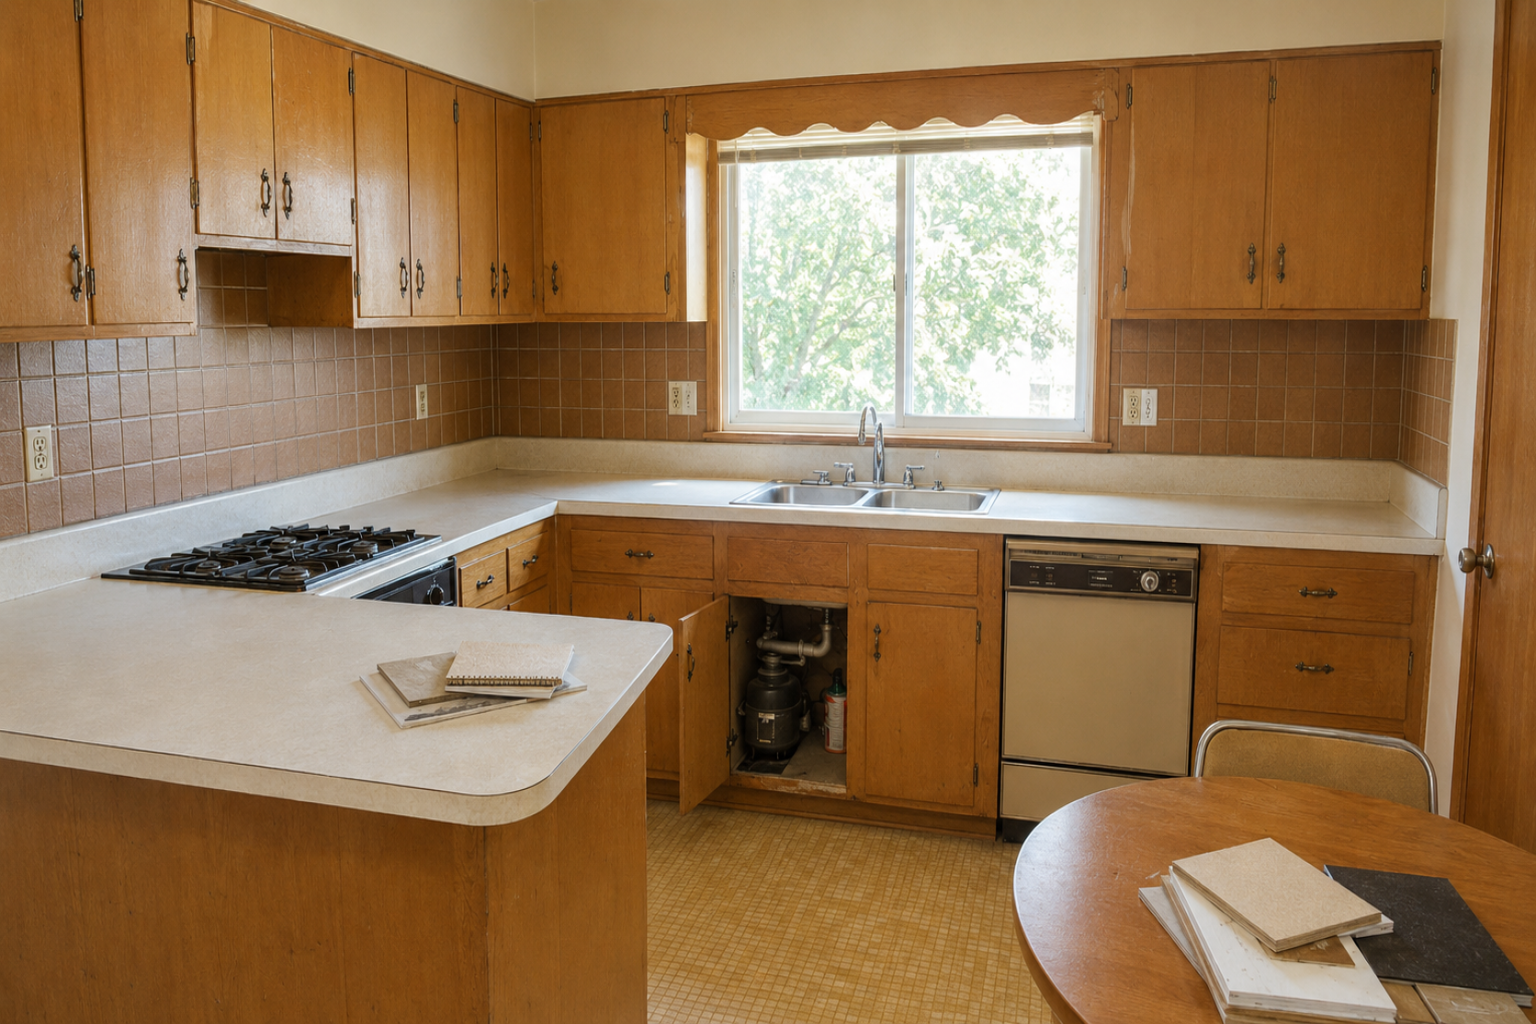
A 1960s kitchen renovation should start by checking the cabinet boxes, plumbing, wiring, flooring, ventilation, and layout limits before choosing new finishes. Image by ArchitectureCourses.org.
The first time I walk a 1960s house, I try to touch nothing. The first pass should feel a little boring. Walk it slowly. Do not start with the sledgehammer, do not scrape the ceiling because the texture annoys you, do not sand painted trim because you want the room lighter by Friday, and do not pull old flooring without knowing what the flooring, the adhesive, or the layer below it might be.
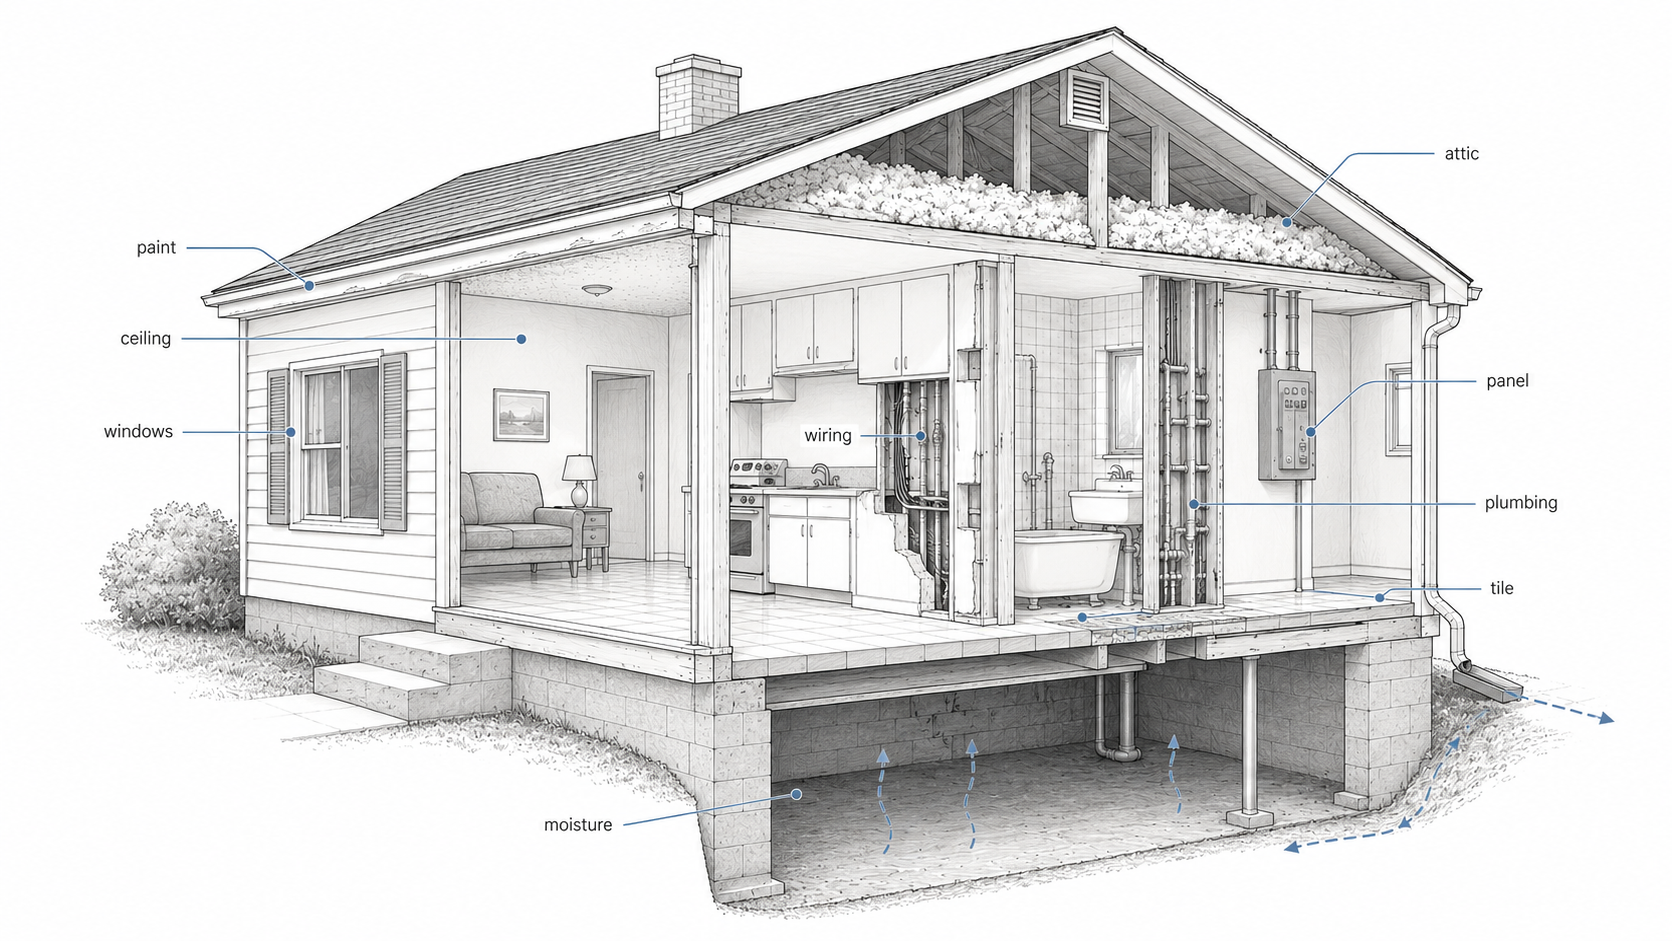
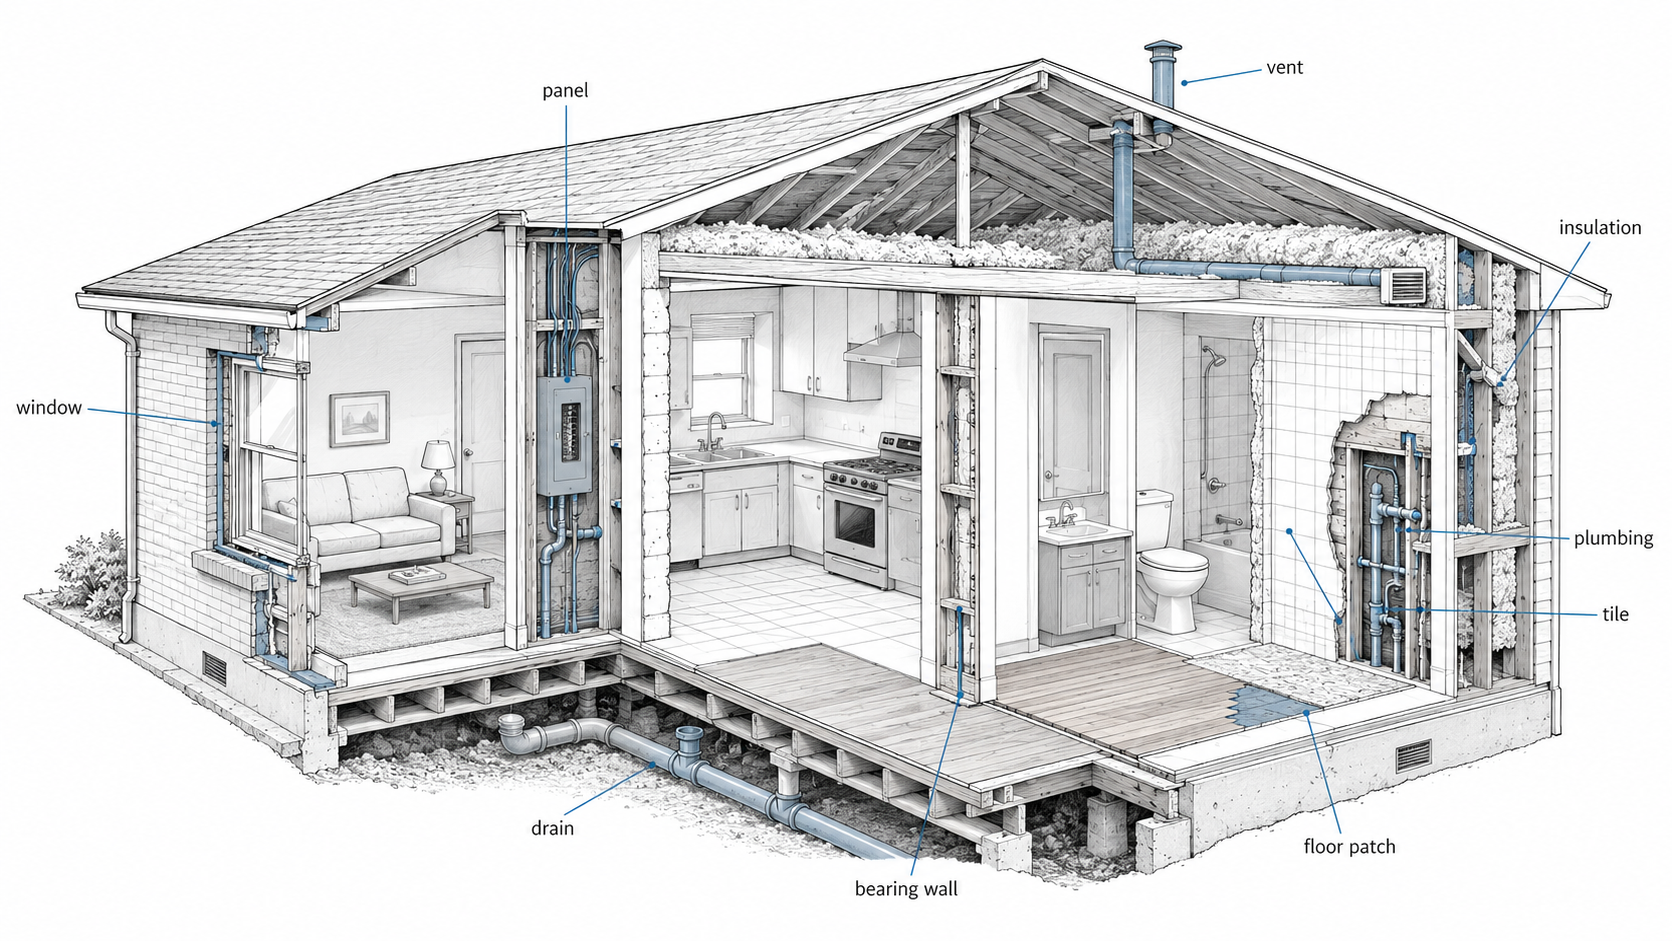
Look first. Check the painted doors, baseboards, window sashes, porch trim, and built-ins; the ceiling texture; the vinyl flooring and its adhesive; the bathroom tile; the kitchen soffits; the electrical panel and any exposed wiring; the plumbing walls; the attic insulation; basement and crawlspace moisture; the exterior grade, gutters, windows, and roof-to-wall joints. It sounds like a lot, and it is still cheaper than opening everything in the wrong order.
In the United States, a 1960s house sits inside the pre-1978 caution zone for lead-based paint. That does not mean every painted surface is dangerous. It means painted trim, doors, windows, baseboards, and old exterior details should be tested or handled carefully before anyone sands, scrapes, cuts, or demolishes them. If you are screening painted trim or doors before disturbing them, use an EPA-recognized lead paint test kit rather than a random swab making vague claims. Testing does not replace lead-safe work practices, but it can stop a bad sanding decision before the dust is all through the house.
Asbestos works the same way. The problem is not that every old material should make you panic. The problem is disturbing a suspect material before you know what it is — old flooring and mastic, ceiling texture, pipe insulation, duct wrap, siding, some backing materials. For any of those that may be disturbed, test before demolition, and if the material is damaged, crumbly, widespread, or part of a larger removal, bring in a qualified asbestos professional instead of treating it like normal debris.
Then there is the wiring. Some houses built or altered from the mid-1960s into the mid-1970s may have aluminum branch-circuit wiring. The concern is usually at the connections — outlets, switches, junction boxes, devices where heat can build — not the cosmetic stuff, and it is worth an inspection before you plan the whole remodel around an assumption.
Cosmetic Update or Systems Project?
Some 1960s updates stay simple, and that is the good news — you do not have to gut every 1960s house to make it livable. Paint, hardware, better lighting, a cleaned-up entry, new cabinet fronts, or a careful floor refresh can change a house without turning it into a major renovation.
The line gets crossed the moment the update touches wiring, plumbing, structure, wet areas, exterior water control, insulation, or old materials that need testing. That is where a weekend job quietly becomes a project.
| Planned Change | Check First | What Can Go Wrong | Better First Move |
|---|---|---|---|
| Paint trim or walls | Age of paint and surface condition | Lead dust if old paint is sanded or scraped badly | Test suspect paint before disturbing it |
| Replace kitchen cabinets | Wiring, plumbing, venting, soffits, and flooring | A cabinet job becomes electrical and plumbing work | Confirm hidden scope before ordering cabinets |
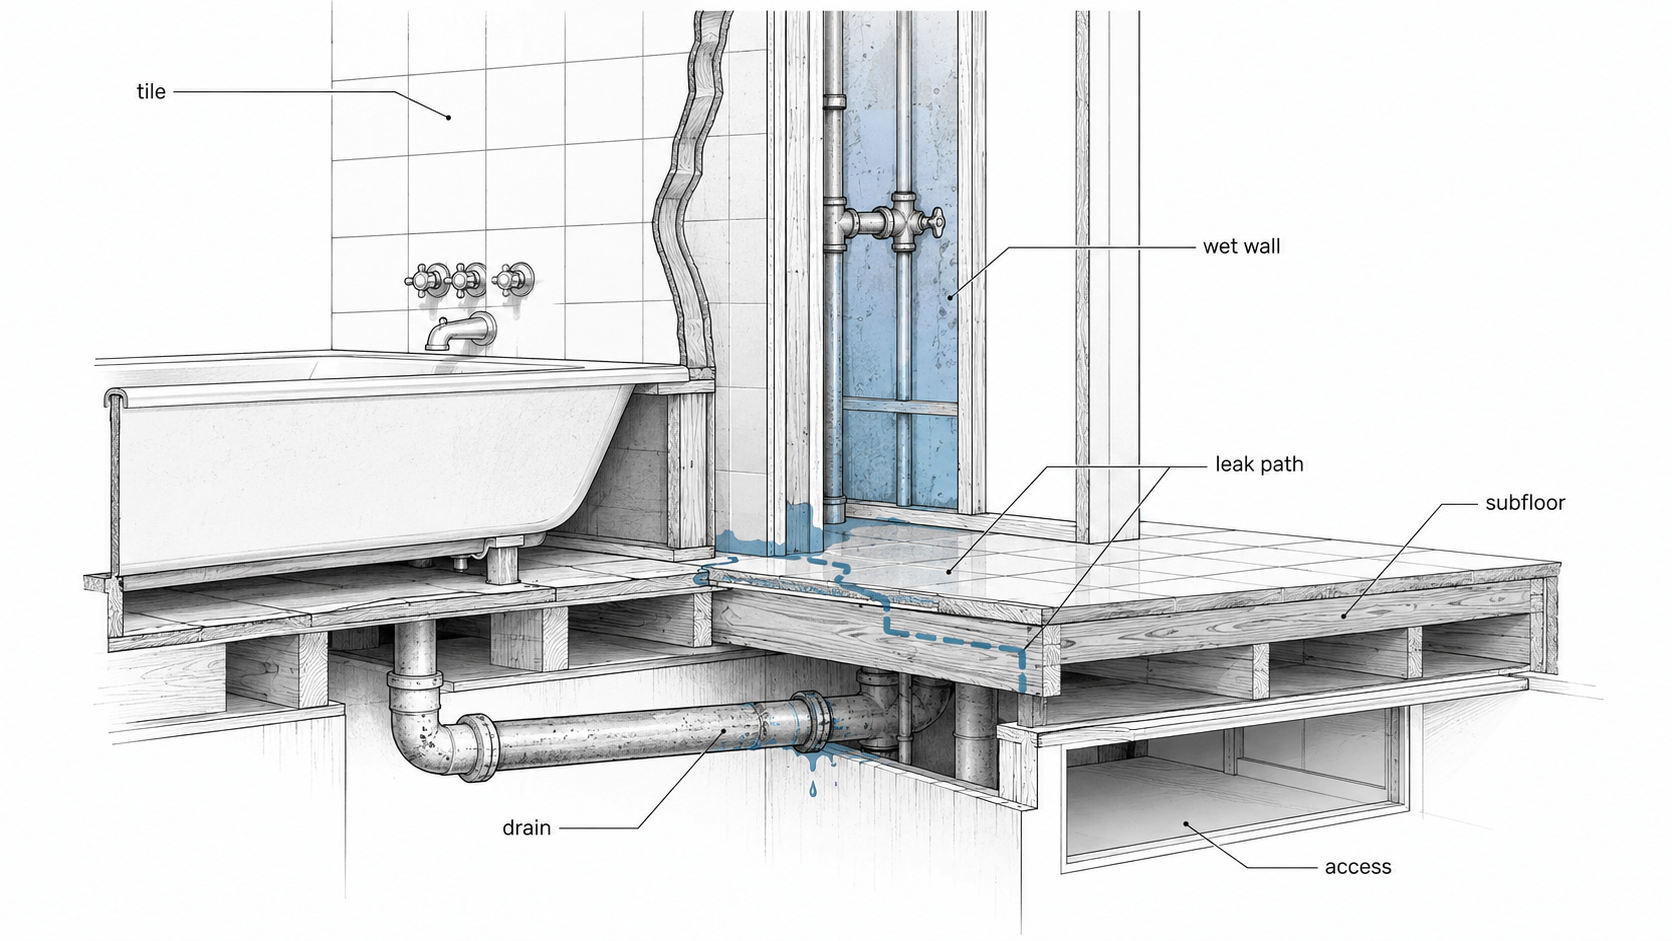
| Remodel bathroom | Wet wall, tile bed, subfloor, drain, and fan | Hidden leaks, rotten subfloor, poor ventilation, failed waterproofing | Inspect the wet areas before choosing finishes |
| Open a wall | Load path, joists, ducts, wiring, and floor patching | Beam cost, ceiling scars, floor repairs, permit trouble | Verify structure before drawing the opening |
| Replace windows | Wall condition, flashing, trim, siding, and opening size | Air leaks, water intrusion, awkward smaller openings | Plan window work with wall repair |
| Update the exterior | Drainage, siding condition, brick, trim rot, and proportions | Trapped water, peeling finishes, fake-looking upgrades | Fix water and alignment before decoration |
The Budget Is Behind the Walls
A small 1960s kitchen can seem cheap to remodel because the room is not large. Then one cabinet wall comes out and the job changes. The old floor stops under the cabinet run. The refrigerator wants a better circuit. The range hood does not vent cleanly outside. The sink wall has old shutoffs. The soffit is not empty. The opening touches the ceiling, the floor, the lighting, and sometimes the structure. That is how a "kitchen update" becomes a renovation.
Bathrooms do the same thing. The tile gets blamed because it is the part you see, but the wet wall decides the project — a tired tub valve, a bad drain, a soft subfloor, a weak fan, a cracked tile bed, or a leaking tub edge can turn a simple refresh into a bad idea. It looks finished and it is still vulnerable.
Windows can move the budget too. A replacement window is never only a window; the opening, trim, flashing, siding, interior casing, wall condition, and water history all ride along. If the wall around the window is damaged, the clean product quote was never the real job. So do not price a 1960s renovation by room. Price it by what each room touches.
What To Keep
The best 1960s renovations do not erase the whole house, and that is where a lot of them go flat. Someone decides the house is dated, then treats every original feature like a problem. Some of it is a problem. Some of it is the reason the house still works.
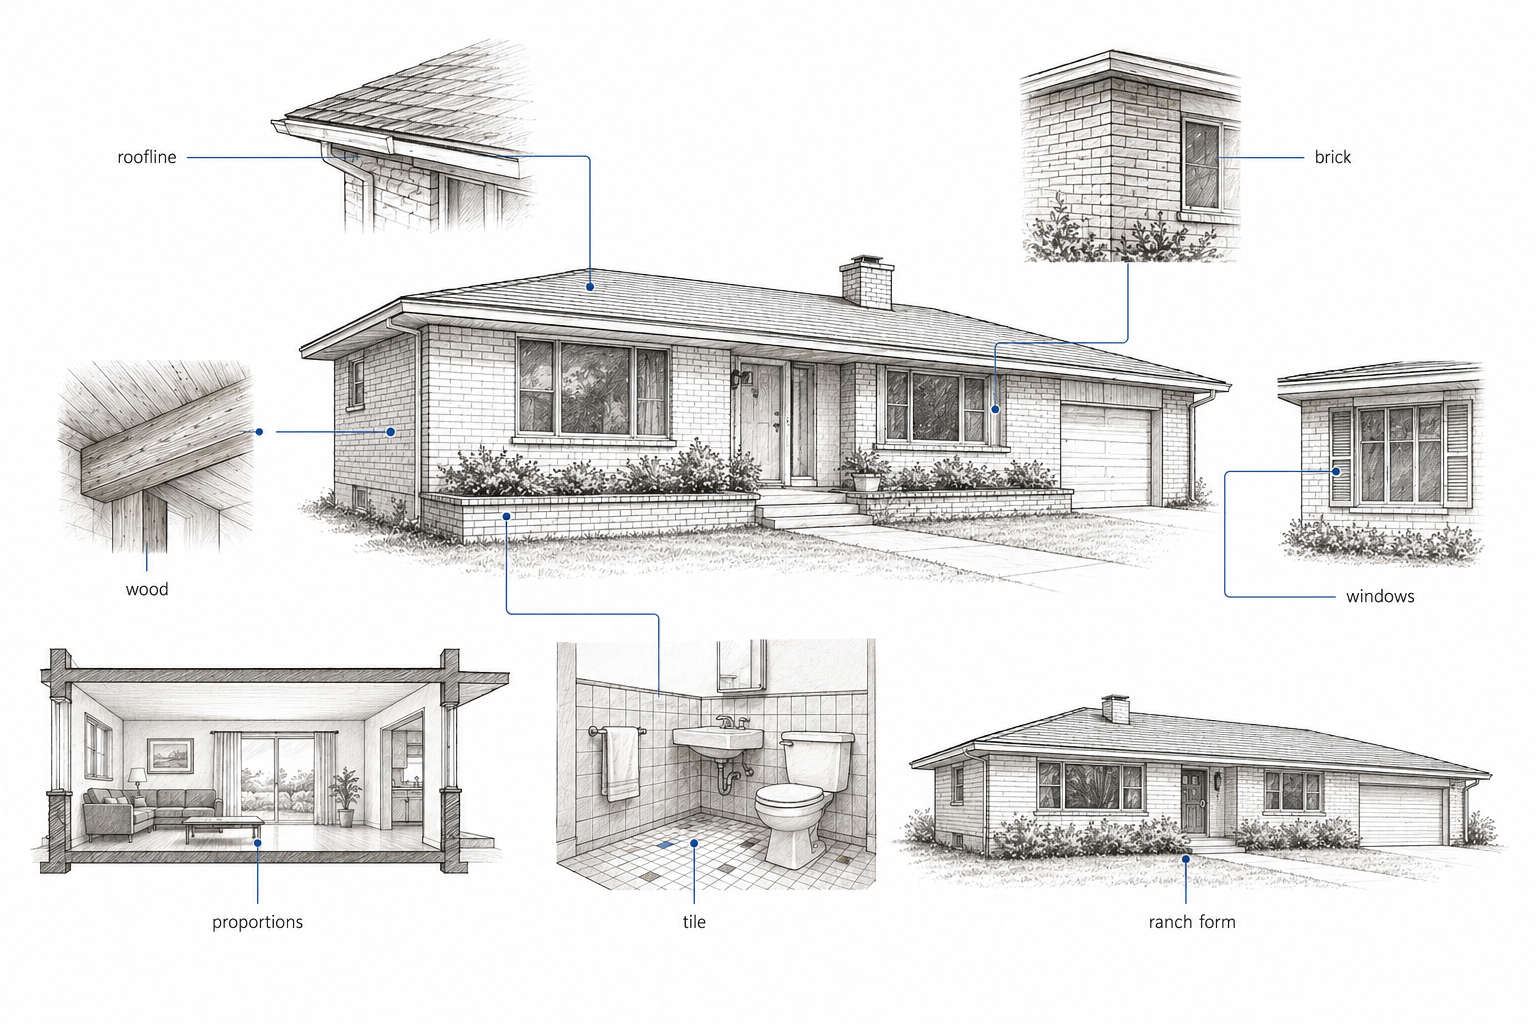
Simple rooflines are worth respecting. Sound, well-placed brick may be worth keeping. Original wood may want a better finish, not removal. A long, low ranch elevation usually needs cleaner trim and a stronger entry, not a fake porch pasted onto the front. And good window rhythm is hard to rebuild once it is broken.
Original wood trim is the good example. Dark stain can make rooms feel heavy, especially under low ceilings or beside small windows, but the wood itself may not be the problem. Repair, cleaning, selective refinishing, or careful painting after testing can solve the room without throwing out useful material.
Brick needs the same pause. Painting it can look good, and sometimes it is the right move — but it also changes the maintenance, because painted brick is no longer the low-upkeep surface it was. If the brick is helping the exterior proportions, try the easier moves first: trim color, landscape cleanup, an entry repair, better lighting, a cleaner walkway, or pulling off a dated railing.
Old bathroom tile is not automatically junk either. If it is dry, well bonded, and still part of a usable room, it may be worth keeping. Once the grout is failing, the tub edge leaks, the wall feels soft, or the floor moves, the age stops being the issue — the assembly is. For broader style context, the existing page on 1960s house style is the better place to separate period character from renovation scope.
What To Replace First
The first thing to replace is not always the ugliest thing. Start with what protects the house and the people in it: suspect lead paint, asbestos-containing materials, unsafe wiring, active leaks, drainage trouble, bad ventilation, failing plumbing, and wet areas already showing damage.
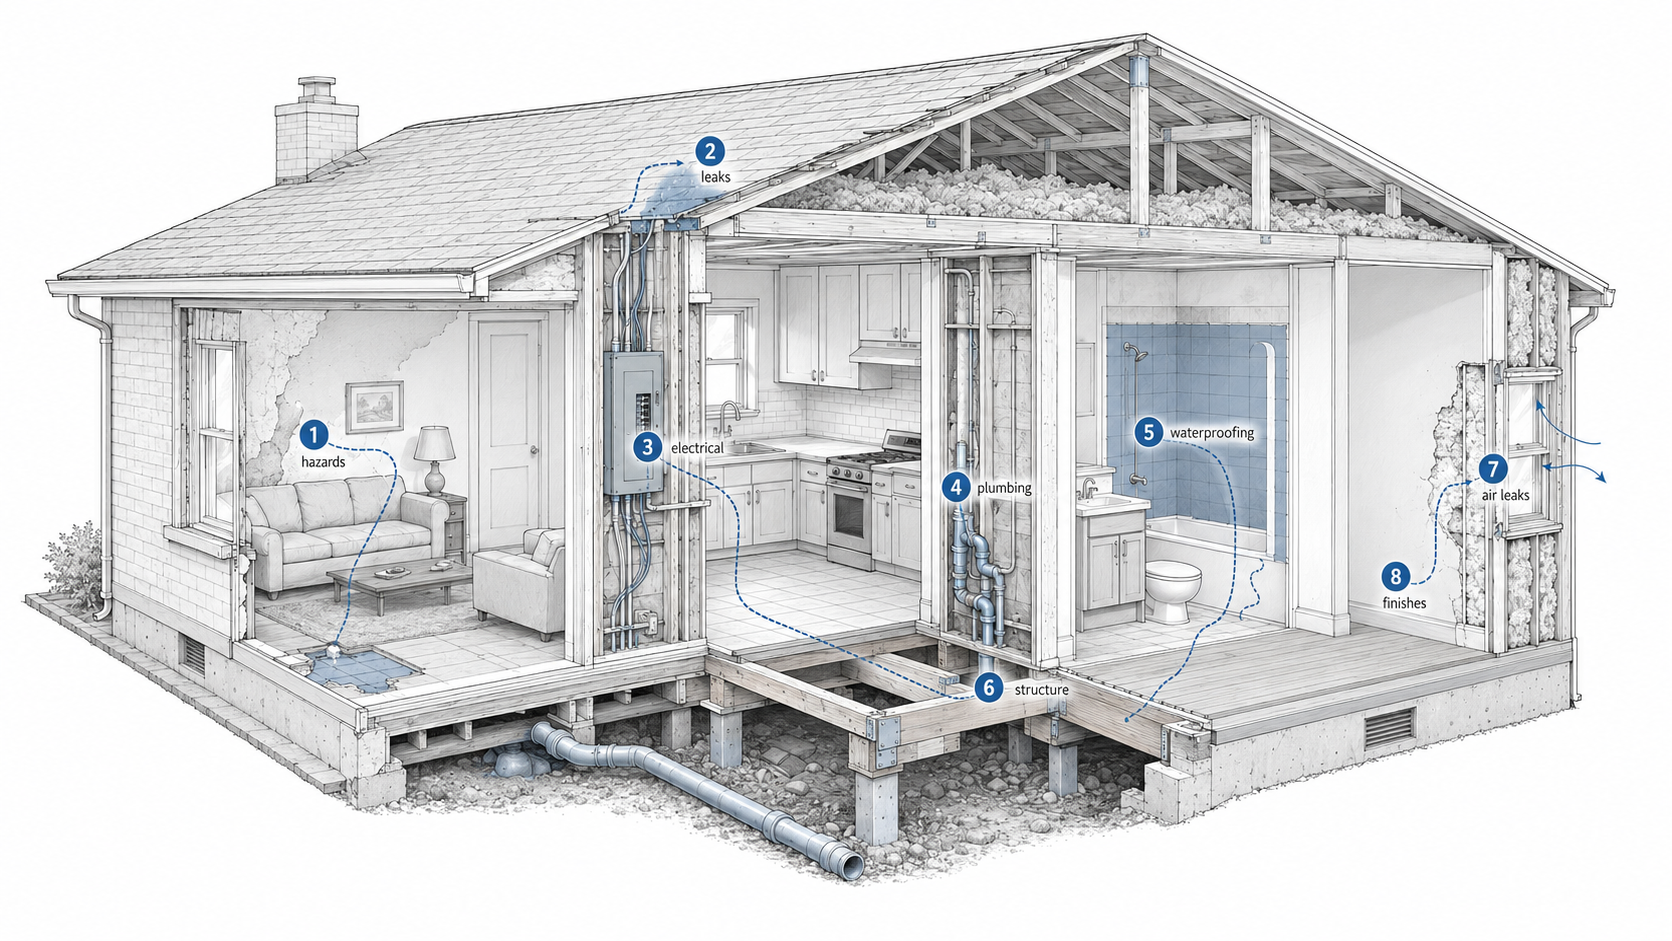
Electrical inspection belongs near the top. A 1960s house may carry original wiring, later repairs, added outlets, a finished-basement project, appliance upgrades, panel changes, or a mix of all of them — and the risk is not always the original system. The messy middle years of patches and add-ons can be worse than what the builder put in.
Plumbing comes next once walls or floors are open. If a kitchen or bath remodel exposes old shutoffs, corroded lines, poor drain routing, or bad access, deal with it while the room is open. Closing a wall over known trouble is just borrowing a future repair.
Moisture beats finishes every time. Wet crawlspaces, basement seepage, bad exterior grade, missing gutters, rotten trim, and window leaks will punish new work — paint does not fix trapped water, and flooring does not fix a damp subfloor. Then look at structure. Wall openings, ceiling changes, additions, and bigger window changes should be checked before the design gets too pretty to revise; a load-bearing wall can usually be changed, but the beam, posts, footings, ducts, wiring, ceiling repair, and floor patching all belong in the same conversation.
The Insulation You Already Have May Be the Problem
Here is a 1960s-specific trap that almost never makes the remodel plan, because the house looks like it already solved it.
The 1960s sit right on the line where wall insulation went from optional to expected. Many houses built early in the decade have little or nothing in the exterior walls. By the middle of the decade, a lot of building codes started calling for some — but "some" often meant a thin batt, frequently around two inches of R-8 sitting in a three-and-a-half-inch stud cavity, and after sixty years it is commonly compressed, gapped, or slumped down the wall. So the wall is not empty. It just is not doing much.
That half-measure is the actual trap. An empty wall gets noticed and dealt with. A wall with a tired, partial batt gets skipped, because as far as anyone can tell the house "has insulation." Then the new windows go in, the finishes go on, and the house is still cold on the windy side and expensive to heat — and nobody connects it back to the walls.
The thing is, a 1960s house tends to force the walls open anyway: for the wiring you probably had inspected, for a kitchen or bath that has to come apart, for a wall you are moving. The walls I open in these houses almost always tell the same story — a little sagging batt, or nothing at all. That open wall is the one cheap moment to fix the envelope. Topping off or replacing the insulation and adding an air seal while the studs are exposed costs a fraction of doing it later, once the drywall is back up and the only choices left are drilling and blowing it in or furring the wall out and losing floor space.
So when a wall comes open in a 1960s house, look at what is in it before you close it back up. If it is empty, or it is two inches of tired batt pretending to be a wall, that is the moment to deal with it — not a separate project for some colder year that never quite arrives.
Kitchens Grow Fast
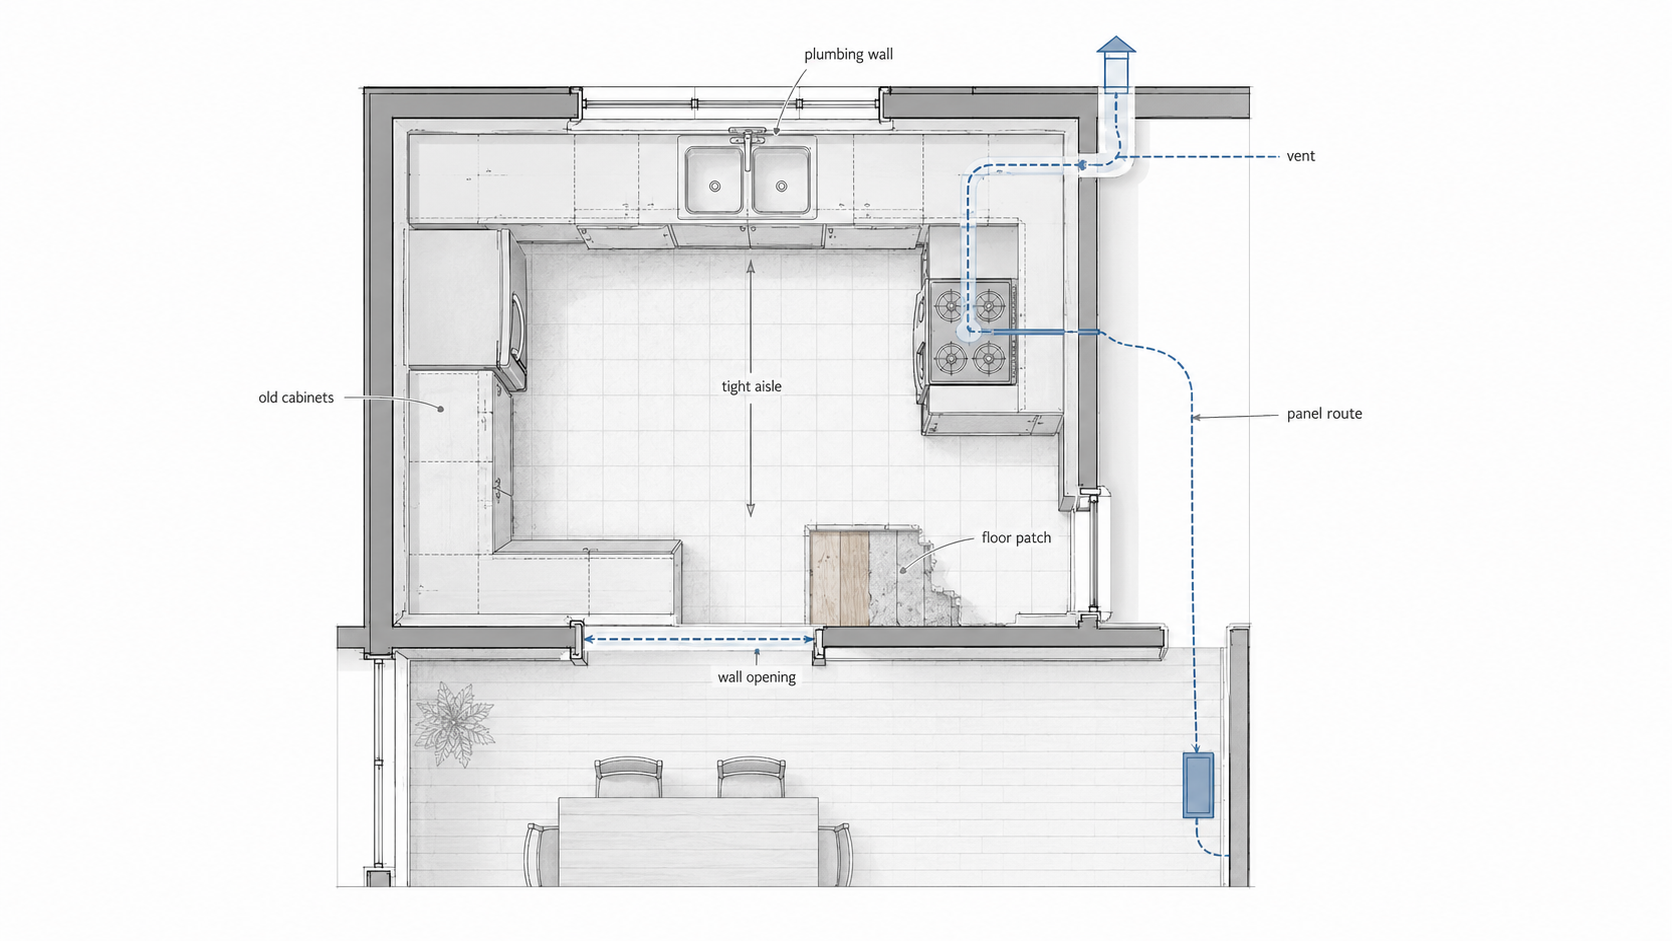
In a 1960s kitchen, the cabinets may be the least complicated part. The room may be narrow, the appliance clearances tight, the refrigerator opening into the walkway, the sink wall locking the layout in place, the range under-vented, and the whole thing lit by one ceiling fixture when it needs task light.
Soffits are the common trap. Sometimes they are empty; sometimes they hide ducts, wiring, plumbing, or framing. You do not want to design new cabinets around a guess. And wall removal is where kitchen plans get expensive — opening a kitchen to a dining or living room can make the house brighter and easier to use, but it can also remove storage, expose floor scars, create ceiling patch lines, push kitchen noise into the living room, and make furniture placement worse. The before-and-after photo never shows the part where the beam, wiring, flooring, lighting, HVAC, and trim all had to be solved.
If the house is a ranch, the kitchen is usually tied into the long plan, the dark middle rooms, and the traffic between the garage, living room, dining area, and backyard. The companion page on ranch house kitchen layout problems goes deeper there. And the cost changes hard once the kitchen moves from refresh to remodel — painting cabinets and swapping hardware is one project; moving walls, relocating plumbing, adding circuits, patching floors, and changing ventilation is another. For ranch-specific cost planning, use ranch kitchen remodel cost as the next step.
Bathrooms Hide the Worst Surprises
A 1960s bathroom can look like a color problem when it is really a water problem. The tub edge, the valve wall, the drain, the toilet flange, the subfloor, the fan, and the wall cavity matter more than the vanity style. If the floor is soft near the tub or toilet, the room has already moved past surface updates. If the fan is weak or missing, moisture may have been sitting in that room for years.
Do not tear out old tile just because it is old. Tear it out when the layout is wrong, the wet area is failing, the plumbing needs access, the subfloor is damaged, or the room cannot be made safe and useful without opening it. The opposite mistake is keeping tile that has already failed — new caulk can buy a small maintenance joint some time, but it will not rebuild a rotten subfloor or fix a leaking valve inside the wall.
Small 1960s bathrooms make every inch count. A door that hits the vanity, a toilet squeezed too close to a wall, a shallow medicine cabinet, or a fan that barely moves air can leave the room feeling wrong even after new tile goes in. For ranch houses, bathroom trouble is usually about small footprints, hall access, tub placement, and storage; the existing page on ranch house bathroom remodel ideas is the better follow-up when the layout, not the whole house, is the problem.
Ranch, Split-Level, and Bungalow Problems Differ
"1960s house" is not one house type, and the renovation questions change with the shape.
A 1960s ranch usually runs long and low, with a garage that can dominate the front, a darker middle zone, and rooms stretched along one floor. The questions are mostly about light, flow, the kitchen connection, exterior proportion, and whether opening a wall helps one room while quietly hurting another.
A raised ranch or split-level has a different problem entirely. The entry can feel tight, the stairs control how you move, and the garage and lower level set how the house reads from the street. Ceiling heights, half-level relationships, and awkward additions matter more than surface style. If that is your house, the existing raised ranch remodel page is the cleaner next read.
A smaller 1960s bungalow or compact one-story has less room to absorb a mistake — a bathroom door swing, a cabinet depth, an appliance location, or a hallway storage decision can change daily life. The same "open it up" idea can rescue one 1960s house and damage another. The plan decides, not the slogan.
Exterior Updates Can Fight the House
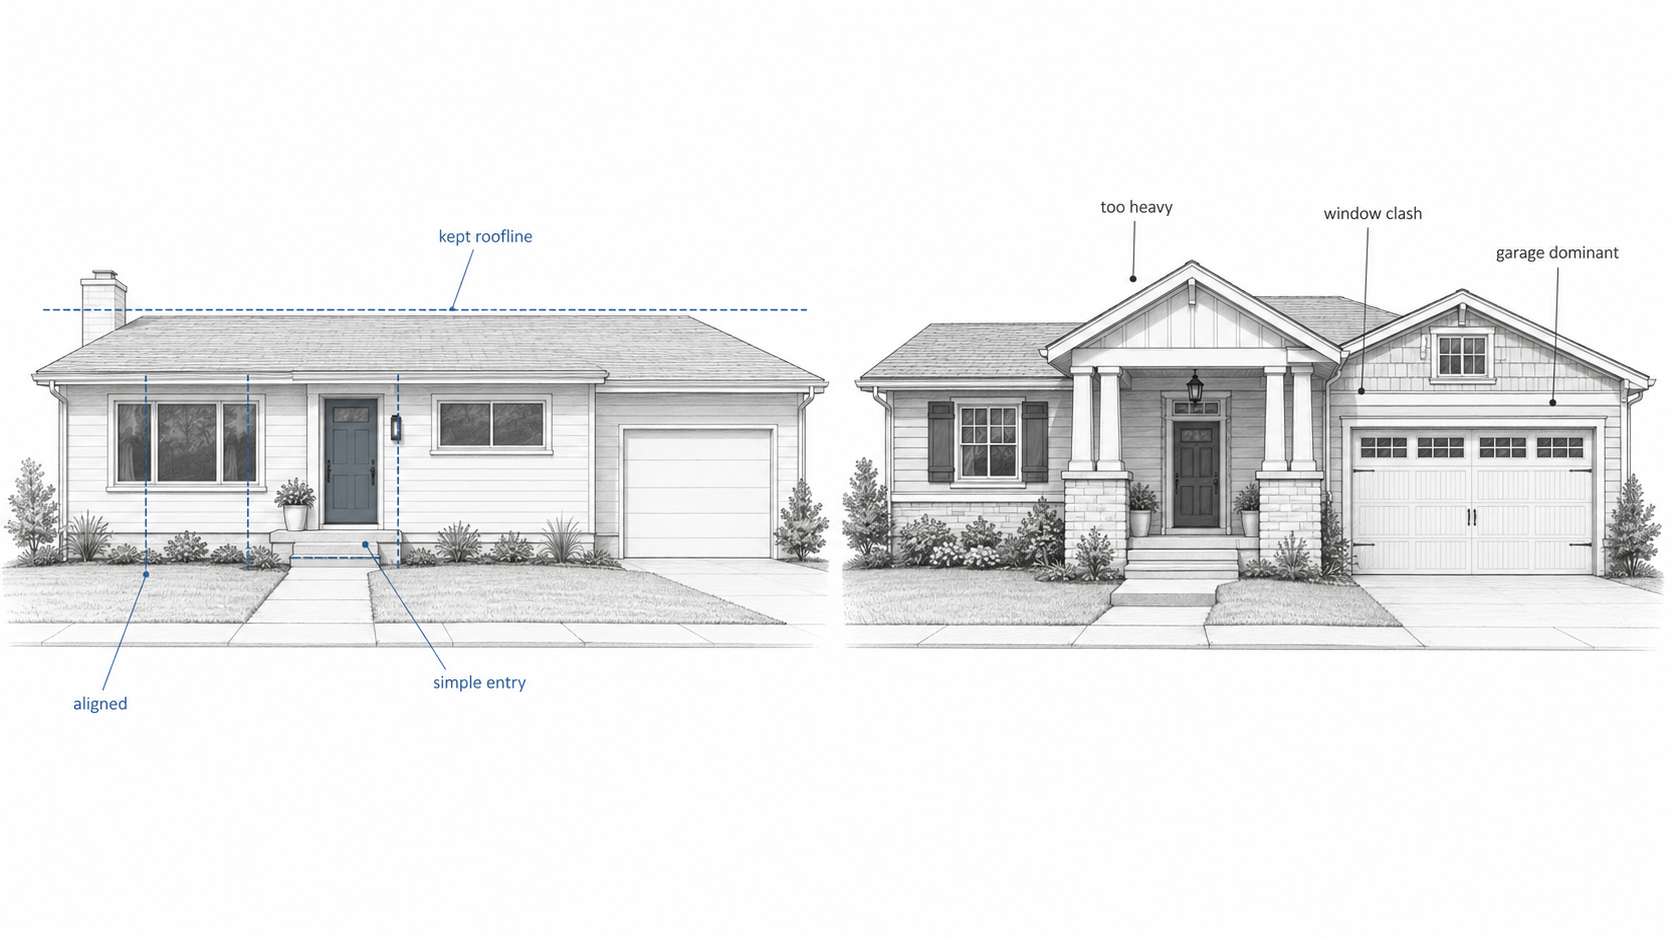
A 1960s exterior usually needs restraint before it needs decoration. The bad updates are easy to spot once you know the pattern: oversized porch features, heavy fake trim, window grids that do not fit the house, awkward siding breaks, and a garage that still dominates after everything else got painted.
The house is still long and low. The original roofline is still there. The window rhythm is still doing most of the visual work. So the better exterior work starts with cleanup and alignment — fix the drainage, repair rotten trim, clean up the entry, improve the walkway, handle the garage dominance, respect the roofline, keep window changes consistent, and use color to calm the house instead of bury it.
Brick ranch homes need extra caution, because paint, limewash, German smear, siding changes, and trim work all hit maintenance and resale differently. If brick is the main question, work through brick ranch house updates before committing to a finish. And for ranch-specific judgment about what is worth touching at all, what to fix on a ranch house exterior is the better next step.
The Remodel Starts Twice
The first remodel is the one you plan with photos, samples, quotes, and optimism. The second one starts when the house answers back.
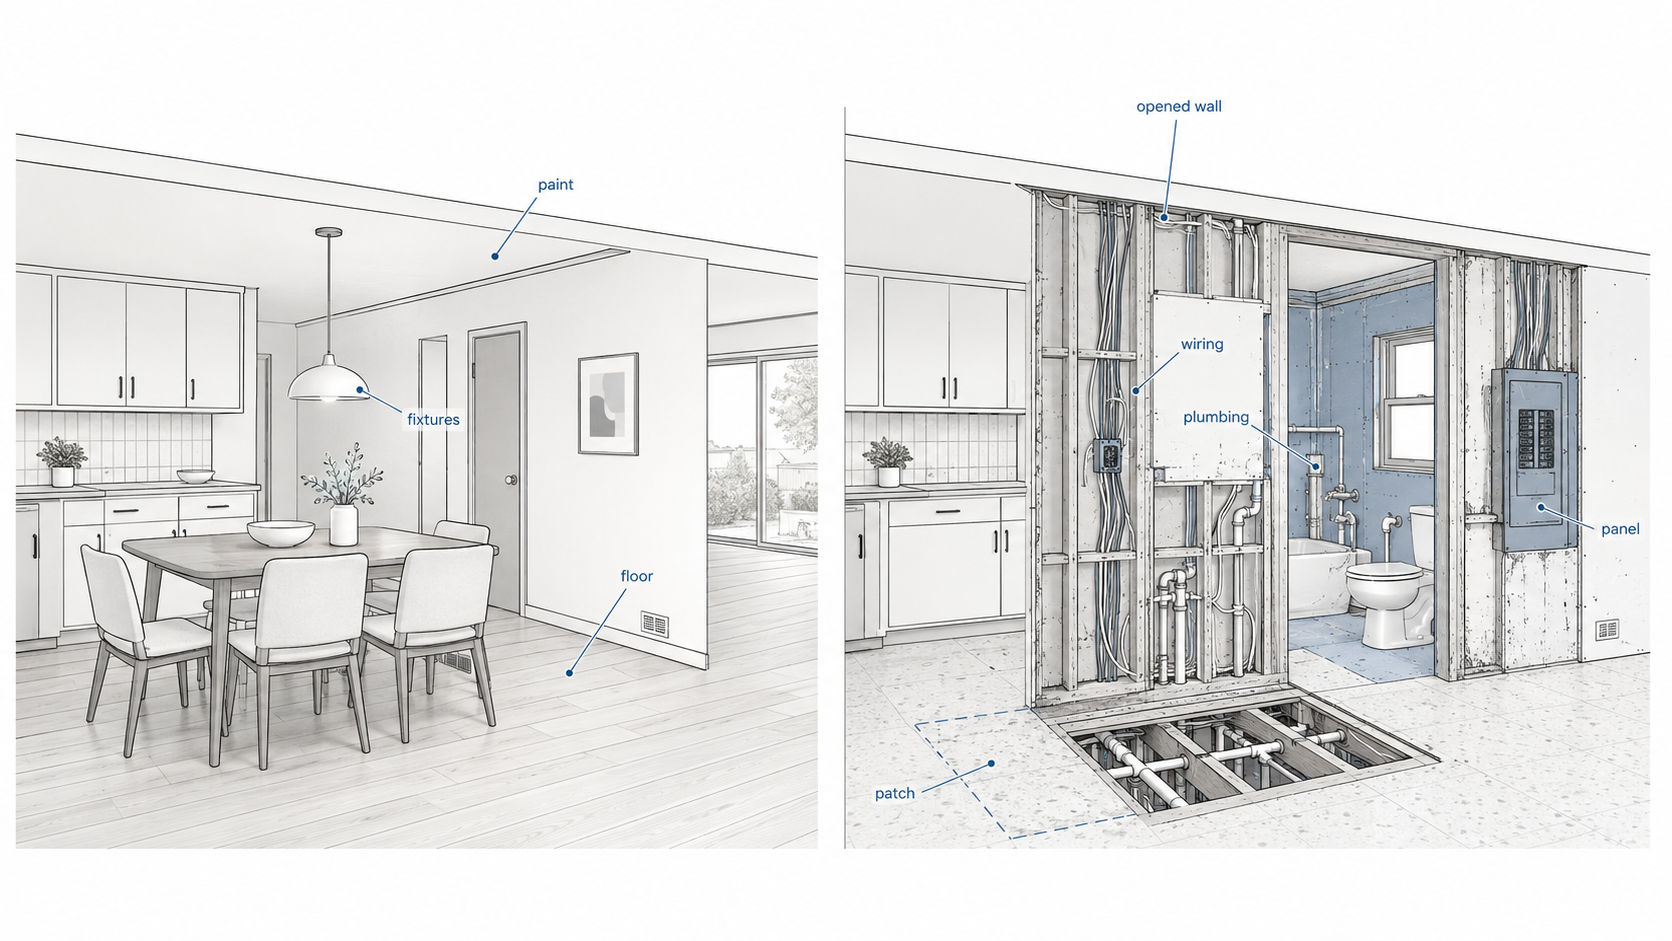
That might be the day the ceiling texture needs testing before it can come down, or the kitchen wall opens and the wiring is messier than the quote assumed, or the bathroom tile comes off and the subfloor around the tub is soft, or the wall you wanted gone turns out to carry more than you priced, or the new window quote skipped the trim, siding, flashing, and interior repair around every opening. This is where a 1960s renovation stops being a mood board and becomes sequencing work.
The safer move is to build two budgets before construction starts. One is for the visible work — cabinets, counters, fixtures, tile, paint, lights, flooring, trim, exterior finishes. The other is for the work that can interrupt everything — testing, abatement, electrical repairs, plumbing repairs, roof or drainage work, bathroom wet-area rebuilding, structural changes, and inspection-driven corrections. Ignore the second budget and it does not go away. It just takes its money out of the first one.
Start in This Order
Walk the house before you open it. Photograph the rooms, the panel, the attic, the basement, the crawlspace, the exterior walls, the roof edges, the windows, the bathrooms, and the kitchen walls.
Test suspect materials before disturbing them — paint, ceiling texture, flooring, adhesive, pipe insulation, duct wrap, and old siding are not worth guessing about when demolition is on the calendar. Then inspect the electrical, plumbing, ventilation, moisture, and structure before ordering finish materials; this is the step that keeps the design flexible while the expensive unknowns are still being found.
Separate the must-do work from the nice-to-do work. Unsafe wiring, active leaks, failed wet areas, bad drainage, and structural questions do not belong in the same column as cabinet color. Plan wall openings as whole-house changes, because one opening touches structure, flooring, ceilings, lighting, ducts, outlets, furniture, sound, smell, and storage — if the goal is a better kitchen, do not wreck the living room to get it. And choose finishes late, since they are far easier to adjust than framing, plumbing, wiring, waterproofing, and exterior water control.
A 1960s house renovation goes better when the order is right: test first, inspect the systems, protect the good parts, price the hidden work, and choose the finishes last.
FAQ
Is a 1960s house worth renovating?
Yes, if the structure is sound, the location works, and the budget allows for hidden systems as well as finishes. Many 1960s houses have simple forms that renovate well. The mistake is treating every project as cosmetic before inspection.
What should I check first in a 1960s house?
Start with safety and hidden conditions: lead paint risk, asbestos-suspect materials, the electrical panel, branch wiring, plumbing condition, bathroom wet areas, attic insulation, basement or crawlspace moisture, roof drainage, and any wall you plan to remove.
Do 1960s houses have lead paint?
Some do. In the United States, residential lead paint was banned after 1978, so a 1960s house is old enough to require caution. Testing is the clean answer. Do not sand, scrape, or demolish suspect painted surfaces casually.
Do 1960s houses have asbestos?
They can. The risk depends on the material, product, location, and later renovations. Old flooring, adhesives, ceiling texture, pipe insulation, duct materials, and some siding products are common places to slow down and test before disturbance.
Is aluminum wiring common in 1960s houses?
It is possible, especially in houses built or altered from the mid-1960s into the mid-1970s. The concern is usually at connections, not because every old wire is visibly failing. Have a qualified electrician inspect it before planning around it.
Should I remodel the kitchen or bathroom first?
Start with the room that has the higher risk of damage or daily failure. A leaking bathroom, unsafe wiring, bad ventilation, or failing plumbing should beat a kitchen that only looks dated. If both rooms work, the kitchen may deliver a bigger daily-use improvement — but only after the hidden scope is priced.
Can I open walls in a 1960s ranch house?
Often, yes, but verify the load path first. Ranch houses can have simple framing, and simple does not mean every wall is safe to remove. Check joist direction, roof framing, beams, posts, basement supports, ducts, wiring, and floor patching before committing to the opening.