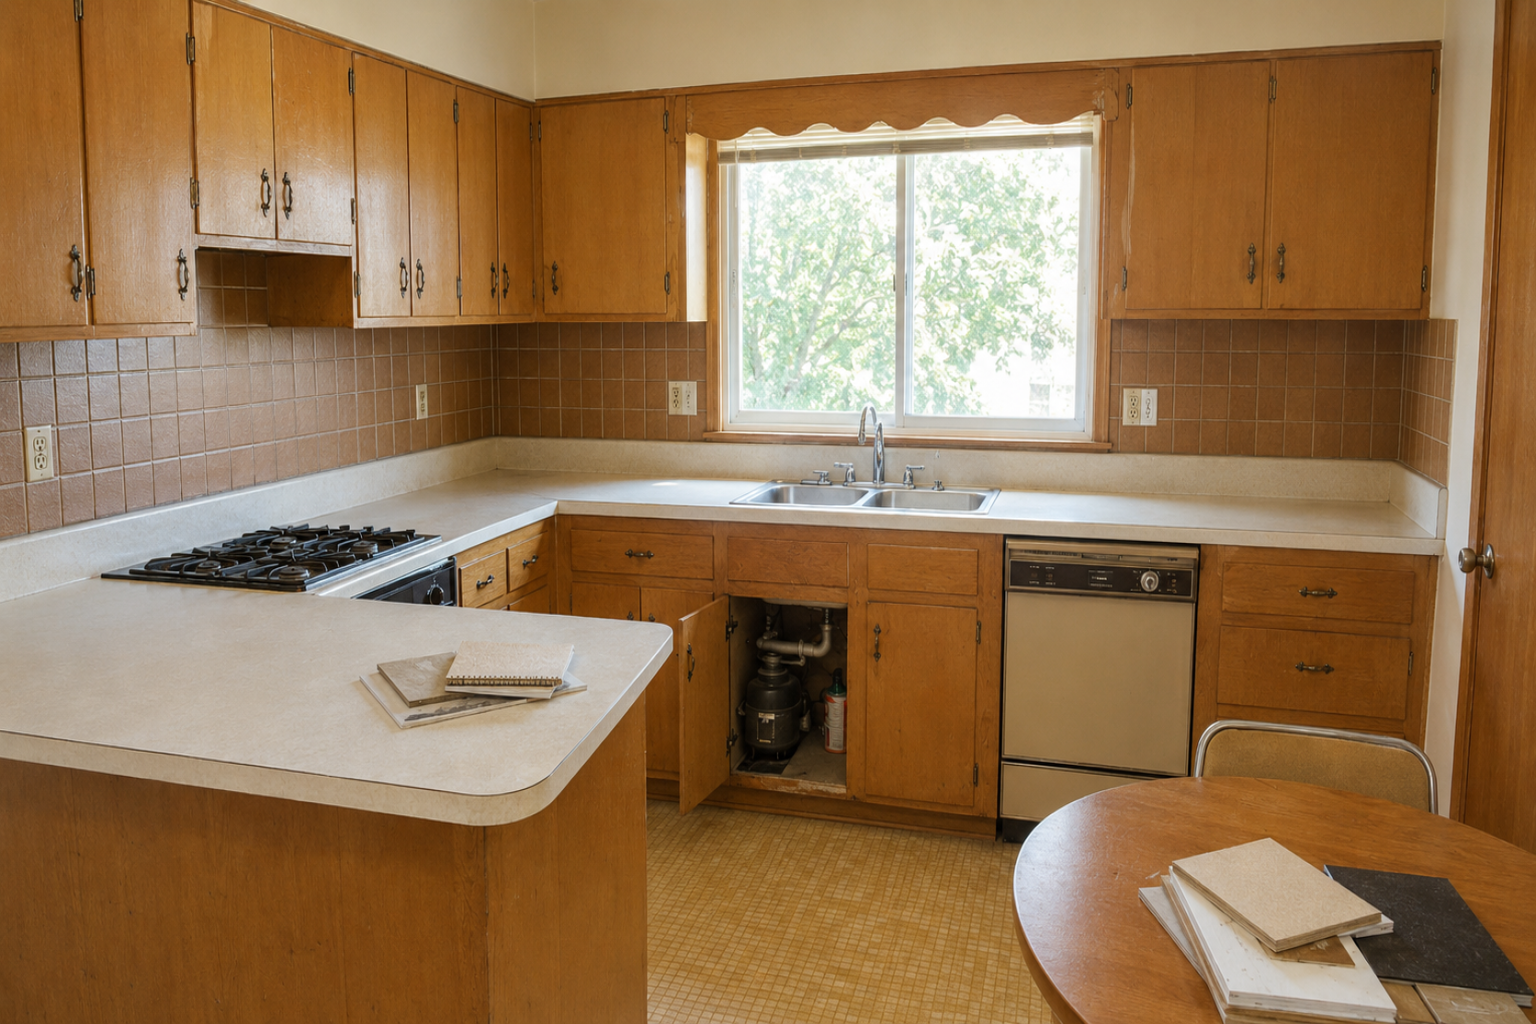
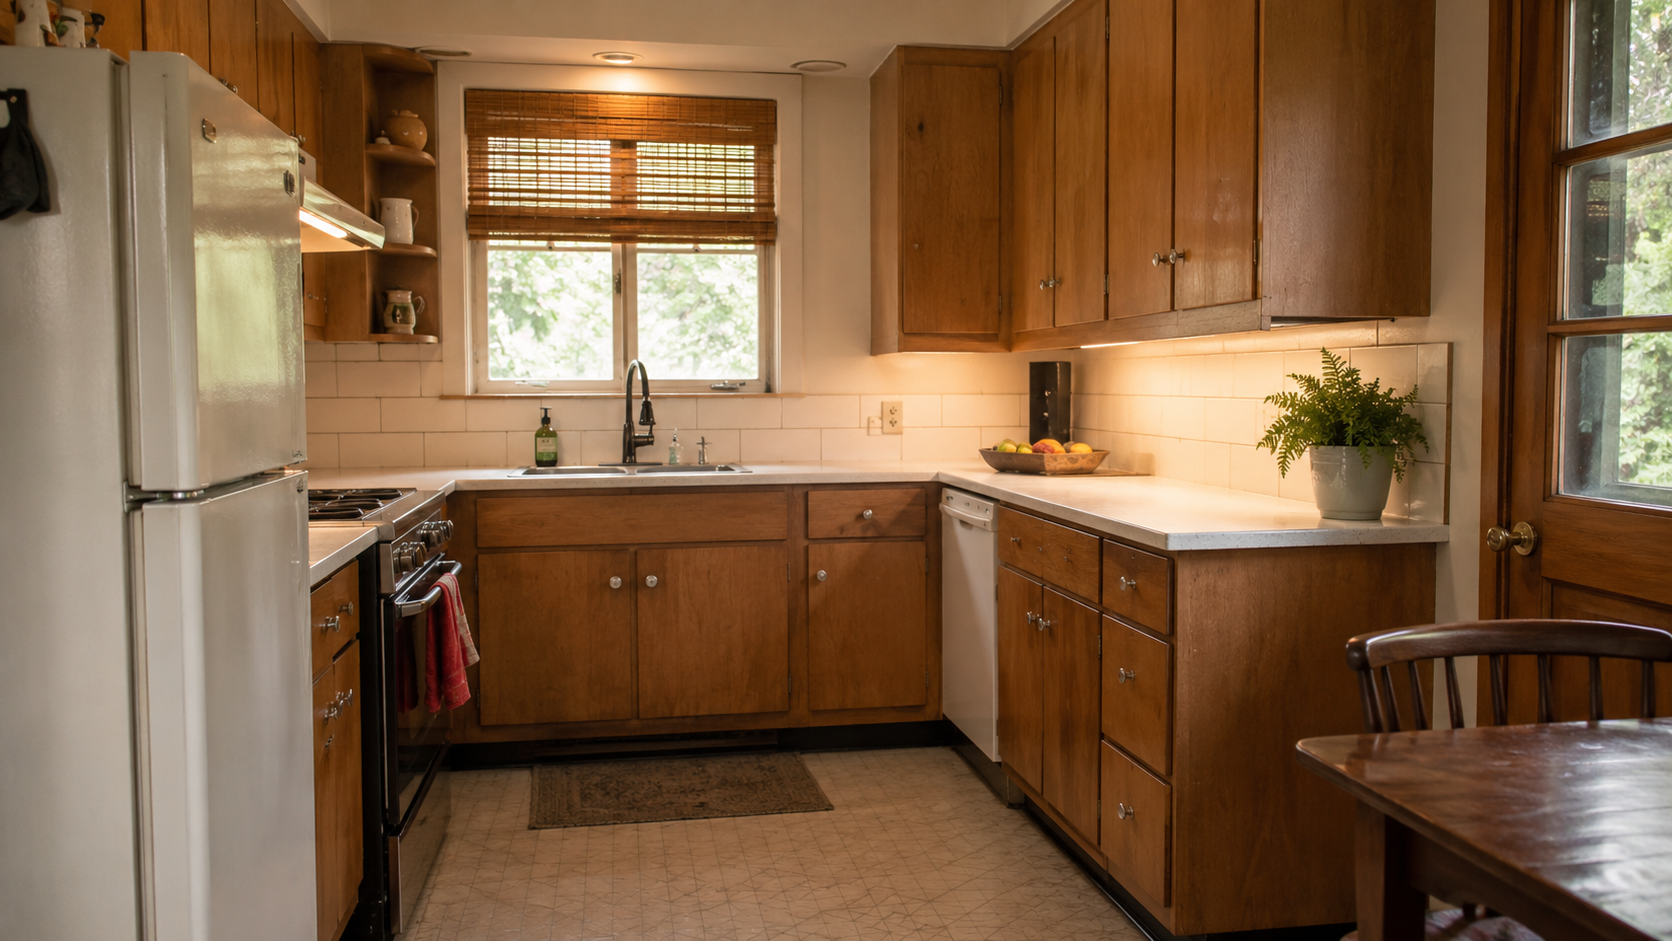
A 1960s kitchen usually looks like a cabinet problem.
Sometimes it is. The doors are dark. The hardware is tired. The soffit makes the room feel low. The light is bad.
But the cost usually starts behind that.
The soffit may hide wiring or ducts. The floor may stop under the old cabinets. The sink may be tied to a wall you want to move. The range may need better ventilation.
The cabinets are what you see first. The expensive part is what they are attached to.
Before You Order Cabinets
Do not order cabinets first.
That sounds obvious until the kitchen showroom starts making the project feel clean and finished. Cabinet drawings can make an old kitchen look solved before the old kitchen has been checked.
Measure the room first. Photograph the cabinet runs, soffits, ceiling lines, floor lines, window trim, sink wall, range wall, refrigerator location, door swings, electrical panel location, and any wall you hope to open. If there is basement, crawlspace, or attic access near the kitchen, document that too.
The boring photos matter later.
Old cabinets may sit on a floor that does not continue underneath them. A soffit may hide ducts or wiring. A sink wall may be harder to move than it looks. A refrigerator opening may be too shallow for the appliance you want. A range may need a better vent path. A wall may be doing more work than the floor plan suggests.
Cabinets are expensive to change after those things are found.
There is also the old-materials question. A 1960s kitchen can include painted trim, older flooring, adhesive, ceiling texture, and patched wall surfaces that should not be disturbed casually. In the United States, pre-1978 paint puts the house in the lead-safe caution zone. Suspect flooring, adhesive, ceiling texture, or backing materials may also need testing before demolition.
Refresh, Remodel, or Rebuild?
The first decision is the level of work.
A refresh keeps the kitchen mostly intact. A remodel changes larger pieces while often keeping the same basic footprint. A rebuild opens the room enough that wiring, plumbing, walls, floors, ceilings, and inspections start driving the job.
| Kitchen Condition | Likely Scope | Watch For |
|---|---|---|
| Cabinets are dated, but the layout works | Refresh | Paint prep, hardware, lighting, counters, old paint |
| Cabinet boxes are solid, but doors are tired | Cabinet update | Hinge condition, drawer function, uneven faces, layout limits |
| Same layout, new cabinets | Remodel | Soffits, flooring gaps, appliance sizes, wall repair |
| Sink, range, or refrigerator moves | Layout remodel | Plumbing, venting, circuits, cabinet redesign |
| Kitchen wall comes down | Structural and layout project | Beam, posts, ceiling scars, floor patch, storage loss |
| Kitchen is gutted | Systems project | Wiring, plumbing, permits, inspection, ventilation, old materials |
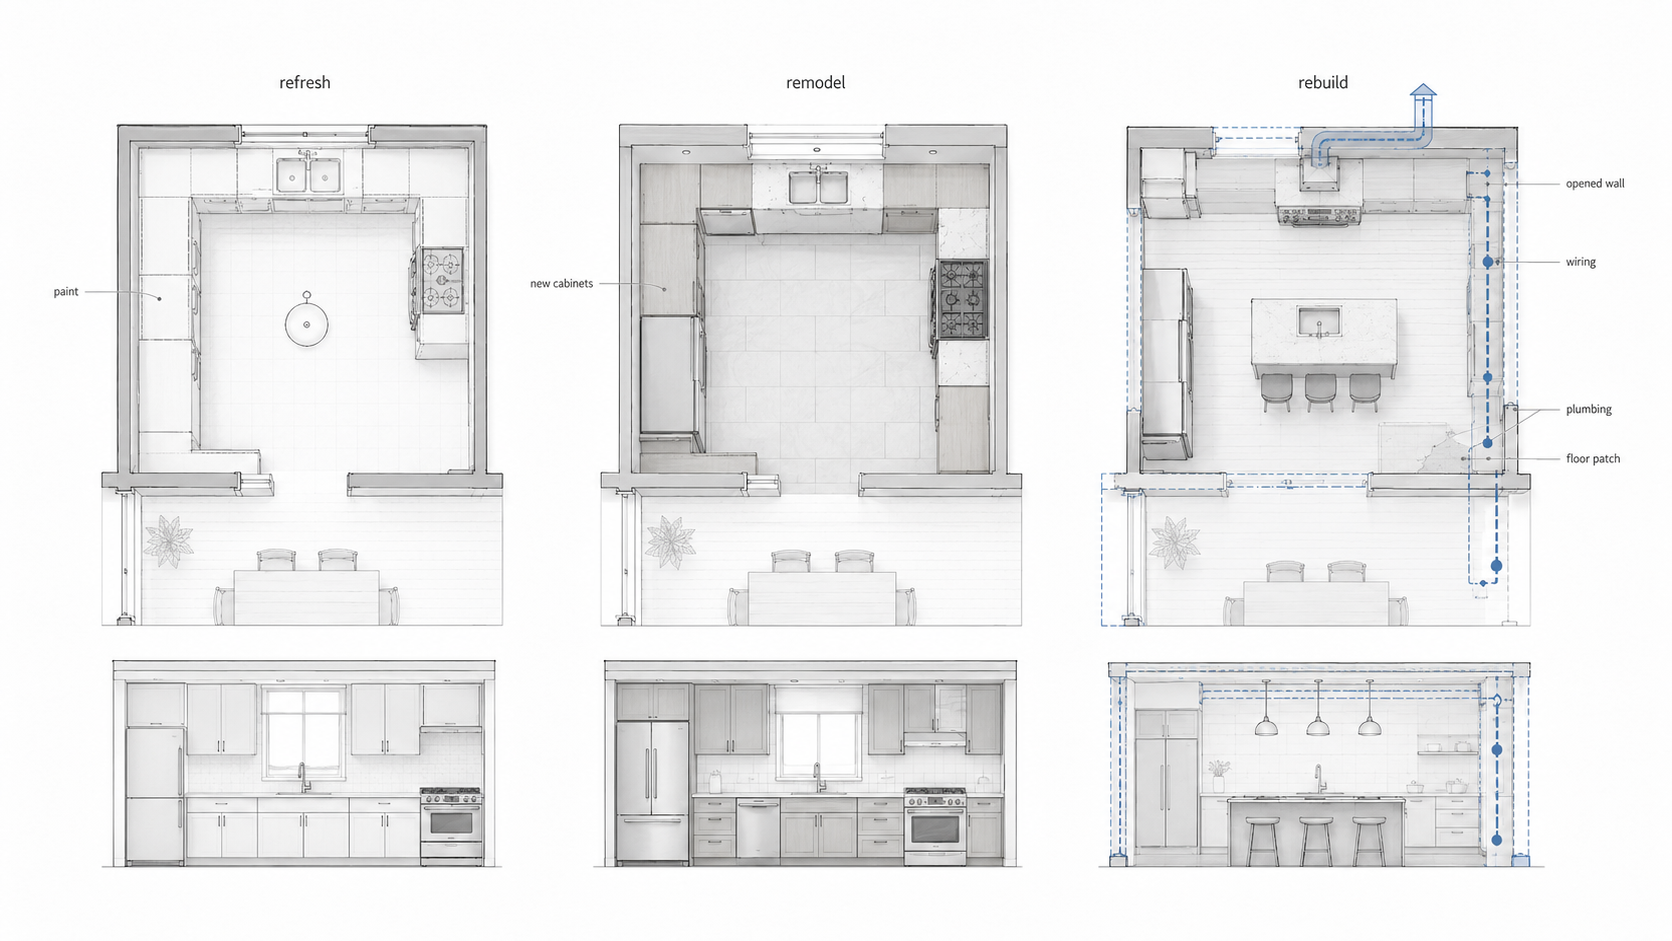
The cheap mistake is calling everything a remodel. The better move is to name the scope before anyone prices finishes.
Soffits Are the First Surprise
The soffit is where a simple cabinet plan starts arguing with the house.
In many 1960s kitchens, the box above the cabinets makes the room feel shorter and older. Removing it sounds easy. Sometimes it is. Sometimes it is not.
A soffit may be empty. It may also hide ductwork, wiring, plumbing, framing, or an old vent route. You do not know from the outside. A small inspection opening can save a lot of redesign.
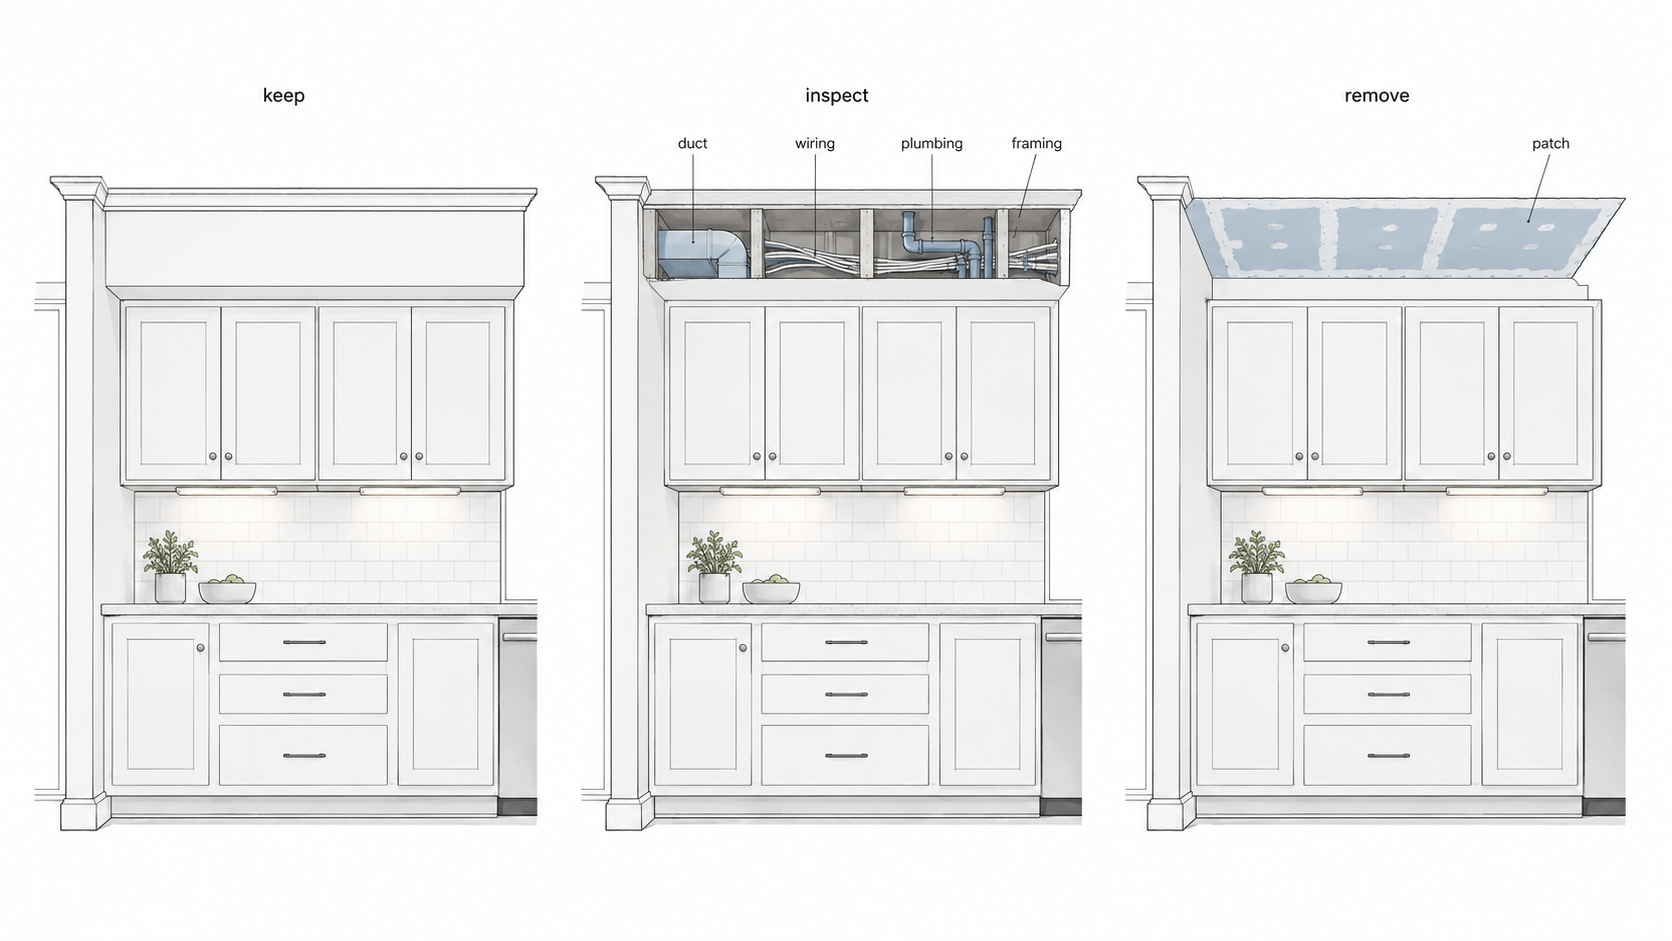
If the soffit is empty, removal still leaves work behind. The ceiling has to be patched. The wall above the cabinets may need repair. Old paint lines may show. Cabinet height may change. Lighting may need to be adjusted. Crown, trim, or a filler detail may be needed so the new cabinets do not look stranded below a rough ceiling plane.
If the soffit is full, the question changes. You may keep it and make it look intentional. You may reroute what is inside it. You may remove only part of it. Or you may decide that taller cabinets are not worth the extra cost and damage.
Good material. Wrong assumption. That is how soffits get expensive.
The Cabinet Problem May Not Be the Cabinets
Old cabinets are easy to hate.
Sometimes they deserve it. Bad boxes, failing drawers, water-damaged sink bases, broken hinges, and awkward layouts are good reasons to replace them. Saving bad cabinets can waste money.
But not every 1960s cabinet problem is a cabinet problem.
Dark wood can look worse than it is when the room has one tired ceiling light, yellowed counters, worn pulls, and no light under the uppers. The cabinets get blamed for everything because they take up the most visual space. Sometimes the finish is doing a lot of the damage. Sometimes the counter is. Sometimes the room is just badly lit.
If the cabinet boxes are straight, dry, sturdy, and laid out well, a cabinet update may be enough. Paint, new hardware, better lighting, a new counter, or improved backsplash can change the room without tearing apart the walls.
If the layout is bad, saving the cabinets becomes harder to defend. A refrigerator in the walkway, a sink trapped in the wrong corner, a range with no landing space, or a dishwasher door blocking the main aisle will still be annoying after the cabinets look better.
The wood may not be the whole problem. The plan might be.
Appliances Got Bigger
Modern appliances can make a 1960s kitchen feel smaller overnight.
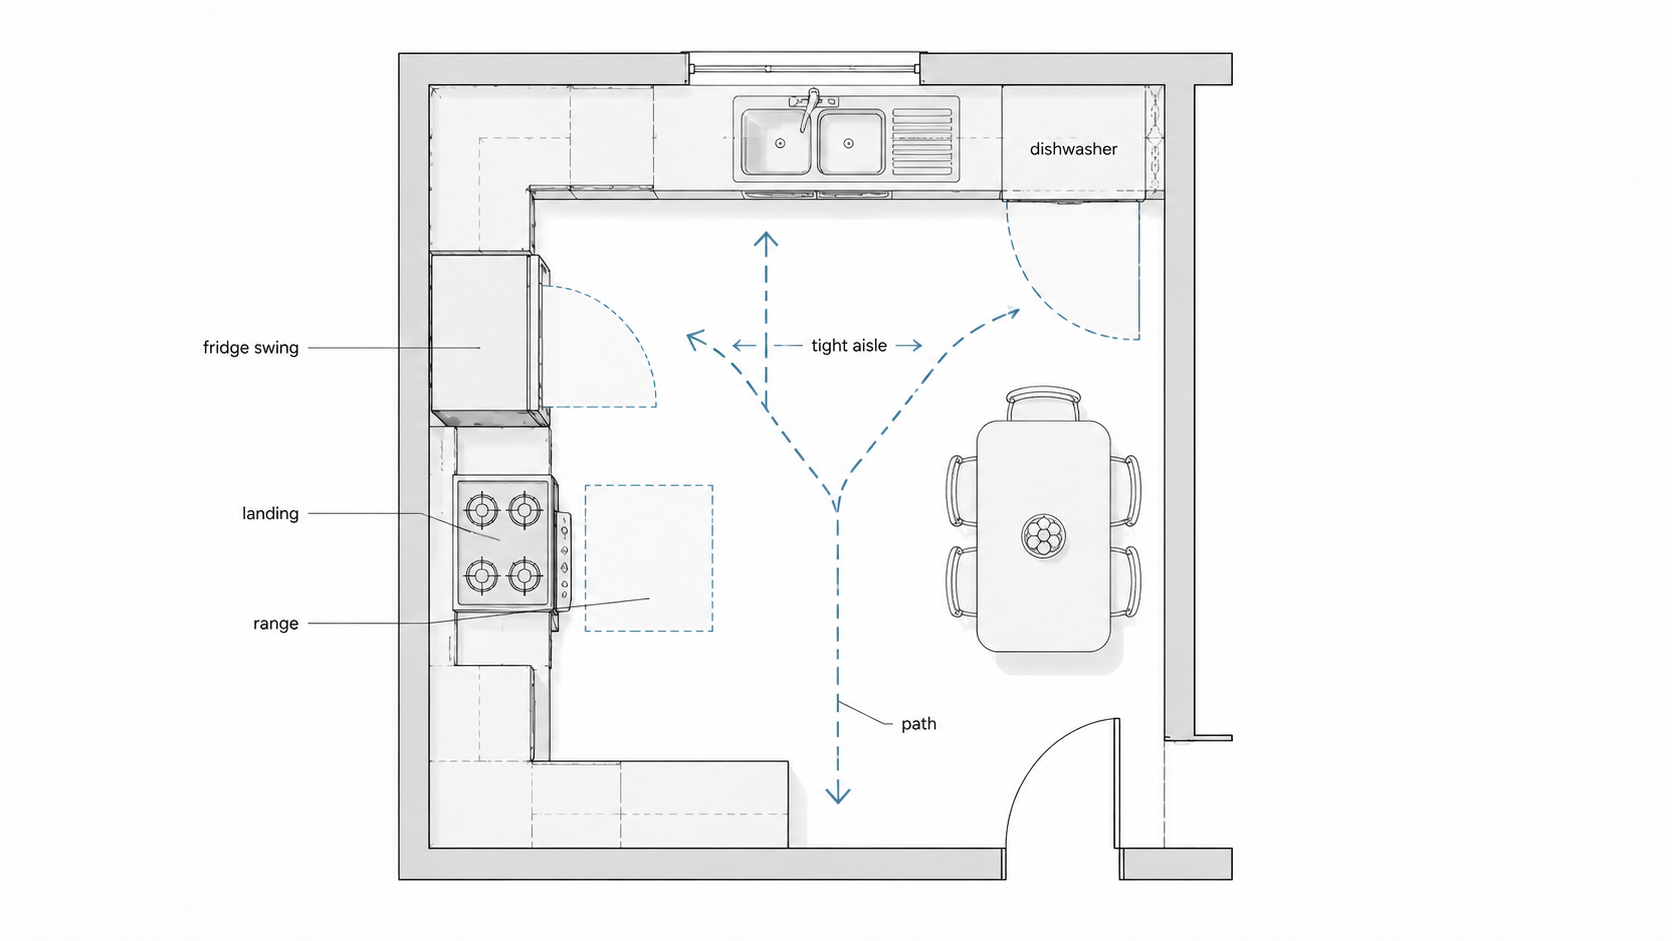
The refrigerator is usually the first offender. A deeper fridge can push into the aisle. The door swing may block the main path. The handle may hit a wall, counter, or pantry cabinet. A kitchen can look renovated and still irritate you every time someone opens the fridge while another person is cooking.
The dishwasher can do the same thing. In a small kitchen, an open dishwasher door can block the sink, trap someone near the range, or cut off the walkway to the dining area.
Ranges need space too. Landing space matters. Venting matters. A new range in the same old spot may still work badly if there is no useful counter nearby or no clean path for a proper hood.
Then add the countertop crowd: coffee maker, toaster oven, blender, microwave, air fryer, chargers, and whatever lives beside the sink because there is nowhere else to put it. Older kitchens were not planned for that many daily appliances sitting out at once.
This is not glamorous design work. It is daily use.
In ranch houses, the kitchen often sits on a traffic route between the garage, side door, dining area, living room, and backyard. That traffic can cut right through the work zone. Before removing walls or ordering cabinets, draw the path people already use. Then draw the refrigerator swing, dishwasher door, oven door, and cabinet drawers over it.
The conflicts show up fast.
Wiring, Lighting, and Venting
A 1960s kitchen was not designed around today’s appliance load.
The old kitchen may have handled a refrigerator, range, a few small appliances, and one main ceiling light. The new kitchen may want a microwave, dishwasher, disposal, coffee station, toaster oven, undercabinet lighting, better task lighting, more outlets, and a range hood that vents outside.
That is why electrical planning should happen before the walls close and before the cabinet layout is final.
This does not mean guessing at code from an article. Kitchen electrical work is one of the places where local code, permit rules, appliance specs, and electrician judgment matter. The practical point is simpler: do not treat wiring as an afterthought after cabinets are measured.
Lighting is part of the same problem. A 1960s kitchen with one central fixture can feel gloomy even after new finishes. Better light usually comes from layers: ceiling light, task light, undercabinet light, and daylight if the window placement allows it.
Venting is easy to underprice. A range hood that recirculates air is not the same as a ducted hood. A microwave-over-range unit may save space, but it can be a compromise for capture, height, and daily use. If the kitchen is opened to the living room, weak ventilation becomes more noticeable because cooking smell, sound, and grease do not stay in the kitchen as neatly.
Once cabinets are installed, every missed wire and vent decision gets harder.
Plumbing Walls Limit the Plan
The sink wall has power.
Moving a sink is not like moving a small table. The drain, vent, water lines, dishwasher connection, wall framing, floor access, and sometimes slab or crawlspace conditions all matter. If the kitchen sits over a basement or crawlspace, the work may be easier to inspect and route. If the house is on a slab, moving plumbing can become a bigger decision.
Keeping the sink in roughly the same place can save money. It can also keep the remodel calmer when the layout already works.
But keeping the sink is not always right. If the sink wall blocks the best cabinet run, traps the dishwasher in a bad spot, or keeps the room from functioning, moving it may be worth the cost. The point is not “never move plumbing.” The point is to price that decision before the cabinet drawing gets emotional.
Dishwasher location belongs in this conversation too. A dishwasher needs to work with the sink, not fight it. In a small 1960s kitchen, a poorly placed dishwasher door can block the main aisle every night.
Wall Removal Can Help the Kitchen and Hurt the House
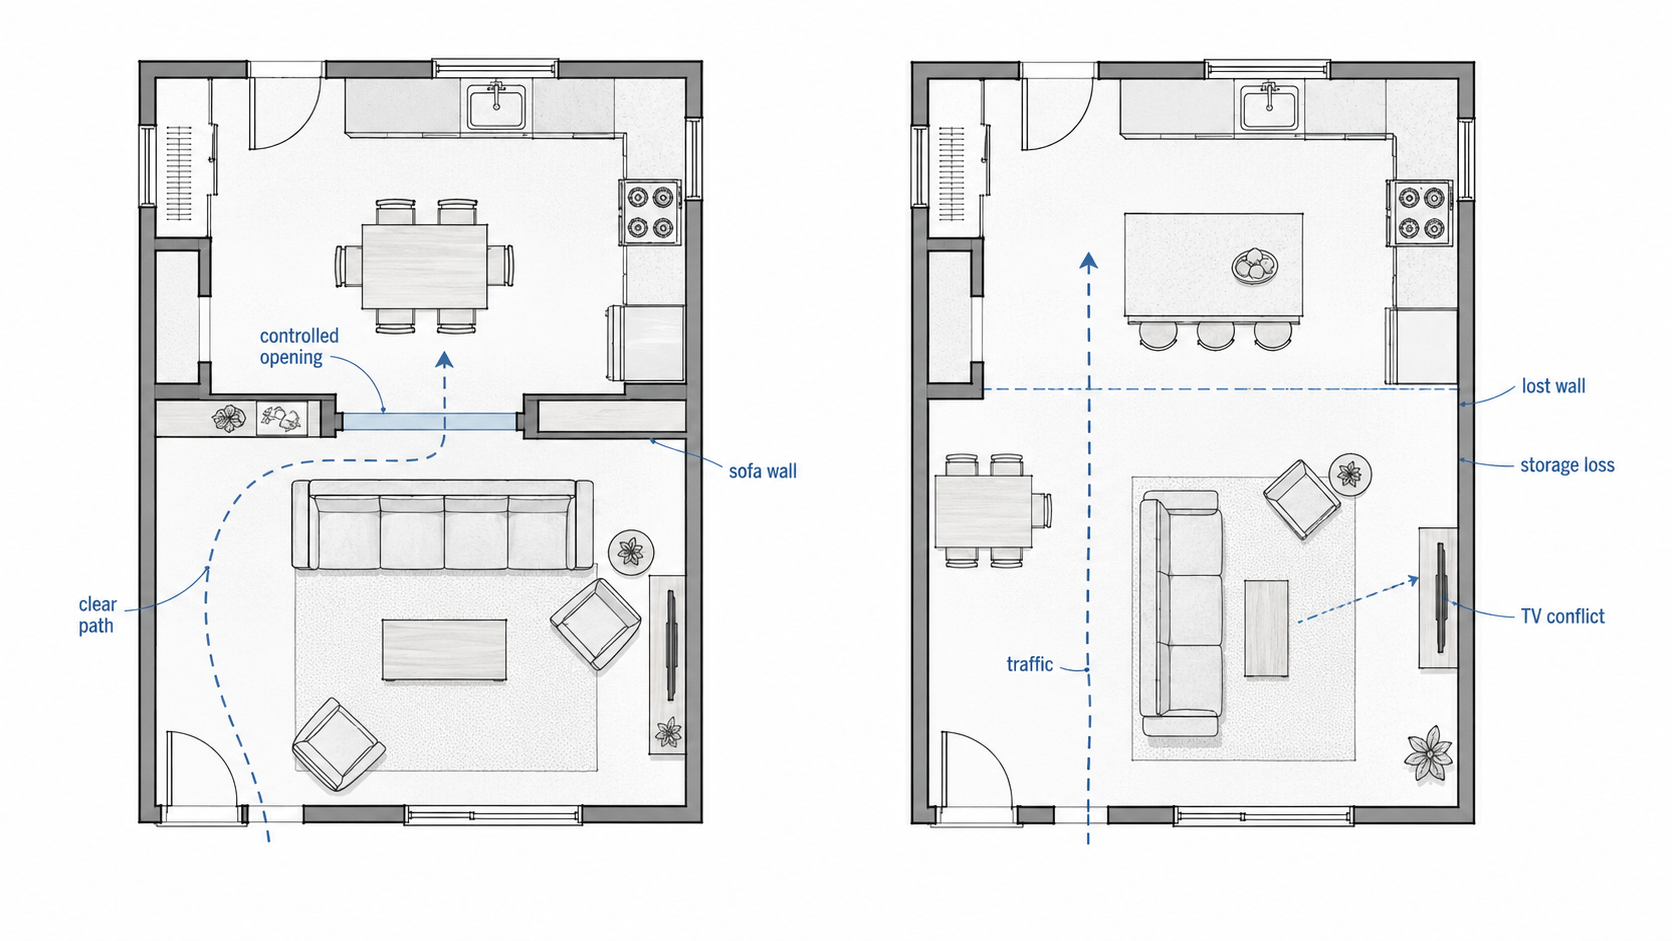
Opening a kitchen wall can be the right move.
It can bring light into a dark room. It can connect the cook to the dining or living space. It can make a cramped kitchen feel less cut off. In a ranch house, a controlled opening can change the whole middle of the plan.
But a wall is not only a wall.
It may carry load. It may contain wiring, ducts, plumbing, or returns. Removing it may expose a floor patch where the wall used to sit. The ceiling may need a beam, header, drywall repair, lighting changes, and trim work. The kitchen may lose upper cabinets. The living room may lose the wall where the sofa or TV belonged.
That last part gets missed.
The kitchen can improve while the living room gets worse. A full opening can push kitchen noise, cooking smell, dirty dishes, and appliance glare into the room that used to feel separate. A pass-through, wider doorway, cased opening, or partial wall may solve the problem without making the kitchen dominate the house.
For ranch houses, the deeper wall-removal decision belongs in removing a wall in a ranch kitchen.
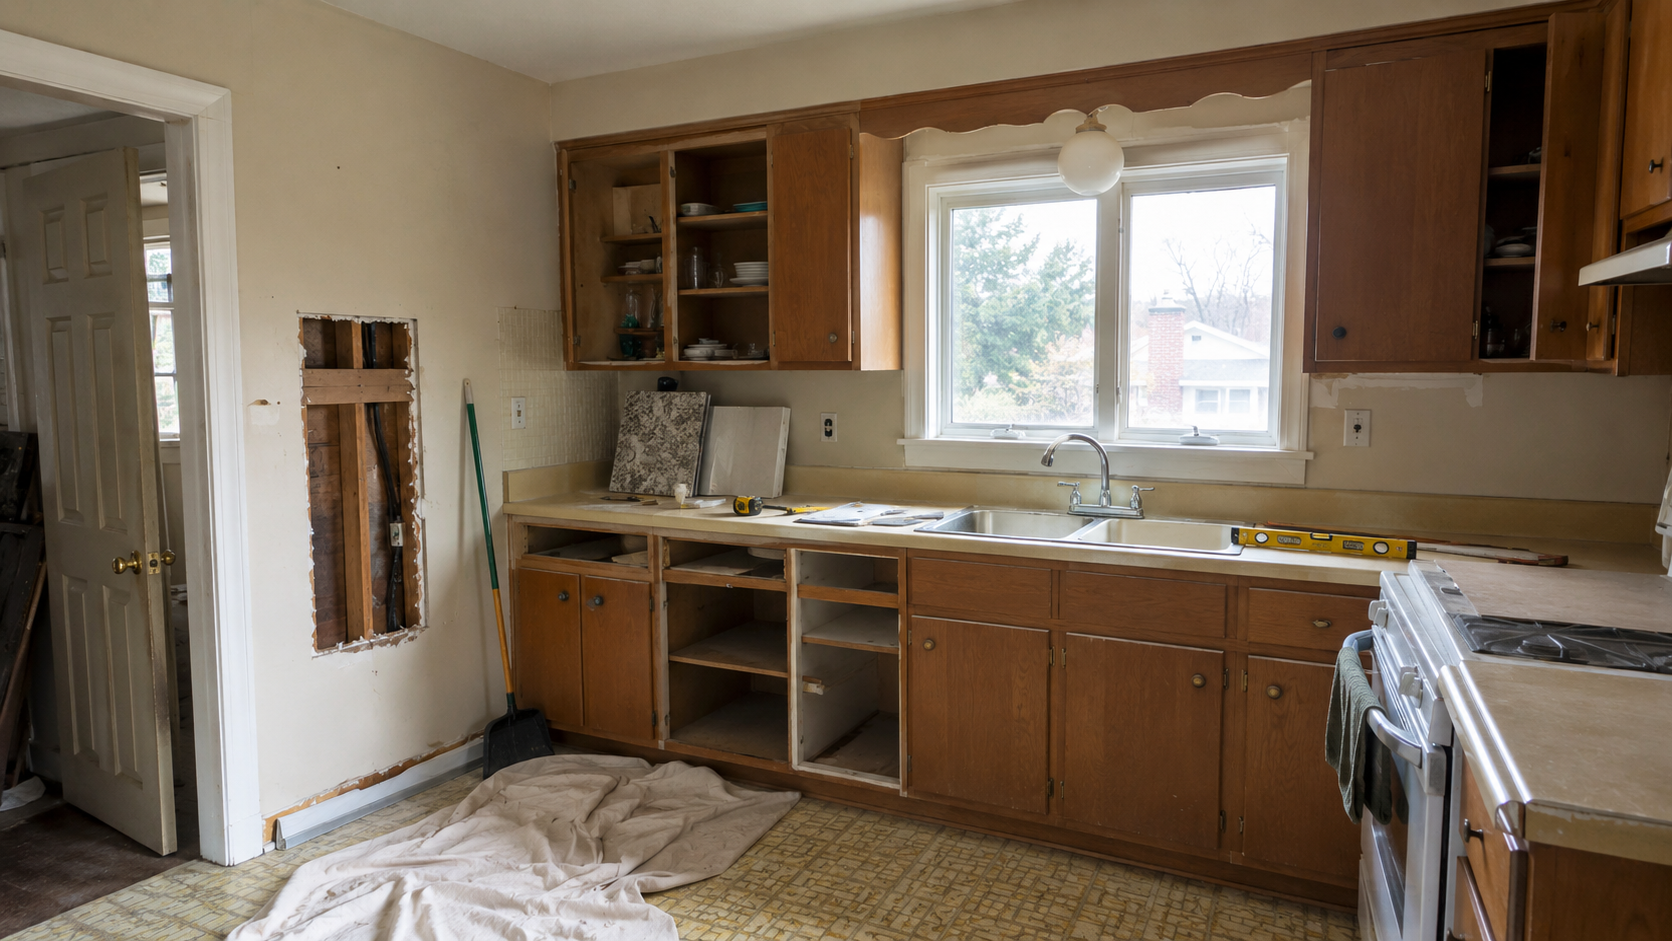
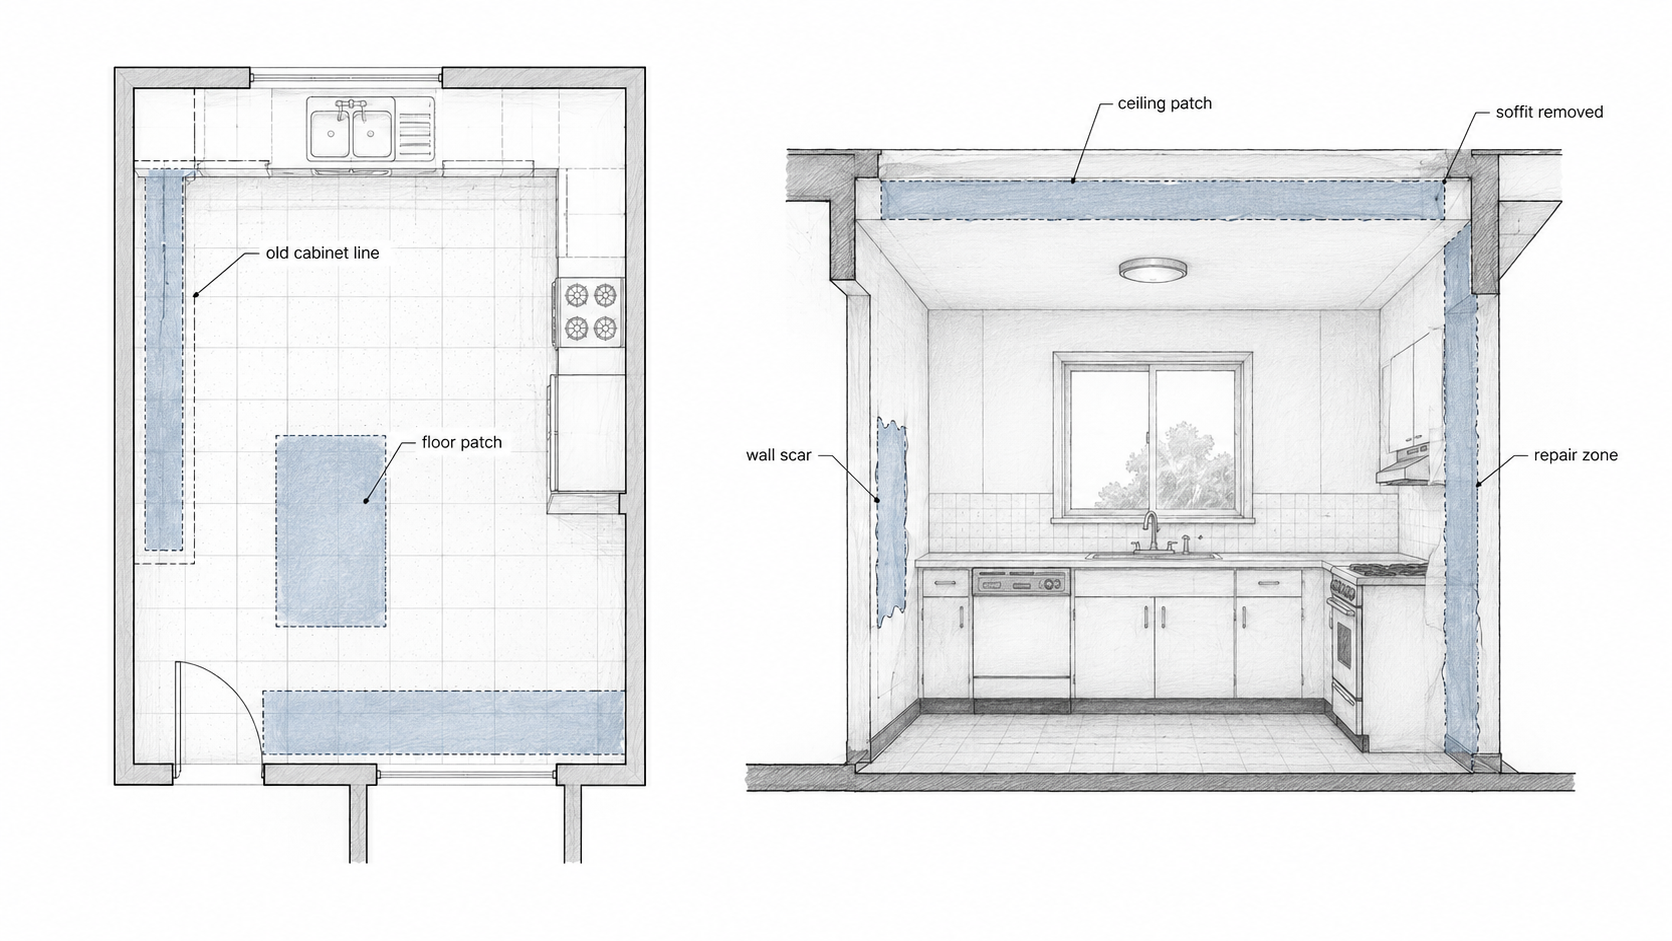
Floor and Ceiling Scars
This is the part the clean after photo usually hides.
Old cabinets may have been installed before the current floor. When they come out, the finished flooring may stop short. The new cabinet layout may expose a strip of subfloor, old vinyl, mismatched hardwood, or a shadow line that cannot be cleaned away.
Soffits leave scars too. Remove the box and the ceiling has to be repaired. Sometimes the wall above the cabinets was never finished cleanly because no one expected it to be seen. Sometimes the old texture does not match. Sometimes the lighting layout no longer makes sense once the upper cabinet line changes.
Wall removal adds another patch. The floor has to be repaired where the wall sat. The ceiling has to be repaired where the wall met it. If the rooms had different flooring on each side, the opening can force a larger flooring decision than expected.
That is why “same layout” is not always boring. Sometimes it is the thing that keeps a kitchen remodel from spreading into three rooms.
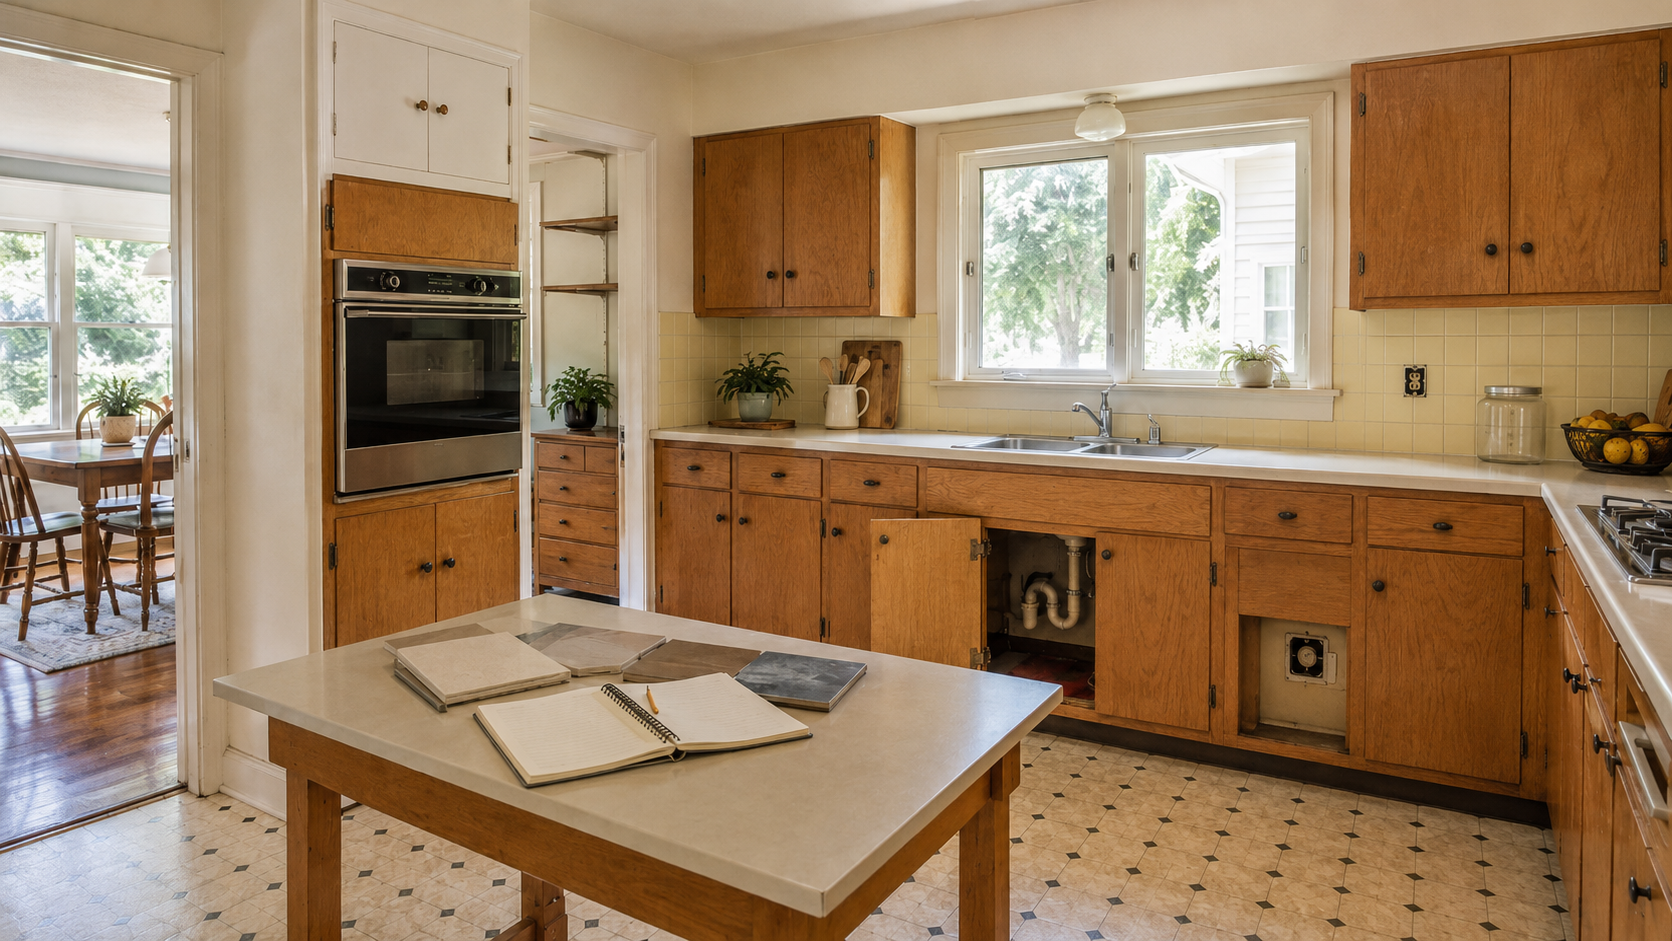
What To Keep From a 1960s Kitchen
A good remodel does not have to punish everything original.
Keep the parts that still work. A solid cabinet box. A good window over the sink. A breakfast nook that people actually use. A simple layout with decent work zones. Original wood that needs a better finish, not a dumpster. Built-ins that add storage without making the room feel crowded.
Some 1960s kitchens have warmth that newer remodels try to fake later. Wood, simple cabinet faces, modest proportions, and a clear eating area can still work if the room gets better light, better hardware, better counters, and cleaner surfaces.
Keep the plumbing wall if moving it does not improve the room enough to justify the cost. Keep the window if it gives the kitchen its best daylight. Keep the smaller footprint if expanding it would damage the dining room, living room, or exterior wall.
Old does not automatically mean wrong.
For whole-house decisions about what to keep before remodeling, use 1960s house renovation as the parent guide.
Start in This Order
Measure the kitchen before you design it. Measure wall lengths, ceiling height, window locations, door swings, appliance spaces, aisle widths, and cabinet depth.
Photograph the existing kitchen before anything comes out. Get the cabinet lines, soffits, floor transitions, sink wall, range wall, refrigerator space, panel location, attic or basement access, and any wall that may be opened.
Check suspect paint, flooring, adhesive, and ceiling materials before disturbance. This is especially important in pre-1978 houses where lead-safe work practices may apply and in older kitchens where flooring or ceiling materials may need testing.
Investigate the soffits before committing to cabinet height. Empty soffits and full soffits lead to different budgets.
Verify electrical needs, lighting, and range ventilation before the cabinet order is final. This step is where a lot of “simple” remodels start to become systems work.
Decide whether the sink, range, and refrigerator stay or move. If one moves, check what else follows it.
Decide wall openings last, not first. A wall opening should improve the kitchen without ruining storage, flooring, ceiling repair, circulation, or the room next door.
Choose finishes after the scope is honest.
Common Questions
Is a 1960s kitchen worth remodeling?
Yes, if the layout can be improved without letting the project spread out of control. Many 1960s kitchens have simple footprints that remodel well. The main risk is underpricing hidden work behind cabinets, soffits, walls, floors, and old utilities.
Should I remove soffits in a 1960s kitchen?
Only after checking what is inside them. Some soffits are empty and mostly cosmetic. Others hide ducts, wiring, plumbing, or framing. Even an empty soffit leaves ceiling and wall repair behind.
Can I keep 1960s kitchen cabinets?
Sometimes. Keep them if the boxes are dry, sturdy, straight, and the layout works. Replace them if the cabinets are damaged, the drawers fail, the layout is bad, or saving them prevents a better kitchen.
What makes a 1960s kitchen remodel expensive?
The cost usually changes when the project touches wiring, plumbing, range ventilation, wall removal, soffit removal, floor patching, ceiling repair, or appliance relocation. Cabinets are only one part of the price.
Should I open the wall between a 1960s kitchen and living room?
Maybe. A controlled opening can improve light and flow. A full removal can also erase storage, create floor and ceiling scars, push kitchen noise into the living room, and make furniture placement worse.
Should I move the sink in a 1960s kitchen?
Move it only if the layout gain is worth the plumbing work. Keeping the sink location can save money, especially when the existing wall gives you a good work zone. Moving it may be worth it when the old layout blocks the entire kitchen from working.
What should I check before replacing cabinets?
Check the soffits, floor under the cabinets, wall condition, appliance clearances, sink plumbing, range venting, electrical needs, ceiling height, and any wall opening plan. Cabinets should be ordered after those conditions are understood.
A 1960s kitchen remodel goes better when the order is right: check the old materials, open the soffit carefully, verify wiring and venting, price the wall and floor repairs, then choose the cabinets and finishes.
References
For lead-safe renovation rules in pre-1978 housing, see the EPA Lead Renovation, Repair and Painting Program.
For asbestos caution during remodeling, see EPA guidance on protecting your family from asbestos exposure.
For older aluminum branch-circuit wiring, see the CPSC guide Repairing Aluminum Wiring.