
Water leak drywall repair should not start with mud, tape, and paint. It starts with one blunt question: is the wall cavity dry enough to close? A ceiling stain or a soft patch of wall can look small from the room side while, behind the surface, the leak has soaked paper, gypsum, insulation, trim, framing, or the bottom plate — and if the source is not fixed and the cavity is not checked, the repair is only cosmetic. This page covers when wet drywall can dry, when water-damaged drywall should be cut out, when a flood cut makes sense, and why ceiling leaks, plumbing leaks, and mold risk change the job.
Fix the Leak Before You Patch the Drywall

The repair does not begin with joint compound; it begins with the water source. Before any drywall work, the roof leak, pipe leak, shower leak, tub drain, toilet flange, window leak, basement seepage, or HVAC condensation problem has to be stopped, because new drywall over an active source only hides the next failure. For a wider moisture check before finishes go back on, see home moisture, leaks, and water damage — the drywall is usually the first thing a homeowner sees, but it is rarely the first thing that failed.
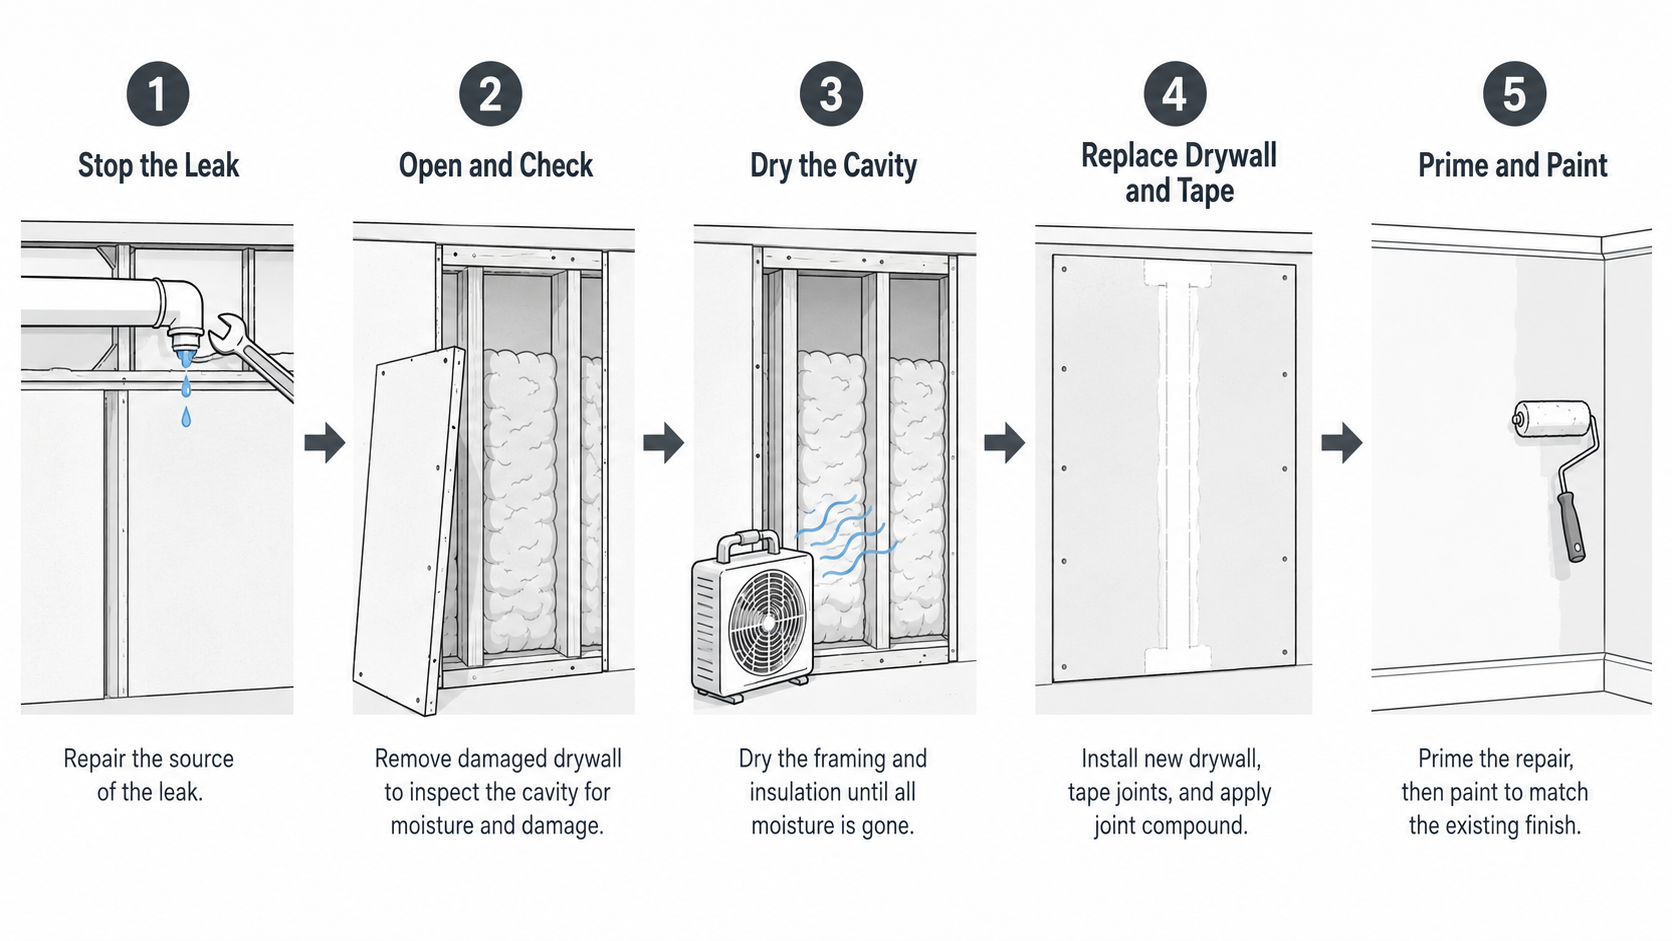
The order that protects the repair is simple: stop the leak, check how far the water traveled, dry or remove the wet materials, and only then repair drywall once the cavity is safe to close. Patch the wall before checking the source and the repair can fail within weeks.
Hidden Pipe Leaks Can Soak More Than Drywall
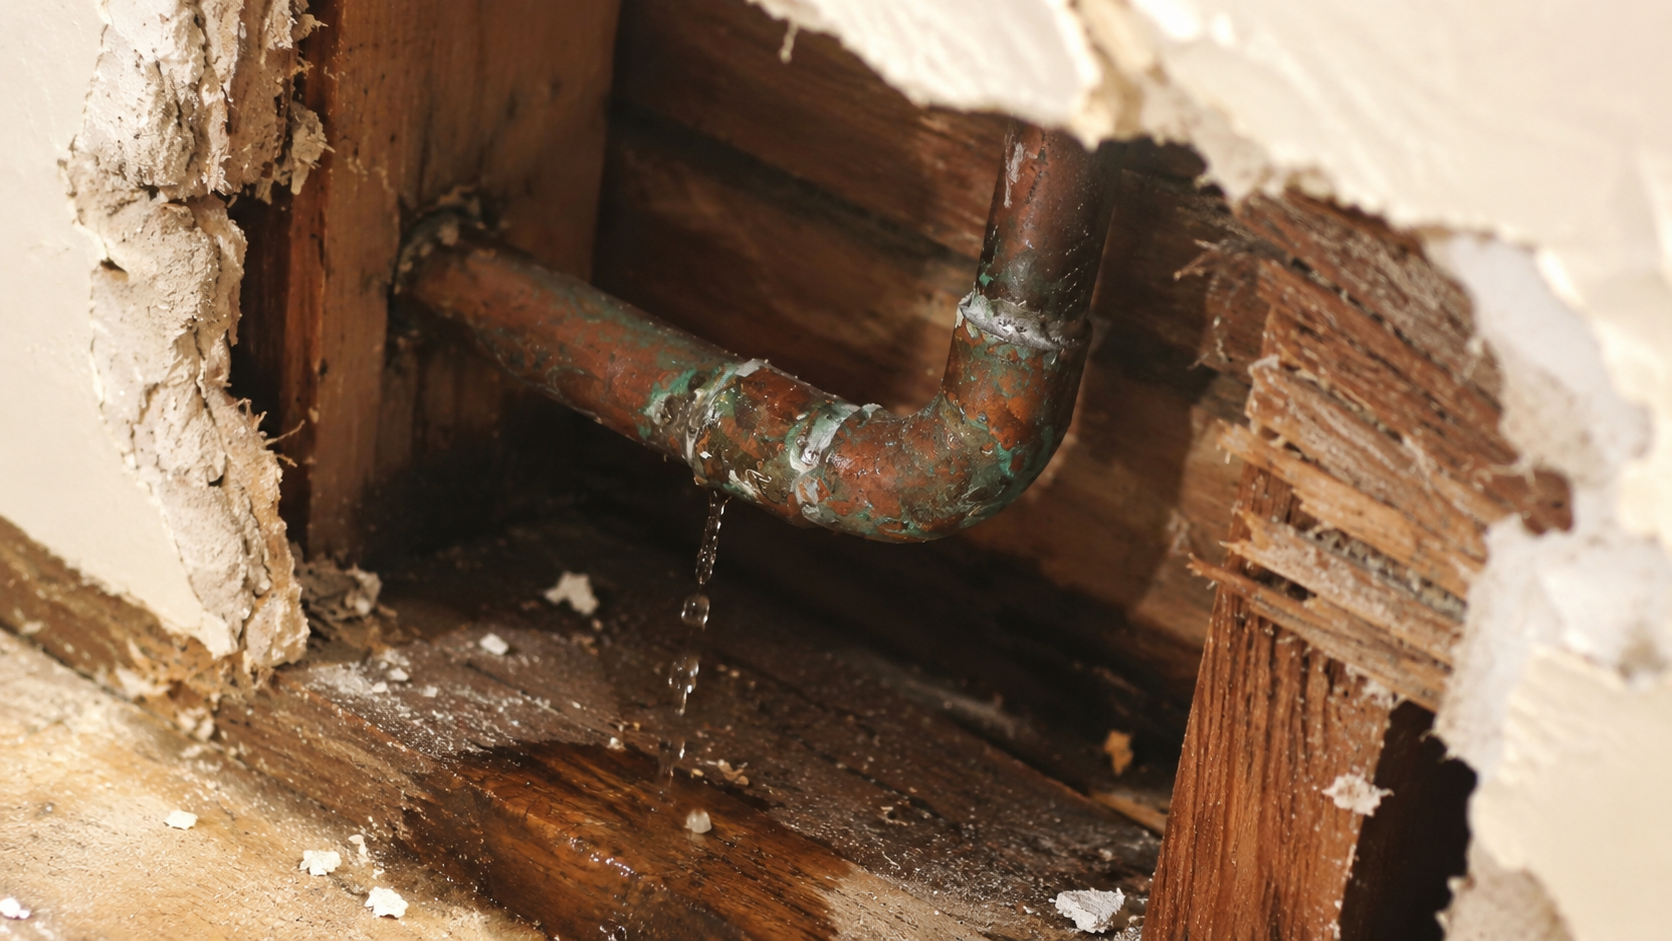
A pipe leak inside a wall can run for days before the paint bubbles or the baseboard stains, and by then the drywall is often the cheapest part of the damage. Water moves down studs, sits behind trim, wicks into the paper face of the board, and pools at the bottom of the wall, so a cavity with insulation can stay damp long after the painted surface feels dry to the hand. I have opened a wall after what looked like a small supply-line drip and found the bottom plate wet three feet in both directions, the insulation holding water against the back of the board like a sponge. That is why water leak drywall repair needs a small investigation step — open enough of the wall to confirm what actually got wet, and do not close it just because the front looks better.
Before You Demo: Document It for Insurance
Before a single piece of board comes off, decide whether this is an insurance claim, because the documentation you skip now is the leverage you lose later. Most homeowner policies treat sudden and accidental water damage — a burst pipe, an overflowing tub, a failed supply line — differently from slow, long-running leaks and surface water, which are often excluded or limited, so the cause matters as much as the damage. Photograph everything before you touch it: the active leak if you can safely reach it, the stains, the soaked materials, the standing water, the source once it is found. Note the date you discovered it and when the water stopped. Keep the wet pieces you remove, or at least photograph them, rather than hauling everything to the curb the same afternoon. If the loss is large enough that an adjuster or restoration contractor needs to see it, do not guess at a final flood-cut height or finish the demolition before the loss is documented — a wall that is already patched is a claim that is harder to prove. None of this slows the urgent part; you still stop the water and start drying immediately. It just means you build the record while the evidence is still on the wall.
When Wet Drywall Can Dry
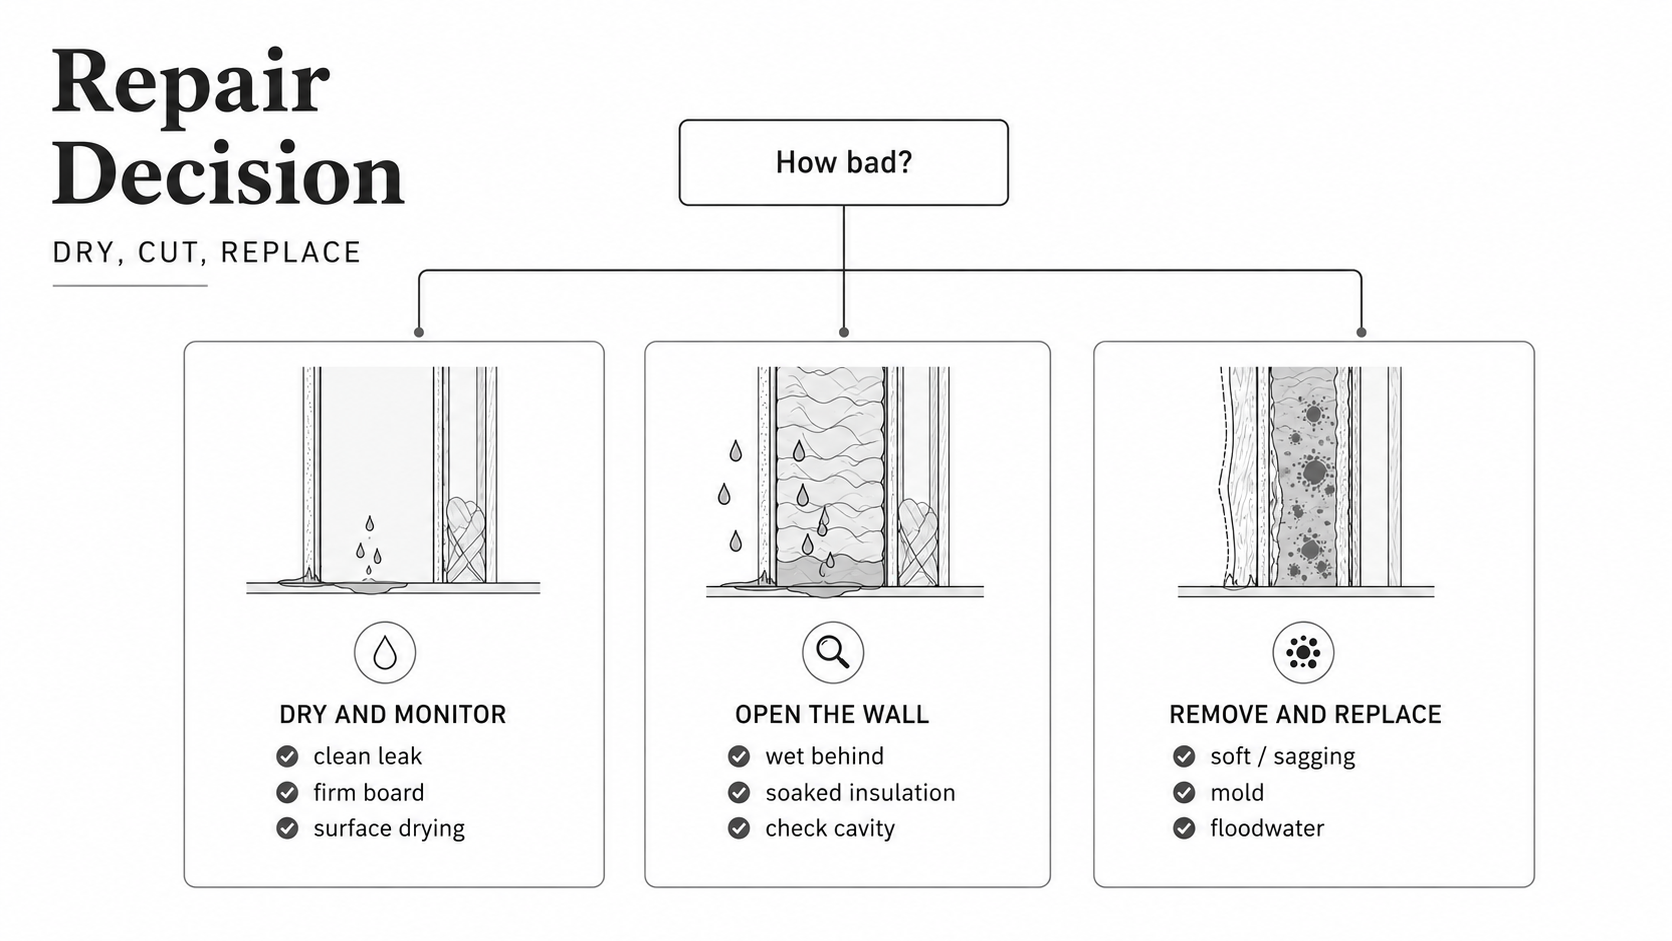
Wet drywall may be salvageable when the leak was clean, small, recent, and fully stopped — a supply-line drip caught early, a one-time roof leak near a ceiling stain, a minor wall leak that never reached the insulation — and when the board is still firm, flat, and bonded to its paper face. The repair stays small when the water was clean rather than floodwater or sewage, the drywall is firm rather than soft, swollen, or crumbling, the paper face is not peeling, fuzzy, or separating, and the cavity can dry within roughly 24 to 48 hours.
The EPA's mold and moisture guidance puts that 24-to-48-hour window on drying water-damaged materials to help prevent mold, which does not mean every wall must be torn out after two days — it means delay changes the risk. Drying also means pulling moisture out of the whole assembly, and painted drywall, vinyl wallpaper, tile, cabinets, insulation, and baseboards all slow that down, so a moisture meter gives a far better answer than touch.
When Water-Damaged Drywall Should Be Removed
Drywall usually has to come out once it has lost strength, stayed wet too long, or met dirty water. Board that is soft, sagging, or crumbles when pressed is finished, paper that peels away from the gypsum core is a bad sign, and a musty smell after the room looks dry is another. Removal gets more likely the moment water reaches the insulation inside the wall, the bottom of the cavity near the base plate, ceiling drywall under wet attic insulation, or bathroom walls behind tile, tub surrounds, and shower plumbing.
The CDC's disaster cleanup guidance says drywall and insulation contaminated by sewage or floodwater should be removed and discarded, and the Gypsum Association's flood and hurricane guidance gives the same warning for gypsum board hit by sewage or flood water. That is the line between a small clean leak and a full water-damage repair: clean water gives you a chance to dry, while floodwater and sewage take that chance away.
| Damage type | Likely drywall decision | What changes the job |
|---|---|---|
| Small clean leak caught fast | Dry, monitor, then patch if needed | Drying time, paint, texture, and access |
| Wet baseboard and lower wall | Open the lower wall section | Insulation, base plate moisture, and flooring |
| Ceiling leak | Cut out damaged ceiling board if soft or sagging | Attic insulation, texture match, and leak source |
| Floodwater or sewage | Remove contaminated drywall and insulation | Sanitation, drying, documentation, and remediation |
What a Flood Cut Means
A flood cut is a horizontal cut through drywall after water rises into a wall, made to remove the wet board, pull the wet insulation, expose the cavity, and let the framing dry before the wall is rebuilt. On most jobs the cut lands some distance above the visible water line, with the exact height depending on the water level, insulation, contamination, local remediation practice, and insurance requirements — so do not commit to a final cut height if an adjuster or restoration contractor still needs to document the loss. A flood cut is not only about the drywall face, either, because water wicks up into gypsum and paper and also sits behind baseboards, under cabinets, inside insulation, and along the bottom plate. Patch only the stained part and wet material stays trapped behind the new board.

Check the Insulation Behind the Wall
Drywall is only the visible layer, and wet insulation left behind new board can sink the repair from the inside. Fiberglass batts hold water against the framing and the back of the panel, cellulose stays damp and slumps, and foam changes the drying path entirely; basement walls add another layer because concrete and framing may already be carrying moisture before the leak ever happened. This matters most in finished basements, where the framing, vapor control, insulation type, and slab edge all need a look before the wall closes — the cost discussion in framing and drywalling a basement only holds up once the moisture has been handled first.
A drywall contractor may not be the one responsible for diagnosing the whole wall assembly, but a good one will still stop and say the cavity is not ready to close. I have read a wall as bone-dry with my hand and then watched the moisture meter call it wet two inches behind the surface — that one reading can save a callback, a mold claim, and a second repair bill.
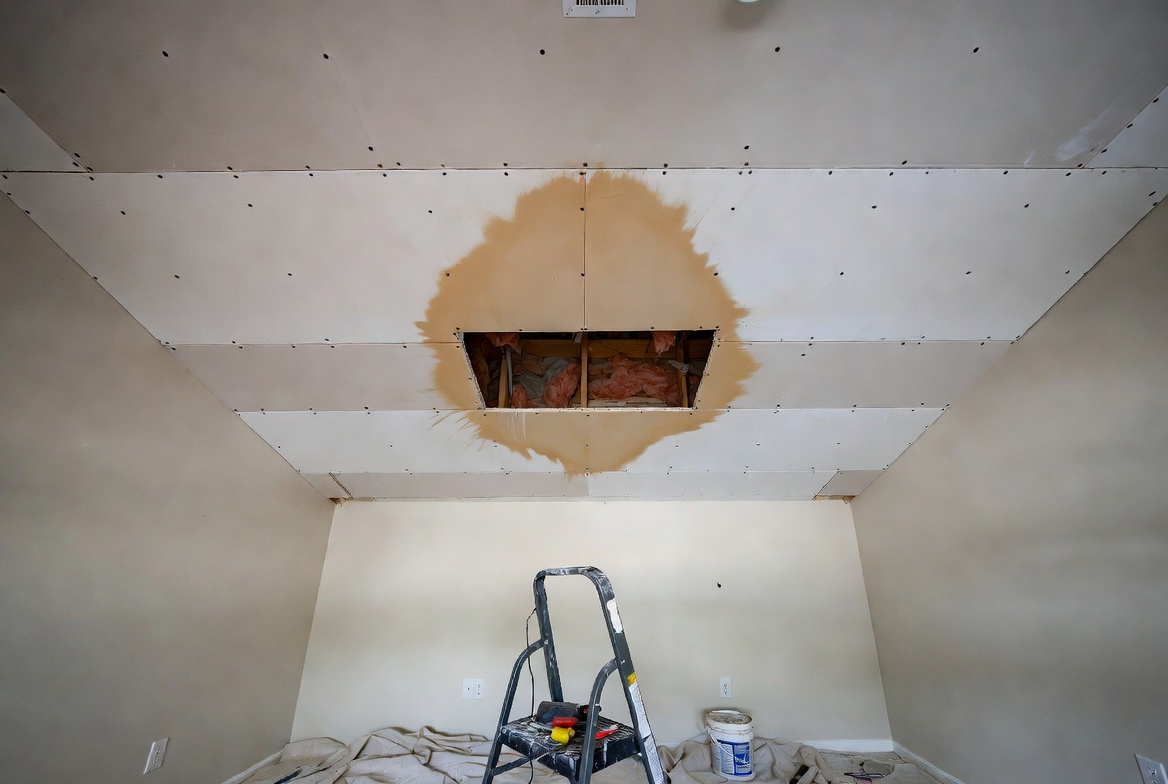
Ceiling Leaks Need a Different Repair Plan
Ceiling drywall fails differently than wall drywall because gravity works against it: wet ceiling board sags, softens around fasteners, stains across seams, and holds water above the paint film. A ceiling stain after a roof leak can look small from below while the wet area above it is much larger, especially under attic insulation. If the ceiling is sagging, bulging, dripping, soft, or cracked around the wet area, it is not a paint problem — open it carefully, find the source, and check the material above the drywall. For broader ceiling diagnosis, use ceiling problems, and if the issue is cracking rather than an active leak, compare it with ceiling cracks before assuming drywall mud will solve it.
Where Mold Changes the Job
Mold turns a drywall patch into a moisture and contamination problem. The EPA's first rule of mold control is moisture control, and it warns that porous materials often have to be thrown out once mold grows into them, because the growth is hard to remove fully from the spaces inside the material. Drywall paper is porous, which is why moldy drywall is not the same problem as mold on tile or metal. Small surface mold from a clean, limited leak is one situation; moldy drywall inside a closed wall, behind baseboards, under cabinets, or after repeated leaks is another, and when the area is large, smells musty, involves sewage or floodwater, or keeps coming back, a qualified remediation contractor should see it before the wall closes. Use the site's mold and moisture section when the drywall repair is tied to musty smells, basement dampness, crawl-space moisture, attic condensation, or stains that keep returning.
The Contractor Sequence After a Leak
The right contractor depends on what failed first. A drywall contractor fixes drywall — not a leaking roof, a failed drain, a cracked shower pan, a hidden plumbing leak, or foundation seepage — so patching over the damage before the source is corrected buys a few good-looking weeks and then fails. On a clean repair the order usually runs: the plumber, roofer, HVAC tech, or exterior contractor stops the leak; a restoration or remediation contractor removes wet materials if needed; drying equipment runs until the framing and cavities read dry; the drywall contractor hangs, tapes, muds, sands, and textures; and the painter primes and blends. Small jobs may fold the last two steps into one repair contractor, while bigger water jobs need more than one trade — that is normal, not a red flag.
What the Drywall Repair Should Include
A water leak drywall repair is not just a patch, so ask what a quote covers before you accept it — a low price often buys only a hung piece of board and a single coat of mud, which is not a finished repair.
| Item | Should be included? | Why it matters |
|---|---|---|
| Leak source confirmed stopped | Before drywall work | Prevents repeat damage |
| Damaged drywall removed | When soft, moldy, contaminated, or too wet | Prevents trapped moisture |
| Insulation checked | When the cavity was wet | Wet insulation can ruin the new repair |
| Taping and multiple mud coats | Yes | One coat is not a finished wall |
| Texture match | If wall or ceiling is textured | A strong patch can still look bad |
| Primer and paint blending | Confirm in writing | Many drywall quotes exclude paint |
Cost Traps After a Drywall Leak
The drywall board is cheap; the repair is not, because the cost lives in diagnosis, access, drying, disposal, insulation, texture, paint, and repeat visits. A small wall patch can be simple, while a ceiling leak with wet insulation, popcorn texture, and full-room paint blending is a different job entirely.
As a 2026 U.S. planning range, a simple drywall patch usually runs in the low hundreds — roughly $100 to $500 depending on size and finish. Water-damage repairs climb once a contractor has to cut out board, check for mold, replace insulation, run drying equipment, finish multiple coats, match texture, and repaint, and most water-damaged drywall repairs land somewhere around $500 to $2,000, with ceiling water-damage repairs commonly running from a few hundred dollars into the low thousands depending on size, access, and finish. If mold remediation enters the job it tends to add on the order of $10 to $30 per square foot on top of the drywall work, and plumbing, roof repair, electrical, flooring, cabinets, or insurance documentation can move the total further still.
The traps themselves are predictable. The quote repairs the drywall but excludes the leak source. It patches the board but excludes the paint. It replaces the visible damage but ignores the wet insulation behind it. Or it assumes texture matching will be easy when matching popcorn or knockdown is some of the fussiest work on the job. Ask for line items, and make sure you know what happens before the wall is closed and what the finished surface will actually look like after primer and paint.
Drywall That Looks Dry Can Still Be a Bad Repair
This is the part homeowners find out three weeks later. The wall gets patched, the room looks normal, and then the baseboard smells musty, the paint flashes in the repair area, or the tape line starts to telegraph — sometimes because the new patch is fine but the damp material beside it was never opened. Water does not stop at the edge of a stain; it follows framing, insulation, gravity, fastener holes, seams, and low spots, traveling several feet across a ceiling before it shows and settling at the bottom plate behind the trim on a wall. I have seen a clean ceiling patch fail three weeks out because no one checked the attic insulation above it, and the wet batt kept feeding the stain straight back through the new paint. A good repair has proof before closure — moisture readings, photos of opened cavities, removed wet insulation, logged drying time, a written note from the restoration contractor. The honest catch is that "it looks dry" and "the cavity is dry enough to close" are not the same claim, and you cannot always tell them apart without a meter and an opened wall; without that proof, the homeowner is buying appearance.
DIY or Hire a Contractor?
DIY makes sense for a small, clean, dry patch. It stops making sense once the drywall is still wet, the ceiling is sagging, the water source is unknown, the leak came from a toilet or sewer line, the house smells musty, or the damaged area is large enough that insulation and framing need checking. Bring in help when the drywall stayed wet longer than 24 to 48 hours, the water came from flooding, sewage, or another dirty source, the ceiling is soft, sagging, or cracked around the wet area, or mold is visible and the smell lingers after drying.
One safety note before any demolition: water and electricity share these cavities. If a wall or ceiling near outlets, switches, or light fixtures is wet, kill the power to that area at the breaker before opening it, and do not touch wet outlets or fixtures. And in older houses, the existing wall and ceiling finishes may hold lead paint, asbestos-containing joint compound, or older texture materials — if the home is old enough for those risks, test before sanding or demolition rather than after.
Repair Sequence for a Small Clean Leak
When the leak was clean, small, and caught early, the basic order is to stop the water source and confirm it does not return, remove wet trim or open a small inspection area if the cavity may be wet, dry the space with air movement and dehumidification, and check the drywall and framing with a moisture meter. Then cut out any drywall that is soft, swollen, moldy, or delaminated, replace damaged insulation before closing the wall, patch with matching board thickness, and tape, mud, sand, prime, and paint. Do not skip the primer — water stains bleed through paint, and raw joint compound absorbs paint differently than the surrounding wall, which is what makes a patch flash under raking light.
What to Ask Before You Close the Wall
Before new drywall goes up, the questions are short and the answers should be specific. What caused the leak, and has it been fixed? Was the back of the drywall or the insulation wet? Were moisture readings taken before closing? Are paint and texture included in the repair quote? The answer does not have to be complicated — it just has to be precise, because "it looks dry" is not the same as "the cavity is dry enough to close."
FAQ
Can wet drywall be saved?
Sometimes. Clean water, fast drying, firm board, and no wet insulation give drywall the best chance. If the board is soft, swollen, moldy, contaminated, or wet behind the wall, removal is safer.
How long before wet drywall grows mold?
The EPA recommends drying water-damaged areas and items within 24 to 48 hours to help prevent mold growth. The exact risk depends on temperature, humidity, airflow, contamination, and how wet the assembly became.
Should I cut out drywall after a leak?
Cut it out when the drywall is soft, sagging, crumbling, moldy, contaminated, or hiding wet insulation. For a small clean leak caught quickly, drying and monitoring may be enough.
What is a flood cut in drywall?
A flood cut is a horizontal drywall cut made above the water line so wet drywall and insulation can be removed and the wall cavity can dry. The height depends on the water level, contamination, insurance documentation, and local remediation practice.
Can I paint over a water stain on drywall?
Only after the leak is fixed and the drywall is dry. Stain-blocking primer may hide a mark, but paint will not fix soft drywall, mold, wet insulation, or an active leak.
Who repairs drywall after a plumbing leak?
The plumber fixes the leak. A drywall contractor, handyman, restoration contractor, or painter may repair the wall after drying and demolition are complete. On larger water jobs, the work often needs more than one trade.
Does water-damaged drywall always need mold remediation?
No. A small clean leak caught quickly may not need a remediation company. Mold, floodwater, sewage, long wet periods, musty smells, and large hidden cavities change that decision.
Will insurance cover water-damaged drywall?
It depends on the cause. Sudden, accidental damage like a burst pipe is often covered, while slow, long-running leaks and surface water are frequently limited or excluded. Document the damage and the source before you demo, and check your own policy.
References
Sources used for this article
- EPA: A Brief Guide to Mold, Moisture and Your Home
- EPA: Mold Cleanup in Your Home
- CDC: Guidelines for Cleaning Safely After a Disaster
- Gypsum Association: Hurricanes and Flooding Technical Resources
- Angi: Drywall Repair Cost Data (2026)
- HomeGuide: Drywall Repair Cost Guide (2026)
- Homewyse: Ceiling Water Damage Repair Cost (2026)