
The kitchen was built for one person, one task, and appliances that no longer exist.
That is the real problem with a 1950s kitchen. Not the color. Not the cabinet pulls. Not the linoleum. The room was designed around a way of cooking that most households stopped doing forty years ago. One cook. No dishwasher. A refrigerator that was smaller than what most people own today. Counter space measured in feet, not running yards. One outlet on each wall if you were lucky.
The house may be fine. The bones may be excellent. But the kitchen is working against you before you open a single cabinet door.
That is worth knowing before you spend anything. Because the most common mistake in a 1950s kitchen remodel is spending money on the surface before understanding what is wrong underneath it.
If the kitchen is part of a larger old-house project, start with the broader 1950s houses guide so the kitchen remodel fits the house instead of fighting it.
Quick cost answer
Most 1950s kitchen remodels fall into a few practical bands. The final cost depends on room size, local labor, cabinet choices, wall access, electrical work, plumbing, and whether the layout stays mostly where it is.
| Remodel level | Typical planning range | What it usually includes | Main risk |
|---|---|---|---|
| Light refresh | $3,000 to $10,000 | Paint, hardware, lighting, faucet, minor cabinet repair, simple backsplash, small appliance swaps | Spending on looks while old wiring, bad ventilation, or failing floors remain |
| Keep-layout remodel | $15,000 to $40,000 | Cabinet refacing or new fronts, counters, flooring, lighting, appliances, basic electrical and plumbing corrections | Discovering old floor layers, asbestos risk, or weak cabinet boxes after ordering finishes |
| Full rebuild | $45,000 to $90,000+ | New cabinets, new layout, electrical upgrades, plumbing changes, flooring, lighting, appliances, counters, wall repair | Moving walls, sink lines, gas lines, or ducting without understanding structure and access |
| Structural remodel | $80,000 to $120,000+ | Wall removal, beams, major layout redesign, high-end cabinets, upgraded systems, premium finishes | Treating a bearing wall or mechanical chase as a simple design obstacle |
These are planning ranges, not quotes. A small kitchen in a lower-cost market can come in below the middle of the range. A dense city, difficult access, custom cabinets, or structural work can push a modest-looking kitchen much higher.
Before you compare quotes: Use the 1950s Kitchen Remodel Cost Calculator to estimate how room size, cabinet condition, electrical work, plumbing, floor layers, ventilation, layout changes, and wall removal can change the budget.
Why 1950s kitchens cost more than they look
The room is small, so people expect it to be a cheap project. That is not how older kitchens work.
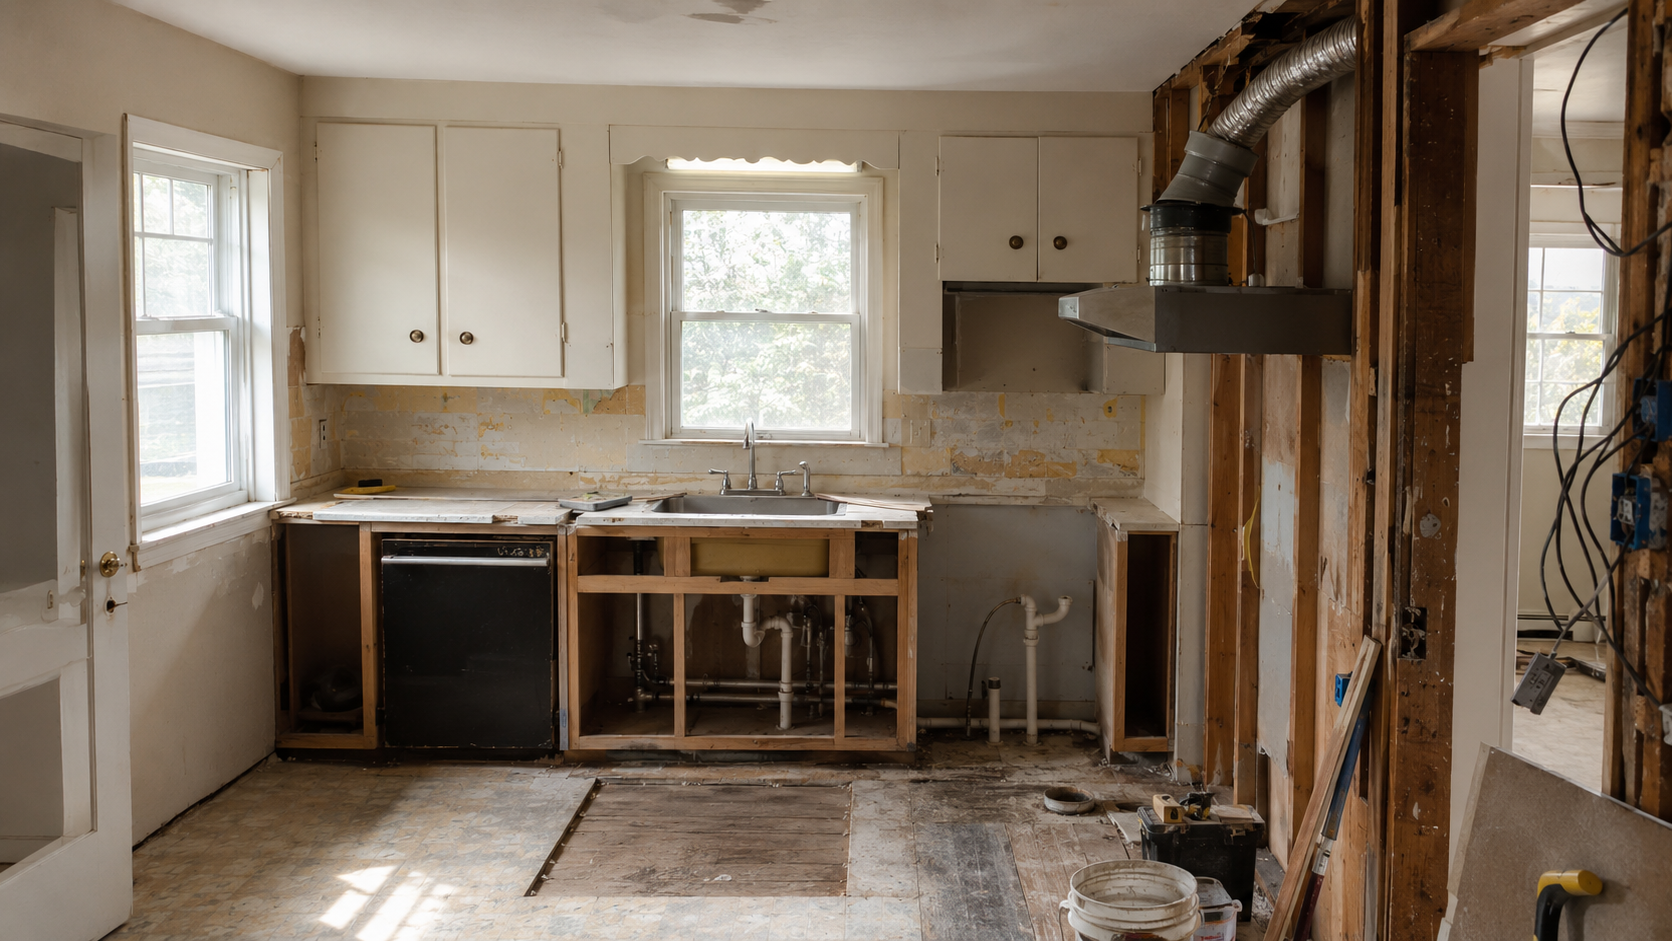
The kitchen may have plaster walls, old electrical boxes, ungrounded circuits, galvanized plumbing, thick floor layers, asbestos-containing flooring or adhesive, weak exhaust, and cabinets built around appliance sizes that no longer exist. Once those items are disturbed, the project is no longer cosmetic.
The biggest cost difference is usually not whether the cabinet door is walnut, white, or pastel. It is whether the old room can accept modern loads without a chain reaction.
- New appliances need more power. Older kitchens often lack the circuits, outlets, and grounding expected today.
- Moving a sink changes more than the sink. Supply lines, drains, venting, floor openings, wall repair, and permits may follow.
- Removing a wall is rarely just demolition. Structure, ductwork, wiring, flooring patches, ceiling repair, and inspection can all appear.
- Old floors hide old decisions. Vinyl, linoleum, underlayment, adhesive, and patch layers may need testing before removal.
Diagnose before you design
Before choosing cabinets or counters, walk the kitchen like a small inspection. You are not trying to scare yourself out of remodeling. You are trying to stop the budget from lying to you.
| Check first | Why it matters in a 1950s kitchen | What it changes |
|---|---|---|
| Electrical panel and kitchen circuits | Original kitchens were not wired for today's appliance loads | Outlet layout, lighting, appliance placement, permit scope |
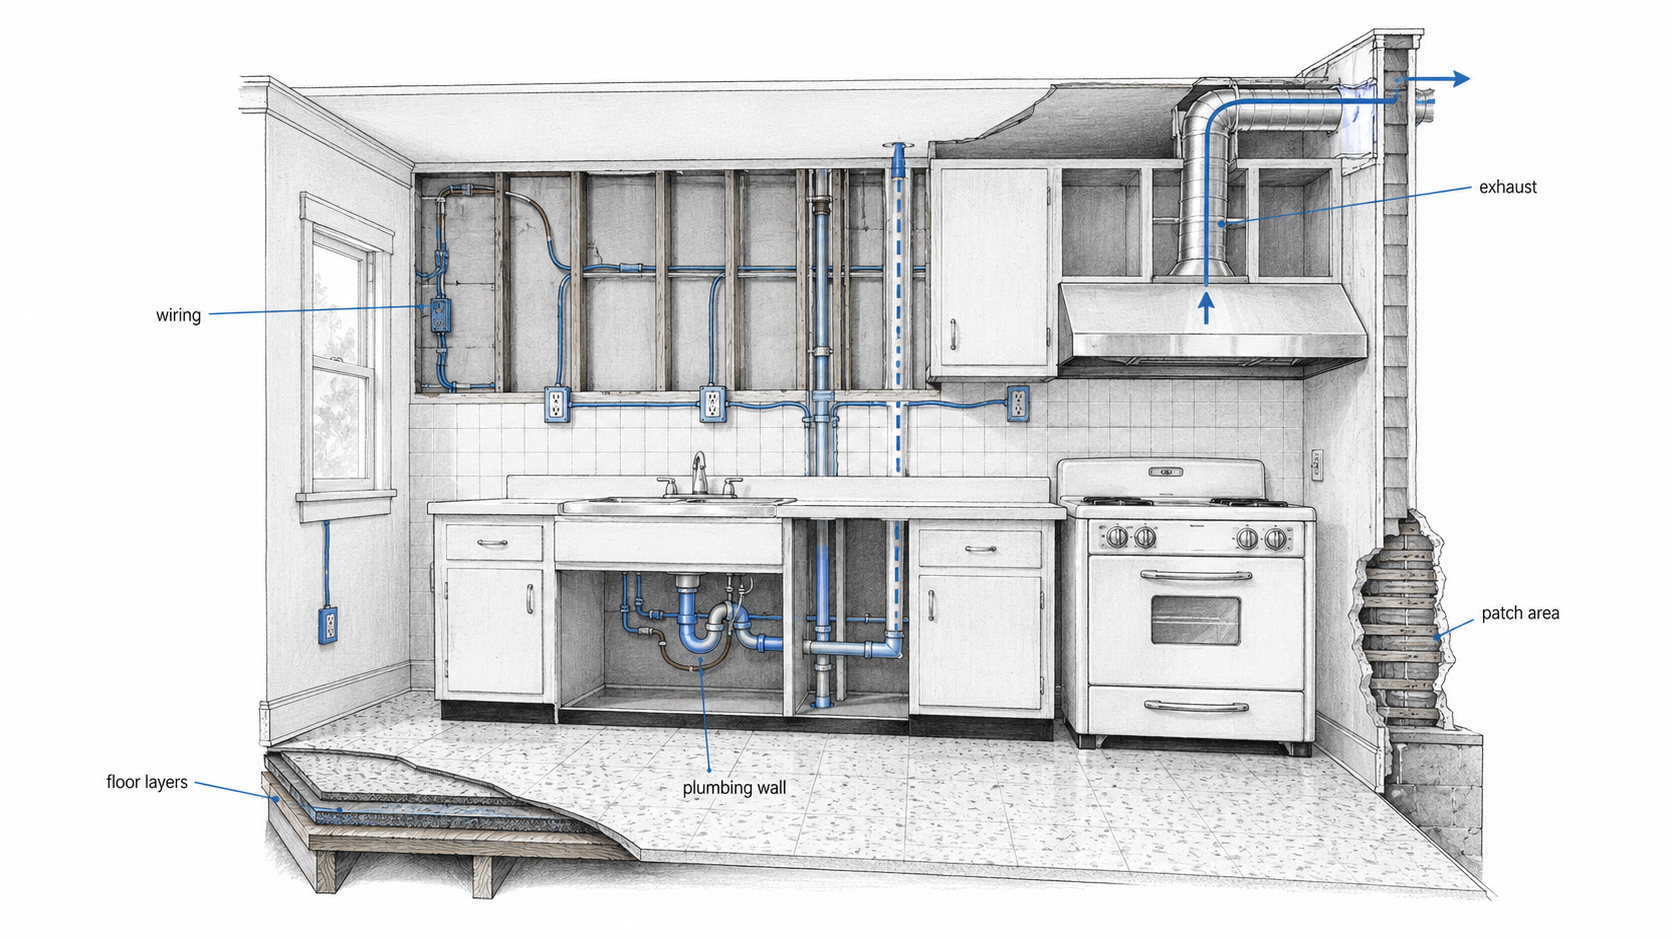
| Plumbing wall | Old supply and drain lines may be worn, corroded, or hard to access | Sink location, dishwasher plan, wall repair, floor openings |
| Floor layers | Multiple old layers can hide asbestos risk, uneven floors, and moisture damage | Demo method, flooring cost, cabinet height, threshold transitions |
| Cabinet boxes | Some original boxes are solid; others are too worn, cut up, or badly modified | Refinish, reface, partial rebuild, or full replacement |
| Ventilation | Many older kitchens have weak exhaust or no proper exterior vent | Range location, duct route, ceiling or wall repair |
| Wall removal plan | Open-concept work can expose structure, ducts, wiring, and bad patch conditions | Beam cost, ceiling repair, floor patching, inspection, layout |
If the kitchen passes these checks, a restrained remodel can work well. If it fails several of them, the budget should move toward systems before finishes.
The layout problem
Many 1950s kitchens were efficient because they were compact. That can still be a strength. The problem is that modern use asks more from the same small room: larger refrigerators, dishwashers, more counter space, trash and recycling, small appliances, wider traffic paths, and sometimes two cooks at once.
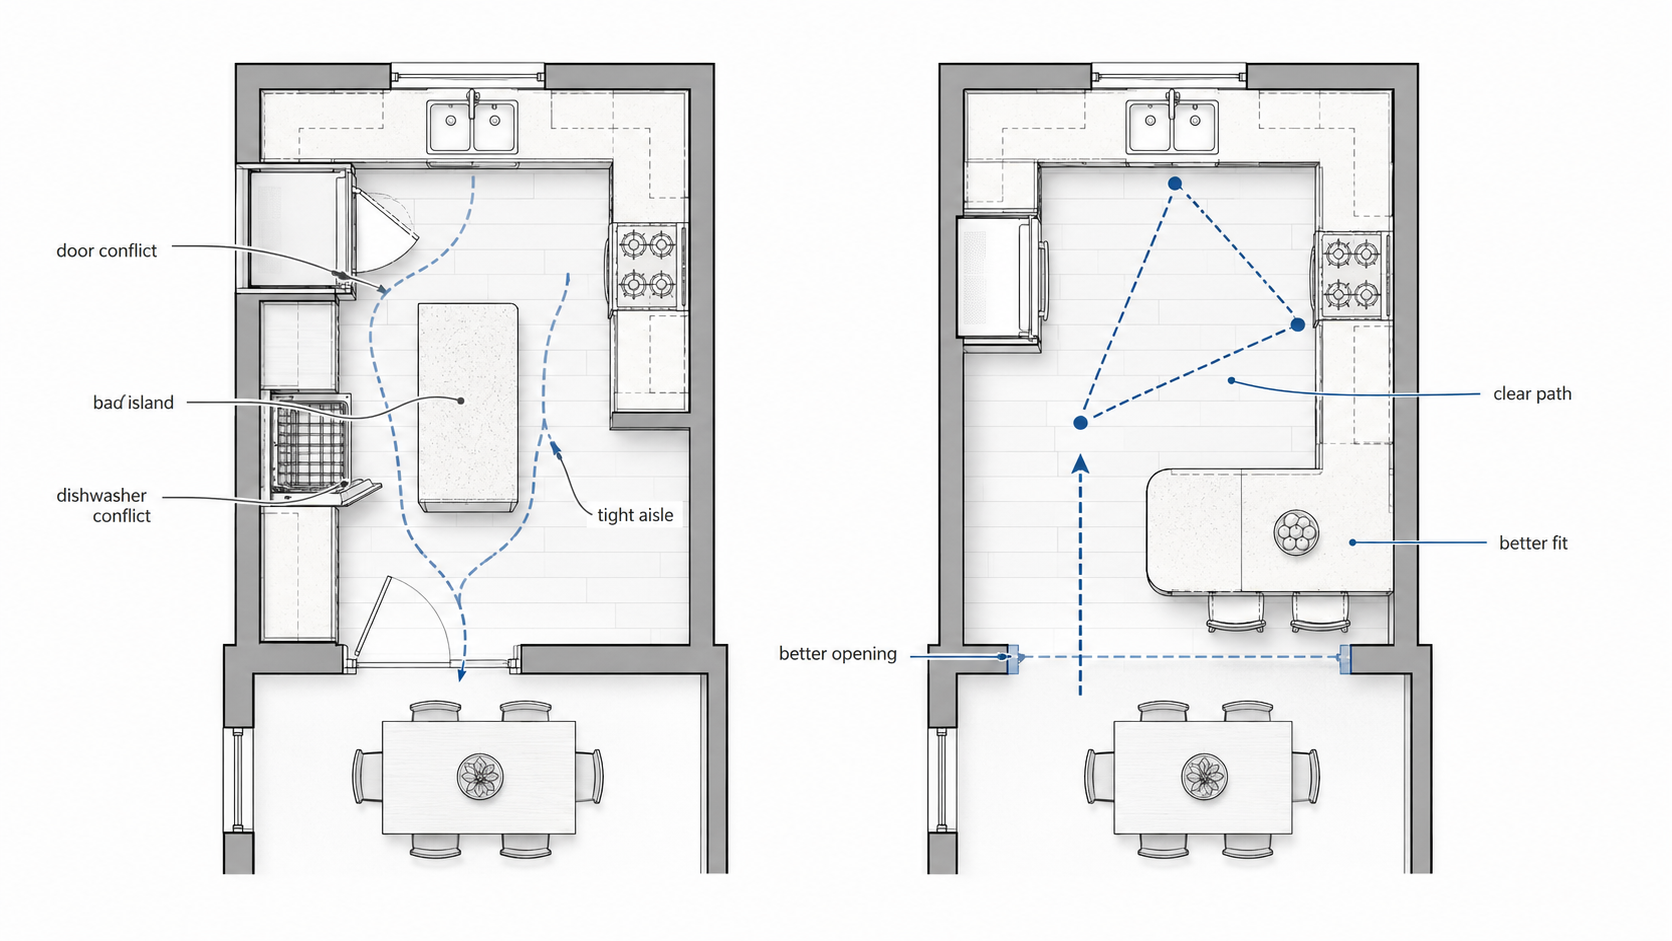
The answer is not always a giant island. In many 1950s houses, an island makes the room worse because the shell is too narrow. A better move may be a wider opening to the dining room, a peninsula, a better appliance order, or a pantry wall outside the kitchen.
In a ranch house, the kitchen cost often overlaps with the larger 1950s ranch house remodel, especially when wall openings, ceiling patches, floor transitions, and appliance placement all meet in the same small area.
Keep the footprint when the room already works
If the sink, stove, and refrigerator are reasonably placed, keeping the footprint saves money. You can improve lighting, storage, counters, cabinet function, flooring, and ventilation without triggering a full plumbing and structural reset.
Open one wall only when the payoff is clear
A partial opening can be better than full open concept. It can bring light and connection while keeping upper storage, wall strength, and some separation from cooking mess.
Do not force a showroom island into a postwar shell
A tight island creates bad clearances around the dishwasher, refrigerator, and oven. If the aisles are wrong, the kitchen will feel expensive and annoying at the same time.
The appliance-fit audit most 1950s kitchens need
A 1950s kitchen can look like it has enough room until the modern appliances arrive.
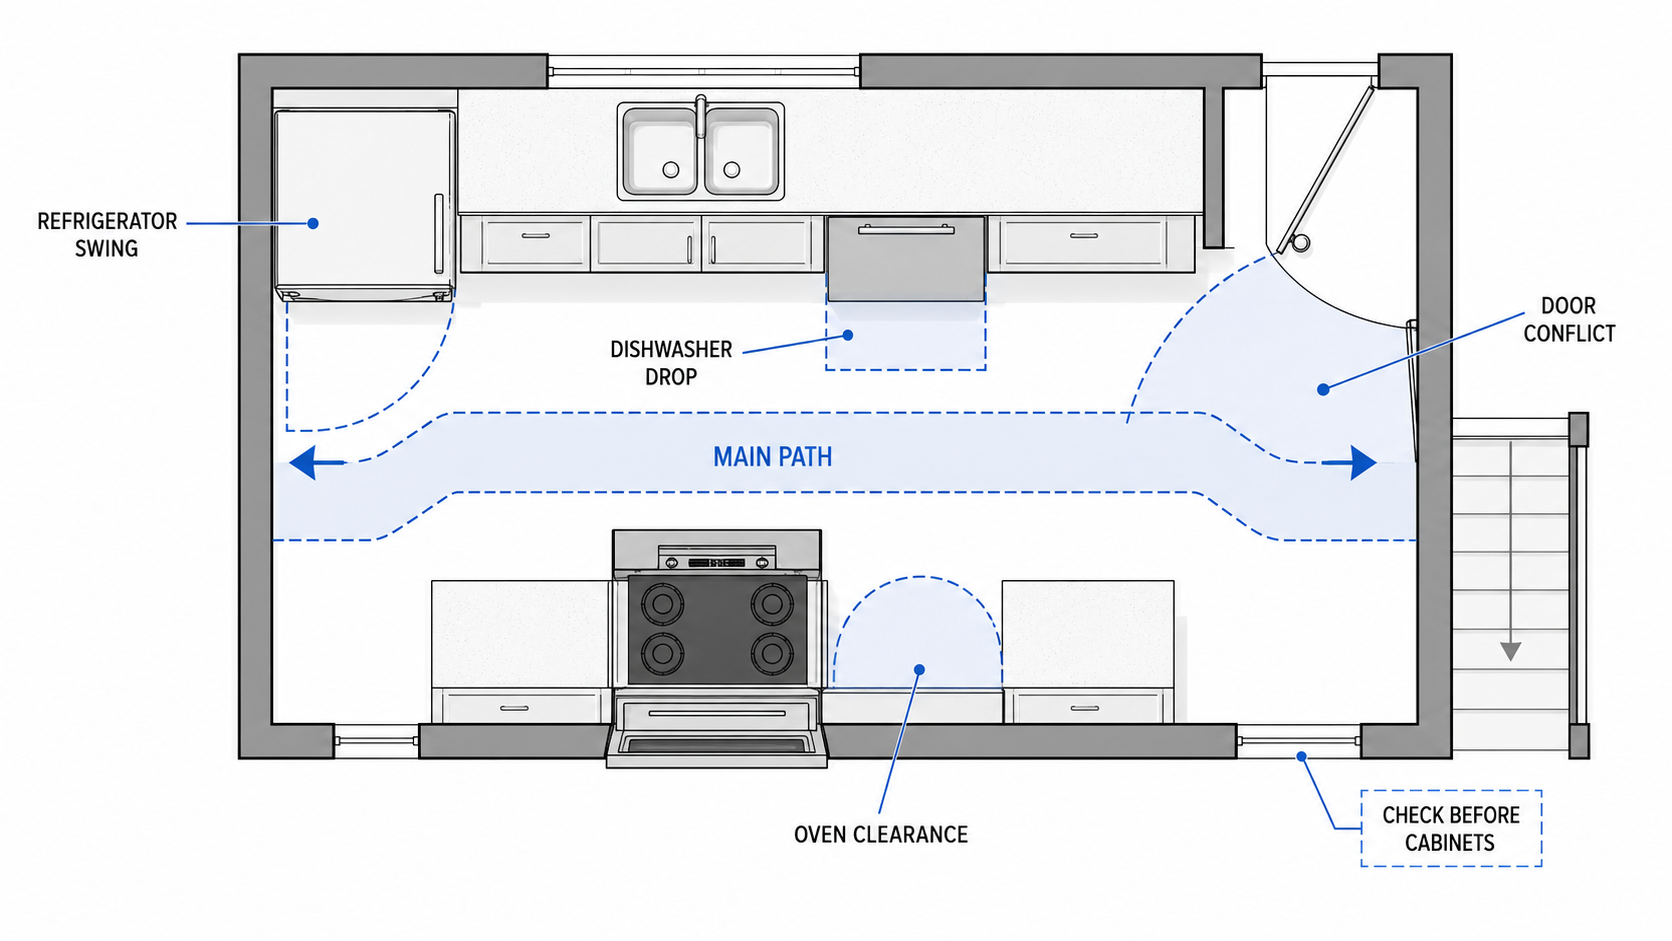
The refrigerator is deeper than what the space was built for. The dishwasher door needs swing room. The range may need a better outlet, gas line, or hood location. The microwave may not belong above the stove. The old cabinet opening may be too narrow, too shallow, or boxed in by trim that nobody noticed during the design phase.
This is one of the easiest ways to ruin a small kitchen remodel.
Before ordering cabinets, counters, or appliances, measure the room as if the appliances are already there and open. Open the refrigerator door. Open the oven door. Drop the dishwasher door. Stand at the sink. Walk from the hall to the back door. Then ask whether two people can still move through the kitchen at the same time.
Check these appliance conflicts early:
- Refrigerator depth against the walkway.
- Dishwasher door blocking the sink, cabinet doors, or main path.
- Range door opening into a tight aisle.
- Hood duct route before the upper cabinets are ordered.
- Microwave location, especially if it steals counter space or sits too high.
- Door swings from the kitchen, basement stair, pantry, or back entry.
- Old cabinet openings that do not match current appliance sizes.
Appliance selection belongs before final cabinet drawings. Not brand selection. Size and swing selection. A 1950s kitchen can accept modern appliances, but the room has to be measured around how they actually move.
The moment the remodel changes completely
There is a point in almost every 1950s kitchen remodel where the project stops being what you planned and becomes something else.
It usually happens on demo day. Or when the plumber pulls the wall. Or when the electrician opens the panel and goes quiet for a moment before telling you what they found.
You pull the flooring and find black adhesive under old tile. You open the wall by the sink and find galvanized pipe that has been losing diameter for decades. You take off a cabinet to check the box condition and the back of it crumbles. You find the exhaust fan venting into the wall cavity, not outside.
None of that is a disaster. It is just what old houses hold. But it changes the job fast, and it changes it at the worst possible time — when the kitchen is already torn apart and you are eating off a card table in the living room.
The homeowners who handle this best are the ones who went in expecting it. They left room in the budget. They did not max out on cabinet finishes before knowing what the walls held. They priced the ugly work first and treated the pretty work as the reward for getting the ugly work right.
The ones who struggle are the ones who spent the budget on cabinet doors and countertops, then found out the wiring needed to be pulled and the plumbing wall had to come open. At that point the choices are bad: cut corners on the systems, borrow more money, or live with a half-finished kitchen for longer than you planned.
Price the hidden work first. Leave fifteen to twenty percent for what the walls find when you open them. That number is not pessimism. It is how old houses work.
What to keep, replace, or leave alone
A good 1950s kitchen remodel is not a museum project. It is also not a gut job by default. The goal is to keep the parts that give the room character and replace the parts that make daily use worse.
| Feature | Keep it when | Replace it when |
|---|---|---|
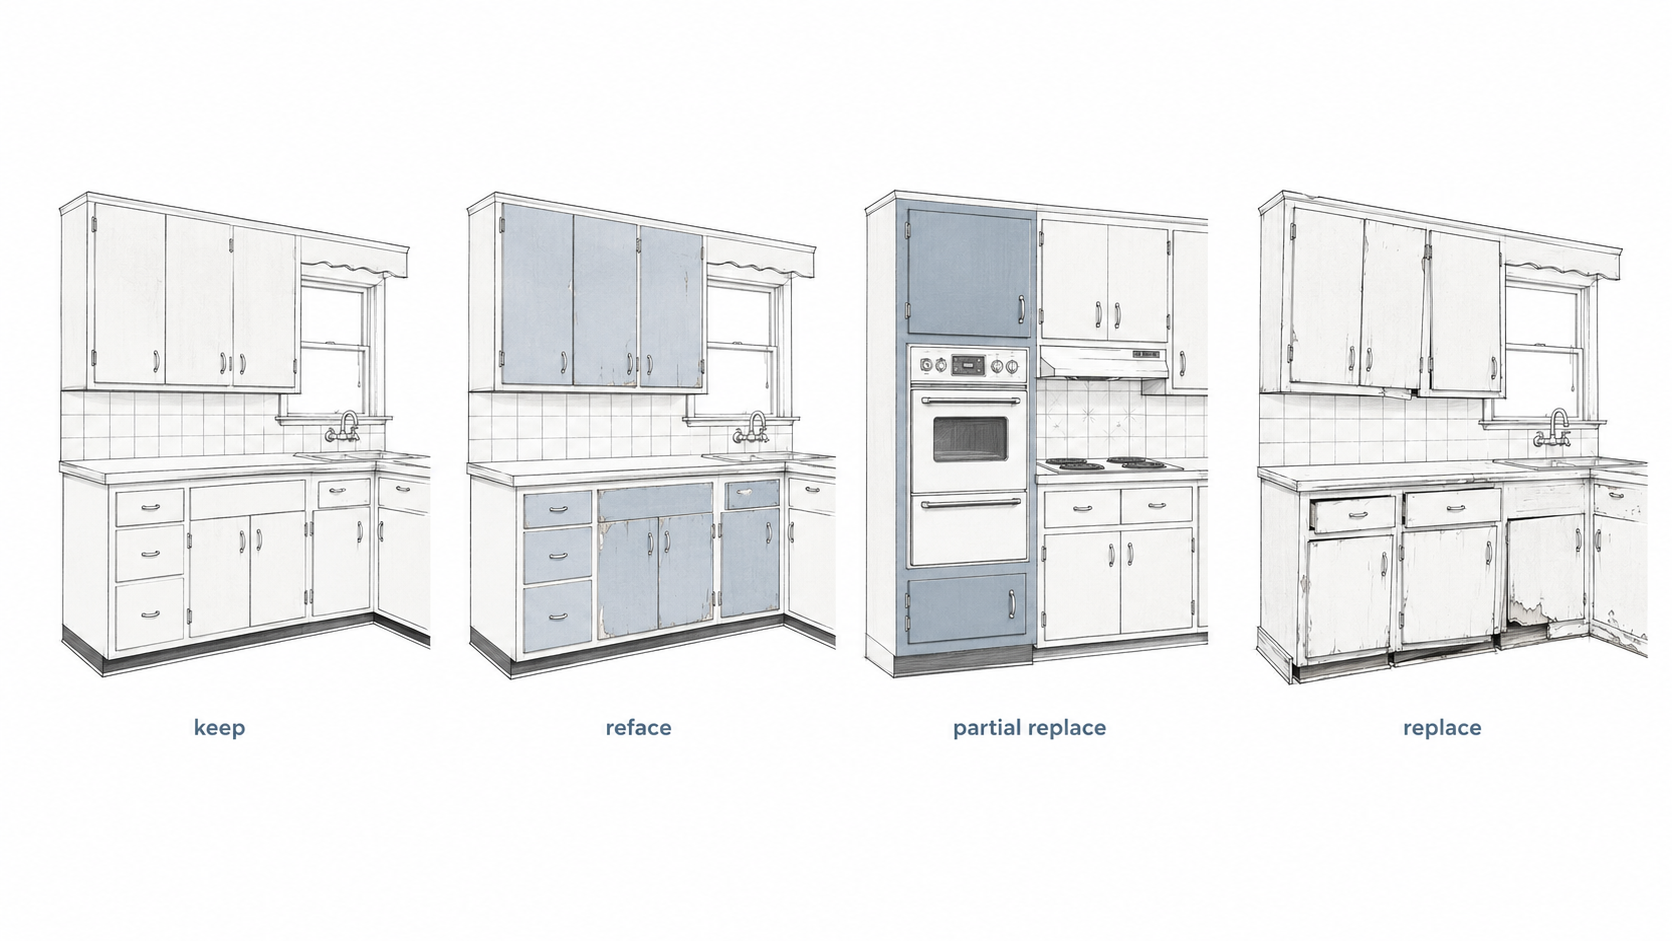
| Original cabinets | Boxes are solid, layout works, doors can be cleaned, painted, refaced, or repaired | Boxes are swollen, cut apart, too shallow, badly modified, or failing structurally |
| Metal cabinets | Rust is minor and the layout still works | Rust is severe, doors are bent, or the finish is failing beyond repair |
| Laminate counters | They are intact, period-appropriate, and not water-damaged | Seams are swollen, edges are loose, or the layout needs new counter runs |
| Old flooring | It is sound, safe, level, and not being disturbed | It is damaged, loose, moisture-stained, or needs removal for cabinet or layout work |
| Wall tile | It is well bonded and works with the cabinet plan | It hides damage, blocks electrical work, or fights the new layout |
| Period color | It is used as one controlled accent | The room starts looking like a restaurant theme set |
Cabinets usually decide the budget
Cabinets are the line item that can keep a 1950s kitchen reasonable or push it into a major remodel.
Original flat-front wood cabinets can be worth saving if the boxes are dry, square, and deep enough for current use. New hardware, repaired drawers, better interior storage, and a cleaner finish can change the room without erasing its period logic.
But saving bad cabinets is not thrift. If the boxes are swollen, shallow, badly cut for old appliances, or poorly attached, refinishing them wastes money. You end up paying for labor on something that still does not work.
Cabinet paths that make sense
- Paint or refinish: best when the cabinet layout works and the boxes are sound.
- Reface: useful when the boxes are good but the doors are wrong, damaged, or too dated.
- Partial replacement: useful when one appliance wall or pantry area needs a new solution.
- Full replacement: justified when the layout, storage, boxes, and appliance openings all fail.
Floors, asbestos, and old layers
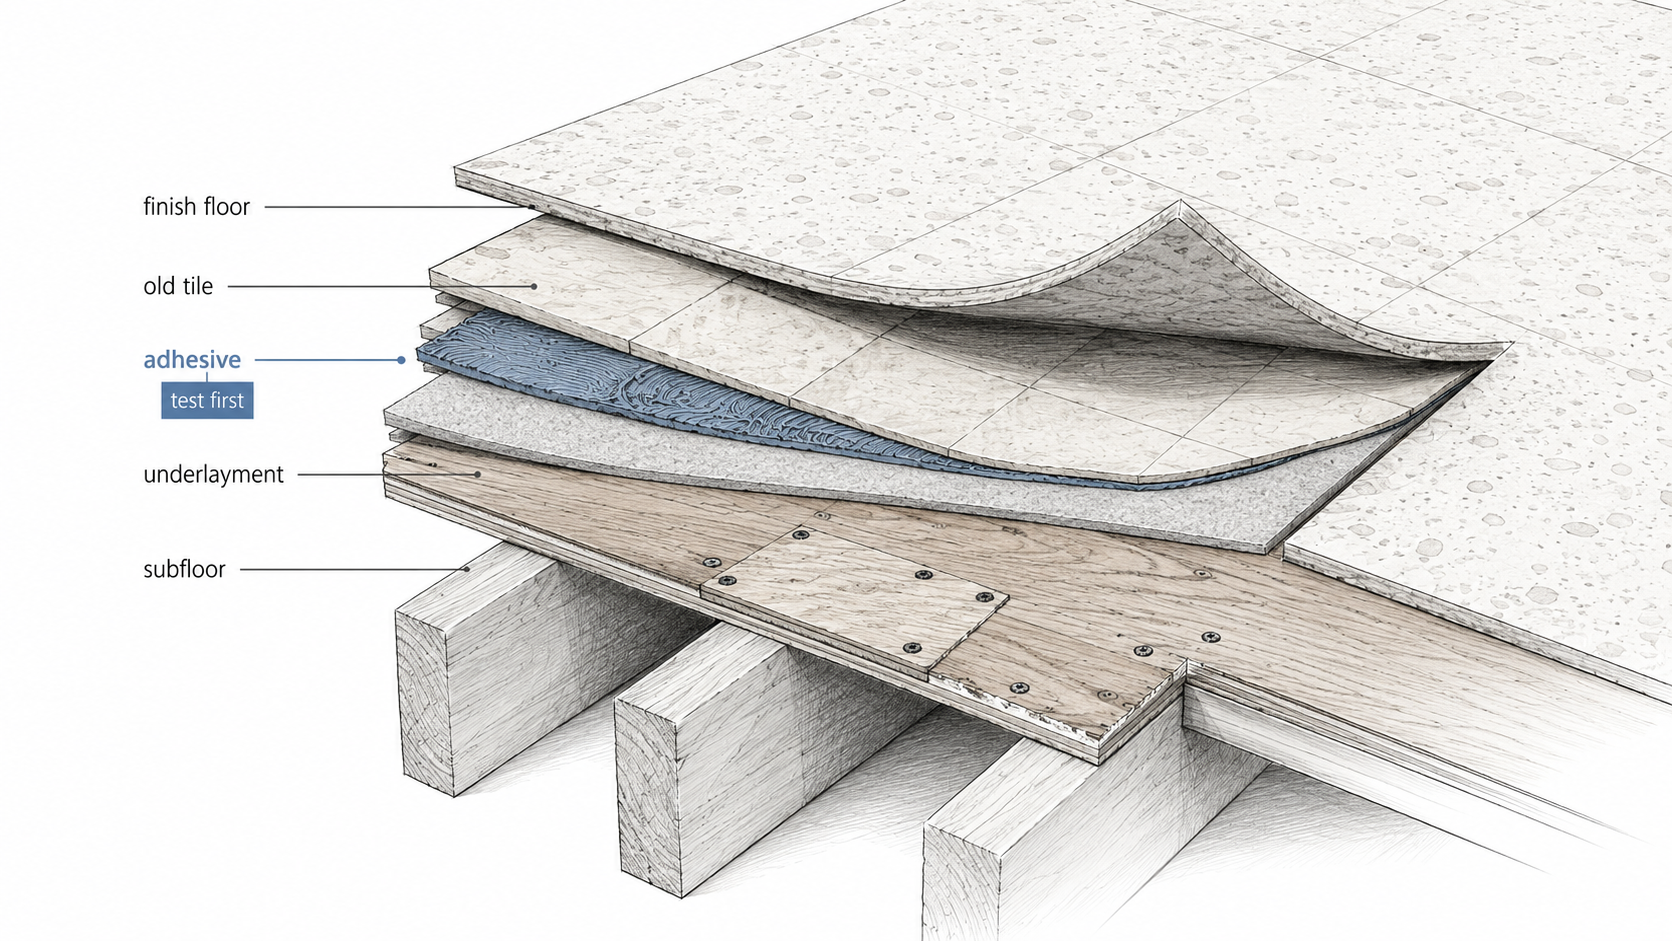
The floor can be the most misleading part of a 1950s kitchen. It may look like a simple flooring swap, but old kitchens often have several layers: original resilient flooring, later sheet vinyl, underlayment, adhesive, patched subfloor, and sometimes moisture damage near the sink or dishwasher location.
Do not sand, scrape, grind, or tear out old flooring until suspect materials have been checked. Some older floor tile, backing, and adhesive may contain asbestos. The danger is not the age of the material. The danger is disturbing it without knowing what it is.
If the existing floor is safe, level, and stable, it may be better to leave it undisturbed and install a new layer over a properly prepared surface. If cabinets are coming out, the floor plan changes, or old layers are loose, the project needs a more careful demo plan.
For the safety side, see asbestos in 1950s houses before removing old flooring, adhesive, siding, ceiling material, or pipe insulation.
Electrical, plumbing, and ventilation
A 1950s kitchen may have been safe enough for its original load and still be wrong for current use. Modern refrigerators, dishwashers, microwaves, disposals, range hoods, countertop appliances, and lighting need a better electrical plan than what most postwar kitchens were given.
Plumbing is similar. Keeping the sink in the same general location saves money. Moving it across the room involves drains, vents, supply lines, floor cuts, wall cuts, permits, and patching. The more the new plan fights the old plumbing wall, the more expensive the remodel becomes.
Ventilation is often ignored because it is not glamorous. That is a mistake. A beautiful kitchen with weak exhaust still dumps moisture, grease, and cooking odor into the house. If the old range hood does not vent outside, plan the duct route before the cabinets are ordered — not after.
The wall removal trap
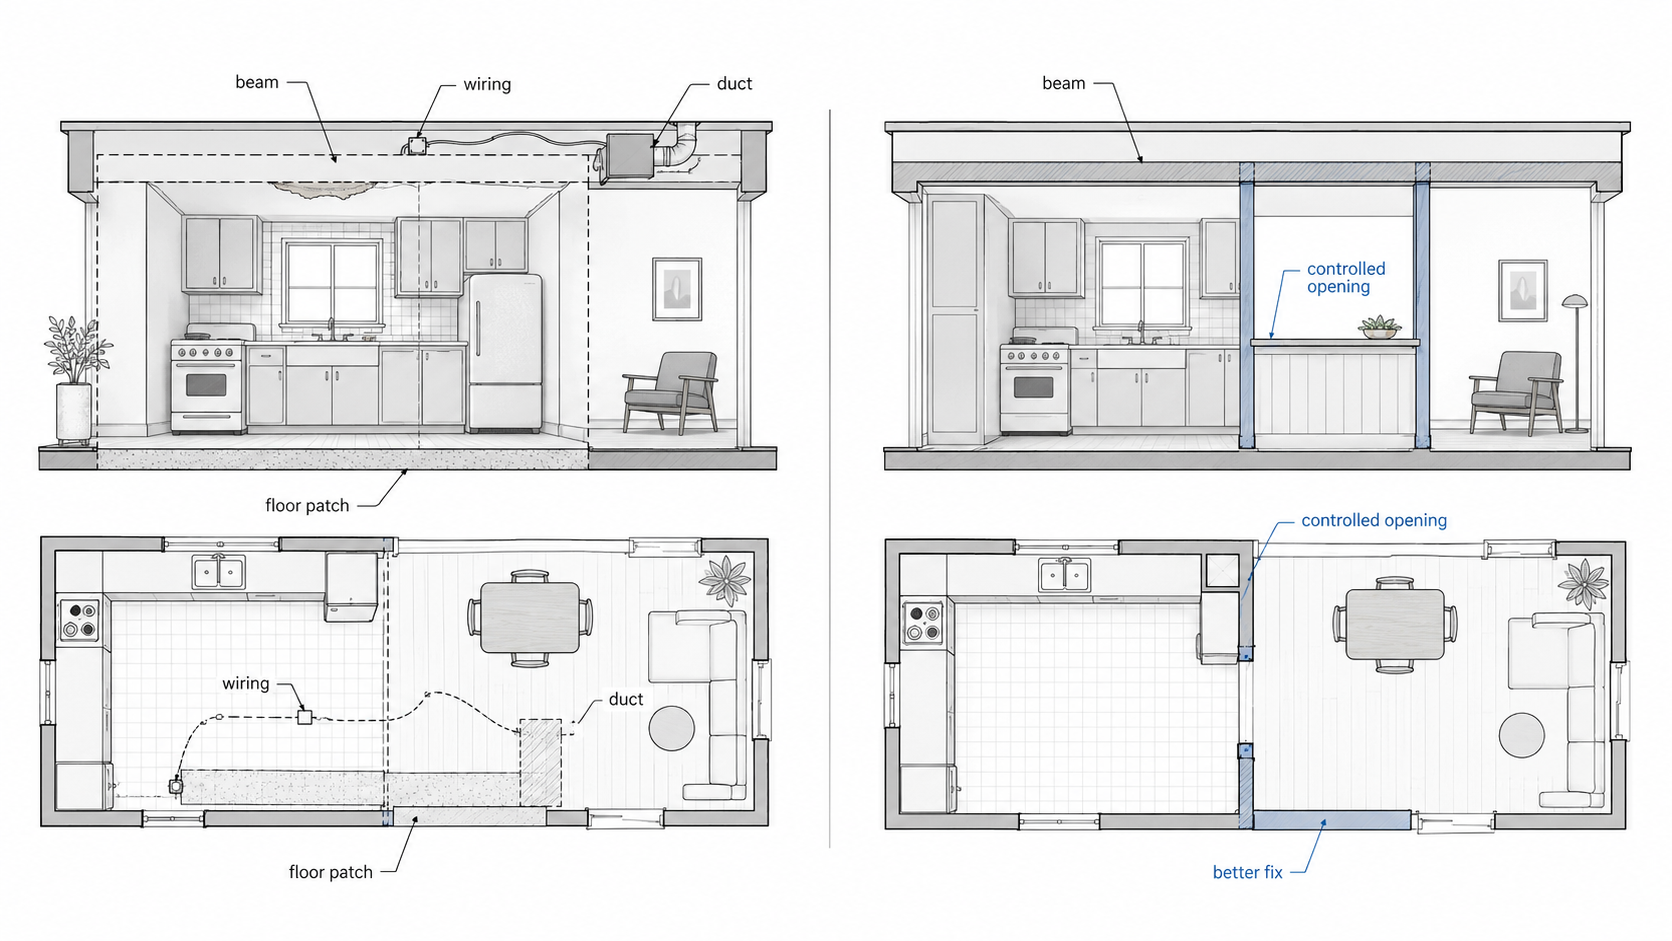
Opening a 1950s kitchen to the dining or living room can be the right move. It can also be the line item that breaks the budget.
Before removing a wall, identify whether it is load-bearing, whether it contains ducts or plumbing, where the electrical runs, how the ceiling will be patched, and what happens to the floor where the wall used to sit. The beam is only one part of the cost. The finish repair around the beam is often the part nobody priced.
A cleaner option is often a controlled opening: widen the doorway, create a pass-through, remove only the upper portion of a wall, or shift storage so the kitchen feels more connected without losing every useful surface.
Related: load-bearing wall removal in houses.
Three remodel paths that work
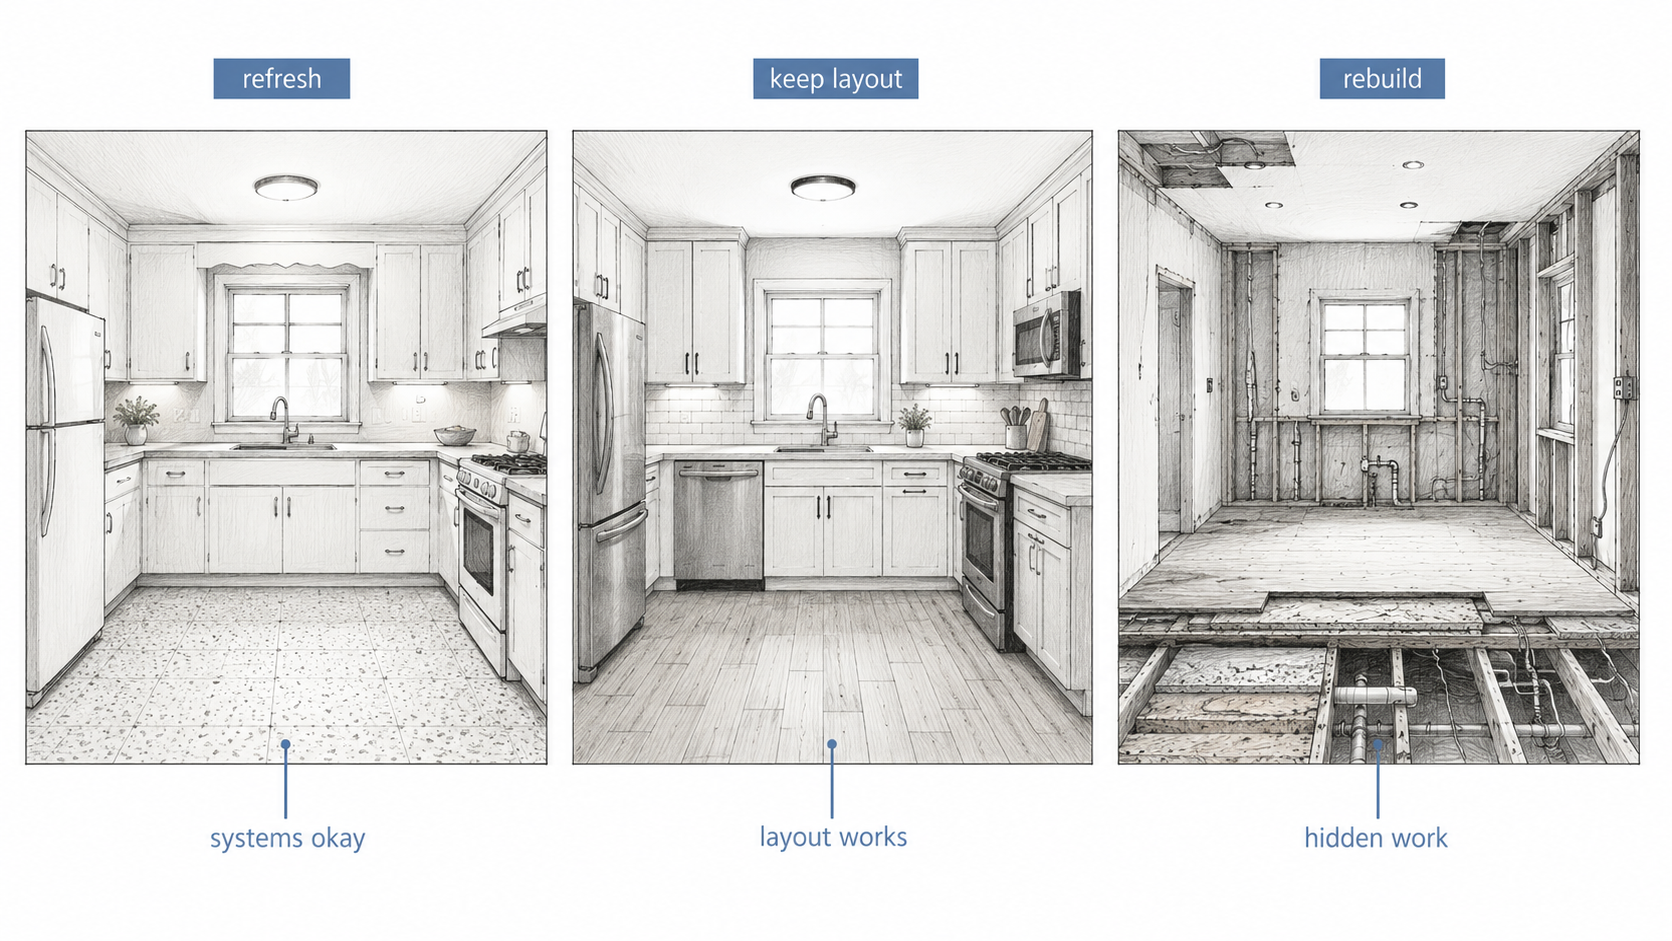
1. The careful refresh
Use this when the layout works, cabinets are sound, and the hidden systems do not need major work. Paint or refinish cabinets, improve lighting, add a better faucet, repair drawers, change hardware, and clean up the backsplash or counters. This is the safest budget path, but only if you are honest about what is actually failing.
2. The keep-layout remodel
Use this when the kitchen needs real improvement but does not need a new footprint. Keep the sink and appliance zones mostly where they are. Upgrade cabinets, counters, lighting, ventilation, outlets, flooring, and storage. This path usually gives the best return because it fixes daily use without triggering the largest structural and plumbing costs.
3. The full rebuild
Use this when the old layout, cabinets, wiring, plumbing, ventilation, and floor all fail together. At that point, small repairs become expensive patchwork. A full rebuild may be cleaner, but it needs a proper design, permit scope, and real contingency built in.
Where the money usually goes
The biggest mistake is budgeting by square foot only. A 110-square-foot 1950s kitchen can cost more than a larger newer kitchen if access is bad and the systems are old.
| Cost driver | Why it matters | How to control it |
|---|---|---|
| Cabinets | Often the largest finish line item | Refinish, reface, or replace only what truly fails |
| Layout changes | Trigger plumbing, electrical, floor, wall, and ceiling work | Keep sink and major appliance zones close to original locations |
| Electrical upgrades | Older kitchens may lack safe modern capacity | Plan outlets, lighting, appliance circuits, and inspection early |
| Wall repair | Plaster, tile, old patches, and demo scars take labor | Open only what needs to be opened and price the repair honestly |
| Flooring | Old layers can hide hazards, height problems, and subfloor damage | Test suspect materials and plan transitions before demo |
| Ventilation | Range hoods need a real exhaust path, not just a decorative hood | Choose range location and duct route before cabinets are ordered |
Design choices that fit a 1950s kitchen

A 1950s kitchen does not need every retro cue at once. That is how remodels start to look fake — and how they start to date badly again in ten years.
Pick one or two strong period signals and let the rest of the room behave. Flat cabinet fronts, simple pulls, a restrained color, warmer wood, a clean laminate, or a period-sensitive light fixture can be enough. You do not need checkerboard floors, diner stools, pastel appliances, boomerang counters, and chrome everywhere to make the room feel like itself.
Recommended reference: Atomic Ranch: Midcentury Interiors is useful if you want period-sensitive kitchen and interior ideas without turning the room into a fake diner set.
Design moves that usually work
- Keep flat-front cabinets or choose simple slab doors.
- Use one period color instead of turning the room into a theme.
- Choose hardware that fits the cabinet scale.
- Use better lighting before relying on bright finishes to make the room feel bigger.
- Keep sightlines to the dining area or yard where the original plan allows it.
Design moves that usually fail
- Forcing a large island into a narrow room.
- Removing every upper cabinet and then complaining about storage.
- Using fake retro finishes on top of bad layout and old systems.
- Replacing good original cabinets with cheap new cabinets that age worse.
- Ignoring the house style and copying a luxury kitchen from a much larger home.
A smarter order of work
- Document the existing kitchen. Measure cabinets, appliance openings, door swings, windows, outlets, and plumbing locations.
- Check hazards and systems. Look at electrical, plumbing, ventilation, floor layers, and suspect materials before demolition.
- Choose the remodel path. Refresh, keep-layout remodel, or full rebuild.
- Decide what stays. Cabinets, tile, flooring, lighting, built-ins, and period details should be judged before removal.
- Lock the appliance plan. Refrigerator, range, dishwasher, hood, and microwave decisions affect cabinets and wiring.
- Price the hidden work first. Electrical, plumbing, wall repair, flooring prep, and ventilation need room in the budget before finishes are chosen.
- Then choose finishes. Finish choices are easier and smarter when the real scope is already known.
FAQ
How much does a 1950s kitchen remodel cost?
A light refresh may cost a few thousand dollars. A practical keep-layout remodel often lands in the tens of thousands. A full rebuild with new cabinets, electrical, plumbing, flooring, lighting, and layout work can move far higher, especially in expensive labor markets.
Is it cheaper to keep the original 1950s kitchen layout?
Usually, yes. Keeping the sink, range, and major appliance zones near their original locations can avoid major plumbing, electrical, wall, ceiling, and floor patch costs.
Are original 1950s kitchen cabinets worth saving?
Sometimes. Save them when the boxes are solid, dry, square, and useful. Replace them when they are swollen, too shallow, badly modified, or failing structurally.
Should I remove a wall to open a 1950s kitchen?
Only after checking structure, wiring, plumbing, HVAC, floor patching, and ceiling repair. A partial opening can often solve the problem with less risk and lower cost.
Can old 1950s kitchen floors contain asbestos?
Yes. Some older floor tile, backing, and adhesive may contain asbestos. Test suspect materials before cutting, sanding, scraping, or demolition.
What is the best budget remodel for a 1950s kitchen?
Keep the layout, repair or reface solid cabinets, improve lighting, update the faucet and hardware, add safe outlets where needed, and fix ventilation before spending heavily on decorative finishes.
What makes a 1950s kitchen remodel go over budget?
Hidden electrical work, plumbing changes, old floor layers, wall removal, asbestos testing or abatement, custom cabinets, and appliance conflicts usually cause the biggest jumps — and most of them show up after demo starts.
How do I keep a 1950s kitchen from looking fake?
Use one or two period cues, not all of them. Flat-front cabinets, simple pulls, one controlled color, and better lighting usually age better than a heavy retro theme.