
A Practical Guide to Choosing the Right Light Fixtures for Every Room
Most people buy light fixtures like they buy throw pillows. Scroll, like, click, hope it looks good. Then they live with shadows on the countertop, glare in their eyes, and a living room that is either a cave or a hospital.
Choosing light fixtures properly is not about chasing trends. It is about matching light to tasks, wiring, ceiling height, room size, and how people actually move through the space. Do that well and your house feels calm, usable, and expensive even if the fixtures themselves are mid range.
This guide keeps it simple and real. No mood boards. No vague “layer your lighting” one liners. You will learn how to think about brightness, beam spread, colour, switching, and what your ceiling and wiring can actually support.
If you like understanding how lines on a plan become real spaces, it helps to keep a basic reference beside you, such as this straightforward guide to reading architectural plans and symbols, and for a bigger room-by-room view of circuits and layouts, you can pair this with this residential lighting & electrical layout guide.
Start With the Room, Not the Fixture
Before you look at a single pendant or chandelier, answer one question for each room: what actually happens here. Not what you wish, what really happens.
For example:
- Kitchen island: chopping, homework, late night snacks, maybe laptop work.
- Living room: reading, television, guests, kids on the floor.
- Bedroom: dressing, winding down, maybe feeding a baby at 3 a.m.
- Bathroom: shaving, make up, quick clean ups, showers with steam everywhere.
- Hallways and stairs: circulation, safety, no drama but zero tripping hazards.
Once you list the real activities, the pattern is clear. You never need just “a light.” You need a mix. Some light that washes the room, some that hits the work surface, some that gives a bit of drama or comfort. That mix is what people mean by “layered lighting.” The difference here is you treat it as a job list, not as a design slogan.
If you struggle to think in terms of rooms and flows, step back and look at the house as a whole. An overview of how spaces connect, like the kind of plan based thinking described in this spatial planning and interior layout guide, can make lighting decisions a lot more logical.
The Four Jobs of Light in a Room
Every fixture you buy should be doing one clear job. If it is not, it is just a pretty object that happens to glow.
Ambient light
This is the general light that lets you see the room at all. Ceiling lights, recessed downlights, large surface mounts, big pendants. It sets the baseline brightness. Bad ambient lighting gives you hot spots and shadows. Good ambient lighting feels invisible, everything just looks evenly usable.
Task light
This is focused light where work happens. Under cabinet lights on the countertop. A reading light beside a chair. Mirror and vanity lighting that hits faces properly. If someone can say “I cannot see what I am doing” the task lighting has failed.
Accent light
Accent lighting is for focus. It pulls attention to a painting, a textured wall, a bookshelf, a piece of stone. Small spots, wall washers, cabinet lights. Used properly, these are what make houses feel designed rather than simply lit.
Decorative light
The jewellery. Chandeliers, statement pendants, sculptural fixtures. They can give some light, but their main job is to say “someone cared about this room.” The mistake is using only decorative fixtures and expecting them to do all the work. They rarely do.
When you choose fixtures, write down which job each one is doing. If you have three decorative pieces and nothing handling basic task lighting, that room will photograph well and live badly. If you want a more design driven overview of how those layers come together in a whole house, it pairs nicely with this guide on building a bright, balanced home lighting scheme.
The One Lighting Move Almost Nobody Plans: Night Mode for Real Life

Most houses are lit for photos, not for how you actually live. Everything is about “bright and airy” daytime shots. Almost nobody designs for what the house feels like at 2 a.m. when you are half asleep, barefoot, and just trying not to wake anyone up.
That is where “night mode” lighting changes everything. It is not a gadget setting. It is a separate, low-level lighting layer that lets you move, use the bathroom, grab water, or check on kids without blasting your eyes or flipping on full ceiling lights.
Why Your House Is Too Bright at Night
Your eyes at night are adapted to the dark. When you hit a full output ceiling fixture, your pupils slam shut, you lose night vision, and your brain thinks it is morning. That is why you feel wide awake after a bathroom trip under bright LEDs.
The fix is not “buy warmer bulbs.” The fix is to create a completely different layer of lighting:
- Very low brightness.
- Very warm colour (around 2200–2700 K).
- Mounted low or indirect, so you never see the source directly.
Once you build this in, you stop needing to “turn on the big light” at night. That alone makes the house feel calmer and more expensive, even if the fixtures are simple.
How to Plan a Night Route Through Your House
Forget the daytime plan for a moment. Think through your most common night paths:
- Bedroom → hallway → bathroom → back.
- Bedroom → stairs → kitchen → back.
- Kids’ room → hallway → parents’ room.
Now mark where you actually put your feet and where your hands go. That is where night lighting belongs. Not in the centre of the ceiling, not in your line of sight, but low, indirect, and out of the way.
Practical examples:
- Low-level LED step lights along the stairs, wired to their own switch or sensor.
- A dimmable strip light under the vanity lip in the bathroom, enough to see the floor and fixtures without hitting the mirror.
- Toe-kick lighting under kitchen cabinets on a tiny separate circuit for late-night water runs.
- A bedside light with a narrow beam and a real off-switch within reach, not a blinding table lamp that lights half the room.
Rules for Night Mode Fixtures
Think of night mode as a different system with its own rules:
- No eye-level glare. You should see the effect on the floor or wall, not the bare LED.
- No cool white. Keep it warm and soft so your brain does not think sunrise just happened.
- Low output only. If you have to dim it down to 5–10% every time you use it, it is too bright by design.
- Simple control. One switch near the bed or motion sensors in key spots. If it is complicated, nobody uses it.
The difference this makes is not subtle. You stop waking fully up every time you move around at night. Kids stop turning on every light in the hallway. The house feels calmer because it is not going from “dark” to “operating room” in one click.
Most lighting guides talk about “layers” and then stop at ceiling, lamps, and maybe some under cabinet strips. If you build in a real night mode layer, you are already ahead of most new builds and renovations, and the house will feel like someone actually thought about how people live in it, not just how it photographs.
Brightness and Beam: How Much Light You Actually Need
Most people still shop by watts. In the LED era that is useless. You care about lumens and where they go, not what number is printed on the old incandescent box.
Lumens, not watts
Rough and simple:
- Living room, bedroom, hallway: around 10 to 20 lumens per square foot when everything is on.
- Kitchen work areas and home office: closer to 30 to 50 lumens per square foot.
- Bathroom vanity: bright but controlled, so you see your face clearly without glare.
You do not need to run calculations for every room, but you should sense check. If your kitchen is 150 square feet and your entire plan is two tiny pendants with 400 lumens each, that is why it feels like you are prepping food in a bar at midnight.
Beam spread and direction
Two fixtures with the same lumens can feel totally different. A narrow spot throws a tight pool on the floor. A wide beam softens everything. A globe diffuses in all directions and bounces off walls and ceiling.
A few practical rules:
- Over counters and islands, you want controlled light downward, not a full blast into your eyes. Look for shades or lenses that shield the bulb when you are seated.
- In living rooms, wall washing and bounced light off the ceiling often feels better than cans pointed straight at the sofa.
- In hallways, a series of reasonably wide fixtures tends to beat one over bright downlight that makes everything else look dark by comparison.
If you are comfortable reading sections and reflected ceiling plans, you can mark rough cone angles and see how many fixtures you need. If that is new territory, a quick pass through this basic guide to architectural drawing can help you picture how the beams fall in space.
Colour Temperature and CRI: Why Some Rooms Feel “Off”
You can get the brightness right and still have a room feel wrong. Usually that is a colour issue. Not paint colour. Light colour.
Colour temperature
Short version:
- Around 2700 K feels warm and residential, closer to old incandescent.
- Around 3000 K feels clean and modern without going into harsh office territory.
- 4000 K and above starts to feel like offices, clinics, garages.
The real problem is mixing. A living room with three lamps at 2700 K and ceiling cans at 4000 K always looks wrong. Skin tones and materials fight each other. Pick a range for the house and stick roughly to it, maybe warmer in bedrooms and living, slightly cooler in kitchens if you like that look.
If you want to see how all of this plays with daylight and windows, it is worth looking at this natural lighting in architectural design guide, which shows how sun and sky light can either fight or support your artificial lighting choices.
CRI and how colours look
CRI, the colour rendering index, tells you how well a light source shows colours compared to a reference. The higher the better, as long as the product is honest about it. Low CRI light makes food look dull, skin look tired, and finishes look cheap.
For a home, aim for 90 CRI or better where you can, especially over kitchens, dining areas, and bathrooms. You spend money on finishes. There is no point if the light makes everything look flat.
If you want the theory behind why some “warm white” lamps feel dirty while others feel cosy, a broader design principle overview such as this article on form and function in architecture helps you see light as part of the overall design system, not an afterthought.
What Your Ceiling and Wiring Can Actually Support
This is the part most “how to choose a light fixture” guides skip. They assume you can hang anything anywhere. That is how you end up with a 25 kilogram chandelier on a fifty year old plastic box.
Ceiling type and structure
Ask a few basic questions:
- Is this a drywall ceiling with joists above, or a concrete slab.
- Is there attic access or an accessible space above.
- Do you know which way the joists run and where you can safely fix new boxes.
Heavy fixtures need proper support. That can mean fan rated or heavy duty boxes, blocking between joists, or in some old ceilings, a decision to use a lighter fixture instead of forcing the point. If you are touching structure or are not sure what is carrying what, that is where a basic understanding of load paths from a piece like this structural analysis primer pays for itself.
Existing wiring and circuits
Your choices are also limited by:
- How many circuits you have in the room.
- Whether the switch box has a neutral conductor if you plan to use smart switches.
- How many fixtures are already on a given run.
For example, you might want separate control for island pendants, recessed downlights, and under cabinet lighting. If the existing wiring feeds everything from a single switch loop, you either accept one switch, plan new wiring, or change the fixture strategy. There is no magic fixture that fixes bad circuits.
Code also matters. Box fill limits, bathroom and shower clearances, exterior wet location ratings. A plain language code summary like this residential code overview is a good reality check before you start ordering fixtures for over tubs and in damp zones.
Room by Room: How to Choose Fixtures That Work
Kitchen
In the kitchen you care about three things. Clear counters, safe circulation, and no glare in your eyes while you work. A typical structure looks like this:
- Ambient: recessed downlights or a good surface mounted grid that covers the floor evenly.
- Task: under cabinet lighting over every work counter, plus pendants or targeted light over the island.
- Accent or decorative: a few spots on a feature wall, maybe a warm strip on open shelves.
Avoid the classic mistake of putting one huge fixture in the centre of the room and expecting it to light the counters. It will not. You will cast your own shadow exactly where you need to see the knife.
Living room
The living room has more modes. Bright for cleaning and kids. Soft for television. Focused for reading. You want options.
- Ambient: cans or ceiling lights on dimmers, possibly some wall washers.
- Task: floor and table lamps where people actually sit.
- Accent: picture lights, backlights for shelves, light grazing on a stone wall if you have one.
- Decorative: one strong central piece if the ceiling height and structure can handle it.
Treat the television wall with care. Direct downlights in front of the screen cause reflections and eye strain. Side light and back light are usually kinder.
Bedroom
Bedrooms need less total light, but better control. Think about three situations. Finding clothes, reading in bed, and not waking a sleeping partner.
- Use a soft ambient light, preferably on a dimmer.
- Put proper task lights by the bed, ideally with independent switching and narrow beams, so one person can read without lighting the entire room.
- Consider low level night lighting near the floor or inside closets for late night movement.
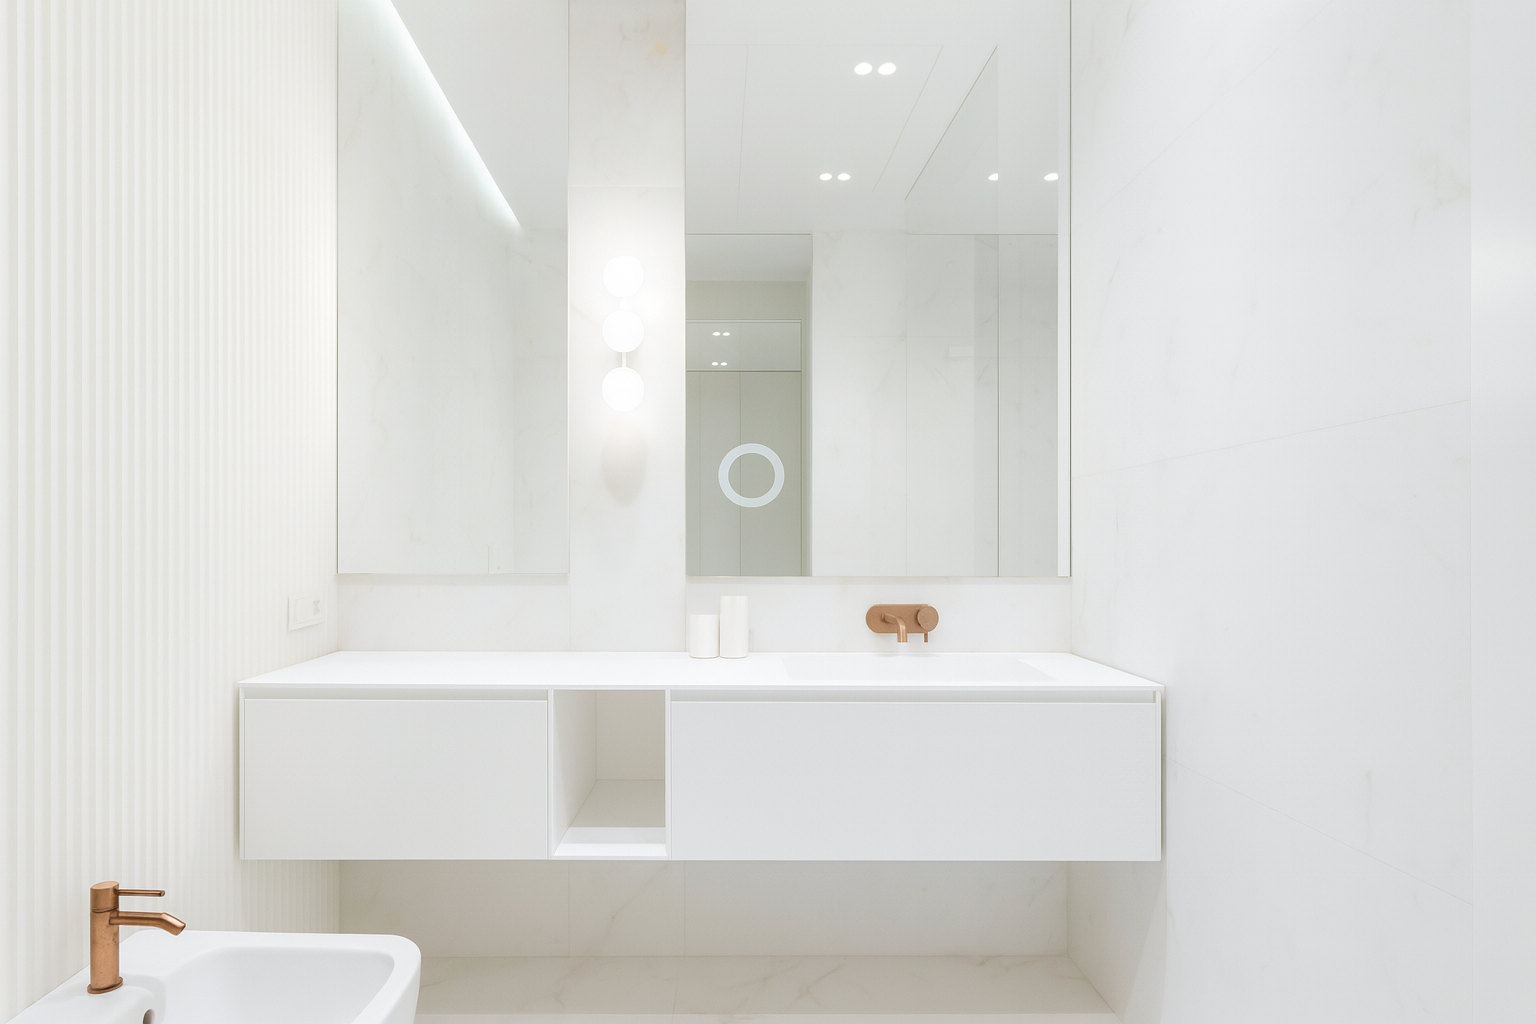
Bathroom
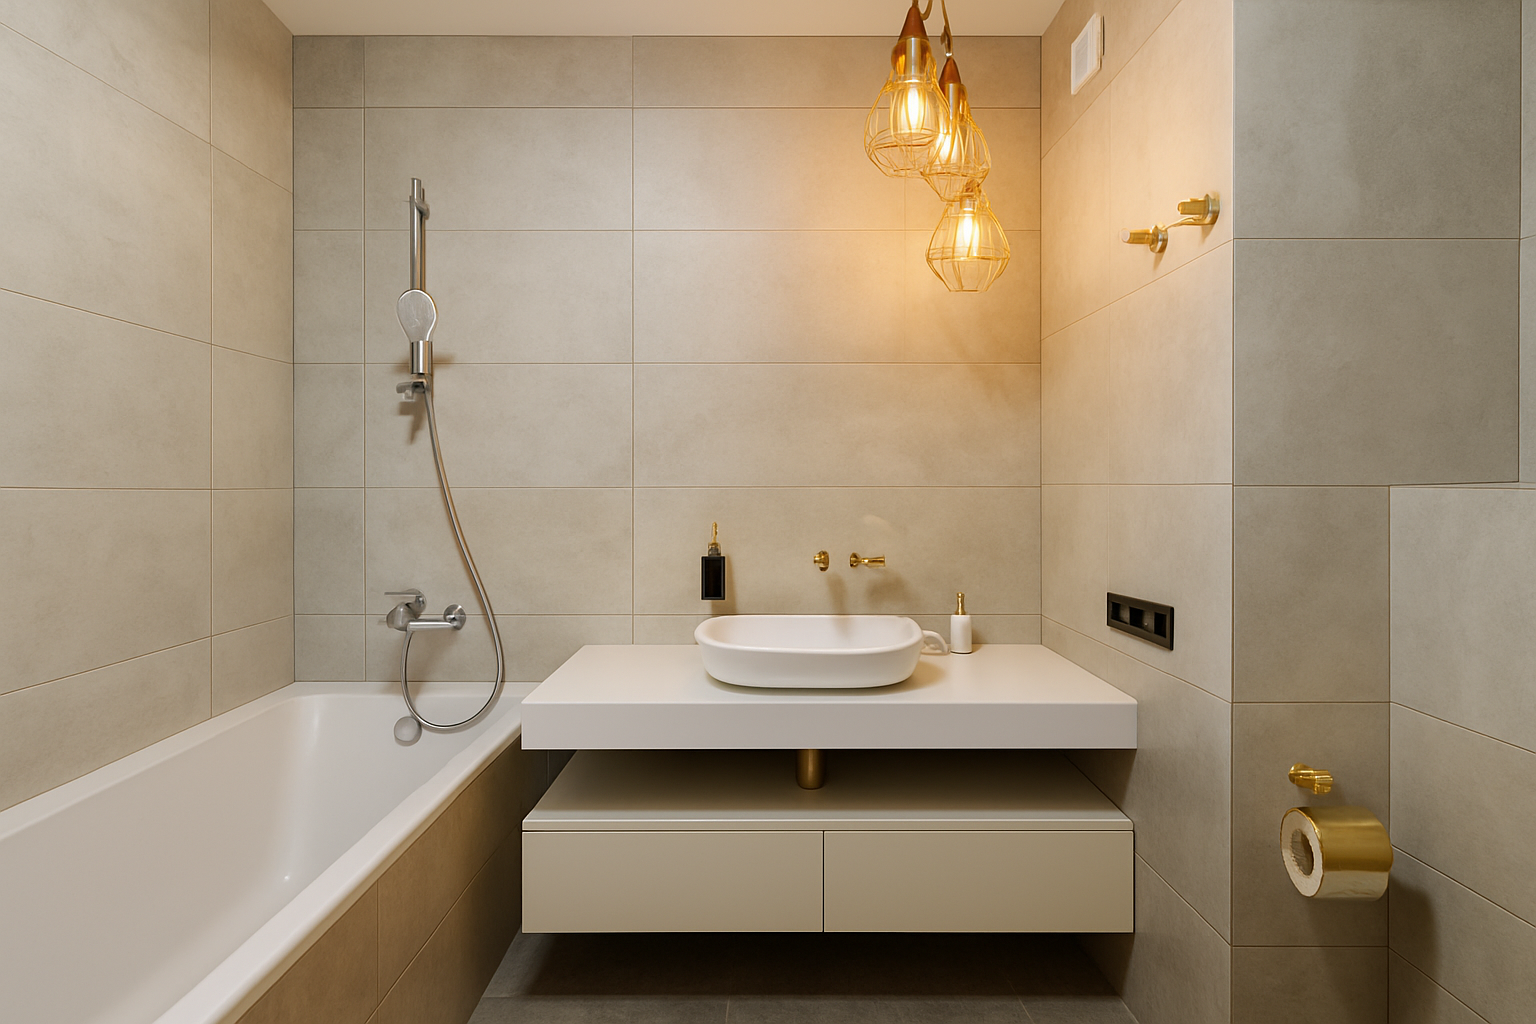
Bathroom mistakes are common. A single downlight over the mirror gives you horror movie under eye shadows. You want light at face level from both sides, plus enough ambient light for the rest of the room.
- Vertical sconces either side of the mirror, or a proper bar that throws light evenly across the face.
- General ambient light in the room, maybe from a central fixture or recessed cans.
- Shower rated fittings in wet zones, sized and placed so you do not stand in your own shadow.
Add in ventilation here too. Many fans come with lights. Decide if that fits your layout or if you want the fan separate so the lighting plan is not tied to one mechanical location.
Hallways, stairs, and circulation
These areas are about safety and rhythm. You want even levels, no dark pockets, and good visibility of treads and changes in level.
- Regularly spaced ceiling fixtures or recessed lights, all on dimmers.
- Wall lights or step lights along stairs so you see each tread.
- Possibly a single decorative piece in a double height space, if structure allows.
Exterior entries and paths
Outside, light becomes security as well as comfort. Entries, garage doors, paths, and patios all need to be usable at night without blinding the neighbours.
- Wall mounted lights by doors at eye height, not too high above the door.
- Downlights in soffits over entries, angled so they do not shine straight out into eyes.
- Path lights that throw light onto the surface instead of into the sky.
Exterior fittings need the right rating for wet locations and climate. Cheap fixtures that rust and leak kill the effect in a few seasons.
Switching, Dimming, and Control Strategy
A good fixture in the wrong switching setup is annoying for years. Before you buy, sketch out how you want to control each group of lights.
Group fixtures by use, not by type
Instead of putting all ceiling lights on one switch and all wall lights on another, think about scenes.
- In a living room, a “bright” setting for cleaning and a “evening” setting with mostly lamps and a bit of soft ambient.
- In a kitchen, one circuit for general light, another for counters, another for island pendants if you can afford it.
- In a bedroom, one circuit for general light, another for bedside reading, maybe a separate low level path to the bathroom.
The more you can line up switching with real life use, the less you will hate the layout later. Big renovations or new builds are the right moment to get this right, ideally alongside the planning steps covered in this house planning guide for beginners.
Dimming and smart control
Dimmers are not luxury. They are the only reason the same room can work at 7 a.m. and 11 p.m. without feeling wrong. Check that your fixtures and lamps are actually dimmable and that the dimmers are compatible with LED loads. Cheap dimmers and random LED lamps are a fast route to flicker and buzzing.
Smart switches and systems add another layer. They can give you scenes, timers, and remote control. They also bring complexity and compatibility headaches. If you go this route, standardize as much as possible. Same brand, same platform, same general approach across the house.
Common Mistakes When Choosing Light Fixtures
Choosing by looks only
The classic mistake. You fall for a pendant online, install it, and realize it shines straight into your eyes when you sit down. Or it throws weak light everywhere and does not help you see the counter at all.
Fix: always ask what job the fixture is doing and how it throws light. If the product page does not show beam spread, lumens, and basic specs, assume it is decoration only.
One bright fixture in the centre of the room
Bedrooms and living rooms suffer from this constantly. A single bright central fixture with no task or accent light means everything is either fully on and harsh, or off and useless.
Fix: accept that you need multiple fixtures at different heights, even if that means holding off on buying the biggest decorative piece until the basics are in.
Mismatched colour temperatures all over the house
A warm lamp in one corner, a cool downlight over the sofa, cold strip light in the kitchen, a random daylight bulb in the hallway. The result is a house that never feels settled.
Fix: pick a band for most of the house. For example, around 3000 K in main areas, slightly warmer in bedrooms. Stay within that range unless you have a very specific reason not to.
No respect for moisture, codes, or ratings
Installing non rated fixtures over a shower. Using cheap open fixtures outside in driving rain. Ignoring clearance around tubs and basins. These are not just aesthetic mistakes, they are safety and durability problems.
Fix: check damp and wet location ratings, read manufacturer instructions, and cross check the basics against a simple residential code summary before buying for bathrooms and exteriors.
How to Read a Light Fixture Spec Sheet Like an Adult
Spec sheets are where the real information lives. Once you know what to look for, you can decide in minutes whether a fixture fits your house or not.
Key items to scan:
- Lumens and wattage. Enough light for the job, reasonable efficiency.
- Colour temperature and CRI. In the range you want for that room, with decent colour rendering.
- Beam angle or distribution. Narrow for spots, wide for general light, clear diagrams if possible.
- Dimming compatibility. Specifically rated for LED dimmers, not just a lazy “dimmable” label.
- Weight and mounting details. Safe for your ceiling type and box rating.
- Location rating. Dry, damp, or wet, matched to the room and position.
Once you build the habit of checking these, a lot of “pretty but useless” fixtures drop off the list fast.
Where to Spend and Where to Save on Light Fixtures
Not every fixture deserves a premium budget. Some locations are daylight all day. Some never get noticed. Others carry the whole room.
Spend more on:
- Key decorative pieces in main rooms that everyone sees.
- Critical task lighting, especially over kitchen worktops and bathroom mirrors.
- Exterior and entry fixtures that take weather and say something about the house every time you arrive home.
Save on:
- Utility rooms, closets, storage areas.
- Simple recessed housings and trims, as long as the photometrics and ratings are decent.
- Secondary fixtures in areas with strong daylight, where lights are rarely used during the day.
Seen as part of the whole design, lighting is one of the highest impact investments per dollar. It changes how every surface, colour, and piece of furniture reads. That is why serious projects treat it as part of design and layout, not as a last minute shopping trip. If you are working through finishes at the same time – especially floors and paint – it also helps to think about how fixtures will play against colour palettes like the ones in this guide to wall colours with light wood floors, so the light and surfaces are working together instead of fighting each other.
If you like that way of thinking, where every system supports the others, it fits cleanly with the broader design approaches described in this guide to green and efficient architecture.
Final Thoughts: A Simple Checklist Before You Buy
Before you hit purchase on any light fixture, run through this in your head.
- What is the job of this light in this room.
- Does the brightness and beam pattern make sense for that job.
- Is the colour temperature and CRI consistent with the rest of the house.
- Can the ceiling structure and wiring actually support it safely.
- Is it grouped on a sensible switch and, ideally, on a dimmer.
- Does it work with how the room is furnished and used, not just how it looks in a photo.
If you can answer those honestly, you stop guessing. You stop buying lights twice. And your house stops feeling like a random showroom and starts feeling like one coherent, well lit place to live.
FAQ
How bright should each room be in my house?
A simple way to size fixtures is to think in lumens per square foot, then spread that light across different jobs (ambient, task, accent):
- Living rooms / bedrooms: roughly 10–20 lumens per square foot total, with extra task light where you read or work.
- Kitchens and home offices: closer to 30–50 lumens per square foot over work areas (counters, desks).
- Bathrooms: strong, even light at face level at the mirror, plus softer ambient light for the rest of the room.
That total can be delivered by a mix of ceiling lights, wall lights, and task lamps. If you want a room-by-room breakdown of how to turn those numbers into actual fixtures and circuits, see Residential Lighting & Electrical Layout: Room by Room Guide .
What colour temperature is best for a house: 2700 K, 3000 K, or 4000 K?
For most homes, stay in the warmer band and keep it consistent:
- 2700 K: very warm, similar to old incandescent, good for bedrooms and cosy living rooms.
- 3000 K: clean and modern but still comfortable, works well for kitchens, living rooms, and hallways.
- 4000 K+: starts to feel like an office or clinic; useful for garages or workshops, not most living spaces.
The biggest mistake is mixing everything. Three different colour temperatures in one open plan area is why the space feels “off” even when the fixtures are expensive. Pick a default band for the house and vary only on purpose. For a deeper dive into how natural and artificial light work together, see Natural Lighting in Architectural Design: The Secret to Better Living .
How do I choose the right size pendant or chandelier?
Three quick checks keep you out of trouble:
- Over a table or island: bottom of the fixture usually lands about 30–36 inches (75–90 cm) above the surface for standard 8–9 ft ceilings.
- Fixture width over a table: aim for about 1/2 to 2/3 the table width so it fills the space without overwhelming it.
- In a general room (no table): scale the fixture to both room size and ceiling height. A big chandelier in a low 8 ft room will feel heavy and dump light right into your eyes.
When in doubt, slightly smaller with good beam control usually feels better than oversize glare bombs. The architectural logic behind these proportions is the same “form plus function” thinking used in Lighting Design: How to Build a Bright, Balanced Home .
Can I put any light fixture over a shower or bathtub?
No. Wet areas are one place you cannot bluff your way through:
- The fixture must be rated for damp or wet locations (check the label and spec sheet).
- There are minimum clearances from tubs and showers that vary by code and jurisdiction.
- Some locations require GFCI protection or specific wiring methods.
In practice, that means you choose from a much smaller pool of products that are explicitly tested for bathrooms and follow your local electrical code. If you are not sure what your code allows, cross-check against a plain language summary such as Residential Building Codes Simplified: What You Need to Know , then confirm with your electrician.
Are integrated LED fixtures a good idea, or should I stick to standard bulbs?
Integrated LED fixtures can be excellent, but they are a commitment:
- Pros: slim profiles, better optics, very efficient, often better glare control and dimming than screw-in lamps.
- Cons: when the LED module fails, you often replace the whole fixture; cheap units can yellow, flicker, or die early.
For main architectural lighting (recessed, linear, cove, good exterior fixtures), quality integrated LED is usually worth it. For decorative pendants and lamps you may want to swap out later, using standard bases with high-CRI LED bulbs gives you more flexibility.
How do I avoid glare and “hot spots” in my lighting?
Glare is more about direction and shielding than raw brightness. To reduce it:
- Avoid bare bulbs at eye level in most rooms.
- Use shades, diffusers, or recessed trims that hide the source from normal seated and standing views.
- Push more light onto walls and ceilings instead of straight down onto glossy surfaces.
Architecturally, the same “light shaping” ideas are used at serious levels in projects like Alhambra Palace Architecture: How Muslim Builders Used Light, Water, and Geometry or Gothic Tracery: The Art of Stone and Light . At home, you are doing a smaller version of the same thing: shaping where light lands and where it does not.
How much does it matter if my lighting matches my wall and floor colours?
A lot. The same fixture looks completely different in a white box versus a dark, moody room:
- Light walls and ceilings: they bounce light, so you can use fewer fixtures and lower output.
- Dark walls, ceilings, and floors: they absorb light, so you often need more wattage, narrower beams, or extra accent lighting to get the same perceived brightness.
If you have light wood floors and are unsure how far you can push darker walls or moodier lighting, it is worth pairing this guide with something like What Wall Color Goes with Light Wood Floors? 7 Expert-Approved Combos . Light, colour, and material are one system; you get better results when you design them together.
Related
- Residential Lighting & Electrical Layout: Room by Room Guide – Wiring, switching, and circuit planning so the fixtures you choose actually work in real rooms.
- Natural Lighting in Architectural Design: The Secret to Better Living – How to use windows, orientation, and daylight so electric lighting has an easier job.
- Lighting Design: How to Build a Bright, Balanced Home – Bigger-picture design principles that sit behind the fixture choices in this article.
References
Industry and Government Resources on Residential Lighting
- U.S. Department of Energy – Energy Saver: Lighting Choices to Save You Money – Official guidance on efficient lamps, fixtures, and how to cut lighting energy use without sacrificing quality.
- U.S. Department of Energy – LED Lighting Basics – Clear overview of how LEDs work, what to look for on labels, and why lumens and colour temperature matter more than watts.
- ENERGY STAR – Certified Residential Lighting and Fans – Database of independently certified efficient fixtures, lamps, and ceiling fans with verified performance and quality.
- Illuminating Engineering Society (IES) – Professional body that publishes the core technical standards and recommended practices for lighting design used by architects and engineers.
- CSA Group – Lighting Standards (Canada) – Reference point for safety and performance standards that many residential fixtures must meet in the Canadian market.