A 1940s house can fool you.
From the street, it can look like a simple paint-and-flooring job. Small house. Plain roof. Modest rooms. Nothing dramatic.
Then the work starts. A bathroom wall opens and the vent is wrong. A window quote turns into trim repair and rot. A small kitchen update pulls electrical, plaster, and patch work into the job. That is where the budget changes.
The good news is that many 1940s houses are still worth the work. The plans are often compact and clear. The rooflines are usually simple. The best ones still have good room shape, decent daylight, and a scale that feels better than a lot of bigger houses built later.
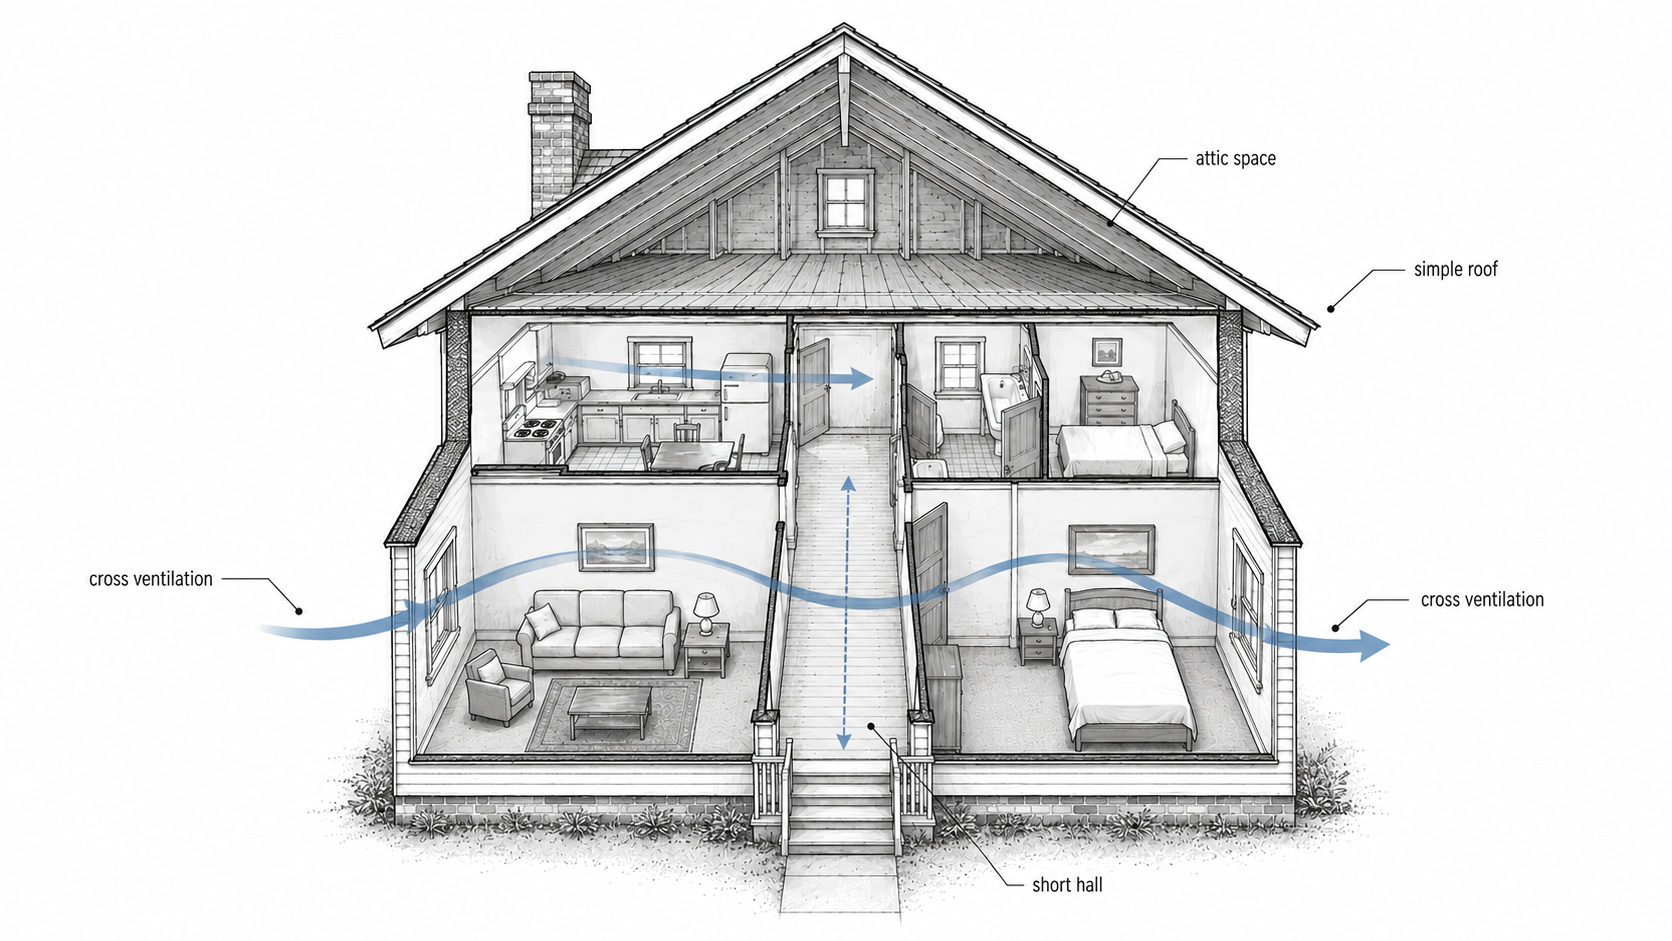
Illustration by ArchitectureCourses.org. A modest 1940s house often worked through simple planning: compact rooms, a short hall, cross ventilation, a plain roof, and attic space that could stay unfinished or be used later.
If you want the style background first, read 1940s house styles. This page is for the harder question: how to renovate one without spending badly or sanding off the parts that made it worth buying.
Start With the House You Have, Not the Mood Board
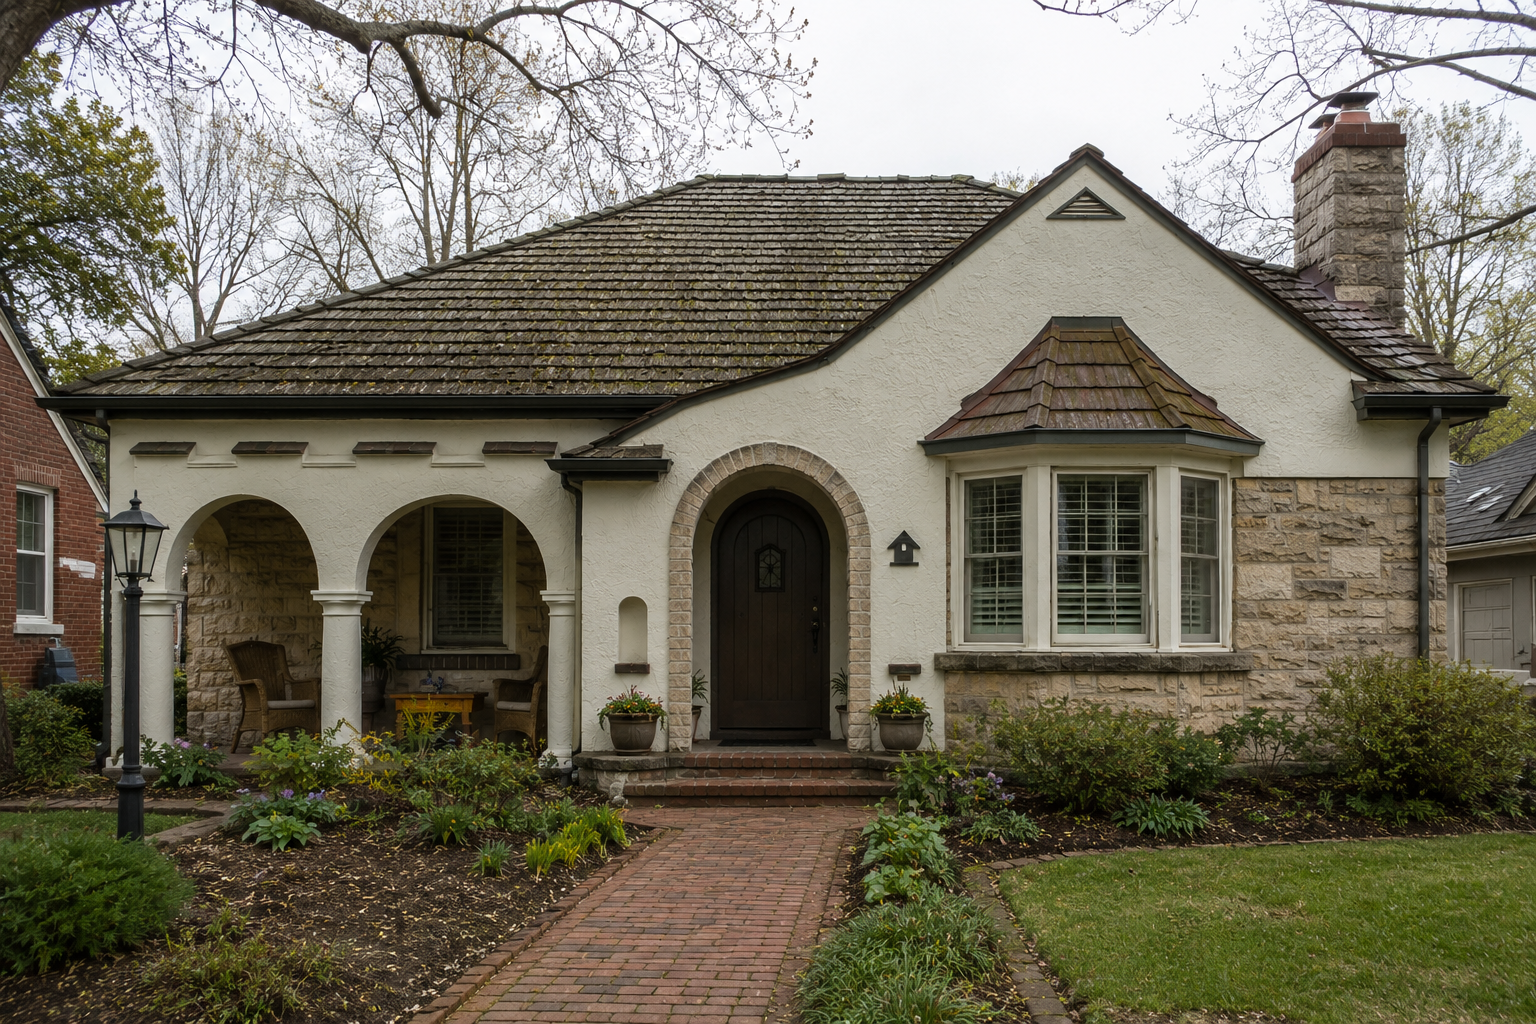
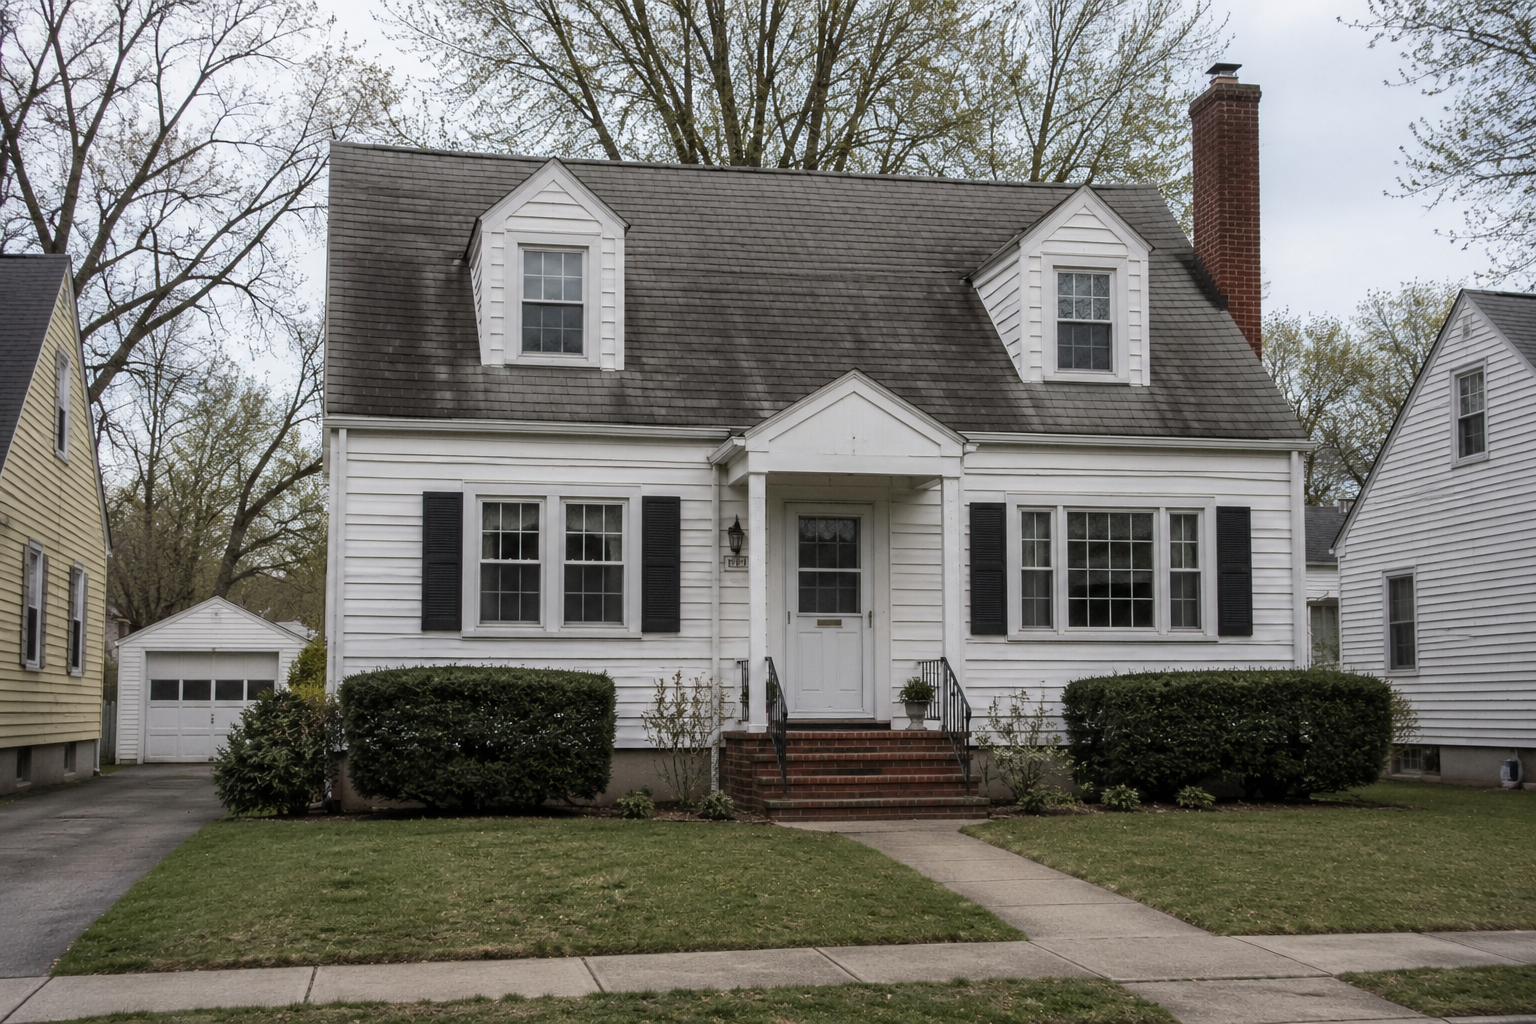
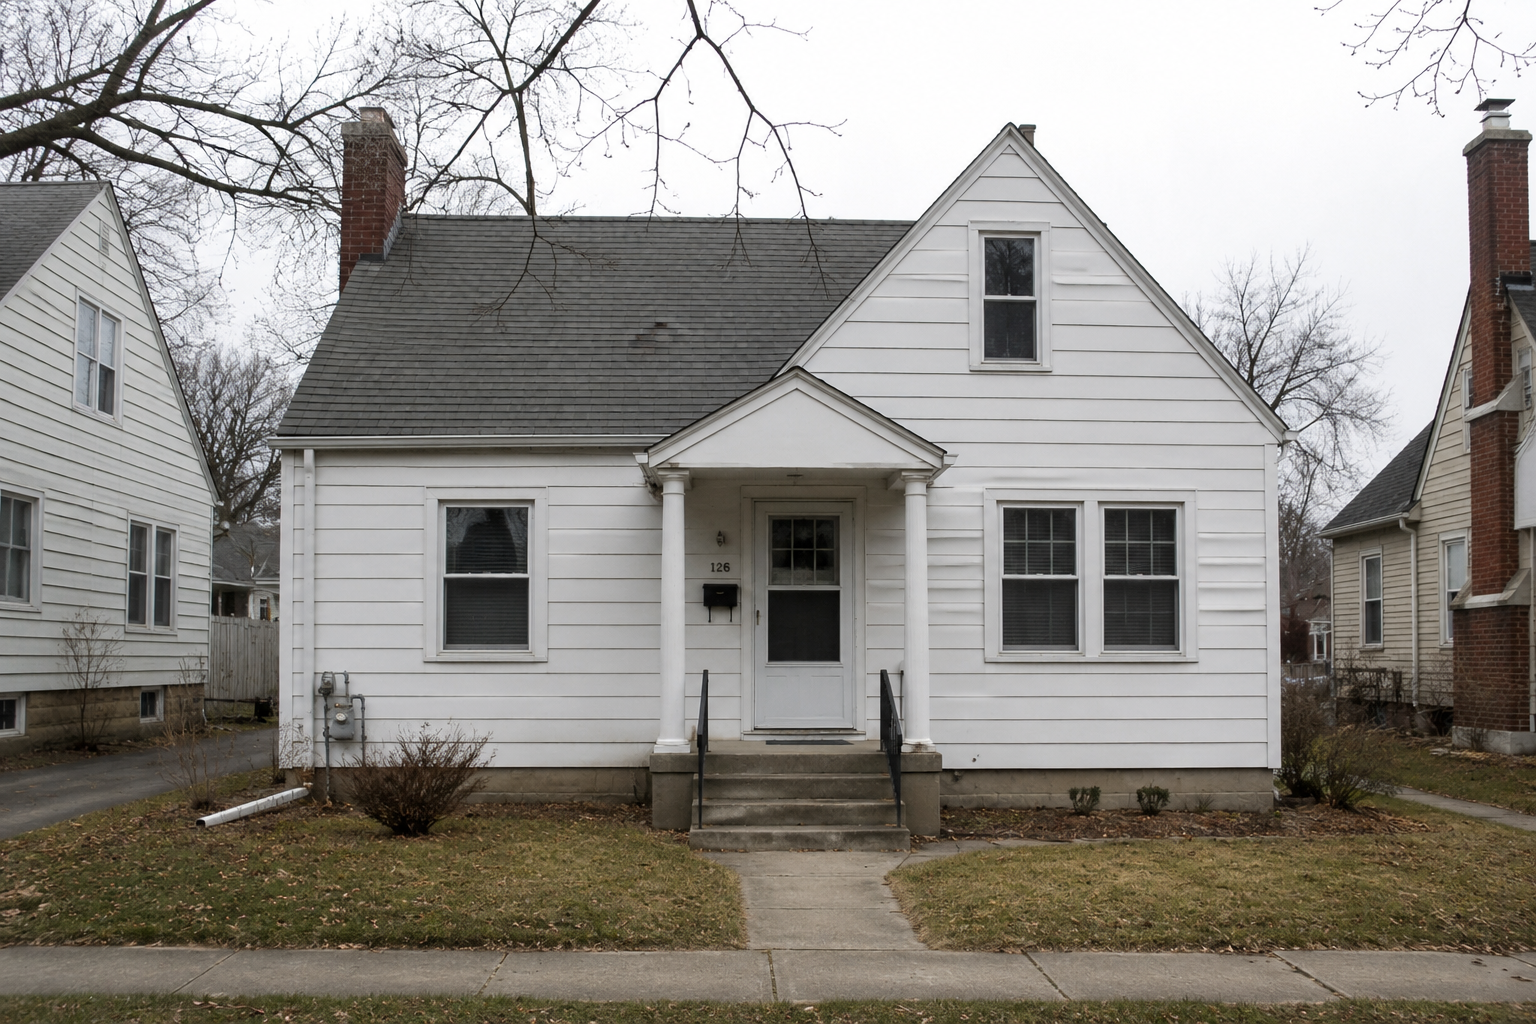
Image by ArchitectureCourses.org. A 1940s exterior often gets its character from the roof shape, arches, masonry, porch openings, window proportions, and a modest garden setting.
The first mistake is reading every 1940s house as the same house.
Some still lean toward the 1930s, with tighter rooms, steeper roofs, and more formal fronts. Some already lean toward the 1950s, especially late-1940s houses with lower lines and easier yard connection. That matters because the right renovation is partly about reading the decade correctly.
A house that still behaves like a compact Cape Cod or Minimal Traditional should not be pushed into a fake mid-century look just because the kitchen is getting redone. If the house already reads lower, looser, and more open to the yard, compare it with 1950s house styles before you start changing openings and materials. A lot of bad remodels start there.
The First Checks Before Demo
Do these before you choose tile, cabinet colors, or light fixtures.
| Check first | Why it matters | What it can widen |
|---|---|---|
| Electrical service and branch wiring | Old panels and patched wiring turn cosmetic work into real electrical work | Kitchen, bath, laundry, wall openings |
| Moisture in basement, crawl space, or around windows | Wet framing and trapped moisture make finish work pointless | Flooring, insulation, trim, drywall |
| Structure at walls you want to open | A simple opening can become a beam, post, and footing job | Living room, kitchen, entry, additions |
| Window condition | Insert replacements can shrink glass area and create patch work you did not price | Exterior trim, plaster, siding, interior casings |
| Roof and drainage | Water problems travel farther than most owners think | Ceilings, walls, insulation, basements, crawl spaces |
A basic pin moisture meter is one of the few cheap tools that can save real money early. It will not diagnose the whole house for you, but it can tell you whether a stain, sill, or basement corner is still wet before you build over it.
Exterior Work That Helps Instead of Hurting
Most 1940s houses do not need more exterior “character.” They need the old proportions to survive the update.
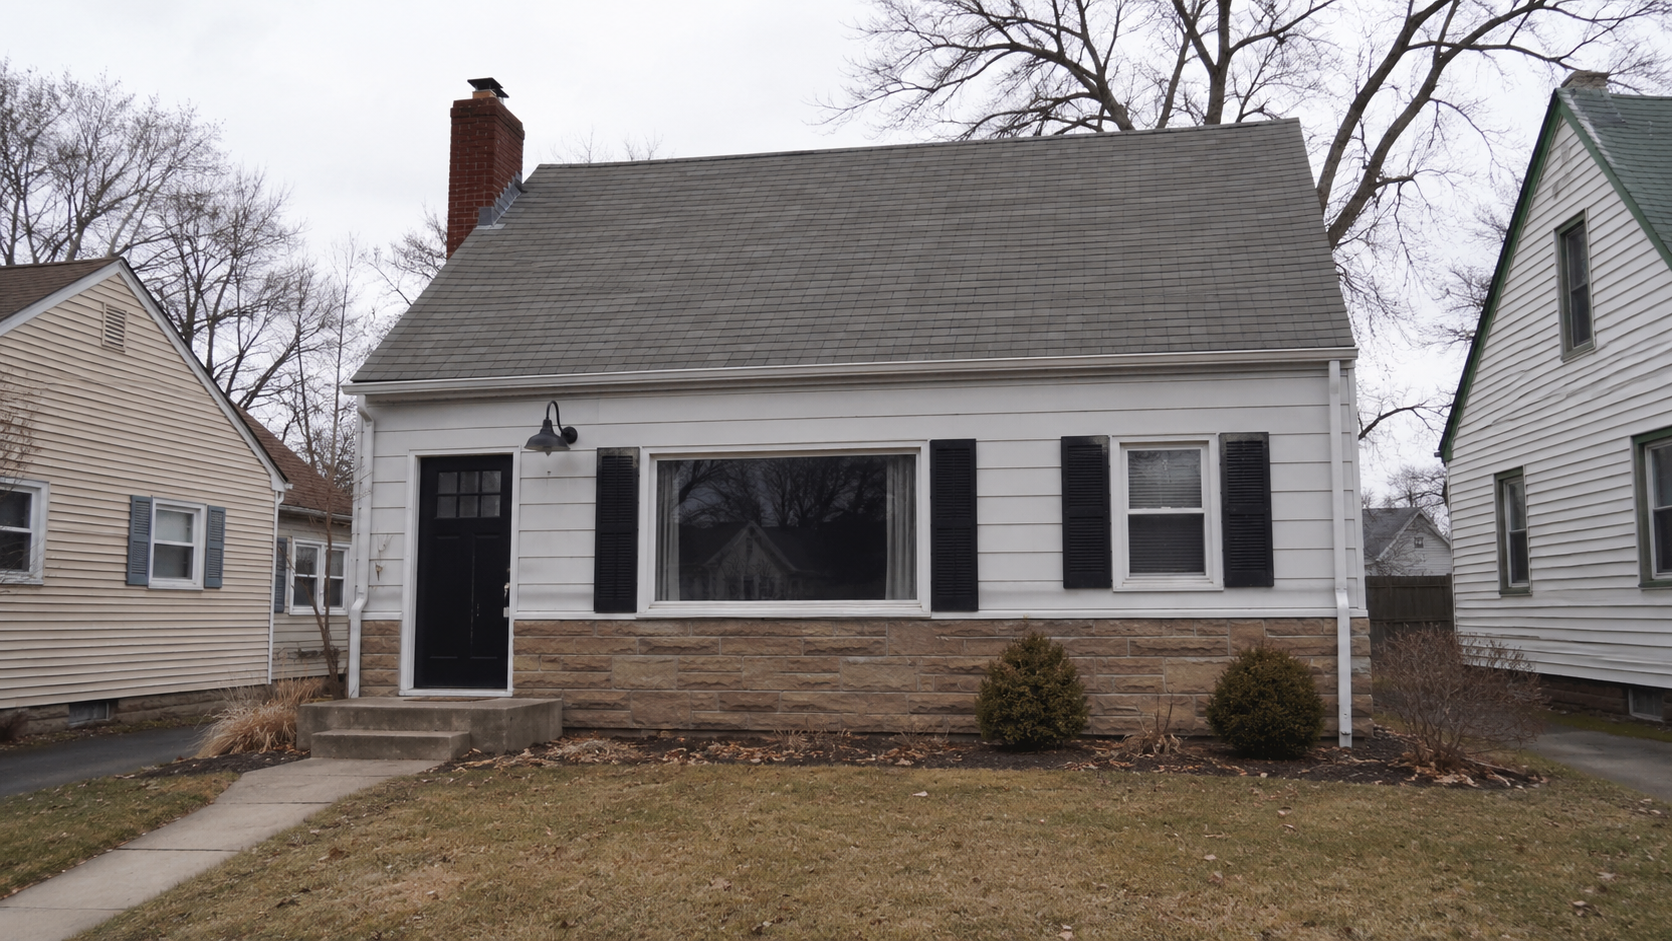
Image by ArchitectureCourses.org. A 1940s house can lose its quiet proportions when updates add oversized windows, fake stone, black shutters, and a trendy front door.
Keep the roof calm. Keep the entry readable. Keep the siding and trim strategy simple. A lot of 1940s houses get worse when they pick up fake stone, oversized picture windows, thick porch columns, farmhouse lights, random shutters, and too many clashing materials.
If the house has old masonry, do not start grinding, sealing, or repointing blindly. Wrong mortar or bad patching can make a decent wall look worse fast. Check how to know if your brick mortar is failing before you price repair work.
If the siding turns out to be asbestos-cement shingles, stop treating it like ordinary exterior finish. Read asbestos siding risks, removal, and replacement before the exterior quote starts pretending it is a routine re-side.
Windows: Repair, Replace, or Leave Them Alone
Window work is one of the fastest ways to spend badly on a 1940s house.
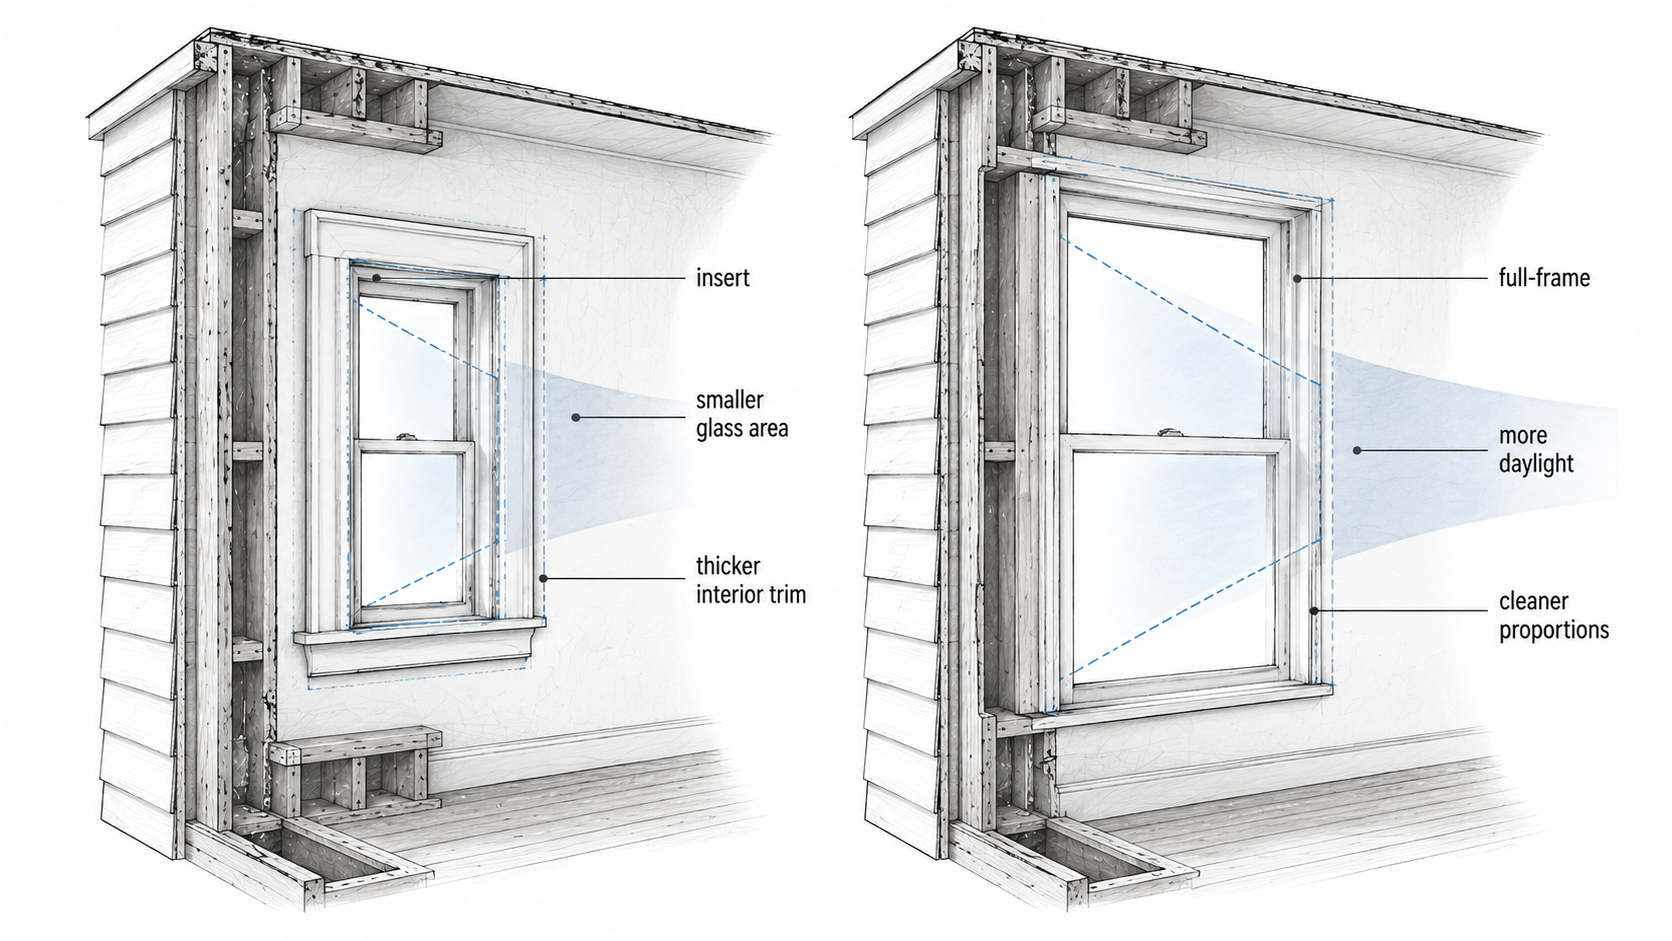
Illustration by ArchitectureCourses.org. Insert replacement windows can save work at the opening, but they often reduce glass area and daylight compared with a full-frame repair or replacement.
A lot of owners replace windows because they look old, not because they are the first thing that truly needs attention. In other cases, the windows really are failing, but the replacement choice still goes wrong because the install method changes the opening more than the quote suggested.
Insert replacements are the classic trap. They sound easier and cleaner. But the new unit sits inside the old frame, so the glass area shrinks. The room gets less daylight. The interior trim gets thicker. And the house can lose the quiet proportions that made the original elevation work in the first place.
That does not mean every old window should be saved. It means window work should be scoped honestly. When the frame is bad, go straight to a better full-frame conversation. When the frame is still sound, repair may be smarter than replacement. If the job is moving that direction, wooden window frame replacement is the better support page than a generic window roundup.
Kitchens: Fix the Layout Before the Look
Many 1940s kitchens are small, cut off, and short on outlets. That part is normal.
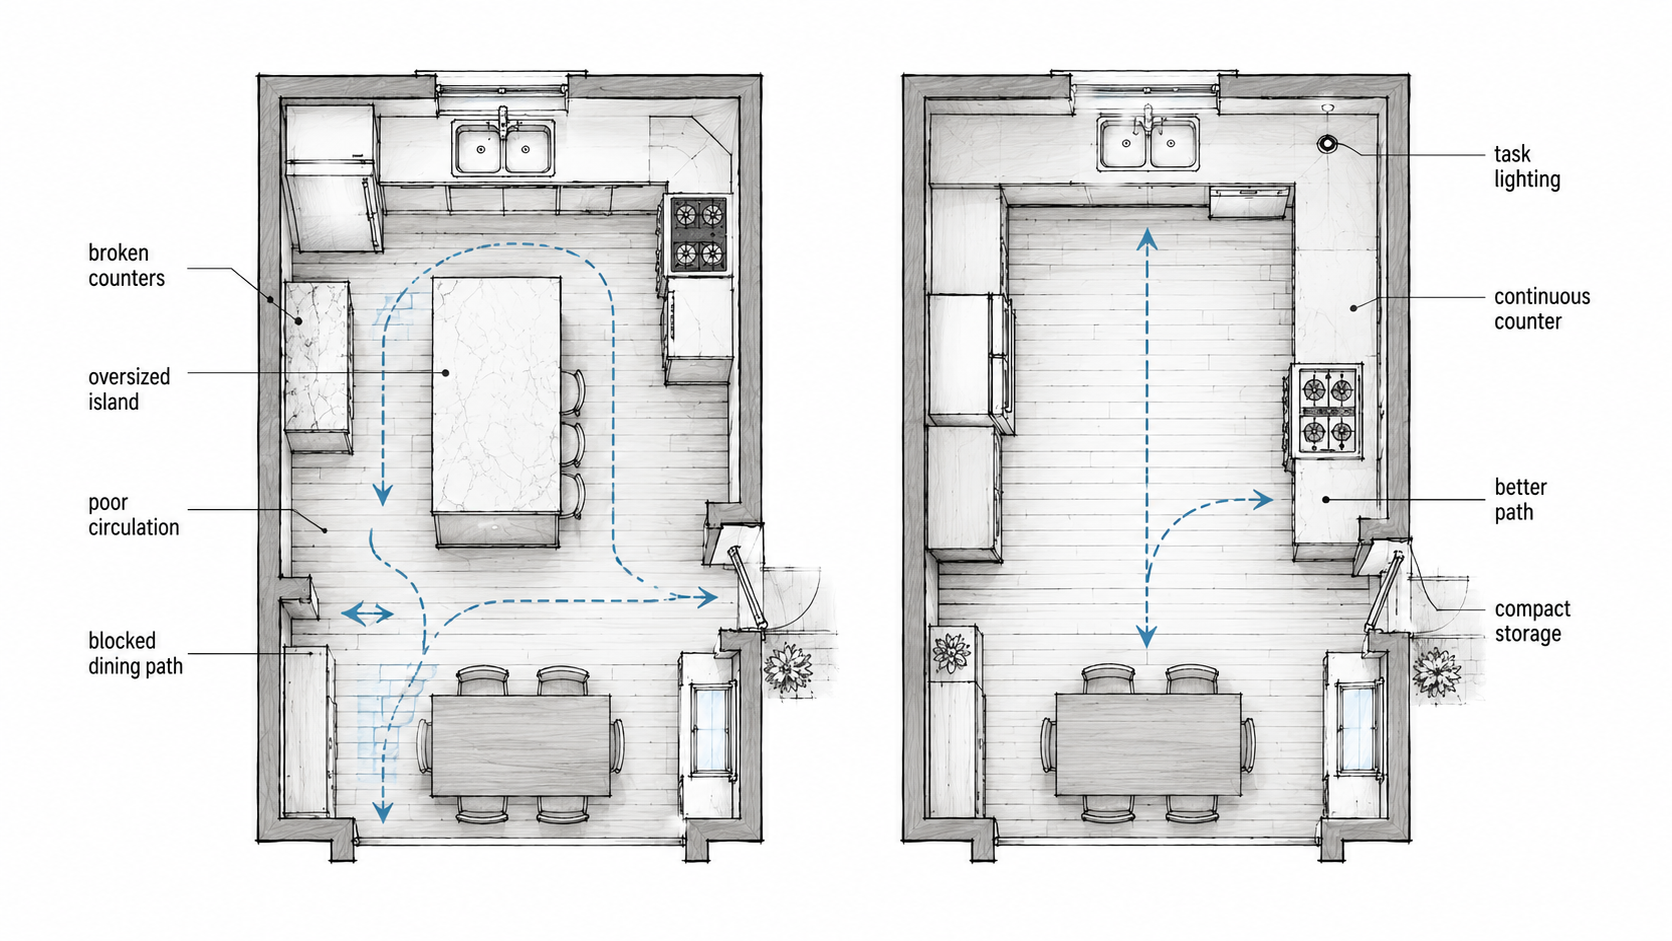
Illustration by ArchitectureCourses.org. A small 1940s kitchen usually works better when the layout fixes counter continuity and circulation before adding a large island or trend-heavy finishes.
The expensive mistake is throwing all the money at surfaces before you decide what the room is supposed to do. A kitchen that is still boxed in, badly lit, and weak on storage will not work just because the cabinets are new.
Fix these first:
- the path between kitchen, dining, and yard
- counter runs that are too broken up to be useful
- bad lighting over the actual work areas
- outlet and circuit limits that will be exposed during the job anyway
Be careful with wall openings. Some are worth it. Some drag beam work and finish repair into a room that would have improved more from better storage, a better window, and a cleaner doorway.
Moving a sink, a range, or the main vent line is usually where a small kitchen update stops being small. That is the point where cabinetry, plumbing, electrical, and patch work start talking to each other.
The best 1940s kitchen renovations usually feel calmer, not trendier. Better work surfaces. Better light. Better circulation. Less waste. Not a giant island dropped into a room that was never meant to carry one.
Bathrooms: Small Rooms, Bigger Consequences
A 1940s bathroom is often where the simple update story dies.
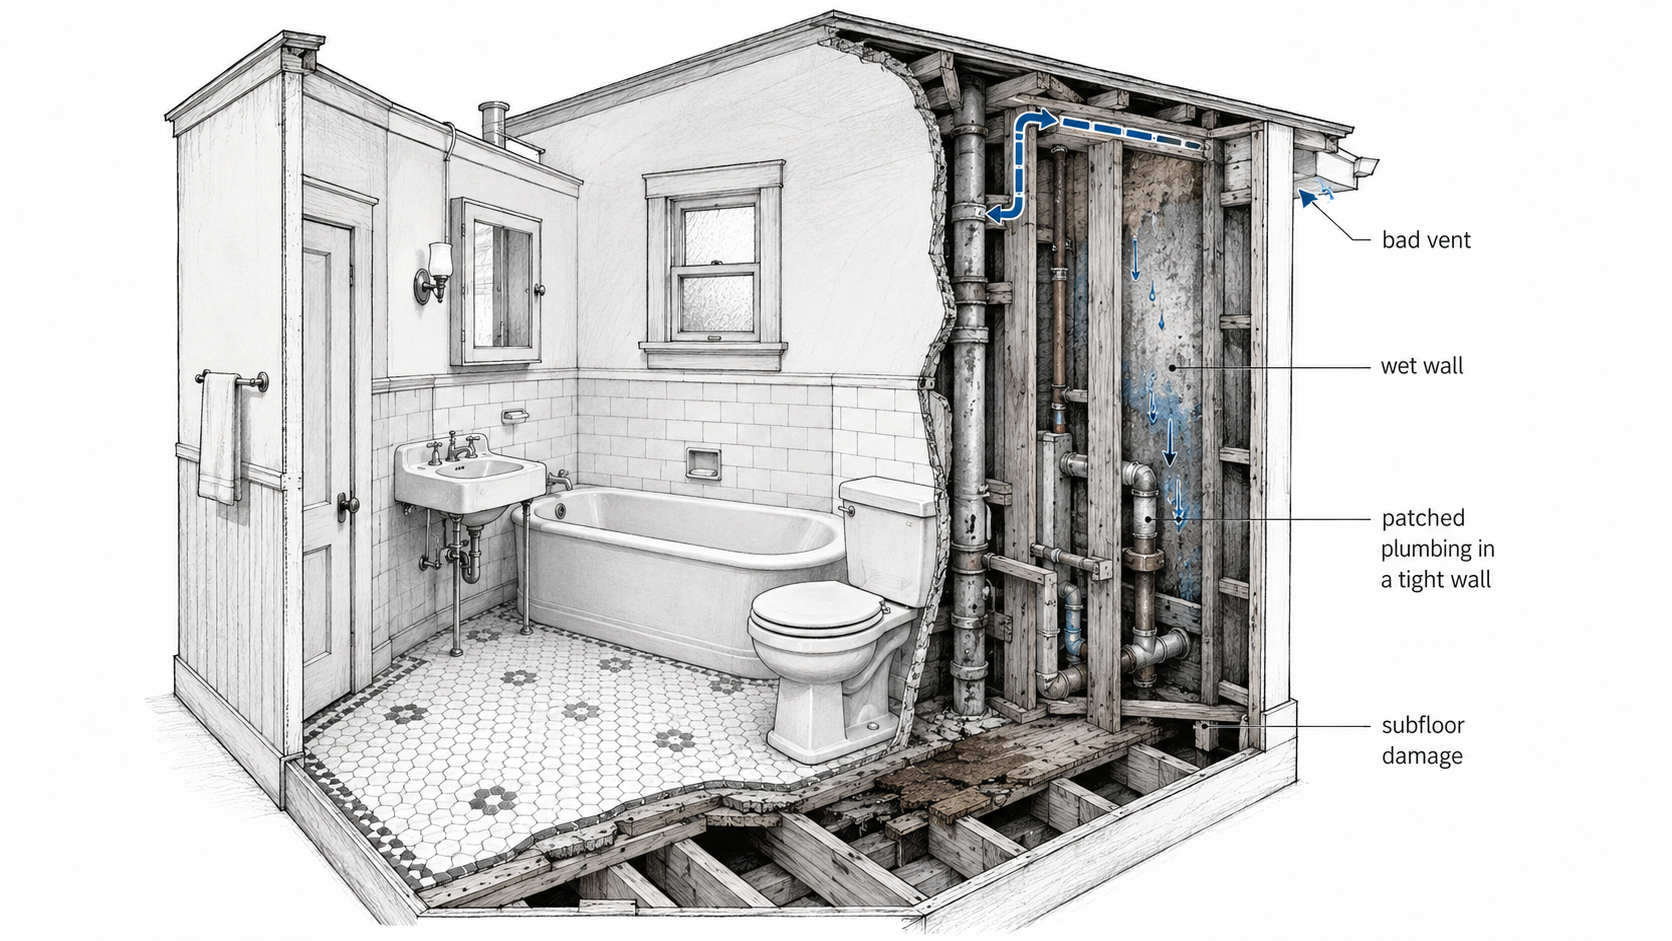
Illustration by ArchitectureCourses.org. A small 1940s bathroom can hide venting, plumbing, wall moisture, and subfloor problems that make a simple update grow fast.
The room is small, which makes owners think the work is small. But once tile, venting, plumbing, and wall condition come into play, the room can widen fast.
Common 1940s bath problems:
- no real exhaust path or weak venting
- old supply and drain work hidden in tight wall cavities
- subfloor damage around tubs or toilets
- one-bath house pressure that pushes owners into overspending on one room
What helps most is not luxury. It is discipline. Better fan. Better layout. Better storage. Better waterproofing. Better light.
Bad exhaust and wet walls often travel together. That is one of the old-house pairings people keep learning twice. If the house only has one bath, sequence matters too. A beautiful room that leaves the household without a working bathroom for weeks is not good planning.
If your bathroom scope is widening, 1950s bathroom remodel is still useful because the layout, venting, and moisture problems overlap more than the decade labels suggest.
Opening One Wall Can Change Three More Things
This is the line a lot of owners do not see coming.
Removing a wall does not just mean demo, drywall, and paint. In a 1940s house, it can mean beam sizing, bearing checks, ceiling repair, floor patching, and support below. Sometimes the wall is the easy part and the load path is the real job.
Do not price a wall opening like a finish upgrade. Price it like a structure question first. The right place to check your assumptions is load-bearing vs non-load-bearing walls.
The Quote That Starts Changing in Week Three
This is where a lot of renovation budgets turn.
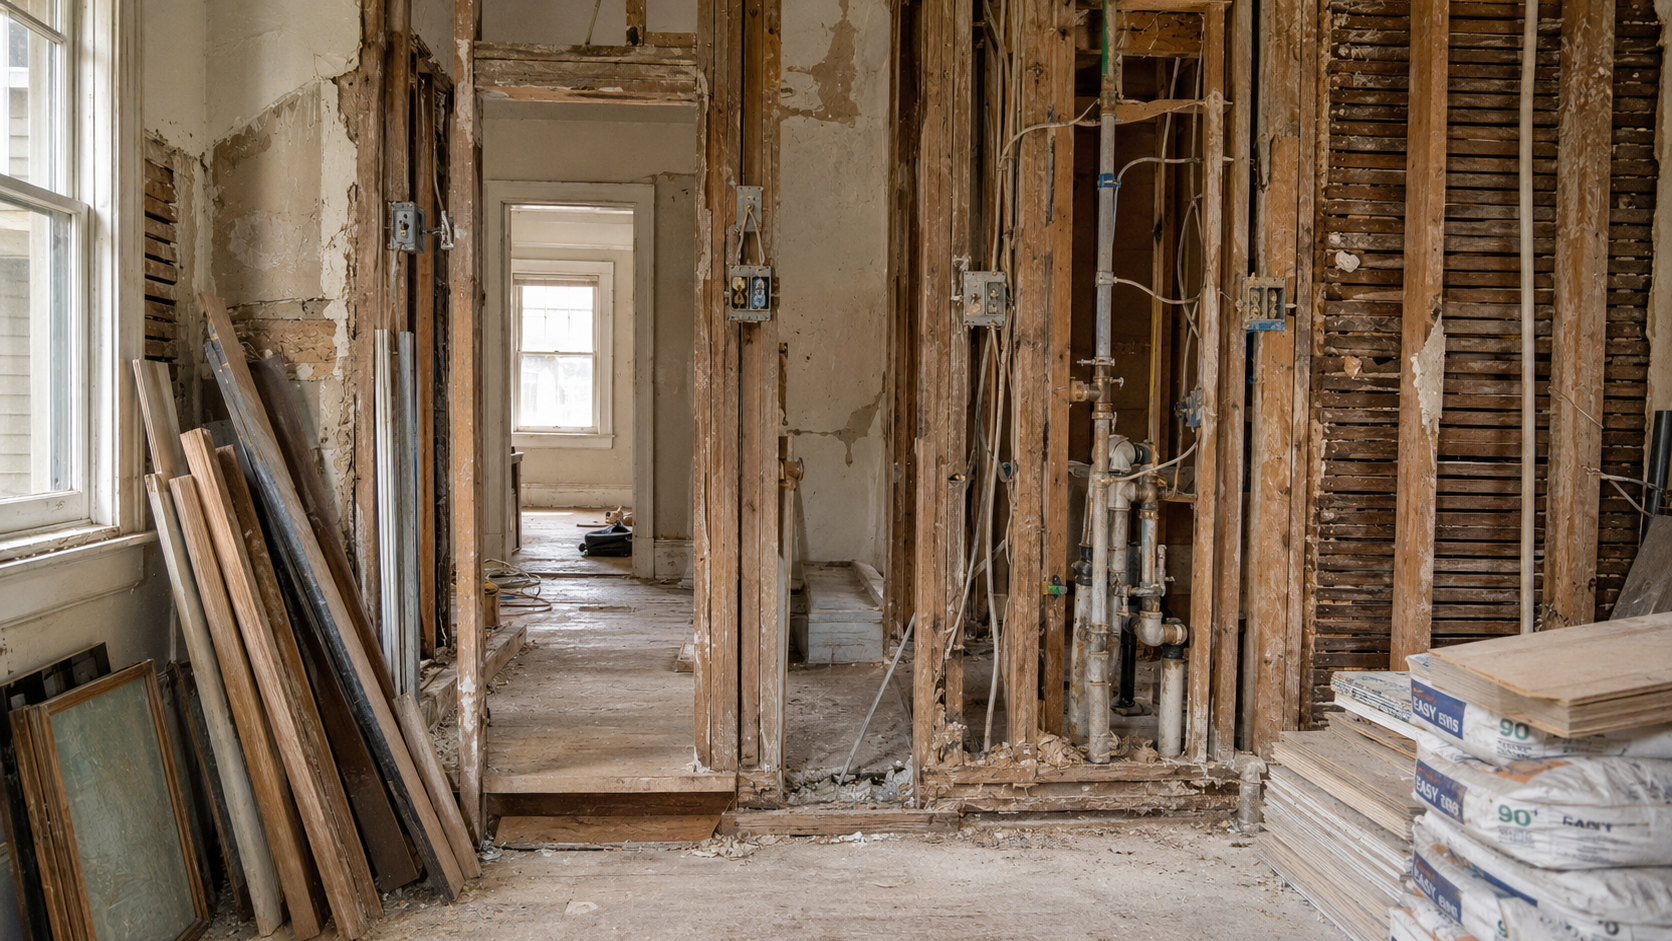
Image by ArchitectureCourses.org. Once the walls are open, a simple 1940s house update can turn into wiring, plumbing, framing, and plaster repair work.
Week one feels clean. Demo starts. The plan seems manageable. Everyone still thinks the project is mostly about finishes.
By week three, the real house shows up. Electrical that is too patched to leave alone. Vent runs that were never right. Window framing that was altered once already. Floor or wall repairs that no one priced because the surfaces were still covering the truth.
This is also where contractor scope starts to split into visible work and necessary work. The visible work won the quote. The necessary work is what keeps the new work from failing. That is why a cheap renovation number can hold for two weeks and then disappear.
The protective move is boring and not exciting: decide early what gets opened, what gets tested, and what level of surprise money the project can carry without panic. If that plan is missing, the house will make it for you mid-job.
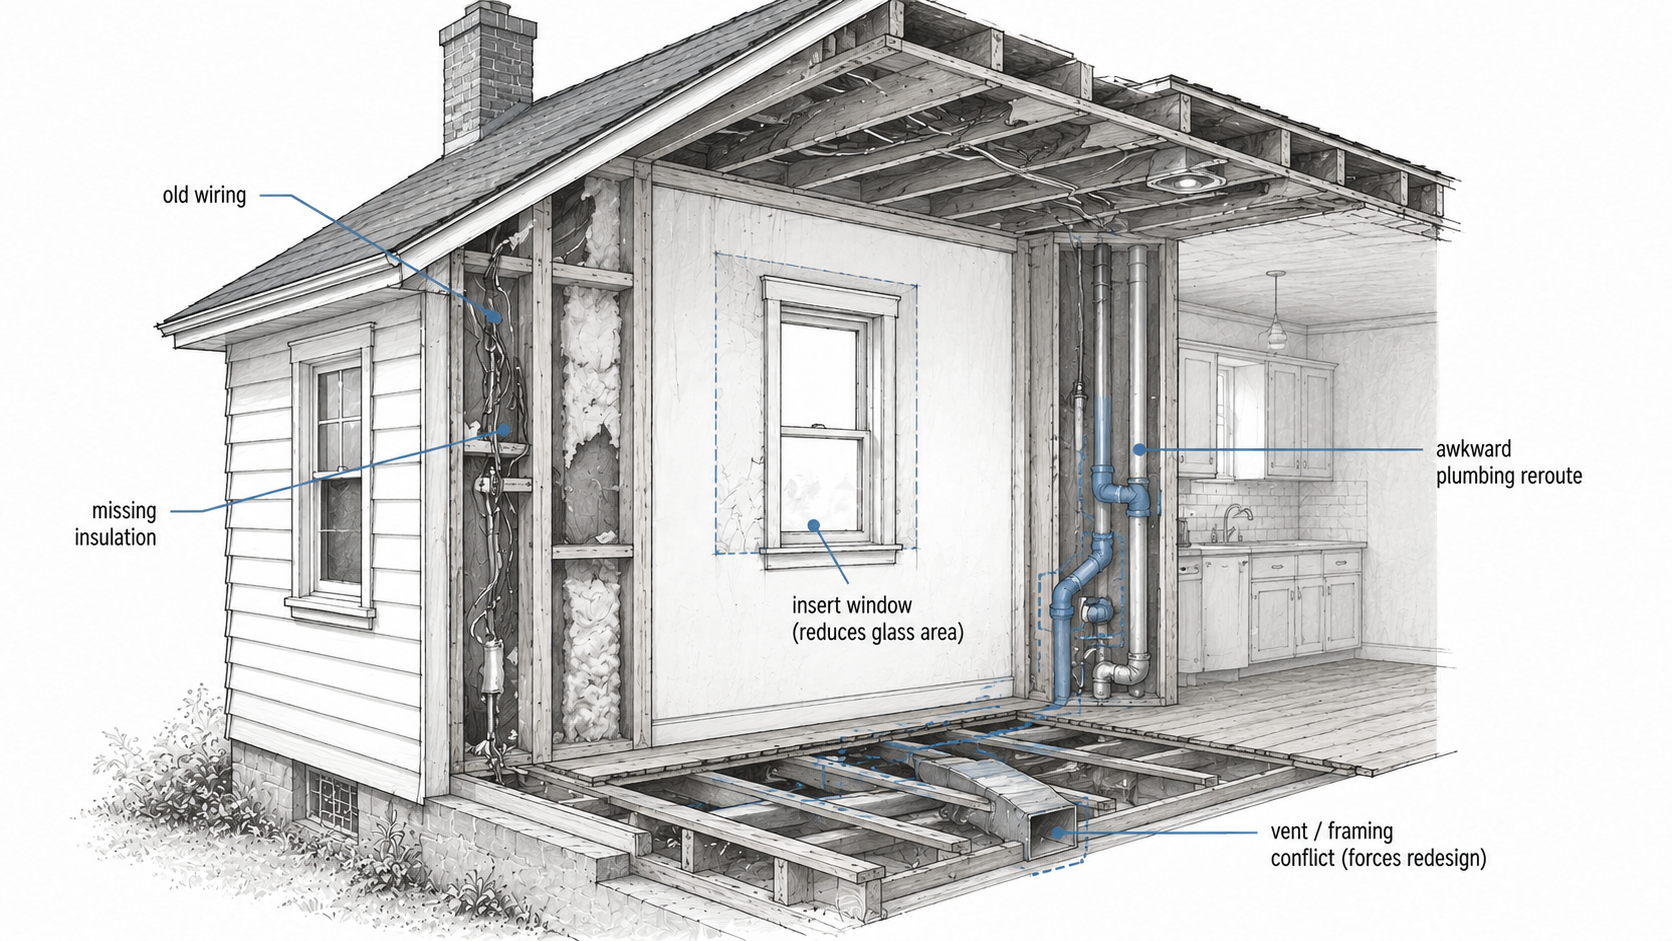
Illustration by ArchitectureCourses.org. A simple 1940s house update can become expensive once the wall is opened and old wiring, missing insulation, window changes, plumbing reroutes, and framing conflicts appear.
When the Permit Widens the Job
Permits are not the whole problem. What they expose is the problem.
Once you touch more than finishes, the job can stop being just a remodel. A vent move, electrical upgrade, structural opening, plumbing change, or window replacement can pull permits and inspection requirements into the project. In some places, that is routine. In others, it changes sequencing, labor, and what gets corrected before the job can close cleanly.
That is not a reason to dodge the permit. It is a reason to stop pretending the pretty part of the job is the job.
Small 1940s Houses Get Over-Renovated Fast
This is one of the quieter money traps in this decade.
A 1940s house may only have a small kitchen, one small bath, and a short run of windows. That makes each room look manageable. But the systems behind them are still whole-house systems. One bath can still pull plumbing and venting work. One kitchen can still widen electrical scope. A few windows can still turn into trim, siding, and plaster repair.
That is why small houses can become financially upside down faster than people expect. The square footage is modest. The repair logic is not. If you pour high-end finish money into every room before the house is dry, safe, and properly vented, the project starts to outrun the house.
The check is simple. Ask whether the next dollar is making the house work better or just making one room look more expensive. Those are not the same thing.
Basements, Crawl Spaces, and the Smell You Should Not Ignore
Many 1940s houses are not sunk by the kitchen. They are sunk by the lower parts of the house.
If the basement leaks, the crawl space stays damp, or the whole house smells musty after rain, do not bury that under new finishes. Fix the moisture path first.
The right support pages here are basement groundwater leaks, water in a crawl space after rain, and crawl space mold remediation. Those are the pages that solve the real building problem instead of decorating over it.
Spend Here Before You Chase Finishes
If the budget is not unlimited, spend in this order:
- Water and moisture control. If the house is wet, other upgrades are weaker than they look.
- Electrical and venting where work is already opening walls. This is cheaper now than later.
- Windows only where they are truly failing or killing comfort.
- Kitchen and bath layout improvements that fix daily use.
- Finish upgrades after the boring work is settled.
That order is less fun, but it is how you keep a 1940s renovation from becoming an expensive sequence of surface corrections.
Read This Next
If window replacement is part of your plan, read wooden window frame replacement before you approve insert units that shrink the glass area.
If moisture is already showing up below the house, start with basement groundwater leaks, water in a crawl space after rain, or crawl space mold remediation before you spend on finishes.
If the renovation includes removing walls, check load-bearing vs non-load-bearing walls before you treat the opening like a simple drywall job.
If your house already feels lower, longer, and closer to postwar suburban planning, compare it with 1950s house styles so you do not renovate the house as the wrong decade.