Plinth Beams Function, Reinforcement, and Placement Guide
Building with Plinth Beams What to Know Before Pouring
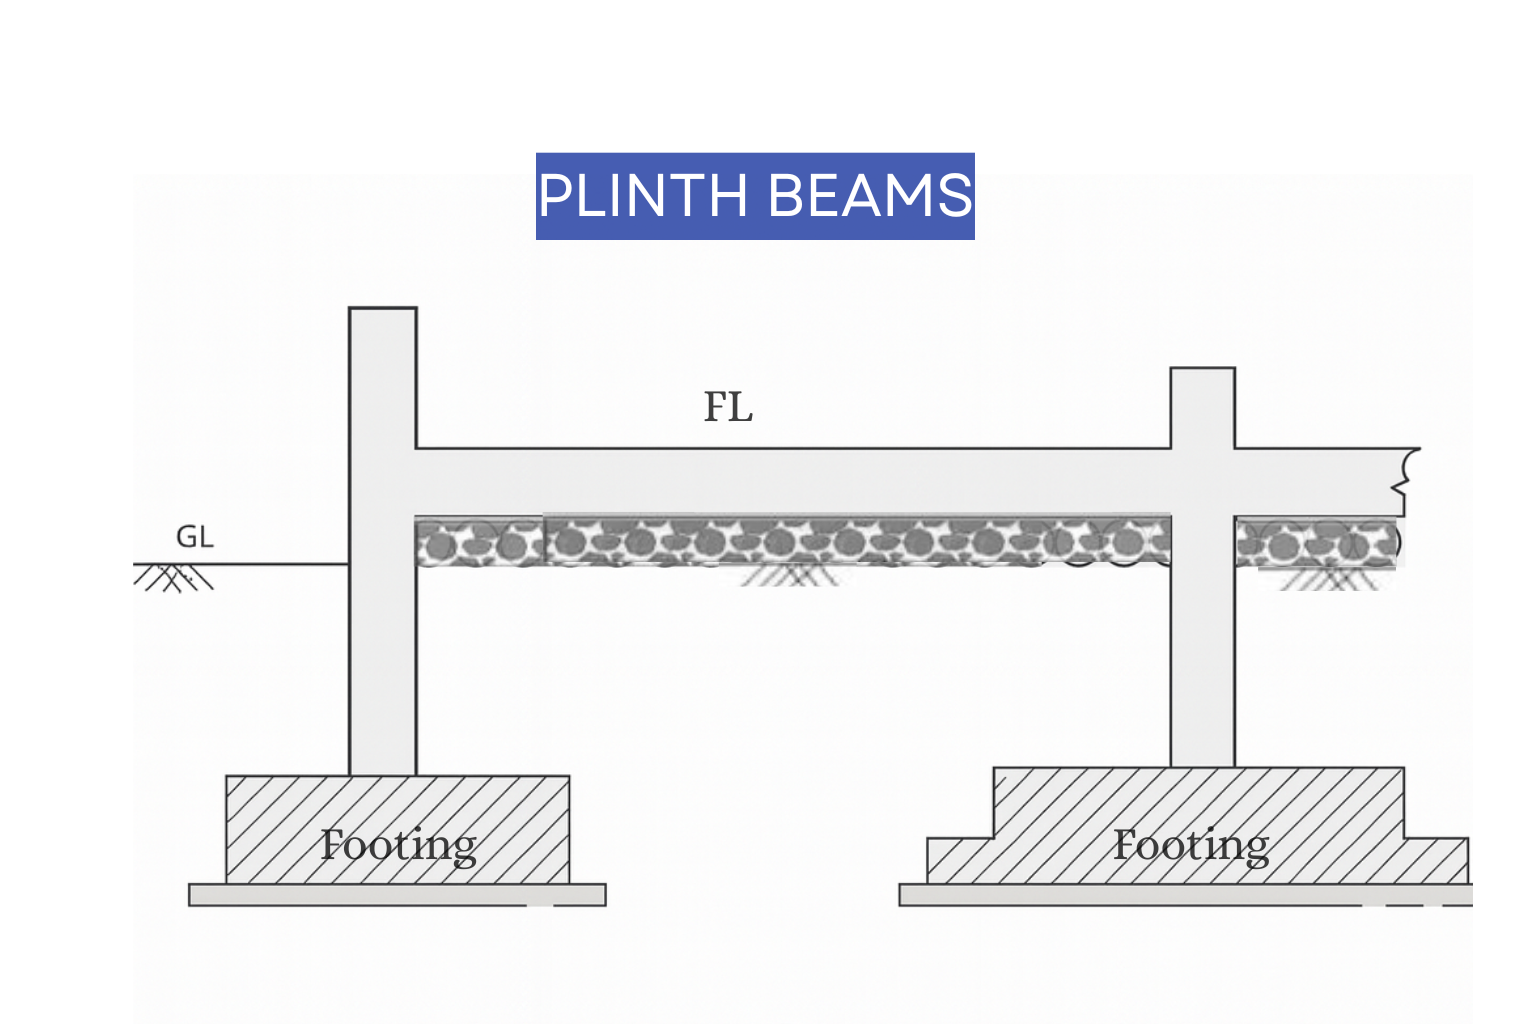
A plinth beam is a reinforced concrete beam cast at plinth level—right where the building rises above ground. It ties the base together, levels the start line for masonry, and helps keep small soil movements from turning into long wall cracks. If you’re dealing with mixed soils, fill, floods, or lots of openings, a good plinth beam is cheap insurance.
Below you’ll get the full picture: what it does, how it differs from a ground beam and a lintel, typical sizes and steel, cost drivers, correct DPC placement, construction sequence, and the mistakes that crack walls later. When it helps, I’ll point you to deeper reads.
Plinth Beams 101: Design, Size, Reinforcement, Cost & When You Actually Need One
Plinth Beam vs. Ground Beam vs. Lintel vs Tie Beams (No More Mix-ups)
Plinth beam
At plinth level, just above finished ground. It ties the perimeter/columns, levels the start course, and controls settlement cracks. Think of it as a ring belt at ground line.
Ground beam
A ground beam spans between footings or piles at/below ground where soil support is inconsistent—more like a structural “bridge” than a perimeter tie. If you’re still choosing a foundation system, skim this foundation types overview.
Lintel (steel or RCC)
A lintel carries wall over openings (doors/windows). Steel lintels are common in brickwork; RCC lintels are typical in blockwork. Different location, different job—don’t confuse it with the plinth beam.
Tie Beams vs Plinth Beams
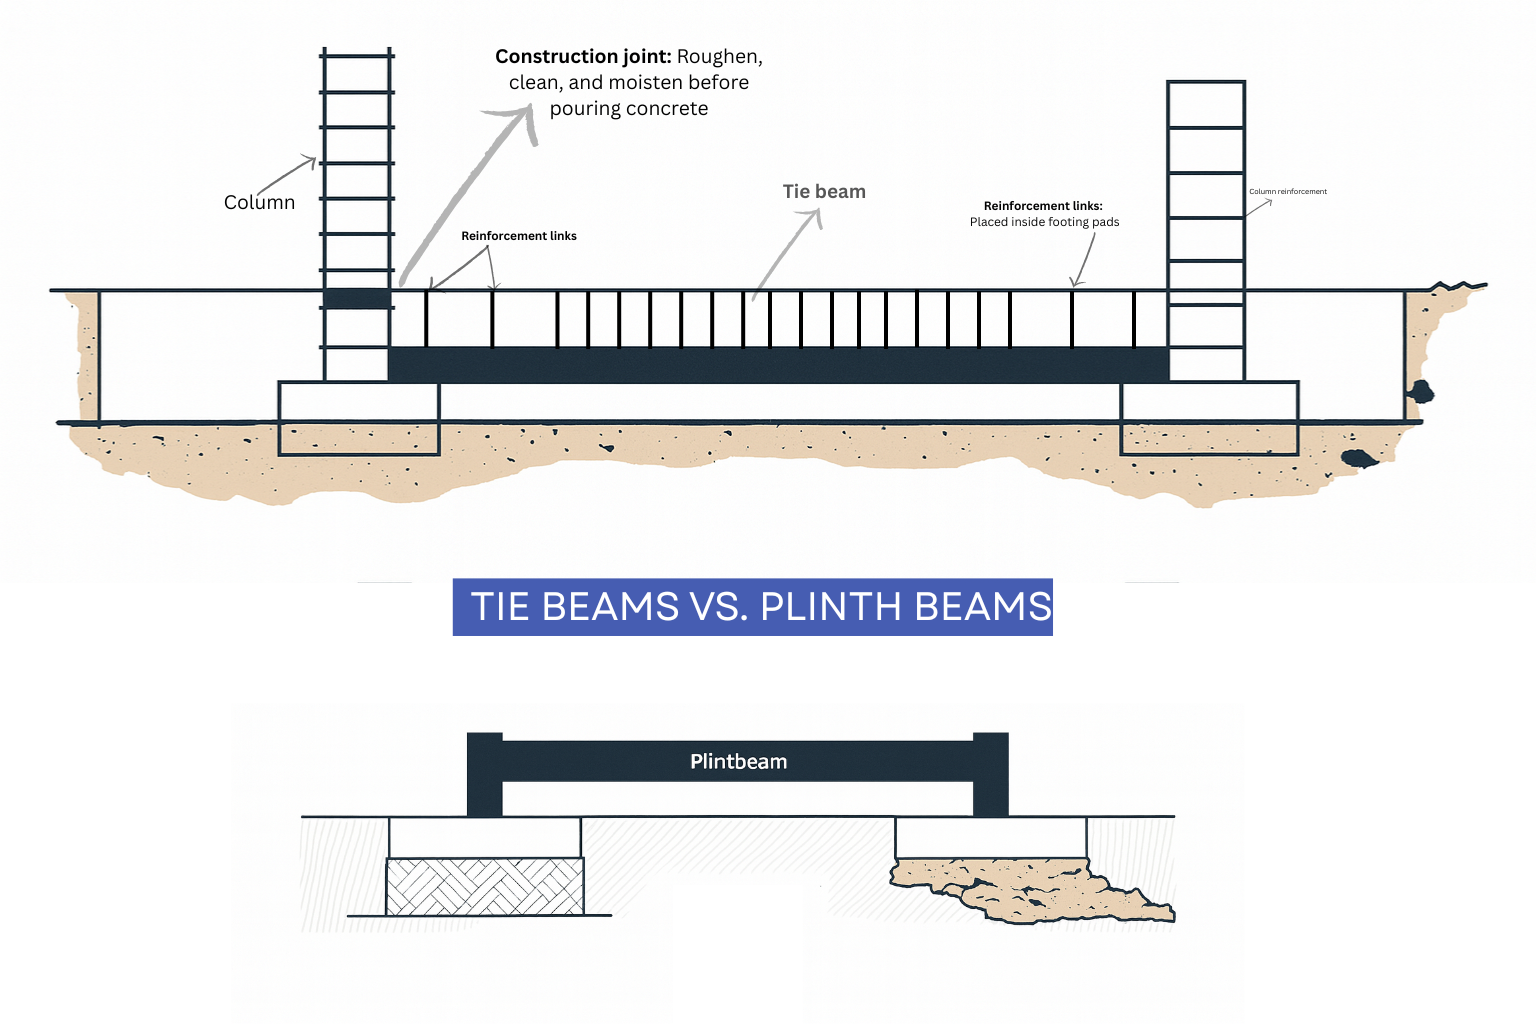
These two beams look similar on drawings, but they do different jobs. A tie beam connects columns and keeps the frame steady. A plinth beam sits near ground level and ties the foundation together so walls don’t crack from settlement.
Think of the tie beam as the upper belt that locks your structure, and the plinth beam as the base belt that levels everything at the start. Both are reinforced concrete, both critical, but they resist different forces — one holds shape, the other spreads load.
For a clear breakdown of sizes, steel detailing, and on-site rules that actually work, read our full guide on tie and plinth beam construction details.
Why Builders Still Use Plinth Beams on Solid Ground
People think plinth beams are only for weak ground. Not true. Even the best soil shifts with time, moisture, or bad backfill. The plinth beam is what keeps that movement from showing up in your walls. It’s quiet work but critical.
Even Good Soil Moves: That’s Why the Plinth Beam Stays
Levels the start line. Footings settle unevenly. Trenches dip. The plinth beam ties everything into one clean level so brickwork starts straight. Without it, each wall follows its own idea of “flat,” and by the first floor, you’re chasing errors with mortar.
Controls cracking. The beam locks the base of every wall, spreading small movements instead of letting them build into visible cracks. It’s why old walls without plinth beams split near doors or corners. A good beam holds the base steady, like a brace under the skin of the house.
Bridges weak spots. Every site has a bad patch—soft soil near a pipe trench, loose fill under a step, or a doorway gap. The plinth beam carries the load across those spots. It’s the structural safety net that saves you from patching plaster later.
Stops damp and termites. A plinth beam sets the right height to keep moisture and pests out. Pair it with a continuous DPC and decent drainage, and the walls above stay clean, dry, and solid. Miss that layer, and you’ll be fixing salt stains and hollow bricks before long.
Bottom line. Even on “good” soil, you still need one. It’s not about strength—it’s about stability and life span. A small beam today saves rebuilds tomorrow.
If you want to see how it fits into the full system, read this clear primer on foundation basics and how structure really starts.
Is a Plinth Beam Necessary?
Usually yes for modern masonry ground floors. It’s essential when you have:
- Mixed soils or partial fill around the perimeter
- Flood risk or capillary moisture concerns
- Long wall runs or many openings at ground level
- Seismic/high-wind considerations where a tie ring helps
On a fully engineered slab-on-grade with proper edge thickening, the slab may perform the tie function. But once you’re on stepped footings or over variable backfill, a plinth beam earns its keep. See why your foundation choice drives everything: why the foundation choice matters.
Plinth Level: Where It Sits and How High
Plinth level = the elevation where the building pops above surrounding grade. Commonly 300–600 mm (≈1–2 ft) above finished ground; go higher with heavy rainfall or splash-back.
- Higher plinth = less mud/rain splash staining.
- Coordinate steps/ramps so access stays clean and safe.
Plinth Beam Size (Typical Widths & Depths)
Size depends on wall load, span between returns/columns, and soil. Typical residential starting points:
- Width: match wall thickness (e.g., ~230 mm for full brick; ~200 mm for 8" block). Don’t neck down under a wide wall.
- Depth: 230–300 mm (9"–12") is common; increase for long spans/heavy walls or where it must truly “span.”
If your beam crosses loose fill or voids, treat and size it like a real beam (grade-beam logic), not a decorative curb.
Plinth Beam Reinforcement (Bars, Ties, Cover)
Typical small-house detailing (confirm with your structural engineer):
- Main bars: 4 longitudinal bars (2 top + 2 bottom). 12–16 mm common—bump up for bigger spans/loads.
- Stirrups: 8 mm @ ~150 mm c/c (tighten near supports, corners, and openings).
- Clear cover: ~40 mm near soil exposure; don’t skimp—cover protects steel.
- Laps: stagger; use ~40–50 × bar Ø unless your spec says otherwise.
- Corners/Ts: closed stirrups and proper bar bends—these are crack hot-spots if lazy.
New to reading base details? This step guide helps you see the parts before steel goes in: foundation walls, step-by-step.
DPC + Plinth Beam (Get the Order Right)
DPC is the moisture barrier that stops rising damp. You’ll see two workable stacks:
- DPC below the plinth beam when the beam sits on masonry or moisture from below is a big risk.
- DPC above the plinth beam to isolate the wall from beam moisture (common in many details).
The non-negotiable: continuity—clean laps, no gaps, protected edges. Pair with grading and drains. Want a practical waterproofing overview? Try the exterior waterproofing explainer.
Concrete, Pour, and Curing (Where Strength Really Comes From)
- Concrete: follow the design note (M20–M25 / ~3000–3500 psi is typical for small homes, but spec rules).
- Pour sequence: place continuously per side; vibrate lightly; avoid cold joints at corners.
- Curing: keep wet 7 days minimum (14 is better). Most “mystery cracks” are just rushed curing.
Still at the digging stage? These excavation key steps keep the beam from trying to rescue a bad base.
Plinth Beam + Foundation: How They Work Together
- Soil (investigated, compacted, drained)
- Footings/grade beams (take loads to soil)
- Plinth beam (ties, levels, limits crack spread)
- DPC + wall (keeps moisture out; carries upper loads)
On poor/variable soil, deeper footings or underpinning matter more than tweaking beam size. Start with site facts: soil & site investigation basics.
Design Inputs That Actually Change the Beam
- Span between returns/columns (longer = deeper/more steel)
- Wall type & load (solid brick vs. AAC vs. reinforced masonry)
- Support conditions (over compacted fill vs. spanning voids)
- Exposure class (sulfates, flood, coastal—affects cover and mix)
Choosing between slab, crawl, basement, piers, etc.? Keep this comparison close: pick the right foundation.
Details That Prevent Cracks (Corners, Openings, Steps)
- Corners: provide continuous bars with bends + closed stirrups.
- Openings: treat under doors like mini-spans; tighten ties near supports.
- Level changes: design proper step beams/returns; don’t “eye” block heights.
- Control joints: align with masonry control joints so cracks choose joints.
Plinth Beam + Lintel Beam (Both, Not Either/Or)
Plinth beam handles base settlement. Lintels handle stresses over openings. On brittle walls (clay brick, AAC, hollow block) and clustered openings, you often need both. Where you want a slim line above windows, consider a steel lintel; use RCC lintels for heavier loads.
Compound/Boundary Walls (Why They Love a Plinth Beam)
Long runs + slender walls = cracks. A continuous plinth beam tied to piers/columns reduces differential settlement, raises masonry off wet ground, and keeps courses level. Add joints every 20–30 m (and at corners) depending on climate and material.
Cost of a Plinth Beam (Estimate It, Don’t Guess)
- Concrete per meter: width × depth × 1 m (e.g., 0.23 × 0.25 = 0.0575 m³/m).
- Rebar per meter: from your bar schedule (roughly 3–5 kg/m for light beams; use the actual takeoff).
- Formwork: side area per meter (2 × depth) × shuttering rate.
- Labor & overhead: tying, placing, vibrating, curing.
Plug in local unit rates for a real number. If you’re comparing systems, this primer helps you think in systems (not parts): post-frame foundations.
Construction Sequence That Works On Site
- Mark plinth level around the perimeter (laser, not strings alone).
- Compact the base or design the beam to span—not to sit on fluff.
- Formwork straight and braced; oil forms; place spacers for cover.
- Fix rebar as drawn; tighten stirrups near corners and openings.
- Place sleeves for services before the pour.
- Pour & vibrate continuously; avoid cold joints at corners.
- Finish flat if it receives masonry; cure 7–14 days.
Need a simple, field-friendly checklist before concrete day? See these foundation construction tips.
Plinth Beam Height: How High Is “High Enough”?
Commonly 300–600 mm above finished ground. Go higher with poor drainage or heavy splash. Coordinate steps/thresholds so access stays comfortable. Pair the height decision with a realistic waterproofing plan; product comparisons here: exterior waterproofing picks.
When a Plinth Beam Isn’t Enough (Red Flags)
- Expansive clays: seasonal movement—consider deeper footings or piles + grade beams.
- Organic/loose fill: remove/replace or design to span; don’t rest beams on junk soil.
- High water table/flood: raise the plinth, improve drainage, upgrade waterproofing details.
Already seeing cracks? Start with diagnosis, not patch: foundation cracks—when to worry.
Renovations, Extensions, and Tie-ins
Adding a room/porch/boundary wall? Drill and epoxy dowels; tie the new plinth beam into the old with closed stirrups at junctions. Don’t leave a “soft” link that will crack later.
Quick Field Checklist (Print This)
- Plinth level marked at corners and every few meters
- Base compacted or beam designed to span
- Width ≥ wall thickness; depth per design
- Bars, laps, and cover checked; closed stirrups at corners
- Sleeves installed; continuous pour; proper vibration
- Cure 7–14 days; DPC continuity verified
Student Corner: From “What Is It?” to “I Can Draw It”
Sketch one base detail showing soil, footing, plinth beam, DPC, wall, exterior grade, and drain. Label cover, stirrup spacing, and dimensions. Then walk a site and find each piece in real life. For a friendly sequence of the whole base, start here: house & building foundations.
MUST READ: Form, Space, and Order by Francis D.K. Ching — the cleanest visual language for how parts connect. Browse the book.
Related Topics Builders Actually Ask About
- Slab-on-grade vs. plinth beams: when slabs make sense: slab-on-grade basics
- Piers + grade beams on bad soil: options and trade-offs: pier & beam foundations
- Waterproofing at the base: plan drainage and membranes: foundation waterproofing guide
Takeaway: Build It Straight, Build It Once
Call it “foundation plinth beam,” “concrete plinth beam,” or simply the ring at the base—its job is simple and important: tie the building together at ground level so walls stay straight, cracks stay small, and loads share nicely. Detail the steel right, pour it well, and cure it like you mean it. That’s how small choices at the bottom keep the whole house honest.
FAQ
Is a plinth beam necessary for a small house?
Usually yes. On a fully engineered slab, your engineer may say it’s redundant.
Typical plinth beam size?
~230 mm wide × 230–300 mm deep for small homes; match width to wall; increase depth for spans/loads.
Standard reinforcement?
Often 4 bars (12–16 mm) + 8 mm stirrups @ ~150 mm c/c; corner/opening zones tightened. Follow the drawing.
Plinth height above ground?
~300–600 mm; go higher for rain/splash. Coordinate steps/ramps.
DPC above or below?
Either works—continuity is the rule. Many place DPC above the beam to isolate walls.
Steel lintel instead of plinth beam?
No—lintel is over openings; plinth is the base tie. Different roles.
What drives cost?
Concrete volume, steel weight, formwork/labor, and—big one—rework from poor compaction or curing.