Tie Beams vs Plinth Beams Explained on Site: Structural Guide
Architects and site engineers rely on tie and plinth beams to control movement and load. Here’s how they differ and where each is used.
Tie Beam (also called Strap Beam) vs Plinth Beam: Don’t be surprised if I tell you it’s very common for basic stuff to get mixed up, like tie beams and plinth beams. Happens all the time with students and DIYers. The real confusion starts when you see them on drawings and assume they’re the same. They look similar on paper, but they’re not.
A tie beam holds a frame steady. A plinth beam keeps the ground line straight. Miss either and you’ll see cracks before you finish painting.
I learned that the hard way. Once poured a wall run without a proper plinth. The next monsoon hit hard; hairline cracks turned into full splits. The plaster peeled. The client called. Never again.
What a Tie Beam Does
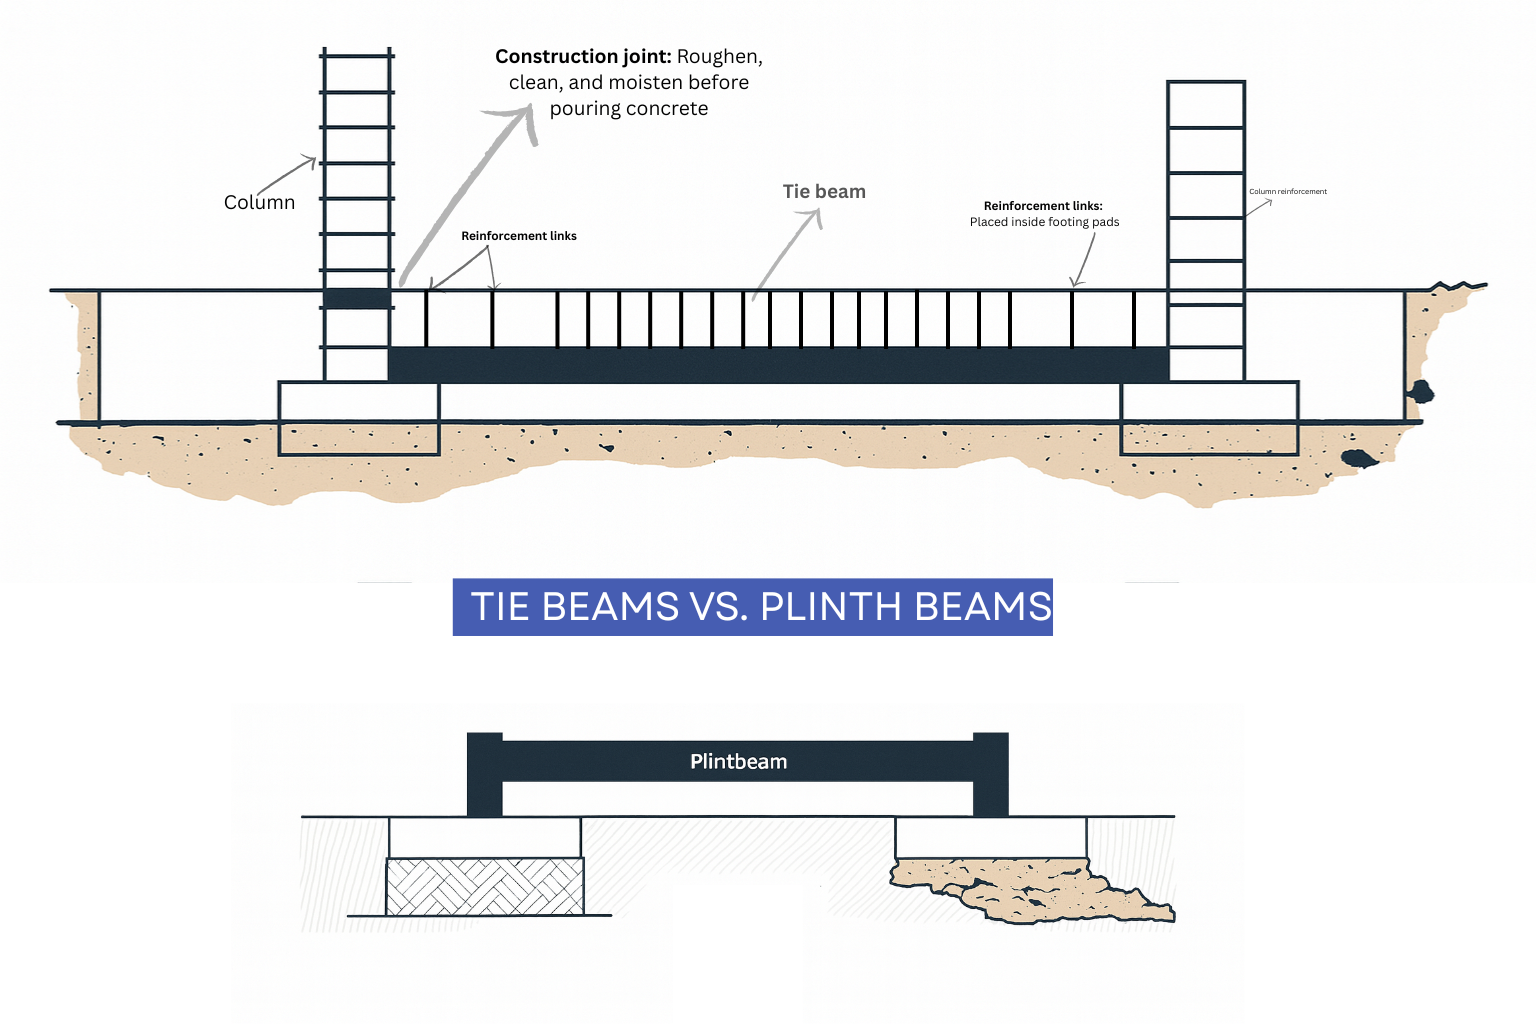
A tie beam connects columns. Its only job is to keep the frame tight. Columns want to move when loads hit or when the roof pushes sideways. The tie beam locks them together. It runs higher—above ground or under the roof line.
You’ll see it where a structure has tall columns or long spans. It resists spreading. It holds the skeleton in shape. It’s not for carrying floors. It’s for control. Without it, the frame flexes and joints open up.
When I check drawings, I make sure ties run straight and continuous. No steps. No breaks. Reinforcement bent properly. Hooks closed. The load path must stay clean. That’s the secret.
Need a visual refresher? This short explainer on foundation wall detailing shows how the tie sits in the system. The logic never changes—load goes down, tie keeps it straight.
What a Plinth Beam Does
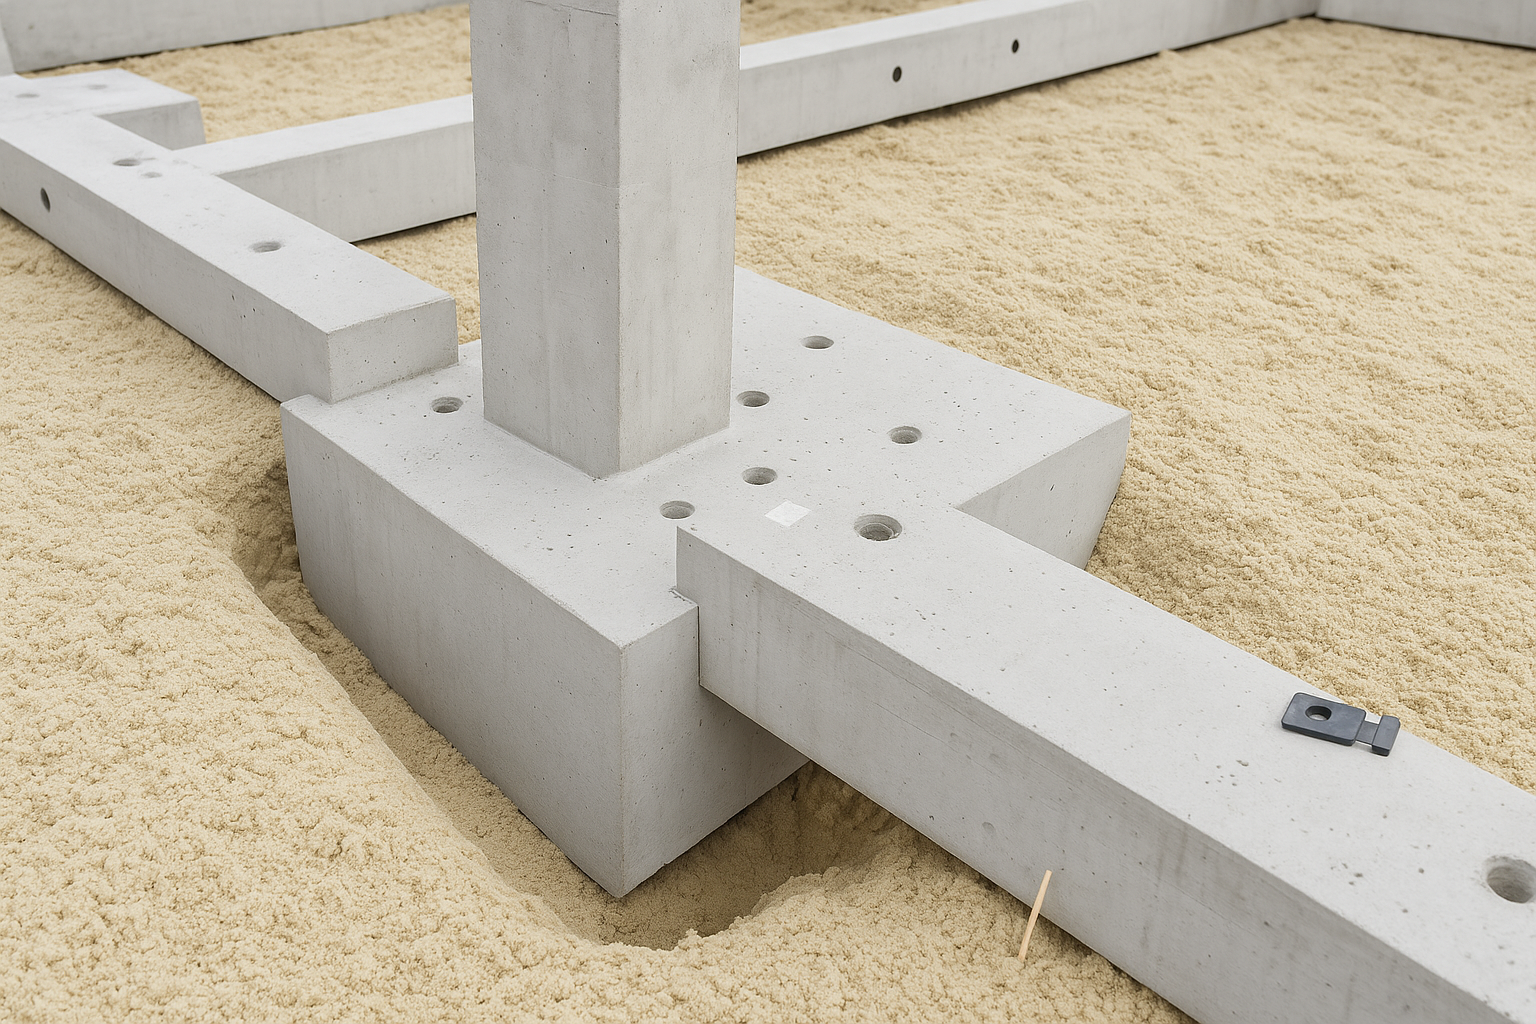
The plinth beam runs low, right above the foundation. It ties footings together and gives one level base for walls. It’s where the building meets the ground. It controls settlement and keeps things level when soil moves or fill shifts.
In small houses, people treat it like an optional extra. It isn’t. A proper plinth beam saves walls from cracks, especially near openings. It also helps block moisture when paired with a good DPC layer.
I always say: if your ground is uneven or backfilled, never skip the plinth beam. It’s cheap insurance. For a quick review of how foundations and plinths connect, read foundation basics. Everything builds from there.
See also: Building with Plinth Beams What to Know Before Pouring
The Real Difference

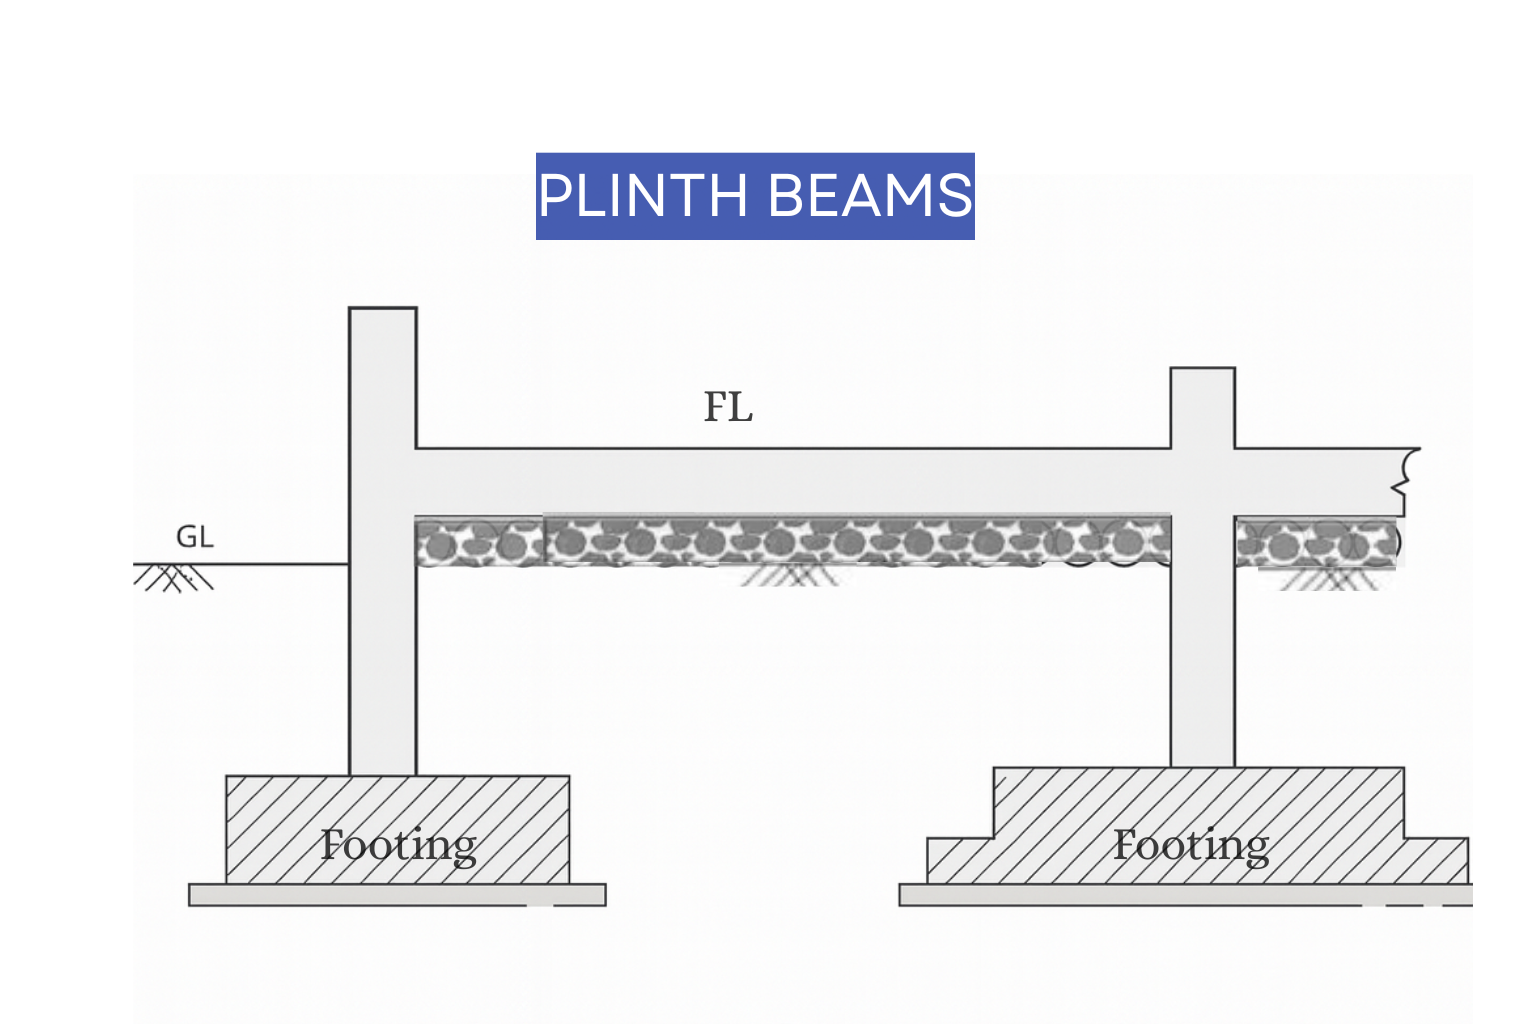
Figure: Technical illustration showing plinth beam integrated with the foundation system, rendered with precise linework to highlight beam alignment, footing connection, and structural support details.
One word: level. The tie beam lives higher, linking columns in the frame. The plinth beam sits at the base, tying the foundation. Same concrete, different purpose.
A tie beam handles horizontal forces. A plinth beam spreads vertical loads. Together they make the structure behave like one piece. Miss one and you’ll see the story written in cracks later.
In simple builds, the plinth beam does more visible work. You can see it, touch it, build over it. The tie beam hides in the frame. Both matter. Both must be placed right.
Why Confusion Happens
Most of it comes from drawings. On paper, both look like a fat line running through the plan. Unless you check the level mark, you won’t know which is which. On site, the mix of terms adds more mess. Some masons call any beam “tie.” Others call any base beam “plinth.” The fix is simple: read the section, not the label.
If you want to train your eye fast, go through this visual piece on footing details. It shows how plinth, DPC, and walls stack correctly.
What Happens When You Skip One
Skip the tie beam and tall columns move. The roof frame sways, joints tear, and plaster shows hairlines you can’t explain. Skip the plinth beam and you get cracks near the floor, uneven tiles, and dampness creeping up walls.
Seen a boundary wall curve after a year? That’s usually a missing plinth beam. Seen window corners with diagonal cracks? That’s a tie beam problem above or a plinth issue below. Either way, it’s not random—it’s poor load control.
If you want to understand crack behavior better, this field guide on foundation cracks shows patterns that tell you which part failed first.
Plinth Beam Size
There’s no single rule. For small houses, 230 mm wide and 230–300 mm deep works. Match wall thickness. Don’t go thinner. When spans are long or soil is soft, increase depth. The width must follow the wall above.
Keep cover at 40 mm minimum. Stirrups 8 mm at 150 mm spacing are standard for small jobs. Bars: two top, two bottom, 12–16 mm diameter. Lap them properly. No guessing.
If you’re new to sizing, this starter overview on foundation types helps. Once you see how loads move, you’ll size beams better.
Tie Beam Size
Depends on the column height and spacing. 230 mm width and 300 mm depth is a fair start for small frames. Always let the engineer decide final sizes. Reinforcement usually matches or slightly exceeds plinth beams.
Never step tie beams up and down. Keep them continuous. Corners must have hooked bars. Laps staggered. Weak corners show first in earthquakes and wind loads.
Plinth Beam and DPC
DPC is your moisture shield. It works with the plinth beam, not instead of it. Place it on top of the plinth beam before starting masonry. That stops rising damp. Don’t fold it wrong. No gaps. No cuts at corners. One small tear, and you’ll smell the problem after the first rain.
For a full look at how DPC, waterproofing, and beam layers connect, read foundation waterproofing basics. Keep the layers tight and continuous.
When Each One Becomes Critical
If your soil varies, or you’re using masonry walls, the plinth beam is non-negotiable. If your columns are tall or you’re in a seismic area, the tie beam is mandatory. In most good builds, you’ll have both. One for the base, one for the frame.
People skip them to save cost. They pay double later. Cracks cost more than concrete.
Concrete and Pouring
Both beams use normal reinforced concrete. M20 to M25 mix for houses. Pour continuous runs. Vibrate gently. No air pockets. Cure for at least seven days, fourteen is better. Don’t pour half a beam and finish the rest tomorrow. That cold joint becomes a crack line later.
Want a reality check before pour day? This clear checklist on foundation construction walks through the steps in builder language, not engineer talk.
On-Site Mistakes I See Often
Skipping spacers. Lapping bars right at corners. Pouring over loose fill. Letting formwork bulge. Forgetting sleeves for drains. Curing for one day instead of a week. Every one of these ruins the beam’s job.
I’ve watched crews hack through fresh concrete to run pipes because no one planned for sleeves. Happens every season. Takes ten minutes to fix on drawing, ten hours on site.
Plinth Beam for Boundary Walls
Boundary walls are the best test of patience. Long, thin, and always ignored. They need plinth beams too. Otherwise they wave, crack, or lean by year two. Tie piers together with a continuous plinth beam. Add control joints every 6–9 meters. Keep DPC above it. Done right, it lasts decades.
If you’re repairing an old wall, tie new plinth beams into the old with dowels and epoxy. It’s cheap and works. Don’t pour beside old concrete without bonding.
For Students: How to Sketch It Right
If you’re learning, draw one simple detail that includes soil, footing, plinth beam, DPC, and wall. Label bar sizes, spacing, cover. Then go walk a site. Find each layer in real life. Once you see it, it sticks forever.
Start small. One wall section. Don’t chase full buildings yet. You’ll understand load flow better when you see cracks and realize what caused them.
Plinth Beam for Extensions
Adding a room or porch later? Tie new beams back into the old with drilled dowels. Close stirrups at the junctions. Don’t leave a soft link. That’s where seasonal cracks start. Match plinth height. Don’t rely on “eyeballing.”
If you’re adding over old foundations, see foundation sequencing first. It’ll show how to align levels cleanly.
How to Tell a Good Beam from a Bad One
It’s simple. A good beam looks straight, smooth, and aligned with the wall. Bars don’t show at corners. Water doesn’t pool. Mortar sits flat. Bad beams? You can see dips and bulges from across the yard. That’s poor formwork or bad curing.
Good work hides itself. You don’t notice it. That’s the goal.
Cost Logic
Concrete volume is easy. Width × depth × length. Add rebar weight (around 4–5 kg/m for small beams). Add shuttering and labor. That’s your total. Prices vary, but in most regions, a plinth beam is 3–5% of total structure cost. Cheap for what it prevents.
If you’re estimating a full base system, check footing cost basics. You’ll get real-world numbers per meter.
Plinth Beam Height
Usually 300 to 600 mm above finished ground. Go higher in flood zones or heavy rainfall areas. Keep stairs and access in mind. Too high and you’ll hate the step every day.
For wall protection, keep the plinth high enough to stop splashback. For clean visuals, align floor height evenly through the plan. Simple logic. Big difference in comfort.
Tie Beam and Plinth Beam Together
They’re not rivals. They’re partners. One keeps the frame tight, the other keeps the base solid. Think top and bottom belts of a single skeleton. Both prevent movement in different directions.
Every solid house has them both. If an engineer says skip one, ask why. Sometimes slabs or grade beams replace them, but never assume. Always check drawings before site work starts.
Checklist for Site
- Plinth level marked all around.
- Base compacted, solid, no loose fill.
- Bars tied per drawing. Laps staggered.
- Spacers under bars. Clear cover confirmed.
- Forms straight and tight. No gaps.
- Continuous pour. Vibrated gently.
- Kept wet for at least a week.
That’s the real test. So, go ahead, tick those boxes if you want your beam will serve you for decades.
The Hidden Beam You Never Think About!
There’s one more beam no one talks about. The invisible one. The mental one. The line in your head that keeps you level when everything around you sinks or cracks. Every builder has it. Every architect needs it. It’s the beam between what you plan and what really happens on site.
You can pour concrete straight, tie bars perfect, and still fail if you forget to think. The hidden beam is judgment. Knowing when to pour, when to stop, when to redo. That’s what separates decent builders from real ones.
I’ve watched people argue rebar sizes for an hour and still miss that the soil under them was never compacted. Doesn’t matter what the drawing says if the ground lies. The hidden beam is what keeps your decisions tied together when plans start fighting reality.
You won’t find it in codes. No engineer will stamp it. But if you stay long enough in this work, you start feeling it. You look at a wall, and you know. That’s when you stop being a student and start being a builder.
Final Thought
Architecture schools teach structure like it’s math. But it’s more like rhythm. You only get it when you stand near wet concrete, feel the vibration, and know it’s right. That’s what the best builders chase — the sound of a beam poured right. You don’t forget it.
Good construction is doing the basics right. Tie beam. Plinth beam. Foundation. DPC. Get those clean and everything above behaves.
I’ve seen expensive designs fail because someone skipped the basics. Don’t. These are the quiet parts that hold the whole story together.
FIELD PICK: Structures: Or Why Things Don’t Fall Down by J.E. Gordon — still the most honest book ever written about strength. Buy it here.
FAQ
What’s the simplest way to remember the difference?
Tie beam ties columns. Plinth beam ties foundations. One sits high, one sits low. Same material, different job.
Can a floor slab replace a tie beam?
Sometimes, if it’s properly reinforced and continuous. But don’t assume. Always check drawings. The slab might not connect columns the way a tie does.
Is a plinth beam really needed in all houses?
Yes if you have brick or block walls. Maybe not if you’re on a full reinforced slab. Ask your engineer. Most times it’s cheap protection against cracks and damp.
How deep should a plinth beam be?
Start with 230–300 mm for houses. Go deeper for long spans or weak soil. Keep width equal to wall thickness.
Can I pour both tie and plinth beams together?
No. Different levels. Different pours. They connect different elements. Never combine just to save time.
Why do my walls still crack even with plinth beams?
Probably bad compaction, no curing, or sloppy joints. Beams don’t fix everything. They only work if what’s below them is solid.
Can I repair a failed plinth beam?
Yes. Chip out weak parts, add dowels, and re-cast in segments. For major damage, consult a structural engineer before touching it.
How high should the plinth level be?
About 300–600 mm above finished ground. Higher in flood zones. Always check site conditions, not just code numbers.
What’s the best way to cure beams?
Keep them wet for at least seven days. Wrap with burlap or keep shaded and moist. Curing builds strength. You skip it, you waste the mix.
What inspection checklist matters most on site?
Bars tied, cover correct, forms tight, pour continuous, curing done. Miss one, and cracks tell your story.