A door frame looks simple, but you do not just slap it together. It holds the door, keeps it square, and anchors it into the wall. Get it wrong and the door drags, will not latch, or leaks air like a screen.
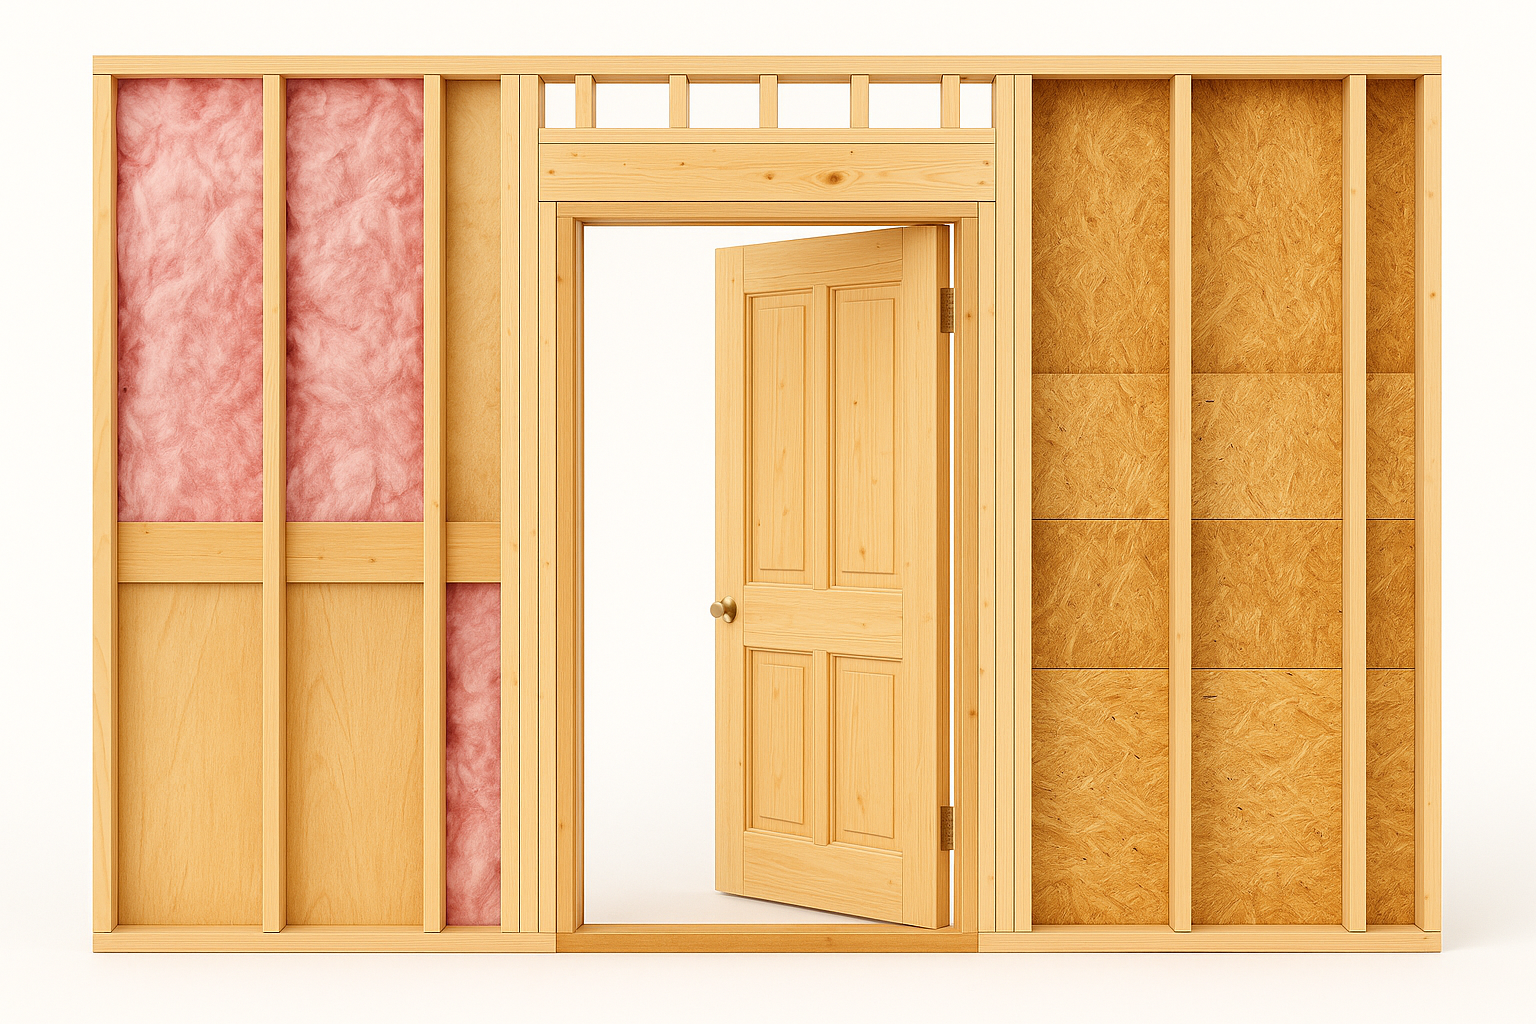
The frame has two side jambs, one head at the top, a stop for the door to close against, and sometimes a threshold. The structural header above it is not part of the frame, but without it the opening would sag. That header sits on king studs and jack studs. If you need a refresher, check the wall framing walkthrough and the king and jack stud basics.
Most interior frames fit doors that are 80 inches tall and 24 to 36 inches wide. Exterior ones are often taller. Every frame needs a rough opening that is slightly bigger than the door so you can shim and level it. Skip that and you will fight the door forever.
Keep it simple, but do not assume it is easy. Even basic framing turns into a mess if you rush the layout or expect crooked studs to fix themselves. This guide covers building from scratch, fixing damage, and replacing frames that are beyond saving. Everything here is based on what works on real job sites, not in brochures.
Door Frames: Real Sizes, Straight Installs, Fewer Callbacks
Frames make or break a door. Get the opening wrong and you fight it forever. This hub is the stuff that saves hours on site and keeps the reveal clean after the paint dries.
Parts of a Door Frame
Head. The top member. Keeps the opening square. If this is out of level the reveal will tell on you.
Hinge jamb. Carries the weight. Shim directly behind hinges and run one long screw into the stud at each hinge. That is what stops sag later.
Strike jamb. Takes the latch hit. Shim firm at latch height to kill rattle and keep the tongue landing clean.
Stops. The small returns that the slab closes against. Set them true to keep a tight shadow line.
Sill or threshold. Exterior frames only. Needs a flat bed and proper flashing. Water always wins if you skip this.
Casing. Covers the gap. Not structure. It only looks right if the frame is right.
Jambs are part of the frame. Trim is not the frame. Keep that language clean in your notes and bids.
Standard Sizes and Rough Openings

Interior slabs. 24, 28, 30, 32, 36 inches wide. Height is usually 80 inches. Rough opening adds room for shims and out-of-plumb walls. Plan about 2 inches in height and 2 inches in width as a starting check, then match the manufacturer sheet if it is prehung.
Exterior slabs. Often 36 by 80. Taller at 84 or 96 is common. Prehung units ship with threshold and weatherstrip. Keep the rough square and level or the sweep will drag and chew up early.
How tall is a door frame. Most interiors finish near 80 at the slab. Rough sits higher. Finished head depends on casing profile and floor build. Always measure after flooring decisions, not before.
If wall heights or plate stacks are shifting on you, refresh the basics in simple wall framing rules.
Plan the Opening
Floor first. Find the high side. Doors read the floor. I learned the hard way on a tiled bath where the low side stole my reveal. Start shims on the high side and grow from there.
Swing and hardware. Confirm hand, swing, and hinge finish before anything ships. Nothing wastes more time than a wrong-handed prehung with perfect paint.
Wall depth. Measure drywall build and any paneling. Adjustable jambs can hide small misses. Big misses look like bad carpentry.
Header call. Load matters. For non load bearing, keep it simple and light. For load bearing, use real spans. If windows are on the same wall, match header logic to keep the line straight. For header thinking, skim clean header layout.
Frame a Wall with a Door

Layout. Snap top and bottom plates. Mark king and jack positions. Keep 16 inch layout marching past the opening so your drywall lands on studs. Accept a short bay at the far end. That is normal.
Jacks and kings. Kings go full height. Jacks carry the header. Nail or screw them tight together. If the wall is wavy, the door will be wavy. Plane or shim your line before sheathing.
Header seat. Land the header fully on the jacks. No gaps. No mystery spacers. If you need height, plan it, do not cheat it.
Cripples. Fill above the header to the double top plate. This keeps the sheathing honest and stiff.
Need the whole wall flow step by step. Use build a wall the straightforward way.
Build or Set the Frame
Prehung vs site-built. Prehung wins for speed and repeatable reveals. Site-built wins when wall depths are odd or the trim package is custom.
Dry fit. Test the unit in the opening. Pull it back out. Fix the problem you just found. Then set it for real.
Hinge side first. Plumb the hinge jamb dead true. Shim tight behind every hinge. Run one long screw through each hinge leaf into the stud. That is your insurance.
Head next. Level the head. Hold a uniform gap across the top. Do not chase the slab if the floor is bad. Correct the floor or you will fight the latch forever.
Strike side. Shim at latch height and near the base. Check the reveal with a thin stick or light. Small adjustments now save an hour later.
Fasteners. Trim-head screws where weatherstrip hides them. Nails alone can creep. Screws let you tune.
Jack placement refresher if you blanked on names. See jack studs in plain terms.
Interior vs Exterior Frames
Interior. Keep it straight and quiet. Hinge screws into studs. Stops tight. No light through the gap. Silence is the test.
Exterior. Moisture rules everything. Use a sill pan or membrane bed. Flash the sides correctly and backer-rod the exterior joint before sealant. If you smear caulk without a proper joint it will split in the first freeze.
If the sheathing is open around the door, plan your layers. Quick primer here helps: exterior sheathing that lasts.
Metal and Hollow Metal Frames
Where they make sense. Garages, basements, utility spaces, and anywhere abuse is normal. Fire rating when specified. Clean look with hard edges.
How to set. Use the anchor system that matches the wall. Steel studs need different brackets than block. Check for twist before you grout or tighten. Once it is locked, that shape is permanent.
Finish work. Metal shows small mistakes. Take the extra minute on shims and you save twenty on filler later.
Pocket Door Frames and Kits
Why they help. Tight rooms where a swing steals space. Hallways. Small baths. Closets.
Why they fail. Flimsy kits, bent studs, soft screws into drywall, and pockets used as wire highways. The door hits something inside and you think the track is bad. It is usually the pocket wall.
What to buy. Steel reinforced kits for heavy slabs. Stiffer track. Better hangers. It costs more and works longer.
Build it flat. The pocket has to be dead straight. Sheath both sides before tile or paneling so the cavity holds true.
Good options and field tests are in pocket frame picks that hold up. Install flow here if you need it today: step by step pocket setup.
Door Frame Repair vs Replacement
Repair candidates. Minor dents, small rot on an exterior edge, loose hinge screws that still catch wood, strike misalignments, hairline splits near the latch. Wood filler works inside. Two part epoxy outside.
Replace. Threshold rot, deep jamb decay, hinge tear-out that will not hold, twisted frames, water paths you cannot stop. You will spend more trying to save it.
Tune before you blame. Many “bad doors” need the floor leveled, the hinge jamb tightened, and the strike moved one millimeter. Do that first.
Door Frame Kits
Interior kits. Good for speed. Match wall depth or use adjustable jambs. Pre-cut hinge locations save layout time. Still shim like a pro.
Exterior kits. Prehung with weatherstrip and threshold. Check square while it is on the floor. Shipping racks units. Do not discover the twist at the rough opening.
Molding, Casing, and Weatherstripping
Casing inside. Set reveals consistent. Scribe to crooked walls. Nail lightly and fill the right way. Do not let caulk stand in for carpentry.
Exterior trim. Brickmould or flat. Flash first. Seal later. Use backer rod so the joint can move. A fat bead looks good for a week and fails in a season.
Weatherstrip. Kerf-in foam on most prehungs. Replace worn sweeps first. Close on a paper strip. It should drag a bit. If it slides out, adjust hinges or swap the strip depth.
Pull Up Bars and Door Frames
Blunt answer. Frames and casings do not like live load. Portable bars crush trim and pry on the head. Use a wall-mounted bar into studs or a stand-alone rack.
Garage Door Framing Basics
Set the plane. Tracks need a square, flat opening. Headers are larger. Jamb boards should tie into structure. Do not anchor into siding and hope.
Bottom edge. Protect jamb bases. Snow, salt, and melt water rot the first inch fast. Flash or use composite where it meets the slab.
Costs and Labor
What moves the number. Interior vs exterior, unit quality, size, rot repair, flashing work, floor corrections, hardware changes, and paint. Removal on old houses takes time when trim is thin or brittle.
Labor reality. A clean interior swap can be quick. Exterior work is slower. You set, flash, tune, and test for water. Add time for the punch list. If hidden damage appears, document with photos and stop. Write the change. Then continue.
How to Replace a Door Frame
Interior sequence
- Score paint and caulk at casing with a sharp blade.
- Pop the casing clean. Keep pieces if you plan to reuse.
- Pull fasteners and remove the old frame in sections if needed.
- Vacuum the rough opening. Check for proud nails or torn drywall.
- Set the new frame. Plumb the hinge side. Shim behind hinges.
- Level the head. Keep the reveal even. Tune the strike side.
- Screw through hidden points. Reinstall casing. Fill tiny holes. Paint later.
Exterior sequence
- Prep a sill pan or membrane bed. Get it dead level.
- Dry fit the unit. Check swing and clearances.
- Set and shim. Lock the hinge side first. Check weatherstrip compression all around.
- Flash the sides and head correctly. Backer rod and sealant at the exterior joint.
- Trim, then water test with a hose before calling it done.
If you have wall sheathing open, check exterior wall layers that work before you close it up.
Field Notes You Can Use Today
- Measure after floors. Finished floors change the head gap. Do not guess.
- Reference one end. Lay out studs from a single corner. Accept a short bay at the far end. That is normal framing.
- Lock hinges to studs. Long screws. No excuses.
- Check light. Close the door and look for light leaks. Fix them now. Customers will see them later.
- Flash right, not fast. Exterior doors pay you back when storms hit.
If you want a quick warm-up, skim straightforward wall framing before you hang the next unit.
FAQ
How tall is a standard interior door frame. Slab height is usually 80 inches. Rough opening height runs higher to allow shims and flooring. The final head reads whatever your casing and floor decide.
Door jamb vs door frame. What is the difference. Jambs are the vertical pieces. The frame is the full assembly. Trim is separate and only hides the gap.
How wide is a door frame. Inside width matches the slab with a small reveal. Rough opening adds room for shims. Exterior prehungs follow the sheet from the manufacturer. Read it before you cut.
Can I put a pull-up bar on a frame. Do not load the casing. Mount into studs or use a rack. Frames are not gym gear.
Do pocket frames handle heavy doors. Yes if the kit is rated and the pocket wall is stiff and flat. Cheap kits and crooked studs fail. Then people blame the door.
When do I replace instead of repair. If you see deep rot, twisted jambs, torn-out hinges, or water you cannot beat. Replace the unit and build it right.
Is wood filler okay outside. Use two part epoxy for exterior edges. It moves with weather and lasts longer.