
Building a house looks simple when you scroll past it online. A clean frame. Fresh concrete. A finished kitchen at the end. The real work feels different. Mud on your boots. Delays you did not plan for. Inspectors who see things you missed. Checks you keep writing.
I wrote this with people who live inside that grind. Architects who argue over load paths. Engineers who pull out span tables every morning. Contractors who answer texts at 6 a.m. because a footing failed the inspection. Interior designers who fix problems long after everyone else left the site.
This guide walks through the work the way it actually happens. Planning. Permits. Soil tests. Footings. The frame that never lines up the way the drawings said it should. Roofing. Wiring. Mistakes. Fixes. Inspections. The long final week when everything feels late.
You will see the parts that cost money. The parts that waste money. The parts that save you when done early. The goal is simple. You understand the process well enough to make better decisions on your own site.
MUST READ (FIELD PICK)
A solid reference that most pros keep around: Visual Handbook of Building and Remodeling. Short explanations. Clear diagrams. Useful when you are staring at a wall and wondering what sits behind it.
Link
Who This Helps
● First-time homeowners trying to understand the work
● Owner-builders managing a project on their own land
● Anyone who wants to see how drawings turn into a real house
What Sets This Guide Apart

● Written by people who build for a living
● Shows mistakes the way they happen on site
● Covers site prep, structure, services, finishes, and the messy in-between
● Includes visuals, field notes, and checklists that match real jobs
You will also get phase-by-phase sections. What happens. Who does it. What usually goes wrong. What to ask before you sign anything. Sample budgets. Quick timelines. Checklists you can print and bring to site.
For more on how the work moves from start to finish, see the construction process.
How to Build Your Own House from Concept to Completion

Building a Home: Everything You Need to Know
The Only Truly Complete Step-by-Step Guide to Building Your Home
Find out how to build a home the right way. Easy-to-follow steps, insider tips, and practical advice for beginners.
1. Housing Concepts: Getting It Right from the Start

One of the most critical steps before even daydreaming about building your own home is nailing down the housing concept.
This is about creating a cohesive vision that ties your future home’s purpose, style, and functionality together. Designing and building your own house go hand in hand, and skipping this step is like trying to bake a cake without a recipe.
Sure, you’ll end up with something, but it might be the kind of “unique” that has your neighbors raising their eyebrows.
The housing concept defines everything: the size, layout, materials, and even the budget. Without a clear idea from the start, you risk winding up with a house that’s either impractical, over-budget, or, frankly, a little embarrassing.
But don’t worry—this is where we step in to help.
Why the Housing Concept Matters
- Aligns Design with Lifestyle
Imagine designing a sleek modern home, only to realize you need space for three kids, two dogs, and a home office. A solid housing concept ensures your design meets your current and future needs. - Saves Time and Money
Changing plans halfway through a build is a nightmare—trust us, we’ve been there. One time, we forgot to account for a mudroom in a family’s house, and you wouldn’t believe the mess (literally) we had to clean up later. Learn from our mistakes: plan early, plan smart. - Avoids Visual Chaos
Without a cohesive concept, your house could look like a Pinterest board exploded. Mixing too many styles or ideas can lead to a mismatched mess rather than a thoughtfully designed home.
How to Create a Housing Concept
- Start with Purpose
Ask yourself: What do you need this house to do? Are you looking for a cozy family home, a minimalist retreat, or a multi-functional space? Clarity here sets the foundation. - Choose a Style
Modern, rustic, colonial, mid-century? Picking a theme early helps guide your decisions, from the materials you use to the finishes you choose. - Think About Functionality
Consider flow, room placement, and how spaces connect. Open floor plan or closed? Extra storage? This is where practical details matter. - Consider Future Needs
Are you planning to expand your family, work from home more, or potentially resell in the future? A good housing concept is flexible and forward-thinking.
For more detailed guidance on this essential subject, don’t miss our Short Guide to Housing Concepts—packed with insights and tips to help you design your dream home without the headaches.
Also:
- Parti in Architecture: The Foundation of Great Design
- Download an informative and simple slideshow of "Housing Concepts: Getting It Right from the Start" in PPTX format.
2. Smart Planning: The Foundation of Building Your Dream Home

Image: A custom house incorporating natural elements like real stone walls on the exterior, overlooking a pool, blending natural beauty with modern luxury.
Before you break ground on your dream house, planning is everything. From securing the perfect piece of land to nailing down your budget, this phase sets the tone for your entire project.
It’s the part we’ve learned to approach with precision—after all, we’ve faced the headaches that come from skipping a few steps.
Trust us, getting it right now can save you from costly mistakes later.
This stage isn’t just about blueprints and permits; it’s about creating a roadmap that leads to a house you’ll love, without the surprises that keep you up at night. Let’s walk through the essentials.
2.1 Choosing the Right Land: Building on a Strong Foundation
The land is your project’s backbone. We’ve seen projects fall apart because people overlooked soil conditions or ignored zoning regulations.
Once, a client chose a scenic plot, only to realize later that the soil couldn’t support a foundation. That mistake cost months of delays and a hefty price tag for remediation.
Here’s what to prioritize:
Evaluating Location
- Think about proximity to schools, work, and other amenities.
- Evaluate access to utilities—one of our early projects taught us the hard way how expensive it is to run water and electricity lines to remote areas.
- Don’t forget long-term value. A picturesque spot might lose its charm if it’s too far from conveniences.
Soil Tests and Geotechnical Reports
- You might think the ground looks solid, but we’ve learned that appearances can deceive. Soil testing is non-negotiable—it ensures your foundation will hold up over time.
- Geotechnical reports also reveal flood risks and drainage challenges, which can impact construction costs and structural stability.
Zoning Regulations and Permits
- Always check zoning laws before making any decisions. We’ve worked with clients who had to redraw entire plans due to restrictions they didn’t catch early.
- Securing permits upfront is a game-changer. Waiting until the last minute invites delays that stall your build.
2.2 Designing Your Dream Home: Turning Ideas Into Reality
The design phase is where your vision takes shape. But we’ve learned it’s also where dreams can outpace budgets. One client came to us with a wish list that was straight out of a luxury magazine—but scaling it back while maintaining quality became the challenge.
Working with an Architect vs. Pre-Designed Plans
- Custom designs give you exactly what you want but can be pricey. We’ve seen some clients balance this by using pre-designed plans and then customizing small elements to add a personal touch.
- Consider starting with tools like SketchUp if you’re DIY-minded. Many clients find it helpful to visualize their ideas before bringing in professionals.
Balancing Aesthetics, Functionality, and Budget
- This is where you have to make tough decisions. During one project, we prioritized a well-designed kitchen and energy-efficient windows over luxury finishes, and it made all the difference in long-term satisfaction.
- Always include sustainable design elements—they’re an investment that pays for itself over time.
2.3 Budgeting and Financing: Setting the Numbers Straight
Budgeting is where many people hit speed bumps. We’ve seen everything from clients underestimating labor costs to completely forgetting about contingency funds. Once, during a remodel, unexpected wiring issues ate up the entire reserve fund—and then some. That’s a mistake we’ll never repeat.
Estimating Costs
- Break down every cost into categories: materials, labor, permits, and contingencies.
- If you’re building a luxury home, expect higher contractor fees and materials pricing—but don’t let hidden costs catch you off guard.
Funding Your Project
- Investigate all options: construction loans, grants for eco-friendly builds, or even phased financing.
- We’ve worked with clients who used creative financing to stretch their budgets without compromising on quality.
The Importance of a Detailed Cost Breakdown
- Tracking expenses sounds tedious, but it’s a lifesaver. One builder we worked with introduced us to software that calculated residential construction costs per square foot. It was a game-changer for staying on budget.
What We’ve Learned
Planning might not be the most exciting part of building your dream home, but skipping it is a recipe for regret. From testing soil to double-checking permits, we’ve learned that every detail matters. One mistake we’ll never make again? Ignoring contingency funds—it’s like tempting fate.
Smart planning isn’t just about checking boxes; it’s about preparing for the unexpected and ensuring you’re ready to handle whatever comes next. So take the time to think everything through now—it’s the foundation of a home that will stand the test of time.
Next up: Pre-Construction—Turning Plans Into Action
Related Links:
- Foundations, Soil Analysis, and Site Investigation
- Types of Building Foundations: Benefits and How to Choose the Right One
- Foundation of a House: DIY Essentials
- How to Get a Loan to Build a House on Your Land
Best-Selling Book for Further Reading
- “The Complete Visual Guide to Building a House” by John Carroll
- Why Buy? In-depth visuals, covering everything from foundation to roof framing.
- Highlight: Detailed step-by-step instructions for framing and basic bracing techniques..
The Definitive Step-by-Step Guide to Building a Home
Everything about home construction. Practical tips, real-life examples, and expert advice all in one place.
How to Build a House: From Foundation to Finishing

Learn how to build a house with our step-by-step guide. From picking land to final touches, we've got you covered.
3. Pre-Construction Essentials: What You Need to Know to Get Started

Image: Custom-designed house
The pre-construction phase is where your dreams start to take shape. This is when planning turns into action, ensuring every aspect of your project is set up for success.
We've seen how skipping even a small step during this phase can lead to massive headaches—and we've learned the hard way how to avoid them. From navigating regulations to clearing the site, every detail matters.
3.1 Legal and Regulatory Requirements
Understanding Permits: What You Need and How to Get Them
Permits are the gatekeepers of any construction project. Early in our careers, we underestimated the complexity of obtaining the right permits for a client’s build. A missing environmental clearance delayed the project for months. Since then, we've mastered the art of navigating red tape.
- Start Early: Research your local building department’s requirements before drafting plans. For one project, we worked closely with the permitting office to fast-track approvals, which saved weeks in the schedule.
- Know the Types: Depending on your project, you might need building permits, zoning approvals, or even environmental clearances.
- Pro Tip: Always keep copies of your permits on-site during construction. It’s not just a best practice—it’s legally required in many areas.
Building Codes and How to Ensure Compliance
Building codes ensure that every structure is safe, sustainable, and up to standard. We once had a project fail an inspection because of a missed fire safety requirement—it was an expensive mistake that taught us to triple-check compliance.
- Work Closely with Professionals: Architects and compliance officers are your allies in understanding local codes.
- Preemptive Checks: Schedule an informal inspection early to identify potential issues before formal inspections begin.
Our Lesson: Failing to meet codes during pre-construction can lead to costly redesigns. Plan ahead, and you'll thank yourself later.
Tips for Navigating Residential Building Codes
- Start with the Basics:
- Focus on general residential building codes, then dive into state-specific amendments.
- Advice: Use online resources like ICC's code finder to access state-specific guidelines easily.
- Consult Professionals:
- Architects and contractors often specialize in navigating building codes.
- Tip: Always ask your builder about their experience with local codes to ensure compliance.
- Leverage Technology:
- Use apps like UpCodes or Buildertrend to search for specific codes and track compliance throughout the project.
- Schedule Inspections:
- Plan for regular inspections at critical stages (e.g., foundation, framing, final finish) to avoid costly rework.
- Keep Documentation:
- Maintain records of permits, inspection reports, and code references for future resale or renovations.
Understanding residential building codes can feel like a lot at first, but they’re there to keep your home safe, functional, and durable.
From building a deck to wiring a room or planning a remodel, sticking to these rules can save you from costly mistakes, safety issues, and unexpected fines.
The key is to tackle it step by step, use reliable resources, and ask for professional help when needed. Building or renovating your home should be exciting—knowing the codes simply makes the process smoother and stress-free.
3.2 Site Analysis
How Site Analysis Works: The Key to a Successful Home Build
Site analysis is the foundation of any successful home build. It’s about understanding the land, its unique features, and how they’ll shape your project—not just today, but for years to come. Skipping this step can lead to costly mistakes, while a thorough analysis unlocks the full potential of your site.
What Site Analysis Reveals
- Environmental Factors:
- Flooding Risks: Identifying areas prone to water pooling or flooding helps in planning drainage and foundation systems.
- Sun and Shade: Understanding where the sun rises and sets helps optimize natural lighting and cooling for energy efficiency.
- Wind Patterns: Knowing how wind flows across the site can guide ventilation plans or protect outdoor spaces.
- Topography and Terrain:
- Slopes and uneven terrain impact drainage, foundation design, and even access. Proper mapping ensures you’re prepared for challenges like erosion or leveling.
- Community and Surroundings:
- The site’s location often dictates zoning regulations, utilities, and access to resources. Paying attention to these factors ensures your design fits the local context without headaches down the road.
Why Site Analysis Matters
Without proper site analysis, you risk running into avoidable problems—like poor drainage, uncomfortable living conditions, or even structural issues. On the flip side, understanding your land means you can design a home that feels natural and works in harmony with its surroundings.
How to Apply This to Your Home Build
- Start with a Plan: Map out the key elements of your site—terrain, sunlight, wind, and utilities.
- Adapt to the Land: Design your home to work with the environment, not against it. For example, position rooms for optimal light or use natural features to enhance aesthetics and functionality.
- Think Long-Term: Consider how your home will age. Durable materials and thoughtful drainage systems can save you trouble later.
Site analysis helps you avoid problems and ensures your home fits naturally into its surroundings, offering comfort and practicality for years.
Taking the time to analyze your site is essential—it lays the foundation for a project that looks great and works perfectly within its space.
Check out our full guide on site analysis to learn why it’s a must for building a successful home.
3.3 Preparing the Site

Clearing, Leveling, and Marking Boundaries
Site preparation is where the physical work begins, and precision is key. On one of our projects, rushing this step led to uneven leveling, which caused foundation issues down the line. We now take this phase seriously.
- Clearing: Remove trees, debris, and any obstacles. We once discovered an old septic tank during site prep—it delayed the project by weeks but could’ve caused major problems if left buried.
- Leveling: High-precision tools like laser levels are a must. Uneven ground can lead to structural issues that are expensive to fix later.
- Marking Boundaries: Clearly marked boundaries ensure contractors stay within legal limits. We once had a neighbor dispute due to unclear property lines—an avoidable headache with proper surveying.
Pro Tip: Don’t cut corners on this step. An unstable foundation is a nightmare waiting to happen.
Conducting Surveys and Setting Benchmarks
Land surveys and benchmarks are essential for accuracy. We once skipped setting proper benchmarks on a smaller project, thinking it wasn’t necessary. Big mistake. The result? Misaligned structures that needed costly corrections.
- Why Surveys Matter: They provide a detailed map of your construction site, including property lines, elevation, and natural features.
- Setting Benchmarks: These reference points guide contractors and ensure every step aligns with the approved plan.
Lesson Learned: Skipping this step is like building a puzzle without an edge piece. It might come together eventually, but not without unnecessary frustration.
What We’ve Learned
Pre-construction is where the real work begins. Skimping on permits, surveys, or site preparation might save a little time upfront, but we’ve seen how those shortcuts can snowball into major problems.
One project we worked on skipped a comprehensive land survey to save money—only to discover property line issues halfway through construction. Fixing that mistake cost more than the original survey would have.
Here’s our advice: do it right the first time. Proper preparation now saves time, money, and stress later, ensuring everything goes smoothly as you work toward your dream home.
Up Next: Foundation and Structure—Laying the Groundwork
The Most Complete Guide to Building Your Dream Home
4. The Core of Construction: Foundations and Frameworks Explained

Building the Backbone: Foundation and Structure
When constructing a home, the foundation and structural framework are what ensure your house stands tall, safe, and enduring. These steps aren’t just technical processes; they set the stage for a long-lasting and efficient home, whether you’re building on your own land or working with professional house construction companies.
4.1 Laying the Foundation
Types of Foundations: Choosing the Right Fit

Excavator at work, digging the foundation for a building project, laying the groundwork for construction.
A solid foundation is the starting point for every successful home construction project. Depending on your location, budget, and house design, you can choose from three common types of foundations:
- Slab Foundations
These are simple, cost-effective options often used in warm climates. They consist of a thick concrete slab poured directly onto leveled ground. While quick to install, slab foundations need proper waterproofing to avoid moisture issues. - Crawl Space Foundations
Common in areas with mild to moderate weather, crawl spaces elevate the home off the ground. This provides better access to utilities and helps prevent flooding, but regular maintenance is needed to avoid mold or pest issues. - Basement Foundations
Basements add extra living or storage space, but they come with higher costs and require proper drainage systems to prevent flooding.
For those asking, “How much does building your own house cost with a basement?” or “What’s the cost per square foot for slab construction?”—the answers vary based on material prices, labor costs, and local regulations. A breakdown of residential construction costs per square foot can provide clarity.
Related: Foundation Construction: DIY Tips
Waterproofing and Drainage Considerations
Waterproofing your foundation is crucial for a durable home. Options like exterior drainage systems, sump pumps, and sealants prevent water damage, particularly for homes in areas prone to heavy rain. For custom homes built on your land, integrating drainage solutions during the foundation phase can save costs down the line.
4.2 Structural Framework
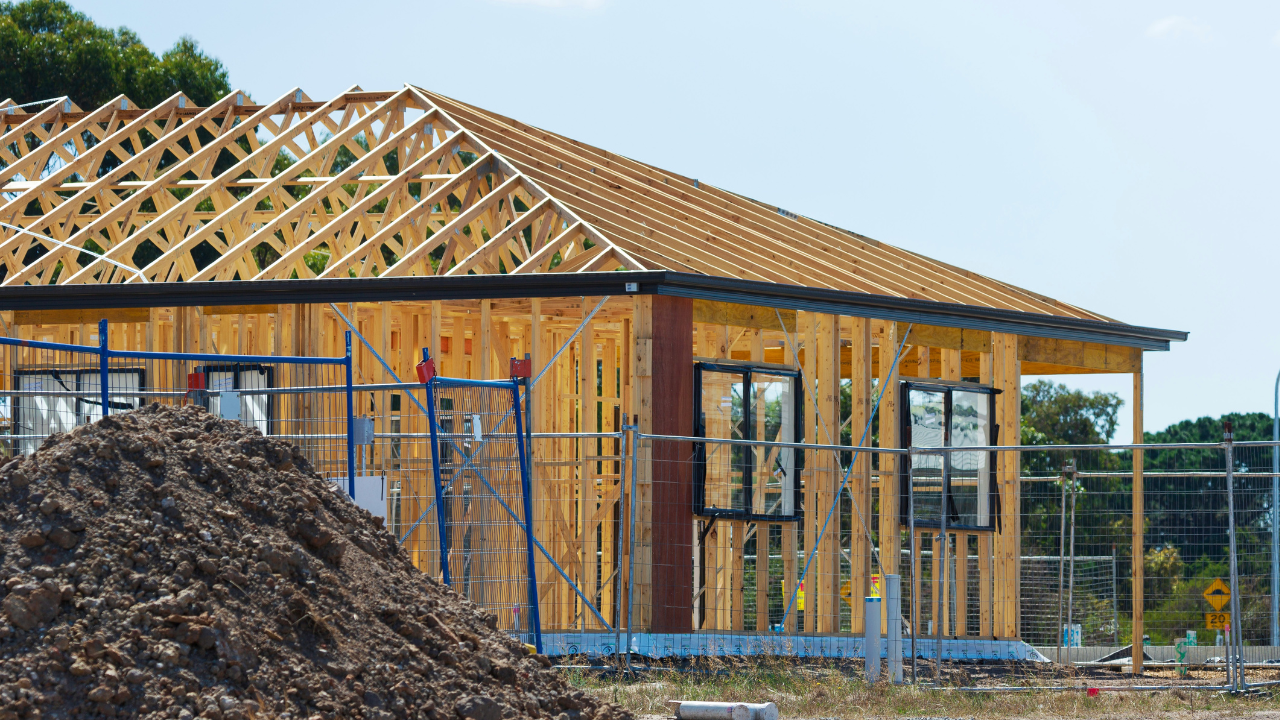
Load-Bearing vs. Non-Load-Bearing Walls
When planning your new house construction, understanding the role of walls is vital.
- Load-Bearing Walls: These support the weight of the roof and upper floors, transferring it to the foundation. Removing them can compromise the structure.
- Non-Load-Bearing Walls: These divide rooms but don’t bear significant weight, making them easier to remove or modify during renovations.
Whether you're building a simple prefab house or a custom luxury home, proper planning of wall placement is key to stability and design flexibility.
See Also: House Framing 101: Everything You Need to Know
Choosing Materials: Timber, Steel, or Concrete?
The material you select impacts cost, sustainability, and durability.
- Timber: Lightweight and eco-friendly, timber is popular for small homes, including tiny houses and prefab cottages.
- Steel: Known for strength and flexibility, steel is ideal for modern prefab homes or areas prone to earthquakes.
- Concrete: Durable and versatile, concrete works well for traditional site-built homes or custom homes.
Each material has a different cost per square foot and can influence the overall cost to build your house. For instance, luxury custom home builders often favor steel for its modern aesthetic, while timber is common for low-cost house construction.
Related: Concrete Foundations 101: Everything You Need to Know
Installing Beams, Trusses, and Joists
These structural components form the skeleton of your home:
- Beams: Horizontal supports that bear the weight of floors and ceilings.
- Trusses: Pre-fabricated triangular structures that support roofs, commonly used in modular houses.
- Joists: Horizontal elements that support floors and ceilings between walls.
Installation must be precise to prevent issues like uneven floors or sagging roofs. Whether you're working with house building contractors or attempting a DIY custom home project, this step is critical.
Understanding how foundation and structure tie into home construction costs, choosing materials, and engaging reliable house construction companies ensures a smoother building process.
With the rising new home construction costs in 2025, paying attention to these early steps can save money and stress later. Whether you’re building a tiny home or a sprawling mansion, the foundation and framework are the backbone of your project.
5. Utilities and Infrastructure: Laying the Groundwork for a Functional Home
When it comes to building a home, utilities and infrastructure are the unsung heroes that keep everything running smoothly. From water and electricity to heating and ventilation, this stage sets the stage for comfort and functionality. Let’s dive into the key components.
5.1 Plumbing Systems: Ensuring Smooth Water Flow
Layout Planning for Bathrooms, Kitchens, and Laundry Areas
The layout of your plumbing system is critical for efficiency and ease of use. A well-thought-out plan ensures that water flow and drainage are optimized while minimizing costs.
- Bathrooms: Consider the placement of sinks, toilets, showers, and bathtubs to minimize the distance to main water lines. Grouping fixtures can reduce plumbing complexity.
- Kitchens: Place the sink, dishwasher, and refrigerator close together for efficiency and shorter pipe runs.
- Laundry Areas: Ensure the water supply and drainage are positioned conveniently for washing machines while maintaining easy access for maintenance.
Materials for Pipes and Fixtures
Selecting the right materials is crucial for durability and avoiding future leaks.
- Pipes:
- Copper pipes: Reliable, durable, and resistant to corrosion but slightly more expensive.
- PEX pipes: Flexible, affordable, and easy to install, making them a popular choice for modern homes.
- PVC pipes: Often used for drainage systems due to their cost-effectiveness.
- Fixtures: Opt for water-saving fixtures like low-flow showerheads and dual-flush toilets to conserve water and reduce utility bills.
5.2 Electrical Systems: Powering Your Home Efficiently
Wiring Basics: Outlets, Circuits, and Breaker Panels
Your home’s electrical wiring is the backbone of modern living, powering everything from lighting to appliances.
- Outlets: Plan the number and placement of outlets to avoid overloading circuits. Consider adding USB ports for convenience.
- Circuits: Separate circuits for major appliances like refrigerators and washing machines prevent overloads.
- Breaker Panels: The panel acts as the hub of your electrical system. Ensure it’s easily accessible and has enough capacity for future upgrades.
Future-Proofing for Smart Home Features
Technology evolves quickly, and future-proofing your home for smart systems is a wise investment.
- Install conduits that allow easy addition of new wiring for future needs.
- Add network cabling (like Cat6) for high-speed internet and smart home hubs.
- Integrate smart light switches, thermostats, and outlets to enhance energy efficiency and convenience.
5.3 HVAC Systems: Comfort and Energy Efficiency
Selecting Energy-Efficient Heating, Cooling, and Ventilation Units
Your HVAC system is essential for maintaining a comfortable indoor climate year-round.
- Choose units with high Seasonal Energy Efficiency Ratios (SEER) for cooling and Annual Fuel Utilization Efficiency (AFUE) ratings for heating.
- Look for Energy Star-rated systems to reduce utility bills while minimizing environmental impact.
Ductwork Design and Placement
Proper ductwork design ensures even air distribution and prevents energy loss.
- Placement: Install ducts within conditioned spaces to avoid energy losses.
- Insulation: Insulate ducts in unconditioned spaces to maintain the desired temperature.
- Zoning: Consider zoning systems to control temperatures independently in different areas of your home.
6.4 Safety and Inspections: Securing Your Home’s Backbone
Electrical Safety Codes and Fire Prevention Measures
Adhering to safety codes during installation is non-negotiable.
- Use Ground Fault Circuit Interrupters (GFCI) in areas with water exposure, like bathrooms and kitchens.
- Install smoke detectors and carbon monoxide detectors as per local regulations.
- Ensure wiring is properly grounded to prevent electrical hazards.
Inspection Milestones During Installation
Inspections are critical checkpoints to ensure everything is up to code and functioning correctly.
- Rough-In Inspections: Conducted before walls are closed to check plumbing, electrical, and HVAC systems.
- Final Inspections: Verify that all systems are operational and meet safety standards.
- Specialized Inspections: Focused on key areas like backflow prevention in plumbing or duct leakage in HVAC systems.
Carefully planning your utilities and infrastructure lays the groundwork for a home that's comfortable, efficient, and safe—ready to support your everyday life seamlessly.
7. Exterior Construction: Building a Durable and Inviting Home

Image: The exterior of Villa Pavruka Yayla in Kalkan, Turkey, showcasing a stunning holiday home with a modern design and breathtaking views.
Exterior construction isn’t just about looks—it’s where aesthetics meet functionality to protect your home from the elements while making it visually appealing. From roofing to windows and insulation, every detail matters to ensure durability, energy efficiency, and comfort.
7.1 Roofing: The Crown of Your Home
- Popular Roofing Options:
Roofing materials play a significant role in your home’s style and longevity. Options like asphalt shingles, metal roofing, clay tiles, and slate each offer unique aesthetics and durability. We’ve worked with all types and learned that the right choice depends on your climate and budget.
Avoid This Mistake: Once, we underestimated the weight of clay tiles for a client’s roof, leading to costly structural adjustments. Always consult with an expert to ensure your chosen material suits your home’s structure. - Leak Prevention and Longevity:
A poorly installed roof can turn into a nightmare. Focus on proper techniques like layering underlayment, ensuring proper drainage, and sealing edges to extend the roof’s life.
Lesson Learned: Rushing a roof installation during rainy season once led to water damage inside. Now, we always schedule roofing during optimal weather conditions to avoid such issues. - Energy Efficiency with Cool Roofs:
Reflective materials like white membranes or light-colored metal roofing help reduce heat absorption, keeping your home cooler and cutting down energy costs.
Pro Tip: Cool roofs aren’t just about efficiency—they can also extend the lifespan of your roof by reducing thermal stress.
7.2 Windows and Doors: The Face of Functionality
- Energy-Saving Choices:
Double-glazed windows and insulated doors are investments that pay off. Not only do they improve thermal performance, but they also cut energy costs. Products with ENERGY STAR ratings are a must for maximum efficiency.
Real Talk: Once, we skipped triple-glazed windows for a colder region, thinking double-glazed would suffice. The result? Drafty interiors and unhappy clients. Don’t compromise in extreme climates. - Installation Know-How:
The best windows and doors are useless if poorly installed. Techniques like proper shimming and sealing gaps with foam or caulk are critical to preventing drafts and ensuring security.
Our Advice: Hire professionals or carefully follow instructions. We’ve seen homeowners install doors slightly off-level, leading to uneven gaps that required costly fixes. - Aesthetic and Functional Appeal:
Beyond energy savings, well-designed windows and doors can elevate your home’s curb appeal while letting in natural light. Think French doors for elegance or bay windows for expansive views.
7.3 Insulation and Energy Efficiency: The Unsung Hero of Comfort
- Insulation Types for Maximum Efficiency:
Each area of your home might need a different type of insulation:- Fiberglass: Affordable and great for attics and walls.
- Spray Foam: Perfect for sealing hard-to-reach spaces.
- Cellulose: Eco-friendly and excellent for soundproofing.
Avoid This Mistake: Once, we opted for fiberglass in a client’s basement to save money, only to find it ineffective against the high humidity. Always match the insulation to the specific area and its conditions.
- Sealing Air Leaks:
Air leaks can drain your energy budget. Use weather stripping, foam sealants, and caulking to block gaps around windows, doors, and vents.
Pro Tip: Pay extra attention to attic and basement seals—they’re the most overlooked areas for air leakage. - Energy Audits and Savings:
Conducting a professional energy audit helps identify insulation gaps and energy losses. We once worked with a family who saved over 20% on their annual heating bill after addressing leaks highlighted in an audit.
What We’ve Learned

Image: The exterior of a modern custom house featuring stone walls, blending natural elements with sleek, contemporary architecture.
Exterior construction is all about balancing durability with efficiency. One of the biggest mistakes we made early on? Skipping proper insulation in favor of aesthetics. While the home looked great, the owner’s energy bills told a different story.
Our advice? Don’t cut corners. From the roof to the windows and insulation, each element contributes to a home that’s built to last—and keeps you comfortable year-round.
Next up: Interior Finishing: Adding the Personal Touches That Make a House Feel Like Home.
8. Interior Finishing: Bringing Your Vision to Life

This is the stage where your house begins to feel like a home. Interior finishing transforms the structural shell into a functional, inviting space tailored to your style and needs. It’s also where the details you’ve envisioned start to come together—walls, floors, ceilings, and all the personalized touches that make your home uniquely yours.
8.1 Walls, Ceilings, and Floors: The Backbone of Interior Design

- Drywall Installation and Finishing
Proper drywall installation is essential for smooth walls that last. Poorly taped seams or uneven surfaces can haunt you every time the light hits just right. Invest in a good finish—it’s worth it.
Pro Tip: Use moisture-resistant drywall in bathrooms and kitchens to prevent future headaches. - Flooring Options: Hardwood, Tile, Laminate, and Carpet
Each flooring type has its pros and cons. Hardwood adds warmth and luxury, tile offers durability and easy cleaning, laminate is budget-friendly, and carpet provides comfort.
Lesson Learned: Once, we rushed a hardwood installation without acclimating the wood to the room’s humidity—resulting in warped floors. Don’t skip this step, no matter how tight your timeline feels.
8.2 Paint, Finishes, and Fixtures: Where Personality Shines
- Selecting Paint Types and Colors
The right paint doesn’t just enhance the look of your home—it protects surfaces too. Choose finishes based on the room’s function: satin or eggshell for walls, high-gloss for trim, and matte for ceilings. Don’t skimp on quality paint; it saves money on touch-ups down the road.
Real Talk: We once underestimated the power of color samples. A “subtle gray” turned neon blue under different lighting. Always test colors in your space before committing. - Choosing Lighting, Faucets, and Hardware
These “small” details can make or break your interior design. Go for fixtures that complement your overall theme—sleek chrome for modern homes, warm bronze for rustic vibes, or minimalist matte black for a contemporary feel.
Avoid This Mistake: Overlooking lighting placement. Poorly positioned fixtures can lead to shadows and uneven light. Layer ambient, task, and accent lighting for a well-lit home.
8.3 Customizing Interior Design: Making It Truly Yours
- Planning Layouts for Maximum Functionality
Interior design isn’t just about looks—it’s about flow and usability. Think about how you’ll use each room daily. For example, placing outlets near seating areas or ensuring enough storage in frequently used spaces can significantly improve your home’s functionality. - Matching Materials and Finishes
Consistency is key for a cohesive look. Coordinating wood tones, metal finishes, and color palettes ties everything together beautifully.
Our Advice: When we first started, we mixed warm and cool tones in one space, and the result was a confusing aesthetic. Stick to one family of materials and finishes for a harmonious vibe.
What We’ve Learned
Interior finishing is all about attention to detail. From uneven drywall seams to mismatched fixtures, we’ve faced it all. Careful planning and thoughtful choices can transform a space into something extraordinary.
One tip we can’t stress enough: Always prioritize function over aesthetics. A stunning kitchen backsplash is great, but if you skimp on the flooring quality, you’ll regret it every time a tile cracks.
Next up: Landscaping and Outdoor Spaces—because the outside deserves as much love as the inside.
9. Landscaping and Outdoor Spaces: Making Your Outdoors Shine

9.1 Planning Your Perfect Outdoor Retreat
-
Crafting Gardens, Patios, and Entertainment Spots:
Start by defining how you want to use your outdoor areas—a serene garden, a lively patio, or a kid-friendly play zone. Sketch ideas that balance functionality with aesthetics.
Our Advice: We worked on a backyard transformation that turned a bland space into a vibrant mix of garden, fire pit, and dining area. The secret? Clear priorities and smart use of space.Tip: Enhance the connection between indoors and outdoors with sliding doors or covered patios for seamless transitions.

-
Picking Sturdy Materials for Paths and Driveways:
Choose materials like concrete pavers, natural stone, or brick for high-traffic areas. These options combine durability with style.
Avoid This Mistake: We once used basic concrete in a freeze-prone area, which led to cracks after a few seasons. Climate-appropriate materials are a must.Pro Tip: Opt for permeable materials to minimize water runoff and improve drainage.
9.2 Going Green with Eco-Friendly Features
- Rainwater Systems That Save:
Install rain barrels or underground tanks to collect water for irrigation. Pairing these with drip systems can save water and simplify maintenance.
Real Talk: A client’s rainwater harvesting setup saved them hundreds on bills while keeping their garden lush. Planning ahead ensures smooth integration. - Lighting and Irrigation That Work Smarter:
Use solar-powered garden lights and smart irrigation systems to create sustainable, hassle-free outdoor spaces.
Our Advice: Place solar panels in optimal spots and use motion-sensor lights for efficiency. We once installed panels in shady areas—not our brightest idea!
What We’ve Learned
Landscaping is more than just aesthetics—it’s about creating outdoor spaces that suit your lifestyle and last over time. Skipping detailed planning or choosing materials without considering your climate can lead to costly repairs. One hard-earned lesson? Failing to plan for water flow caused flowerbeds to flood and required a complete do-over.
Our advice? Think ahead. Durable materials, eco-friendly features, and intentional design make for outdoor spaces that are both practical and stunning.
Next Up: Final Touches—Bringing Everything Together for the Home of Your Dreams.
10. Final Inspections and Move-In Preparation: The Home Stretch
10.1 Ensuring Building Code Compliance
-
The Ultimate Inspection Checklist:
Before move-in, a final inspection ensures everything meets building codes. This includes reviewing structural stability, electrical safety, plumbing systems, and HVAC performance.
Our Advice: Double-check everything. On one project, a minor plumbing oversight delayed occupancy for weeks. A thorough inspection prevents surprises.Pro Tip: Work with your contractor or hire an independent inspector to catch any issues that might have been overlooked.
10.2 Smooth Move-In Prep
- Getting Ready for the Big Day:
Prepare your home by cleaning thoroughly, making minor repairs, and setting up essential utilities like electricity, water, and internet.
Avoid This Mistake: Skipping a deep clean before move-in can turn excitement into frustration. We’ve seen new homeowners discover drywall dust in unexpected places months later.- Transition Checklist for Moving Day:
- Confirm utility connections are active.
- Walk through each room for last-minute touch-ups.
- Plan furniture placement to avoid chaos.
- Stock essentials like cleaning supplies and tools for quick fixes.
- Transition Checklist for Moving Day:
What We’ve Learned
The final steps might seem like small details, but they’re crucial for a hassle-free move-in. Neglecting inspections or rushing move-in prep can lead to unnecessary stress and expenses. One lesson that stuck with us? Never assume utilities are set up—always confirm beforehand!
Our advice? Take your time. Thorough inspections and organized preparation ensure you can focus on enjoying your new home, not fixing last-minute issues.
Next Up: Enjoying Your Dream Home—Tips for Making It Truly Yours!
Special Features: Making Your Home Stand Out with Smart and Sustainable Features
When building a home, a few thoughtful upgrades can make all the difference. Whether it’s adding energy-efficient solutions or staying ahead with the latest trends, these features make your home more functional, valuable, and future-ready.
Go Green: Sustainable Features That Pay Off
1. Solar Power: Save Money While Saving the Planet
Adding solar panels isn’t just about reducing your carbon footprint—it can drastically cut your utility bills too.
- Example: A homeowner in Arizona installed a 5kW solar panel system and saw their electricity bill drop from $200 to $30 a month. Over 10 years, they’ll save nearly $20,000 and boost their home’s resale value.
- Why Now? Solar panels are more affordable than ever, and many local governments offer rebates or tax incentives to cover part of the cost.
2. Recycled and Sustainable Materials: Build Smarter
Using materials like reclaimed wood, recycled steel, or bamboo gives your home a unique look while reducing environmental impact.
- Example: One couple used reclaimed wood for their floors, giving their home a rustic, high-end feel without the high price tag.
- Pro Tip: Check local suppliers for reclaimed materials—they often have hidden gems at a fraction of the cost.
Stay Trendy: Features for a Modern Home
1. Smart Home Technology: Convenience at Your Fingertips
Smart thermostats, motion-sensor lighting, and app-controlled security systems make life easier, safer, and more energy-efficient.
- Example: A family in Seattle installed a smart thermostat and saved 20% on heating costs during winter by programming it to adjust temperatures when they weren’t home.
- Why It Matters: These devices are easy to install during construction, and they make a big impression on future buyers if you ever decide to sell.
2. Prefab and Modular Homes: Fast, Affordable, and Stylish
Prefabricated and modular homes are built offsite and assembled quickly on your land. They’re not just efficient—they’re also stylish and customizable.
- Example: A modular home in Colorado was built and move-in ready within four months, saving the owners 25% compared to traditional construction methods.
- Pro Tip: Modular designs are perfect for unique layouts or hard-to-reach locations where traditional builds are more expensive.
Why These Features Are Worth It
- Save Money: Features like solar panels and smart tech cut long-term costs on energy and maintenance.
- Future-Proof Your Home: These upgrades make your home modern and efficient, so you won’t have to retrofit them later.
- Boost Resale Value: Buyers love energy-efficient and high-tech homes, so these investments can pay off when it’s time to sell.
What We’ve Learned
Adding special features during construction is easier and more cost-effective than trying to upgrade later. We worked on a project where the homeowner skipped installing solar panels, thinking it wasn’t worth it. A few years later, rising electricity bills forced them to install the system anyway—at double the cost due to retrofitting.
Our Advice: Think long-term. Features like smart tech, solar energy, and sustainable materials save money, reduce stress, and make your home a standout. Start planning these upgrades early—you’ll thank yourself later.
Next: Final Touches—Getting Your Home Ready for Move-In.
Moving In: The Final Stretch

You’ve made it—your home is complete, and it’s time to move in. This is the part where excitement meets exhaustion, and maybe a few "I told you so" moments over furniture placement. Let’s tackle this final step with a touch of humor and a dash of practicality.
Clean Like Your Life Depends On It
No matter how pristine your house looks, construction dust has likely staked its claim. It's like glitter at a kid’s birthday party—it’s going to be everywhere.
- Our Tip: Start with the floors and work your way up. Otherwise, you’ll clean the counters only to have dust rain down from the ceiling fans.
- Funny Moment: One homeowner shared they found sawdust inside their microwave. No idea how it got there, but they learned the hard way not to trust a “clean” kitchen until they’d checked every nook and cranny.
Test Everything—Yes, Everything
Before the furniture comes in, give your new house a full systems check. Flip all the switches, turn on the faucets, and flush the toilets like you’re auditioning for a plumbing commercial.
- Why It Matters: Discovering the shower only spits out ice water after a long moving day is the kind of plot twist nobody wants.
- Real-Life Example: One family thought their HVAC system was working fine—until they realized the vents were blowing air into the basement and not the living room. Don’t skip this step!
Strategic Furniture Moving
Start with the essentials—beds, sofas, and tables. Save the decorative items for later, or risk spending hours debating where to hang that picture frame while standing knee-deep in boxes.
- Pro Tip: Assemble the bed first. After a long day, you’ll thank yourself when you can flop onto a mattress instead of a pile of bubble wrap.
- Funny Warning: Be careful with those tight corners. You didn’t spend months perfecting that drywall just to gouge it while hauling in a sofa. Trust us—it’s a rite of passage you want to skip.
Invite Friends (With Pizza Bribes)
Need help moving? Call in the troops! Just make sure you pay your movers (a.k.a. friends and family) in pizza and soda—and maybe cupcakes for the heavy lifters.
- Funny Observation: There’s always that one friend who insists on directing traffic while carrying nothing heavier than a throw pillow. Let them—it’s better than letting them touch the fragile stuff.
Celebrate, But Keep It Low-Key
You’ve earned a moment to relax, but keep things simple and stress-free. Unpack your favorite items, order your favorite meal, and enjoy the first evening in your new space.
- Our Advice: Enjoy the moment, snap some photos, and start envisioning how to make this house truly feel like home.
Wrapping It Up: Your New Adventure Begins
Moving in isn’t just about getting everything inside—it’s about turning your new house into a home. Laugh at the small hiccups, avoid the big ones, and remember: no matter how chaotic moving day feels, it’s the start of something amazing.
Now, where did you pack the coffee maker? Because you’re going to need it.
Why This Guide Stands Out
Unlike fragmented advice scattered online, this guide provides the complete picture. With contributions from industry professionals, it offers insider knowledge you won’t find elsewhere. From structural engineering tips on load distribution to interior design hacks, every piece of advice is tested and practical.
And the best part? You’ll have the tools to confidently manage or actively participate in building your dream home. Let’s get started!
Wrapping It Up
A couple stands proudly in front of their newly built home—your guide to building your own house.
Building a home isn’t just about walls and windows—it’s about creating a space that reflects your vision, fits your needs, and feels like yours. From navigating permits to picking out the perfect fixtures, we’ve covered the essentials to get you from an empty lot to a place you’ll love calling home.
Sure, there’s a lot to think about, and things won’t always go as planned (trust us, we’ve learned the hard way). But with a solid plan, a good team, and a bit of flexibility, you can handle anything that comes your way.
Now it’s time to take that first step—get building, and make it happen!
Best-Selling Books for Building Your Own Home
If you’re taking on the exciting challenge of building your own house, these books offer the perfect balance of theory, practical steps, and clear illustrations. Each one dives deep into carpentry, framing, and truss bracing, helping you confidently handle everything from basic layouts to more advanced structural concepts.
1. “The Complete Visual Guide to Building a House” by John Carroll
Why Buy?
Combines stunning visuals with practical advice, guiding you through the process of building your dream home, step by step.
Highlight:
Covers every stage of construction—from site preparation to finishing touches—while providing insights into framing and bracing systems.
Who It’s For:
Perfect for beginners or experienced DIY builders looking for an easy-to-follow, visually driven resource.
2. “Modern Carpentry” by Willis H. Wagner
- Why Buy?
Offers comprehensive coverage of carpentry principles, including roofing frameworks and bracing techniques crucial for a self-built home. - Highlight:
Updated references to modern building codes, ensuring your DIY project meets safety standards. - Who It’s For:
Homeowner-builders, DIY enthusiasts, and anyone looking for a user-friendly yet thorough carpentry guide.
3. “Building Construction Illustrated” by Francis D.K. Ching
- Why Buy?
Known for its clear, detailed illustrations of structural systems—perfect for visualizing how walls, rafters, and trusses fit together in a new home. - Highlight:
Explains complex topics like truss bracing through easy-to-follow diagrams, removing guesswork from your build. - Who It’s For:
Self-builders and owners who want a strong visual grasp of how each component in a house comes together.
4. “Design of Wood Structures – ASD/LRFD” by Donald E. Breyer
- Why Buy?
Gets deeply into the engineering side of wood framing, load distribution, and truss design—helpful if your self-build involves larger or more complex layouts. - Highlight:
Covers both Allowable Stress Design (ASD) and Load and Resistance Factor Design (LRFD), giving you the technical backbone to ensure structural integrity. - Who It’s For:
Ambitious homeowner-builders seeking a more rigorous, code-heavy approach to guarantee their custom home is built right.
5. “Carpentry & Building Construction” by John L. Feirer and Mark D. Feirer
- Why Buy?
A go-to textbook packed with step-by-step instructions for framing, roofing, and installing bracing components—key skills when constructing a house from scratch. - Highlight:
Features practical safety tips, tool lists, and code compliance guidelines, making it easier to handle on-site challenges. - Who It’s For:
Motivated DIY homebuilders and anyone wanting a detailed, reliable resource on industry best practices.
Why These Books?
- Comprehensive Coverage:
Each title goes beyond surface-level guidance, offering in-depth discussions on everything from planning and layout to detailed bracing strategies—exactly what a self-builder needs. - Balanced Approach:
They blend essential theory with practical, step-by-step methods. Whether you’re laying out your first floor plan or tackling roof truss bracing, you’ll find clear directions to follow. - Code Compliance & Safety:
All of these resources are up-to-date or reference modern standards, ensuring your new home meets local building requirements and safety regulations. - Ideal Companions for DIY Projects:
Think of these books as on-demand mentors: use them alongside your on-site experience or any formal instruction you receive. The more you know about roof framing and bracing, the smoother—and safer—your home-building journey will be.
We recommend taking the time to learn from these trusted resources. With the right knowledge and hands-on tips, you'll feel confident building a home that stands the test of time. Happy building!
FAQs About Home Construction
Planning and Design
1. How long does it take to design a house?
It varies, but designing a house can take 2-6 months, depending on the complexity of the project, revisions, and permit approvals.
2. Can I design my own house without an architect?
Yes, with tools like SketchUp or Home Designer, you can create your own designs. However, hiring an architect ensures compliance with building codes and optimizes functionality.
3. What factors influence home design costs?
Key factors include size, complexity, materials, labor, and location. Custom designs typically cost more than pre-designed plans.
Budget and Financing
4. What is the average cost to build a house in 2025?
Costs vary widely but generally range between $150 and $500 per square foot, depending on materials, labor, and location.
5. How can I save money during construction?
Opt for energy-efficient designs, use local materials, and consider prefabricated options. Planning thoroughly reduces unexpected costs.
6. Are there loans specifically for home construction?
Yes, construction loans are available to cover building costs. These loans are typically converted to a mortgage once construction is complete.
Permits and Regulations
7. What permits are required to build a house?
Permits usually include building, plumbing, electrical, and mechanical. Specific requirements depend on your location and project scope.
8. How do I ensure my home complies with local building codes?
Hire a professional architect or contractor familiar with local regulations. Regular inspections during construction also help ensure compliance.
Construction Timeline
9. How long does it take to build a house?
Building a house typically takes 6-12 months, depending on size, complexity, weather, and contractor schedules.
10. What delays should I anticipate during construction?
Common delays include weather, material shortages, permit issues, and changes in design plans.
Materials and Sustainability
11. What are the most durable construction materials?
Brick, concrete, steel, and hardwood are highly durable options, ideal for longevity and resilience against weather.
12. Can I build a sustainable home on a budget?
Yes! Incorporating energy-efficient designs, recycled materials, and solar panels can be cost-effective in the long run.
Related: My Real-World Experience with Recycled Plastic Bricks
Contractors and Labor
13. How do I choose the right contractor?
Research reviews, check licenses, ask for references, and ensure they have experience with projects similar to yours.
14. What should be included in a contractor agreement?
The agreement should cover project scope, timeline, payment terms, warranties, and how changes will be handled.
Interior Finishing
15. What are the most popular flooring options?
Hardwood, tile, laminate, and carpet are common choices, each offering unique benefits for aesthetics and durability.
16. How do I choose the right paint for my walls?
Consider durability, finish (matte, satin, or gloss), and the room’s purpose. High-traffic areas benefit from washable paints.
Landscaping and Outdoor Spaces
17. How much does landscaping add to the cost of a home build?
Landscaping costs can range from $5,000 to $50,000 or more, depending on the design and materials used.
18. What are eco-friendly options for outdoor spaces?
Rainwater harvesting systems, solar lighting, and native plants for landscaping are excellent sustainable choices.
Moving and Post-Construction
19. When is it safe to move into a newly built home?
After the final inspection and when utilities are fully operational, it’s safe to move in.
20. What should I include in a move-in checklist?
Test all utilities, ensure final cleaning, check for pending repairs, and document any remaining issues with your contractor.
Home Maintenance
21. How often should I inspect my home for maintenance?
Perform seasonal checks for HVAC, roofing, plumbing, and electrical systems. Annual inspections for structural elements are also recommended.
22. What are common post-construction issues to watch for?
Look out for settling cracks in walls, leaks, and HVAC inefficiencies. Address issues promptly to prevent further damage.
Legal and Insurance
23. Do I need construction insurance?
Yes, construction insurance protects against risks like fire, theft, or accidents during the build.
24. What is a builder's warranty?
A builder’s warranty covers structural defects and major systems (like plumbing or electrical) for a specified period, typically 1-10 years.
Future Trends
25. Is smart home technology worth the investment?
Absolutely! Smart devices enhance convenience, energy efficiency, and home security, often increasing resale value.
26. What are the benefits of modular homes?
Modular homes are faster to build, cost-effective, and eco-friendly, making them an excellent choice for modern construction.
General Advice
27. Should I be involved in the construction process?
Yes, staying involved helps ensure the project aligns with your vision and addresses potential issues early.
28. What’s one mistake to avoid during construction?
Skipping contingency funds is a major mistake. Unexpected expenses can arise, so allocate at least 10% of your budget for emergencies.
This comprehensive FAQ section ensures you’re well-informed and prepared for every stage of home construction. Have a specific question? Reach out, and we’ll help you out.
Related
- How Much Will it Cost to Build a House?
- Is it Cheaper to Build a House or Buy?
- How Long Will it Take to Build a House?
- What Luxury Home Architects Actually Do (And Why It Matters)
More:
1. Residential Construction and Home Building
Home Construction Costs and Pricing
- Cost to Build a House: Detailed breakdown of home-building expenses.
- Builder Cost to Build a House: Understanding contractor charges for building.
- How Much Does Building Your Own House Cost: Overview of costs when building independently.
- Home Construction Cost: Learn about typical costs for home construction projects.
- Residential Construction Cost per Sq Ft: Calculating costs based on square footage.
- Building House Prices: Factors influencing home construction prices.
- Building Your Own Home Cost: Costs involved when building without a contractor.
- Current Cost to Build a House: Updates on home-building costs in 2025.
- New Home Construction Costs 2025: Latest data on construction expenses.
Contractors and Companies
- Home Construction Companies: Top companies to hire for constructing your home.
- House Construction Companies: Explore reliable firms for house construction.
- House Building Contractors: How to find the right contractor for your build.
New Home Construction
- New House Construction: Process and tips for building a new house.
Custom Home Building
- Luxury Custom Home Builders: High-end builders for luxury properties.
- Custom Home Builders: How to choose the right builder for your dream home.
- Custom Home Construction: Everything about building unique, custom homes.
Building on Your Own Land
- Building a House from Scratch: Starting fresh with new home construction.
- Building a Home on Your Own Land: Legal and financial considerations for building on owned land.
2. Custom and Prefab Homes
DIY Custom Homes
- Build Your Own House: Tips for taking control of your home build.
- Steps to Building Your Own Home: Essential steps to start your home-building journey.
- Build Your Own Home: DIY tips for creating a personalized home.
- Build Your Custom Home: Everything about planning and building unique homes.
- Build My Custom Home: Personalizing the construction process for your dream home.
- Build on Your Land: Steps for custom or prefab construction on personal property.
- Custom Homes Built on Your Land: Steps to construct custom homes on your property.
- Houses Built on Your Land: Options for building a home on your property.
- Site-Built Homes: Homes constructed entirely on location.
Prefabricated Homes
- Prefab Houses: Benefits and types of prefabricated homes.
- Pre Built Homes: Understanding ready-made homes and their advantages.
- Factory Built Homes: Exploring options for homes constructed in a factory.
- Prebuilt Houses: Convenient options for pre-constructed homes.
- Kitset Homes: Overview of homes delivered in kit form for assembly.
Specialized Prefab Options
- Prefab Tiny House: Tiny homes built efficiently offsite.
- Modern Prefab Homes: Stylish and sustainable prefabricated homes.
Costs and Planning
- Modular House Prices: Costs associated with modular home builds.
- Prefabricated Homes Cost: What to expect when budgeting for prefab homes.
- New Home Construction Blueprints: Understanding blueprints for a new build.
3. Alternative and Innovative Housing
Tiny and Small Homes
- Tiny House: Pros and cons of downsized living.
- Tiny House with Loft: Maximizing space in tiny homes with loft areas.
- Tiny House on Wheels: Portable homes designed for mobile living.
- Tiny Home Cost: Typical expenses associated with building or buying a tiny home.
- Small Modern Homes: Sleek, contemporary designs for small spaces.
- 3-Bedroom Tiny House: Small homes optimized for family living.
- Tiny Log Cabins: Rustic, compact homes perfect for remote settings.
Container and Modular Housing
- Container House: Building homes using shipping containers.
- Shipping Container House: Innovative uses for shipping containers in housing.
- Conex Box House: Repurposed shipping containers for housing.
- Flat Pack House: Modular homes delivered flat-packed for assembly.
Innovative Construction Techniques
- Printed House: Homes created using advanced 3D printing technology.
- 3D Printed Homes: Exploring innovative construction methods.
Unique Architectural Styles
- A-Frame House: Stylish homes with a distinctive triangular design.
- Quonset House: Unique, durable homes with curved roofs.
- Dome Houses: Futuristic homes with a dome structure for durability and aesthetics.
Relocatable and Turnkey Homes
- Relocatable Homes: Homes that can be moved from one location to another.
- Turnkey House: Move-in ready homes with no additional setup required.
4. Affordable Housing and Budget Options
- Cheapest Way to Build a House: Strategies to minimize building costs.
- Low-Cost House Construction: Affordable construction techniques and materials.
- Affordable Homes Built on Your Land: Building economical homes on your own property.
- New Construction Homes Under $200k: Affordable new-build options in your area.
- Prefab House Cost: Understanding the pricing of prefabricated homes.
- Low-Budget Home Construction: Effective tips for building on a limited budget.
- Cheapest Duplex to Build: Designing a duplex with cost efficiency in mind.
- Budget for Home Construction: How to plan your finances for a new build.
5. Design and Planning Tools
- Design Your House: Tools and techniques to design a home layout.
- Design Your Dream House: Planning your ideal home step by step.
- Online House Design: Best platforms to design a home virtually.
- House Planner Online: Tools for creating detailed home plans.
- Blueprint of My House: How to access or create your house’s blueprint.
- Virtual House Builder: Online platforms for creating 3D home models.
6. Specialized Housing Types
- Duplex House: Benefits and layouts for two-family homes.
- Log Cabin Homes: Rustic homes built from natural logs.
- Granny Flats: Compact, self-contained units for extended family living.
- Prefab Cottages: Small, prefabricated homes with charming aesthetics.
7. Luxury and High-End Homes
- Luxury Home Builders: Companies specializing in high-end home construction.
- Dream Home Construction: How to create your ultimate luxury home.
- Mansion Homes: Features and costs of building large luxury homes.
8. Sustainable and Eco-Friendly Homes
- Sustainable House: Homes designed for long-term environmental benefits.
- Green Homes: Energy-efficient and sustainable living options.
- Earthship Homes: Sustainable homes using recycled materials.
9. Home Renovation and Additions
- House Addition: Adding extra space or rooms to your house.
- Home Renovation Cost: Breakdown of expenses for renovating your house.
- Build Your House Extension: Guide to planning and constructing a house extension.
10. Vacation and Seasonal Homes
- Cabin Houses: Cozy homes ideal for vacation or weekend retreats.
- Prefab Cottages: Charming, prefabricated homes for vacation use.
- Vacation Homes: Ideal properties designed for seasonal stays.