Architecture Software You Should Learn First
You do not need every app on earth. You need a lean stack that covers drafting, modeling, rendering, page layout, and file hygiene. Start here, then add only what your studio or office actually uses.
The Essential Five
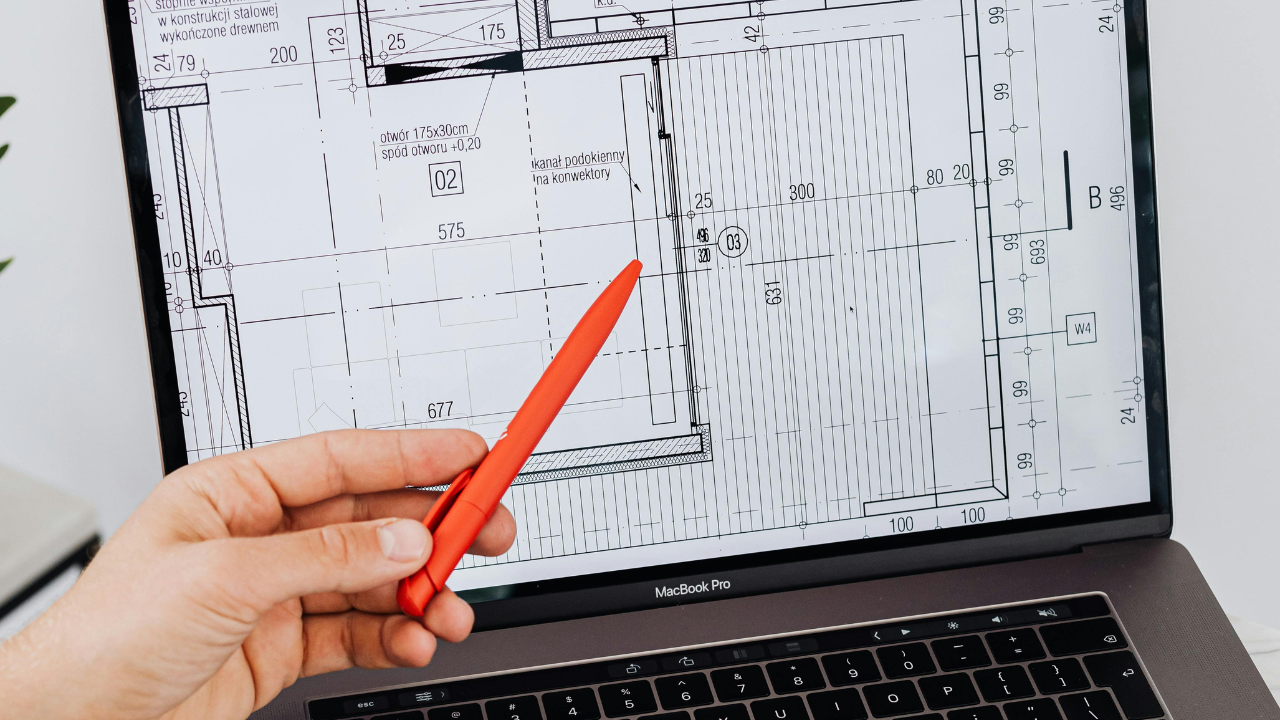
1) Drafting and BIM
-
Revit or Archicad
-
Best for: studio projects that must read as buildings, not sculptures.
-
Why: schedules, sections, and sheets come from one model. You learn coordination, not just pretty pictures.
-
Student cost: usually free or cheap through education programs.
-
Trade-off: heavier learning curve. Payoff is real when you hit construction logic.
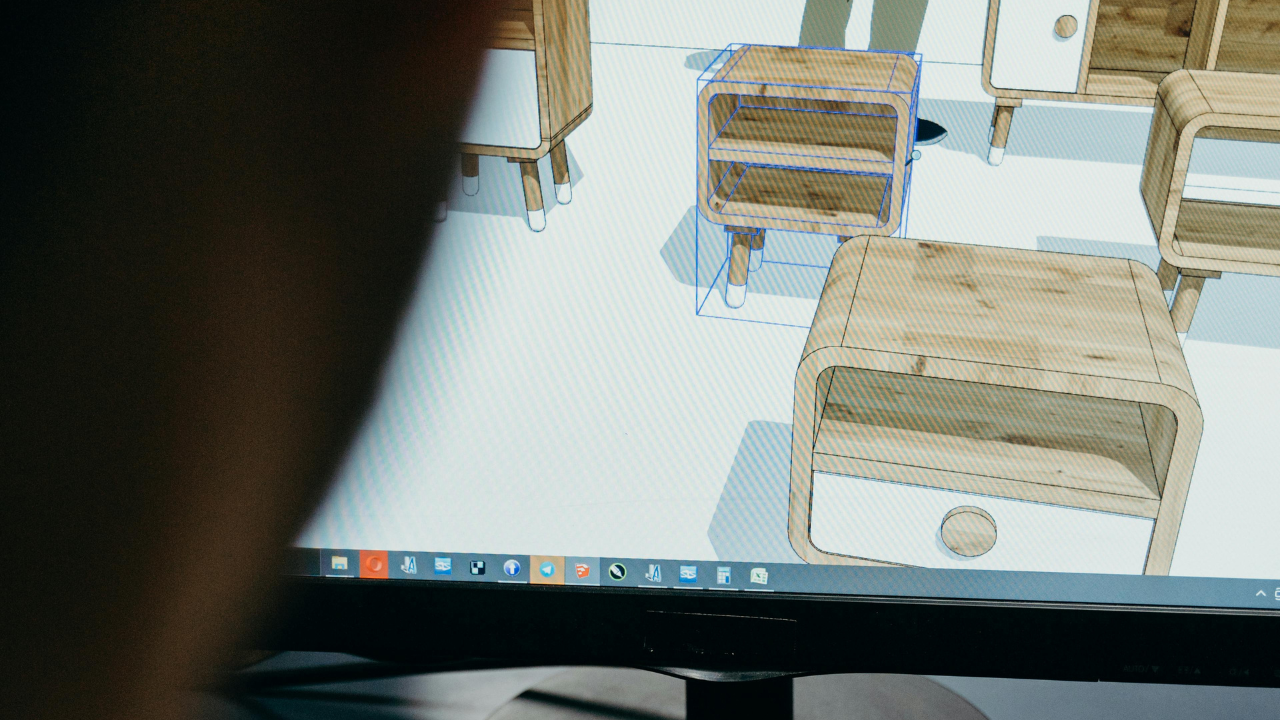
2) 3D Modeling
-
Rhino + Grasshopper
-
Best for: quick massing, clean NURBS, early form tests.
-
Why: you can sketch fast, then hand the model to rendering or BIM.
-
Student cost: discounted.
-
Trade-off: you must learn layers, display modes, and clean curve discipline.
3) Concept Modeling (easy on-ramp)
-
SketchUp
-
Best for: early diagrams and quick iteration under deadline.
-
Student cost: low.
-
Trade-off: watch your units and faces or you build sloppy habits. Use it to think, not to finish.
4) Rendering
-
Enscape or Twinmotion
-
Best for: fast daylight studies and client visuals inside your modeling app.
-
Why: real-time feedback without spending all night waiting on frames.
-
Student cost: discounted or free trials.
-
Trade-off: not as photoreal as high-end offline engines, but speed wins in studio.
5) Page Layout and Graphics
-
InDesign + Illustrator or the Affinity equivalents (Publisher, Designer)
-
Best for: boards, booklets, diagrams, clean legends.
-
Why: your great drawings die if the sheets look sloppy.
-
Student cost: discounted.
-
Trade-off: set paragraph styles early or you will fight text all week.
MUST READ
Residential Design Using Autodesk Revit 2025 by Daniel John Stine
5.0 ★★★★★ (4 ratings)
A clean starter if you’re new to Revit. Step-by-step you design a full house—from setup and plans to sections, renderings, and a full construction set. Comes with expanded video tutorials: chapter-by-chapter walkthroughs plus tool-specific clips for quick fixes. Good prep for Autodesk’s certification exam.
Nice to Have
-
Blender. Free. Powerful renderer and animation. Good when you want cycles-quality images without a license bill.
-
Photoshop or Affinity Photo. Post-process renders, adjust values, and knock back glare.
-
Bluebeam or PDF-XChange. Clean markups and quick set reviews.
-
Figma or Miro. Fast pin-ups and team diagrams.
-
Obsidian or Notion. Track references, precedents, and studio notes that always get lost at 2 a.m.
Specialized When Needed
You don’t need every plugin on day one. But when the project demands more than linework and a quick SketchUp export, these tools save hours and make your work feel professional.
V-Ray – The standard for photoreal rendering. It’s heavy and takes patience, but if you want an image that looks like it came out of an office instead of a classroom, V-Ray still delivers. It forces you to think about light the way photographers do—exposure, bounce, and material depth. Best for final boards, not fast drafts.
D5 Render or Lumion – When deadlines are brutal, these tools win. The asset libraries—trees, people, furniture—are drag-and-drop, and the real-time preview means you can see your mistakes before the crit. D5 feels lighter; Lumion has been the school workhorse for years. Both give you entourage that looks lived-in without burning nights on Photoshop.
QGIS – This is where your project leaves the bubble. QGIS pulls in real site data: contours, property lines, zoning, sun paths. It grounds your massing studies and makes you stop guessing about slope or shadow. Every good urban or landscape project I’ve seen uses it to argue facts, not just aesthetics.
Ladybug Tools for Rhino – When climate matters, Ladybug is gold. You can run sun studies, daylight analysis, and even early energy checks right in Rhino. It’s not glamorous, but showing a reviewer how your design responds to winter sun versus summer shade is the kind of move that separates solid projects from empty gestures.
pyRevit – For students deep in Revit, pyRevit is the secret weapon. It automates boring tasks, cleans up sheets, and builds shortcuts for repetitive work. I’ve seen students shave days off their documentation set just by scripting with pyRevit. Learn it after you’ve got the basics down—it’s not a starter tool, but it’s a time-saver when projects scale up.
What Works in Practice
The minimal student workflow
-
Model in Rhino for speed.
-
Link to Revit once massing and grids stabilize.
-
Render with Enscape for quick light checks.
-
Lay out in InDesign with styles and a master page.
-
Final pass in Photoshop to control values and sky.
One line I keep hearing from first-years after this switch: “I stopped losing nights to presentation boards. The sheets build themselves once the styles are set.”
File naming that saves grades
Keep this pattern and you will stop overwriting work:PROJECT_phase_scale_version_initials.ext
Example: LIBRARY_SD_1-100_v07_JK.rvt
Folders: _01_MODEL, _02_REFERENCES, _03_EXPORTS, _04_BOARDS, _05_RAWS. One underscore. No spaces. Your future self will thank you.
Hardware that will not choke
-
CPU: 6 cores or better.
-
RAM: 32 GB if you can, 16 GB minimum.
-
GPU: 6–8 GB VRAM for real-time renderers.
-
Storage: 1 TB SSD.
-
Display: 24–27 inch, 1440p or better, neutral color temp.
If the laptop runs hot, buy a stand. Heat kills performance.
From the Trenches: What Actually Happened
The pipeline that ended all-nighters
A student team kept exporting random PNGs from five apps. We forced a pipeline: Rhino to Revit to Enscape, then InDesign templates with paragraph styles. Output time dropped from six hours to ninety minutes. Quote at 3 a.m.: “We finally stopped fighting the software and started designing.”
The Grasshopper trap
One student tried to parametricize the entire facade on week two. The model broke every crit. We reset: one Grasshopper script for sun-shade spacing only. Everything else manual. He delivered on time and learned one clean parametric idea well. Lesson: one script with a purpose beats ten that never compile.
The rendering rabbit hole
A classmate pushed V-Ray materials for days. The plan never advanced. We switched him to Enscape for daylight studies and told him to do one hero V-Ray image at the end. He showed up with a coherent project and a single killer render. Quality over quantity won the room.
The InDesign rescue
A group kept dragging images around like a collage. We built a master page with a grid, set styles for titles, notes, and captions, and locked them. Boards aligned in minutes. The work looked smarter without changing a single drawing.
The PDF war
Someone kept sending 500 MB boards. We set a rule: export vector where possible, raster only where needed, compress images to sane DPI. Boards went under 50 MB with no visible loss. The professor could actually open the file in studio.
Mistakes
Buying software for the logo
Half your classmates will chase tools because they are fashionable. Pick tools that match deliverables. If the studio wants line-rich sections, spend time on modeling and line styles, not on water simulations.
Modeling without units
If your Rhino or SketchUp file starts at “unitless,” you are already behind. Set units on day one. Your export headaches will disappear.
Over-rendering a bad plan
Do not hide weak plans under glossy images. Fix the plan. Then render. Everyone can see through the polish.
Too many plugins
One plugin per problem. If the problem is daylight, use a daylight plugin. Do not install twenty because a YouTuber said to.
Dirty exports
Random lineweights, jagged text, and rasterized vector drawings make your work look cheap. Clean your layer names, set pen weights, and export vectors when possible.
What It Took
Money
-
Revit or Archicad: student license.
-
Rhino: student discount.
-
Enscape or Twinmotion: student access or low cost.
-
Adobe or Affinity: student pricing.
-
Blender: free.
-
Bluebeam alternative: PDF-XChange, low cost.
You can run a complete stack for the cost of one restaurant meal per month if you stay on student plans and free tools.
Time
Two weekends to build muscle memory.
-
Weekend one: modeling discipline, clean layers, unit settings, exporting vectors.
-
Weekend two: InDesign styles, master pages, and a real board built from scratch.
Discipline
Lock your pipeline. Do not hop between five renderers. Do not rebuild the model in a new app at week twelve. Stay consistent, finish strong.
Pro Tips
-
Set units first in every file. Metric or imperial. No mix.
-
Model simple first. Resolve grids and floor-to-floor heights before you chase details.
-
One parametric lever at a time. Use Grasshopper to solve a single problem.
-
Real-time first, photoreal last. Enscape or Twinmotion for process, one hero with Blender or V-Ray at the end.
-
Styles do the heavy lifting. InDesign paragraph styles and object styles turn chaos into order.
-
Batch export. Build an export preset once. Use it for the whole semester.
-
Color check on a neutral monitor and a cheap print. Fix values before final.
-
Backups. Cloud sync for live files, weekly offline zip of the whole project. One drive failure can end a semester.
How to Apply
Day 1
Install the essential five. Create a clean folder tree. Set your InDesign template with master pages and styles.
Day 2
Model massing in Rhino. Lock units. Export one clean vector line drawing to test your pipeline.
Day 3
Link to Revit or Archicad. Set levels, grids, and one section. Push an Enscape view for daylight sanity.
Day 4
Place drawings in InDesign using your template. No manual text boxes. Styles only.
Day 5
One pass in Photoshop to control values. No fake lens flares. Just balance, sky, and shadows.
Day 6
Crit dry run. Print two boards at half scale. Mark problems with a red pencil. Fix them.
Day 7
Freeze naming and export presets. Back up the whole folder. Sleep.
What Architecture Software Should You Learn First? Here's a Simple Guide
From Sketch to BIM: The First Tools Architects Should Master
Architecture Software Learning Roadmap (2025 Edition)
From total beginner ➝ confident, job-ready designer
🔹 STAGE 1: Total Beginner (Month 1–2)
Goal: Start designing + get comfortable with basic tools
1. SketchUp
▪ Easiest 3D tool for beginners
▪ Great for early ideas, massing, and quick models
▪ Tons of free tutorials on YouTube
Tasks to Try:
✔ Model a simple house
✔ Learn how to use the push/pull tool
✔ Try importing furniture or trees
2. AutoCAD (or DraftSight if you need free)
▪ Still used everywhere for 2D drawings
▪ Learn basic layers, dimensions, and line weights
Tasks to Try:
✔ Draft a basic floor plan
✔ Add dimensions + labels
✔ Print to PDF with correct scale
Time commitment: 30 mins a day is enough to make serious progress here.
🔹 STAGE 2: Intermediate Level (Month 3–4)
Goal: Build full design projects + better visuals
3. Adobe Photoshop
▪ Touch up renderings
▪ Create mood boards + diagrams
▪ Add people, shadows, sky, etc.
4. Illustrator (optional)
▪ For linework, clean diagrams, and final boards
Tasks to Try:
✔ Take a SketchUp render and enhance it in Photoshop
✔ Create a simple exploded axonometric in Illustrator
🔹 STAGE 3: BIM & Industry Tools (Month 5–6)
Goal: Learn what real firms use
5. Revit (non-negotiable for many firms)
▪ Smart modeling
▪ Linked views (plans, sections, 3D all update together)
▪ Great for working on teams
Tasks to Try:
✔ Model a basic house with walls, windows, doors
✔ Create floor plans and 3D views
✔ Add materials and simple lighting
Bonus: Export PDFs and build a small set of drawings.
🔹 STAGE 4: Advanced Design (Month 7–8)
Goal: Experiment + create stunning visuals
6. Rhino + Grasshopper
▪ Rhino = flexible modeling
▪ Grasshopper = parametric design (great for complex geometry)
Tasks to Try:
✔ Model a parametric tower or shell structure
✔ Adjust form using sliders
✔ Export clean drawings from Rhino to Illustrator
🔹 STAGE 5: Rendering + Presentation (Ongoing)
Goal: Make your work look pro
7. Lumion or Twinmotion
▪ Add materials, lighting, environment
▪ Render stills or walkthroughs
▪ User-friendly, works with Revit and SketchUp
Tasks to Try:
✔ Render your SketchUp/Revit model in Lumion
✔ Add landscaping, sun settings, interior lights
✔ Export a 30-second walkthrough
Final Stage: Build a Job-Ready Portfolio (Month 9–10)
Now it’s time to combine everything.
✔ Use AutoCAD or Revit for plans
✔ Use SketchUp or Rhino for forms
✔ Render in Lumion
✔ Clean up in Photoshop
✔ Present with Illustrator or InDesign
Pro Tips to Make This Work
Stick to 1–2 tools at a time — Don’t learn everything at once
Build real projects — Even if they’re small
Practice on real deadlines — Use class assignments or online competitions
Save everything — You’ll use it later for your portfolio
Ask for feedback — Show your work on forums or Discord groups
Free Tools If You’re Broke (Totally OK!)
▪ SketchUp Free (web version)
▪ AutoCAD Student Edition
▪ Revit Student License
▪ Blender (alternative to Lumion)
▪ Krita / GIMP (Photoshop alternatives)
Learning Curve Breakdown
| Software | Learning Curve | Great For |
|---|---|---|
| SketchUp | Easy | Concept design, quick visuals |
| AutoCAD | Moderate | Precision drafting, construction docs |
| Rhino | Moderate | Freeform modeling, parametric design |
| Revit | Steep | Full BIM modeling, firm-ready plans |
| Enscape / Lumion | Easy | Rendering your models for client review |
Don't overwhelm yourself. Start with the easiest tools that align with your goals.
Wrap-Up: What You’ll Know After This
If you follow this roadmap, here’s what you’ll walk away with:
✔ Strong 2D drawing skills
✔ 3D modeling confidence
✔ BIM knowledge (huge in job interviews)
✔ Clean presentations that actually impress
✔ A solid portfolio with software variety
That’s what firms look for. Not perfect buildings—but solid thinking and tool skills.
2D vs 3D: What You Actually Need to Know
2D Software (Precision + Documentation)
- AutoCAD: Still used heavily for technical plans, especially in construction drawings
3D Modeling (Concept + Presentation)
- SketchUp: Fast for idea generation and client presentations
- Rhino: More fluid 3D modeling with better control over complex curves
BIM (Building Information Modeling)
- Revit: Industry standard for creating full building models with real data (used by firms)
Learn 2D basics first, then add 3D for concept design, and finally dive into BIM if you're aiming for firm work.
Job Relevance: What Software Firms Actually Use
- Revit – The gold standard for BIM work in mid-to-large firms
- AutoCAD – Still used everywhere for 2D sheets
- SketchUp – Popular for early-stage design and client presentations
- Rhino + Grasshopper – Key for firms doing parametric or custom work
- Enscape, Lumion, V-Ray – Used for rendering and client visuals
If you’re looking to get hired, Revit + AutoCAD + SketchUp is a strong beginner toolkit.
Pro Tips for Learning Fast
- Don’t try to master them all at once—learn in phases
- Use YouTube + free courses for walkthroughs (plenty are project-based)
- Start a small personal project to practice: a tiny house, your bedroom, a pavilion
- Use keyboard shortcuts early—they’ll save you hours later
- Keep a learning journal to track what you’ve built and what you want to try next
Mac vs. Windows Support
| Software | Windows | Mac |
| SketchUp | ✅ | ✅ |
| AutoCAD | ✅ | ✅ |
| Revit | ✅ | ❌ Windows only |
| Rhino | ✅ | ✅ |
| Enscape | ✅ | ❌ Windows only |
| Lumion | ✅ | ❌ Windows only |
If you're using a Mac, prioritize SketchUp, Rhino, and AutoCAD. You can use Bootcamp/Parallels to run Windows-only tools like Revit, but performance varies.
Starter Project Checklist
Try one of these to practice real skills:
- Model your bedroom or living space in SketchUp or AutoCAD
- Design a tiny house – start with basic floor plans, then model it in 3D
- Create a pavilion or bus stop – experiment with curves and geometry using Rhino
- Build a small residential BIM model in Revit (walls, doors, roof, sections)
- Render a final view using Enscape or Lumion if your model supports it
Pick one project and keep it simple—just enough to test features and build confidence.
Summary: What to Focus on First
| Goal | Start With |
| Quick 3D concepts | SketchUp |
| Construction-level drawings | AutoCAD |
| Advanced modeling/BIM | Revit |
| Complex forms + scripting | Rhino + Grasshopper |
| Renderings + client visuals | Enscape / Lumion / V-Ray |
Stick to the tools that match where you are and what you want to build. Then expand as your skills grow.
My Advice (From Experience)
You don’t need to know everything from day one.
✔ Start with SketchUp + AutoCAD
✔ Then add Revit if your school/future job uses it
✔ Learn Photoshop to polish your boards
✔ Try Rhino when you’re ready to experiment
Don’t Try to Learn Everything at Once
Start small. Focus on 2–3 tools that help you get your ideas out fast.
Once you’re confident, add more. That’s how pros do it.
One tip from experience:
If you can do a full project using SketchUp, AutoCAD, and Photoshop… you’re already ahead of 80% of students.
Why this matters:
Students who know even 2-3 of these tools stand out immediately.
I’ve helped grads land jobs just because their portfolios looked clean and professional—not because the design was perfect, but because they used tools well.
Architecture Software 101: What to Learn First for Design Success
Pro Tip: Mix Software in Your Portfolio
▪ Start your project in SketchUp
▪ Create plans in AutoCAD
▪ Build final models in Revit
▪ Render in Lumion
▪ Clean it all up in Photoshop
Boom. That’s a full-stack student designer. Firms notice that.
3D Rendering: Why It Matters (and How to Actually Be Good at It)
Most architecture students treat rendering like a last-minute photo filter. Big mistake.
Rendering isn’t about making things “pretty.”
It’s about communication. It shows what your space feels like, not just what it looks like. And if you do it well, it can make your project unforgettable—even if your concept isn’t perfect.
Why Rendering Is a Big Deal
▪ First impressions matter. A clean render grabs attention—on a desk, in a portfolio, or at a job interview.
▪ Professors notice. When you present something that looks polished, they take your whole project more seriously.
▪ Clients understand. Not everyone can read a plan or section. But everyone gets a well-done render.
▪ It sets you apart. 9 out of 10 students submit dull screenshots or rushed walkthroughs. You stand out with just a bit of extra effort.
What Most Students Don’t Realize
1. You don’t need a super computer or expensive software.
Tools like Lumion, Twinmotion, D5 Render, or even Blender can create amazing results—fast.
2. Rendering isn’t about realism—it’s about mood.
Add a little fog, warm lighting, or shadows. Suggest time of day, material feel, and emotion.
3. You don’t need 20 angles.
Two powerful shots tell a better story than a dozen weak ones.
Real Tip From My Own Work
I once had a solid design with weak renders. The idea got ignored in the critique. I redid just the visuals—same concept, new lighting, context, and contrast—and suddenly everyone paid attention.
Lesson? It’s not just what you design. It’s how you show it.
How to Get Better at Rendering (Without Going Crazy)
▪ Render early. Don’t leave it to the night before.
▪ Use real-life scale furniture + plants. Makes it feel grounded.
▪ Use lighting to tell the story. Bright = welcoming. Shadows = dramatic.
▪ Always add a person or two. Not 20. Just enough to feel alive.
▪ Clean up in Photoshop. Add sky, textures, trees—boost without overdoing.
▪ Name your files right. “Final_FINAL_render_USETHISONE.tif” is a bad habit to break.
Pro-Level Trick: Match Your Render to Your Concept
Designing a quiet, nature-inspired house?
▪ Use soft lighting, calm colors, fog, and early morning vibes.
Designing a tech-heavy urban project?
▪ Night render. Blue tones. Reflections. Fast cars blurred in motion.
Match feeling to concept = render with purpose.
Rendering isn’t the icing. It’s the plate. It’s how you present your design to the world. And honestly? You don’t have to be the best designer—just the one who tells their story the clearest.
That’s what rendering helps you do.
Best-Selling Architecture Books (That Are Actually Worth Buying)
These aren’t dusty textbooks—they’re the ones architects, students, and designers keep going back to. Great for beginners and those leveling up.
101 Things I Learned in Architecture School – By Matthew Frederick
(Available in Hardcover + Kindle)
Why It’s a Favorite:
-
Short tips, super digestible
-
Breaks down design thinking in plain language
-
Easy to flip through, but full of “a-ha” moments
Best For: Total beginners who want to sound like they know what they’re doing (and actually do).
Architecture: Form, Space, and Order – By Francis D.K. Ching
Why It’s a Classic:
-
Used in design schools around the world
-
Great diagrams and sketches
-
Helps you understand space, proportion, and flow
Best For: Visual learners and design nerds (in a good way).
The Future of Architecture in 100 Buildings – By Marc Kushner
Why It’s Fun & Smart:
-
Cool, modern projects from around the world
-
Talks about tech, culture, and climate in design
-
Inspires without overwhelming
Best For: Anyone who needs creative fuel or project ideas.
FAQ
Real Questions, Real Answers
Q: Do I need to know how to draw before studying architecture?
A: Nope. Sketching helps, but most schools teach you from scratch. Focus on communicating ideas, not drawing like an artist.
Q: Is architecture all-nighters and stress all the time?
A: Sometimes, yes—but that’s poor time management, not the job. Good planning = fewer breakdowns. Learn to pace yourself.
Q: Which software should I learn first?
A: SketchUp + AutoCAD to start. Revit when you’re ready. Photoshop to make things pretty. Done.
Q: Is architecture worth the cost of school?
A: If you love it and want to build a real skillset—yes. But be smart: choose affordable schools, use student software licenses, and build a killer portfolio to get hired faster.
Q: Do I need a master’s degree?
A: Not always. Some countries require it, others don’t. A strong portfolio often matters more. Check your country’s license requirements.
Q: Can I get a job right after graduating?
A: Yes, if you have:
▪ A decent portfolio
▪ Some software skills
▪ A good attitude (seriously, it matters)
Start small—entry-level or internships. You build up from there.
Q: Is architecture still relevant with AI taking over?
A: Absolutely. AI is a tool, not a replacement. It helps you work faster—but human creativity, judgment, and people skills still run the show.
Quick FAQ for Students
1) Do I start in Rhino or Revit?
Start in Rhino for speed. Jump to Revit once the structure and grids make sense.
2) Which renderer should I learn first?
Pick one real-time renderer. Enscape or Twinmotion. You get faster feedback and less pain.
3) Can I skip InDesign and use PowerPoint?
You can. Your boards will look like slides. Learn InDesign or Affinity Publisher. Styles will save your semester.
4) Do I need V-Ray or Blender?
Only if you plan hero images. Use them for one or two finals, not for every view.
5) My laptop is weak. What now?
Lower your texture sizes, proxy heavy assets, use real-time renderers, and keep models clean. Offload one hero render to a lab machine.
6) How do I stop losing files?
Version by date or v numbers. Zip the project weekly. Sync to the cloud. Keep a local copy.
7) What about notes and references?
Use Obsidian or Notion. One vault per studio. Tag by project, site, system. Paste links to your working files.
Related
- Architectural Presentation and Rendering: Tools, Techniques & Best Practices
- Architectural Renderings Enhanced by AI: : Revolutionizing Project Presentation and Communication
- Rendering for Architecture Students: A Simple 2025 Guide
- Study Architecture Abroad Opportunities in 2025: Explore study abroad programs that allow you to experience different cultures, architectural styles, and learning environments firsthand.
- Architectural Model Making Tools for Beginners & Professionals
- Architectural Model Making: Materials, Techniques & Best Practices
- 10 Best Countries to Study Architecture Abroad in 2025: A List of the 10 Best Countries to Study Architecture Abroad in 2025.
- Why Choose to Be an Architect: Making Dreams Real, Changing the World.
- The Hilarious Chronicles of Architects: Surviving the Quirky World of Design.
- What is Fun About Architecture? Exploring the Lighter Side of Architecture.
- Top 10 Reasons to Study Architecture in 2025: Is Architecture the Right Path for You?
Resources
Legit, reliable, and actually helpful.
▪ NCARB – Licensing + architect career roadmap in the U.S.
▪ RIBA – Royal Institute of British Architects (UK)
▪ ArchDaily – News, inspiration, and student projects
▪ Visualizing Architecture – Amazing Photoshop tutorials for presentations
▪ Open Source Architecture (OSArc) – Ideas + free info for modern, inclusive design
▪ Autodesk Education – Free AutoCAD, Revit, etc. for students