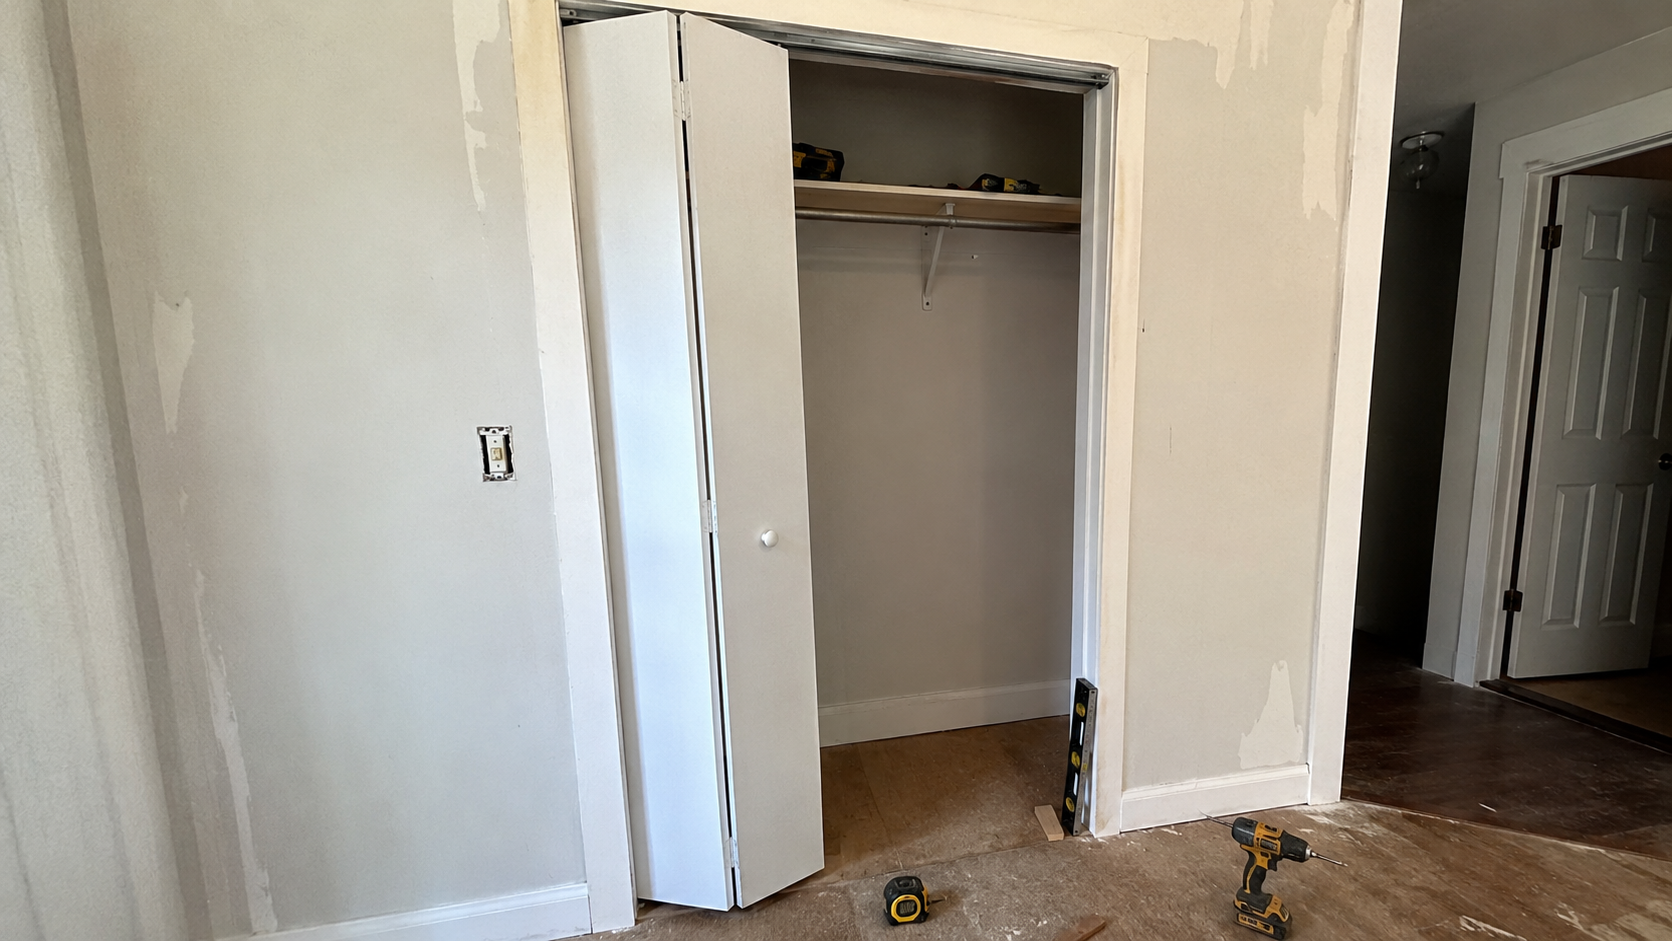
Where Bifold Doors Go Wrong
Masonite bifold doors usually fail because the opening is wrong.
The door panel may be fine. The trouble is often the top track, lower bracket, floor height, finished opening, or pivot line.
When those parts miss, the door still fits in the closet. It just works badly. It rubs the floor, hits the jamb, leaves a crooked middle gap, pops out of the track, or feels loose every time someone opens it.
Start with the finished opening
Do not start by cutting the track. Start by measuring the finished opening.
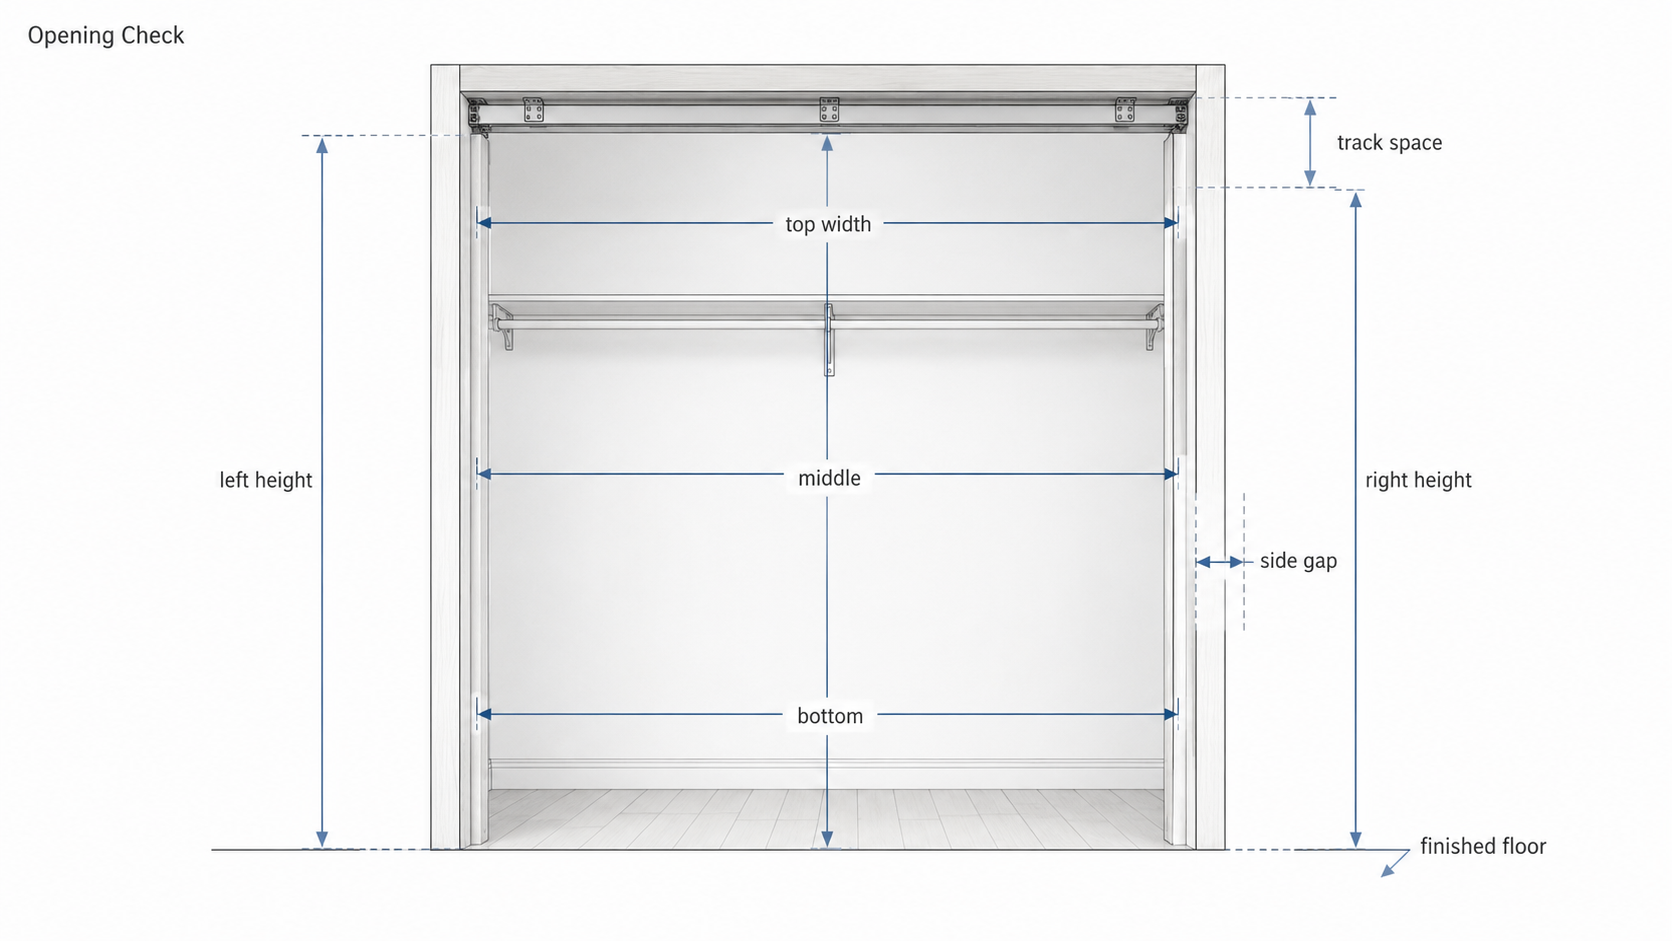
The finished opening is the space the door actually has to fit after drywall, jambs, trim returns, paint, flooring, carpet, and baseboard are in place. The rough opening behind the wall matters during framing. Once the closet is built, the door only sees the finished opening.
Measure the width at the top, middle, and bottom. Measure the height at the left side, center, and right side. Then check the floor. A closet floor that rises even a little can make one side of a bifold clear while the other side drags.
| What to check | Why it matters | What it can cause |
|---|---|---|
| Width at top, middle, and bottom | Controls side gaps and center meeting line | Door rubs the jamb or leaves a wide gap |
| Height at left, center, and right | Controls track clearance and floor clearance | Door drags, binds, or feels too loose |
| Floor level | Controls the bottom pivot adjustment | One panel clears while the other rubs |
| Side jamb plumb | Controls the pivot line | Door leans, twists, or leaves an uneven center gap |
| Baseboard and floor finish | Controls lower bracket placement | Bracket sits crooked or too far from the jamb |
If the opening is too small, hardware adjustment will not make the door fit. If the opening is too tall, the pivots may not stay seated properly. If the opening is too wide, the side gaps and center meeting line may look bad even when the door is hung carefully.
Check the door size before changing the opening
Look at the label, packaging, and instruction sheet for the exact Masonite bifold unit you bought. Do this before removing old doors, cutting track, drilling bracket holes, or trimming anything.
Bifold doors are sold by nominal size, but the installed fit depends on the finished opening. A door sold for a common closet size still needs enough height for the track, enough width for the side gaps, and a solid place for the bottom bracket. If you are still comparing the brand before buying, our Masonite doors review is a better place to weigh the product decision before you start this installation work.
This is where many bad installs start. The door gets blamed, then trimmed, then adjusted badly, when the real problem was a low header, thick flooring, old carpet, loose trim, or a closet opening that was never square.
| Before buying or opening the box | Good sign | Warning sign |
|---|---|---|
| Finished height | Matches the door instruction sheet | Opening is short because of flooring or a lowered head |
| Finished width | Allows normal side gaps and center clearance | Opening is narrow at the bottom or wide at the top |
| Floor condition | Bracket can sit flat and solid | Carpet, baseboard, or a transition strip blocks the bracket |
| Jamb condition | Side jamb gives the bracket a solid landing | Loose trim, damaged drywall, or no real jamb surface |
The hardware controls the fit
A Masonite bifold door does not swing like a normal hinged door. It depends on several small pieces working together.
The panel closest to the side jamb is the pivot door. It carries the top and bottom pivot points. The other panel is the guide door. It follows the top track as the door folds. The top track controls the guide path. The top pivot bracket locates the upper pivot. The lower jamb bracket locates the bottom pivot. The snugger guide helps the door stay closed. Aligners help double bifold units meet at the center.
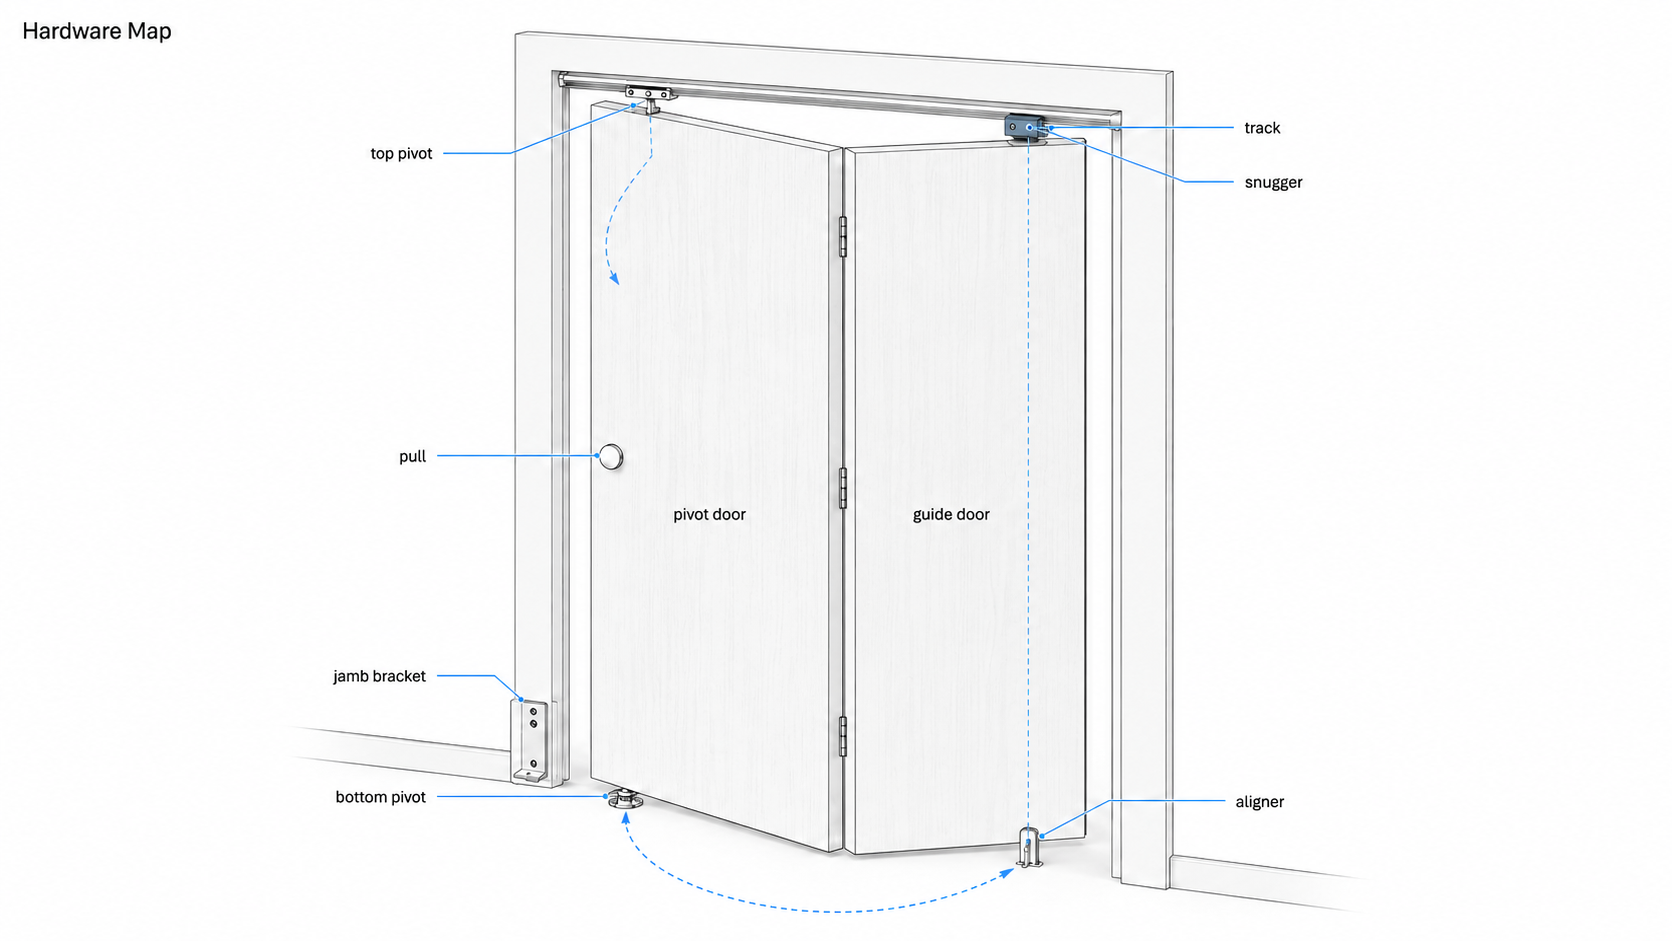
This matters when something rubs. If the door is too low, think about the bottom pivot. If the door leans, think about the top pivot bracket and lower jamb bracket. If the door will not stay closed, check the snugger and aligners only after the door is already hanging plumb.
Tools and prep
A typical bifold install needs a tape measure, pencil, level, screwdriver, drill, 3/16-inch drill bit, hammer, hacksaw, wood saw, and safety glasses. A utility knife, small pry bar, painter’s tape, shims, and a straight board are useful in older closet openings.
A small level is worth having before you start. You are not just checking whether the door looks straight; you are checking the finished opening, the side jamb, and the pivot line. A simple 9-inch torpedo level is enough for most closet-door work. For larger layout jobs beyond a closet opening, see our guide to the best laser tape measures for builders.
Keep the screws and hardware sorted before you start. Similar-looking pivots and guides are easy to mix up, and one wrong piece can make the door act like the opening is crooked. If your kit requires pilot holes, a clean 3/16-inch drill bit helps keep screws from wandering in old trim or jamb material.
Inspect the door before installing hardware. Check for damaged corners, missing parts, cracked edges, wrong size, wrong profile, or panels that do not match the rest of the room.
Paint or finish the panels before hanging when possible. It is easier to work on sawhorses than inside a closet opening. Keep paint out of pivot holes and hardware pockets. Do not paint the track. Paint inside the track can make the guide drag.
The clean installation order
The job gets easier when the order is clear. Do not adjust the center gap before the door is hanging plumb. Do not install the pull before the panels are adjusted. Do not blame the snugger when the bottom pivot is too low.
The tools are basic, but they matter because this job is mostly layout and adjustment. A level, sharp drill bit, fine-tooth hacksaw, and a few shims can prevent most of the sloppy fixes people try later.
- Measure the finished opening.
- Confirm the correct door size and hardware.
- Paint or finish the panels if needed.
- Cut the top track to fit the finished opening.
- Install the top track with the pivot bracket on the correct side.
- Tap pivots and guides into the correct ends of the panels.
- Install the lower jamb bracket in line with the top pivot bracket.
- Hang the pivot door.
- Seat the guide door and snugger in the track.
- Adjust height first.
- Adjust plumb and side gaps.
- Install pulls and aligners last.
Cut and install the top track
Cut the top track to fit the finished opening, not the rough framing. Use a fine-tooth hacksaw and remove burrs after cutting. A rough track end can catch the guide or make the door feel gritty. If you do not already have one, use a fine-tooth hacksaw or 24 TPI hacksaw blade for cleaner cuts through the metal track.
Before fastening the track, decide which side the door should stack toward when it opens. The pivot bracket belongs on that side. If the pivot bracket is placed on the wrong side, the door will fold the wrong way.
Set the track straight and secure it to solid material. In a weak old closet, screws driven only into thin trim or damaged drywall may loosen later. If the head of the opening is weak, add proper backing before installing the track.
Do not overtighten the screws so hard that the track bends. A slightly twisted track can make the guide bind even when the door panels are fine.
Put the pivots in the correct ends
Lay the panels down on a clean surface. Identify the pivot door and guide door before tapping in any hardware.
Tap the top pivot, bottom pivot, and guide hardware straight into their holes. Do not hammer at an angle. Do not crush the plastic flange. If a pivot goes into the wrong end, pry it out evenly around the flange instead of forcing one side until it breaks.
This is a small mistake that wastes a lot of time. The door may still partly hang with hardware in the wrong position, but it will not adjust correctly.
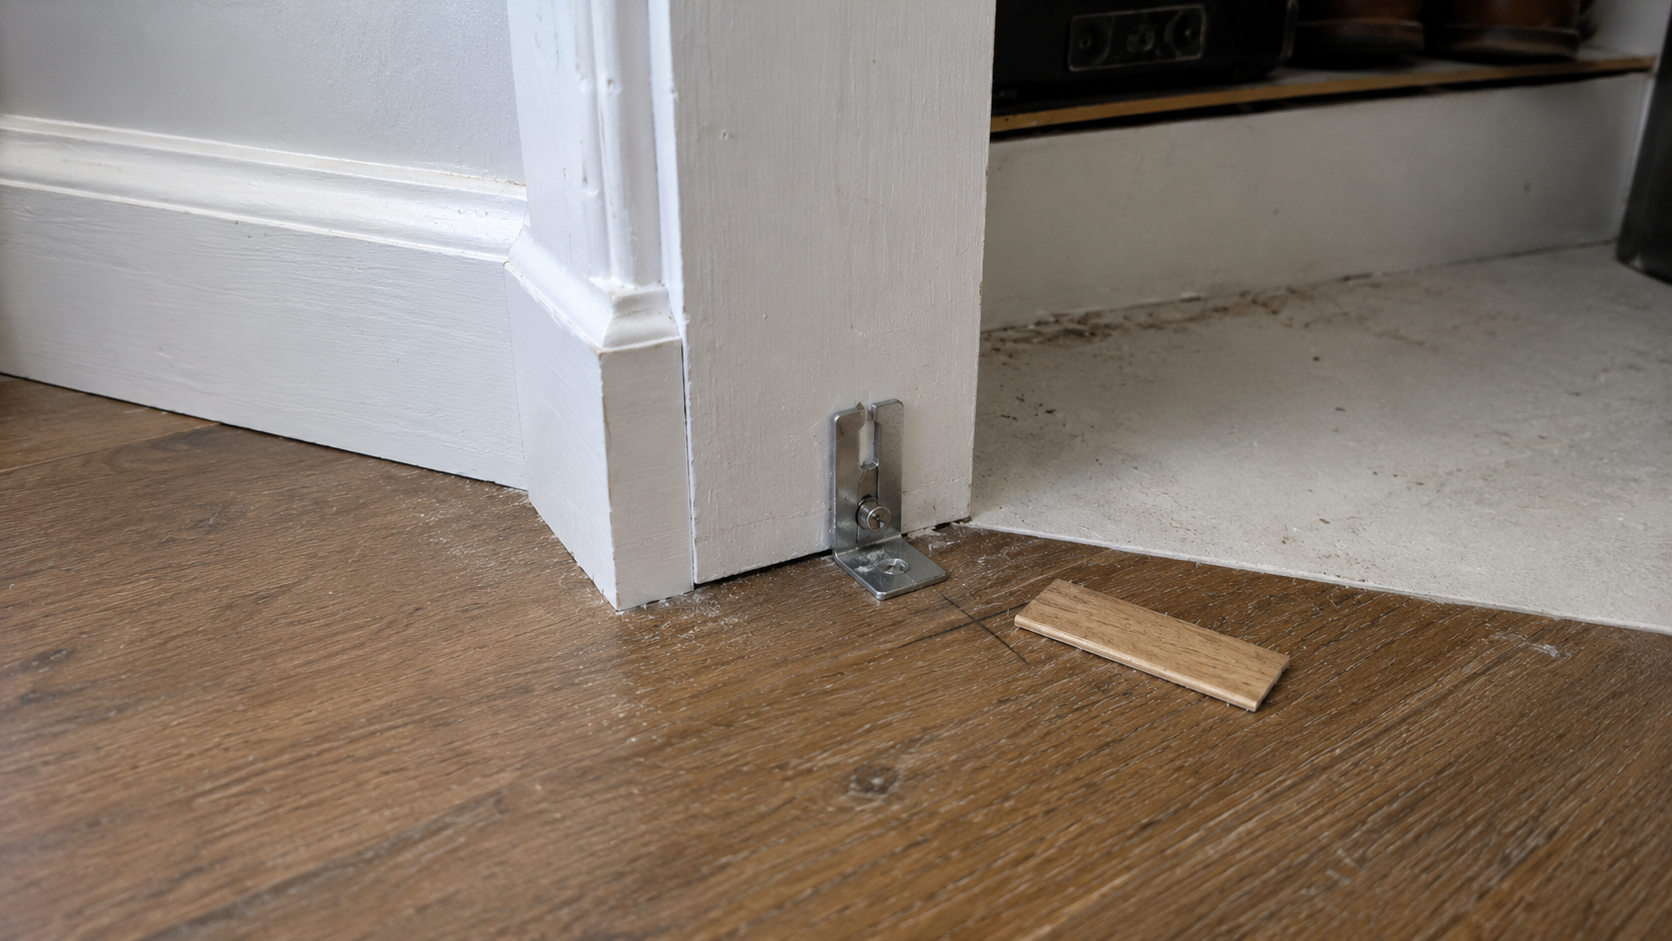
The lower bracket has to line up with the track
The lower jamb bracket is easy to underestimate because it sits near the floor. It controls the bottom of the pivot line. If it is too far forward, too far back, loose, tilted, or blocked by baseboard, the whole door will fight the opening.
The bracket should relate to the top pivot bracket above it. Use a level or straightedge to check the line from the top pivot area down to the floor. Do not set the bracket wherever the baseboard happens to allow it.
In some openings, the baseboard must be removed, trimmed, or relieved so the bracket can sit flat. Do not leave the bracket riding on a curved baseboard face. It may feel tight on install day and still shift later.
On carpet, the bracket needs firm support below it. On hard flooring, it needs a flat bearing surface. Avoid setting it on a flooring transition strip, broken floor edge, heavy caulk ridge, or loose trim.
Keep a small wood shim pack nearby for old openings. Shims are not there to fake a bad install; they help support small gaps, stabilize trim, and give the lower bracket a solid surface when the closet edge is slightly uneven.
Hang the door without forcing it
Hang the pivot door first. Insert the top pivot into the pivot bracket in the track. Lift the door and seat the bottom pivot into the lower jamb bracket.
The door does not need to look perfect yet. It only needs to be safely seated. If the bottom pivot will not drop into the bracket, do not use the door as a lever. Something is off. The bracket may be too far out, the bottom pivot may be set too low, the opening may be too short, or the top track may not be located correctly.
After the pivot door is seated, install the snugger guide and seat the guide door in the track. Open and close the door slowly. Watch the top guide and bottom pivot. This is a test, not the final adjustment.
Adjust height before side gaps
Start with height. The bottom of the door should clear the floor without leaving the door loose in the track. On many bifold systems, the bottom pivot can be turned to raise or lower the door.
Do not fix a floor rub by moving the track sideways. Do not fix a crooked center gap before the height is right. Those shortcuts create new problems.
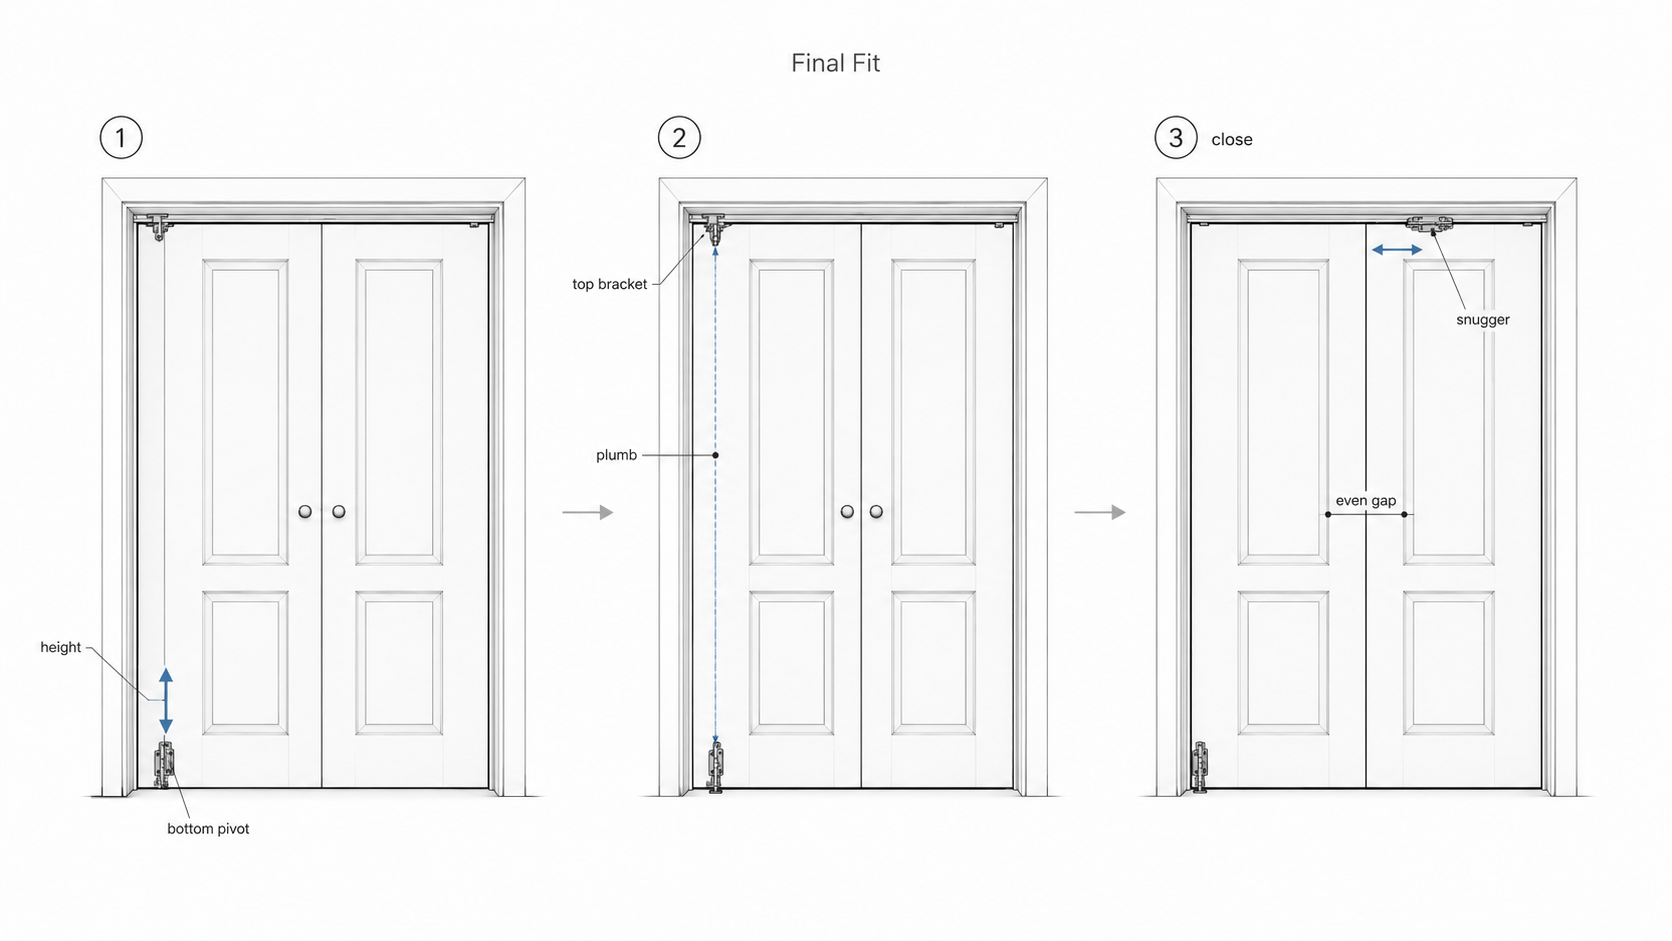
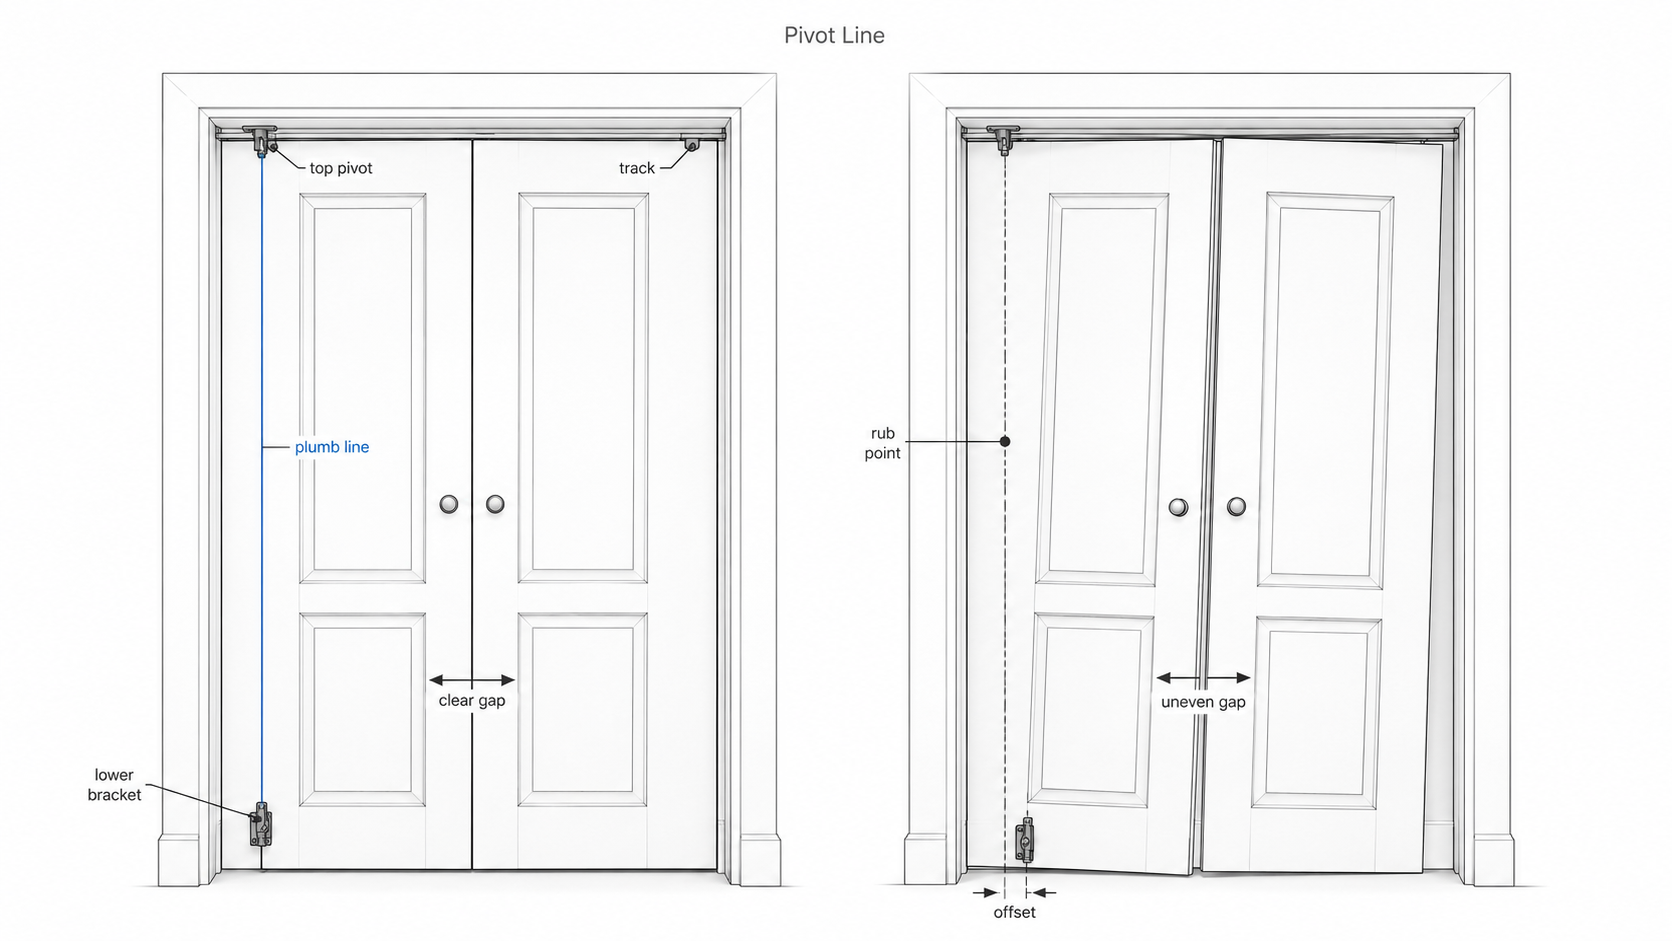
After height, adjust the pivot side. Loosen the top pivot bracket only enough to move it. Adjust the lower pivot position in the jamb bracket as needed. The goal is a plumb pivot line, not just a gap that looks acceptable from one angle.
Then check the center gap. If it is tight at the top and wide at the bottom, one side is usually out of plumb. If the panels meet but will not stay closed, adjust the snugger or aligners after the door is already hanging correctly.
The floor problem usually shows up later
Finished flooring can ruin a bifold installation after the installer leaves.
A door that clears old carpet may scrape after vinyl plank is added. A bracket that sits nicely on subfloor may end up buried after carpet and pad go in. A closet that works before a flooring job may fail after the room is finished because the bottom pivot no longer has enough adjustment.
If new flooring is planned, decide when the door should be installed. Sometimes it makes sense to wait until the finished floor is in. Sometimes the door can be temporarily hung and adjusted later. What does not work is pretending the future floor height will not matter.
This is also why the bracket should never be placed on something soft, loose, or temporary. The bottom pivot carries the door’s position. If that point moves, the door moves.
Do not treat trimming as a normal adjustment
If the door is too tall, cutting it shorter feels like the easy answer. With Masonite bifold doors, that is a warranty problem. Masonite says trimming bifold doors voids the warranty.
Before cutting anything, check the opening and adjustment first. Confirm the finished height. Check the floor. Make sure the bottom pivot is not set too low. Confirm the track is installed correctly. Look for thick carpet, added flooring, heavy paint, a dropped head, or trim that reduced the opening.
Better fixes may include choosing the correct factory height, rebuilding the opening, adding a clean head filler, correcting the floor detail, or ordering the right unit. Cutting may stop the immediate rub, but it can expose the door core, weaken an edge, affect hardware seating, damage the finish, and remove warranty protection.
Double bifold doors need a center plan
A wide closet may use two bifold units that meet in the middle. Do not treat them like two separate jobs. The center meeting line has to be planned.
Set both pivot sides plumb first. Then adjust height. Then check the center gap. Aligners should help the doors close neatly; they should not be used to force crooked doors into place.
For broader product comparisons and future door pages, keep this installation guide connected to the site’s doors and windows section. Interior closet doors, exterior doors, French doors, and replacement hardware behave differently, even when the basic measuring habits look similar.
Quick troubleshooting
| Problem | Most likely cause | Fix this first |
|---|---|---|
| Door rubs the floor | Bottom pivot too low, opening too short, or floor too high | Raise the bottom pivot and recheck finished height |
| Door hits the side jamb | Pivot line is not plumb | Align the top pivot bracket with the lower jamb bracket |
| Center gap is crooked | One door is higher or out of plumb | Set height, then plumb the pivot side |
| Guide pops out of track | Guide not seated, track bent, or door too loose | Re-seat the guide and check track straightness |
| Door will not stay closed | Snugger or aligners need adjustment | Adjust them only after the door hangs plumb |
| Bottom bracket rocks | Weak trim, carpet compression, or uneven floor | Add solid support or reposition the bracket |
| Door feels twisted | Track, bracket, or opening alignment is off | Recheck the finished opening and pivot line |
Sometimes the closet opening is the real repair
A bifold door cannot make a bad opening square.
If the side jamb bows into the opening, the door may rub no matter how many times the hardware is adjusted. If the head sags, the track may sit too low in the middle. If the floor slopes hard, the panel may clear one side and drag on the other. If the closet has no solid jamb surface, the lower bracket may never stay tight.
In those cases, the repair is carpentry, not more adjustment. Plumb the jamb. Add blocking. Replace loose trim. Repair the head. Create a solid landing for the lower bracket. The door should be adjusted after the opening is made stable.
Where the money gets wasted
The first waste is buying another door before measuring the opening correctly. If the first door “doesn’t fit” because the finished opening is wrong, the second door may fail the same way.
The second waste is paying for a simple door install when the real job is opening repair. A bad jamb, high floor, blocked bracket, weak head, or missing solid backing turns a small closet-door job into finish carpentry.
The third waste is trimming the door too soon. It may seem cheaper than fixing the opening, but it can damage the door, void warranty protection, and still leave the hardware fighting the same bad geometry. Exterior door decisions have a different risk profile because weather seals, cores, thresholds, and exterior exposure matter more; for that comparison, see JELD-WEN vs Masonite exterior doors.
Install pulls and aligners last
Install the pull after the door is adjusted. The pull usually belongs on the guide door, where it lets the panels fold naturally. If it is placed too close to the hinge side, too high, or too low, the door may twist when pulled.
Install aligners last on double bifold setups. They are for final closing alignment. They are not a substitute for plumb pivot sides, correct height, and even center spacing.
Final checks before you call it done
Open and close the door several times. Watch the top guide, bottom pivot, side gap, center gap, and floor clearance. The door should not need two hands or careful handling to work.
The panels should fold without lifting out of the track. The door should close without slamming. The lower bracket should stay still. The pull should feel natural. The track should stay quiet and clean.
If the door only works when moved slowly and gently, it is not finished. Something still needs adjustment.
FAQ
Can I install Masonite bifold doors by myself?
A single bifold closet door can often be installed by one careful person, but a helper makes the hanging step easier. The awkward part is lifting the door into the top pivot while seating the bottom pivot without twisting the panel.
Can I cut a Masonite bifold door shorter?
Masonite says trimming bifold doors voids the warranty. Before cutting anything, check the finished opening, bottom pivot height, floor condition, track location, and whether the correct factory size was purchased.
Why is my bifold door rubbing the floor?
The bottom pivot may be set too low, the finished opening may be too short, or the floor may be higher than expected because of carpet, vinyl plank, tile, or a transition strip.
Why is the center gap uneven?
An uneven center gap usually means one side is out of plumb or one door is sitting higher than the other. Adjust height first, then plumb the pivot side, then tune the center meeting line.
Should I paint the bifold track?
No. Paint inside the track can interfere with the guide and make the door drag. Paint or finish the panels before installation, but keep the track clean.
Where should the pull go?
The pull usually goes on the guide door at a comfortable height. It should let the panels fold without twisting. Raised-panel profiles may affect the exact location.
Can two Masonite bifold units cover a wider opening?
Yes, some wider closets use two bifold units that meet in the middle. Both pivot sides need to be adjusted first, then the center meeting line and aligners can be tuned.
A good bifold install feels ordinary
A well-installed Masonite bifold door should not feel delicate. It should open, fold, and close without being babied. The track should guide the door, the pivots should stay seated, and the lower bracket should not move.
Most of that comes from the plain work at the start: measuring the finished opening, setting the track straight, lining up the pivot brackets, and adjusting the door in the right order. Skip those steps and the door may hang, but it will keep reminding you that the opening was never right.