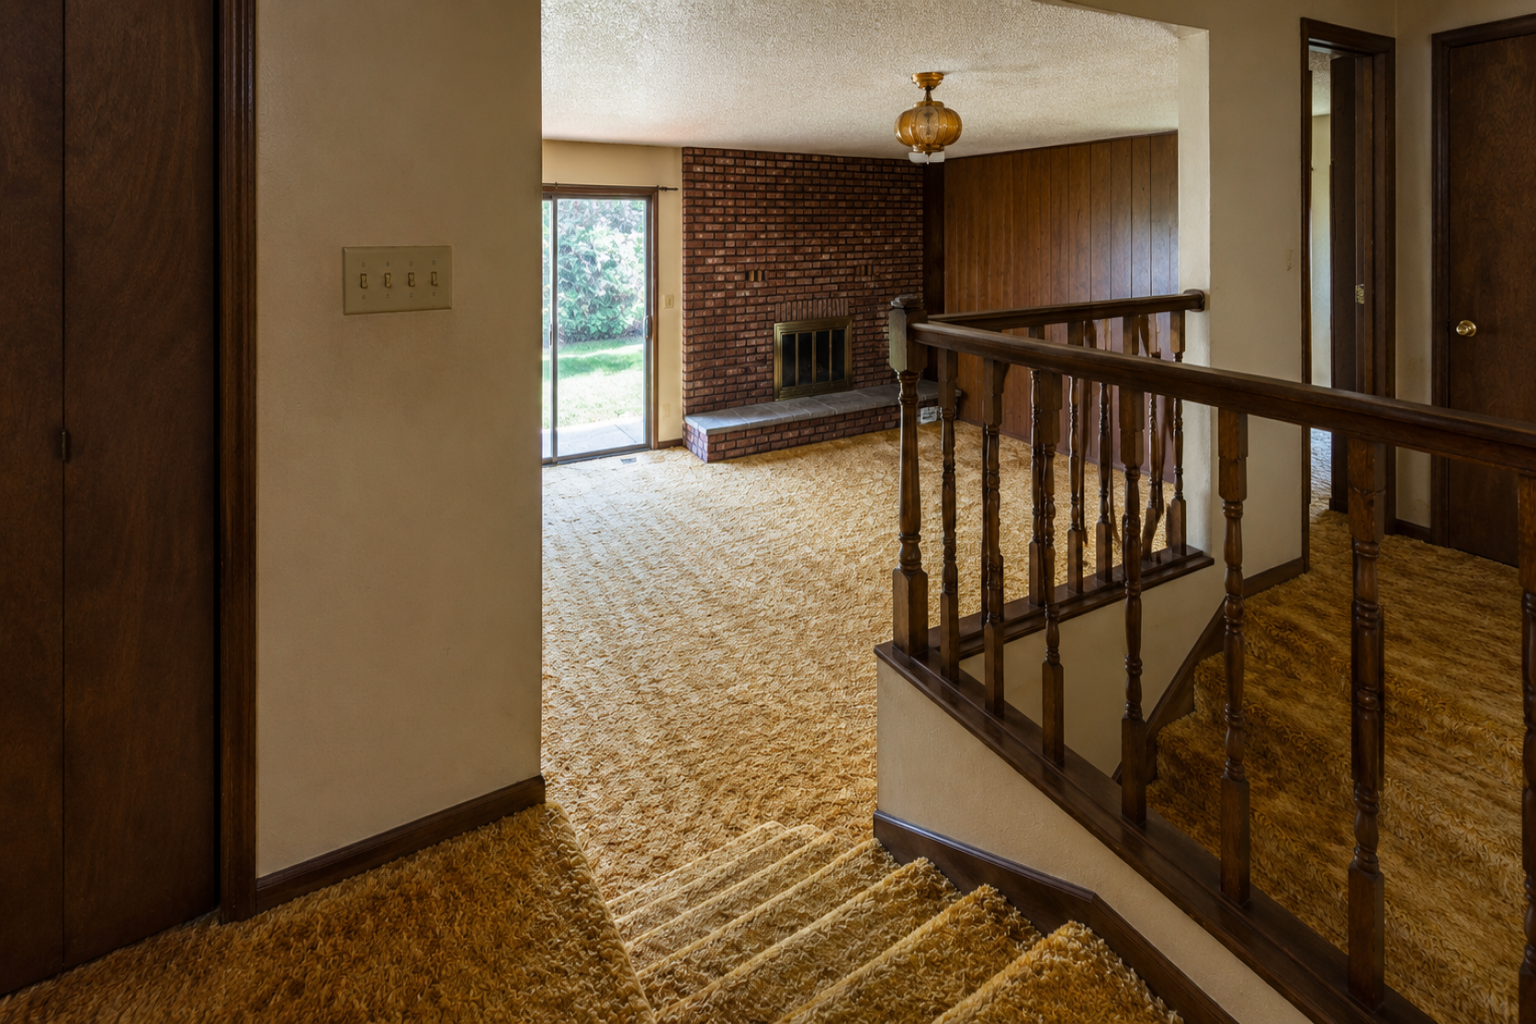
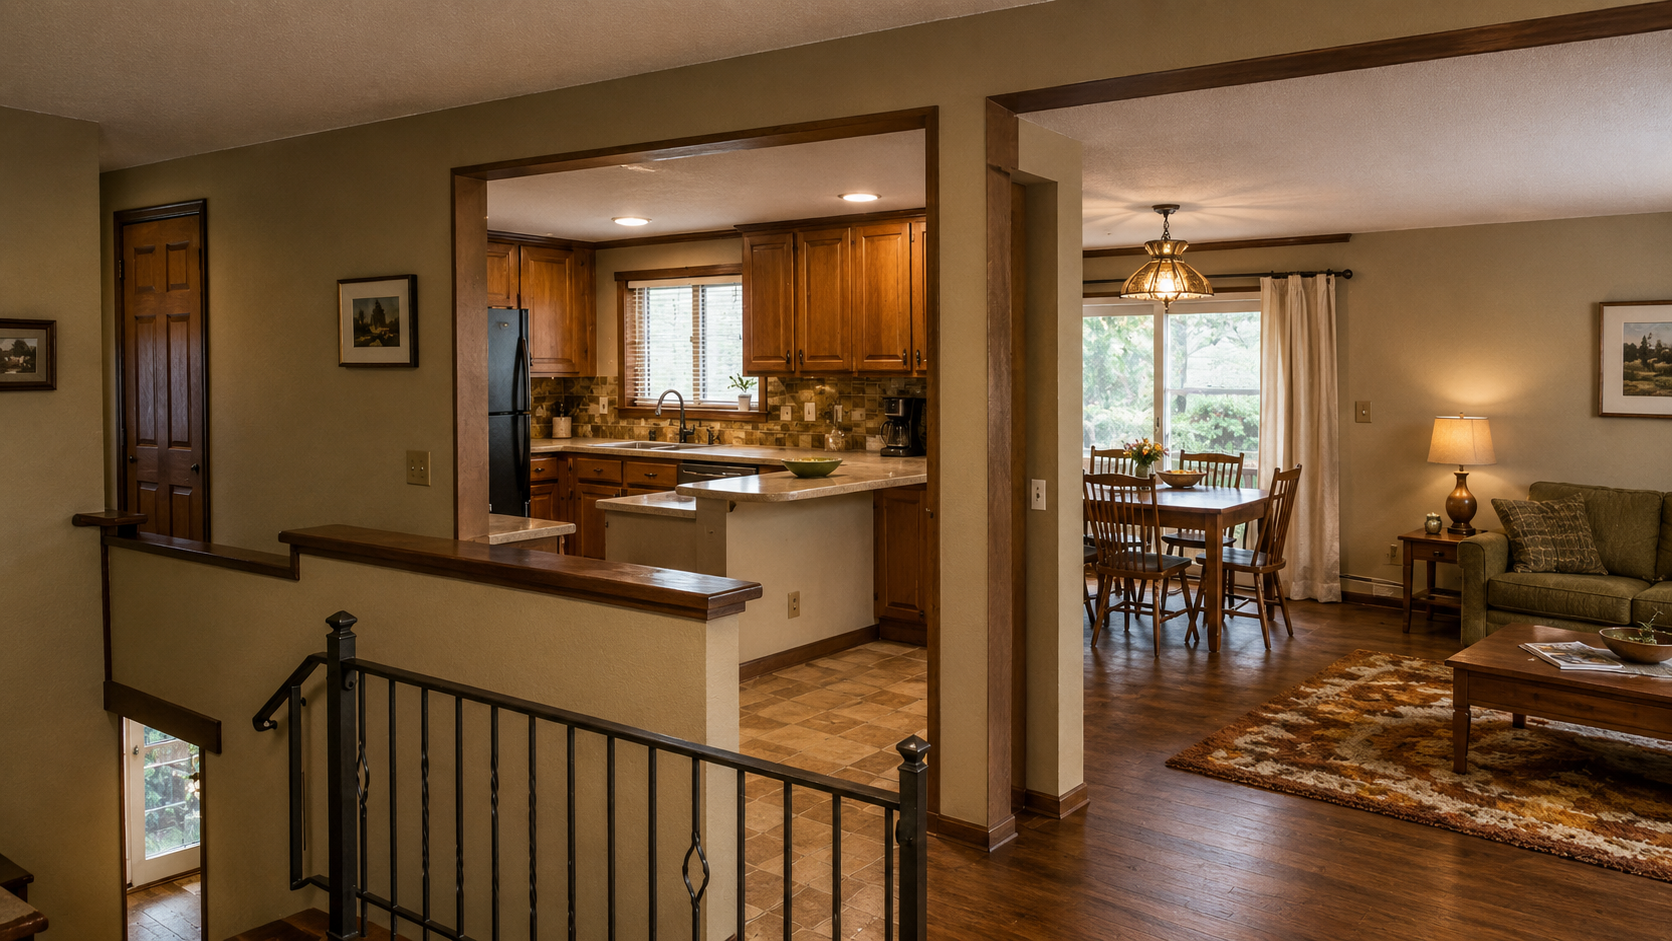
A 1970s split-level usually gets judged on its surfaces first — the gold shag, the dark paneling, the brick fireplace wall, the amber globe light over the stairs. Strip all of that out and you would have a blank, bright shell. That is exactly the instinct that gets people in trouble.
Under the shag and the paneling, most of these houses are working fine. The split gives you separation a ranch can't: bedrooms up and away from noise, a lower family room with its own feel, a main level that catches light from both ends. The dated finishes are loud, but they are not the problem. The problem is that people rip out the character, spend the budget on surfaces, and never touch the few things that actually make a split-level live better or worse — the entry, the sightlines, the lower level, and how light moves between them.
So this page is not a "gut it and start over" guide. It is about what to change behind the shag and paneling, and what to leave alone. For the wider house, start with 1970s house renovation. For the kitchen specifically, 1970s kitchen remodel covers that part. Here, the focus is the split itself.
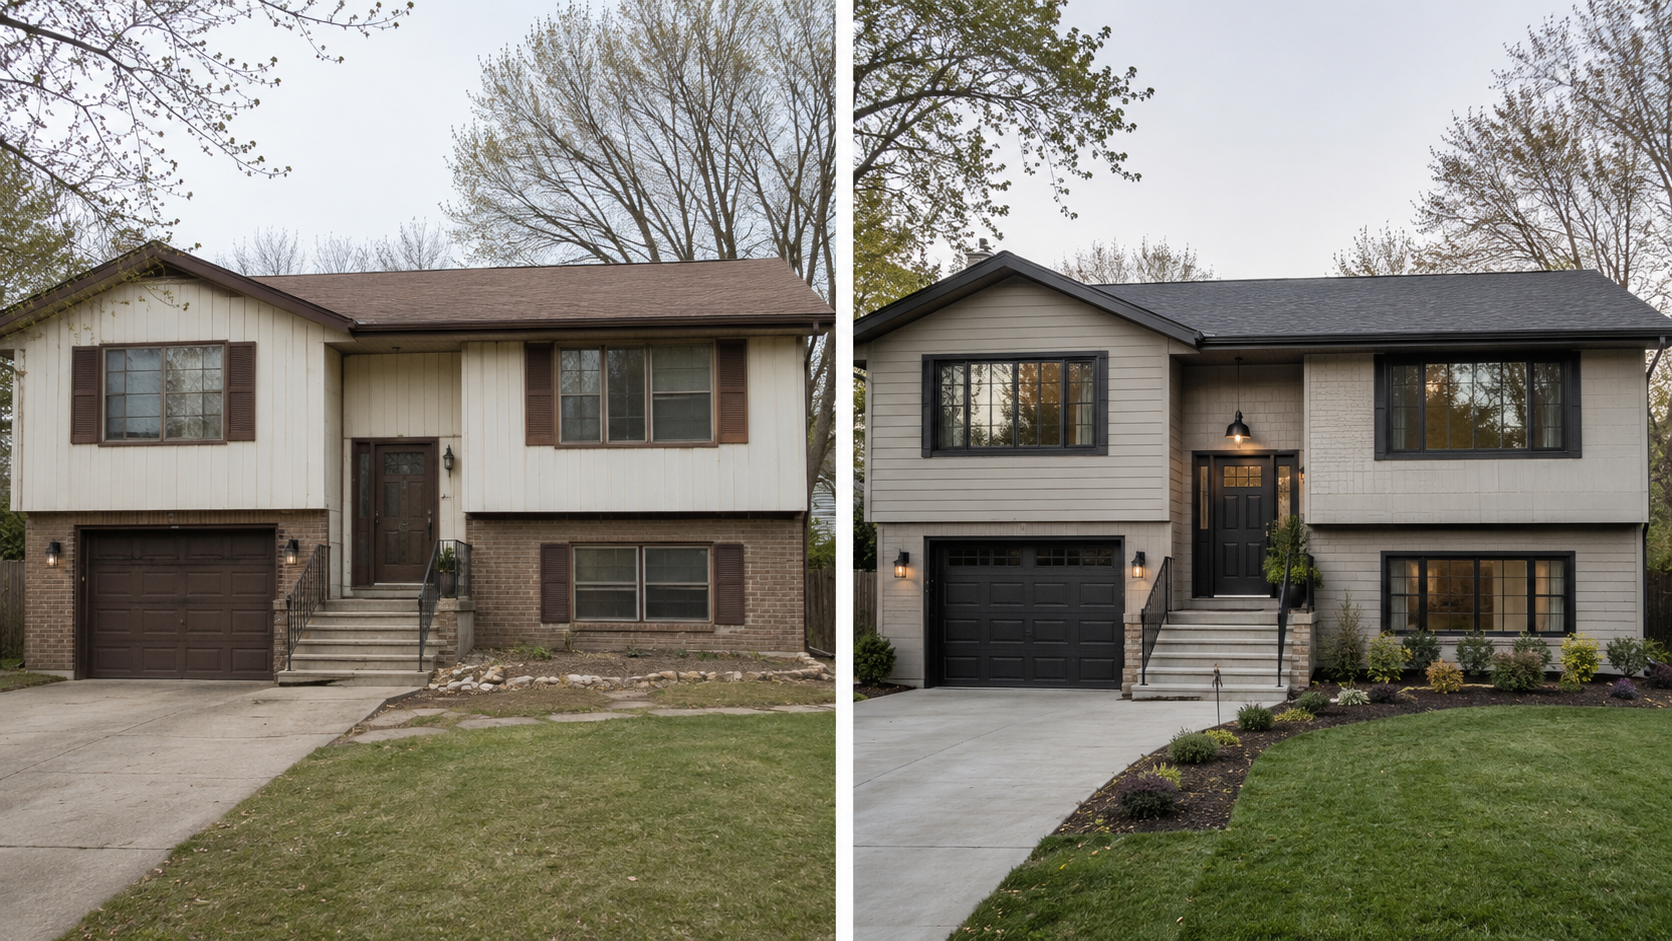
What a Good Before-and-After Should Show
The best before-and-afters do not erase the house — they clarify it. A clearer entry. Window zones that feel intentional instead of accidental. A garage that does not dominate the front. Light reaching into the middle of the house. A kitchen connection that works without turning the stair zone into a hazard.
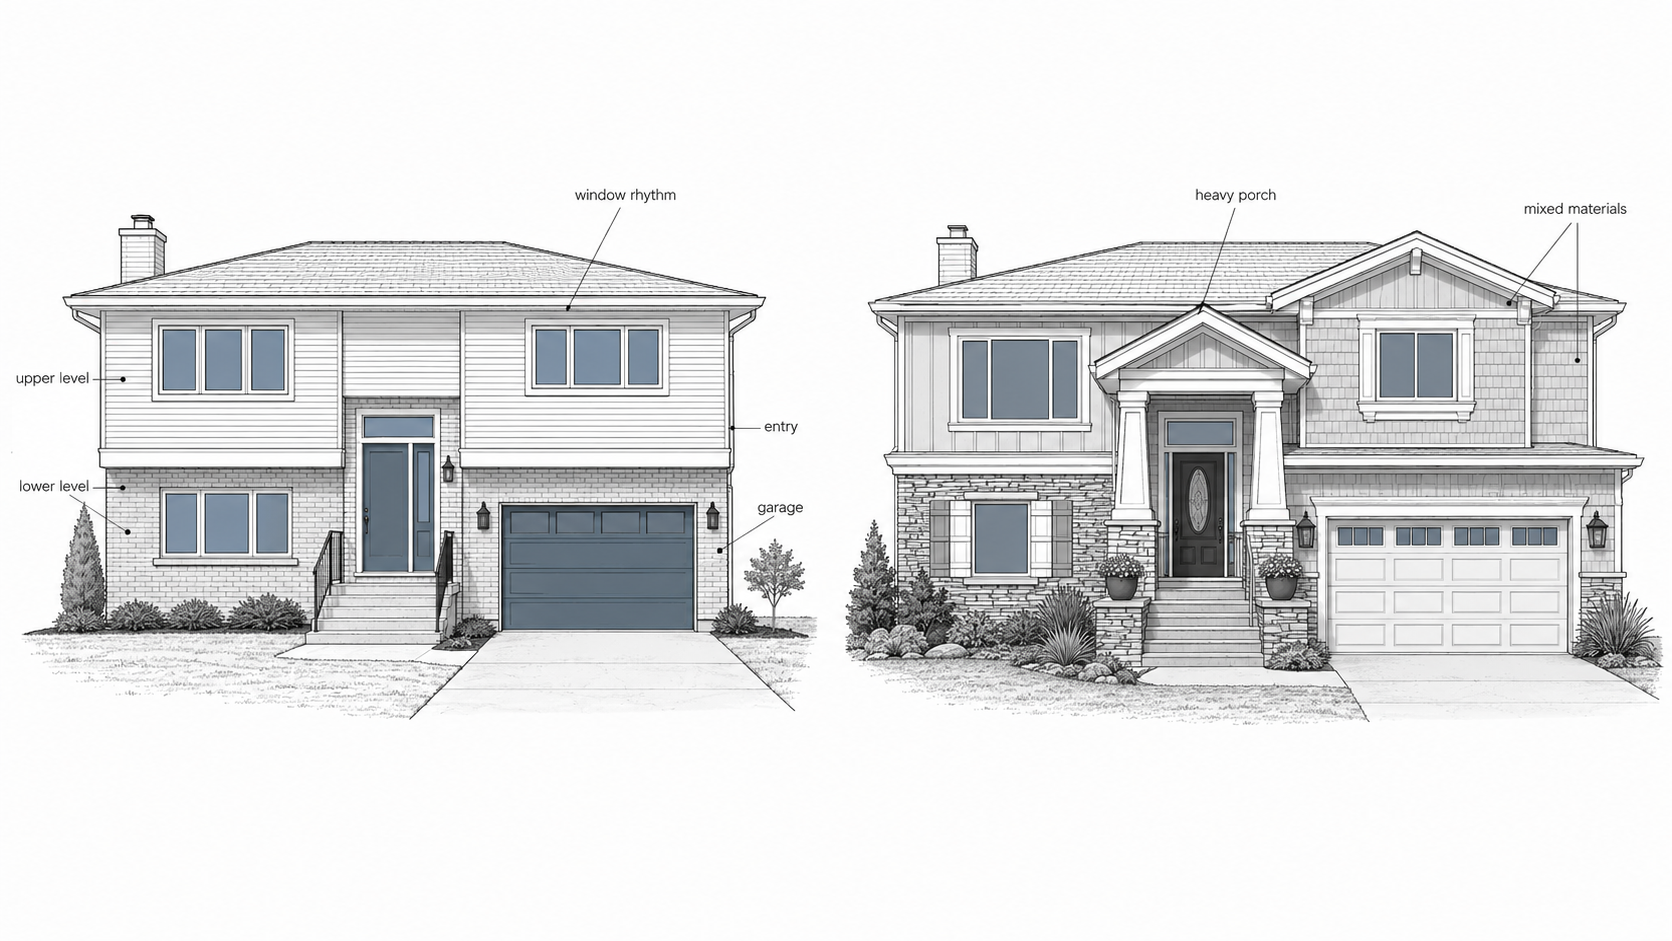
The bad renovations go the other way. A heavy porch gets bolted on. Random siding shows up. Fake farmhouse trim, oversized columns, a new window pattern that fights the stepped structure. The house ends up looking freshly remodeled and somehow less coherent than before — it stops reading as a split-level and just looks confused.
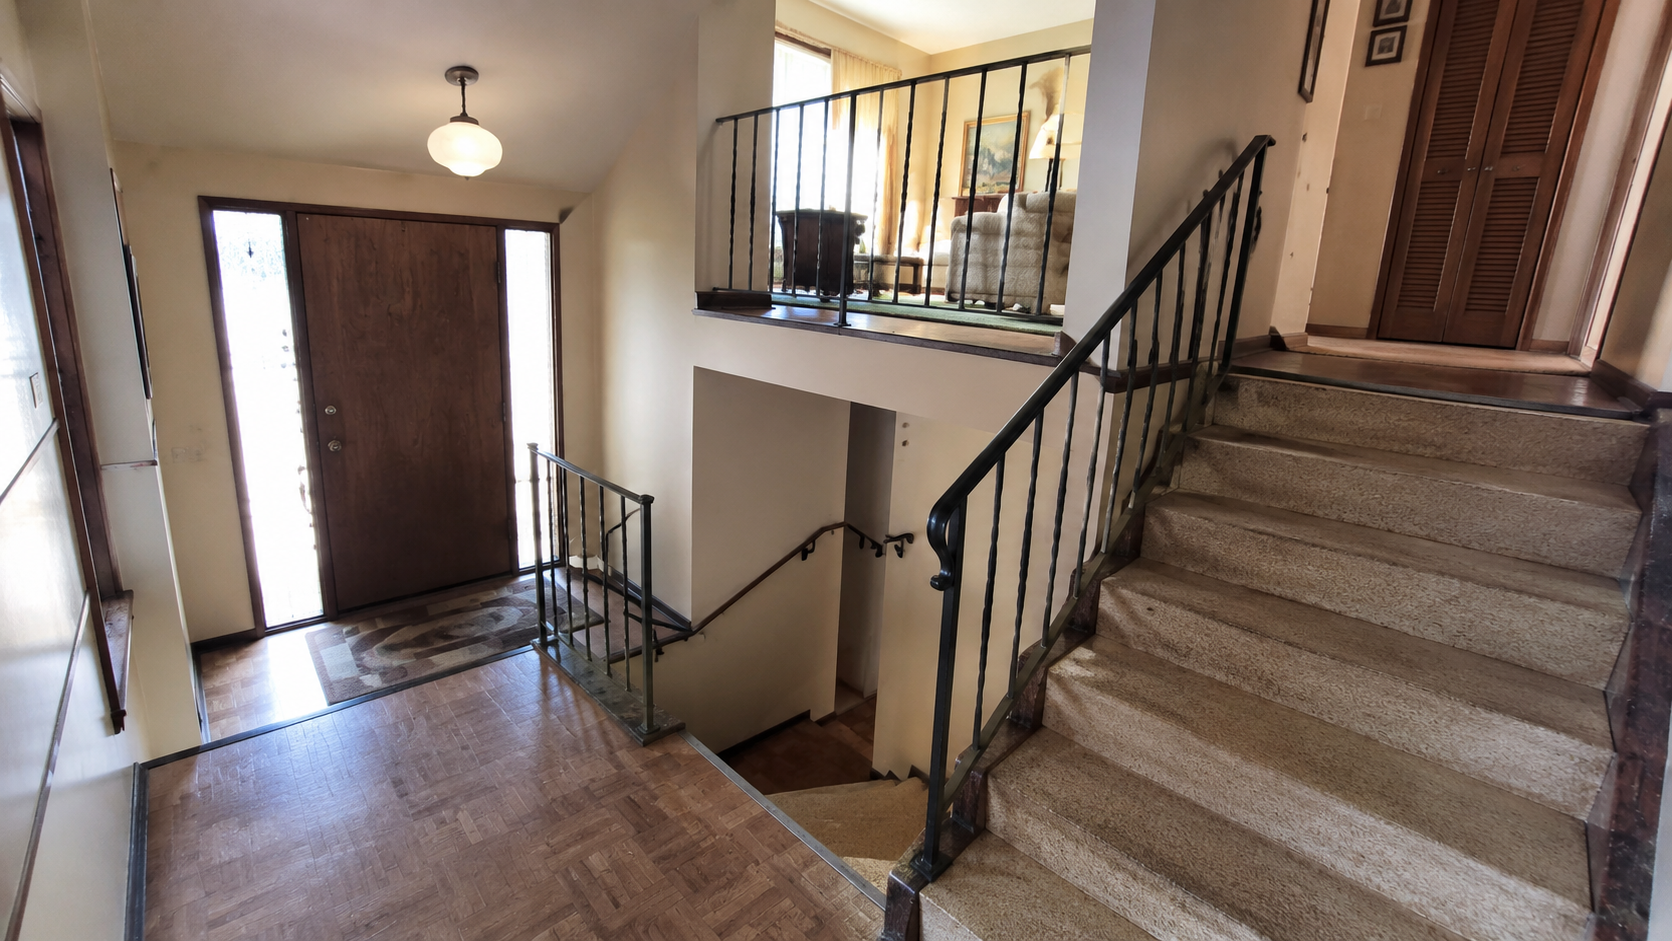
Start With the Entry, Not the Kitchen
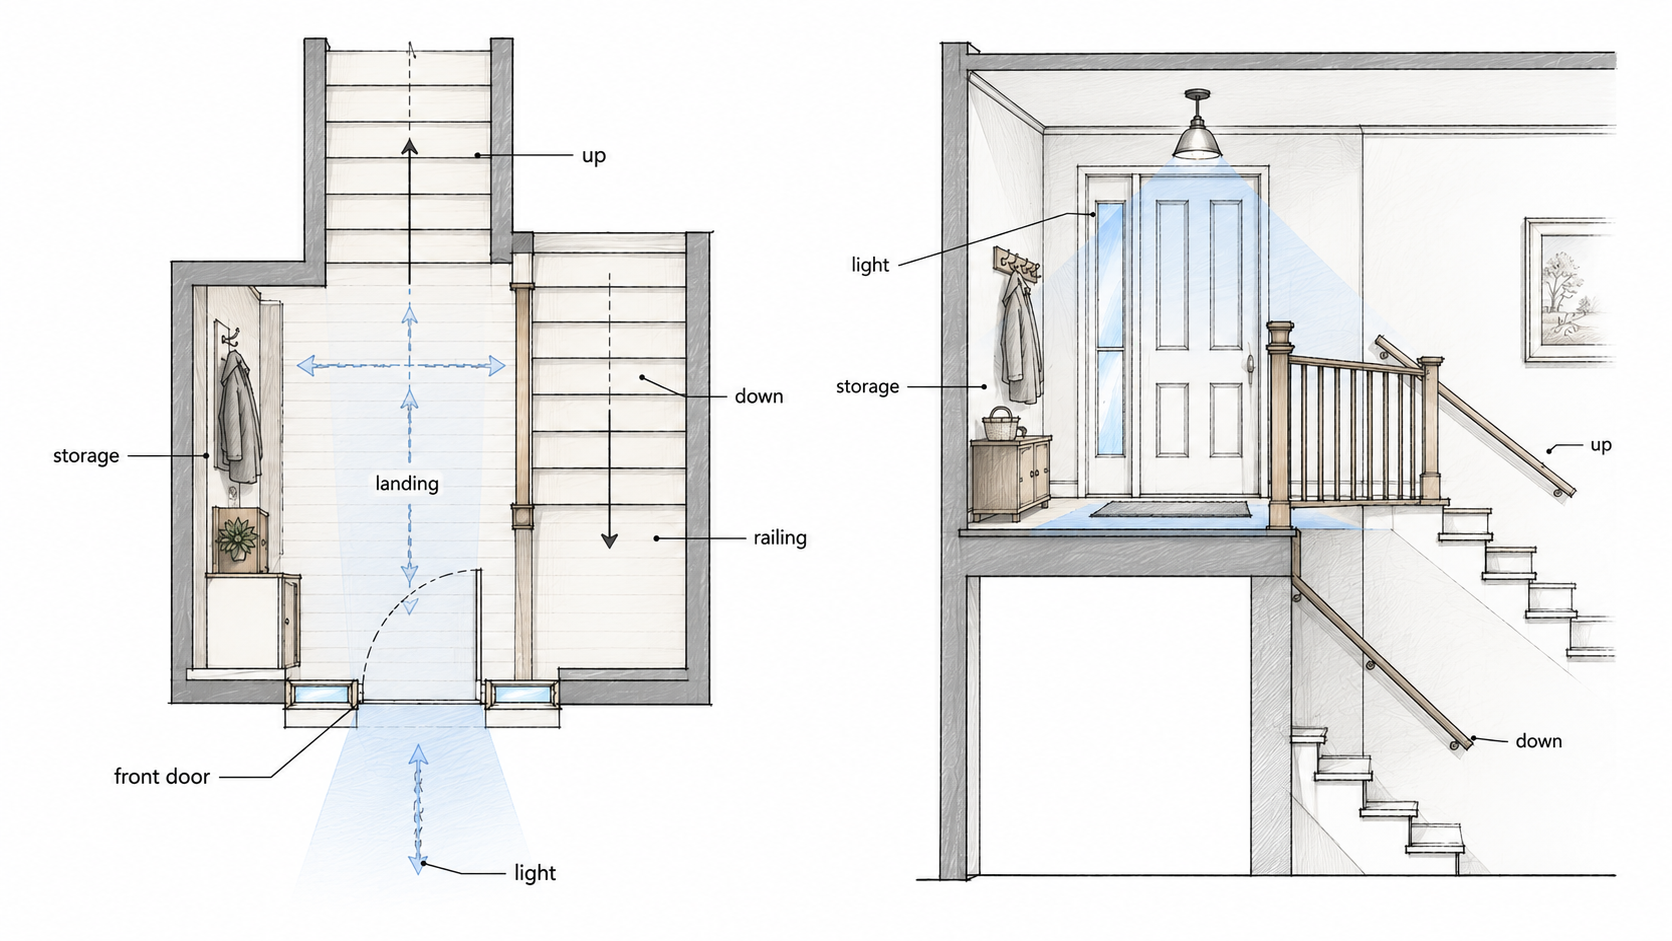
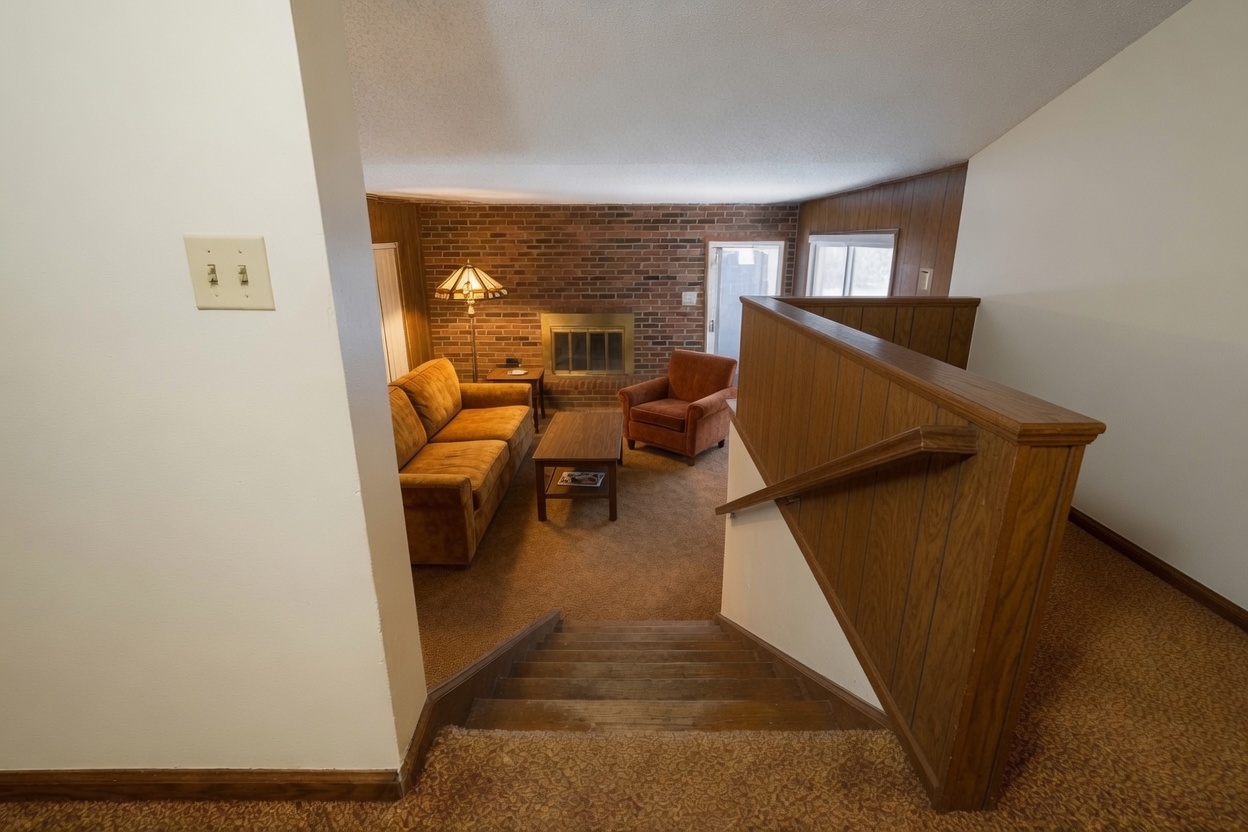
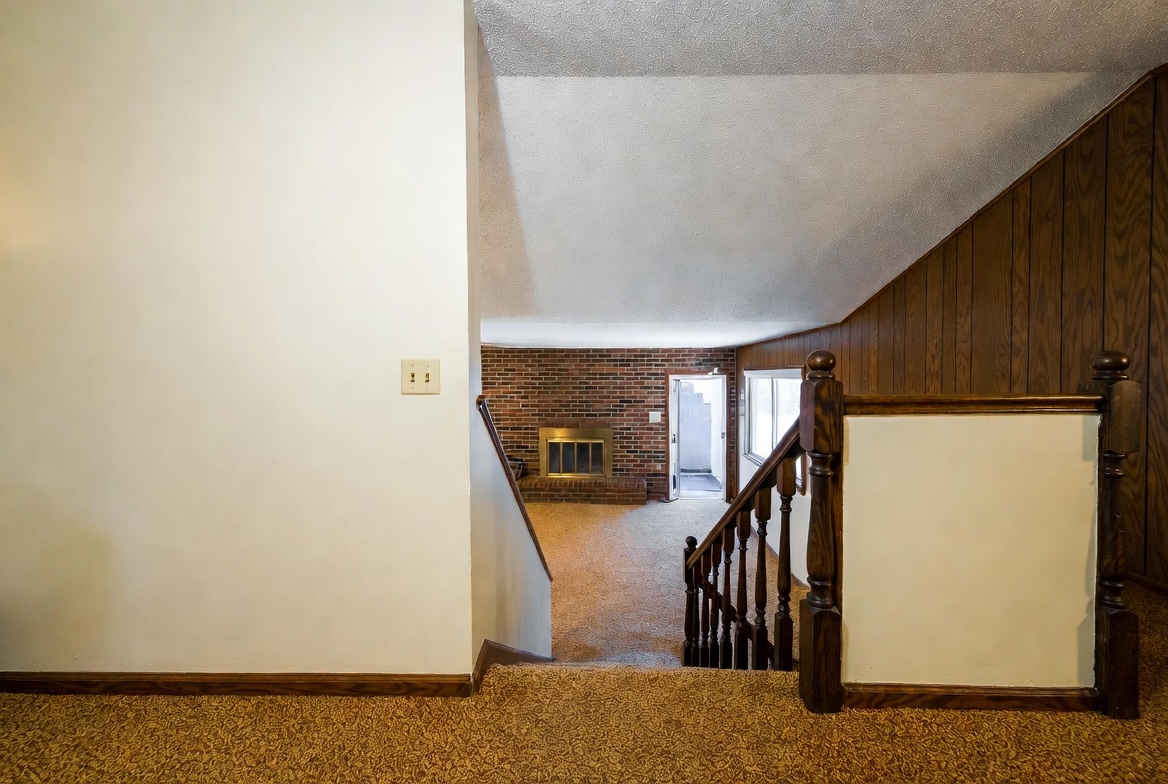
The entry landing is the pressure point in almost every split-level. In a lot of 1970s split-levels, the front door opens straight onto a small landing with stairs going up and stairs going down. That landing has to handle shoes, coats, guests, daily traffic, a railing, lighting, door swing, and the first impression of the entire house — all in a few square feet.
There is not much room for error there.
If the landing is dark, the whole house feels dated the moment you walk in. A bulky railing makes the first view feel cramped. If storage blocks the traffic path, the entry never works no matter how good the rest of the house looks. If the front door and sidelights are weak, both the exterior and interior suffer for it.
A good remodel usually fixes the landing before it touches the big rooms. Better lighting, safer railings, cleaner flooring transitions, a stronger front door, a clearer coat zone, and a better view of the stairs can change how the whole house feels — fast, and often for less than people expect.
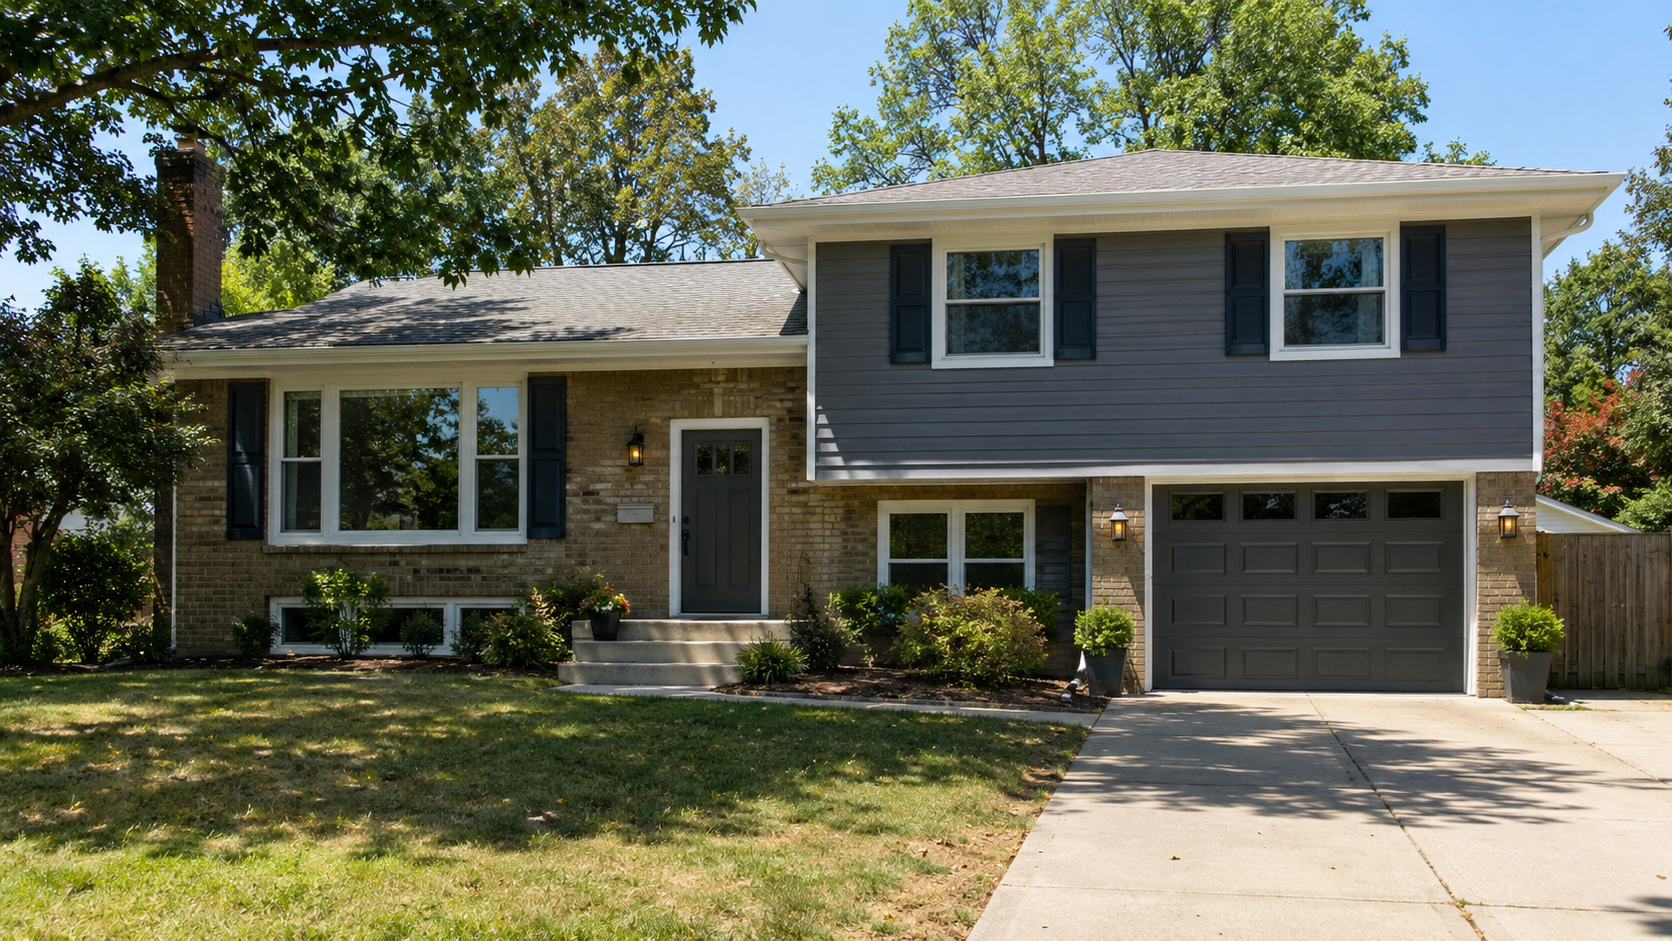
The Exterior Has to Explain the Levels
A split-level exterior is already busy — the floors do not line up in one plane, so the front elevation has more going on than a typical ranch or two-story. That is not an excuse to pile on more noise.
Break the front elevation into layers: upper windows, lower windows, entry, garage, roofline, siding or brick, walkway, grade. Good remodels make those layers easier to read at a glance. Bad ones bury them under fake detail.
| Exterior Problem | Better Fix | What Usually Hurts It |
|---|---|---|
| Entry gets lost | Better door, light, rail, walkway, and modest cover | Oversized porch that fights the split levels |
| Garage dominates | Calmer garage door, entry focus, planting, lighting | Random trim or fake materials around the garage |
| Upper and lower windows feel disconnected | Improve window rhythm and trim consistency | Mixing window styles without a plan |
| Old siding or brick feels dated | Repair, simplify, repaint only when the material allows it | Covering sound materials with weak veneers |
| House looks chopped up | Use fewer materials and clearer horizontal lines | Too many colors, trim bands, and accent zones |
It is not the split-level form that turns people off. It is the confusion layered on top of it.
The Kitchen Wall Is Not the Whole Remodel
The kitchen is usually the first room people want to open up, and that makes sense. A lot of 1970s split-level kitchens are boxed in, narrow, or only half-separated from the living and dining space. But a split-level is not a blank canvas waiting for an open floor plan.
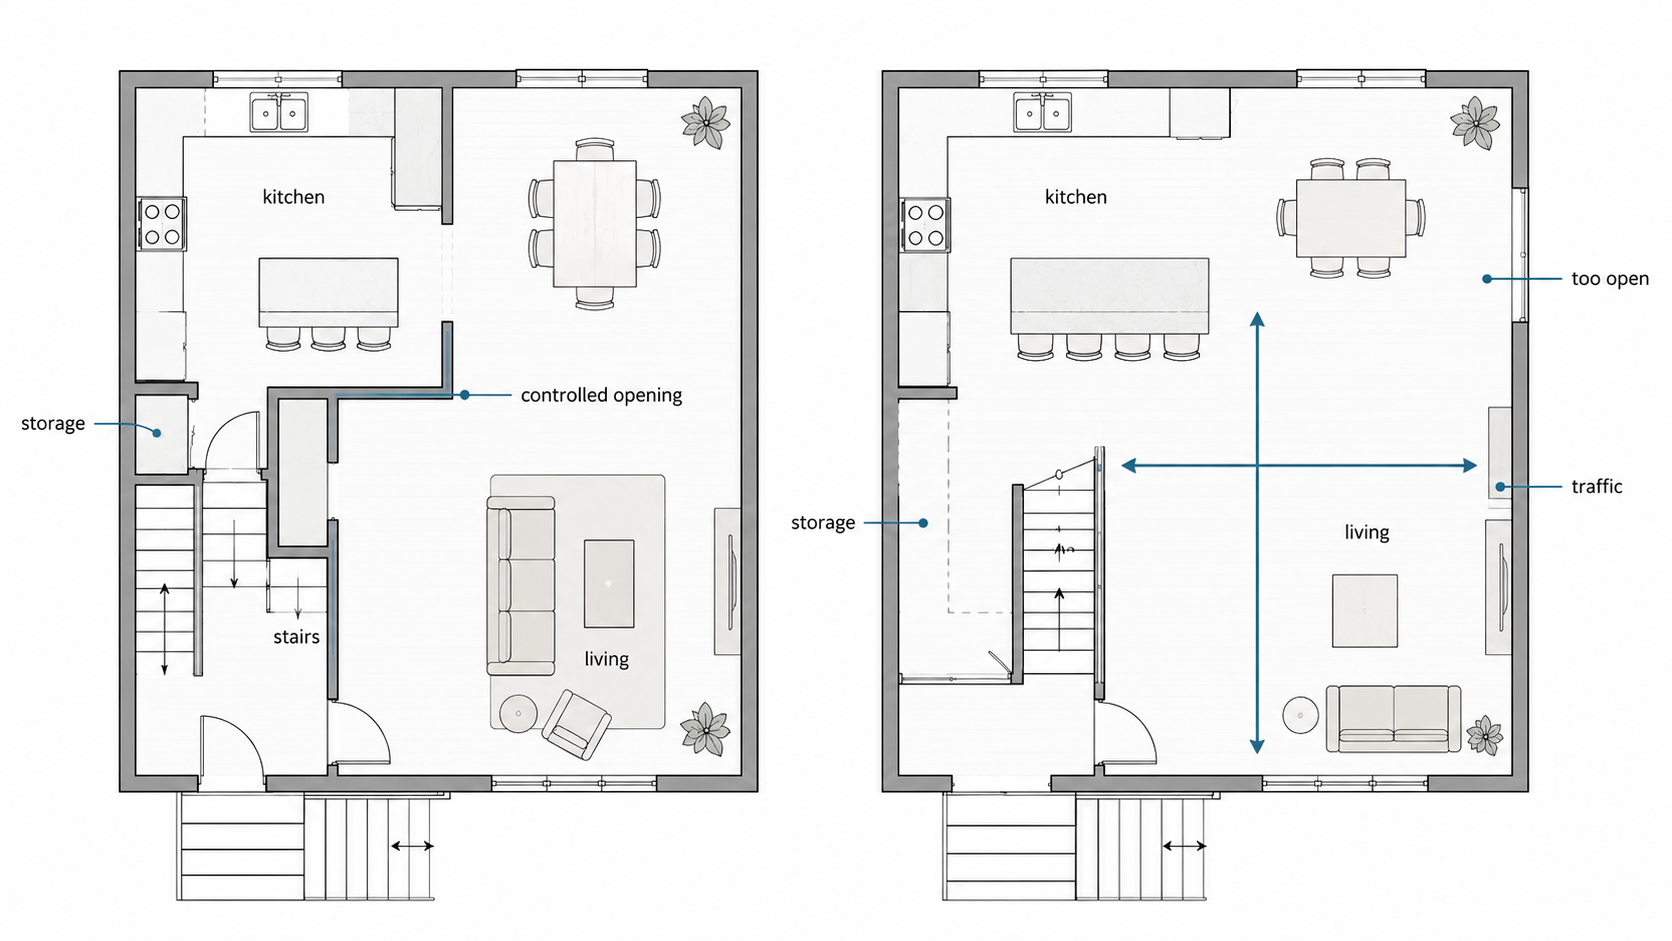
Wall removal can improve light and flow, but it can also expose the stair zone, take out storage you actually needed, make furniture placement worse, and send foot traffic straight through the middle of the living room. Bigger is not automatically better here.
The better question is simple: what does the kitchen actually need from the next room? If the answer is borrowed light, a controlled opening may be all it takes. If the answer is better dining flow, a wider passage might do the job. If the answer is more counter space, opening the wall will not fix that at all.

For the kitchen itself, see 1970s Kitchen Remodel. The split-level version needs that same kitchen judgment, but it also has to account for stairs, landings, storage, traffic, and the way light moves through the main floor.
The Lower Level Decides Whether the House Feels Bigger
The lower level is the hidden opportunity in most split-levels — and the part most likely to get finished before anyone checks whether it should be. It can become a family room, office, guest space, laundry zone, mudroom, storage area, or a better connection to the garage or backyard. But it has real limits, and none of them are optional.
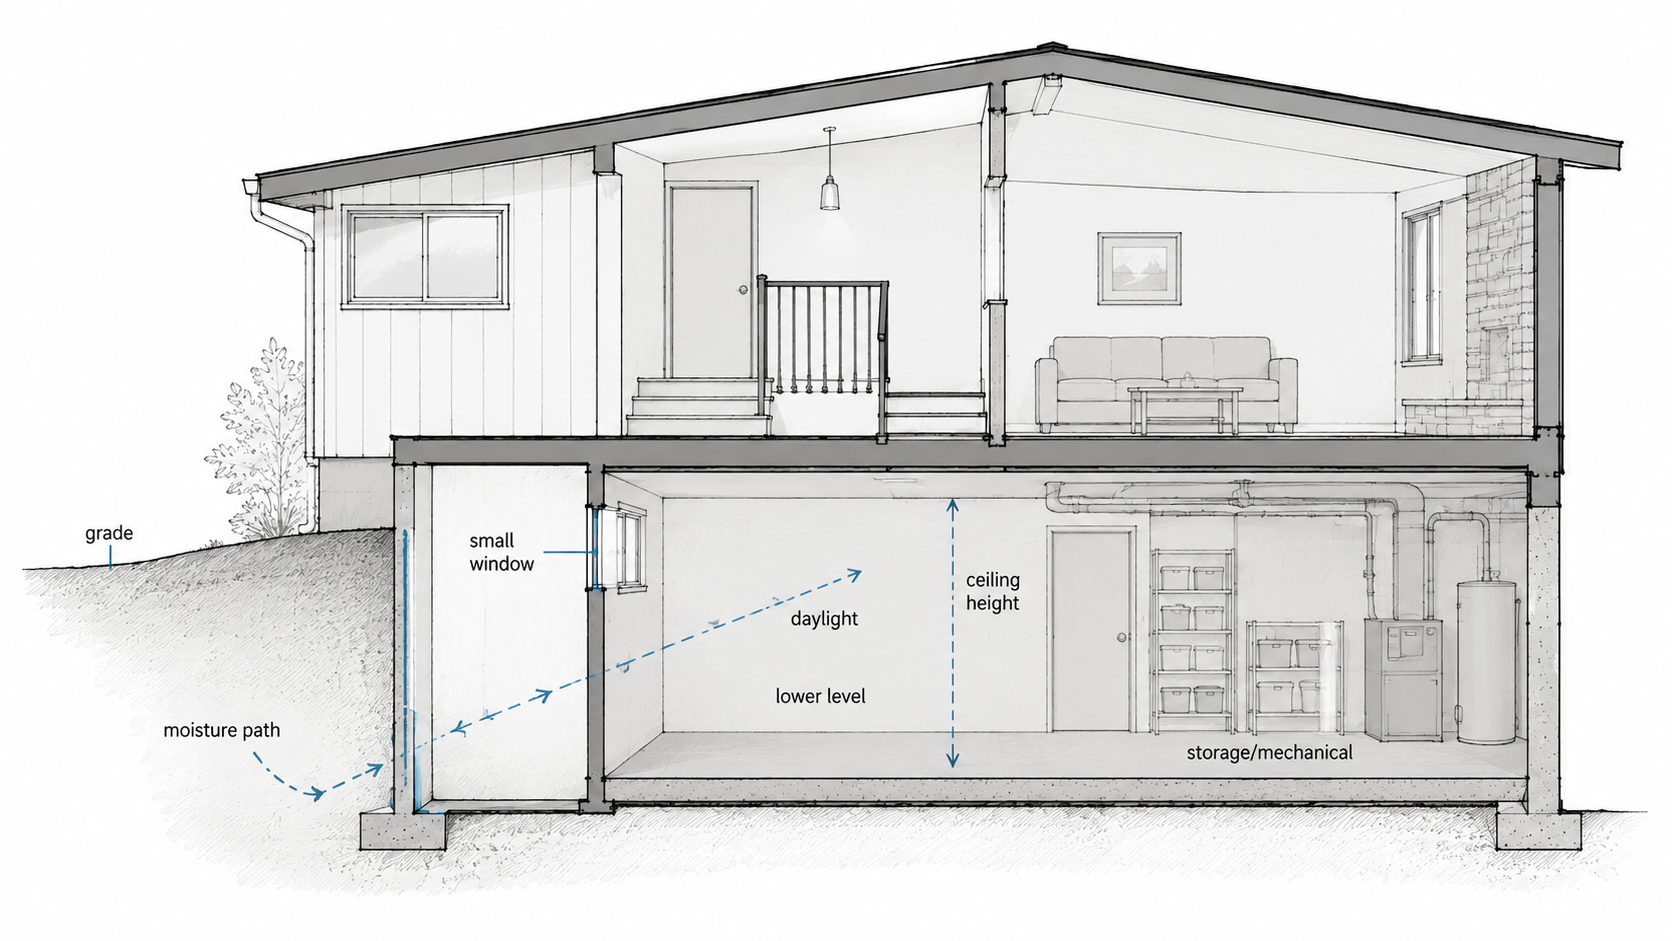
Ceiling height, daylight, moisture, egress, mechanical equipment, and how the lower level relates to the stairs above it — all of that has to check out before anyone starts designing the room around it. A lower level that smells damp, feels dark, or has a low ceiling will not feel like finished living space just because drywall and flooring got added.
Check grade, drainage, foundation walls, slab condition, lower windows, stair headroom, insulation, ventilation, and any signs of water staining before you design the finished room around them. In a split-level, the lower floor sits close enough to grade that moisture problems can quietly become the most expensive part of the whole remodel.
The Code Numbers Nobody Checks Before Finishing the Lower Level
Most split-level owners start planning the lower level around furniture and paint colors. The house does not care about either until the basic code and site conditions get checked first.
Ceiling height is the first check. Many residential codes call for around seven feet of clear ceiling height in finished living spaces, with limited allowances for beams, ducts, or other projections. The exact number depends on the adopted code, local amendments, the room type, and the inspector. A lower level built around mechanical clearance instead of living space can fall short of that without anyone noticing until a contractor actually measures it.
Egress is the second check. If the finished lower-level room will be used as a bedroom, most jurisdictions require a proper emergency escape opening — usually a window or exterior door sized so someone can get out and help can get in. That single requirement can change the window budget, the wall layout, or whether the room can legally be called a bedroom at all.
Moisture is the third check. It does not come with one clean number because the problem has to be solved before the room is finished, not after. Grading, perimeter drainage, foundation cracks, sump equipment, ventilation, slab moisture — covering any of that with drywall and carpet does not fix it. It just delays the day the wall comes back out.
None of this means skip the lower level. It means get the order right: check the numbers, fix what is wrong, then design the room.
Do Not Modernize Away the Only Thing That Works
A split-level has one main advantage: separation without a full second story. The living room, kitchen, bedrooms, lower family room, garage, and storage zones can each have a different relationship to the rest of the house. That can feel awkward, but it also works well for noise control, privacy, kids, guests, and everyday routines.
The mistake is flattening all of that in the name of open living. Remove every separation and the house loses its best practical quality. Sound carries farther. The kitchen dominates every other room. The stairs feel exposed instead of tucked away. Furniture gets harder to place. And the lower level still feels disconnected anyway, because the real issue was daylight or moisture all along — not the walls standing in the way.
Keep what works: split-level privacy, short stair runs, a separate lower family zone, upper bedrooms away from noise, and a main level that can be opened up carefully without turning into one loud room.
What Usually Changes the Budget
The visible remodel is rarely the whole cost. Split-levels often hide work at the exact spots homeowners want to change: stairs, railings, kitchen walls, exterior doors, lower-level windows, garage entries, and old finishes.
Watch these first:
- Entry and stair work. Railings, guards, lighting, flooring transitions, and door changes have to be safe and code-compliant — not just good-looking.
- Wall openings. Structure, wiring, ducts, returns, ceiling repair, and floor patching can all expand the scope once a wall actually comes out.
- Lower-level finishing. Moisture, egress, insulation, ventilation, ceiling height, and mechanical zones decide what the space can legally and practically become.
- Old materials. A 1970s house may involve lead paint, asbestos-containing materials, old flooring adhesives, or aluminum branch-circuit wiring.
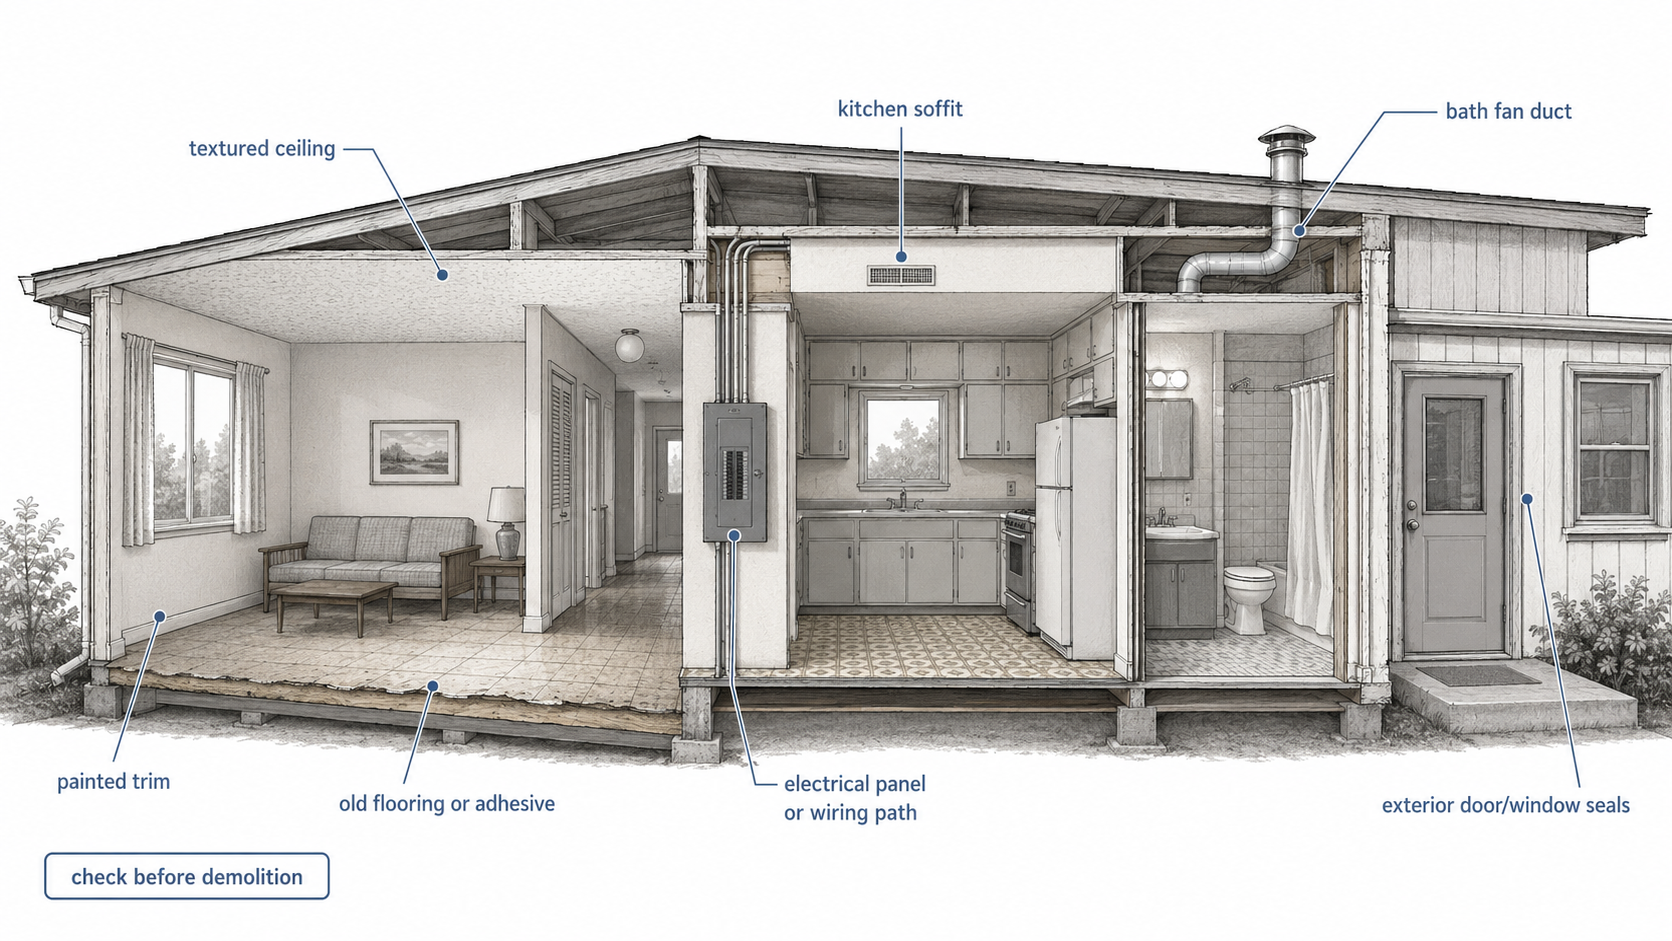
For pre-1978 painted surfaces, renovation, repair, or painting work can kick up dangerous lead dust when lead-based paint gets disturbed. Older flooring, adhesives, textured ceilings, duct materials, or other suspect materials may also be disturbed during the work. Some homes from this era may have aluminum branch-circuit wiring, which a qualified electrician should review before any new work adds load or changes devices. That is not a scare tactic — it is the correct order of operations: test or verify before demolition, then design the remodel around what the house will safely allow.
Good Fixes for a 1970s Split-Level
- Make the entry brighter. Door glass, sidelights, lighting, railing changes, and cleaner flooring transitions can change the feel of the whole house.
- Clarify the exterior levels. The house should read as upper, lower, entry, and garage without looking chopped up.
- Open the kitchen carefully. One controlled opening beats total wall removal almost every time.
- Respect the lower level. Finish it only after daylight, moisture, egress, and ceiling height are understood.
- Use fewer exterior materials. Split-levels already have enough geometry. Too many finishes make it worse.
The best split-level remodels are not the ones that hide the split. They are the ones that make the split useful.
What to Leave Alone
Leave useful separation in place. Leave parts of the stair wall standing if they help with safety, furniture placement, storage, or sound control. Leave sound masonry or siding alone unless the material is failing or genuinely fighting the remodel. Leave the level changes visible enough that the house still makes sense from the street.
Do not remove walls just because the house feels dated. Find the actual problem first. A dark kitchen may need a better opening, not a missing wall. A cramped entry may need a new railing and better light. A weak exterior may need entry focus and window balance, not a bigger porch. A damp lower level needs moisture control before anyone talks about flooring.
Start in This Order
Photograph the front elevation, entry landing, stairs, railing, kitchen wall, lower level, garage entry, exterior grade, windows, and any stains or soft flooring you notice.
Check old materials before demolition, especially paint, flooring, adhesives, ceiling texture, insulation, and pipe or duct materials.
Inspect the lower level for water staining, musty smell, grade problems, window size, ceiling height, and mechanical conflicts.
Draw the entry traffic path. Include the front door swing, stairs up, stairs down, coat storage, railing, and daily movement through the space.
Decide exterior changes by level: upper windows, lower windows, entry, garage, siding or brick, and walkway.
Plan kitchen openings only after checking structure, ducts, wiring, storage, seating, stair safety, and lighting.
Choose finishes last.
A 1970s split-level remodel works when the house is treated as a set of connected level changes: entry, stairs, kitchen, exterior, garage, lower level, and light all affect each other. What hides behind the paneling matters less than what you do with the structure underneath.
FAQ
Is a 1970s split-level worth remodeling?
Yes, as long as the structure is sound and the split layout still fits the household. These houses tend to remodel well because the levels give natural separation. The risk is spending money on finishes before fixing the entry, stairs, kitchen connection, exterior balance, and lower-level moisture or light.
What is the biggest problem in a 1970s split-level remodel?
The entry landing, almost always. It controls the stairs, the traffic, the light, the storage, and the first impression of the house. If the landing stays dark and cramped, the rest of the remodel can still feel dated.
Should I open the kitchen in a split-level?
Sometimes. A controlled opening can improve light and connection, but removing too much wall can hurt storage, seating, stair safety, sound control, and furniture placement.
How do you update a 1970s split-level exterior?
Clarify the entry, calm the garage, improve the upper and lower window rhythm, simplify materials, and use planting and lighting to guide attention. Skip the heavy fake porch features that fight the split-level shape.
Can the lower level become living space?
Often, but only once moisture, ceiling height, daylight, egress, insulation, ventilation, and mechanical conflicts are handled. A lower level that is damp or too dark will not feel finished for long, no matter what is on the walls.
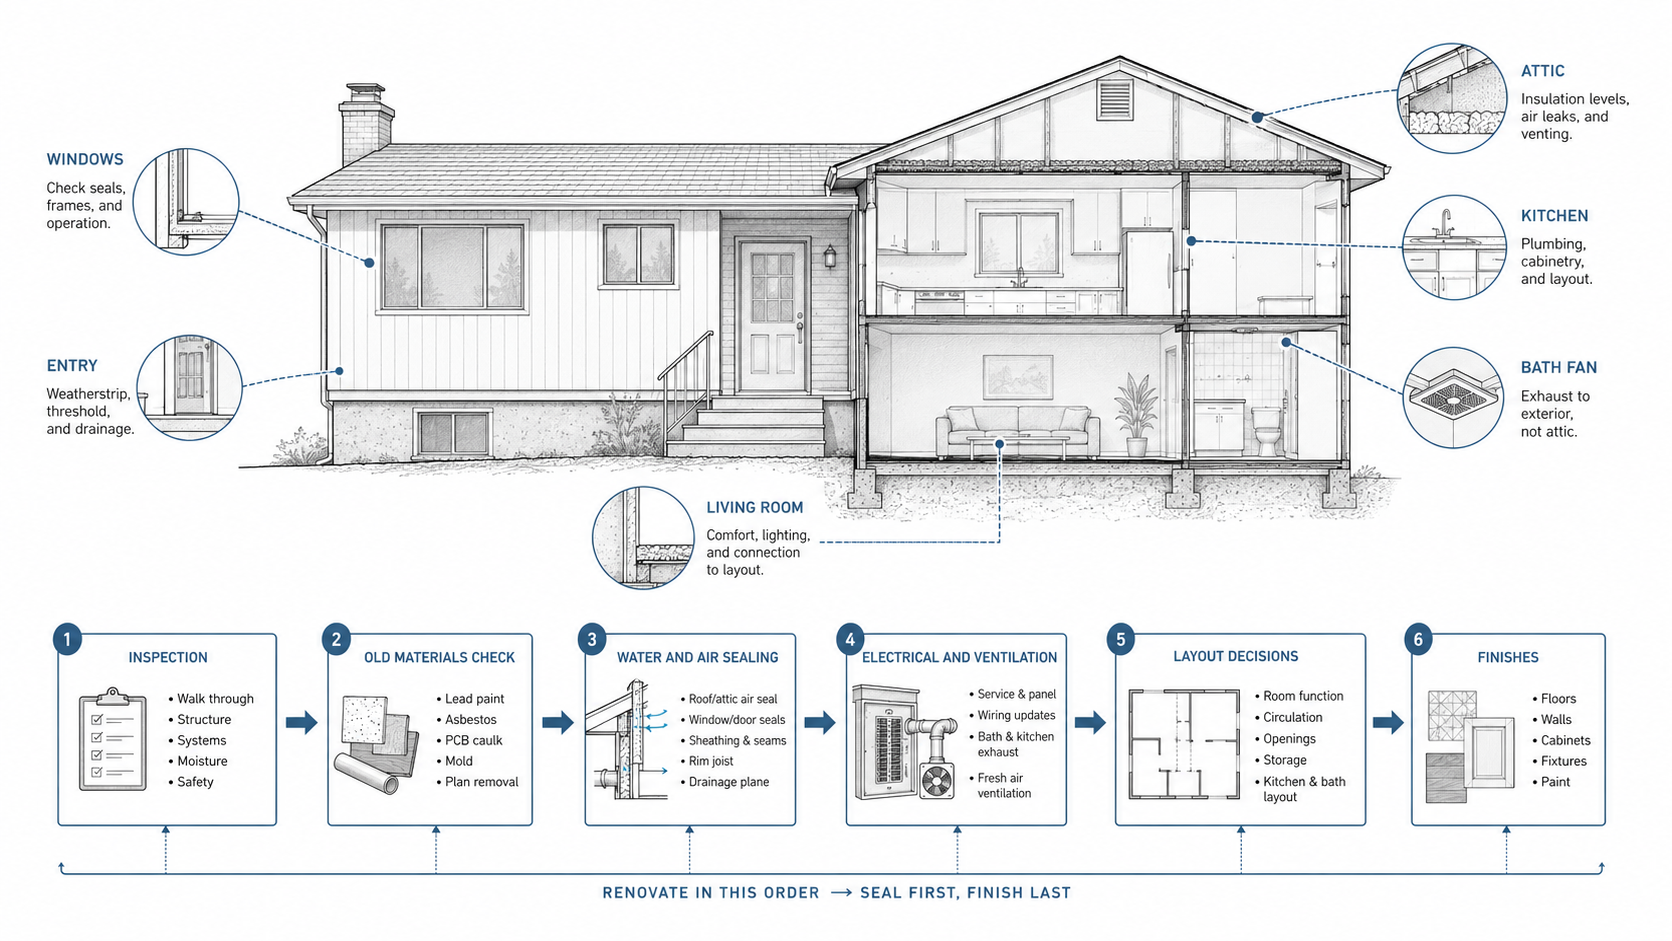
What should be remodeled first?
Start with safety, old materials, water control, lower-level conditions, entry and stair function, wiring, and ventilation. Then move to kitchen openings, exterior updates, bathrooms, flooring, lighting, and finishes.
Read This Next
- 1970s House Renovation — for the larger whole-house renovation sequence.
- 1970s Kitchen Remodel — if the kitchen wall and dining connection are driving the remodel.
- 1970s Front Door Update — if the split-level entry and façade are the first weak spots.
- 1970s Sunken Living Room — if level changes inside the house are driving the remodel decision.
- 1970s House Style — for what to keep before flattening the decade.
References
- U.S. Environmental Protection Agency, Lead Renovation, Repair and Painting Program.
- U.S. Environmental Protection Agency, Protect Your Family from Exposures to Asbestos.
- U.S. Consumer Product Safety Commission, Repairing Aluminum Wiring.
- U.S. Environmental Protection Agency, Remodeling Your Home and Indoor Air Quality.