Someone paints the paneling, changes the lights, and starts pulling floors before checking the house.
That is where a 1970s renovation gets expensive.
The dark rooms may need better lighting. The bath fan may be weak. The wiring may be old. The stairs may be unsafe. The trim may be wet. The floor or ceiling texture may need testing before demo.
Walk the house once before finishes.
Keep the parts that still work. Fix safety, moisture, air, wiring, ventilation, and bad layout first. Then spend money on the pretty parts.
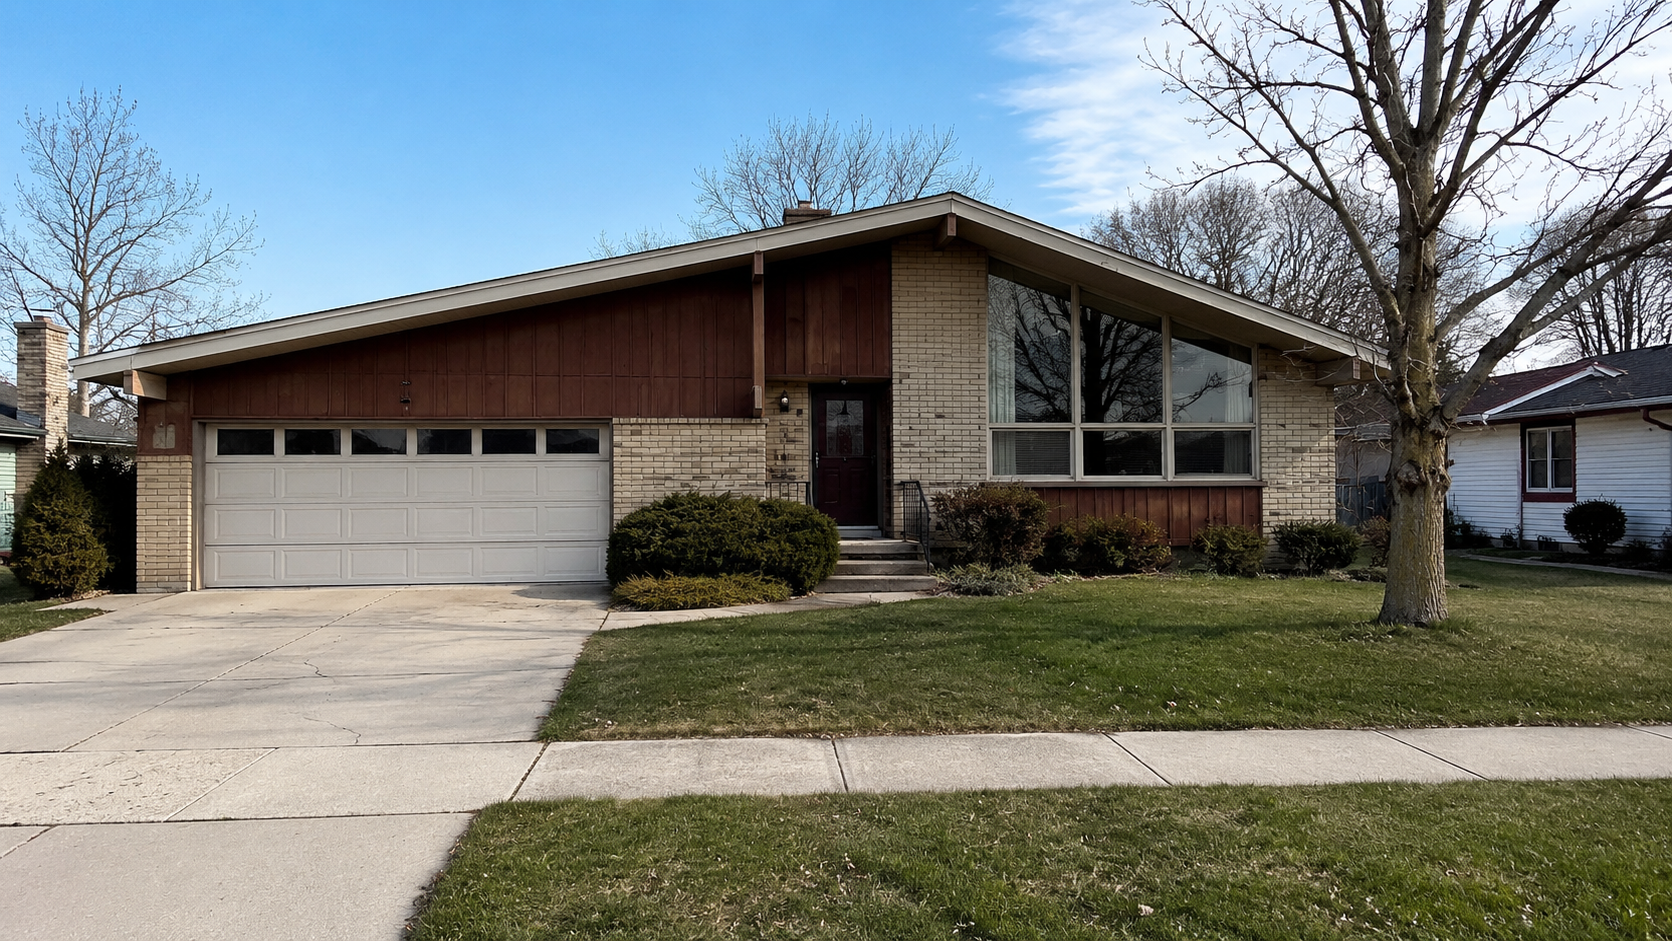
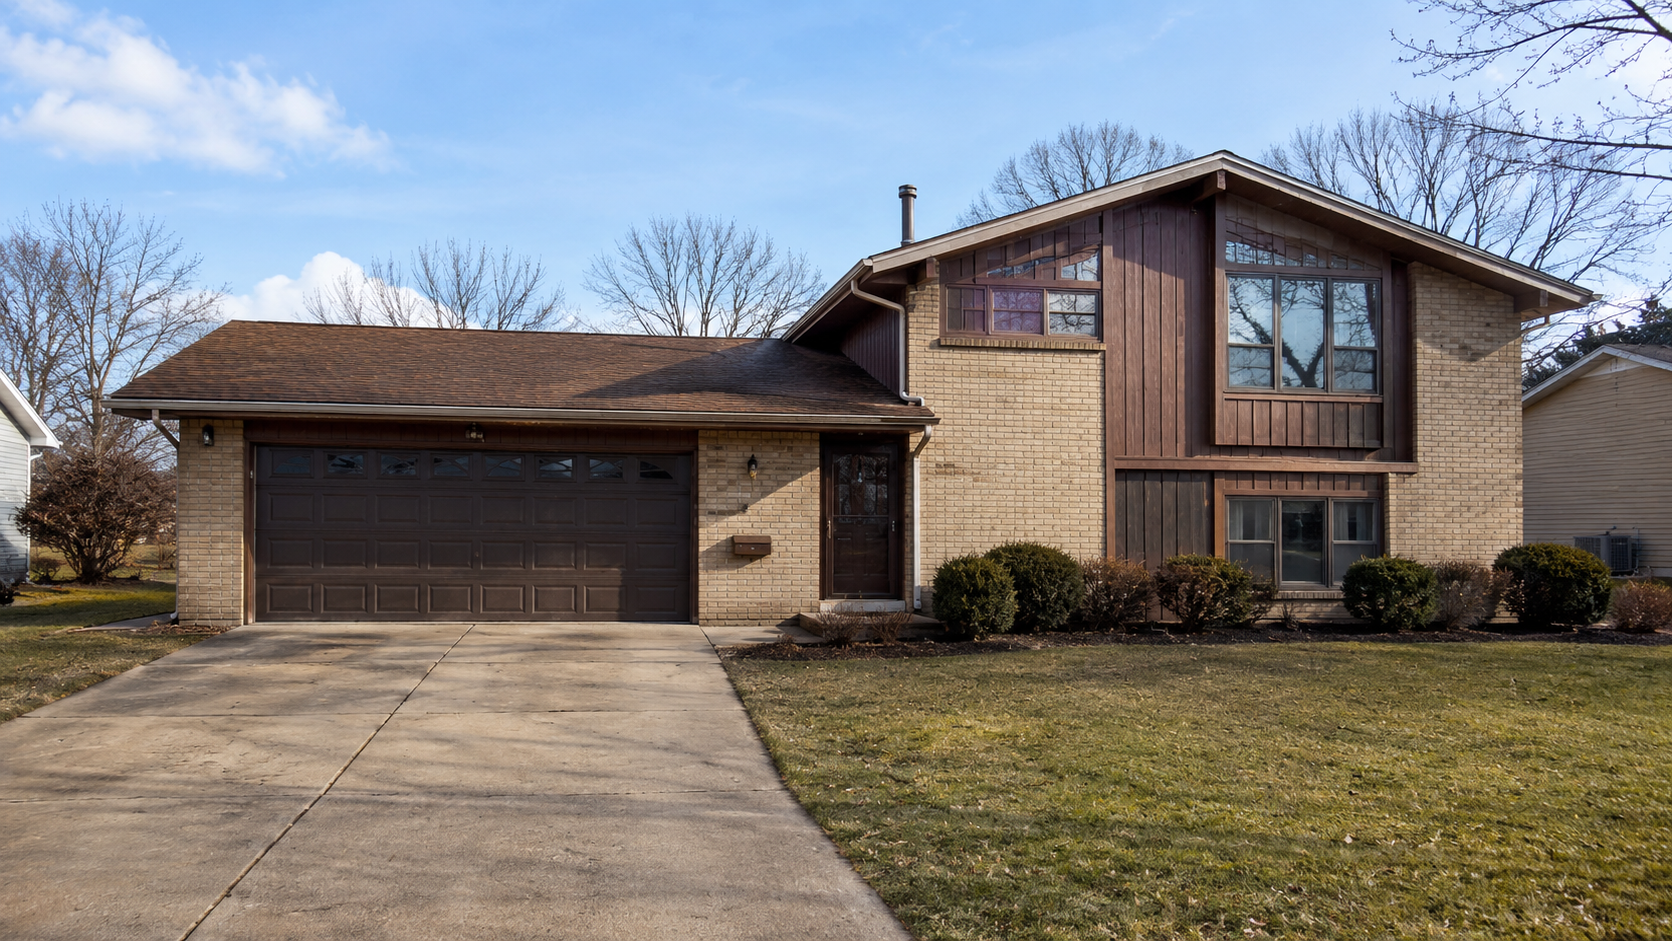
A typical 1970s suburban house often has a solid basic form, low roofline, attached garage, large windows, and dated exterior details that can be updated without erasing the original character. Image by ArchitectureCourses.org.
What Usually Makes a 1970s House Feel Worse Than It Is
The finishes take the blame first.
Dark cabinets. Paneling. Heavy fireplace walls. Old carpet. Brown tile. Yellowed switches. Aluminum sliders. A front door that feels more tired than intentional. It all adds up, and it can make a solid house feel like a bigger problem than it is.
But a tired surface is not the same thing as a failed house.
Many 1970s houses have good room sizes, useful family layouts, attached garages, larger windows, practical roof forms, and better yard connections than older formal houses. The renovation decision is not “modernize everything.” It is deciding which parts are helping and which parts are costing you comfort, safety, or money.
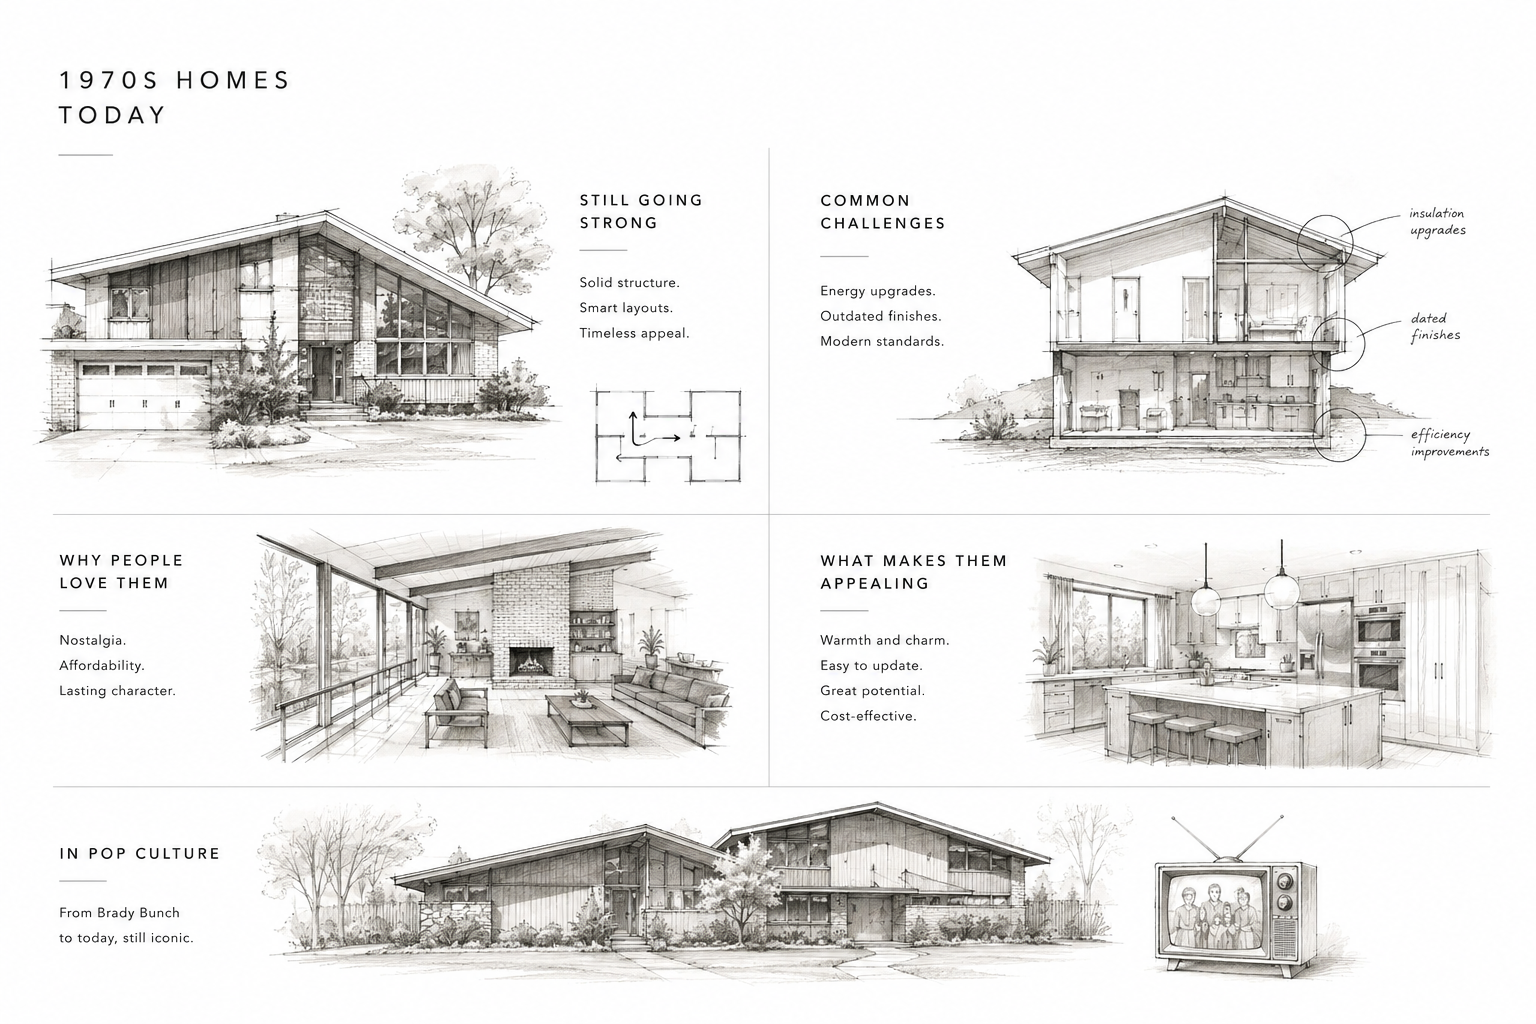
Many 1970s homes still have strong layouts, usable structure, and familiar character, but the usual renovation work is in energy upgrades, dated finishes, kitchens, entries, and exterior maintenance. Illustration by ArchitectureCourses.org.
What to Update First in a 1970s House
Start with the work that changes the project if you find a problem.
That means inspection, old-material checks, water, air leakage, electrical capacity, ventilation, window and door condition, and layout decisions. Finishes come later because finishes get redone when the hidden work was missed.
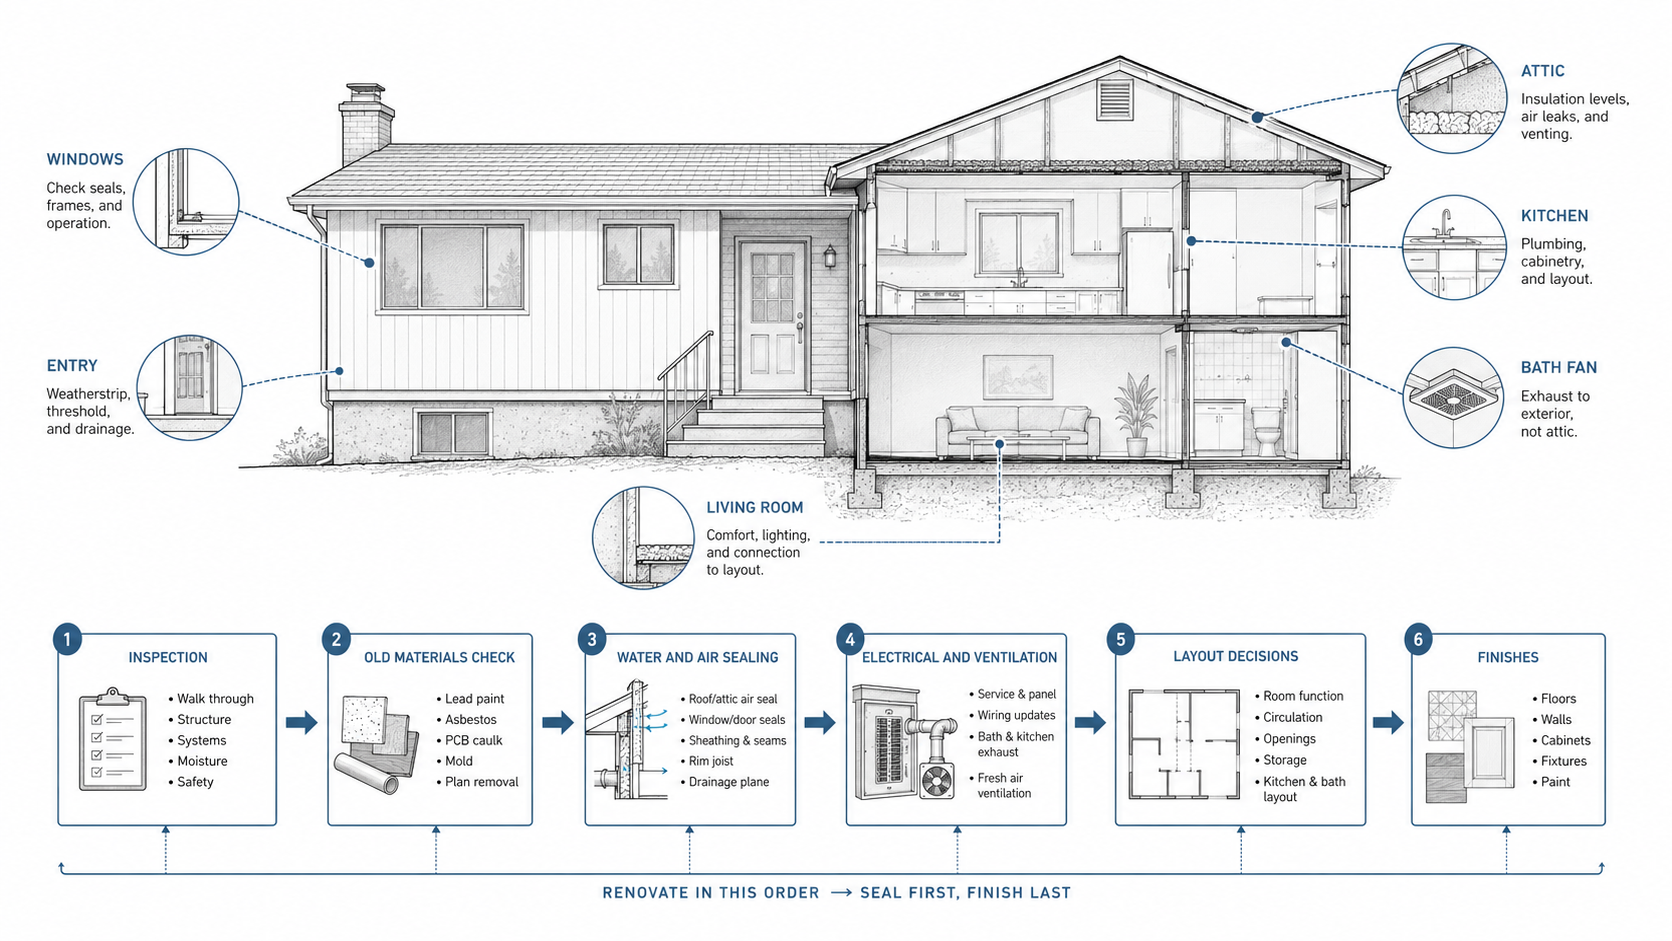
The safest 1970s renovation sequence starts with inspection, old-material checks, water and air control, electrical and ventilation, layout decisions, then finishes. Illustration by ArchitectureCourses.org.
- Inspection first. Roof edges, siding, foundation cracks, grading, attic, crawl space, basement, plumbing leaks, panel condition, and visible water damage all come before finish choices.
- Old-material checks next. Painted trim, old flooring, adhesives, textured ceilings, and patching compounds can change the demolition plan.
- Water and air control before cosmetics. Leaky windows, bad weatherstripping, poor attic air sealing, and wet trim make new finishes age fast.
- Electrical and ventilation before layout. Kitchens, baths, laundry areas, and HVAC changes often need more than a cosmetic update.
- Layout decisions before cabinets and flooring. Moving one wall or widening one opening can change flooring, lighting, structure, and budget.
- Finishes last. Paint, flooring, hardware, fixtures, tile, and cabinet faces work better after the house has been read properly.
This order is not slow. It prevents expensive do-overs.
Start With What Should Not Change
A good 1970s renovation does not begin by asking what can be removed.
It begins by asking what should be protected. The answer might be the low roofline, the brick, the cedar siding, the fireplace wall, the larger rear glass, the split-level zoning, the open living space, or the front entry proportion. Those pieces give the house its identity.
Once those are clear, the tired parts are easier to edit.
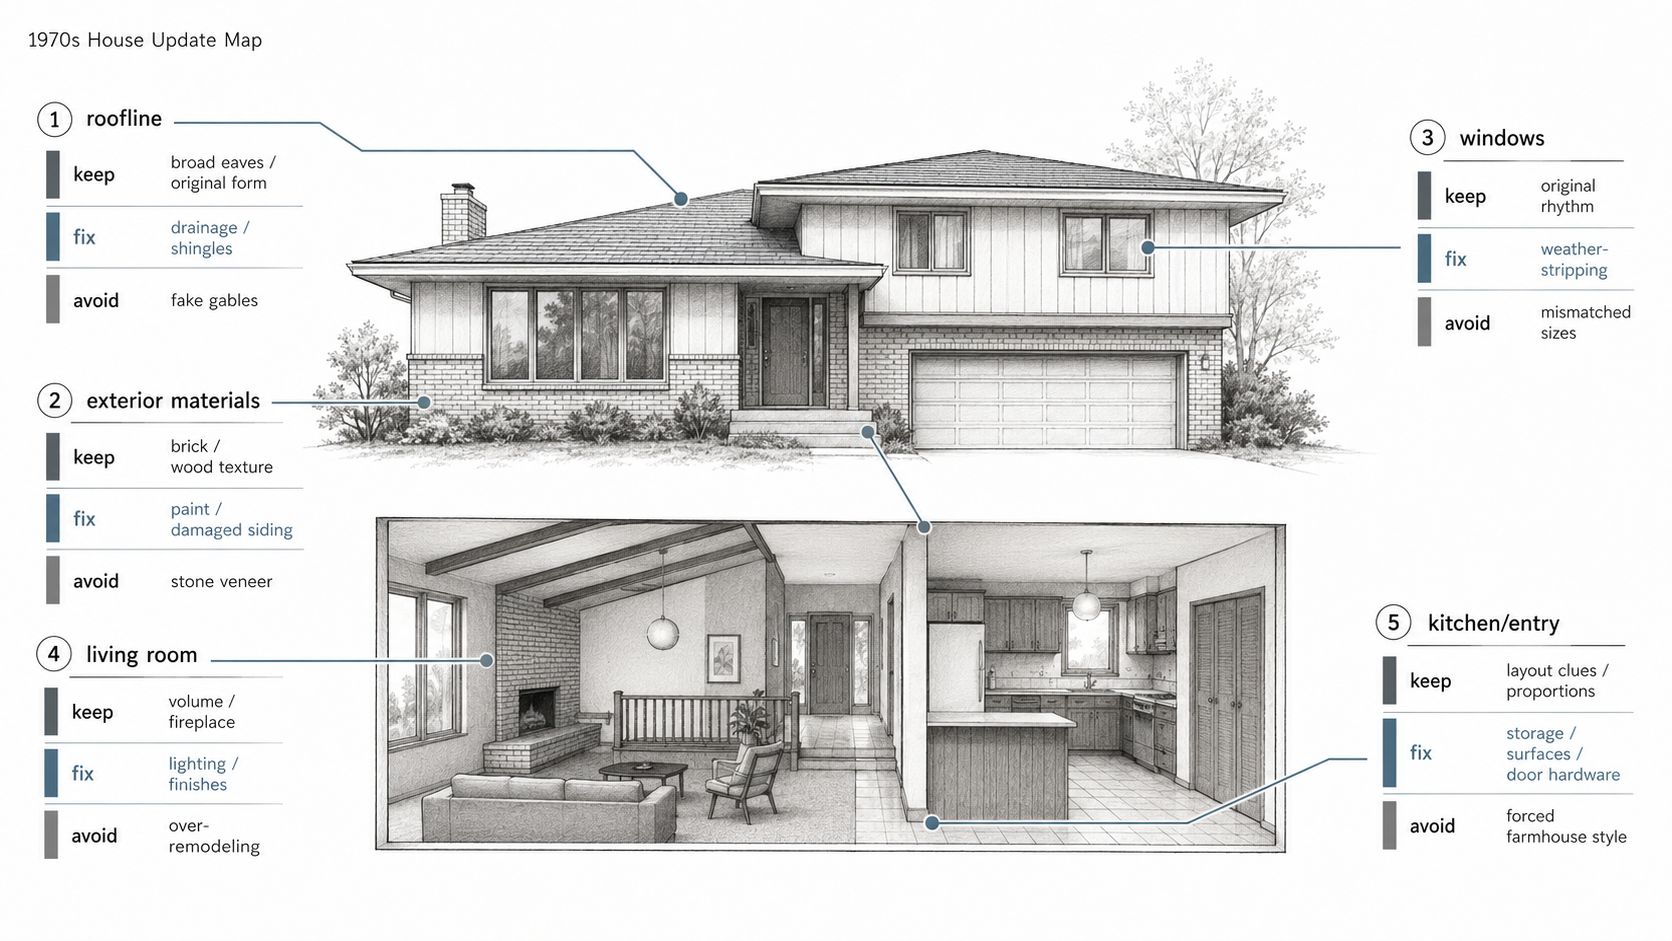
A 1970s renovation works best when the original roofline, window rhythm, brick, wood texture, living room volume, and entry proportions are protected while worn finishes, weather-sealing, lighting, hardware, and surfaces are updated carefully. Illustration by ArchitectureCourses.org.
| Protect | Fix | Replace |
|---|---|---|
| Low roofline and broad house shape | Gutters, fascia, soffits, roof edges, attic air leaks | Fake gables, random trim, top-heavy additions |
| Brick, cedar, stone, beams, fireplace mass | Damaged finish, failed joints, bad lighting, moisture stains | Cheap cladding that hides the original material logic |
| Large windows and yard connection | Weatherstripping, seals, glazing, exterior flashing | Tiny replacements that make the house darker |
| Split-level zoning or useful room separation | Railings, lighting, stair edges, dark landings | Opening every wall without solving furniture, storage, or structure |
| One or two strong era details | Surrounding finishes that make them feel heavy | Keeping every dated feature just because it is original |
Old Materials Need a Slower Demolition Plan
A 1970s house can be young enough to feel ordinary and old enough to need demolition caution.
If the home was built before 1978, painted surfaces may contain lead-based paint. That matters when sanding, scraping, cutting, drilling, removing windows, removing doors, disturbing painted trim, or opening old painted assemblies. Paid renovation work that disturbs paint in pre-1978 housing may trigger EPA lead-safe rules.
Some flooring, adhesives, textured ceilings, ceiling tiles, patching compounds, duct materials, and heat-adjacent materials may also need asbestos caution. You cannot confirm asbestos by looking at the material. If the work will disturb suspect material, test before demolition or bring in qualified help.
Some houses from the mid-1960s into the mid-1970s may also have aluminum branch-circuit wiring. That does not mean panic. It does mean an electrician should evaluate the wiring, devices, panel, and connections before you add kitchen loads, bath fans, recessed lighting, or new appliances.
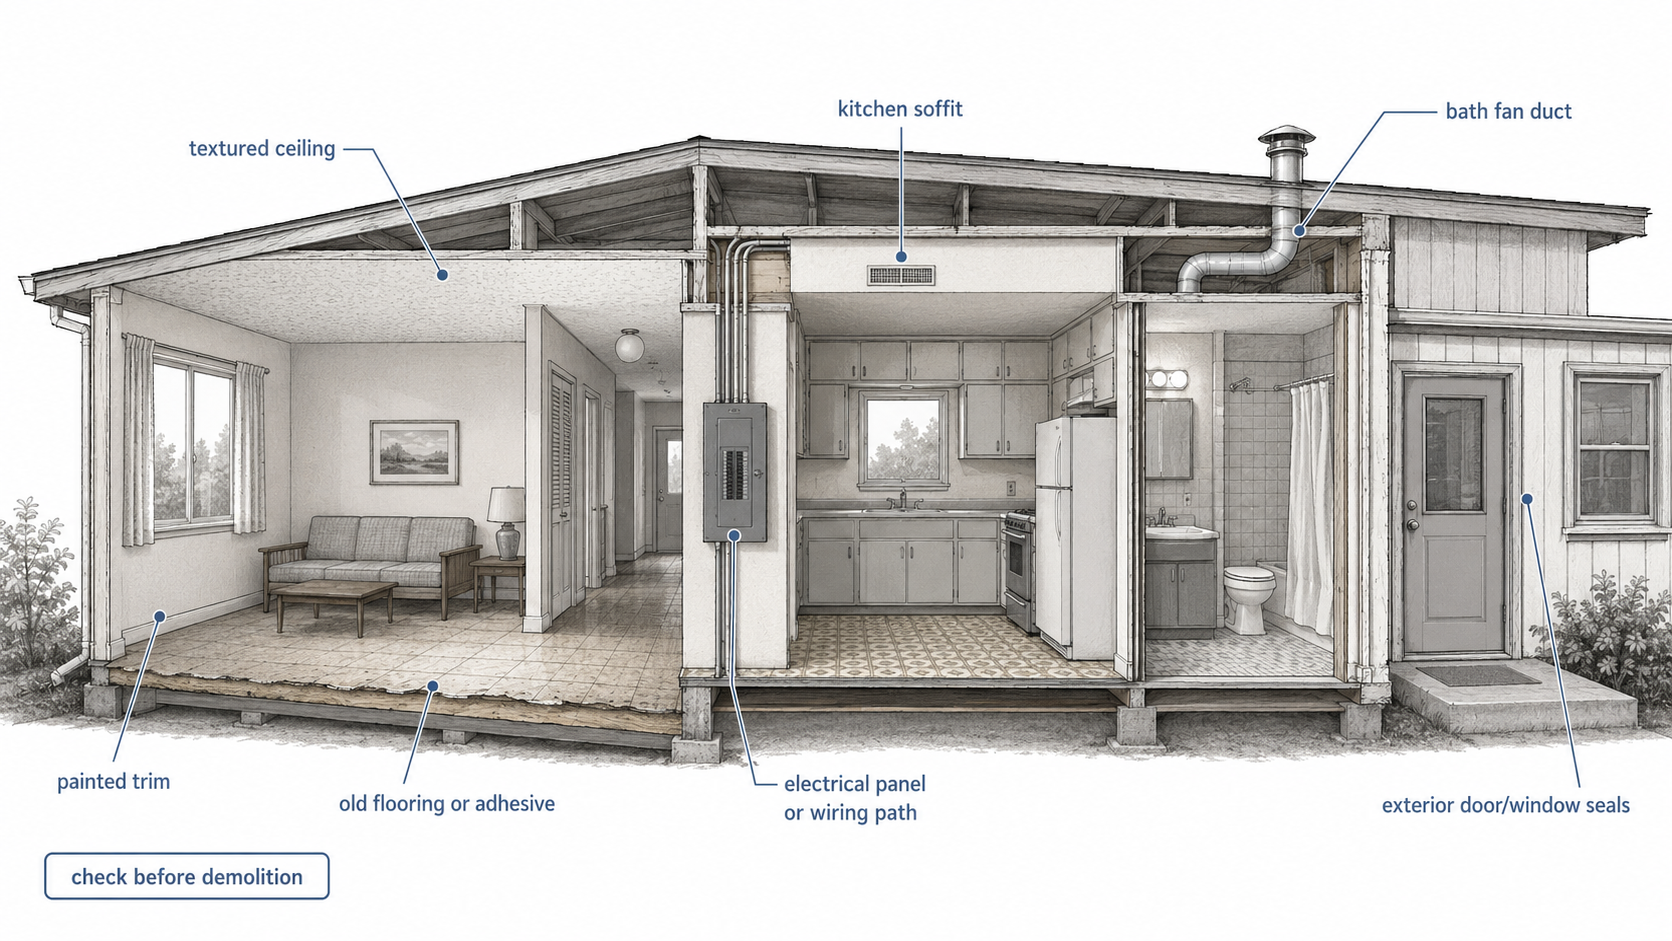
A 1970s renovation should slow down before demolition because painted trim, old flooring, textured ceilings, wiring, and ventilation can change the project scope. Illustration by ArchitectureCourses.org.
The worst time to discover this is after the first weekend of demo. By then the dust is already in the house, the budget is already wrong, and the contractor scope may no longer match the work.
Kitchen, Bathroom, and Living Room Decisions Come After the Checks
The kitchen usually wants attention first because it is the room everyone sees and uses.
That does not mean it should be designed first. A 1970s kitchen remodel can involve cabinet condition, soffits, electrical capacity, ventilation, flooring layers, lighting, plumbing, appliance locations, and sometimes wall openings. One change can affect three trades.
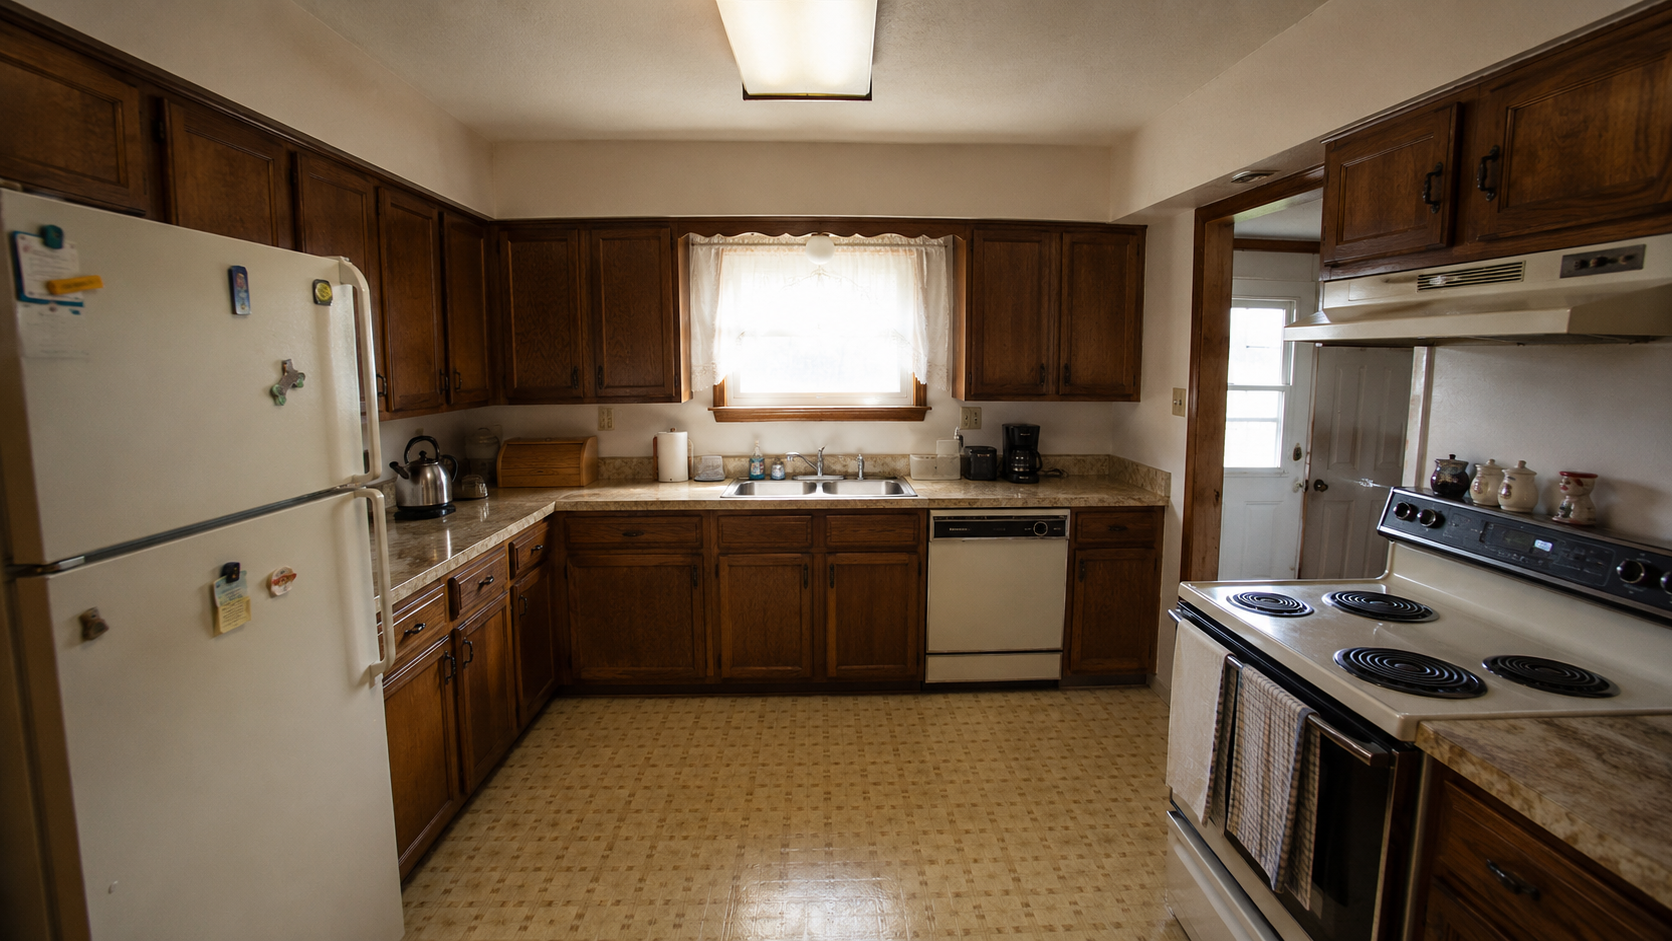
A 1970s kitchen remodel usually starts with layout, cabinet condition, soffits, lighting, flooring, ventilation, and electrical capacity before finishes are chosen. Image by ArchitectureCourses.org.
Bathrooms have the same problem in smaller space. The tile color may be ugly, but the bigger issue may be a weak fan, wet subfloor, old valves, poor lighting, or a tub surround that has been leaking at the corners for years.
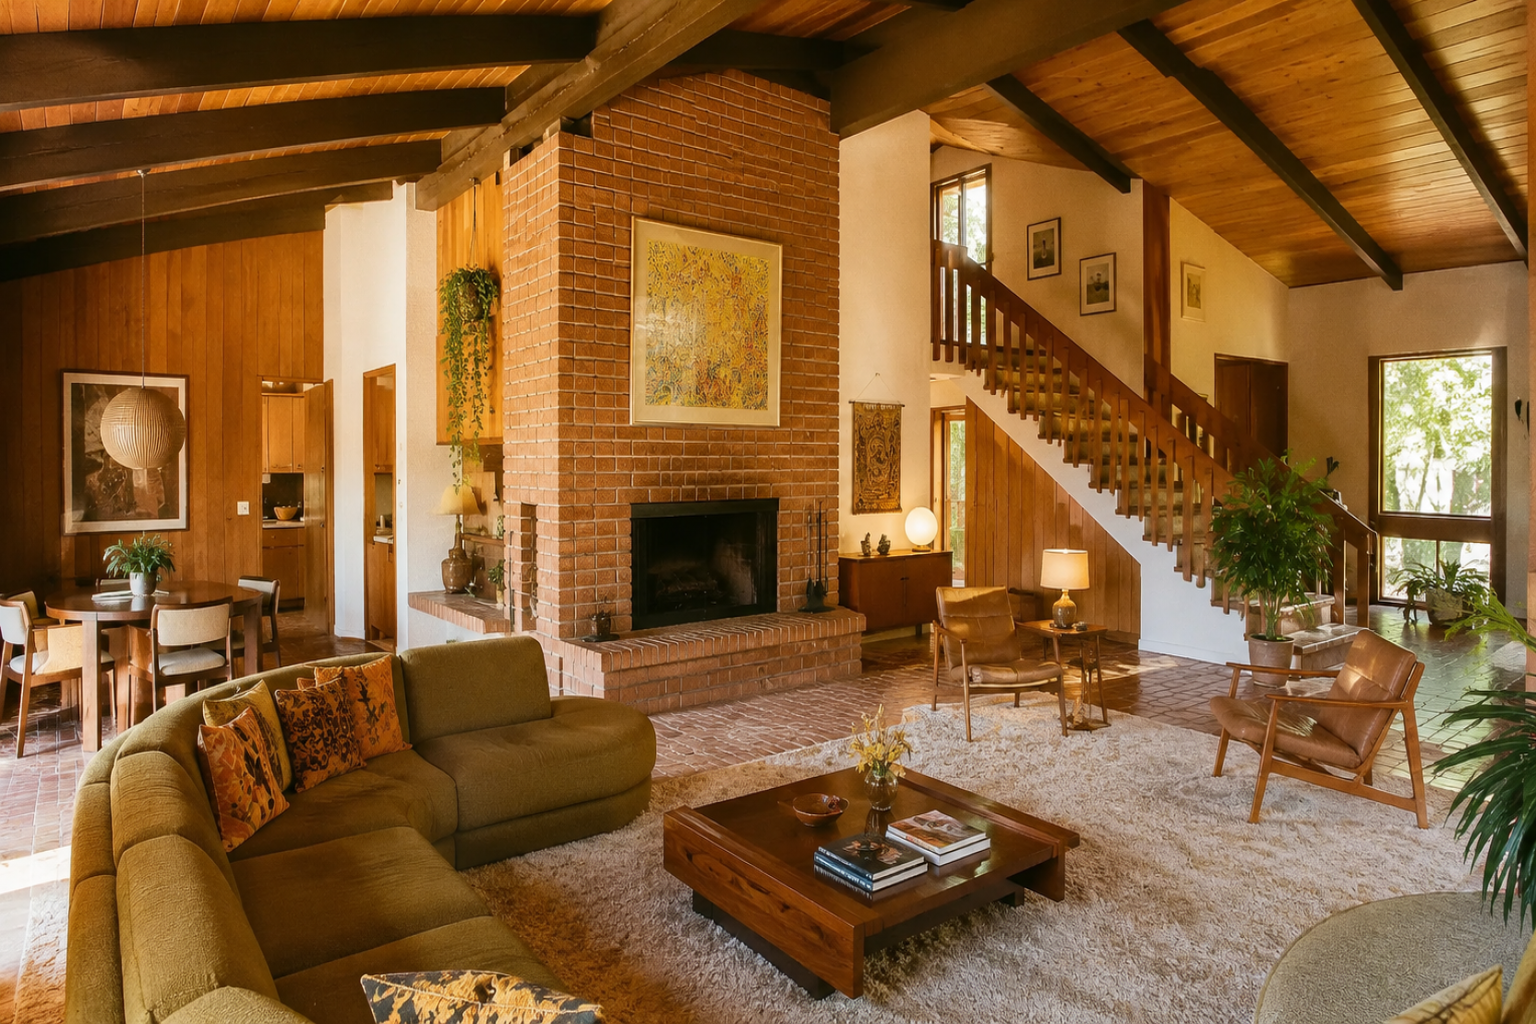
Living rooms are different. The risk there is usually over-removal. A brick fireplace, wood ceiling, paneled wall, sunken area, or open stair can be worth keeping if the light, flooring, railing, and furniture layout are handled properly.

An open-plan 1970s living room often combined a brick fireplace, warm wood finishes, dramatic ceiling lines, and low casual seating, giving the space strong character even before any renovation work begins. Image by ArchitectureCourses.org.
If the lowered living area is the main problem, handle that as its own decision. A 1970s sunken living room can be kept, modified, or filled in, but the answer depends on step safety, circulation, structure, flooring transitions, and how the room is used every day.
Exterior Updates Should Protect the Shape of the House
The outside of a 1970s house usually improves when the renovation respects the original shape.
Most of these houses do not need fake gables, extra trim, farmhouse shutters, or a pasted-on porch language. They need cleaner materials, better entry lighting, repaired trim, stronger paint choices, better windows or seals, and a front door that belongs with the brick, siding, roofline, and garage.
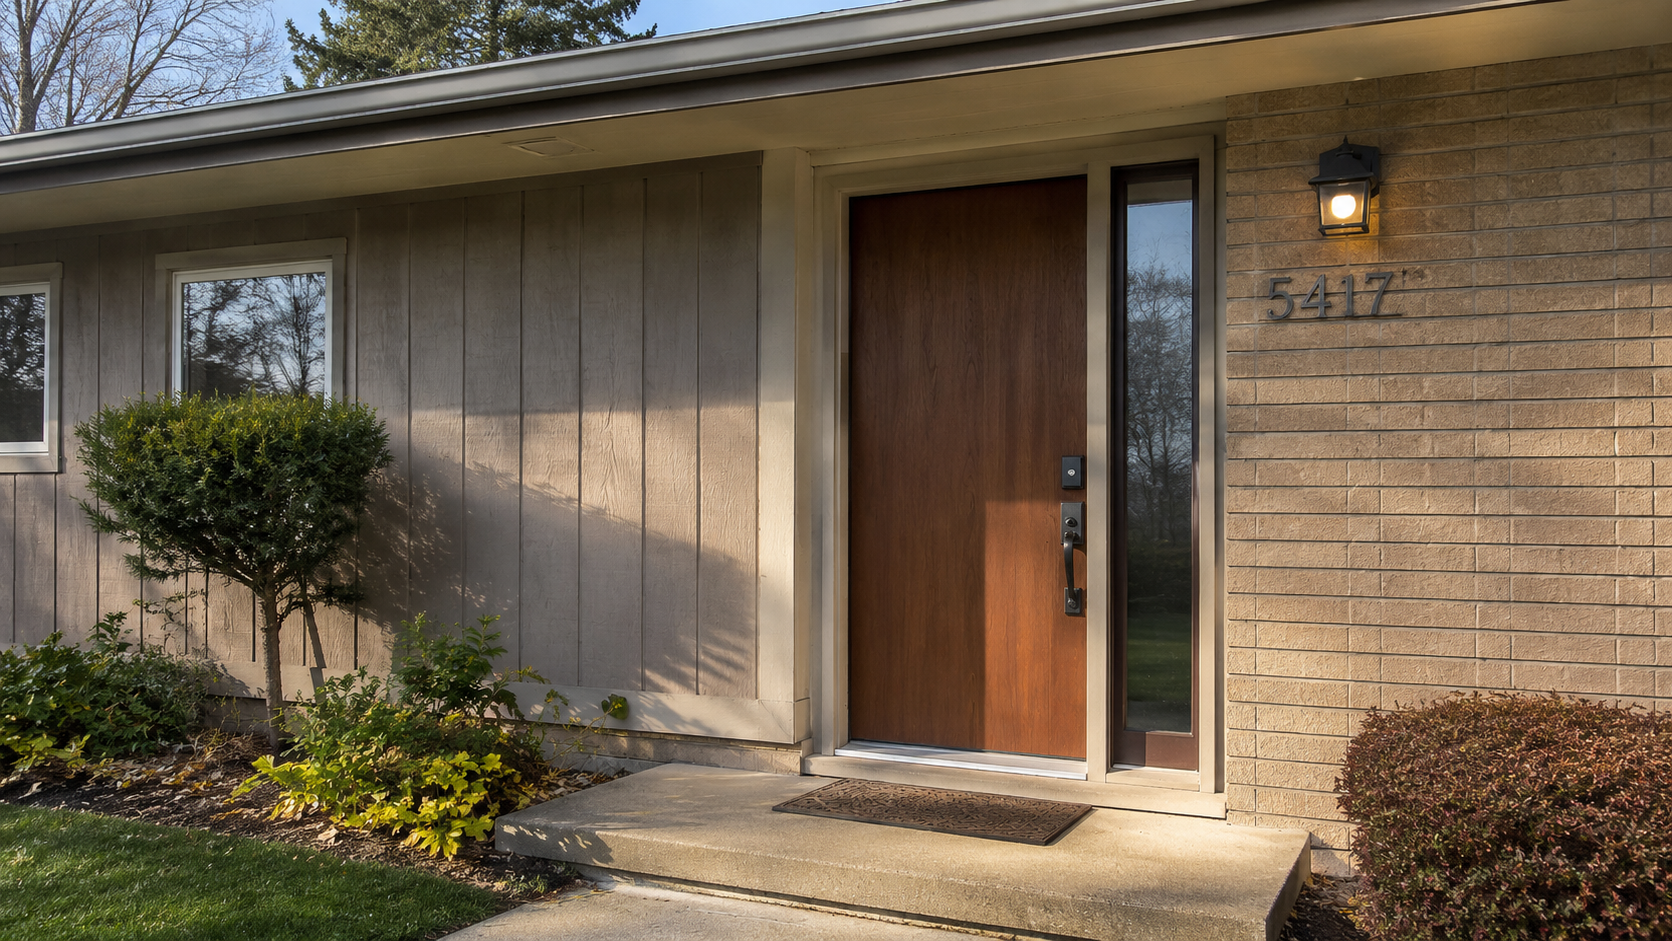
A good 1970s front door tells you more than the door style; the glass, trim, brick, hardware, and entry lighting all decide whether the update feels right. Image by ArchitectureCourses.org.
If the entry is the weak spot, start with the door assembly, not just the door slab. Glass, sidelights, storm door, threshold, lockset, porch light, house numbers, paint, and path lighting all change how the house reads from the street.
That is why the tighter entry guide lives separately at 1970s Front Door Update. The hub decision is simple: do not make the entry fight the rest of the façade.
What to Fix Before Spending on Finishes
Finishes are allowed to be last because they are visible. The hidden work has to earn the money first.
- Air leaks: attic penetrations, exterior doors, windows, rim areas, and duct leaks can make a renovated house still feel uncomfortable.
- Ventilation: bath fans should exhaust outside, not into an attic or dead cavity.
- Water damage: soft trim, stained ceilings, wet subfloors, and swollen baseboards need cause-and-repair thinking, not paint.
- Electrical capacity: kitchens, baths, laundry, heat pumps, induction ranges, and new lighting can outgrow old assumptions.
- Window and door performance: repair, weatherstripping, or replacement should be decided before new interior trim and paint.
Air sealing and insulation work can look boring on paper, but it changes comfort. A house that is easier to heat, cool, dry, and ventilate is a better renovation even before the photos look finished.
Where 1970s Renovation Budgets Break
Budgets break when the visible scope is priced and the hidden scope is treated as a surprise.
The common trap is starting with flooring, cabinets, paint, tile, fixtures, and exterior color while leaving old-material testing, wiring, ventilation, water damage, and air sealing as “we will see.” That usually means the finish budget gets raided later.
| Budget Item | Why It Breaks | Protective Move |
|---|---|---|
| Demolition | Old flooring, adhesive, paint, or ceiling texture needs testing or controlled work | Test suspect materials before demo pricing is final |
| Kitchen | Soffits, wiring, ventilation, flooring layers, and layout changes affect trades | Confirm cabinet, electrical, duct, and wall decisions before ordering finishes |
| Windows and doors | Opening size, trim, flashing, rot, and siding repairs change the cost | Inspect openings and exterior water damage first |
| Living room | Fireplace, sunken areas, railings, stairs, and flooring transitions create extra work | Resolve level changes and safety before flooring is selected |
| Exterior | Paint hides rot, bad trim, poor flashing, and siding issues | Repair water paths before cosmetic curb appeal work |
For planning, keep a contingency. In older-house renovation, 10 percent is light if the house has not been opened before. A 15 to 20 percent reserve is more realistic when old flooring, wiring, water damage, or layout changes are still unknown.
Split-Level and Ranch Problems Need Different Fixes
A 1970s ranch and a 1970s split-level can share materials but fail in different ways.
The ranch usually depends on its long horizontal line, garage relationship, rear glass, and simple circulation. The renovation mistake is making it too vertical, too busy, or too fake-traditional.
The split-level usually depends on the stair core. If the entry is dark, the railing is heavy, the landing is awkward, or the kitchen is cut off from the main living area, the whole house can feel smaller than it is.
A 1970s split-level house often combines brick, vertical siding, large front windows, and an attached garage, with most renovation decisions focused on the entry, exterior materials, windows, and dated finishes. Image by ArchitectureCourses.org.
Do not use one renovation formula for both. Ranches usually need restraint. Split-levels usually need better light, stair clarity, entry order, and cleaner transitions between levels.
When to Keep the Character and When to Let It Go
Keep the character when it still helps the house.
A brick fireplace can anchor the room. A low roofline can make the exterior feel settled. Larger rear glass can make a modest house live bigger. A wood ceiling or paneled wall can add warmth if the rest of the room is not too heavy.
Let the feature go when it creates a recurring problem.
A warped slider that leaks air every winter is not character. A loose stair rail is not charm. A kitchen wall that blocks the only useful light may not be worth defending. A failing bath fan that dumps moisture into the wrong place is not a finish issue. It is a durability issue.
The test is practical: after safety, moisture, air, ventilation, and layout are handled, does the feature still make the house better? If yes, work around it. If not, replace it cleanly.
How to Sequence the First 90 Days
The first 90 days should produce decisions, not just demolition.
- Weeks 1 to 2: walk the house with inspection notes, photos, roof/attic/basement or crawl space checks, and a list of obvious water or safety issues.
- Weeks 2 to 4: test suspect materials before demolition, confirm whether painted or textured surfaces need controlled work, and have electrical concerns reviewed.
- Weeks 4 to 6: decide what stays: roofline, brick, fireplace, windows, sunken room, stair rail, kitchen footprint, or exterior materials.
- Weeks 6 to 8: price hidden work and performance work before finishes: ventilation, air sealing, window or door repair, wiring, moisture repair, and bath/kitchen rough-ins.
- Weeks 8 to 12: choose finishes after the layout and hidden work are settled.
That early discipline keeps the remodel from turning into scattered upgrades. The house needs a sequence, not a shopping list.
FAQ
What should you fix first in a 1970s house renovation?
Start with inspection, old-material checks, water damage, air sealing, ventilation, electrical condition, window and door performance, and layout decisions. Finishes should come after the work that can change the scope.
Are 1970s houses worth renovating?
Yes, when the structure is sound and the layout still works. Many have useful room sizes, practical planning, larger windows, and solid suburban forms. The problem is often tired finishes plus hidden performance issues, not the whole house.
Should you keep the original 1970s features?
Keep them when they still help the house. Brick, wood, rooflines, large glass, fireplaces, and some sunken living rooms can work well. Do not keep a feature that creates safety, moisture, comfort, or layout problems.
Do 1970s houses have asbestos?
Some may. Older flooring, adhesives, textured ceilings, ceiling tiles, patching compounds, duct materials, and heat-adjacent materials can be suspect. You cannot confirm asbestos by looking, so test before disturbing questionable material.
Do 1970s houses have lead paint?
Some do, especially if built before 1978. Painted trim, windows, doors, cabinets, railings, and exterior surfaces should be handled carefully before sanding, scraping, cutting, or demolition.
Is aluminum wiring common in 1970s houses?
Some homes from the mid-1960s into the mid-1970s may have aluminum branch-circuit wiring. Have a qualified electrician evaluate it before adding loads or changing devices.
Should you remodel the kitchen first?
Usually not first. The kitchen may be the biggest visible project, but it should come after old-material checks, electrical review, ventilation planning, flooring decisions, and layout decisions. Otherwise cabinet and finish choices can get made too early.
What is the biggest 1970s renovation mistake?
Spending the finish budget before the house has been checked. Paint, flooring, fixtures, and cabinets look productive, but they do not fix air leaks, moisture, unsafe wiring, poor ventilation, or bad layout decisions.
Read This Next
- 1970s House Style — to understand what is worth keeping before you renovate.
- 1970s Front Door Update — if the entry is the first weak spot on the exterior.
- 1970s Sunken Living Room — if a lowered living area is driving the remodel decision.
References
- U.S. Environmental Protection Agency, Lead Renovation, Repair and Painting Program.
- U.S. Environmental Protection Agency, I’m remodeling my home. Do I need to be concerned about asbestos in building materials?
- U.S. Department of Energy, Air Sealing Your Home.
- U.S. Consumer Product Safety Commission, Repairing Aluminum Wiring.