
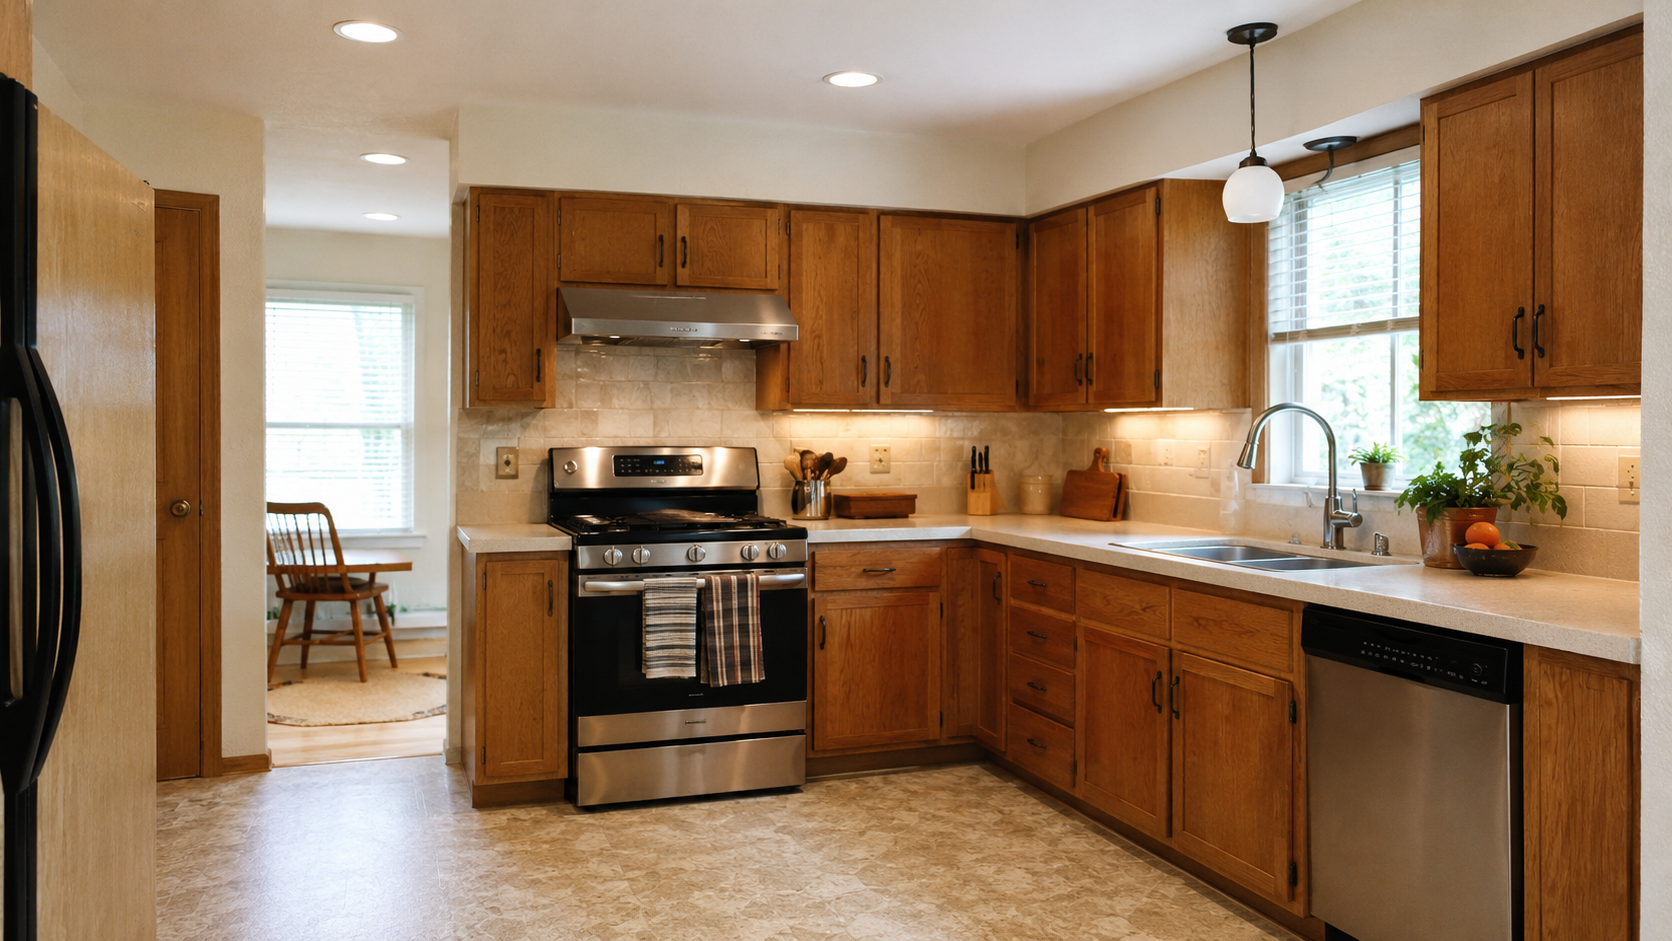
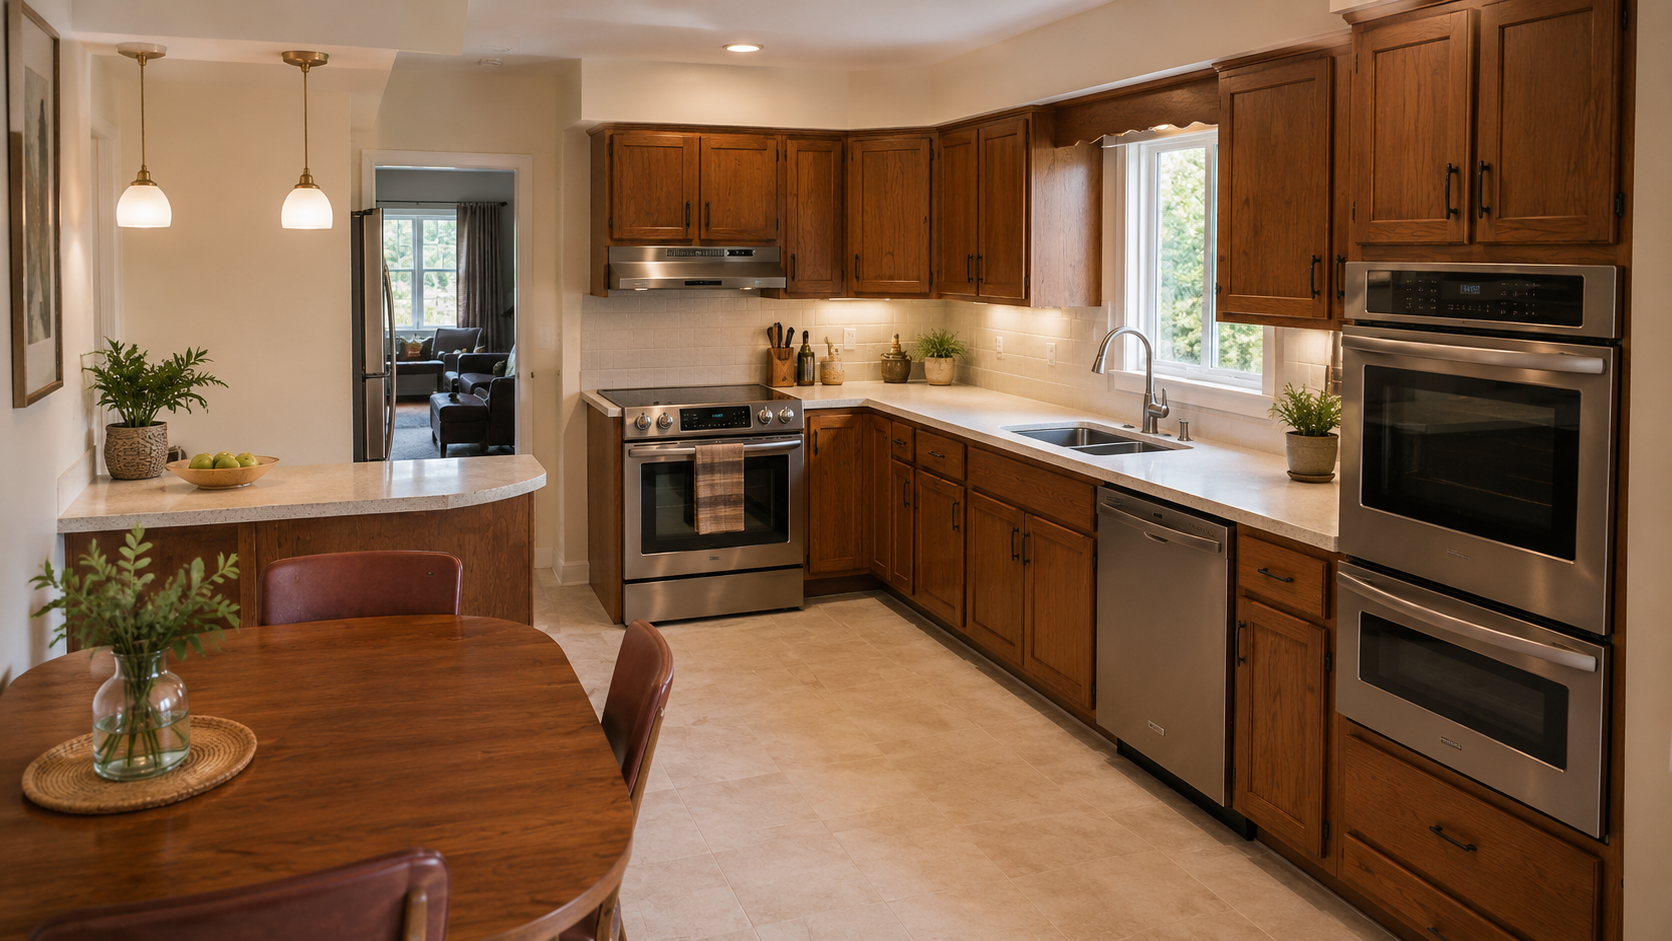
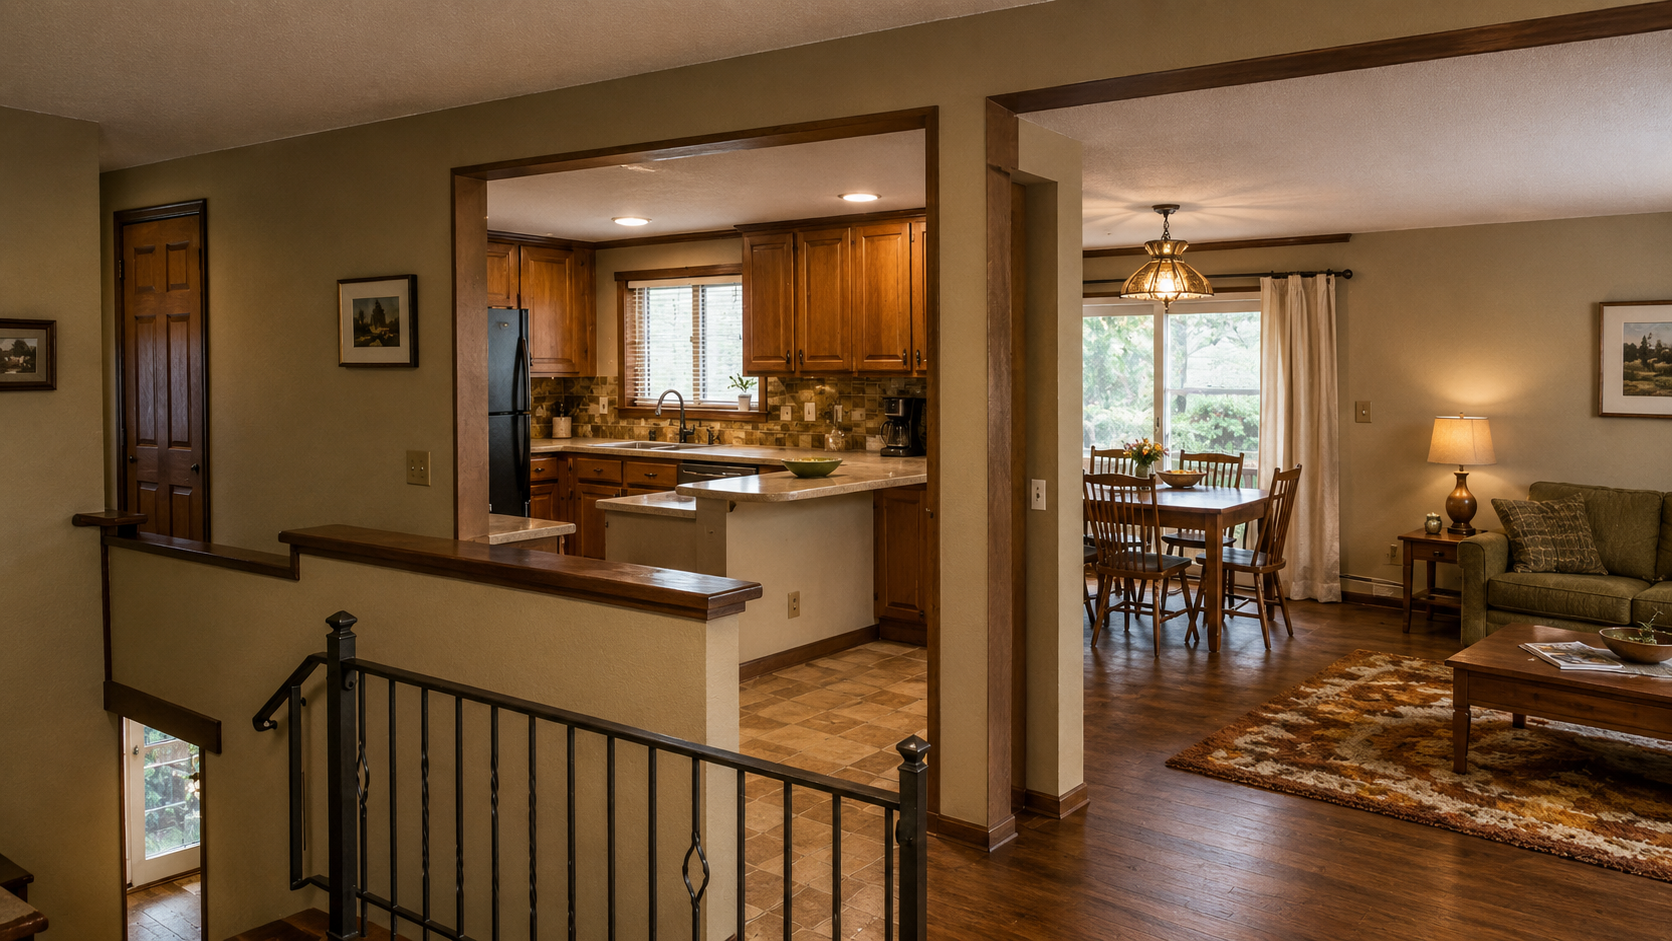
The 1970s kitchen usually looks like a cabinet problem. It is rarely only a cabinet problem.
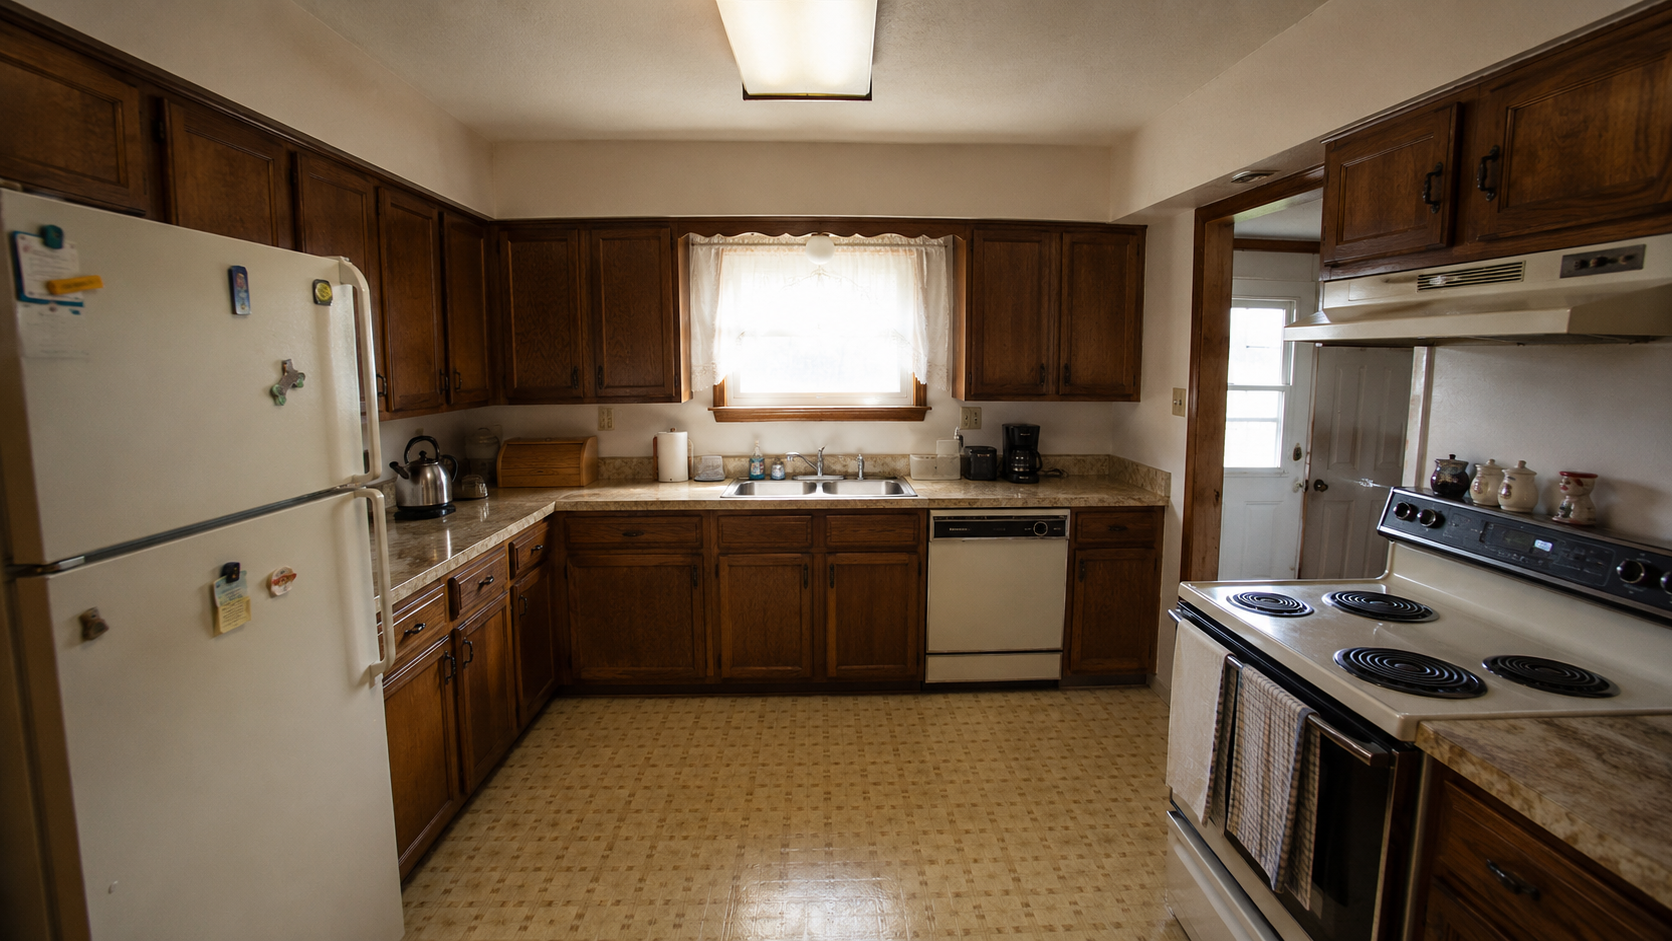
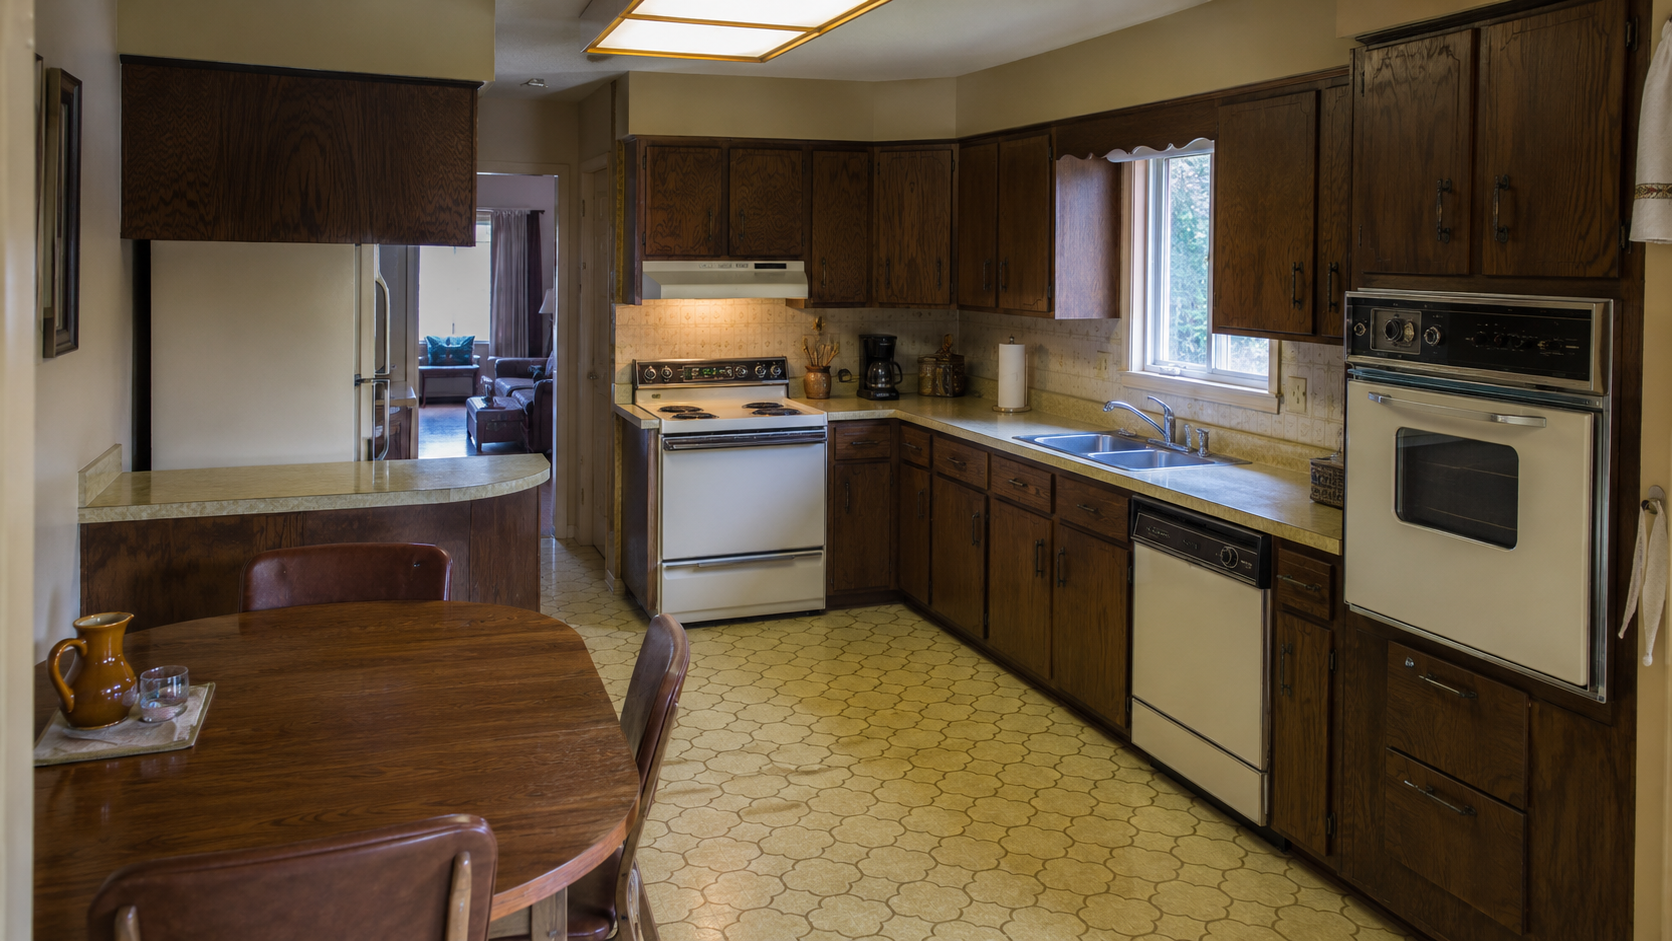
Dark wood, low soffits, fluorescent lighting, worn laminate, sheet flooring — that is what you see. What you do not see yet is whether the soffit hides ductwork, the floor has suspect layers, the panel can handle modern appliance loads, or the cabinet boxes are actually in better shape than the doors suggest. Until those questions are answered, picking finishes is guessing.
The room needs to be read before it gets redesigned. Layout first. Cabinet condition next. Soffits, lighting, flooring, ventilation, and electrical before anything gets ordered.
What Makes a 1970s Kitchen Feel Worse Than It Is
The heaviness usually comes from several small problems stacking up at once.
Dark wood cabinets. A soffit that drops the ceiling by eight inches. Fluorescent lighting that flattens everything. Old laminate. Sheet flooring with a seam that has been lifting since 1993. Heavy hardware. Appliances pushed into whatever opening the original plan left. A peninsula or half-wall that cuts the kitchen off from the dining room and makes both rooms feel smaller than they are.
None of those automatically means the kitchen needs to be gutted.
A lot of 1970s kitchens have a practical work triangle, decent cabinet runs, useful window placement, and enough wall length to remodel well without relocating every service. The mistake is treating every dated surface as proof that the whole room has failed. A tired finish is a surface problem. A bad layout, failing cabinet boxes, old wiring, or water damage behind the sink wall — those are different problems, and they have different costs.
Before demolition, separate the kitchen into three honest categories: what still works, what is only ugly, and what is creating a real daily problem.
Check the Layout Before You Choose Finishes
Layout is the expensive decision. Everything else can change later without touching the structure.
Cabinet doors, counters, pulls, fixtures, paint, and tile can all be updated in a future project. Moving a sink, opening a wall, changing appliance locations, or removing a soffit can pull in plumbing, electrical, framing, flooring repair, ceiling patching, and ventilation work all at once. That is how a $20,000 cabinet refresh becomes a $60,000 remodel.
Start with the daily problems that actually affect how the kitchen works:
- Does the refrigerator door block the main path when it swings open?
- Is there at least one useful counter landing near the stove and sink?
- Does the kitchen connect to the dining area, or does one wall make the whole main floor feel boxed in?
- Is the window helping the room, or is the cabinet plan fighting it?
One wider opening can do more than a full gut. In a split-level house, the right opening between kitchen, dining, and stair landing can change how the entire main floor feels. The wrong opening removes storage, exposes an ugly ceiling transition, and still leaves the kitchen hard to use. That is the version that costs the most and changes the least.
If the kitchen remodel is part of a bigger house project, use 1970s House Renovation before locking in the kitchen scope. The kitchen decision and the wall decision and the flooring decision are often the same decision.
When the Original Cabinets Are Worth Saving
Some 1970s cabinets are better than they look, and the look is usually the problem.
The faces may be dark, worn, or dated, but if the boxes are solid — frames are square, shelves are not sagging, drawers can be repaired — a refresh makes more sense than a full tear-out. Full-plywood cabinet boxes from this era can be painted, refaced, or fitted with new doors and hardware and give another twenty years of use. Particleboard boxes near the sink or dishwasher are a different story.
Keep the cabinets when three things are true: the layout works, the boxes are solid, and the kitchen does not need major plumbing or appliance relocation. None of those things can be assessed from a photo or a first walkthrough. They require opening a drawer, checking the cabinet back near the sink, pressing on the shelf near the dishwasher, and looking at whether the existing appliance openings match what you are planning to buy.
Dark cabinets that pass that test do not have to stay dark. They can be cleaned, refinished, painted, or balanced with better counters, lighter walls, and under-cabinet lighting. That can change the room significantly without touching the cabinet boxes.
But do not spend heavily saving cabinets that force a bad layout to remain.
When Cabinets Should Be Replaced
Replace them when they are controlling the room in the wrong way.
Soft particleboard, water damage below the sink, broken drawer systems, cabinet depths that cannot fit modern appliances, or a layout that blocks the dishwasher door, the refrigerator swing, or the main cooking path — those are reasons to start over. Full replacement also makes more sense when the wall layout, plumbing, electrical, flooring, and lighting are all changing anyway. At that point the cabinets are getting replaced by the project whether you plan it that way or not.
| Cabinet Condition | Best Move | Why |
|---|---|---|
| Solid boxes, dated doors, useful layout | Refinish, paint, reface, or replace doors | Less disruption and less waste |
| Good cabinet runs but poor lighting | Keep cabinets and improve task lighting | The problem may be visibility, not storage |
| Water damage, swelling, soft shelves | Replace damaged runs | New finishes will not fix failing boxes |
| Bad appliance locations or blocked circulation | Redesign the layout | Keeping cabinets may preserve the wrong problem |
| Major wall, plumbing, or floor changes | Price full replacement | The kitchen is already being rebuilt around new work |
The expensive mistake is ordering cabinets before the soffit and wall decisions are settled. A cabinet order placed too early can lock the room into the wrong ceiling line, the wrong appliance locations, or a lighting plan that has to work around what got installed instead of what the room actually needed.
Soffits Can Be Cosmetic, Structural, or Full of Services
A soffit over 1970s kitchen cabinets is never just a visual problem until someone has looked inside it.
Some soffits are empty boxes — a builder's way of filling the gap between the cabinet tops and the ceiling when the cabinets stopped short. Some hide wiring runs. Some cover ductwork. Some carry plumbing. Some were built around an uneven ceiling that nobody wanted to repair. You cannot tell from the outside.

Do not tear out the whole soffit on day one. Open a small access area first, or have the contractor verify what is inside before the demo scope is priced. If it is empty, removal may be straightforward. If it carries ductwork, the remodel changes. If the ceiling above it is uneven or framed at a different height, removal may force drywall, framing, or cabinet-height decisions that were not in the original budget.
Three normal outcomes:
- Keep it: clean it up, repaint it, improve the lighting around it, and make it look intentional instead of leftover.
- Remove it: only after confirming services, ceiling condition, and what cabinet height will be after it is gone.
- Rebuild it cleaner: useful when services must stay but the old box is heavy and out of proportion with the new cabinet plan.
A rebuilt soffit can be better than an exposed mess of ductwork. The goal is not to remove every soffit. The goal is to stop the soffit from making the kitchen feel lower and darker than the room actually requires.
Old Flooring Can Change the Demo Plan
Old kitchen flooring is one of the places where a routine remodel can become a safety and budget problem without much warning.
Many 1970s kitchens have layers: sheet flooring over older flooring, underlayment over old adhesive, patching compounds, or flooring tucked under cabinets that cannot be removed cleanly without disturbing what is beneath. Pulling it up can expose material that should have been tested before demolition started.
You cannot identify asbestos by looking at flooring or adhesive. If the material is suspect and the work will disturb it — by sanding, scraping, grinding, or tearing it out — test it or bring in qualified help before the work starts, not after the first layer is already on the floor of the dumpster.
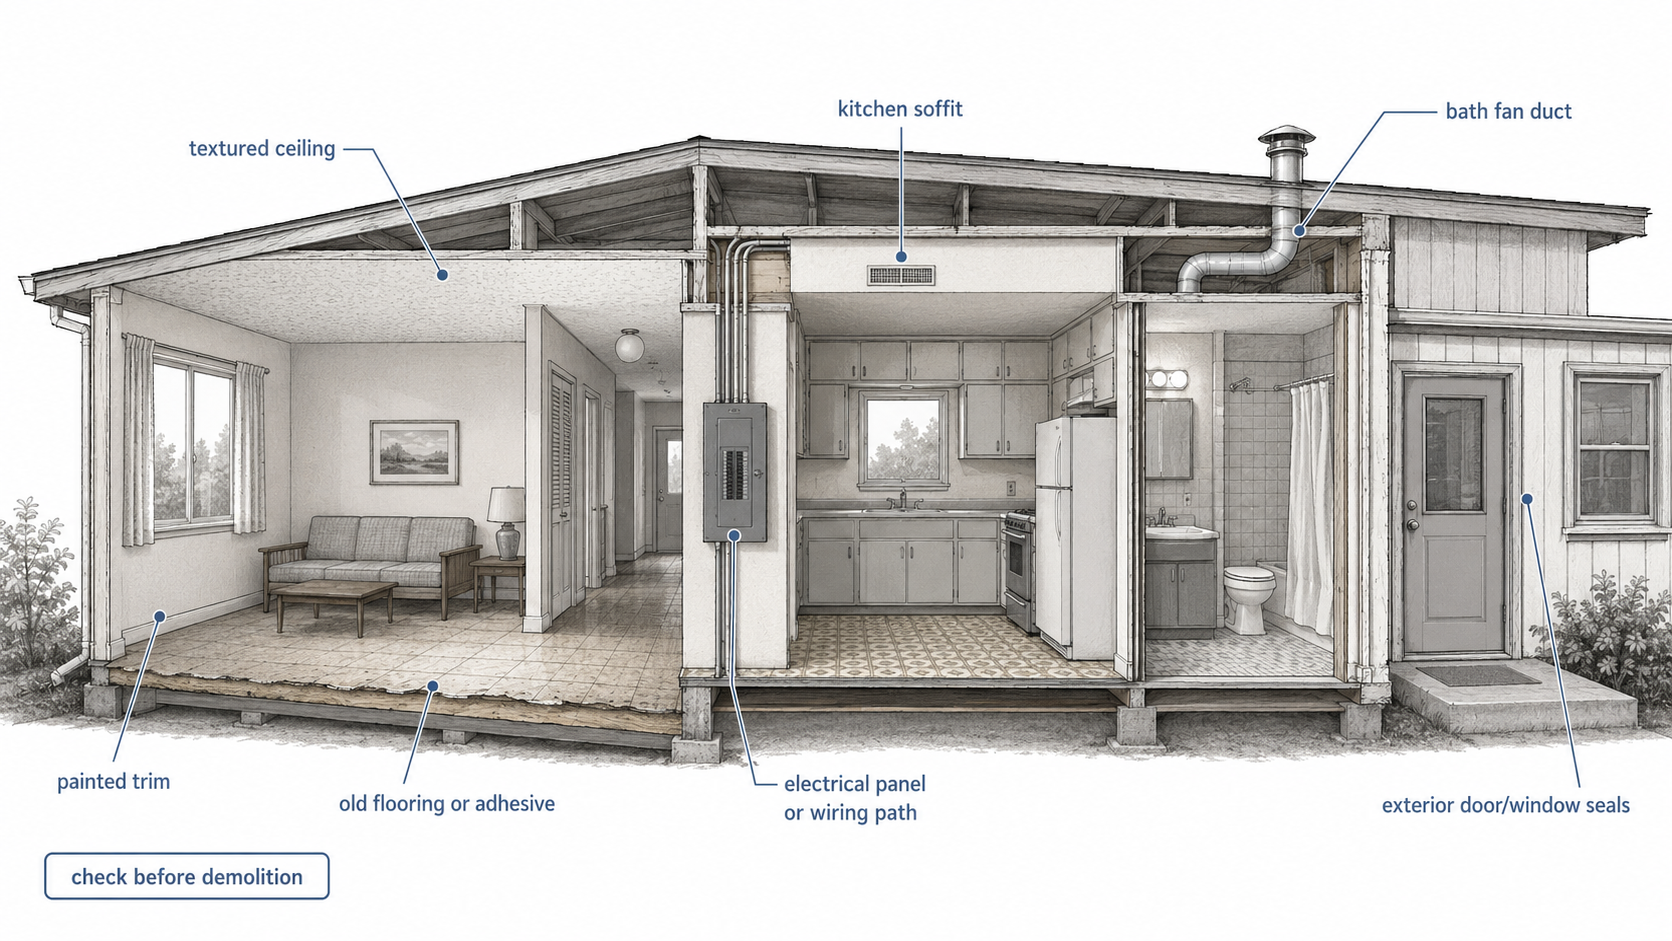
The same caution applies to painted trim, older cabinet finishes, textured ceilings, and patched walls. Homes built before 1978 may have lead-based paint. Sanding, scraping, cutting, or drilling painted surfaces creates dust that changes how the work needs to be handled and who is qualified to do it.
Lighting Is Usually the Fastest Visible Upgrade
Bad lighting makes a 1970s kitchen look worse than it is, and fixing it costs less than almost any other change in the room.
One fluorescent box in the center of the ceiling cannot do all the work. It leaves counters dark, makes cabinet faces look heavier, and turns the kitchen into one flat pool of light with shadows everywhere useful work happens. Before committing to new cabinets, spend an evening in the kitchen with a few plug-in lamps positioned at counter level and see what the room looks like with actual task light.
A better lighting plan has three parts, and they all matter:
- General light: clean, even ambient light for the room as a whole.
- Task light: counters, sink, range, and prep areas need dedicated lighting that does not depend on the overhead fixture.
- Accent or atmosphere: pendants over an island or peninsula, under-cabinet strips, or better sink lighting can shift how the room feels at 7 p.m. without being theatrical about it.
Lighting does not fix a bad layout. But it can rescue a good one. A kitchen that feels dark and heavy at night will still feel dated after new counters if the lighting plan stays the same.
Ventilation and Electrical Come Before Appliances
New appliances expose old assumptions, and in a 1970s kitchen the assumptions are usually wrong.
Most kitchens from this period were not planned for the circuit load, receptacle layout, range hood routing, microwave location, dishwasher, garbage disposal, under-cabinet lighting, and small-appliance use that a modern kitchen runs on daily. Adding an induction range to a kitchen that was wired for a gas cooktop is a different electrical project than it sounds.
Before appliances are selected, check the panel, circuit capacity, receptacle layout, range location, and ventilation path. Some houses from the mid-1960s into the mid-1970s may also have aluminum branch-circuit wiring. That is not automatically dangerous, but it needs evaluation by a licensed electrician before new loads or device changes are added.
Ventilation needs the same discipline. A range hood that only recirculates through a grease filter is not the same as proper exhaust. The difference shows up in the air quality, the moisture load, the grease that ends up on cabinet faces, and the smell that settles into the house after cooking. If there is a viable duct path to the exterior, use it. The routing decision should happen before the upper cabinet layout is drawn, not after.
Before and After: What Should Actually Change
The best before-and-after should not make the kitchen look like it belongs in a different house.
The 1970s kitchens that remodel well usually keep the useful parts — the window placement, the cabinet rhythm, the basic cooking zone, the connection to dining — and remove the fatigue around those parts. Better light. Cleaner counters. Working ventilation. Cabinets that are either saved properly or replaced for real reasons. A floor that was handled honestly before new material went down.
The weak version is the opposite: every visible surface changed, same bad lighting, same blocked circulation, same ventilation going nowhere, same hidden floor problem now buried under new flooring. That remodel photographs better than it lives.
What a Good 1970s Kitchen Remodel Usually Changes
| Kitchen Part | Usually Worth Checking | Common Good Fix |
|---|---|---|
| Cabinets | Box condition, layout, drawer function, water damage | Refinish, reface, replace damaged runs, or redesign if layout fails |
| Soffits | Wiring, ducts, plumbing, ceiling condition | Keep, remove, or rebuild cleaner after inspection |
| Flooring | Layers, adhesive, cabinet overlap, suspect materials | Test before disturbing, then replace with a durable kitchen floor |
| Lighting | Task light, sink light, counter visibility | Layered lighting instead of one center fixture |
| Ventilation | Range hood path, moisture, air movement | Proper ducting where feasible and code-compliant |
| Electrical | Panel, circuits, receptacles, appliance loads | Licensed review before appliances and lighting are finalized |
The sequence matters because the parts are connected. Cabinet height affects soffit decisions. Soffit decisions affect lighting. Flooring affects cabinet removal. Electrical affects appliances. Ventilation affects wall and ceiling work. Change one and you may be changing three.
Where 1970s Kitchen Budgets Break
Budgets break when the visible work gets priced and the hidden work gets left as an estimate to be figured out later.
A 1970s kitchen can look like a cabinet-and-counter job from the doorway. Then the soffit opens, the floor layers reveal a problem, the range hood has no clean duct path to the exterior, the panel needs a licensed review, and the ceiling patch above the removed soffit turns out to be bigger than anyone quoted. The contingency that looked excessive at the start of the project starts to look optimistic by week three.
For planning, hold a real contingency. Ten percent is light for a 1970s kitchen if the soffit has not been opened, the floor layers are unknown, the wiring has not been reviewed, and the ventilation path has not been confirmed. Fifteen to twenty percent is more realistic when those things are still open questions going into the project.
- Soffit surprises: ducts, pipes, wires, or a ceiling condition nobody priced to repair.
- Flooring surprises: multiple layers, suspect adhesive, uneven subfloor, or flooring trapped under cabinets that cannot be removed cleanly.
- Electrical surprises: appliance load requirements, old circuits, poor receptacle layout, or aluminum wiring that needs assessment.
- Ventilation surprises: no good duct route, blocked framing path, or exterior termination that requires more wall work than expected.
- Layout surprises: one removed wall changes flooring, ceiling, trim, lighting, and sometimes structure.
The cheap-looking remodel is often cheap only until demolition starts.
Split-Level 1970s Kitchens Need Their Own Check
A 1970s split-level kitchen is often tied to the stair and dining area in ways that change what the remodel can do.
The problem may not be the cabinets alone. It may be the way the kitchen turns its back on the living room, sits just above or below a stair landing, or blocks light from reaching the middle of the house. In a split-level, one well-placed opening can change how the main floor lives. But the wrong opening removes the only good cabinet wall, exposes a bad ceiling line, or makes the stair feel unfinished and unsafe.
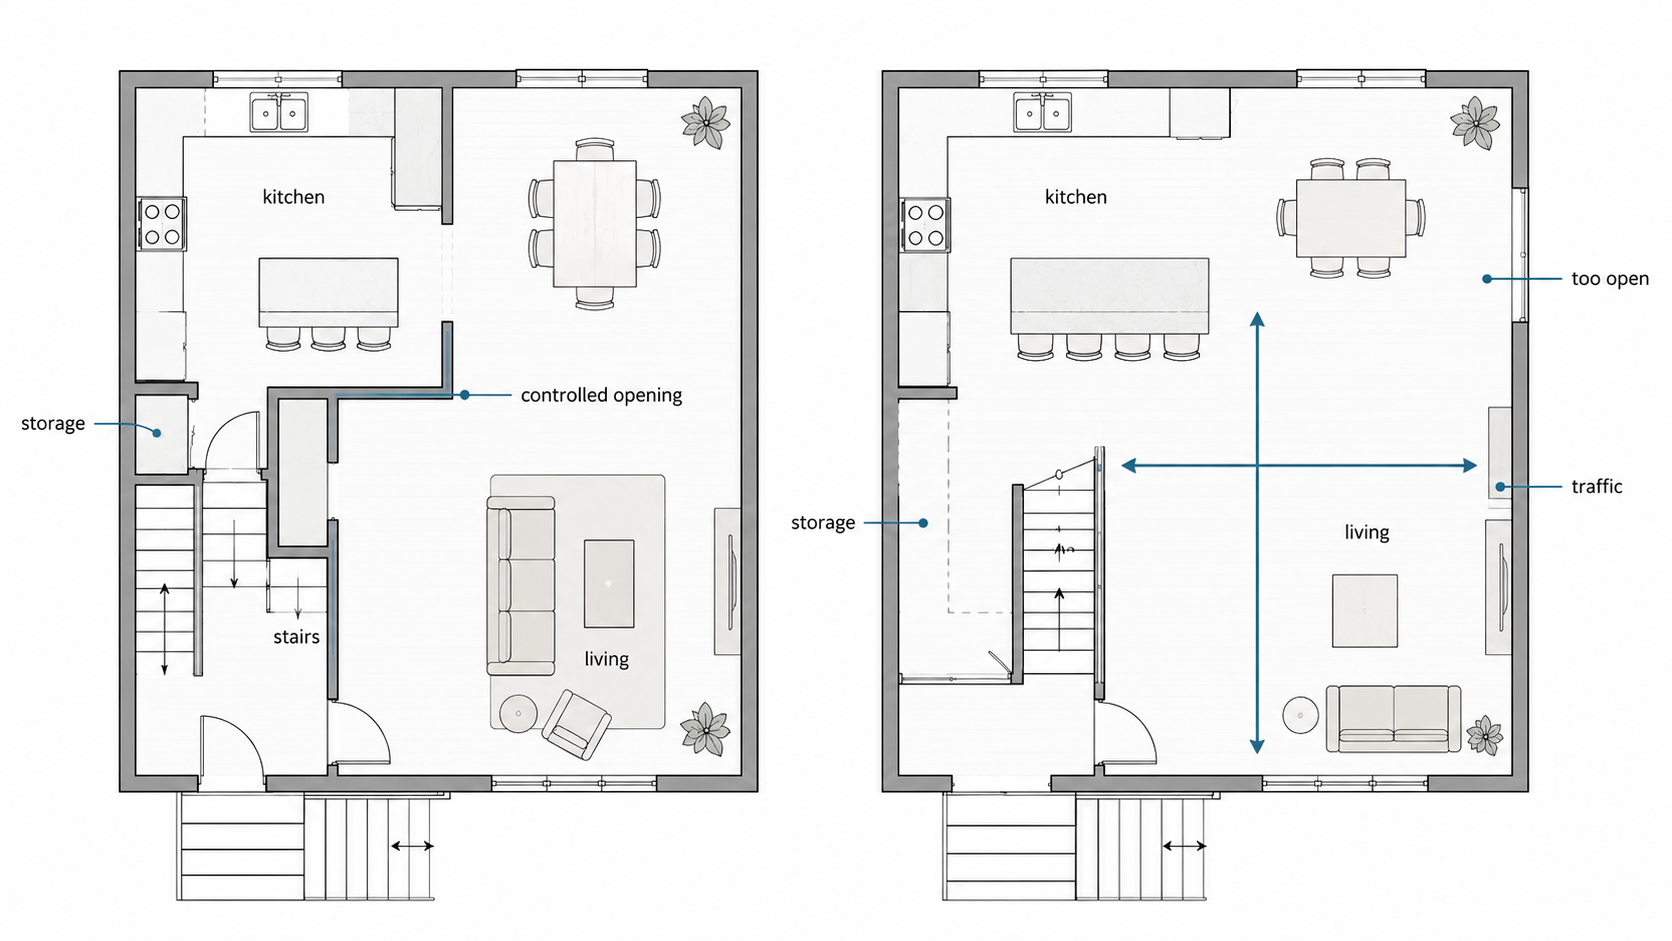
Before committing to a wall change in a split-level, check:
- How the kitchen connects to the dining area and whether one opening fixes it or needs more.
- Whether the stair landing needs its own lighting improvement independent of the kitchen.
- Which wall carries cabinets, structure, ducts, or wiring that has to go somewhere.
- How flooring will transition between levels when the wall is gone.
- What the entry view lands on after the wall comes out — a useful part of the kitchen or a dead corner.
What to Keep and What to Skip
Keep what gives the room structure and helps the house work.
That might be a useful cabinet run, a good window over the sink, a practical galley layout, a breakfast area that still makes sense, a peninsula that serves the dining room, or original wood that can be cleaned up instead of buried under something that will look dated faster.
Skip the updates that fight the house or the kitchen's actual constraints:
- Oversized islands forced into kitchens that do not have the aisle clearance to support them.
- Farmhouse trim and cottage details on a straightforward 1970s suburban kitchen.
- All-white finishes used to hide poor lighting instead of fixing the lighting.
- Open shelving in a kitchen that needs closed storage more than it needs visual interest.
- New floors installed before the floor layers, cabinet removal, and layout decisions are fully settled.
The best remodel looks calmer, brighter, and easier to use. It does not need to pretend the kitchen was built yesterday or belong to a house it was never part of.
FAQ
Is it worth remodeling a 1970s kitchen?
Yes, if the layout can work or be improved without rebuilding the entire room. Many 1970s kitchens have solid bones under dark cabinets, low soffits, old flooring, and weak lighting.
Should I keep 1970s kitchen cabinets?
Keep them when the boxes are solid, the layout works, and the damage is mostly cosmetic. Replace them when water damage, poor storage, bad appliance clearances, or layout problems are what is actually driving the remodel.
Can I remove a 1970s kitchen soffit?
Sometimes. Check inside first. A soffit may hide wiring, ducts, plumbing, uneven ceilings, or framing conditions. Empty soffits are easier to remove, but many are not empty.
What should I check before demolishing a 1970s kitchen?
Old flooring, adhesives, painted trim, textured ceilings, wiring, plumbing, cabinet attachment, soffits, and ventilation paths. If suspect materials will be disturbed, test before demolition starts.
Can a 1970s kitchen be updated without replacing everything?
Yes. Lighting, counters, hardware, flooring, paint, ventilation, and selective cabinet work can change the room substantially when the layout and cabinet boxes are still sound.
What is the biggest mistake in a 1970s kitchen remodel?
Choosing finishes before checking the layout, soffits, electrical, ventilation, flooring layers, and cabinet condition. That is how new finishes get installed over old problems that surface again within a few years.
Should I open the wall between a 1970s kitchen and dining room?
Maybe. It depends on what the wall carries — structure, wiring, ducts — and what the kitchen loses in cabinet storage and what the ceiling and floor repair will cost. One wider opening is often better than removing the whole wall.
Does a 1970s kitchen need new electrical?
Not always, but it should be reviewed before new appliances, lighting changes, or receptacle work is planned. Some houses from this period have aluminum branch-circuit wiring that needs proper assessment before new loads are added.
Read This Next
- 1970s House Renovation — start here if the kitchen is part of a bigger whole-house plan.
- 1970s House Style — understand what is worth keeping before flattening the decade.
- 1970s Front Door Update — useful if the kitchen remodel is part of a broader exterior and entry cleanup.
- 1970s Sunken Living Room — if the kitchen connects to a lowered living area or open-plan main floor.
References
- U.S. Environmental Protection Agency, Lead Renovation, Repair and Painting Program.
- U.S. Environmental Protection Agency, I'm remodeling my home. Do I need to be concerned about asbestos in building materials?
- U.S. Consumer Product Safety Commission, Repairing Aluminum Wiring.