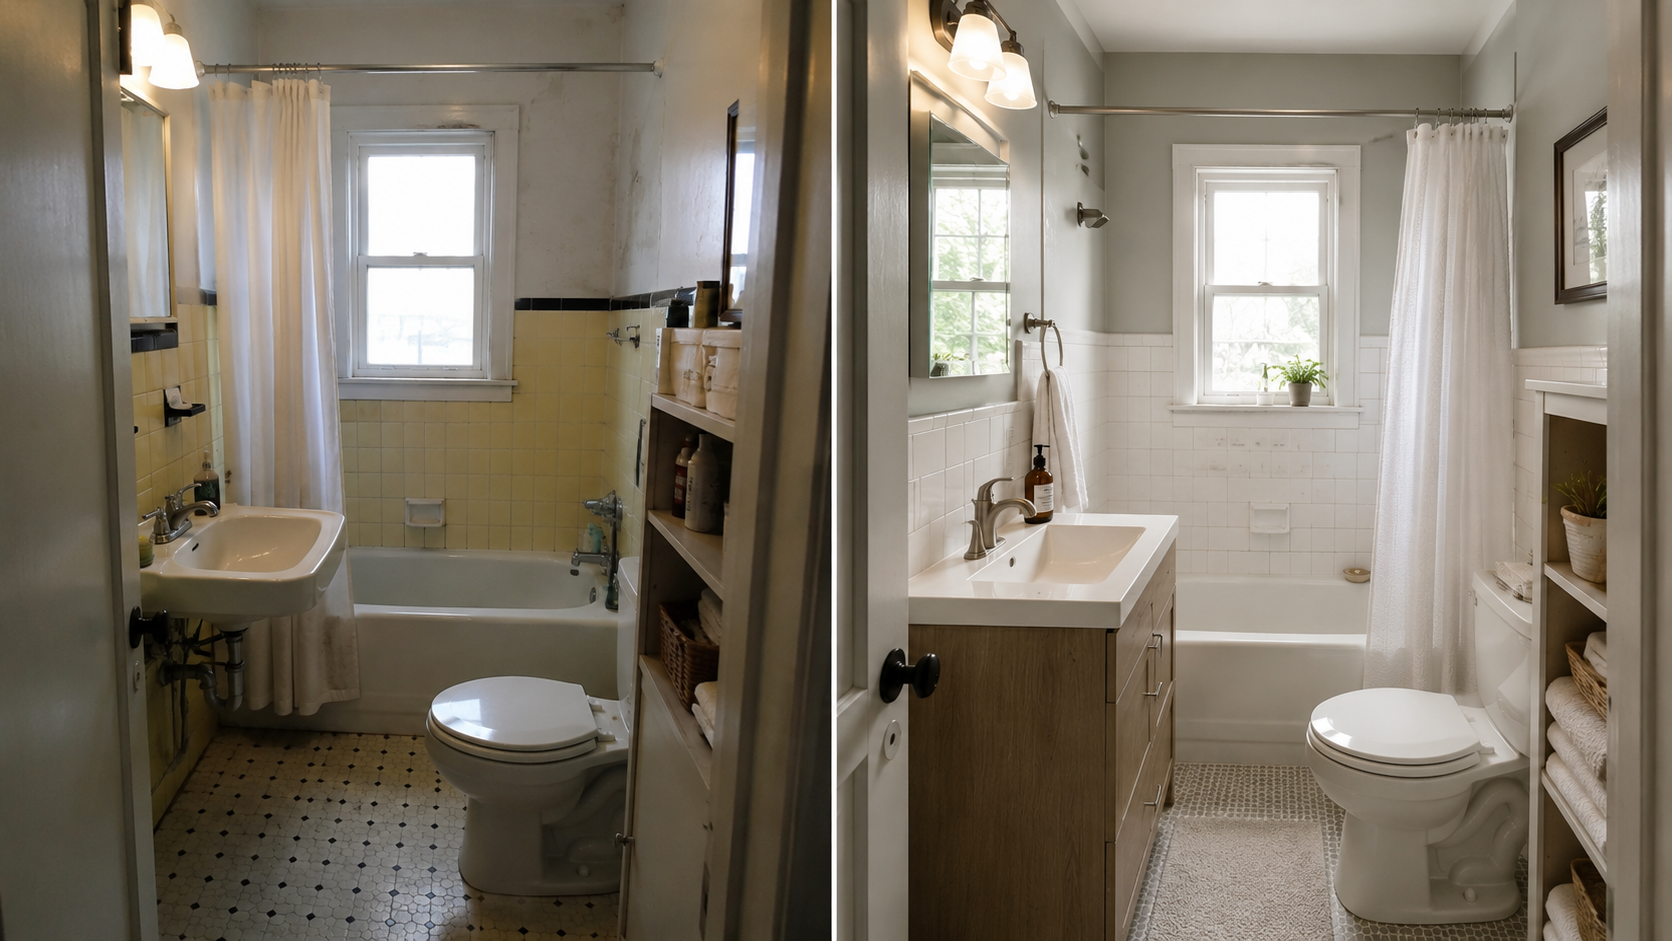
Image by ArchitectureCourses.org. A smart 1940s bathroom update can improve light, storage, surfaces, and daily use while keeping the room small and practical instead of turning it into a luxury remodel.
A 1940s bathroom can look like a small job right up until the demo starts.
New tile. New vanity. Better light. Maybe swap the tub or add a fan. It sounds contained because the room is tiny. That is where people get caught.
The old tile comes off and the wall is wetter than expected. The floor around the toilet is softer than it looked. The venting is weak, wrong, or missing. The plumbing move that looked minor on paper starts touching the wall cavity, the floor, and the schedule. A small room turns into a systems room fast.
The better remodels do not start with finishes. They start with diagnosis. Find the wet spots. Find the air problem. Find the weak floor. Then decide what deserves replacement.
If you want the decade background first, start with 1940s house styles. If the whole house is in play, not just the bathroom, read renovating a 1940s house before you start pricing rooms in isolation.
Layout comes before tile
A lot of 1940s bathrooms are cramped in the same predictable ways. The door swing hits the vanity. The vanity crowds the toilet. Storage is thin. The room works only because the fixtures are small and the household is used to it.
That does not mean the answer is a full tear-up every time. Sometimes one better fixture location, one slimmer vanity, or one cleaner door move fixes more than expensive surface work.
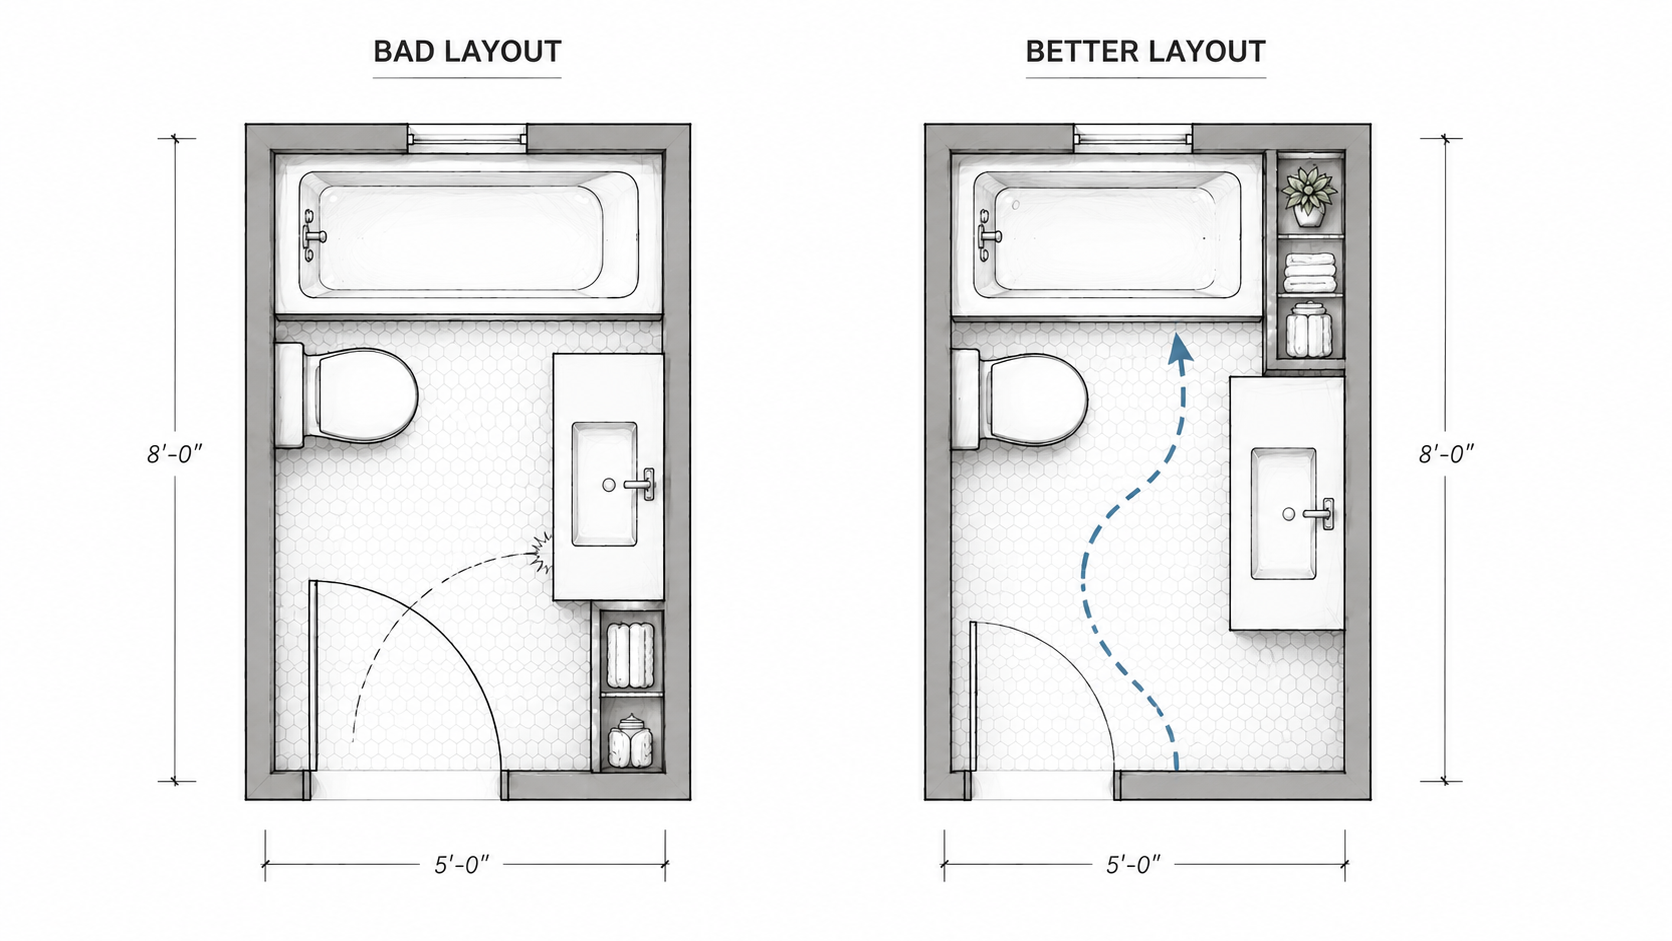
Illustration by ArchitectureCourses.org. In a small 1940s bathroom, moving fixtures is not always the first fix. Better door swing, storage placement, and clearance can make the same footprint work harder.
| Bathroom move | What it helps | What it can widen |
|---|---|---|
| Move the vanity | Improves door clearance and storage | Plumbing, patching, wall repair |
| Move the toilet | Can improve layout in a tight room | Drain work, venting, subfloor repair |
| Replace the tub with a shower | Can improve use and access | Waterproofing, drain changes, resale trade-offs |
| Add storage | Makes the room work better daily | Less than most people think if done inside the existing logic |
| Open or move a wall | Can fix a truly broken layout | Structure, electrical, finish work, cost spread into nearby rooms |
The expensive move is forcing a luxury-bath layout into a room that was never built for it. Bigger vanity. Bigger shower. Bigger tile. Bigger glass. The room rarely gets better just because everything got larger.
Keep what still earns its place
Not every old fixture deserves saving. But not every old piece is the problem either.
A small cast-iron tub that is still sound may be easier to keep than replace. A bathroom window that still gives the room daylight may matter more than a trendy mirror wall. Even a plain medicine cabinet can do more real work than an expensive vanity upgrade if storage is the main daily problem.
The point is not preservation for its own sake. The point is sequence. Replacing a sound element can widen the job without solving the room’s actual failure.
The tile quote is not the bathroom budget
This is one of the easiest ways to misread a bathroom remodel. The tile number looks like the job, so people start building the whole budget around the visible finish.
Then the room opens up. The walls are out of plumb. The old substrate is weak. The floor around the toilet or tub is softer than expected. The valve depth is wrong for the new wall build-up. Patch work, leveling, backing, edge trim, and all the small corrections start stacking around the tile install.
The protective move is simple: treat tile and finish numbers as one line item, not the project total. Ask what happens if the walls are crooked, the floor is soft, or the old tub surround comes off uglier than expected.
The wet wall is usually the real job
This is the section a lot of bathroom pages skip.
A bathroom wall that has been wet for years does not care how nice the new tile is. If the source problem is still there, the finish work just hides it for a while.
The failure can come from different directions. Slow plumbing leaks. Bad tub or shower waterproofing. Condensation from weak venting. Water getting driven into the wall because the surround details failed. Until you know which one you are dealing with, you are not fixing the bathroom. You are decorating the symptom.
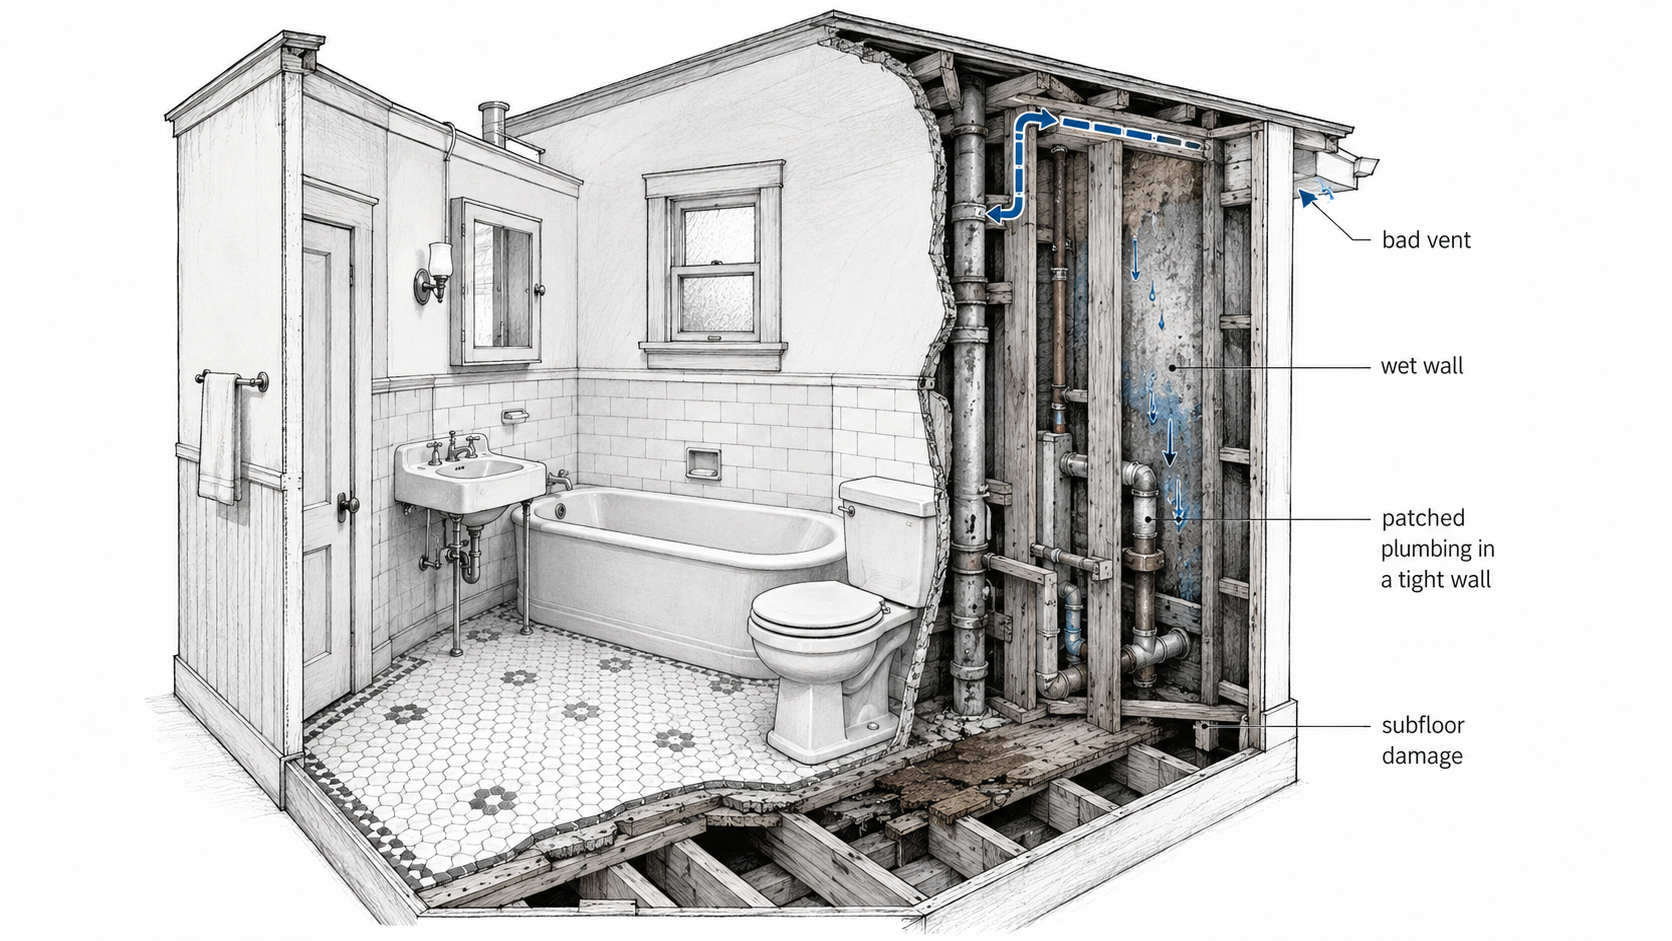
Illustration by ArchitectureCourses.org. A small 1940s bathroom can hide venting, plumbing, wall moisture, and subfloor problems that make a simple update grow fast.
Diagnosis first. Source second. Repair after that.
The fan and the moisture problem are not the same thing
A better fan helps. A fan is not magic.
If the room is steaming up because it has no real exhaust path, fix that. But if the subfloor is rotting because the tub edge leaks, or the wall stays wet because the assembly is wrong, a stronger fan will not save you. It only changes the air. It does not fix trapped water.
That is where bathroom remodels go wrong in a very specific way. Somebody notices mold, peeling paint, or a musty smell. The quote adds a new fan. The real leak stays. Six months later the finish looks tired again and the room still smells off.
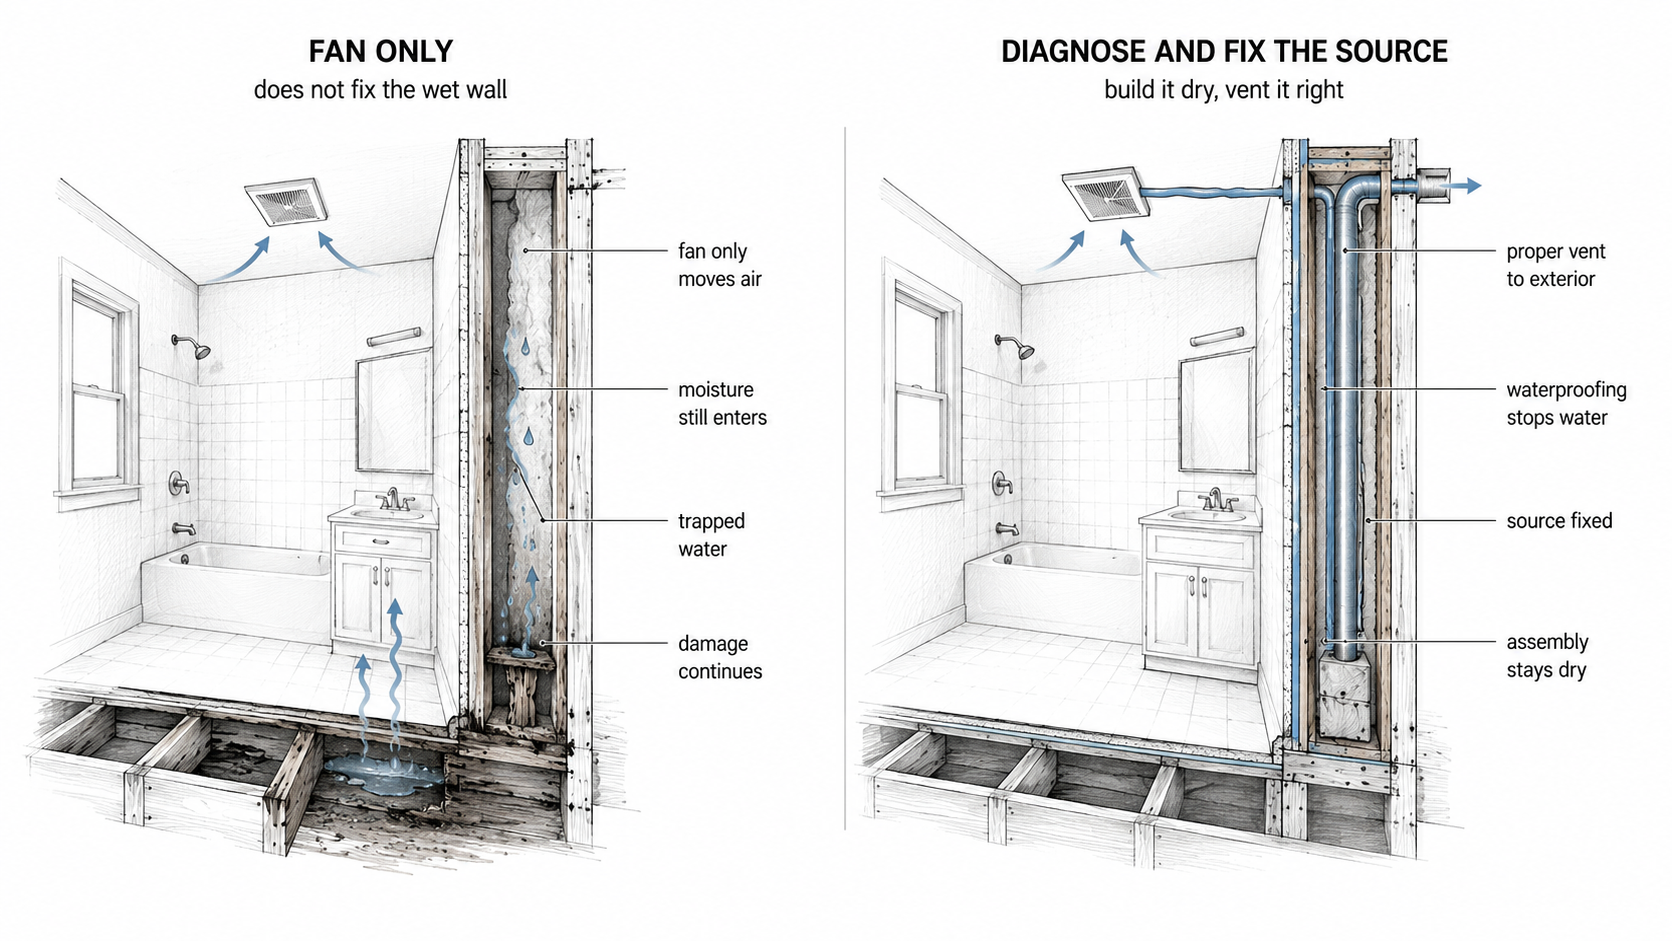
Illustration by ArchitectureCourses.org. A bathroom fan can move humid air, but it will not fix a wet wall, bad waterproofing, leaking plumbing, or trapped moisture inside the floor and wall assembly.
The plumbing move is where the room starts touching the house
Moving a vanity sounds small. Moving a toilet sounds manageable. Swapping a tub for a shower sounds modern and simple. This is where budgets start breaking.
Now the drain path changes. The vent path changes. The floor may need to open farther than expected. Old plumbing that was tolerated because it was hidden stops being easy to leave alone. One fixture move starts pulling on the whole room.
That does not mean never move plumbing. It means the boring work has to be priced first. The hidden cost is usually not the fixture. It is what the fixture makes you touch.
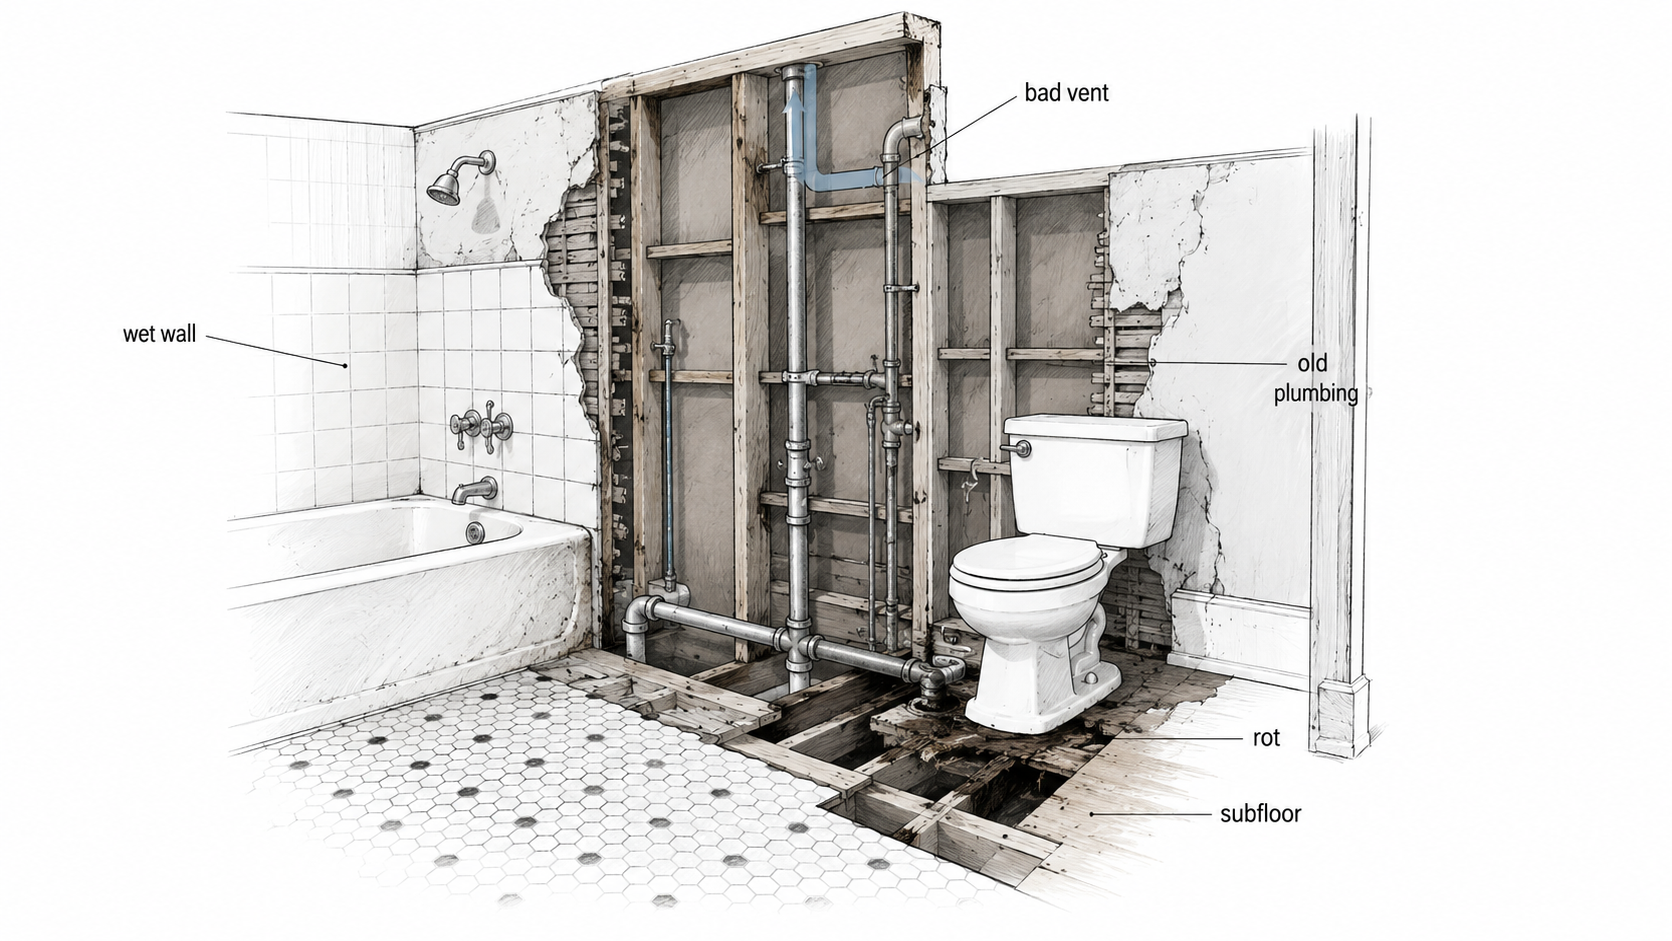
Illustration by ArchitectureCourses.org. Bathroom remodel costs often rise after demolition exposes old plumbing, weak venting, damaged subflooring, wet-wall repairs, and tight framing conditions hidden behind the finished surfaces.
One-bath houses punish slow sequencing
This is another section most articles skip.
A one-bath house turns a bathroom remodel into a household problem immediately. The room cannot stay out of service for long. That changes everything: demolition timing, inspection timing, material lead times, and how much surprise work the project can absorb before daily life starts breaking down.
That is why one-bath remodels often cost more than the room size suggests. The pressure is higher. There is less tolerance for delay. If the toilet has to go back in fast, some decisions get made from urgency instead of judgment. That is where weak patch work, rushed plumbing, and bad waterproofing start creeping in.
The protective move is blunt: sequence the room like it is mission-critical, because it is. Confirm long-lead items before demo. Know which repairs have to happen before the room can become usable again. Do not start by assuming the household can make it work.
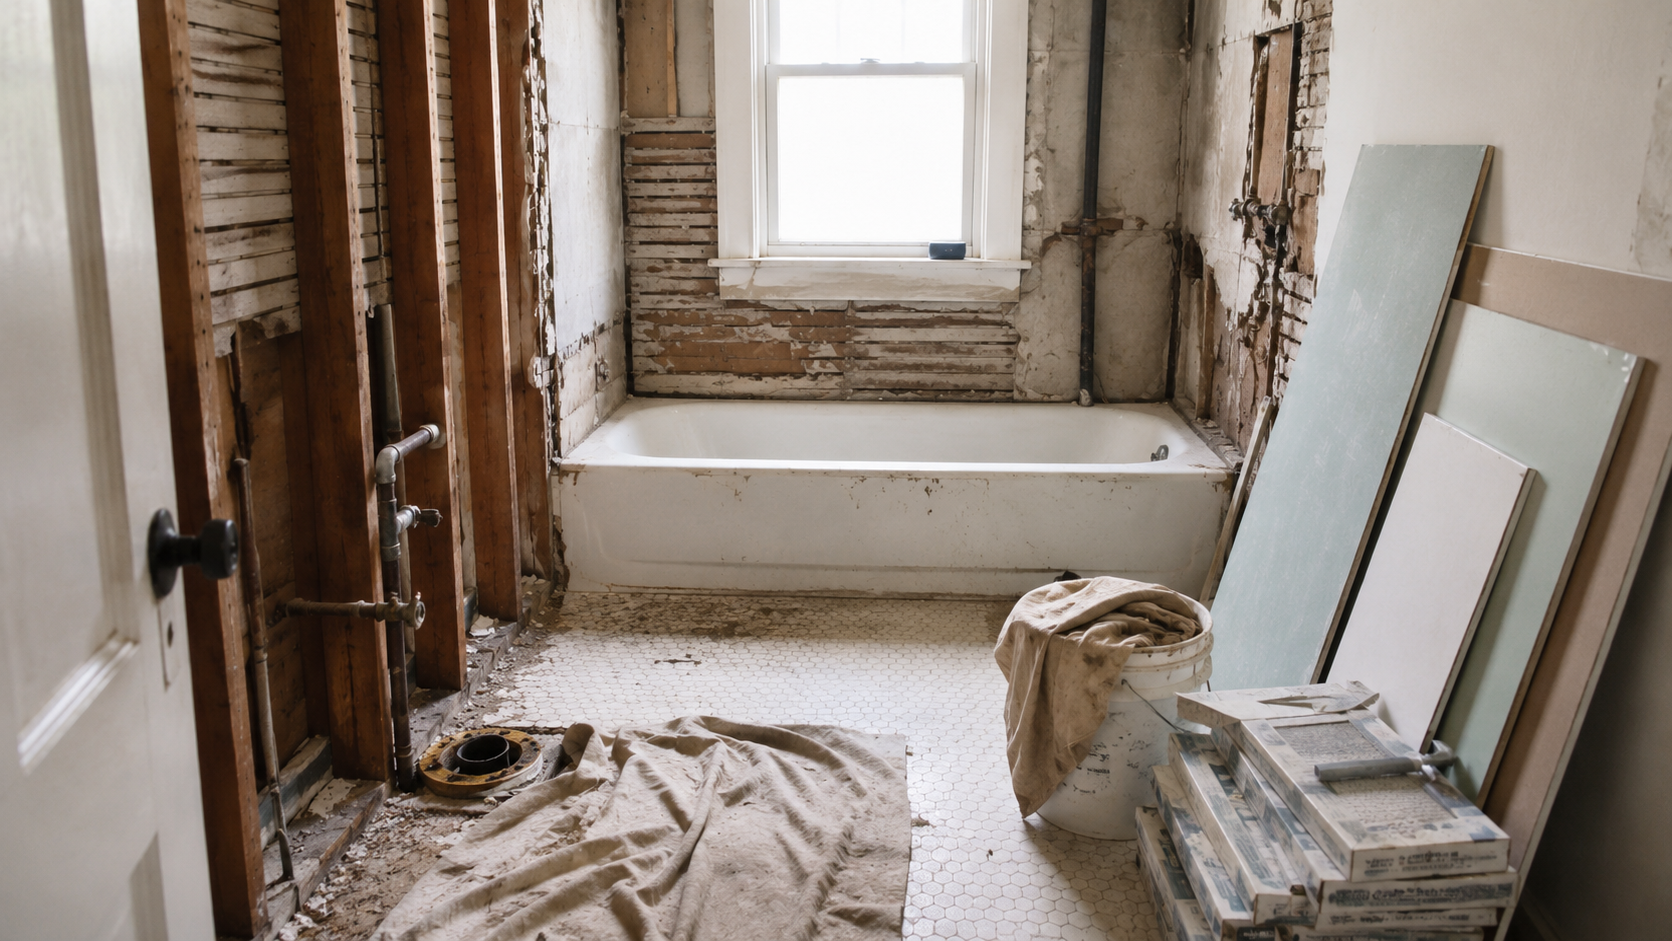
Image by ArchitectureCourses.org. In many 1940s one-bath houses, the hardest part of the remodel is not the tile or fixtures. It is keeping the house functional while the only bathroom is out of service.
That small floor patch can be the whole point
Bathrooms hide rot well.
The damage around the toilet flange, the tub apron, or an old shower curb may only show up once the finish layers are gone. That is why a bathroom can feel solid enough to use for years and still need subfloor repair the minute the remodel begins.
This is where people waste money on the visible upgrade first. Fancy tile. Better fixtures. Nicer glass. Meanwhile the floor under the room is what decided the scope.
If the floor is weak, repair the floor. Everything else waits.
Small bathrooms go upside down fast
This is the part people usually find out late.
Because the room is small, owners assume the budget risk is small too. But a bathroom is tied to whole-house systems. One tiny room can still widen plumbing, venting, waterproofing, electrical, floor repair, wall repair, and schedule pressure.
That is how a modest bathroom becomes financially upside down. The finish area is small. The repair logic is not.
The check is blunt. Ask whether the next dollar is making the room work better or only making it look more expensive. Those are different jobs. Small old bathrooms punish that confusion fast.
Spend here before the fancy finish
If the budget is not endless, spend in this order:
- Moisture diagnosis and repair. If the room is wet, the finish work is weaker than it looks.
- Venting and air movement. A bathroom that cannot clear moisture stays tired fast.
- Subfloor and wall repairs. Fix the weak assembly before building over it.
- Layout and storage. Better daily use usually beats more expensive materials.
- Tile, fixtures, and decorative finish moves. These come after the room is honest again.
That order is less fun, but it keeps the remodel from becoming a prettier version of the same old problem.
FAQ
Should I replace the tub in a 1940s bathroom?
Only if the tub is truly failing, the room works badly with it, or access needs have changed enough to justify the waterproofing and drain work that usually follow.
Is it worth moving the toilet?
Sometimes. But toilet moves widen the job fast because they pull on drain location, venting, subfloor work, and finish repair. The gain has to be real.
What is the biggest mistake in a 1940s bathroom remodel?
Treating the room like a tile project when the real failure is moisture, venting, or a weak floor assembly.
Can I remodel a one-bath house in phases?
Yes, but the sequencing has to be tighter than people expect. In a one-bath house, delay is not just annoying. It changes how the household functions, which is why rushed decisions start creeping into the work.
Read This Next
If the whole house is in play, not just the bathroom, start with renovating a 1940s house.
If the kitchen is part of the same project, read 1940s kitchen remodel before you let two small rooms widen the budget at the same time.
If you are still placing the house in the right decade first, go back to 1940s house styles.