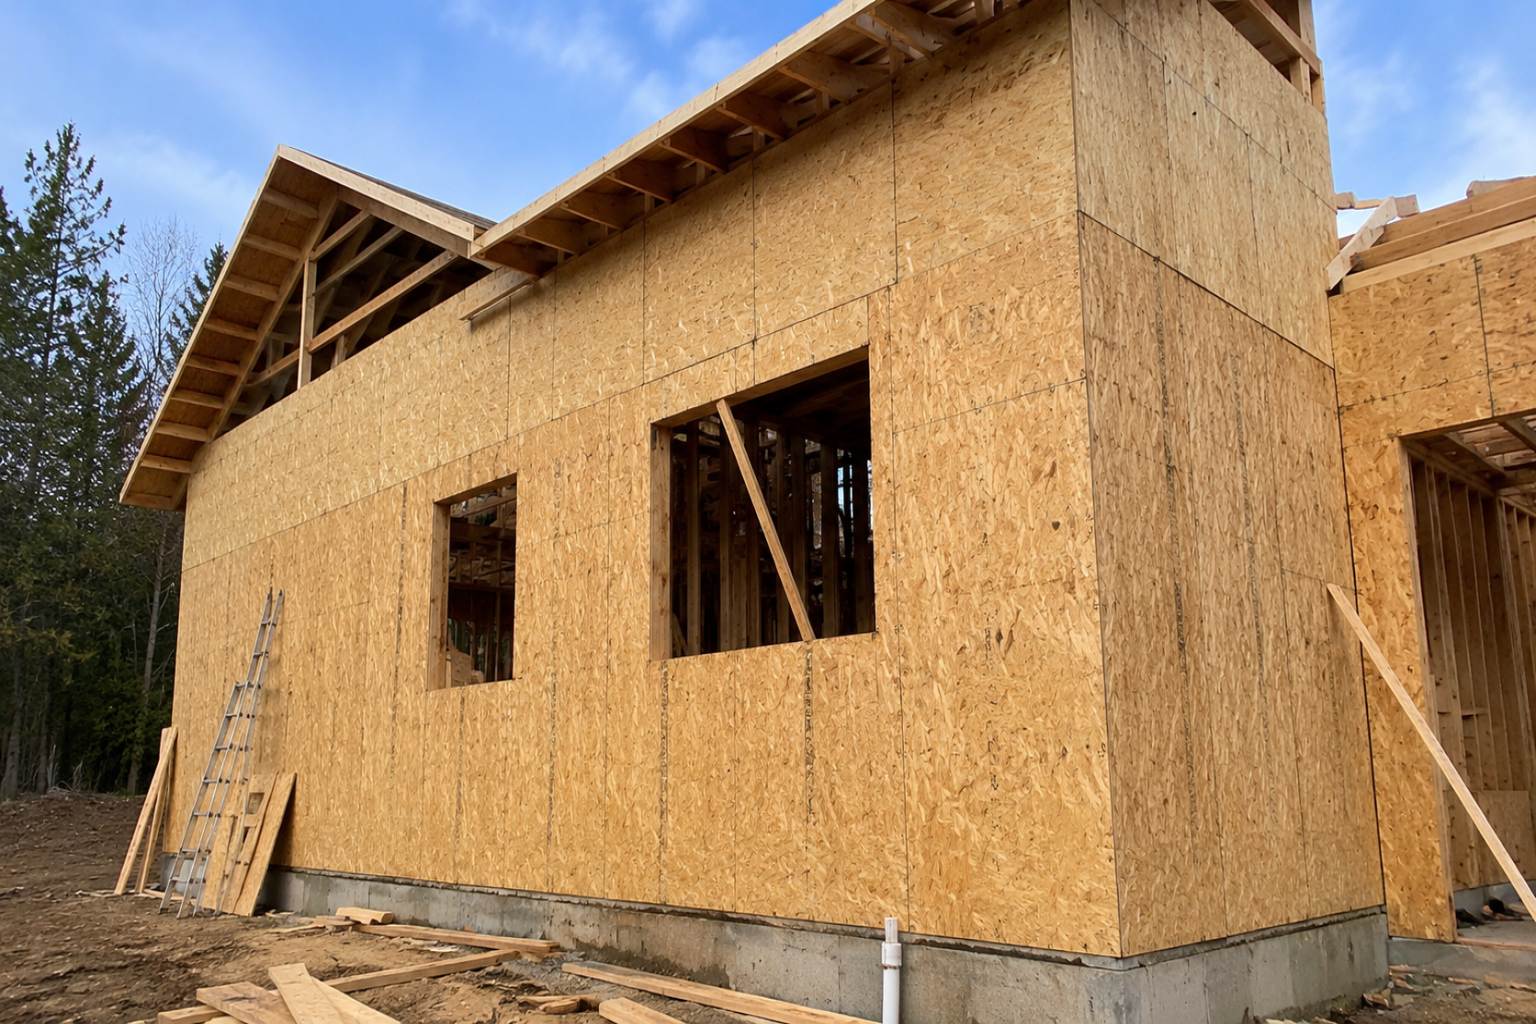
House sheathing is the panel layer that turns framing into a working shell.
The same word gets used for roof decks, wall panels, floor panels, garage walls, porch roofs, additions, and repair patches. Those locations do not all need the same answer, because water exposure, fastener holding, panel spacing, and flashing order all change from one to the next.
Choose sheathing by location and risk, not by the cheapest sheet in the stack.
How house sheathing works
The frame needs a skin
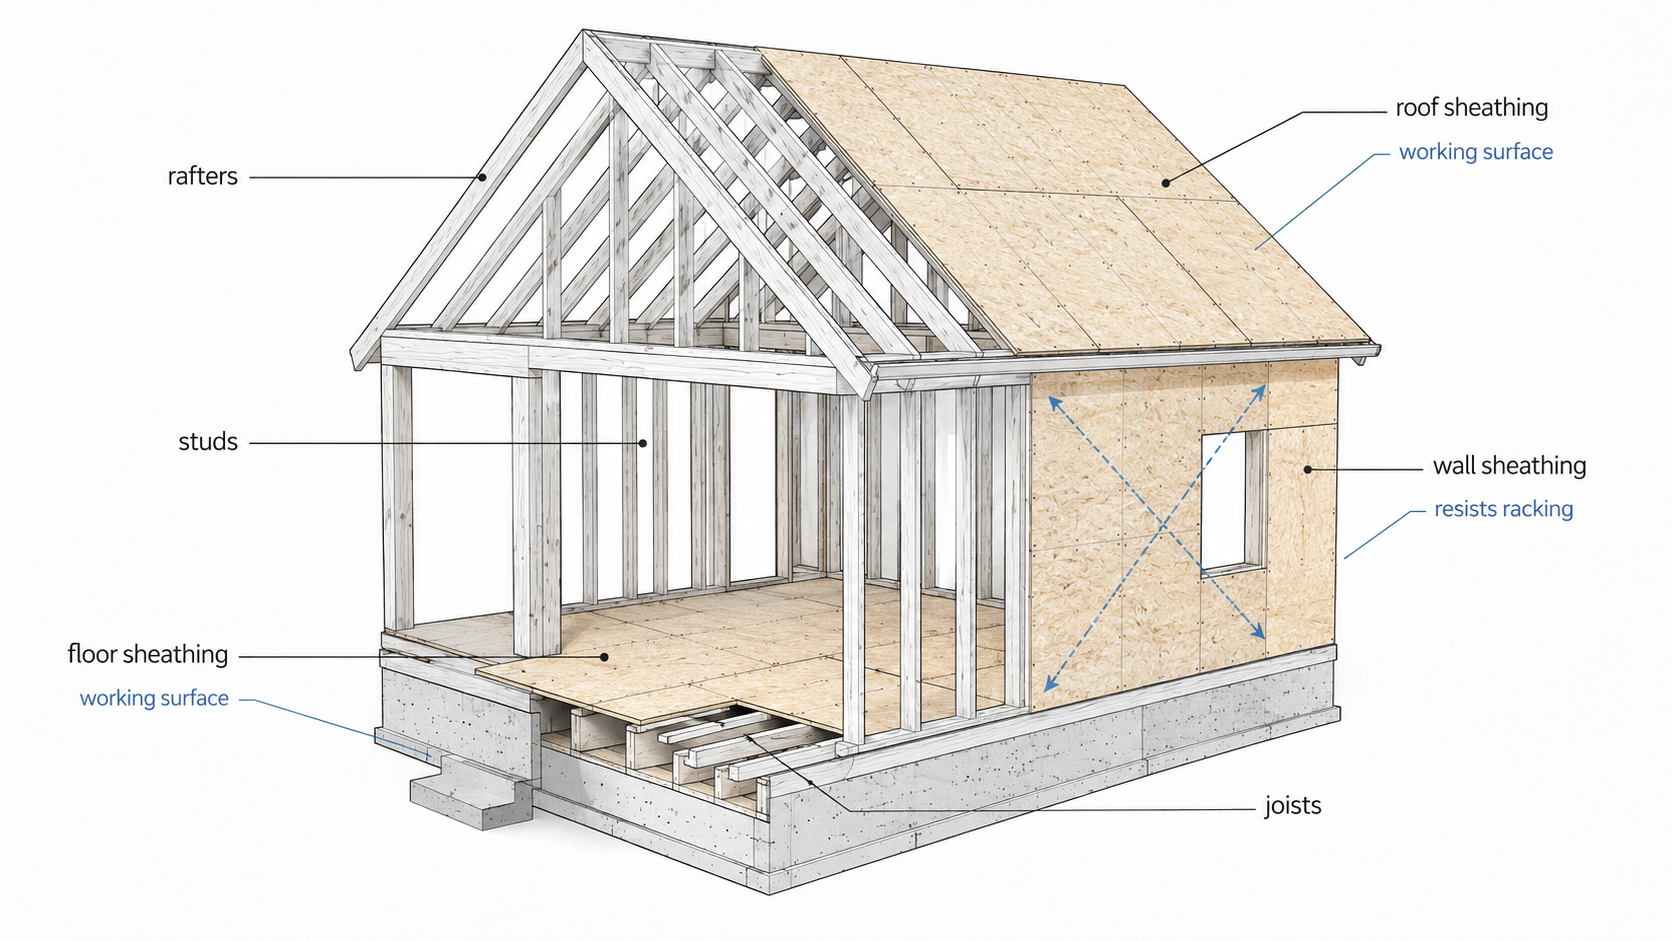
A framed house is not stiff just because the studs, rafters, joists, and plates are standing. The frame needs panels that tie those pieces together.
Roof sheathing ties rafters or trusses into a deck. Wall sheathing helps studs resist side movement. Floor sheathing spreads loads across joists and gives the floor system a working surface.
Without sheathing, the frame racks, twists, and damages easily before the rest of the envelope is complete. Once the panels are on and fastened correctly, the house starts to behave like one connected shell.
Sheathing is not the whole envelope
Sheathing does not replace flashing, roofing, housewrap, siding, underlayment, or drainage. It gives those layers something solid to attach to.
That difference is easy to forget. A wall can have strong sheathing and still leak if the water-resistive barrier is missing, and a roof deck can be solid and still rot if the flashing or ventilation is wrong. Sheathing is one part of the system, not the system by itself.
Where the risk starts
Most sheathing failures start at exposed edges, openings, valleys, bottom plates, and places where water gets trapped against the panel.
A panel can look fine from the outside while it swells at the edge or goes soft around a hidden leak path. That is why panel choice, fastener pattern, spacing, flashing sequence, and exposure time all matter.
House sheathing materials and trade-offs
Most house sheathing decisions come down to four things: structure, water exposure, cost, and what will cover the panel later.
The cheapest panel is not automatically the wrong one, and the priciest is not automatically necessary. The location decides more than the label on the stack does.
| Material | Where it usually makes sense | Main advantage | Main risk |
|---|---|---|---|
| OSB | Standard wall sheathing, many roof decks, production framing | Lower cost and easy availability | Edges can swell if wet too long |
| Plywood | Walls or roofs with higher moisture risk, repairs, better-grade work | Handles wetting and drying better than OSB | Higher material cost |
| Integrated sheathing panels | Projects where the panel also works with a taped weather-barrier system | Can reduce separate housewrap steps | Seams and tape must be installed correctly |
| Fiberboard or older blackboard panels | Existing older homes where the wall is already built that way | Can be breathable and common in older construction | Usually not a structural substitute for modern sheathing |
| Continuous insulation over sheathing | Energy retrofits and better wall assemblies | Reduces thermal bridging | Does not replace structural sheathing or bracing |
OSB
OSB is common because it is affordable, available, and approved for many wall and roof uses when the panel rating, span, thickness, and fastening schedule match the job. It is the default sheathing on many production houses.
The weak point is moisture. OSB edges are vulnerable when panels sit exposed too long, when cut edges are left unprotected, or when leaks keep the panel wet after the house is finished. Once edges swell, they do not flatten back like new.
Plywood
Plywood usually costs more, but it is more forgiving around wetting and drying. It can be a better choice for repairs, exposed edges, roof work, coastal conditions, or walls that will carry heavier cladding.
Plywood is not magic, though. Bad flashing, trapped water, and poor nailing can still ruin it. The advantage is that it gives the wall or roof more forgiveness when conditions are not perfect.
Integrated weather-barrier panels
Some panels combine structural sheathing with a factory-applied weather-control surface. They can save time because the crew tapes seams instead of wrapping the whole house separately.
The trade-off is installation discipline. Tape, seams, corners, penetrations, surface condition, and weather all matter. A rushed taped-panel system can fail at the same weak places it was supposed to simplify.
Older fiberboard and blackboard sheathing
Older homes may have fiberboard, blackboard, Bildrite, Celotex, or similar panels. Some stayed dry for decades and still work as part of the wall. Others crumble once leaks, siding failure, or trapped moisture reach them.
The structural point matters. Many older fiberboard panels should not be treated like modern structural OSB or plywood sheathing. If the wall needs bracing, shear strength, or new cladding support, check that before covering it again.
Continuous insulation
Foam, mineral wool, and wood-fiber insulation panels can sit outside structural sheathing to improve energy performance. They reduce thermal bridging through studs, but they do not remove the need for proper bracing and attachment.
When continuous insulation is added, fastener length, cladding attachment, drainage, and wall drying direction all need attention. The insulation layer changes the wall, even when the structural sheathing behind it stays the same.
How to read the panel stamp
Every sheet of rated sheathing carries a stamp, and once you can read it, you can check almost any sheathing decision yourself, at the lumberyard or up on the roof, without taking anyone's word for it. Four things on that stamp do most of the work.
The span rating is the pair of numbers with a slash, like 24/16 or 32/16. The left number is the widest rafter or truss spacing, in inches, the panel is rated for as a roof deck; the right number is the widest joist spacing it is rated for as a subfloor. So a 32/16 panel is good for rafters up to 32 inches apart or floor joists up to 16, as long as the long side runs across the supports. A single number instead of a pair means it is a floor or siding panel, not general sheathing. Sheathing rated 24 or higher on the roof number can also be used on walls.
The Performance Category is the thickness, written like 7/16 or 15/32. It runs close to the actual thickness and is the number the building code and the plans refer to. This is what people mean by a “7/16 wall” or a “5/8 roof.”
The bond classification is where money gets wasted or walls get ruined. It reads either Exposure 1 or Exterior. Both use waterproof glue, so both survive rain during construction, but only Exterior is built to stay exposed to weather for the long term. The everyday panel the trade calls “CDX” is Exposure 1, and it gets mistaken for an exterior panel constantly. It will shrug off several soakings while the house goes up, but it is not meant to sit bare to the sky for months or serve as permanent exposed material. For anything that stays exposed, the stamp has to say Exterior.
The strength-axis mark, an arrow or a face-orientation note, points along the panel's stronger direction, which has to run across the rafters, trusses, or joists rather than parallel to them. The span rating assumes it, so a panel turned the wrong way is a weaker deck than its own stamp promises. One more small thing worth knowing: rated panels are cut a hair under a true 4 by 8 feet, “sized for spacing,” exactly so you can leave the 1/8-inch gap at the joints and still land on the framing.
A couple of extras show up on some sheets. Structural 1 means enhanced racking and shear strength, which matters on engineered shear walls and diaphragms rather than an ordinary wall. The mill number and the product-standard line (PS 1 or PS 2) are the maker's ID and the standard the panel was tested to. If a supplier hands you a substitute, the stamp is how you check in about ten seconds whether it actually matches the span, thickness, and exposure the job calls for. Where the plans or the inspector specify something, that governs over any rule of thumb here.
Roof sheathing vs wall sheathing
Roof sheathing and wall sheathing are related, but they fail in different ways.
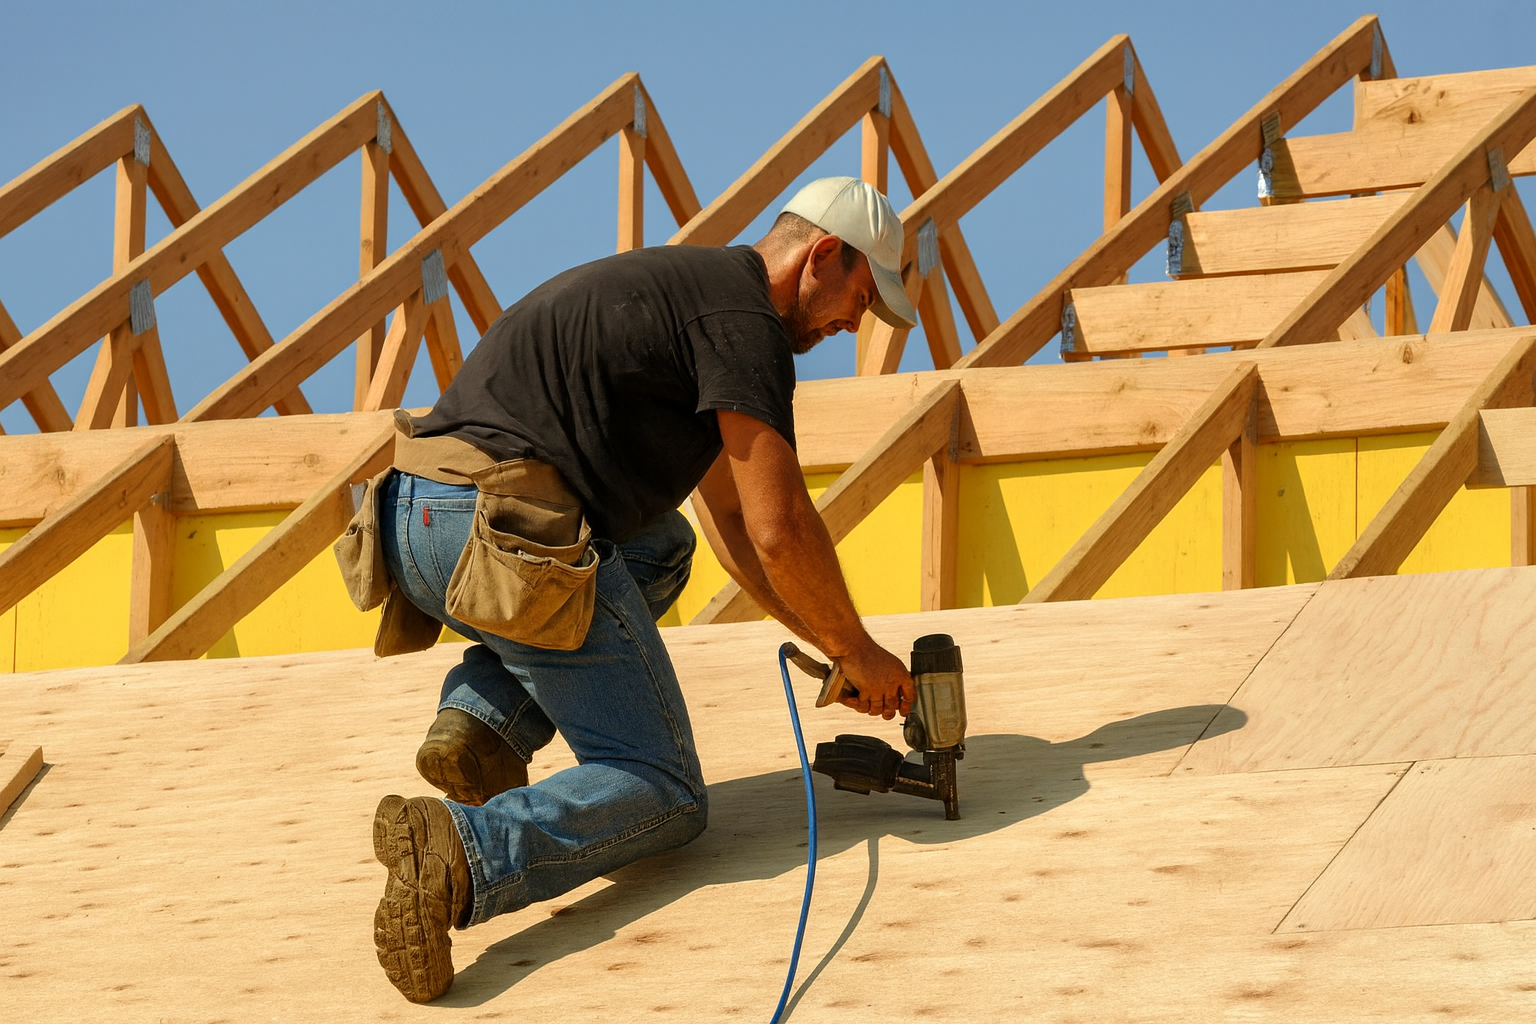
Roof sheathing has to support underlayment, shingles, metal roofing, snow loads, wind uplift, and foot traffic during installation. Wall sheathing has to brace studs, support siding, carry fasteners, and work behind the water-resistive barrier.
| Location | Main job | Common failure | Better next page |
|---|---|---|---|
| Roof sheathing | Creates the roof deck over rafters or trusses | Rot, soft decking, swollen seams, loose fasteners | Roof sheathing basics |
| Wall sheathing | Braces the wall and supports WRB, siding, and trim | Water damage around windows, siding waves, weak backing | Exterior wall sheathing |
| Damaged roof deck | Needs repair before underlayment and roofing hide the problem | Rot discovered during tear-off | Replacing roof sheathing |
Do not let the broad word “sheathing” blur the decision. A roof deck repair, a vinyl siding backing problem, and an old fiberboard wall are separate jobs.
Old roof planking Board roof deck found on older houses before plywood or OSB was common Large gaps, split boards, loose planks, cupping, poor fastener hold Roof planking
Exterior wall sheathing thickness
Exterior wall sheathing thickness affects more than price. It affects nail hold, wall stiffness, panel flatness, and how much abuse the wall can take before siding goes on.
Common wall sheathing often starts around 7/16-inch OSB or 15/32-inch plywood, but the right panel depends on panel rating, fastener schedule, wind exposure, seismic risk, bracing design, siding type, and local code. Do not treat one thickness as universal for every wall.
- 7/16-inch OSB or similar rated wall panels are common on standard wall framing where the design, fasteners, and local conditions allow it.
- 15/32-inch or 1/2-inch panels can give better nail bite and a flatter base, especially where siding attachment matters.
- 5/8-inch panels may appear where the wall is engineered for higher loads, heavier cladding, or stricter bracing requirements.
Thin panels can pass inspection and still become a problem when they are left wet, nailed poorly, or used behind cladding that needs a flatter base. Thicker panels cost more, but they can reduce movement, edge damage, and siding problems in the right places.
The expensive mistake is using the same panel everywhere without thinking about exposure. Corners, shear walls, garage returns, tall walls, heavy siding, and areas likely to get wet often deserve more attention than a protected short wall under a deep overhang.
For more wall-specific decisions, see exterior wall sheathing.
Vinyl siding, codes, and missing sheathing
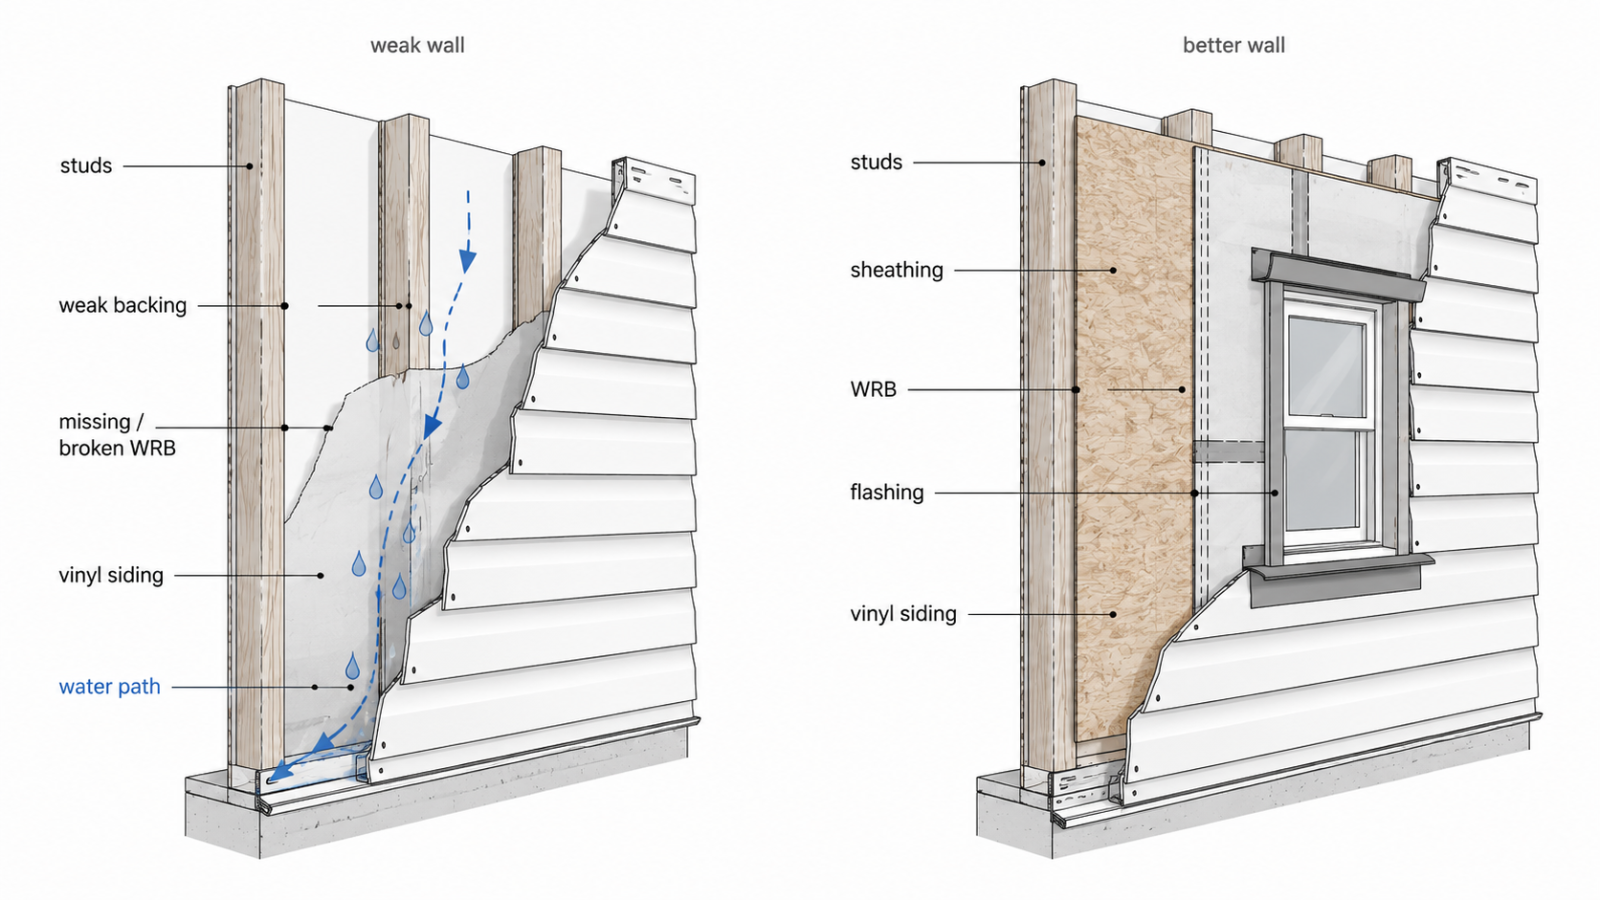
Vinyl siding is not wall sheathing, it is not structural bracing, and it is not a water-resistive barrier on its own.
This is where a lot of wall repairs go wrong. Someone strips old siding, sees open studs or weak old board sheathing, and treats the new vinyl as if it will tighten everything up. It will not, and the wall it hides can bow between studs, leak around openings, and move more than the siding can cover. The first visible sign may be loose siding, cracked trim, or waves in the wall, but the cause is usually deeper than the siding panel.
Fasteners need something solid behind them
Siding fasteners must reach a suitable substrate and still allow the siding to move as it expands and contracts. Foam alone is not enough unless the wall assembly is designed with furring, proper fasteners, or another approved attachment method.
Shortcuts here are expensive because the fix usually means removing finished siding, correcting the backing or furring, and reinstalling the wall covering.
Bracing still matters
Some walls use intermittent bracing, let-in bracing, or engineered braced-wall methods. Full structural sheathing often makes the wall simpler to stiffen, but the required method depends on the design and local code.
The practical point is simple: do not cover a weak wall and expect the cladding to solve it. Check the sheathing, bracing, WRB, and fastening surface before the siding goes back on.
Estimate sheathing before buying panels
Sheathing quantity changes with wall height, roof pitch, gables, openings, waste, panel size, and repair scope. Guessing from floor area alone is how you end up short on sheets or paying for panels you do not need.
Use the Sheathing Calculator for a broad estimate across walls, roofs, floors, gable ends, repair areas, openings, panel size, and waste.
For specific areas, use the Wall Sheathing Calculator or the Roof Sheathing Calculator. The main sheathing calculators page groups the roof, wall, floor, OSB, plywood, gable-end, and repair-cost tools in one place.
If the sheathing is already soft, swollen, mold-stained, rotted, or water damaged, do not price the panels first. Find the leak source first. After the water path is understood, use the Water-Damaged Sheathing Repair Cost Calculator to estimate the rough repair range.
What the code check means on site
Code language can feel abstract until the wall is open. On site, it usually comes down to a few practical checks: panel rating, spacing, fastening, bracing, water control, and whether the wall assembly matches local conditions.
Panel spacing is not cosmetic
Wood structural panels need room to move. When OSB or plywood is jammed tight at every seam, the first serious wetting can swell the edges and push the wall or roof surface out of plane.
That can show up later as wavy siding, raised roof deck joints, or panels that fight the finish material. The gap is small, but skipping it can make the whole surface harder to cover cleanly.
Exterior insulation changes the wall
Continuous exterior insulation can improve energy performance, but it changes how the sheathing dries and how the cladding is attached. In cold climates, the insulation layer also affects the temperature of the sheathing during winter.
Thin exterior insulation may not keep the sheathing warm enough in some assemblies. Thick insulation may require longer fasteners, furring strips, different cladding attachment, or a different drying strategy. This is where code tables, manufacturer details, and local climate matter.
Water control has to be continuous
Sheathing is not the water-resistive barrier by itself unless it is part of a tested integrated system installed exactly as required. Standard OSB or plywood still needs a proper water-control layer, flashing, and attention at openings.
The failure almost never happens in the middle of the panel. It happens at the seam, the window head, the corner, the bottom edge, or the roof-wall joint, anywhere water finds one small path behind the finish.
Bracing is a structural issue
Some houses use full structural sheathing. Some use engineered bracing methods, let-in bracing, intermittent panels, or other approved designs. The method depends on the building, local wind and seismic requirements, openings, wall length, and inspection rules.
Do not cover a wall until the bracing method is clear. A wall can look finished from the street and still be weak behind the siding.
What usually goes wrong
Most sheathing problems are not mysterious. They come from water, movement, weak backing, poor fastening, or using one material where the job needed another assembly.
Water reaches the panel edge
OSB, plywood, fiberboard, and older board products all handle water differently, but none of them benefit from repeated wetting. Panel edges, cut openings, roof valleys, bottom wall edges, and leaking window heads are common failure points.
Once the edge swells, softens, or starts to delaminate, the wall or roof may still look normal from outside. The damage often stays hidden until siding, roofing, or interior finishes are removed.
The wall is covered before the backing is right
New siding can hide weak sheathing for a while, but it cannot make the wall stiff, flat, or dry. If the backing is missing, rotten, thin, or poorly fastened, the finish layer inherits that problem.
This is common in old-house work. The crew opens a wall, finds fiberboard, patched panels, old water stains, or missing bracing, and has to decide whether to cover it or fix the wall before the finish goes back on.
The labor side gets ignored
Material price is only part of the decision. A cheaper panel can cost more if it needs extra wrapping, patching, edge sealing, rework, or weather protection. A more expensive panel can still fail if the seams, tape, flashing, or fasteners are rushed.
The right choice is rarely the strongest or most expensive sheet; it is the assembly that fits the exposure, the labor, the inspection, and the finish material.
Older sheathing gets misunderstood
Fiberboard, blackboard, Bildrite, Celotex, and similar older panels can survive for decades when they stay dry and the wall has enough bracing from other parts of the structure. None of that makes them the equal of modern structural sheathing.
Before covering an older wall again, check corners, openings, racking resistance, water staining, softness, and whether the new siding or insulation needs stronger backing.
Common sheathing mistakes
Most sheathing mistakes look small when the wall or roof is open. They get expensive after siding, roofing, windows, or interior finishes are already installed.
Installing siding over weak or missing sheathing
Vinyl siding, fiber cement, metal siding, and trim systems all need the right backing. A finish layer should not be asked to fix a weak wall.
If the wall lacks proper sheathing, bracing, furring, or a water-control layer, the failure usually shows up as waves, loose panels, cracked trim, leaks, or callbacks around openings.
Skipping panel gaps
Wood structural panels need spacing at edges and ends. Tight panel joints can swell when wet and create ridges or waves that telegraph through the finish.
This is especially risky on walls and roof decks that sit exposed during framing. The more weather the panel sees, the less forgiveness tight joints have.
Treating insulation as structure
Foam board, mineral wool, and wood-fiber insulation can improve a wall, but they do not automatically brace it. Continuous insulation needs a proper structural layer or an approved bracing method behind it.
The cladding attachment also has to be designed. Long screws, furring strips, drainage space, and fastening schedules may matter more than the insulation board itself.
Rushing taped panel systems
Integrated sheathing systems depend on the seams. Tape, rollers, clean surfaces, temperature limits, corners, and penetrations are not small details. They are the system.
If the seams are dirty, cold, loose, or unrolled, water can find the same weak points it would have found behind housewrap. The premium panel does not save a careless installation.
Leaving old fiberboard without checking bracing
Older fiberboard can be part of an existing wall, but it should not be assumed to provide modern structural bracing. Dry panels may stay in place, while soft, crumbling, loose, or water-stained panels need closer review.
The dangerous shortcut is covering the wall because the old panel “looks fine enough.” Check the corners, wall movement, fastener hold, and water history before closing it up.
What changes the cost
House sheathing cost changes for reasons that are easy to miss at the lumberyard. Sheet price matters, but access, labor, exposure, repair work, fasteners, flashing, and finish materials can change the real bill.
| Cost driver | Why it changes the price | What to watch |
|---|---|---|
| Panel type | OSB, plywood, integrated panels, and specialty panels have different material costs. | Do not compare sheet price without comparing water-control steps. |
| Thickness and rating | Thicker or higher-rated panels cost more and may require different fasteners. | Use the panel required for the wall, roof, span, or bracing design. |
| Repair access | Removing siding, roofing, trim, or interior finishes adds labor. | Small damaged areas can become larger once the assembly is opened. |
| Water damage | Rot, mold risk, swollen edges, and failed flashing add scope. | Fix the leak path before replacing the panel. |
| Weather-control layers | Housewrap, taped seams, flashing tape, membranes, and rainscreen details add material and labor. | The cheapest sheathing package can become expensive if water control is ignored. |
| Labor and timing | Roof slope, wall height, scaffolding, weather delays, and crew access affect cost. | Fast installation is not cheaper if it creates rework. |
New construction costs behave differently
On a new build, sheathing is part of the framing sequence. The crew has open access, the panels go on before finishes, and mistakes can still be corrected before the wall or roof is covered.
The main cost choices are panel type, thickness, fastening schedule, weather exposure, housewrap or integrated barrier system, and how quickly the shell gets dried in.
Repair costs are harder to predict
Repair work is different. A small soft spot under siding may lead to a larger damaged area once the trim, flashing, or cladding is removed. Roof deck repairs can grow when shingles, underlayment, valleys, or flashing are opened.
That is why repair estimates need a contingency. The visible damaged panel is often only the starting point.
The cheapest bid may leave the expensive problem
A low sheathing price can miss the real cause: bad flashing, trapped water, missing WRB, poor ventilation, weak bracing, or siding attached to the wrong substrate.
Replacing the sheet without fixing the condition that damaged it usually buys a short delay, not a repair.
Details that save rework
Sheathing mistakes are easier to fix before the wall or roof is covered. After siding, roofing, windows, or trim go on, the same mistake becomes demolition.
Start with corners and braced wall areas
Corners, garage returns, tall wall sections, and braced wall lines deserve attention first. These areas do more than fill space. They help the house resist racking and movement.
If layout starts randomly in the middle of a wall, the corners often end up with awkward cuts, weak edges, or poor fastening. Get the structural areas clean first, then fill the field.
Choose the water-control layer before panels go up
The sheathing choice affects the water-resistive barrier, flashing sequence, window details, and siding attachment. Housewrap, taped panel systems, fully adhered membranes, and rainscreen assemblies do not all install the same way.
Changing the WRB plan after the sheathing is already up usually creates extra cuts, awkward laps, missed flashing steps, or rework around openings.
Follow the fastener schedule
Sheathing fasteners are not random. Nail size, spacing, edge distance, field spacing, and panel rating all matter. Missed fastening can weaken the wall or roof and fail inspection.
The avoidable mistake is rushing the first pass, then spending hours adding nails after the inspector or builder notices. Slower layout is usually faster than re-nailing a finished wall.
Do not treat flashing as an afterthought
Window pans, head flashing, kick-out flashing, roof-wall transitions, and bottom edge details protect the panel from the water paths that cause most failures.
Sealant alone is not a flashing plan. The water has to be directed out before it reaches the sheathing edge.
Where each sheathing choice makes sense
The right sheathing depends on where the panel goes and what it has to survive. A protected wall, a roof deck, a garage return, an old-house repair, and a high-performance wall do not all need the same answer.
New wall sheathing under vinyl or fiber cement
Rated OSB or plywood can work when the wall has proper spacing, fastening, bracing, WRB, and flashing. The siding should go over a flat, sound, dry backing.
Fiber cement and heavier claddings may need more attention to fastening, panel thickness, flatness, and manufacturer requirements.
Roof sheathing under shingles or metal
Roof sheathing has to carry roofing, resist wind uplift through the fastening system, and stay flat enough that the finish roof does not show every seam.
If the deck is soft, wavy, swollen, or rotted, use replacing roof sheathing before treating the project as a simple re-roof.
Taped sheathing panel systems
Integrated sheathing systems can simplify the WRB layer when seams, corners, openings, and penetrations are detailed correctly. They are useful when speed, air control, and fewer loose wrap layers matter.
The trade-off is discipline. The tape, roller, surface condition, temperature, and flashing details become part of the weather-control system.
Older homes with weak or missing sheathing
Old houses may have board sheathing, fiberboard, blackboard, patched panels, or areas with little structural backing. Before new siding goes on, check whether the wall has enough bracing and a reliable water-control layer.
Sometimes the answer is targeted panel replacement. Sometimes corners or braced areas need plywood. Sometimes the siding, insulation, and drainage plan need to be rebuilt together.
Exterior insulation assemblies
Continuous insulation can improve comfort and energy performance, but it does not remove the need for structure. The wall still needs sheathing or another approved bracing method.
Plan the attachment path before buying material. Long fasteners, furring strips, drainage space, cladding weight, and drying direction can decide whether the assembly works.
Small buildings and tiny houses
Small buildings still need bracing. A tiny house, shed, or small addition may use fewer panels, but wind, towing, roof loads, and wall movement still matter.
Weight can influence material choice. It should not erase the need for a continuous load path and a stiff shell.
Where sheathing fails first
Sheathing rarely fails evenly across a whole wall or roof. It usually fails at the edges, openings, transitions, and hidden wet spots.
Window and door openings
Openings cut through the sheathing and create corners where water can collect. A missed pan, bad head flashing, reverse lap, or poorly sealed corner can send water into the panel edge.
By the time staining shows inside, the sheathing around the opening may already be swollen, soft, or mold-stained.
Bottom edges of walls
Bottom wall edges are vulnerable because water can splash up, drain down, or sit against trim and siding. Poor clearance, missing flashing, or trapped water at the bottom of the wall can rot the lowest panel strip first.
This is common behind porch connections, deck ledgers, low siding, and areas where grade or paving sits too close to the wall.
Roof valleys and roof-wall intersections
Roof sheathing fails fast when water is directed into a valley, wall intersection, chimney, skylight, or kick-out flashing location. The roof covering may look normal while the deck below is getting wet.
These are not places to rely on caulk. They need correct flashing, underlayment, drainage, and ventilation.
Panel seams and exposed edges
Panel seams can swell when they are tight, wet, or poorly protected. Exposed cut edges are even more vulnerable because water reaches the panel core faster.
If panels sit exposed during construction, edge protection, drainage, and drying time become part of the job. Covering swollen edges with siding or roofing does not make them flat again.
Old fiberboard and patched walls
Older fiberboard can hide trouble because it may look complete from outside while offering little modern bracing value. Water-damaged fiberboard can also crumble once siding is removed.
Patch decisions should be based on stiffness, water history, fastener hold, and whether the new wall covering has enough backing.
What to check before you cover it
Before siding, roofing, trim, or interior finishes cover the sheathing, stop and check the parts that will be expensive to reach later.
- Panel edges: Look for swelling, gaps that are too tight, exposed cut edges, and panels that sat wet too long.
- Openings: Check window pans, head flashing, door flashing, and the way the WRB laps around each rough opening.
- Fasteners: Confirm the nail pattern, edge spacing, missed studs, overdriven nails, and any areas that need closer fastening.
- Backing and bracing: Make sure siding, furring, insulation, or cladding will attach to something solid, instead of foam, weak fiberboard, or a patched wall.
- Water path: Find where water will go at roof-wall joints, bottom edges, deck connections, porch roofs, valleys, and trim transitions.
The cheapest time to fix sheathing is while you can still see it.
House sheathing FAQs
What is house sheathing?
House sheathing is the panel or board layer attached to framing. It can stiffen the structure, support roofing or siding, and provide a base for water-control layers.
Is OSB or plywood better for house sheathing?
Both can work. OSB is common and cost-effective. Plywood is more forgiving where water exposure, fastener holding, or repair tolerance matters.
Is sheathing the same as siding?
No. Sheathing is behind the finish layer. Siding is the exterior cladding. Siding should not be asked to brace the wall or replace a WRB.
Does vinyl siding need sheathing?
Vinyl siding needs a flat, suitable backing and a water-resistive barrier. Bare studs or weak foam backing can lead to waves, leaks, weak fastening, and failed installation.
What does the span rating on sheathing mean?
It is the pair of numbers with a slash, such as 32/16. The left number is the widest support spacing the panel is rated for as a roof deck; the right number is the widest spacing as a subfloor, with the long dimension running across the supports.
What is the difference between Exposure 1 and Exterior sheathing?
Both use waterproof glue, but only Exterior is rated for long-term weather exposure. Exposure 1, often sold as “CDX,” resists construction-stage wetting but is not meant to stay exposed to the weather permanently.
Does roof sheathing need gaps?
Wood structural panels need small expansion gaps unless the product instructions say otherwise. Tight panels can swell and telegraph through shingles or siding.
Can old fiberboard sheathing stay?
Sometimes. Dry, sound fiberboard may stay in some old-house repairs, but it should not be assumed to provide modern structural bracing. Check corners, water damage, fastener hold, and the new cladding plan.
Can foam insulation replace sheathing?
Not by itself. Foam can improve thermal performance, but the wall still needs structure, bracing, and a cladding attachment plan.
When should sheathing be replaced?
Replace sheathing when it is soft, rotted, swollen, delaminated, mold-stained from chronic wetting, unable to hold fasteners, or not adequate for the roof, wall, or siding assembly being installed.
Read This Next
- Roof Sheathing
- Exterior Wall Sheathing
- Replacing Roof Sheathing
- Roof Planking
- Sheathing Calculators
- Water-Damaged Sheathing Repair Cost Calculator
References
Sources used for this article
- International Residential Code: water-resistive barrier requirements for exterior walls
- APA: the APA panel trademark explained (span rating, Performance Category, bond classification, strength axis)
- APA: Prevent Buckling With Proper Spacing
- APA: Proper Installation of APA Rated Sheathing for Roof Applications
- Vinyl Siding Institute Installation Manual
- Building Science Corporation: controlling cold-weather condensation using insulation