A crawl-space inspection should answer one thing fast: is this space basically damp, actively wet, structurally stressed, or just neglected?
A lot of crawl spaces look bad in a vague way. Dark wood, torn plastic, hanging insulation, rust, mud, stains, and musty air all start to blur together if you do not know what matters. People either panic too early or miss the part that is still active.
A good inspection separates bulk water from humidity, old damage from current damage, and ugly conditions from real structural risk.
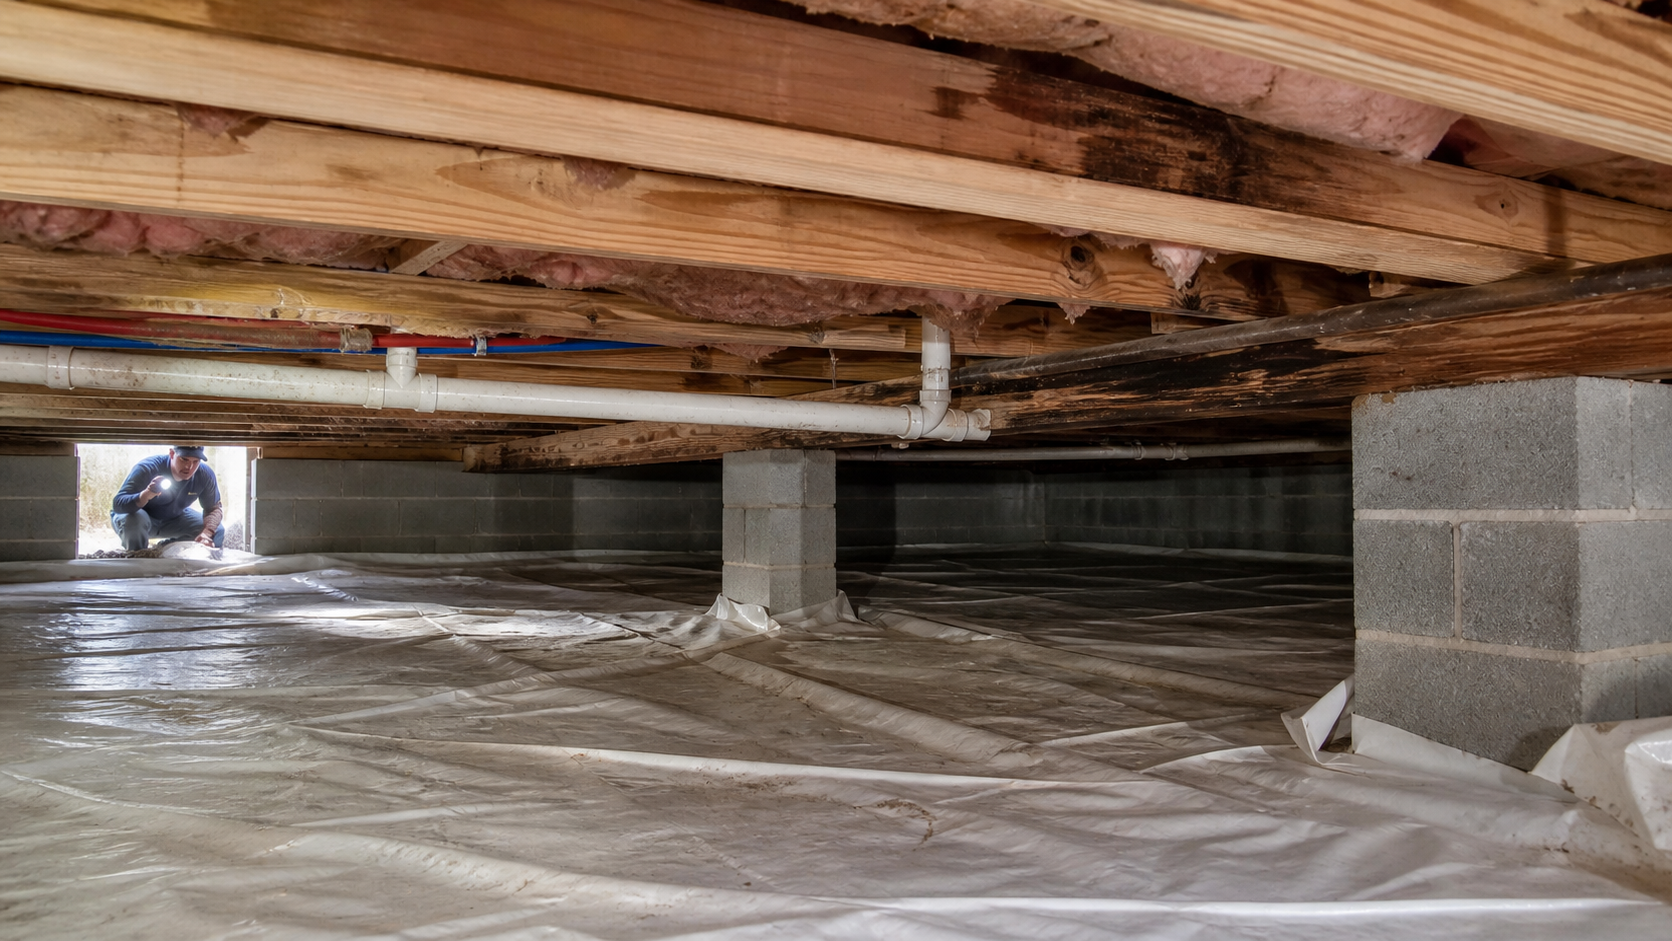
Image by ArchitectureCourses.org. A crawl-space inspection should look beyond the surface and check framing, insulation, pipes, supports, moisture stains, and the condition of the ground liner.
Start Outside
A lot of crawl-space trouble starts before you ever go under the house.
If roof water dumps near the foundation, if the grade leans toward the wall, or if one corner stays wet after every storm, the crawl space is often just where that mistake shows up. I would look at that first.
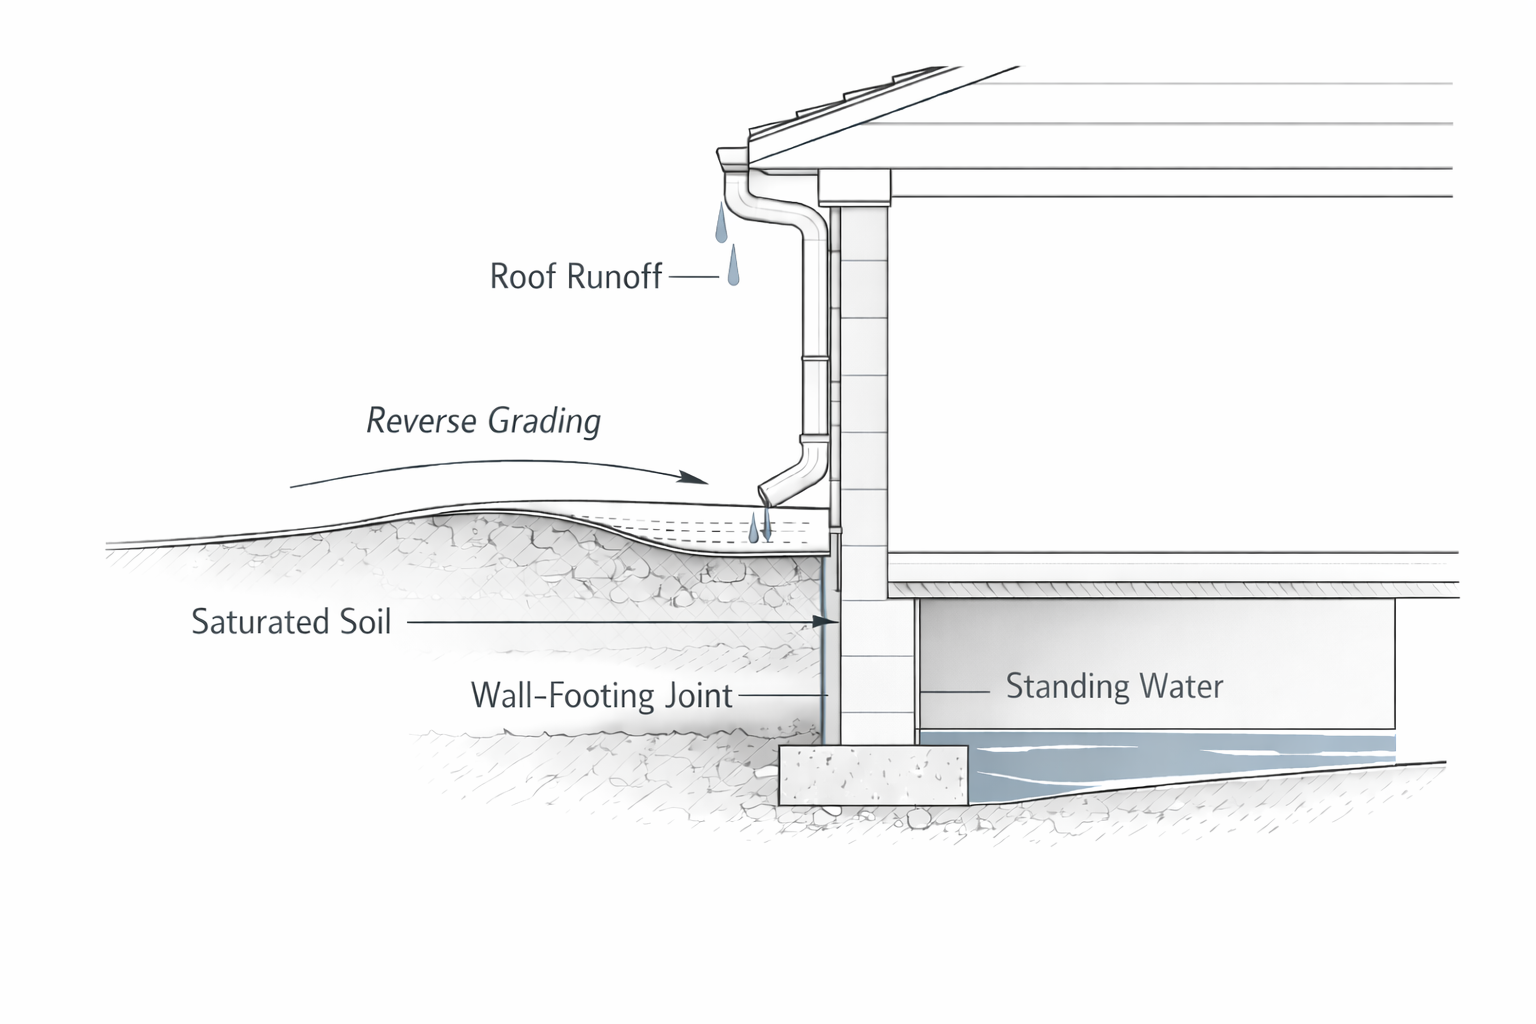
Illustration by ArchitectureCourses.org. One of the first inspection checks after rain is whether grade and roof runoff are pushing water back toward the foundation.
- gutters overflowing or packed with debris
- downspouts discharging too close to the house
- negative grade or settled soil along the foundation
- low corners collecting runoff
- splash marks, damp soil bands, or erosion near one wall
- hardscape sloping toward the house instead of away from it
If the outside water pattern already looks wrong, keep that in mind before blaming anything inside the crawl space.
If this part already looks bad, the next useful reads are water in a crawl space after rain and crawl space drainage system.
What To Check First Under the House
Once you are under the house, do not try to read everything at once. Start with the parts that tell you whether moisture is active, repeated, or old.
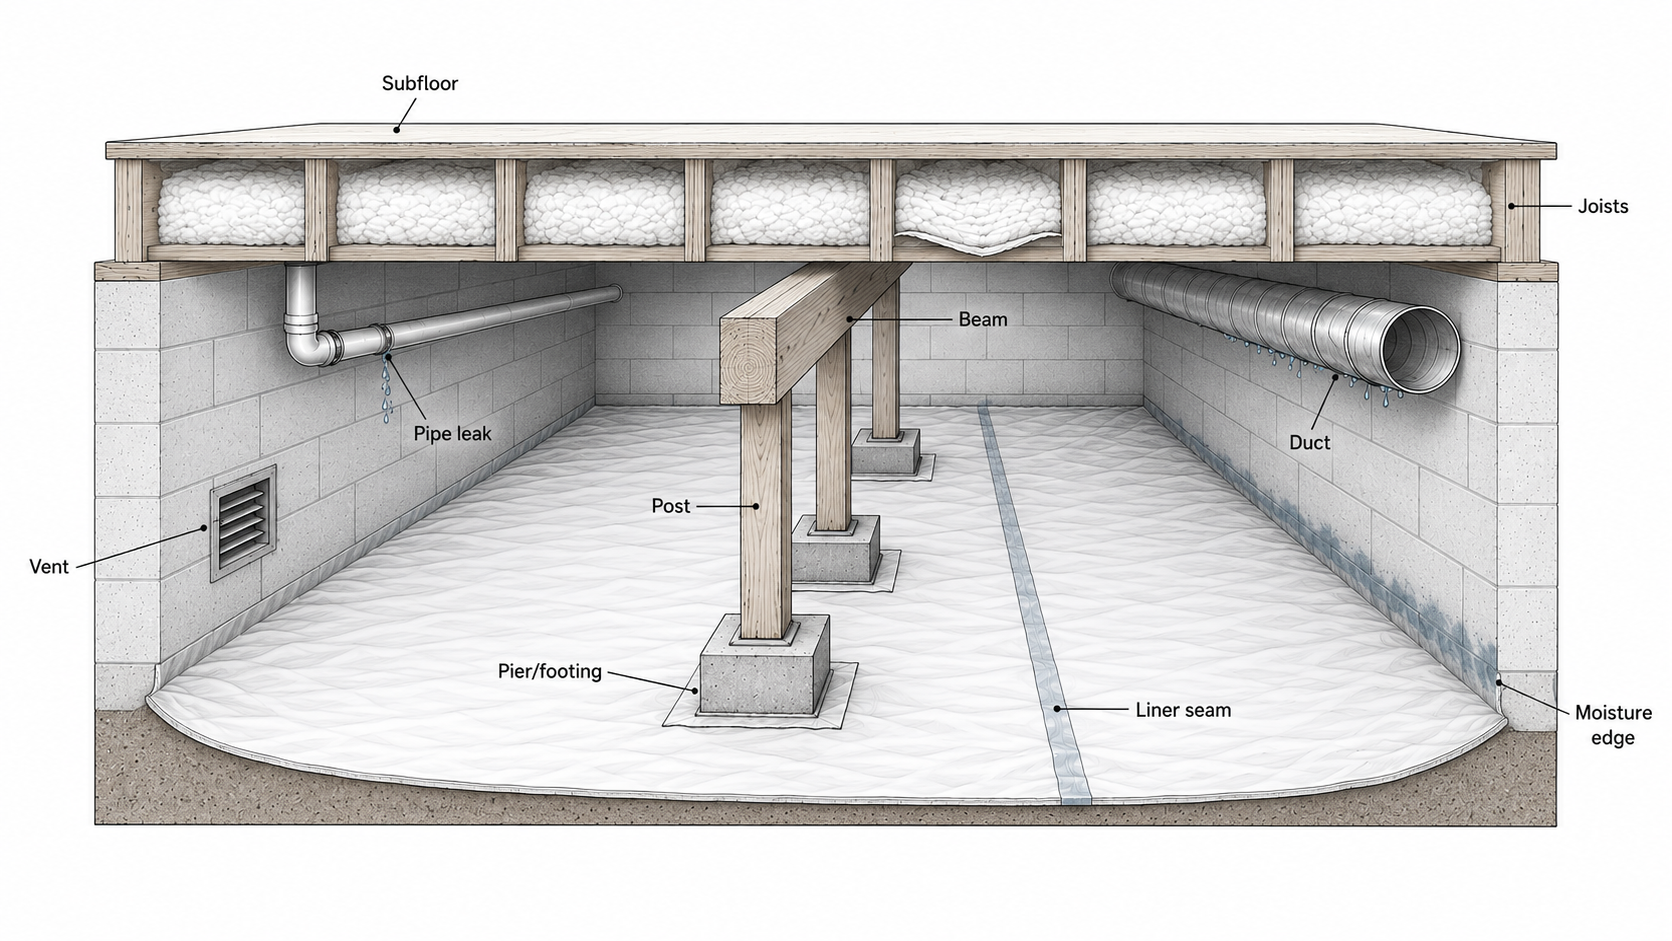
Illustration by ArchitectureCourses.org. A crawl-space inspection should follow the structure first, then check moisture, plumbing, ductwork, liner seams, vents, insulation, posts, and pier supports.
| Area | What To Look For | What It Often Points To |
|---|---|---|
| Ground surface | mud, standing water, damp soil, torn liner, water on top of plastic | bulk water entry, groundwater, poor drainage, or weak liner detailing |
| Foundation wall and corners | staining, damp lines, mineral residue, wet wall bases | runoff pressure, seepage, or repeated wetting at one perimeter zone |
| Floor framing | darkened wood, surface growth, soft spots, checks, insect activity | long-term moisture, poor ventilation strategy, or deeper wood damage |
| Insulation | sagging batts, wet insulation, missing sections, staining | condensation, repeated wetting, air leakage, or old failed repairs |
| Pipes and drains | drips, corrosion, wet soil below fittings, patched lines | plumbing leaks or condensate problems |
| Ductwork | sweating ducts, rust, wet straps, damp insulation wrap | humidity and condensation, especially in hot humid weather |
| Supports and piers | tilt, settlement, crushed shims, movement, loose hardware | support issues, uneven loading, or past moisture damage affecting the base |
Start there. Then widen out.
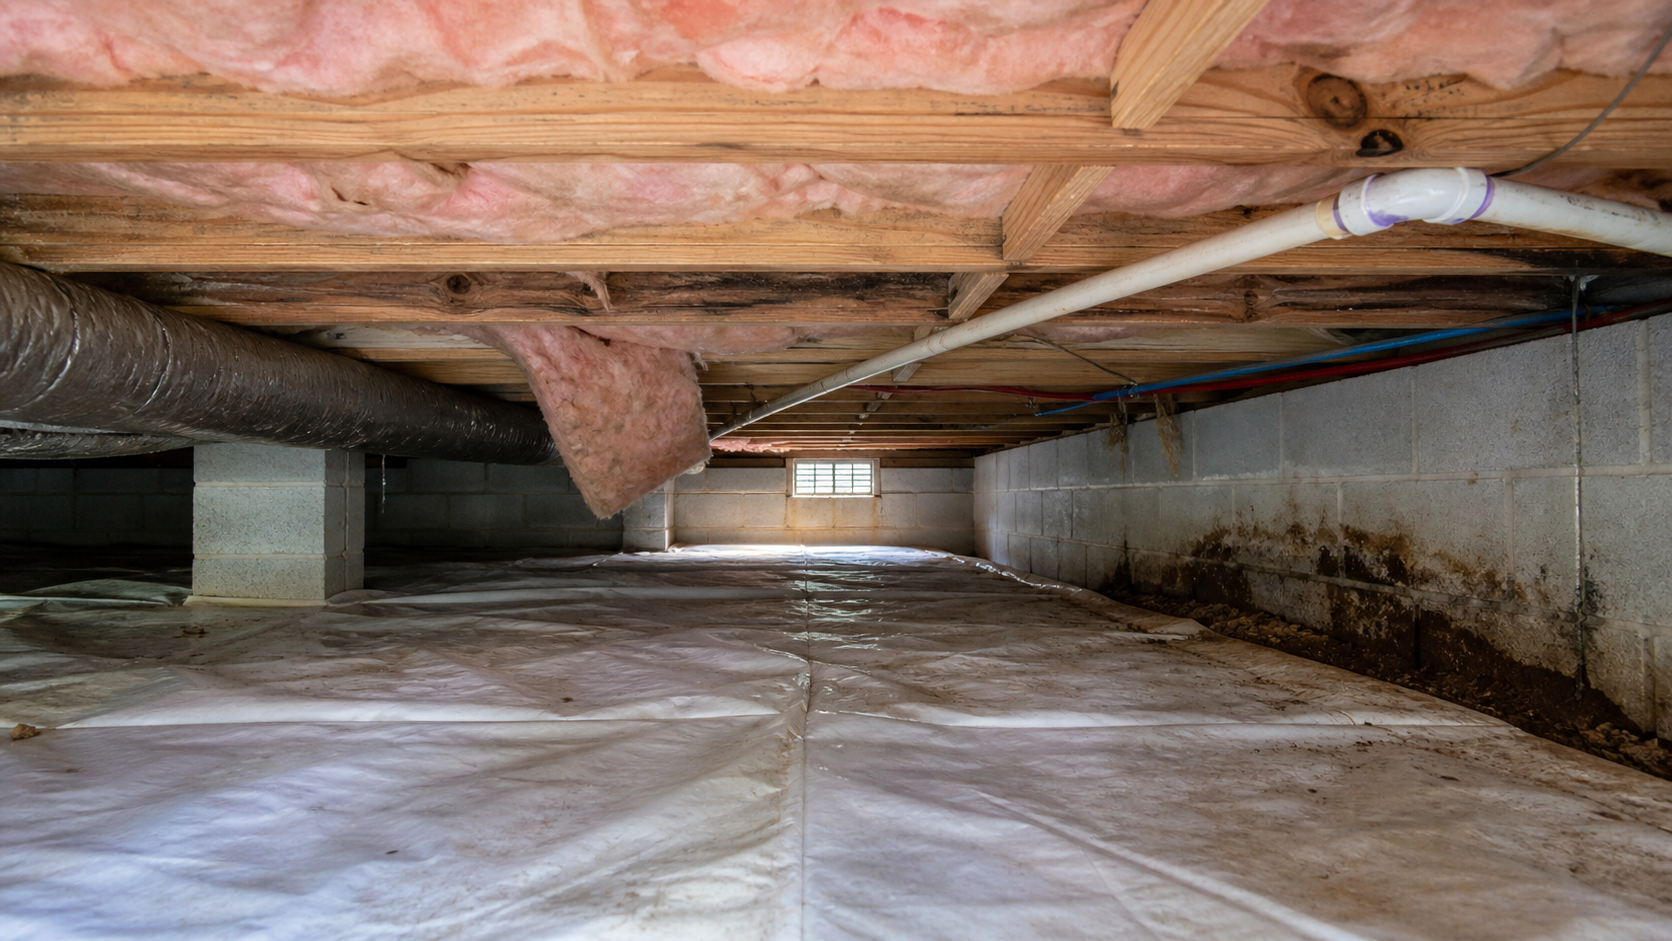
Image by ArchitectureCourses.org. A practical crawl-space inspection should check framing, insulation, ductwork, the ground liner, and visible moisture staining along walls and supports.
What You See vs What It Usually Means
| What You See | Most Likely Cause | What To Check Next | Best Fix Direction |
|---|---|---|---|
| Water near one wall or one corner after storms | Downspout, grade, local runoff, one weak perimeter zone | roof discharge, splash pattern, exterior grade | outside water correction first |
| Broad dampness across the crawl floor | ground moisture, poor drainage, missing or weak liner | ground cover, humidity, drainage path | water control first, then liner or encapsulation decision |
| One isolated wet patch that lingers | plumbing leak or condensate leak | pipes, traps, HVAC drains, nearby fittings | repair leak before broader crawl-space work |
| Water trapped on top of plastic | bulk water entering after liner installation | entry point, edges, seams, wall terminations | stop the water source before blaming the liner |
| Sagging insulation and musty smell | long-term moisture, wetting, bad air sealing, humidity | humidity level, liner condition, mold signs, wetting history | dry-out, remove failed materials, correct moisture source |
| Dark framing with no obvious water | old staining, past humidity, or current low-grade moisture | wood firmness, smell, humidity reading, active wetting signs | separate old damage from active damage before spending |
The Signs That Matter Most
People fixate on the word mold because it sounds expensive. Sometimes it is. A lot of the time, the bigger issue is repeated wetting that nobody has stopped yet.
During inspection, these signs usually matter more than whether the space simply looks ugly: active dampness, mud that matches recent rain, water lines at the wall base, insulation that is wet now instead of just stained from the past, wood that crushes or flakes instead of staying firm, and condensation on ducts or pipes. Musty air moving into the house through floor penetrations matters too. That is often the clue people notice first upstairs.
If moisture is active, the crawl space is still in problem mode. If the marks are old but the space is now dry and stable, the job may be cleanup, repair, and monitoring instead of heavy water work.
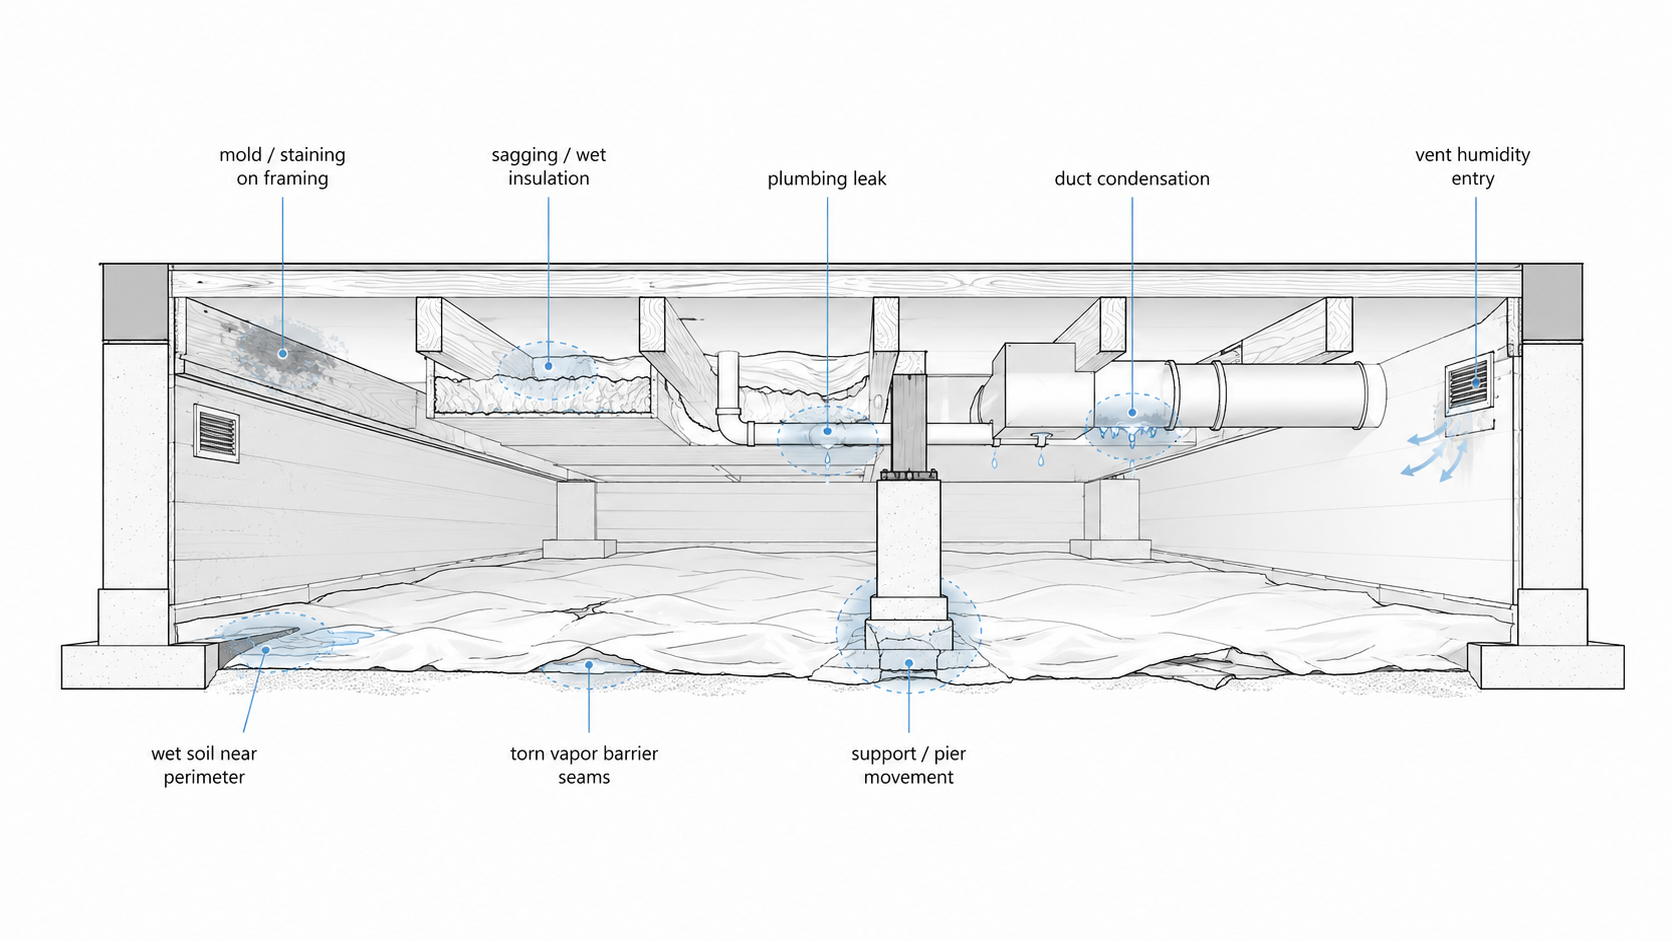
Illustration by ArchitectureCourses.org. Crawl-space problems usually show up first at the perimeter soil, framing, insulation, vapor barrier seams, ducts, plumbing, support piers, and vents.
If odor, staining, or visible growth are already part of the pattern, go next to crawl space mold remediation.
Framing, Supports, and Movement
Not every crawl-space inspection is mainly about moisture. Some are really about what the moisture has been doing to the floor system over time.
Check the framing and supports for sagging beam lines, split or crushed wood at bearing points, temporary-looking shims, pier movement, joists cut badly around plumbing or ductwork, and fastener corrosion in chronically wet areas.
A lot of crawl spaces are structurally fine even when they are damp and ugly. Some are not. That is the split the inspection needs to catch.
If floors above feel bouncy, sloped, or newly uneven, I would give that part of the crawl space more attention than the usual moisture talk.
Insulation Tells You More Than People Think
Falling insulation usually points to air movement, moisture, poor fastening, old work, or some mix of all four.
Check whether the insulation is dry or wet, whether it is sagging everywhere or only in one bay, whether the kraft facing is turned the wrong way, whether rodents have torn it apart, and whether it is hiding framing you still need to inspect.
Wet fiberglass does not help much. It sags, holds moisture, picks up dirt, and often becomes part of the odor problem. If the insulation is soaked, stained, or falling apart, treat it as failed material.
If the liner question is becoming the real next step, use cost to install a crawl-space vapor barrier and crawl space encapsulation vs vapor barrier only.
The Ground Liner Usually Tells the Truth Fast
A crawl-space liner or vapor barrier is one of the fastest ways to tell whether the crawl is mostly a ground-vapor problem or a bigger water problem.
Bare earth still exposed, torn plastic, open seams, loose edges that stop short of the walls, ripped detailing around piers, or muddy soil showing below the liner all point one way. Dirty water sitting on top of the liner points another.
If the soil is mostly damp and the crawl space is reloading from below, that points toward vapor control and humidity management. If water is clearly moving across the top of the liner, the crawl space still has a bulk-water entry problem.
Those are different repairs and different budgets.
Plumbing, Ducts, and Small Leaks
One of the easiest mistakes in crawl spaces is assuming every wet area is a drainage problem.
Sometimes it is a plumbing leak. Sometimes it is condensate. Sometimes it is duct sweating in humid weather. Sometimes it is a trap, fitting, or line that has been dripping slowly for months.
These smaller wetting sources matter because they keep one zone chronically bad while the rest of the crawl space looks only mildly damp. That is how people end up paying for broader moisture work before fixing the local leak that is feeding the problem.
I would check bathrooms, kitchens, HVAC condensate lines, low duct runs in humid climates, patched copper or plastic connections, and shutoff valves or hose-bib penetrations before assuming the whole crawl space needs the same level of repair everywhere.
What Gets Missed Most Often
The crawl-space problems that get missed are usually boring, local, and repeated.
- one downspout loading one wall every storm
- one vent or opening letting humid air reload the crawl
- one torn liner seam near a pier
- one small plumbing drip keeping one bay wet
- one low exterior corner driving water into one interior corner
- one crushed or shifted support that no one noticed because the rest looks fine

Image by ArchitectureCourses.org. Tight clearance, ducts, piers, and low framing can hide problem areas and make a crawl-space inspection much harder to complete thoroughly.
That is why rushed inspections underperform. The crawl space is not always failing everywhere. Sometimes it is failing in one place that is driving the rest.
DIY or Pay for a Real Inspection?
| DIY Makes Sense When | Pay for a Real Inspection When |
|---|---|
| you want a first pass before spending money | the crawl space is very low, unsafe, or hard to access |
| the issue looks limited and you mainly need direction | there are signs of structural movement, rot, or widespread wetting |
| you can safely enter and document conditions | you are buying the house or arguing over repair scope |
| you are checking whether the problem is still active | the odor, water, or floor issues keep returning despite prior work |
| you already know the crawl space is accessible and not hazardous | you need a written report with photos, moisture readings, and repair direction |
A lot of homeowners can do a decent first inspection. Not everyone should. Tight access, deep mud, obvious contamination, electrical hazards, or structural concerns raise the bar fast.
The expensive mistake is reading a limited crawl-space problem as a whole-crawl-space failure. The other expensive mistake is doing the opposite.
What a Good Report Should Include
If you pay for an inspection, the report should do more than say the crawl space is wet or needs attention.
- photos of the actual problem zones
- where the moisture appears to be coming from
- whether the issue looks active or old
- the condition of framing, supports, insulation, liner, ducts, and plumbing
- what needs correction first
- what needs cleanup after that
- what may need follow-up from a drainage contractor, mold remediator, plumber, or structural pro
If the report only says “recommend further evaluation” without showing the pattern, it did not do enough.
What Usually Makes Sense After the Inspection
The best sequence is still the boring one:
- figure out whether the crawl gets bulk water after rain or mainly stays humid
- fix outside water load and drainage first if that is the real source
- repair plumbing or condensate leaks next if they are contributing
- remove failed wet materials and debris
- then decide between liner-only, broader crawl-space sealing, or humidity-control equipment
Most wasted money comes from reversing that order.
People buy moisture equipment before stopping water. Or they lay plastic over a still-wet crawl space. Or they pay for encapsulation before understanding the runoff pattern outside. That is what the inspection is supposed to stop.
FAQ
What should I check first in a crawl space inspection?
Start outside. Roof runoff, grade, and wet exterior corners often explain what you later find under the house. After that, check ground condition, wall bases, framing, insulation, liner, plumbing, and ducts.
Can I inspect my own crawl space?
Sometimes. An accessible crawl space without standing water, contamination, electrical hazards, or structural warning signs is realistic for a first pass.
What usually gets missed in crawl spaces?
One-corner runoff problems, small plumbing drips, torn liner seams, duct condensation, and local support movement get missed all the time because the whole space looks bad and people stop reading it carefully.
How do I know if crawl-space damage is old or active?
Look for current wetness, fresh staining, mud, active odor, condensation, and materials that are wet now. Old staining alone is not enough. A good inspection should separate old marks from active moisture, because that changes what you fix first and what can wait.
Does a musty smell always mean mold?
No. It often means moisture has been hanging around long enough for odor to build, but the bigger issue may still be humidity, wet insulation, damp soil, or repeated water entry.
When is a crawl-space inspection worth paying for?
It is worth paying for when you are buying a house, arguing over repair scope, seeing repeated wetting, feeling floor movement above, or dealing with a crawl space that is too tight or messy for a reliable DIY look.
Will a crawl-space inspection tell me whether I need a vapor barrier or encapsulation?
It should. A good inspection should tell you whether the crawl mainly has ground moisture, repeated water entry, high humidity, or a larger control problem.
Can a crawl-space inspection tell if I need a dehumidifier?
Yes. If bulk water is under control and the crawl still stays humid, a dehumidifier may make sense. If the crawl still gets wet after rain, that is not the first move.