A good 1990s kitchen before-and-after is not about one magic change.
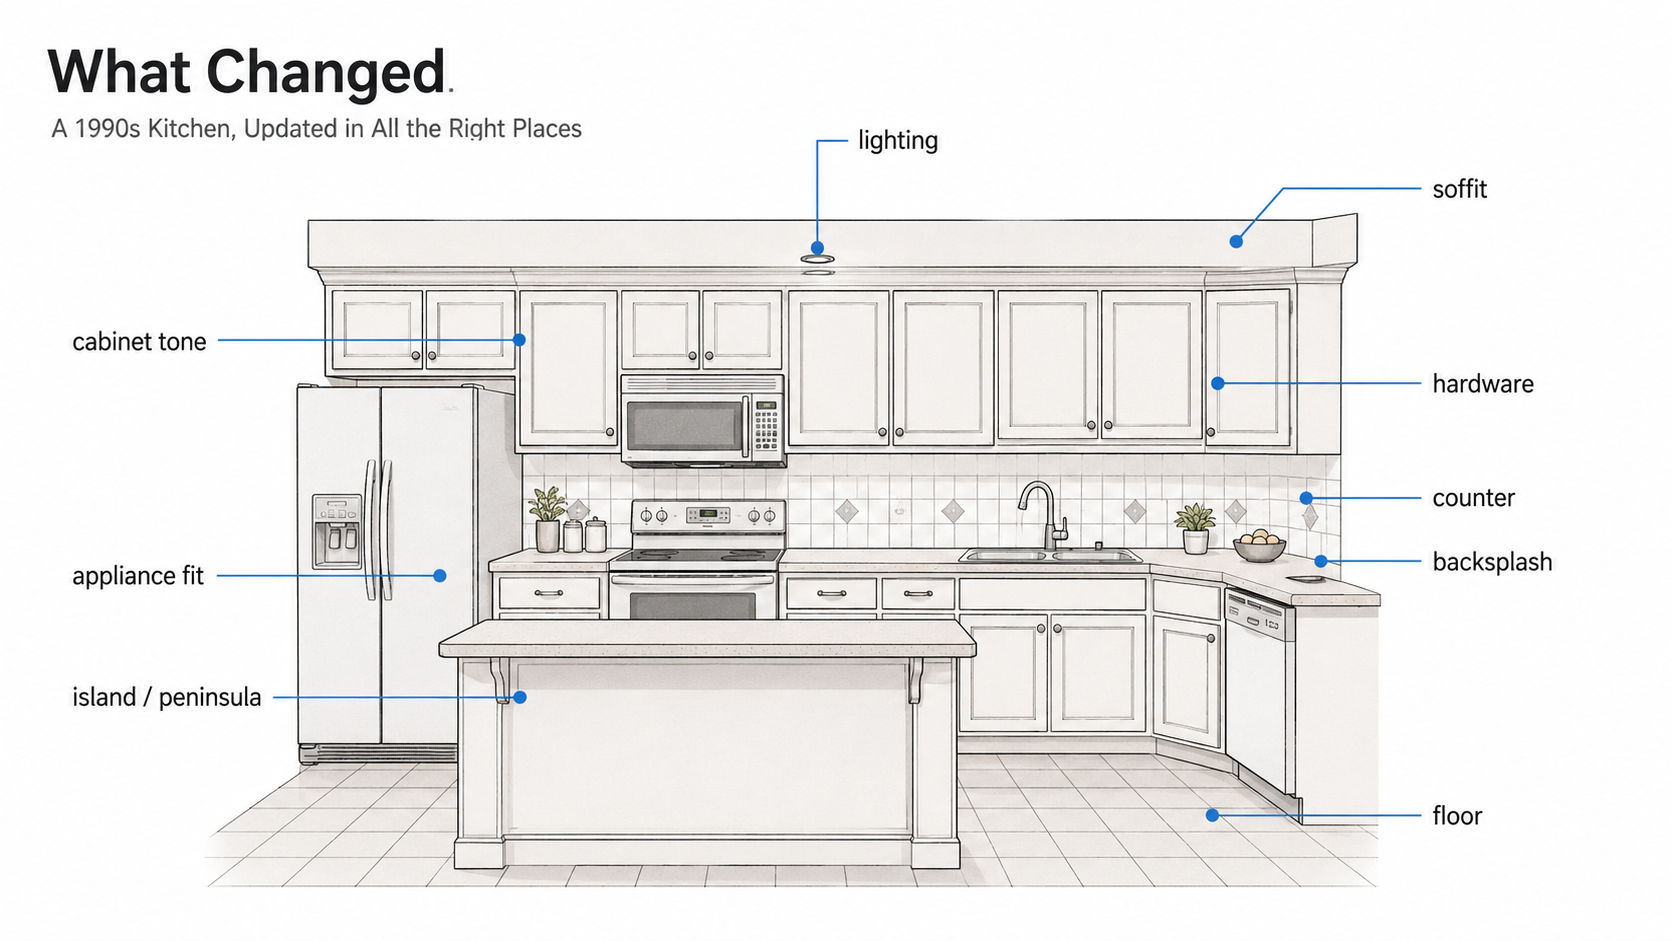
The best ones usually fix several small problems that were making the whole room feel old: yellow lighting, orange oak, weak hardware, tired counters, short backsplash, beige flooring, old appliances, soffits, and visual clutter. One change helps. Three or four changes together make the kitchen feel new.
This page is the visual companion to the full 1990s kitchen remodel guide. That article covers order, cost, soffits, flooring, layout, and scope; this one is about reading the before-and-after correctly so you can see what actually changed.
In many 1990s houses, the kitchen already has the right basic idea: open to the family room, bright enough, practical storage, and a place for daily meals. The failure is often not the whole room. It is the stack of dated finishes sitting on top of a workable plan. For the bathroom side of the same house, see 1990s bathroom remodel.
The Quick Answer
A 1990s kitchen looks newer when the remodel calms the room, improves the light, and makes the cabinet decision fit the rest of the finishes. The strongest before-and-afters usually improve these things together:
- lighting
- cabinet tone
- hardware
- counters
- backsplash
- flooring
- appliance fit
- island or peninsula layout
- soffits or ceiling clutter
The weakest remodels change only the cabinet color and leave the old lighting, counters, backsplash, floor, and layout problems in place.
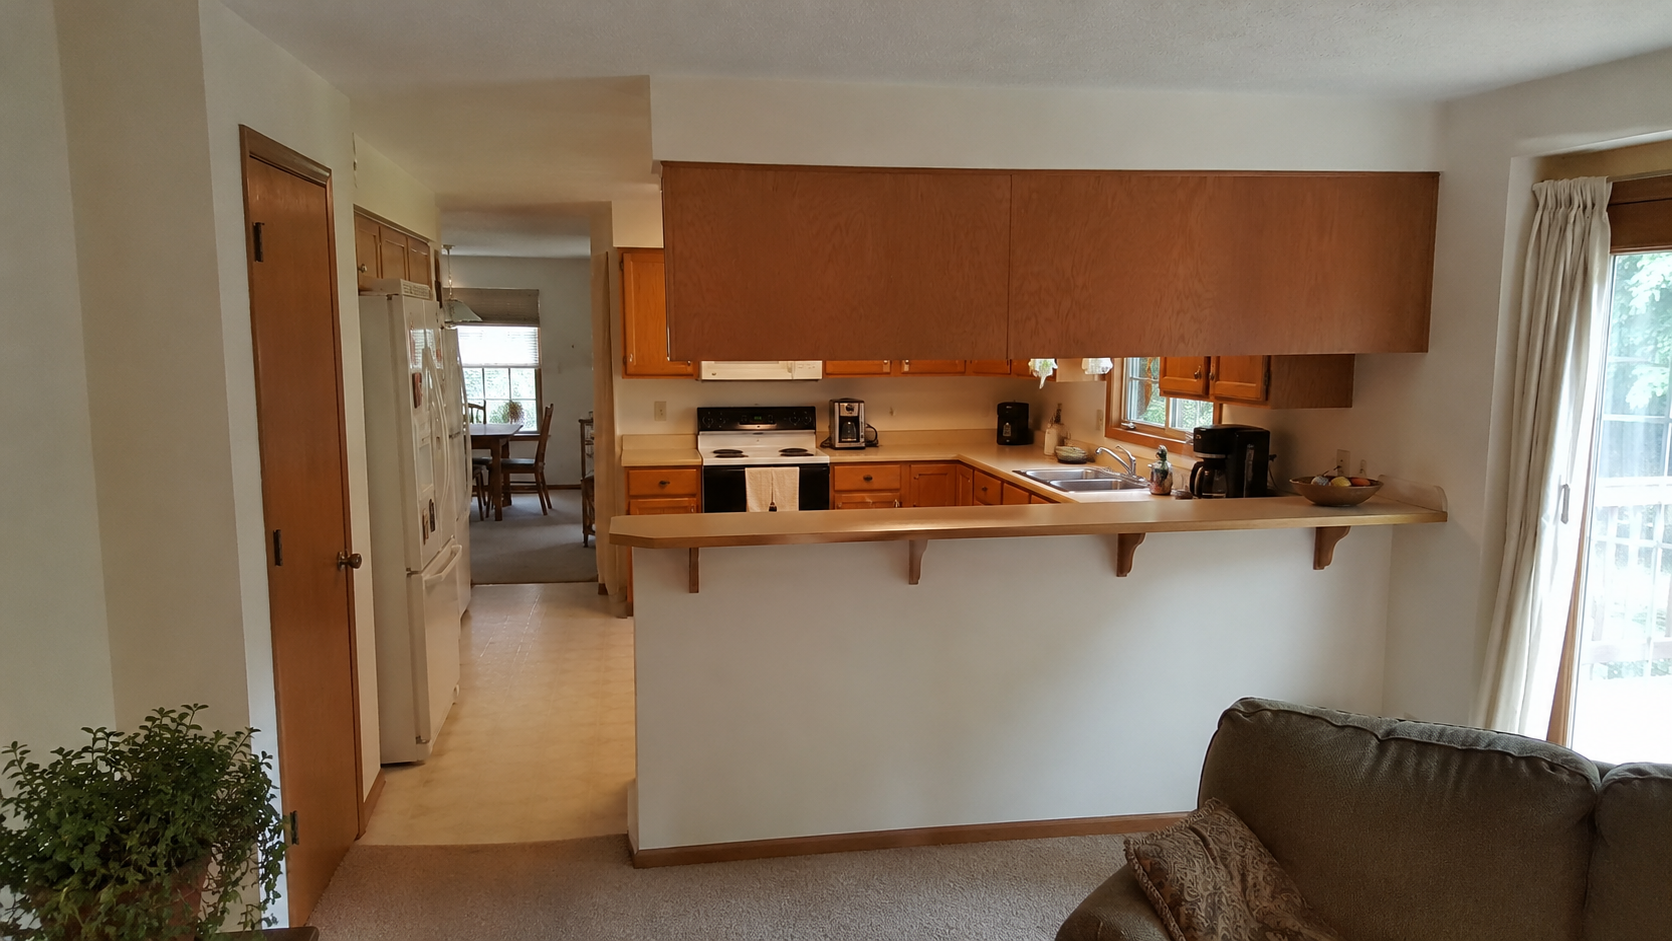
Before and After 1: Oak Cabinets Kept
This is the most useful before-and-after for many homeowners, because it proves something important: oak does not always have to go.
A 1990s oak kitchen can look dated because everything around the oak is also warm, yellow, beige, shiny, or busy. The cabinets may be doing their job while the old counter, wall color, lighting, and backsplash make them look worse.
What changed
- The lighting became cleaner.
- The wall color stopped pushing the oak more orange.
- The hardware became quieter.
- The counter and backsplash worked with the wood instead of fighting it.
- The kitchen looked intentional instead of leftover.
What stayed
- The cabinet boxes
- The basic layout
- The wood character
- The family-home warmth
This only works when the cabinets are solid and the layout still works. If you are unsure whether the oak is worth saving, read 1990s oak kitchen cabinets before you paint, refinish, reface, or replace anything.
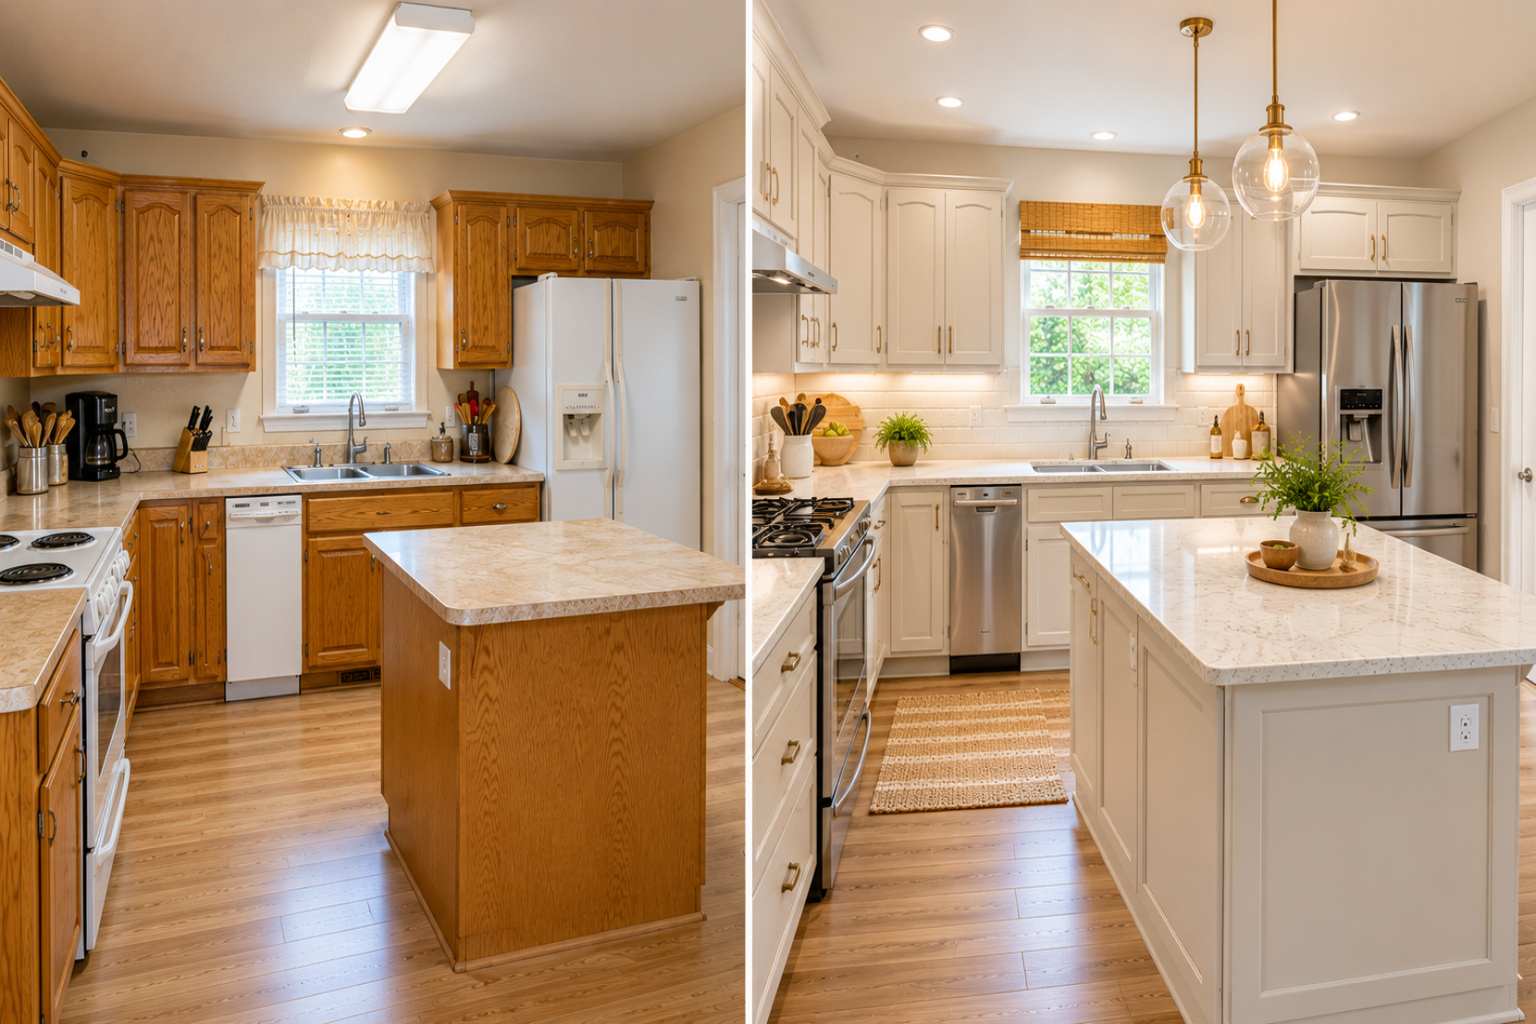
Before and After 2: Oak Cabinets Painted
Painting oak cabinets can create a huge change, but it is not the whole remodel. A painted-cabinet after photo often looks strong because the cabinet color no longer dominates the room — yet the cleaner result usually comes from a group of changes together: painted cabinets, better light, new counters, a simpler backsplash, updated hardware, and less yellow in the room.

When this works
- The cabinet boxes are good.
- The drawers and hinges still work.
- The layout is worth keeping.
- The cabinet door profile still fits the house.
- The new paint color is tested beside the actual counter, floor, and window light.
When it fails
- The old boxes are swollen or weak.
- The layout already frustrates the owner.
- The flooring will be changed later.
- The counter is replaced before the final cabinet plan is known.
- The oak grain is not filled or prepped well enough for the finish expected.
The important thing is not whether the cabinets end up white, green, cream, gray, or black. It is whether the cabinet finish belongs to the rest of the kitchen.
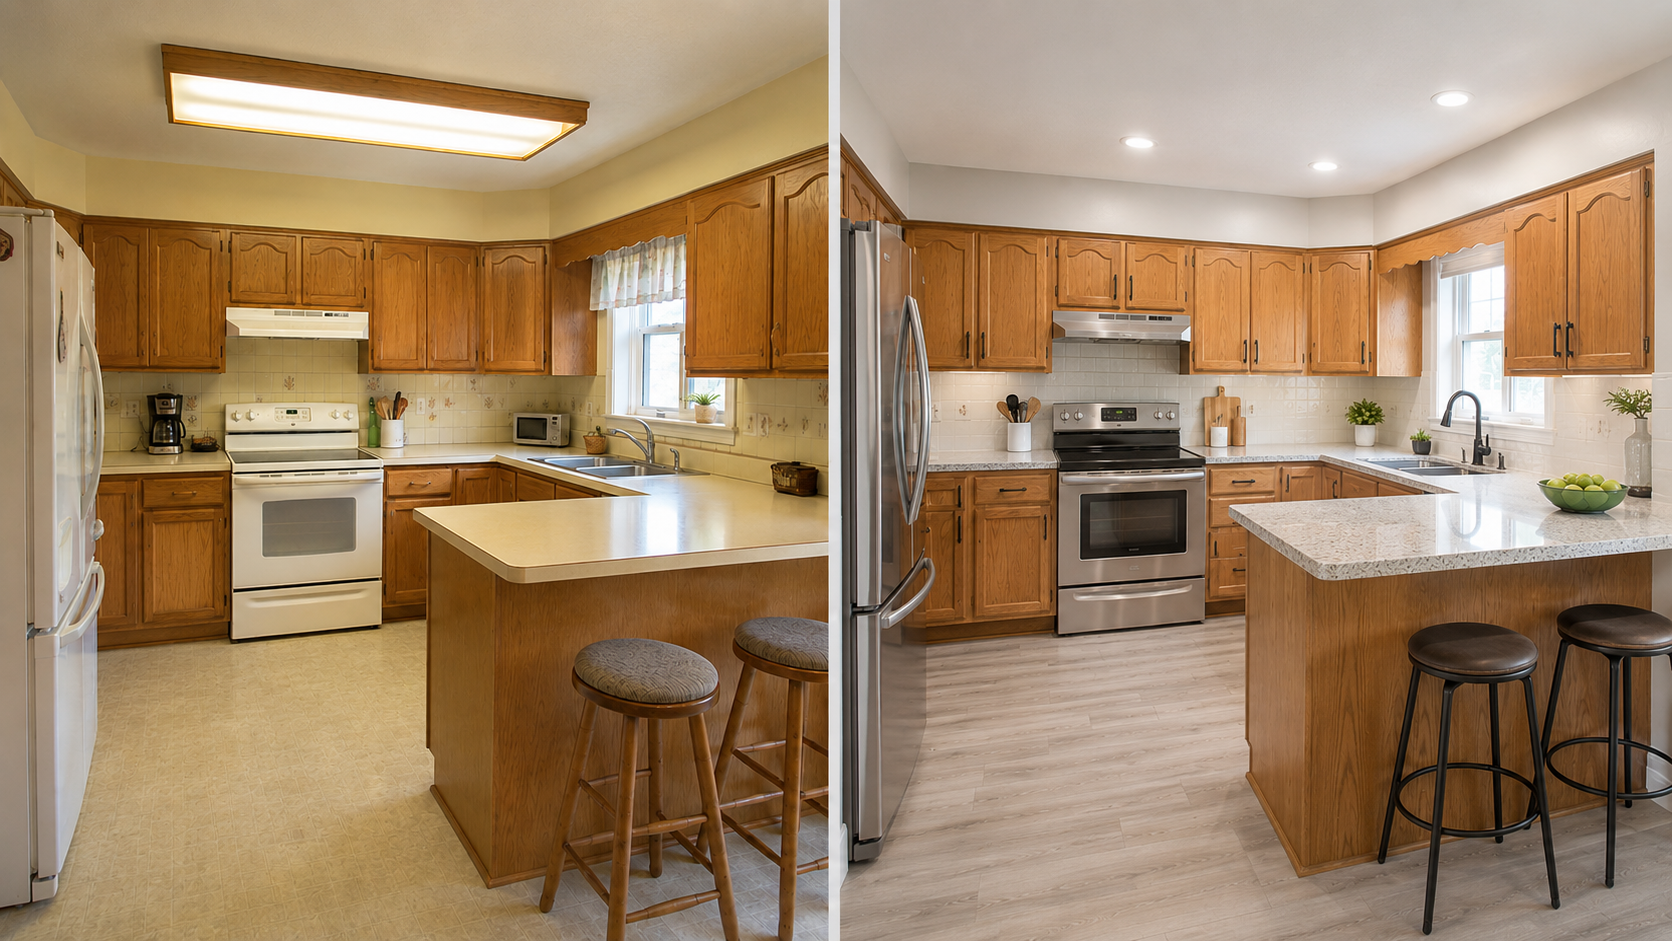
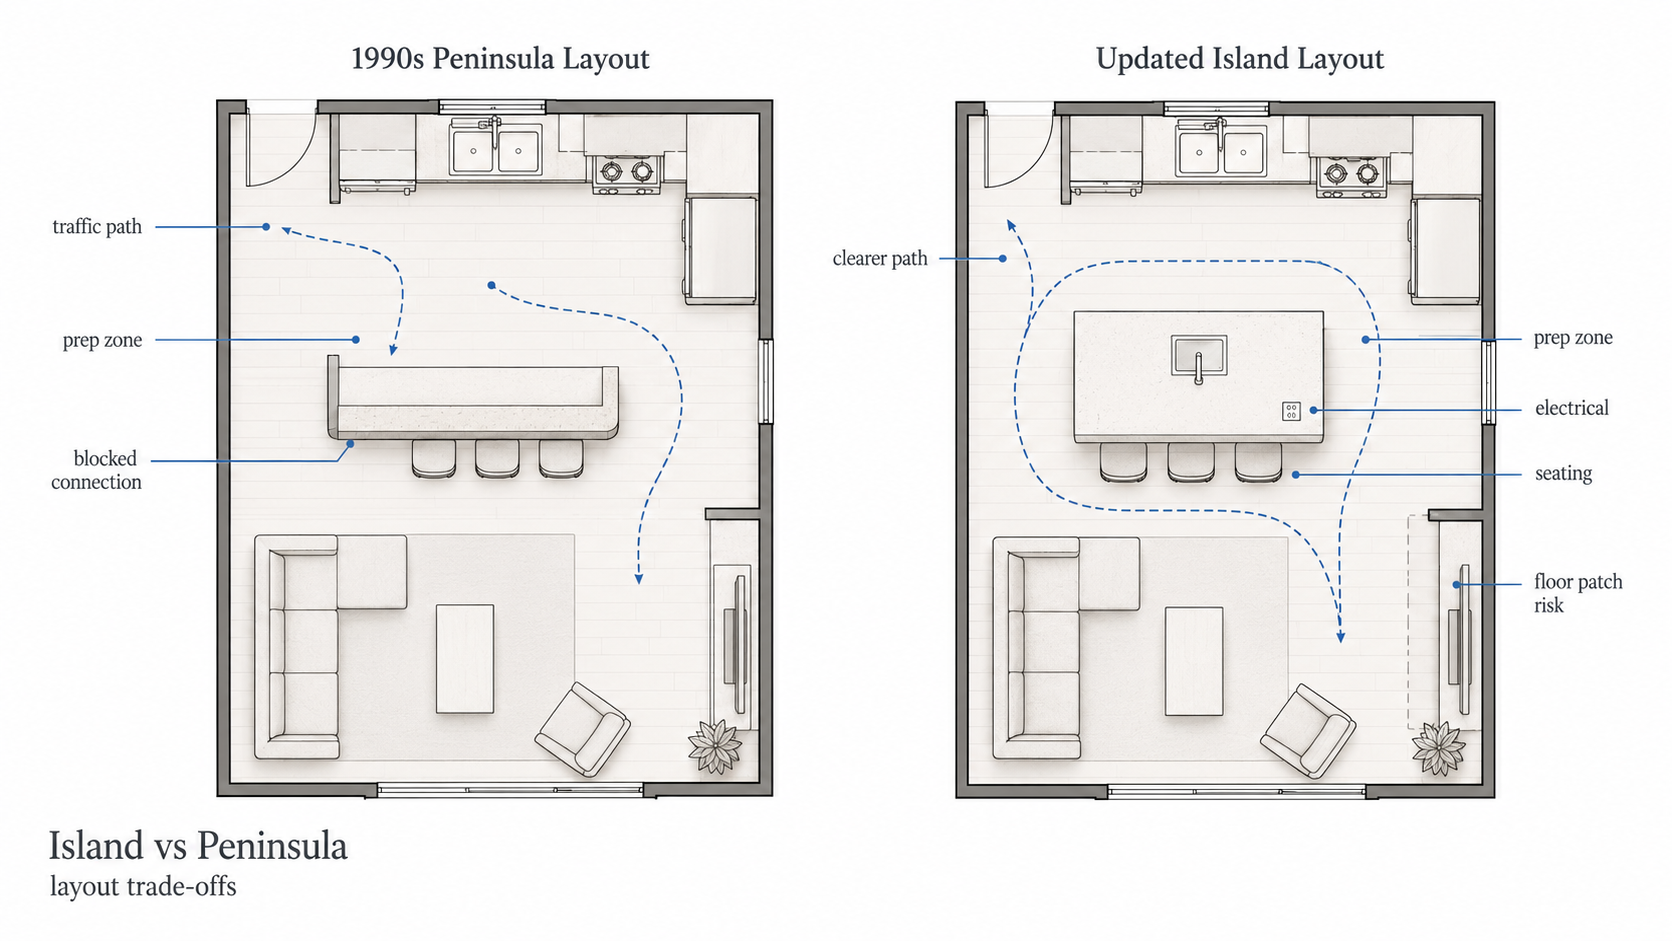
Before and After 3: Peninsula Changed to Island
This is one of the biggest visual changes in 1990s kitchen remodels. Many 1990s kitchens used a peninsula to divide the kitchen from the breakfast room or family room. Sometimes that worked; other times it trapped the cook inside the kitchen, made the room feel smaller, and blocked the connection the house was trying to create.
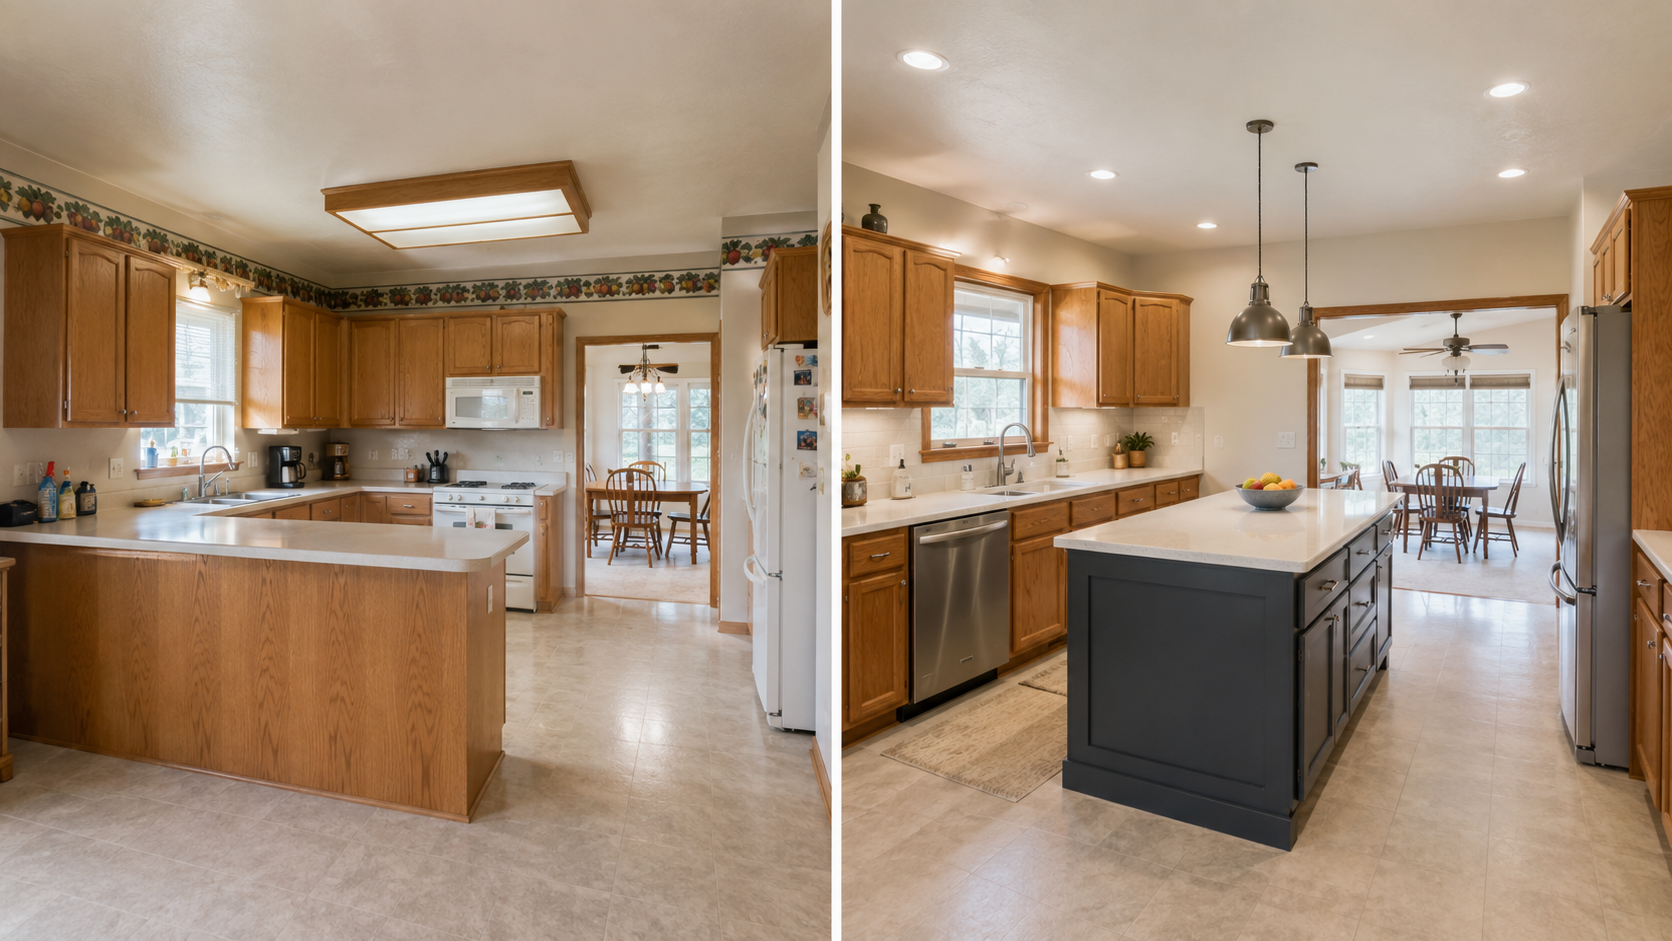
What the image should make you check
- Did the new island improve circulation?
- Did it add useful prep space?
- Did it create seating that works?
- Did storage get better or just move around?
- Did the old peninsula leave a flooring patch?
- Did the island need electrical work?
A peninsula-to-island conversion can be the right move, but it is not automatically better. A new island that is too big, too close to the cabinets, or poorly wired can create a newer-looking version of the same problem.
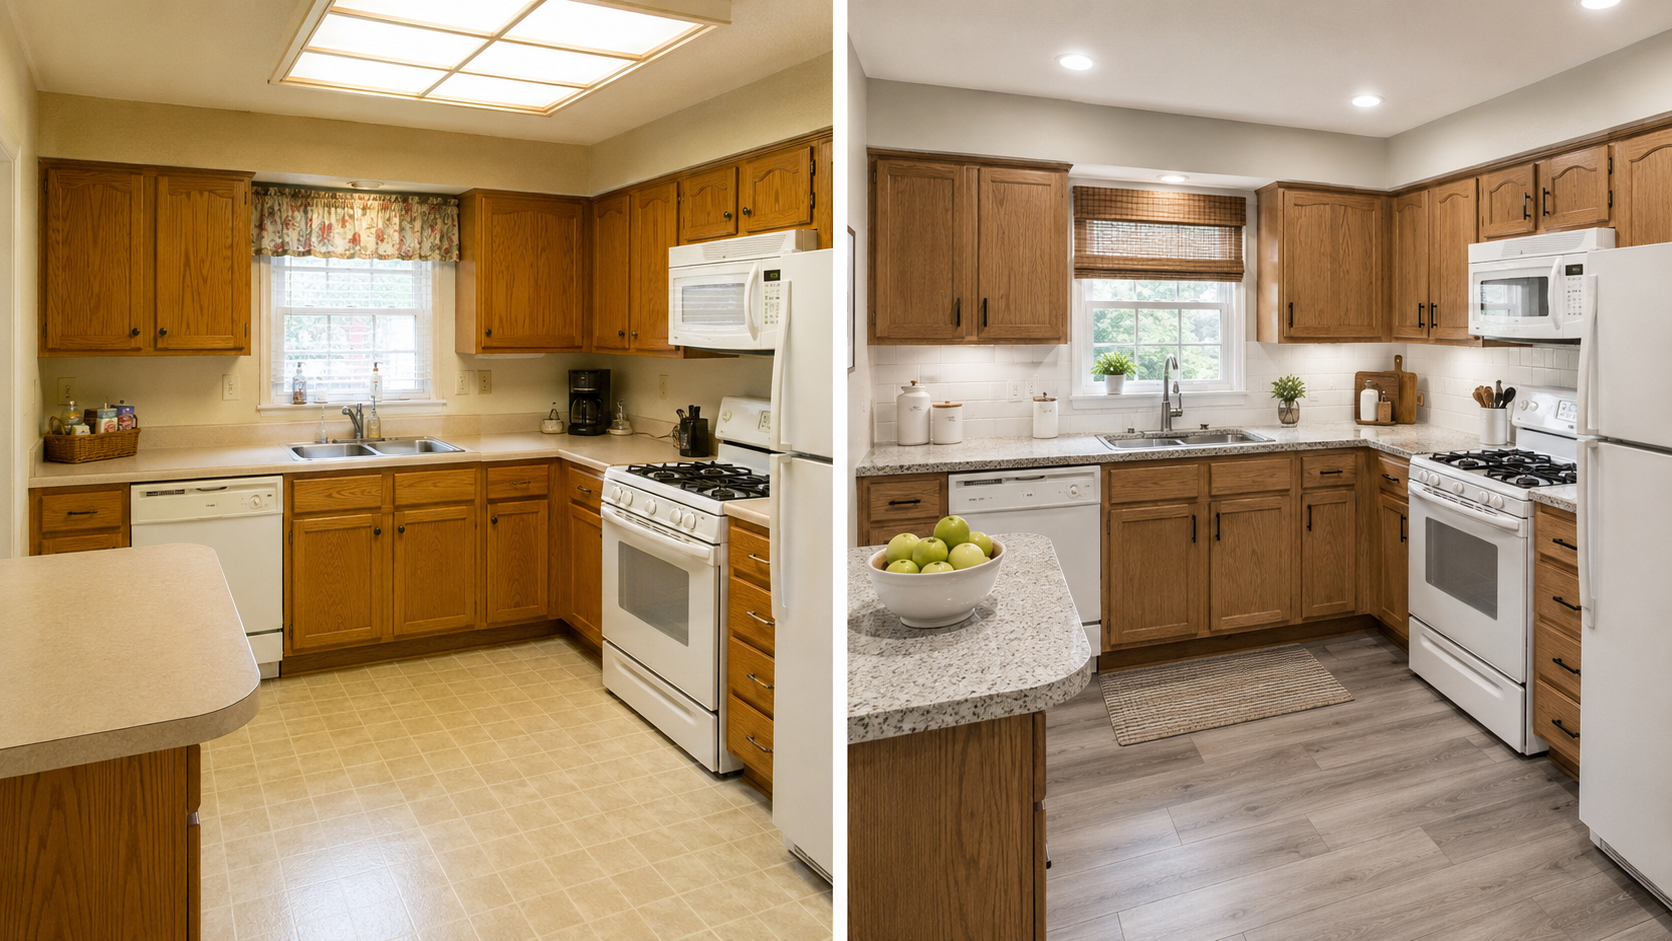
Before and After 4: Lighting and Soffit Fixed
Lighting is the quiet reason many before-and-afters look good. In the before photo, the kitchen may look yellow, flat, and tired; in the after photo, the cabinet finish may look calmer even when the cabinets are not dramatically different. That often comes from better ceiling lighting, under-cabinet lighting, cleaner bulb color, and fewer shadows.
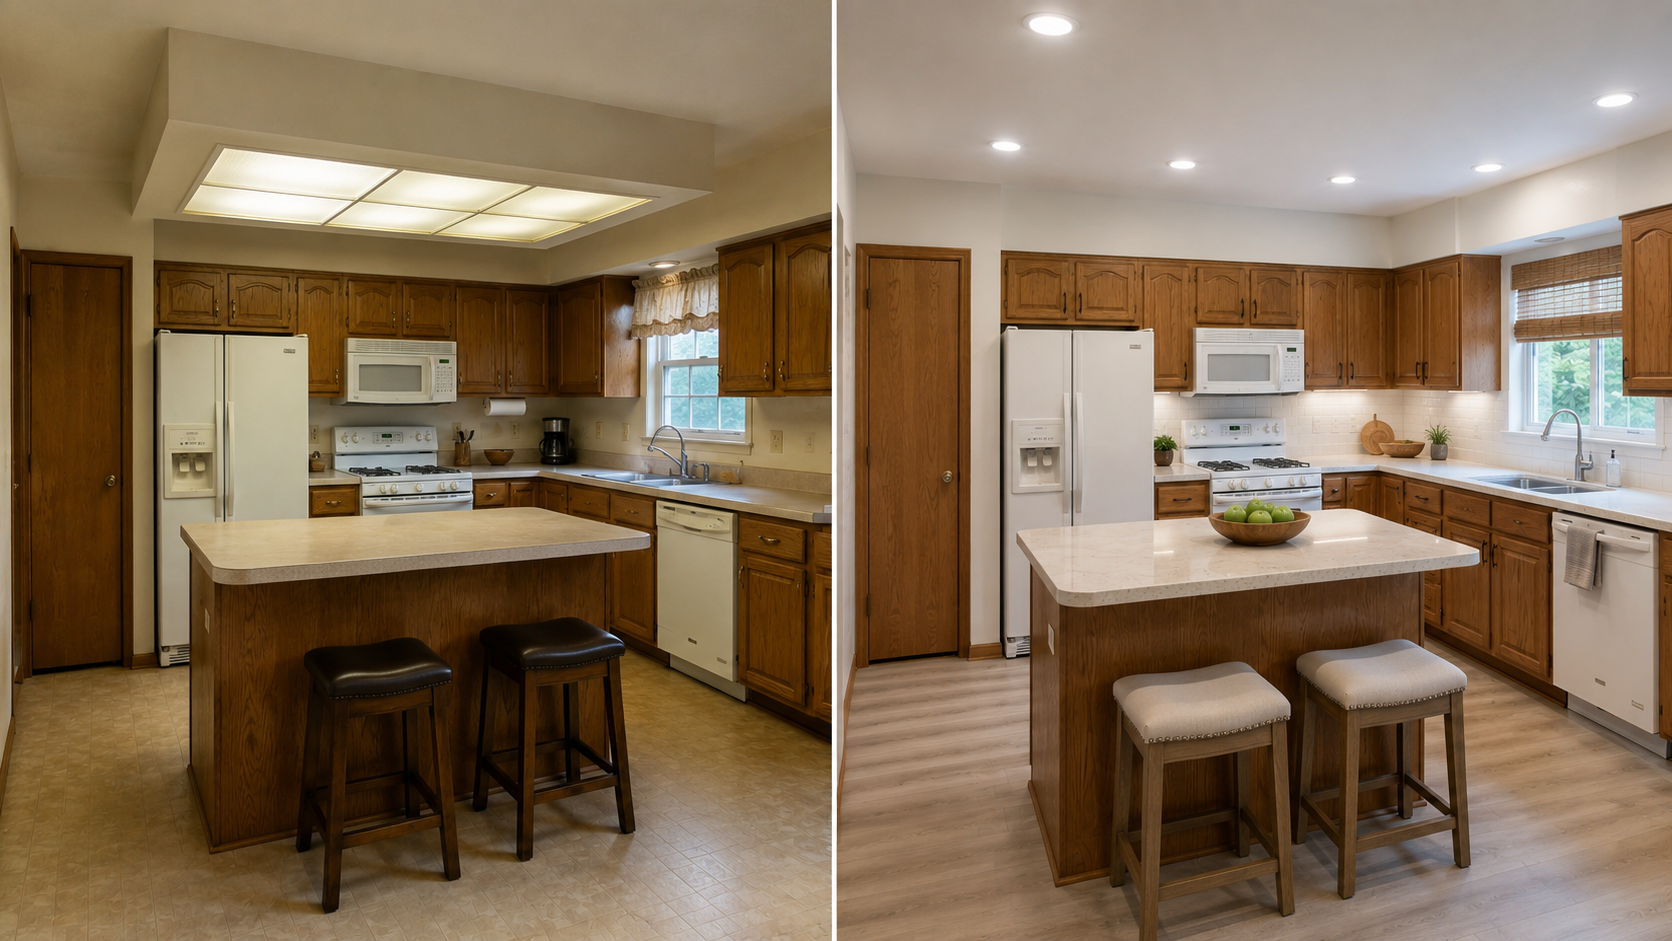
Soffits are harder. Some are just empty boxes over short cabinets; some hide ducts, wiring, plumbing, or exhaust paths. The before-and-after may show a clean ceiling, but it may not show what it took to get there.
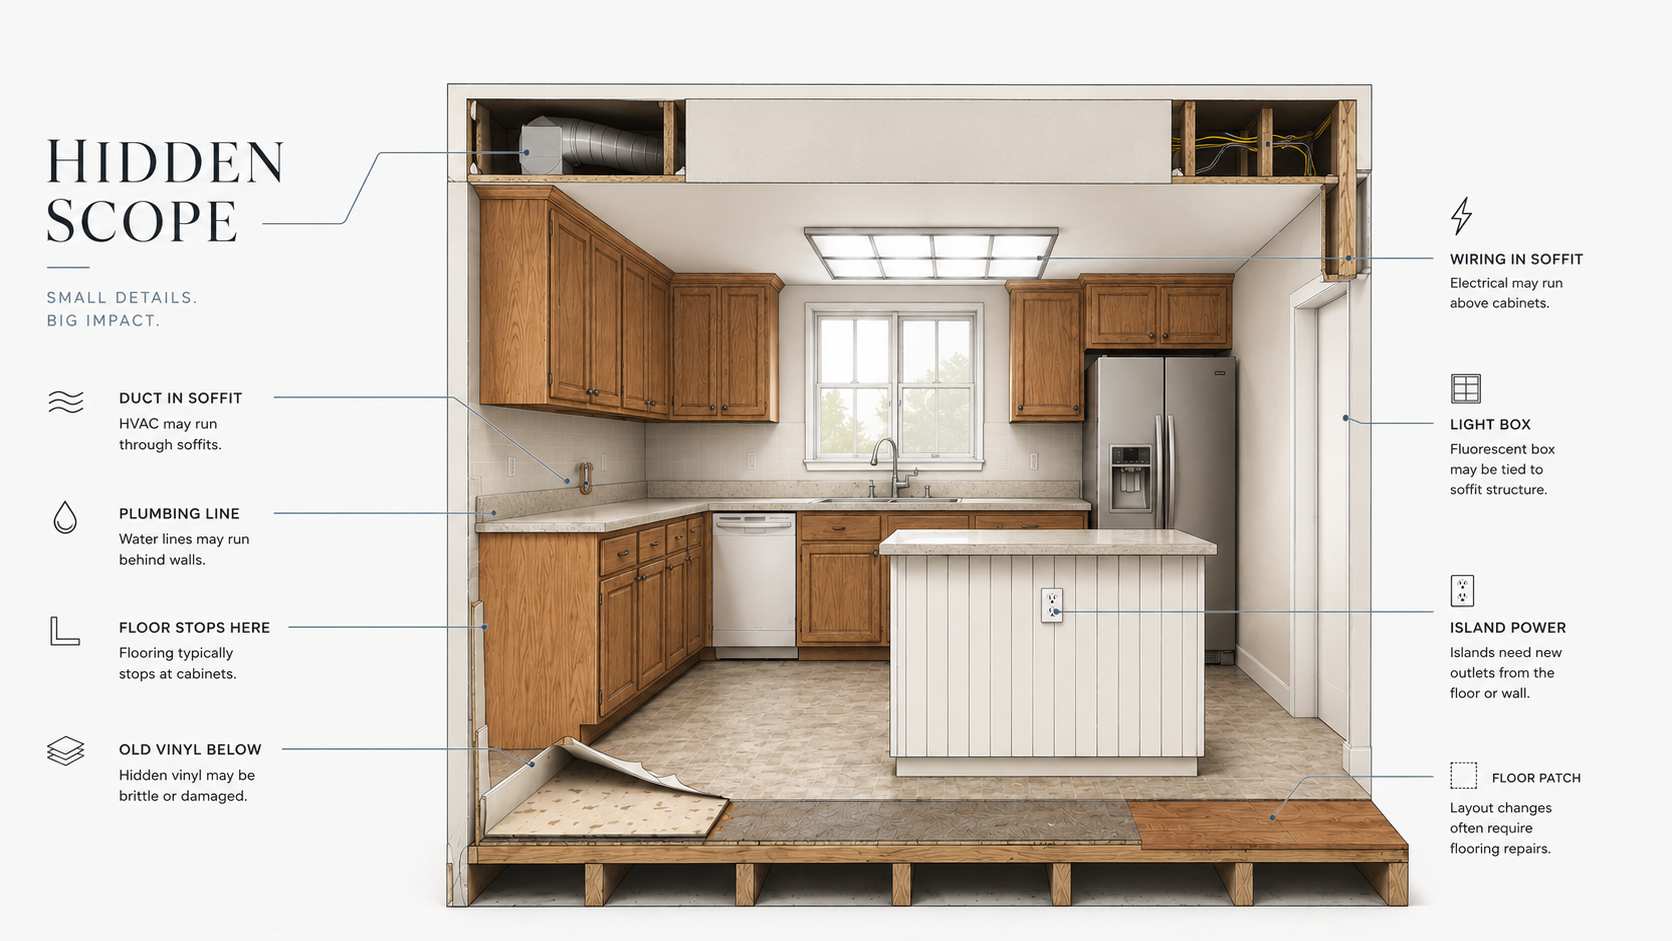
Before you copy a soffit-removal photo, check:
- whether the soffit hides ductwork
- whether it carries wiring
- whether plumbing runs above the kitchen
- whether taller cabinets will actually fit
- whether the whole ceiling needs patching
- whether new lighting will need new circuits or switches
This is where a pretty before-and-after can mislead people. The photo shows a cleaner ceiling. It does not show the trades behind it.
Before and After 5: Layout Problem Fixed
Sometimes the best before photo is not ugly. It just shows the wrong layout. A kitchen can have clean cabinets, newer appliances, and good daylight but still feel awkward because a half-wall, overhead cabinet, peninsula, or appliance location breaks the room. The after works because the circulation was fixed, not because the finishes got more expensive.
Signs the layout, not the finish, is the real problem
- The refrigerator blocks the main path.
- The dishwasher opens into the cooking zone.
- The island has seating but no useful prep area.
- The peninsula traps people inside the kitchen.
- The family-room connection is blocked by cabinets or a half-wall.
- The range has poor ventilation.
- The sink has daylight but poor counter space nearby.
When the layout is wrong, the remodel should be planned like construction. Paint and hardware can help the photo, but they will not fix daily use.
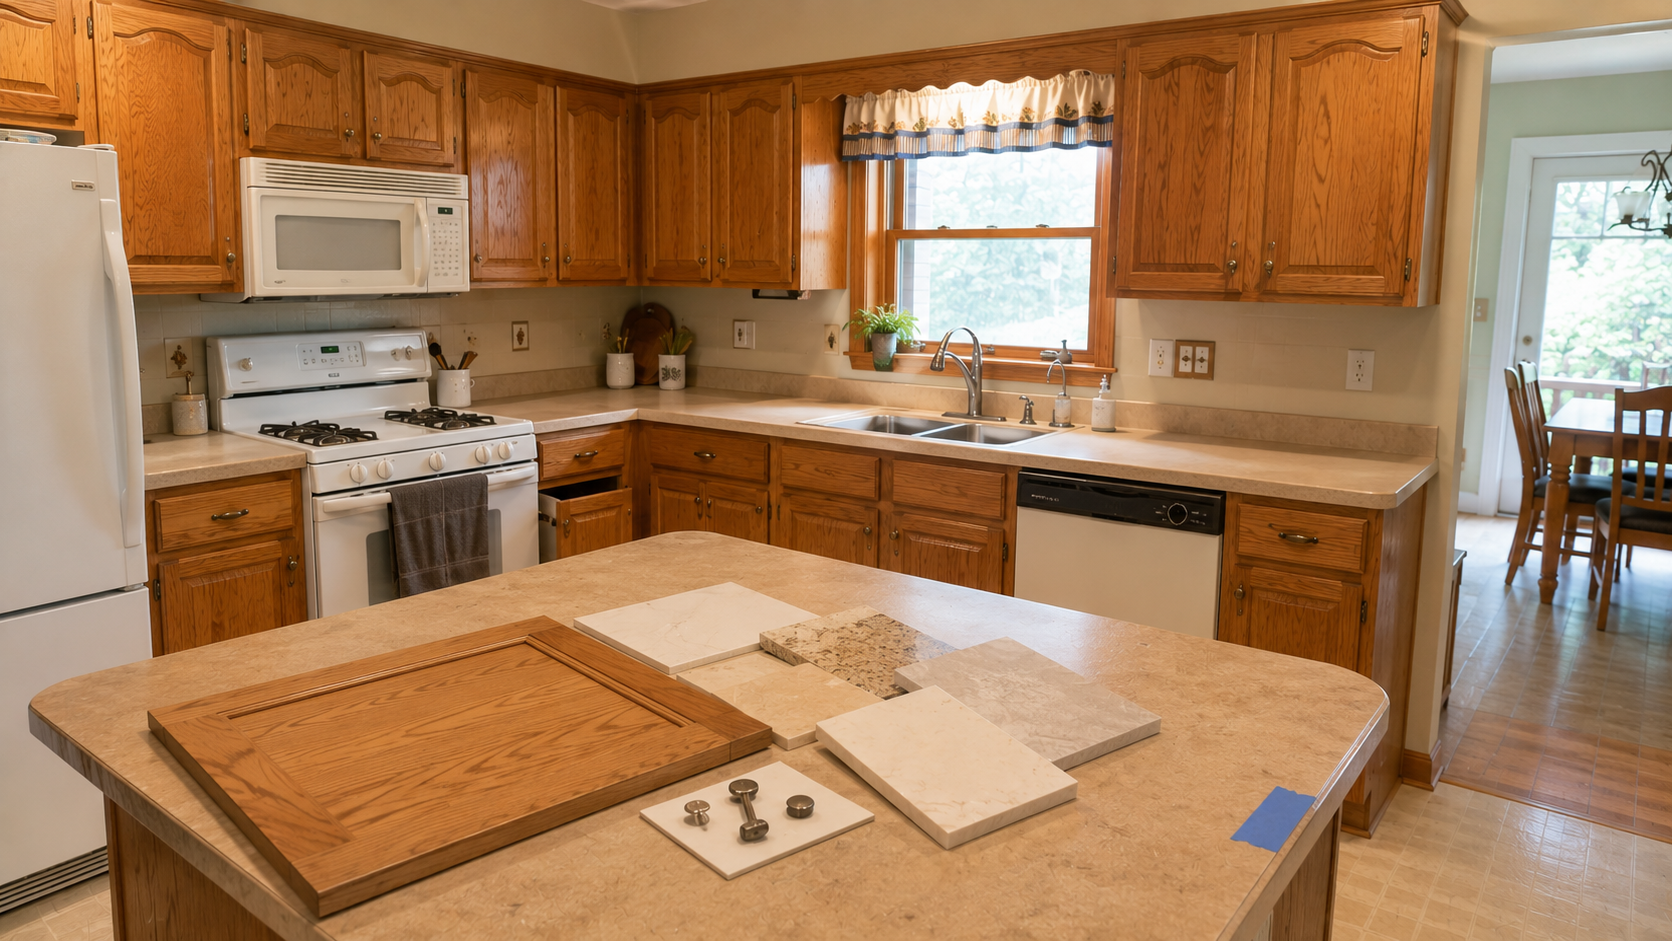
Check the Oak Before You Pick the Counter
This is the part most before-and-after articles skip. The counter, backsplash, wall color, floor, and cabinet finish all read together. A counter that looks clean in a showroom can turn yellow beside honey oak. A gray backsplash can turn cold. A white paint color can make the oak look louder. A warm counter can send the whole kitchen orange again.

Samples should be tested in the actual kitchen, not only under store lighting. Put the counter sample beside the cabinet, put the paint sample beside the counter, and look at them in morning light, afternoon light, and at night with the kitchen lights on. A good before-and-after is usually not the result of a brave color. It is the result of finishes that stopped arguing with each other.
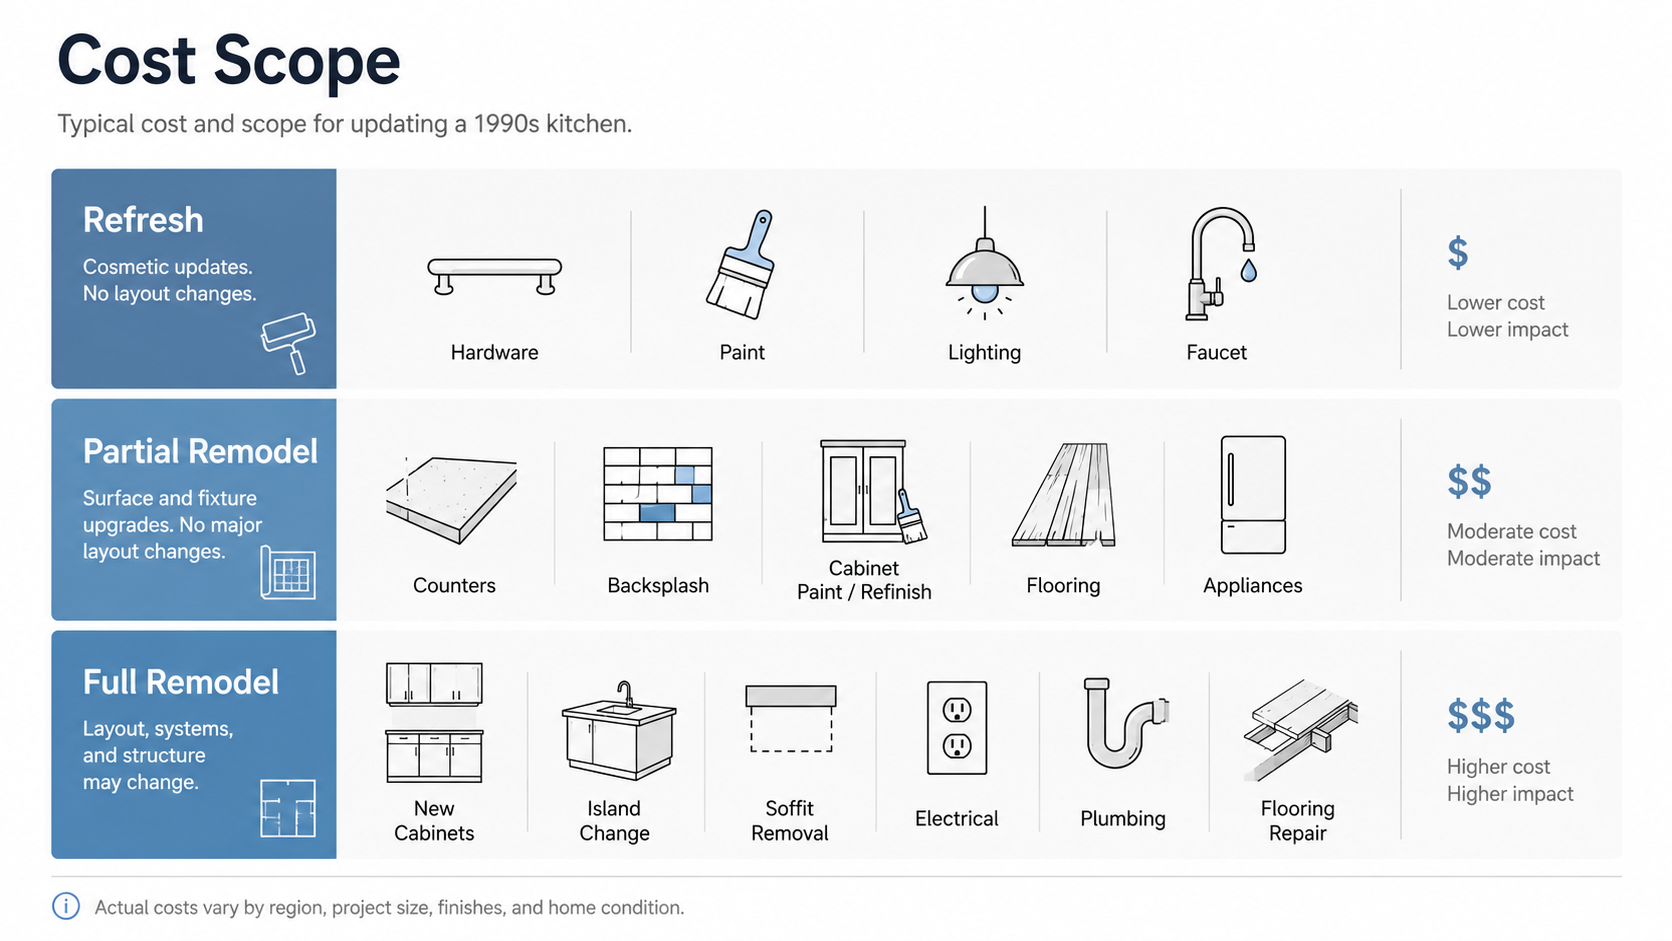
The $5,000 After and the $50,000 After Can Look the Same
Here is the thing no before-and-after photo will tell you: two kitchens that started identical can reach almost the same after and cost ten times apart.
One owner paints the oak, swaps the hardware, adds under-cabinet lighting, drops in a quartz-look counter and a simple backsplash, and stops — call it five to thirteen thousand dollars. Another owner with the same dated kitchen guts it: new cabinets, moved sink, new floor, new layout, thirty to fifty thousand and up. In a thumbnail, shot in good light from the right corner, the two finished kitchens can look strikingly similar. The cost data backs this up — a paint, hardware, counter, and backsplash refresh runs roughly $5,000 to $13,000 and delivers around three-quarters of the visual change of a full $50,000 remodel. I have stood in two kitchens that photographed almost the same and were quoted thirty thousand dollars apart.
That last quarter is real, and sometimes it is the part you need: a wall moved, a peninsula gone, drawers where there were doors, a layout that finally works. But it is also the part that does not show up in a photo. The picture rewards the finishes and stays silent about the floor plan. So when an after photo stops you in your tracks, the useful question is not "how do I get that look" but "how much of that look is finish, and how much is construction I cannot see?"
For a lot of 1990s kitchens, the honest answer is that most of the look is finish, and most of the cost in a gut goes to things the camera never captures. If the layout already works, you are often one good refresh away from the after you are pinning — not one gut renovation away.
What These 1990s Kitchen Updates Have in Common
The successful examples usually fix the same core problems, even when the final kitchens look different.
They reduce yellow
Yellow light, orange cabinets, beige counters, and warm floors can all stack together. A good remodel breaks that stack.
They simplify the surfaces
The backsplash gets quieter, the counters get calmer, the hardware stops calling attention to itself, and the wall color stops fighting the cabinets.
They make the ceiling cleaner
Old light boxes, soffits, heavy fixtures, and badly placed recessed cans can make the whole kitchen feel lower and older.
They respect the good parts
Not every 1990s kitchen needs to be erased. Many have a useful connection to the family room, good daylight, decent cabinet runs, and a practical breakfast area.
What Did Not Need to Change
One of the biggest mistakes in a 1990s kitchen remodel is changing things only because they appear in the before photo. The layout may be fine. The cabinet boxes may be better than new budget replacements. The window may be in the right place. The family-room connection may already work. The pantry may be useful. The island footprint may only need resizing, not a full redesign.
Worth keeping when they work
- good daylight
- solid cabinet boxes
- useful pantry storage
- working kitchen-family room connection
- comfortable aisle widths
- appliance locations that already function
- an island or peninsula that gives real prep space
A smart before-and-after does not replace everything. It keeps the parts that still work and spends money where the room actually fails.
The Before-and-After Photo Can Lie
A before photo is often darker, wider, messier, and shot from a worse angle. An after photo is brighter, cleaner, staged, and photographed from the best corner. That does not mean the remodel is fake; it means the image is doing some of the work. I have made a kitchen look transformed with nothing but a clean counter, the right time of day, and a better camera position.
When you look at a before-and-after, ask:
- Was the camera angle similar?
- Did the window exposure change?
- Was the room staged in the after photo?
- Did the layout actually improve?
- Were appliances moved?
- Did the floor change because cabinets moved?
- Did the ceiling change because soffits were removed?
- Was the cabinet finish changed, or did the light make it look different?
The most useful before-and-after is not the prettiest one. It is the one that lets you see what was actually fixed.
Cost: What the Image Does Not Show
A 1990s kitchen before-and-after can look like a finish update when it was really a multi-trade remodel. The image may show new counters and painted cabinets; it may not show electrical work, drywall repair, floor patching, plumbing changes, cabinet refacing, appliance circuits, range ventilation, or ceiling repair.
| What changed in the photo | What might be hidden behind it |
|---|---|
| New island | Electrical, flooring patch, cabinet redesign, new counter slab |
| Removed soffit | Drywall, ceiling repair, wiring, ducts, lighting layout |
| Painted cabinets | Door removal, prep, grain filling, spraying, curing time, hinge adjustment |
| New countertops | Sink change, faucet, plumbing reconnection, cabinet leveling, backsplash work |
| New flooring | Cabinet footprint decision, height changes, transitions, subfloor repair |
For most homeowners, this is the money lesson: the visible change is not always the expensive part. The hidden work decides whether the project stays small or becomes a full remodel.
The Best Update Order
Use the before-and-after image as a clue, not as a shopping list.
- Decide the layout first. Do not buy counters or flooring until you know whether the island, peninsula, sink, range, and refrigerator are staying.
- Check the cabinet boxes. Paint, stain, or refacing only makes sense if the boxes and drawers are worth keeping.
- Open the soffit question early. Find out whether it hides anything before you design taller cabinets or new lighting.
- Confirm the flooring footprint. Make sure the floor does not stop under the old cabinets or peninsula.
- Fix the light. Better light changes how every finish reads.
- Choose counters and backsplash together. They sit beside the cabinets, so they need to work as one decision.
- Finish with hardware and paint. These help most when the larger choices are already settled.
That order keeps the project from becoming a collection of nice finishes attached to the wrong plan.
FAQ
What makes a 1990s kitchen look newer fastest?
Lighting, cabinet tone, hardware, counters, backsplash, wall color, and flooring usually create the fastest visual change. The room looks newer when those elements work together instead of making the oak, beige, and yellow tones louder.
Do 1990s oak cabinets have to be painted?
No. Some 1990s oak cabinets look much better with new counters, backsplash, hardware, lighting, and wall color. Paint makes sense when the cabinet boxes are solid and the orange tone is the main problem.
Is a peninsula-to-island remodel worth it?
It is worth it when the island improves circulation, prep space, seating, and the connection to the family room. It is not worth it if the new island creates tight aisles, removes useful storage, or triggers floor and electrical work without improving daily use.
Should I remove a 1990s kitchen soffit?
Only after checking what is inside it. Some soffits are empty; others hide ducts, wiring, plumbing, or exhaust paths. The cleaner ceiling in an after photo may have required more work than the image shows.
What is the biggest mistake when copying a before-and-after kitchen?
The biggest mistake is copying the finish without understanding the scope. A photo may show painted cabinets and new counters, but the real improvement may have come from better lighting, layout changes, ceiling repair, flooring, or appliance relocation.
Read This Next
- 1990s Kitchen Remodel: What to Update First and What to Leave Alone
- 1990s Oak Kitchen Cabinets: Keep, Refinish, Paint, or Replace?
- 1990s Houses: Styles, Features, and What to Update
- 1990s Bathroom Remodel: What to Update First and What to Leave Alone
References
Sources used for research and cost context
- Kylie M Interiors: How to Update Your 1990s Kitchen
- In Between Chaos: Updating a 90s Kitchen Without Painting Cabinets
- Average Inspired: DIY Kitchen Makeover Reveal
- Apartment Therapy: 90s Kitchen Remodel Before and After
- CostToRenovate: Kitchen Remodel ROI & Refresh-vs-Gut Cost (2026)
- Modernize: Cabinet Refacing Cost Guide 2026
- The Home Depot: Cabinet Refacing Cost Guide