A 1990s bathroom can look like a finish problem when it is really a moisture problem.
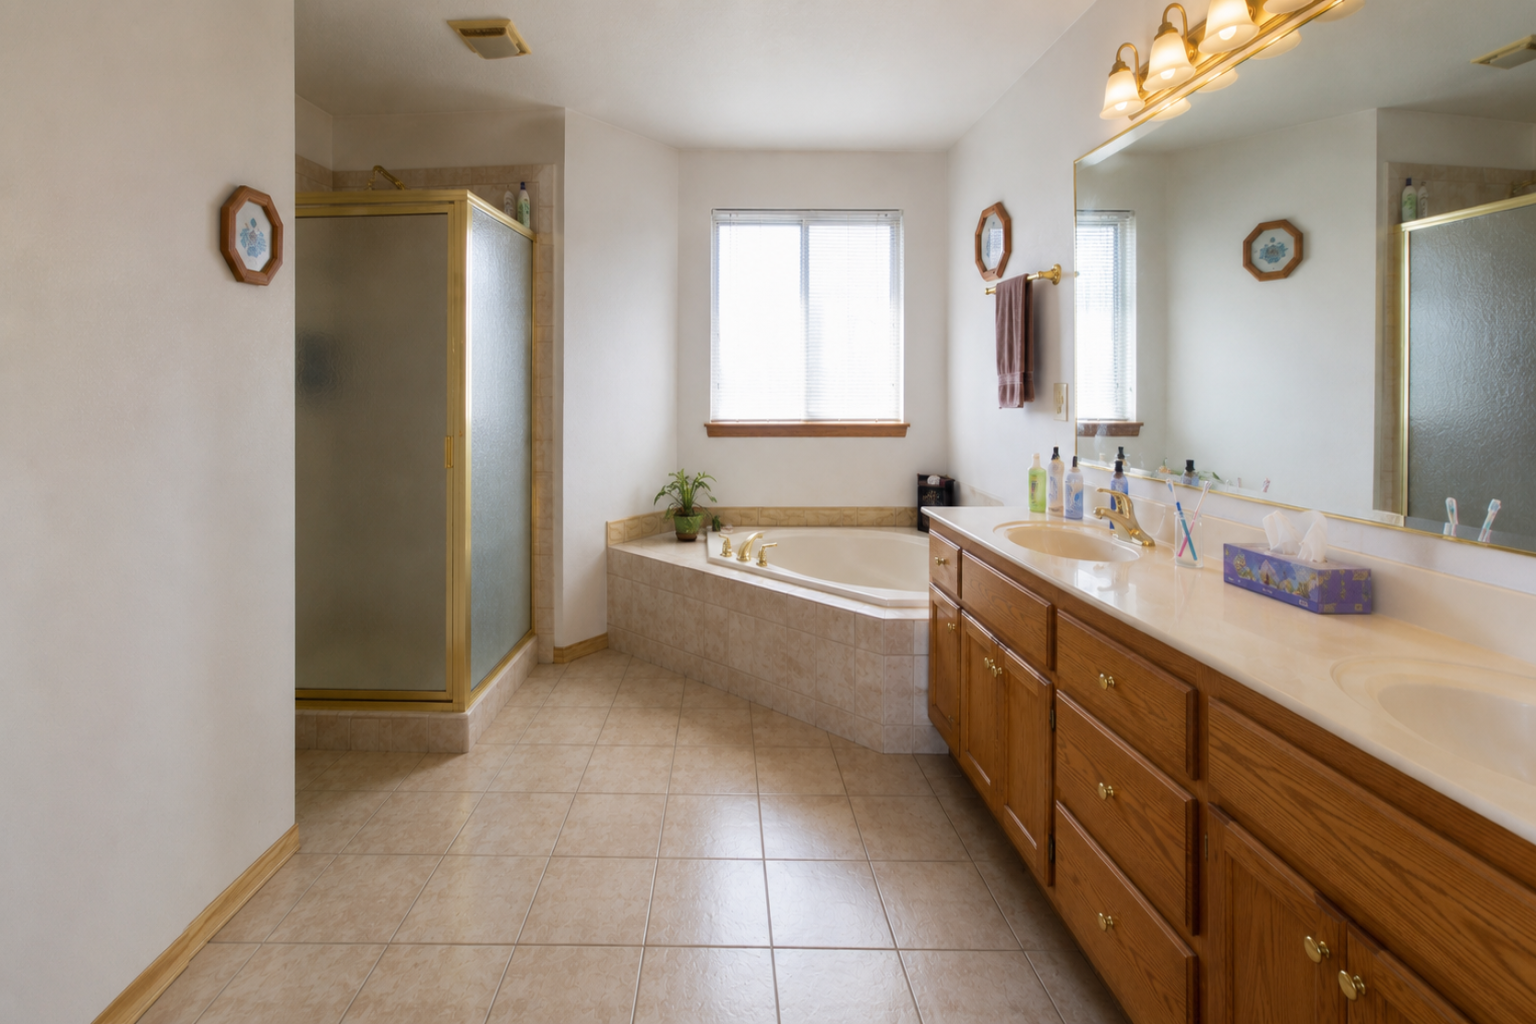
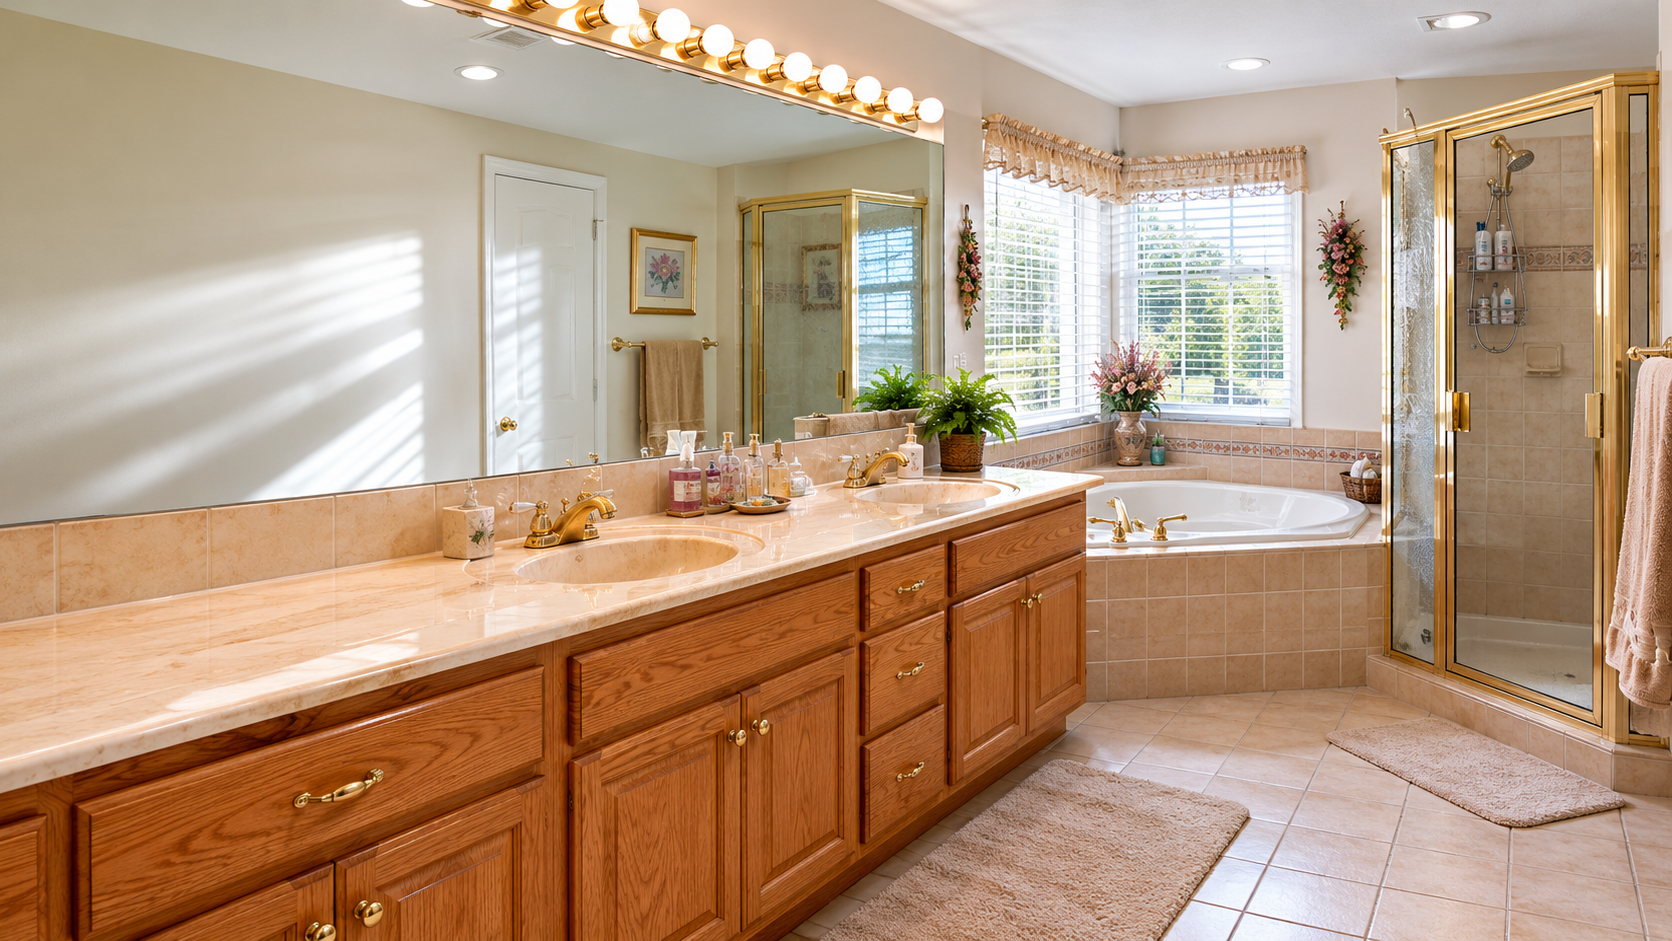
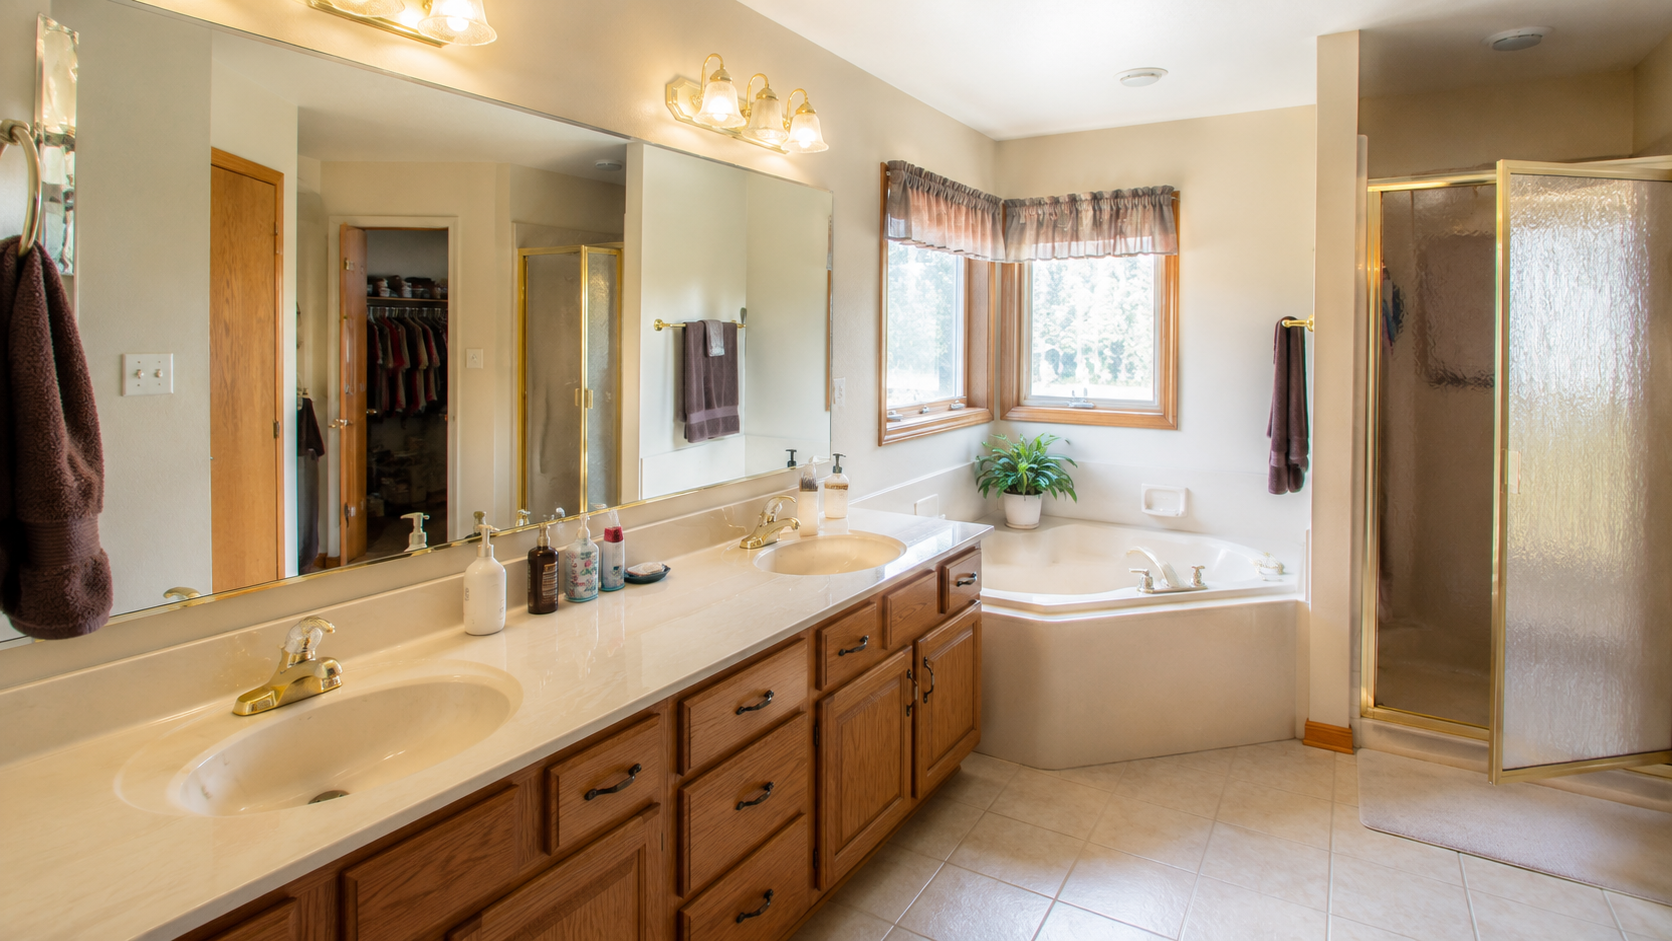
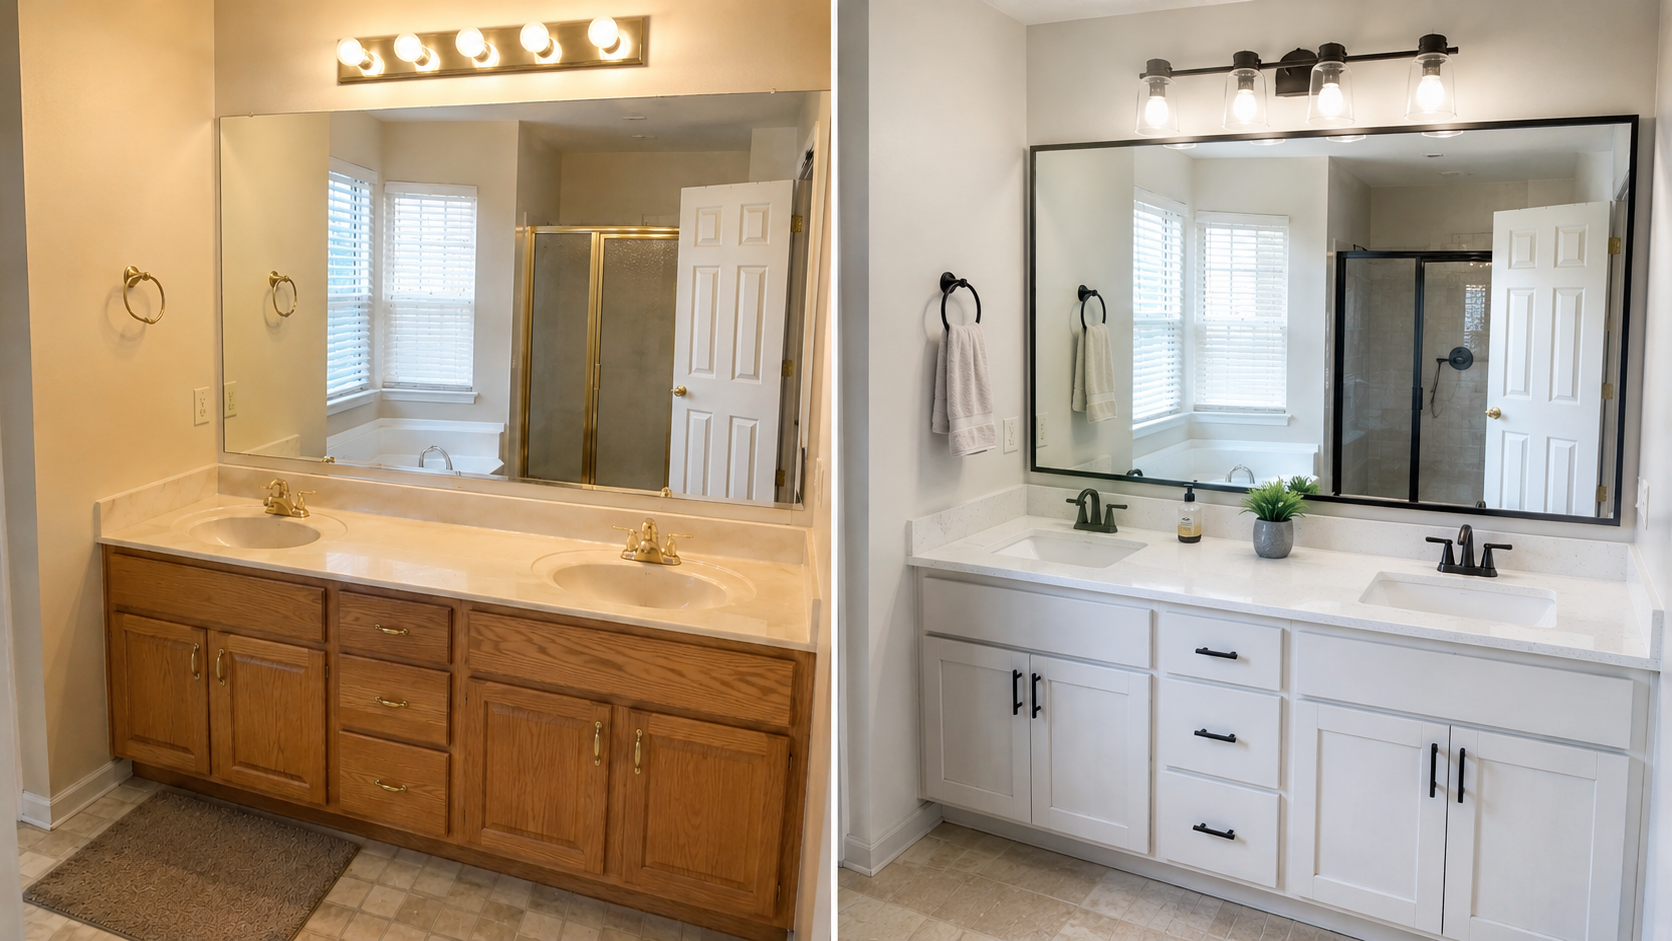
The oak vanity, brass faucets, beige tile, giant mirror, cultured marble top, corner tub, and old light bar are easy to blame, and they do make the room feel dated right away. But the expensive part of a 1990s bathroom remodel is usually behind the surface: weak ventilation, old caulk, tired grout, swollen vanity bases, loose tile, wet drywall, poor shower waterproofing, and plumbing that has already had thirty years of use.
That is why the best 1990s bathroom remodel does not start with tile color. It starts with what gets wet, what dries slowly, what still works, and what should be inspected before the room gets covered with new finishes.
The same rule applies across many 1990s houses: do not confuse dated finishes with real repair scope. Like a 1990s kitchen remodel, a bathroom update should separate the parts that only look old from the parts that control cost, moisture, plumbing, and daily use.
The Quick Answer
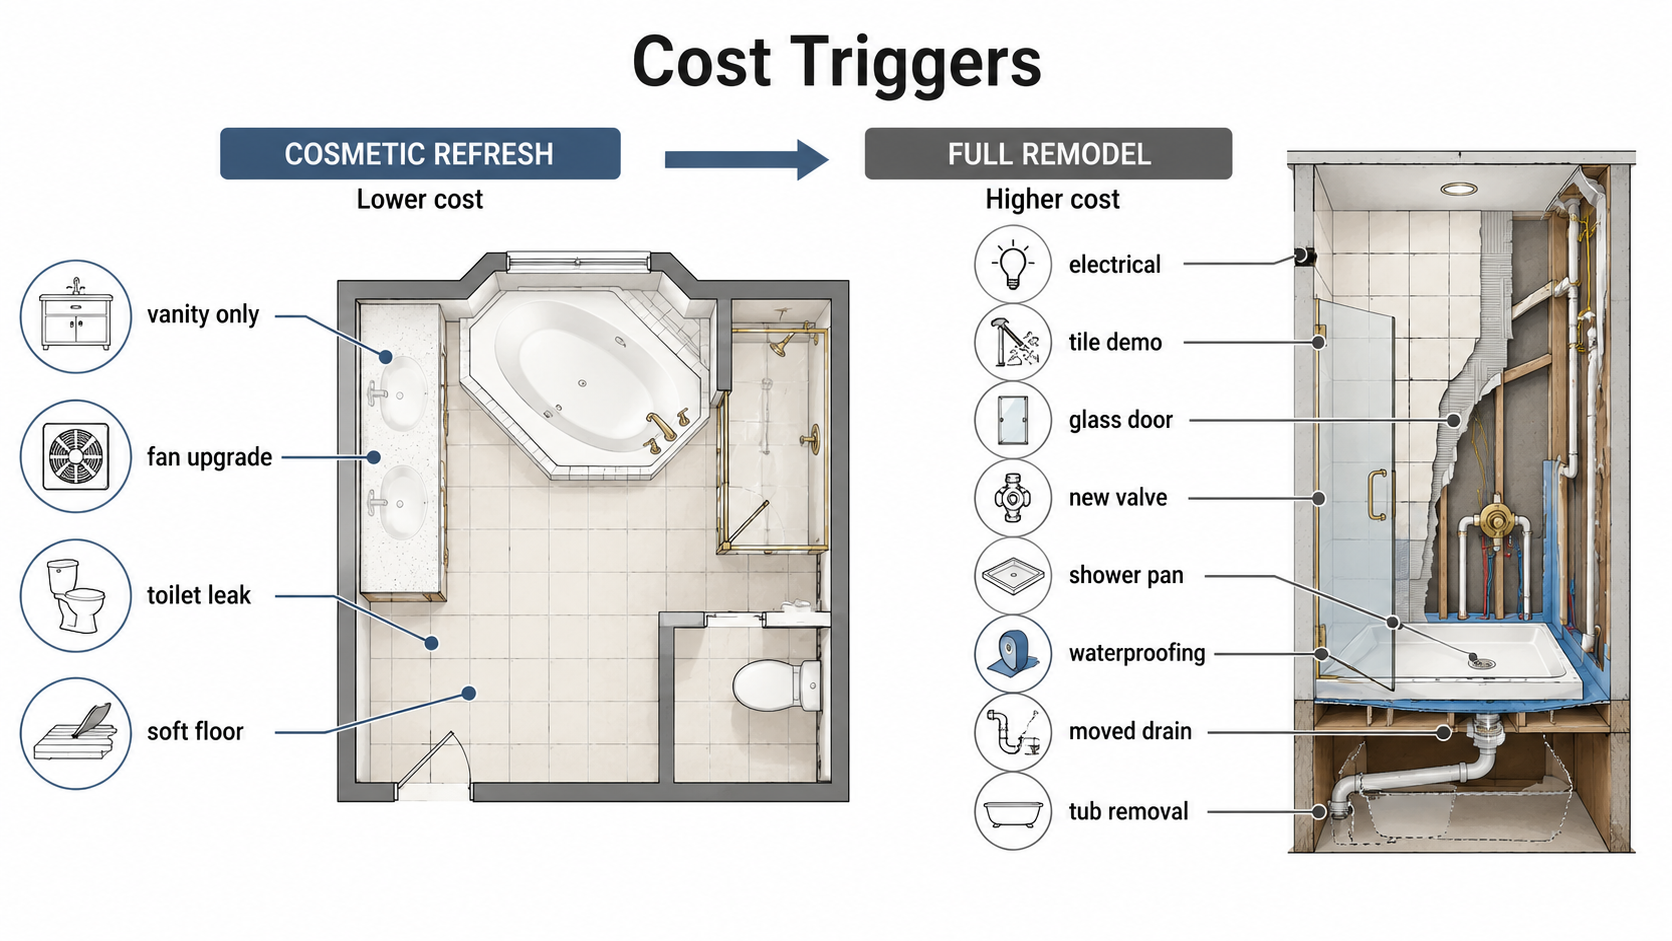
Start a 1990s bathroom remodel by deciding whether the room needs a cosmetic refresh, a wet-area remodel, or a full layout change. If the vanity is solid, the fan works, the shower is dry, and the layout still functions, you may be able to update lighting, mirror, hardware, paint, counters, and fixtures without gutting the room. If the shower leaks, the tub deck is failing, the vanity is swollen, the fan does not exhaust well, or the layout wastes space, plan for a larger remodel from the beginning.
| Project type | Best when | Watch for |
|---|---|---|
| Refresh | The bathroom is dry, functional, and mostly dated in finishes. | New paint, hardware, and lighting will not fix moisture, bad ventilation, or a failing shower. |
| Partial remodel | You are keeping the layout but changing vanity, lights, mirror, toilet, flooring, or fixtures. | New flooring and vanity work can expose old plumbing, subfloor damage, or uneven walls. |
| Wet-area remodel | The shower, tub, tile surround, or waterproofing is the main problem. | Tile replacement can become framing, plumbing, waterproofing, glass, fan, and drywall work. |
| Full remodel | The layout wastes space, the tub/shower plan is wrong, or plumbing and electrical need to move. | Moving drains, supply lines, walls, doors, and fixtures can quickly turn the job into construction. |
What Makes a 1990s Bathroom Look Dated?
Most 1990s bathrooms do not look dated because of one feature. They look dated because the whole room is still speaking the same decade.
- Oak vanities with raised-panel doors
- Polished brass faucets, towel bars, shower trim, and light fixtures
- Large frameless wall mirrors over double vanities
- Hollywood-style vanity light bars
- Cultured marble counters with molded sinks
- Beige, almond, pink, green, or cream tile
- Corner tubs, deck tubs, or jetted tubs that use too much floor area
- Small separate showers beside oversized tubs
- Glass block, frosted glass, or gold-framed shower doors
- Wallpaper borders, sponge paint, heavy valances, or warm wall colors
- Carpet near the vanity or tub in some larger primary bathrooms
Those features are not equal problems. A brass faucet is easy; a bad fan is not. A giant mirror is cosmetic; a leaking shower is not. A dated vanity light can be changed in an afternoon; a failed tub surround can open the wall.
Start With Moisture, Not Tile
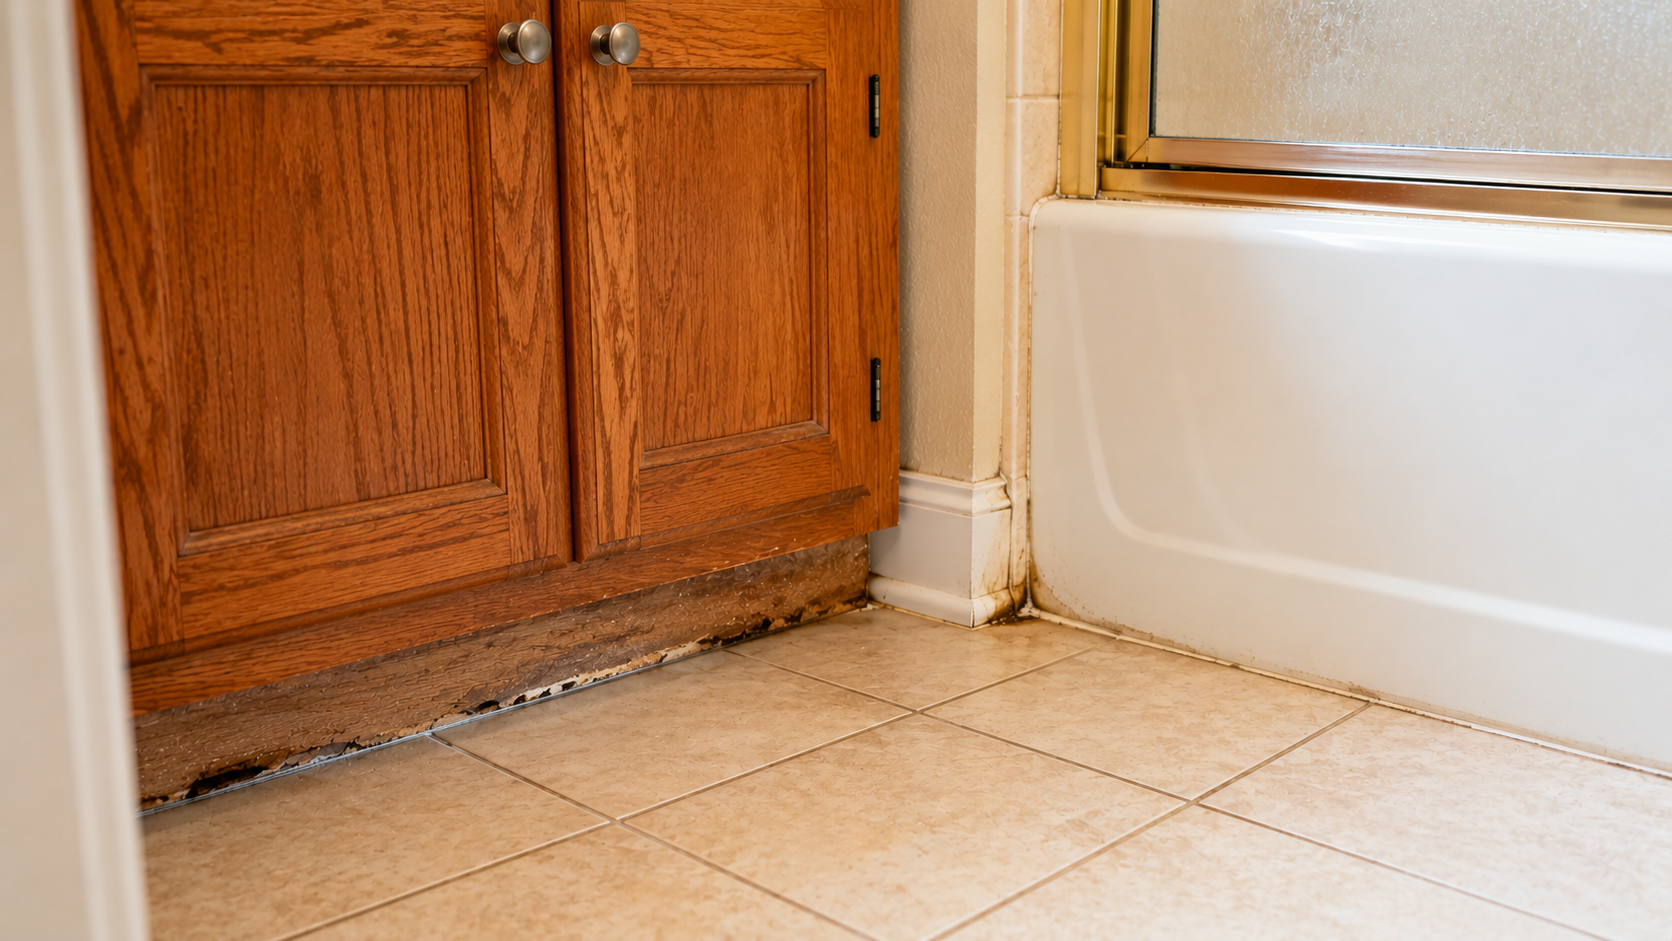
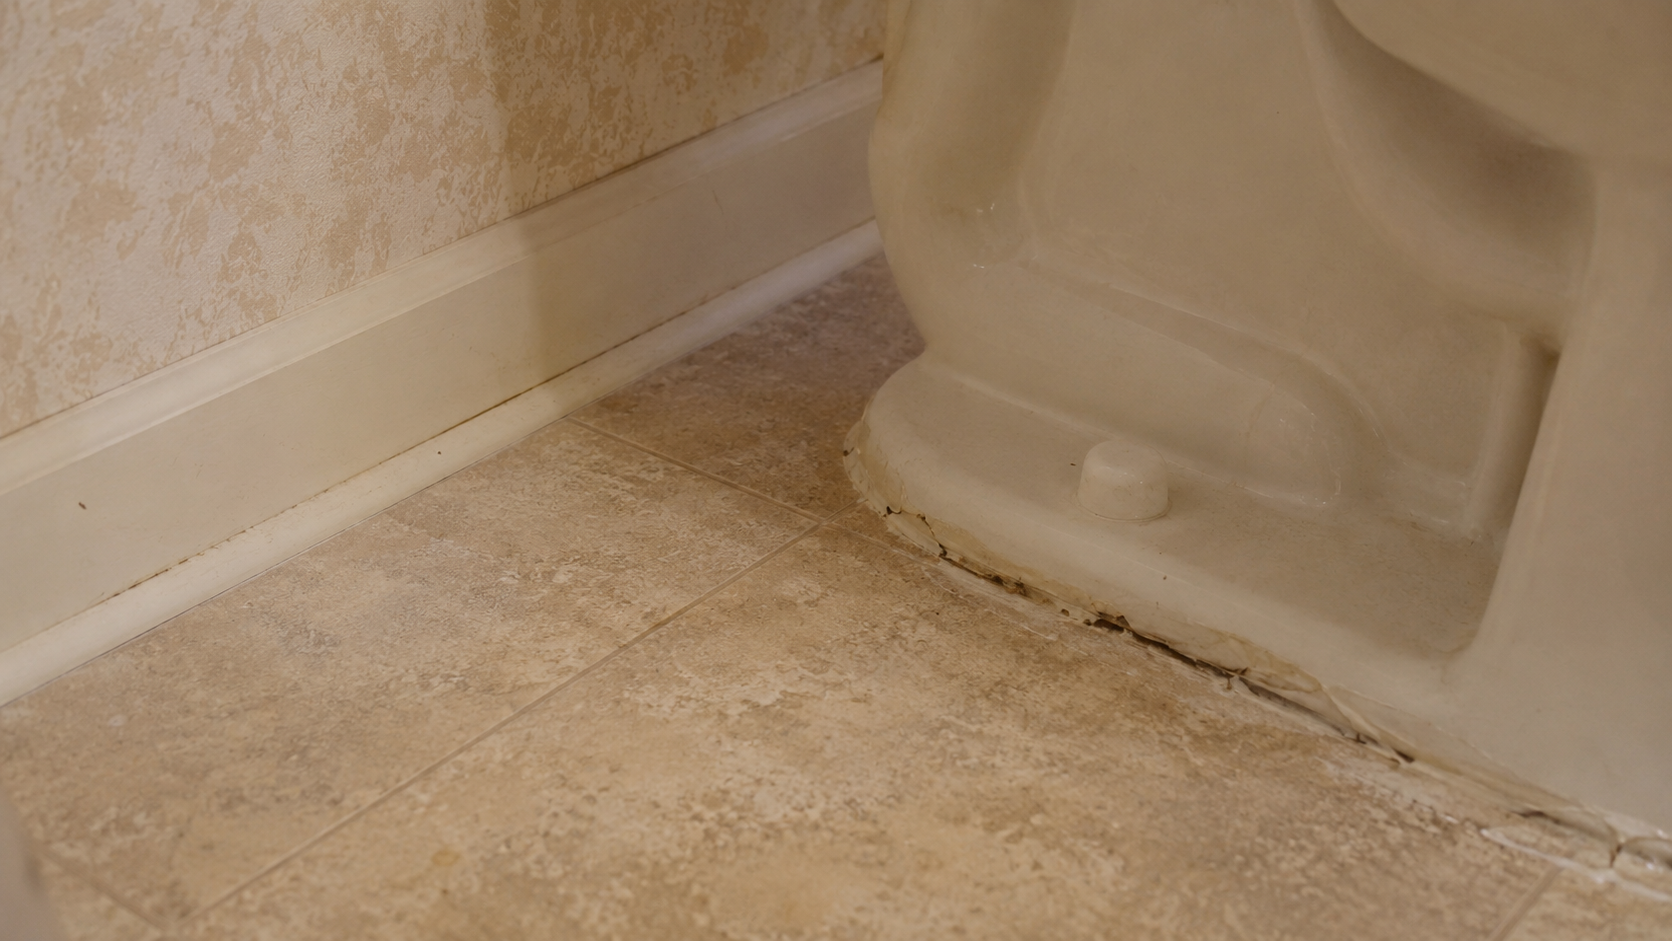
Bathrooms are wet rooms. That sounds obvious, but many bad bathroom remodels ignore it. Before choosing tile, open the vanity doors and look under the sink. Check the floor around the toilet. Look at the wall beside the tub. Press gently on the baseboards near the shower. You are looking for bubbling paint, dark caulk, loose grout, swollen trim, a musty smell, soft flooring, or stains below the bathroom ceiling if there is a finished room underneath.
Check these before choosing finishes
- Vanity base: Look for swelling, dark stains, soft bottoms, and old leaks under the sink.
- Toilet area: Check for loose flooring, staining, rocking, or signs of a bad wax ring.
- Tub deck: Look at caulk lines, corners, overflow trim, and any tiled horizontal ledge.
- Shower walls: Check cracked grout, loose tile, failing caulk, and movement at the curb.
- Ceiling below: Look for old stains if the bathroom sits over finished space.
- Fan: Confirm that it pulls air and exhausts outdoors, not into an attic or dead space.
If the bathroom is dry, the update can stay controlled. If it is not dry, the remodel should be planned as repair first and design second.
The 1990s Primary Bathroom Trap
The classic 1990s primary bathroom often has one strange problem: the tub is too important and the shower is not important enough.
Many of these bathrooms were designed around a large corner tub, deck tub, or jetted tub that looked impressive when the house was new. Then the separate shower was squeezed into a smaller stall. Thirty years later, the tub may be used rarely, while the cramped shower is used every day. And the flat tiled deck around that tub is the most common hidden leak I find in these bathrooms — water sits on the horizontal grout, the caulk at the tub rim lets go, and it wicks down into the deck and the wall behind it long before anything looks wrong.


Keep the tub when:
- It is used regularly.
- It fits the room without crowding the shower.
- The deck is dry and in good condition.
- The tub location supports the layout.
- Resale expectations in the area still favor a tub in the primary bath.
Remove or reduce the tub when:
- The shower is too small for daily use.
- The tub deck takes the best floor area in the room.
- The jetted tub no longer works or is rarely used.
- The deck has failed caulk, cracked tile, or water staining.
- A larger shower would make the bathroom work better every day.
This is where the remodel decision becomes personal. A tub can be useful. A giant unused tub that steals space from the shower is not useful just because it came with the house. A garden tub tends to feel permanent until you see the room drawn without it.
The Good News: You Usually Don't Have to Move the Plumbing
Here is the part that makes a 1990s bathroom cheaper to remodel than most people fear: the single most expensive thing you can do in a bathroom is move plumbing, and in a house this age you usually do not have to.
The line item I watch most closely on a bathroom quote is not the tile or the vanity. It is whether anyone is moving a drain. Relocating a toilet flange, a shower drain, or a vanity waste line means opening the floor, reworking the drain-waste-vent, and often patching the ceiling below — and that is where a fifteen-thousand-dollar bathroom quietly becomes a thirty-five-thousand-dollar one. The supply side is friendlier than it sounds, too: most 1990s houses were plumbed in copper or CPVC that has decades of service left. The one exception worth ruling out first is grey polybutylene supply pipe; if you see it, get it identified, because it is a separate problem the 1990s houses guide covers.
The lucky part is that 1990s drain locations already sit close to where modern fixtures want them. That means most of the dramatic "after" you are picturing can happen on the drains you already have:
- A roomy walk-in shower usually drops into the old garden tub's footprint, reusing the same drain area.
- A 60-inch double vanity often fits where a 48-inch single sat, reusing one existing drain and adding a second faucet and trap.
- A sound but dated tub can be reglazed for roughly $400 to $700 instead of pulled and replaced for $2,500 and up, which keeps its drain and the wall behind it untouched.
None of this means never move anything. Sometimes the toilet really is in the wrong place, or the layout only works if the shower shifts. But that should be a deliberate, priced decision — "we are moving the toilet three feet, and here is what that costs" — not a default. Decide everything you can do on the existing drains first. For a lot of 1990s bathrooms, the honest answer is that you can transform the room without moving a single one.
Vanity, Mirror, and Lighting
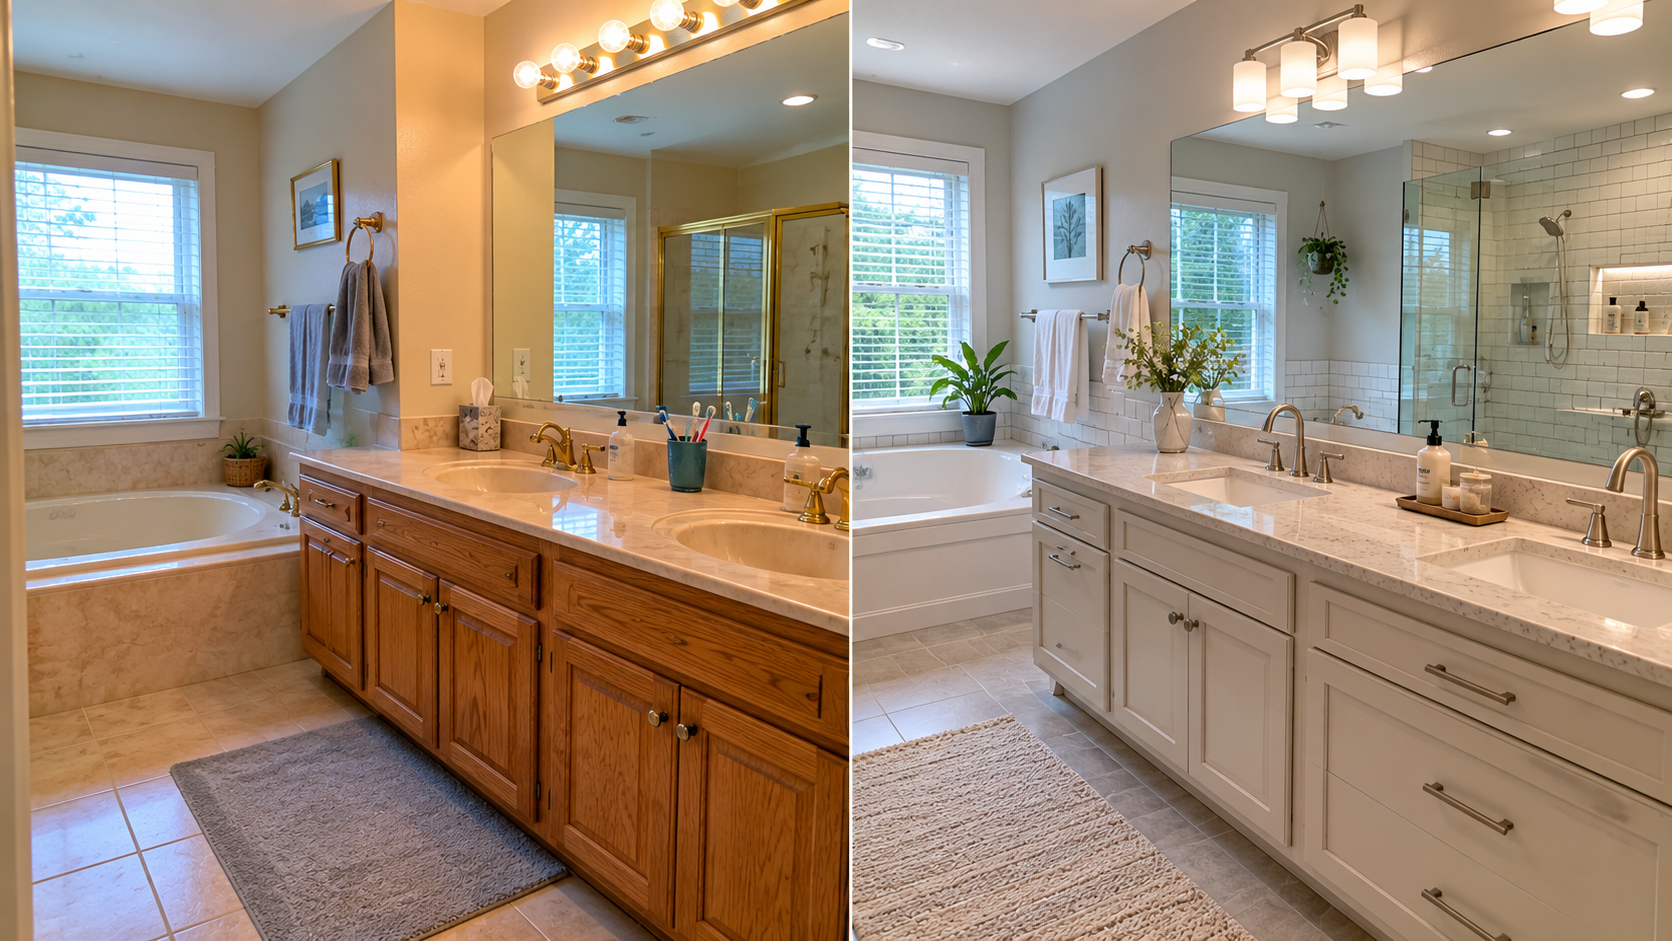
The vanity wall is the fastest place to change the look of many 1990s bathrooms. A typical setup has an oak vanity, a cultured marble top, a wide frameless mirror, a brass faucet, and a long light bar above the mirror. It dates the room immediately, but it does not always require a full gut.
Keep the vanity if:
- The cabinet box is solid.
- The drawers and doors work.
- The sink base is not swollen.
- The height still feels comfortable.
- The layout works and storage is useful.
Replace the vanity if:
- The bottom is swollen from leaks.
- The drawers are failing.
- The old vanity is too low or too shallow.
- The counter shape locks in bad sink placement.
- You are moving plumbing or changing the whole layout.
The mirror deserves the same kind of judgment. A large frameless mirror is dated, but it also reflects light and makes a small bathroom feel larger. Replacing it with two smaller mirrors can look better when the lighting and sink spacing support it — but if the sinks are not centered well, two mirrors only make the old layout look worse.
Test the Vanity Finish Before You Commit
A 1990s oak vanity can shift the whole bathroom warm. That does not automatically mean it should be replaced. Sometimes the old vanity only needs a better finish, better lighting, a calmer counter, and hardware that does not push the room back into brass-and-beige.
Test paint, tile, counter, and hardware samples against the actual vanity, not in a store aisle. Beige tile, warm bulbs, brass fixtures, and cultured marble can change how every color reads.
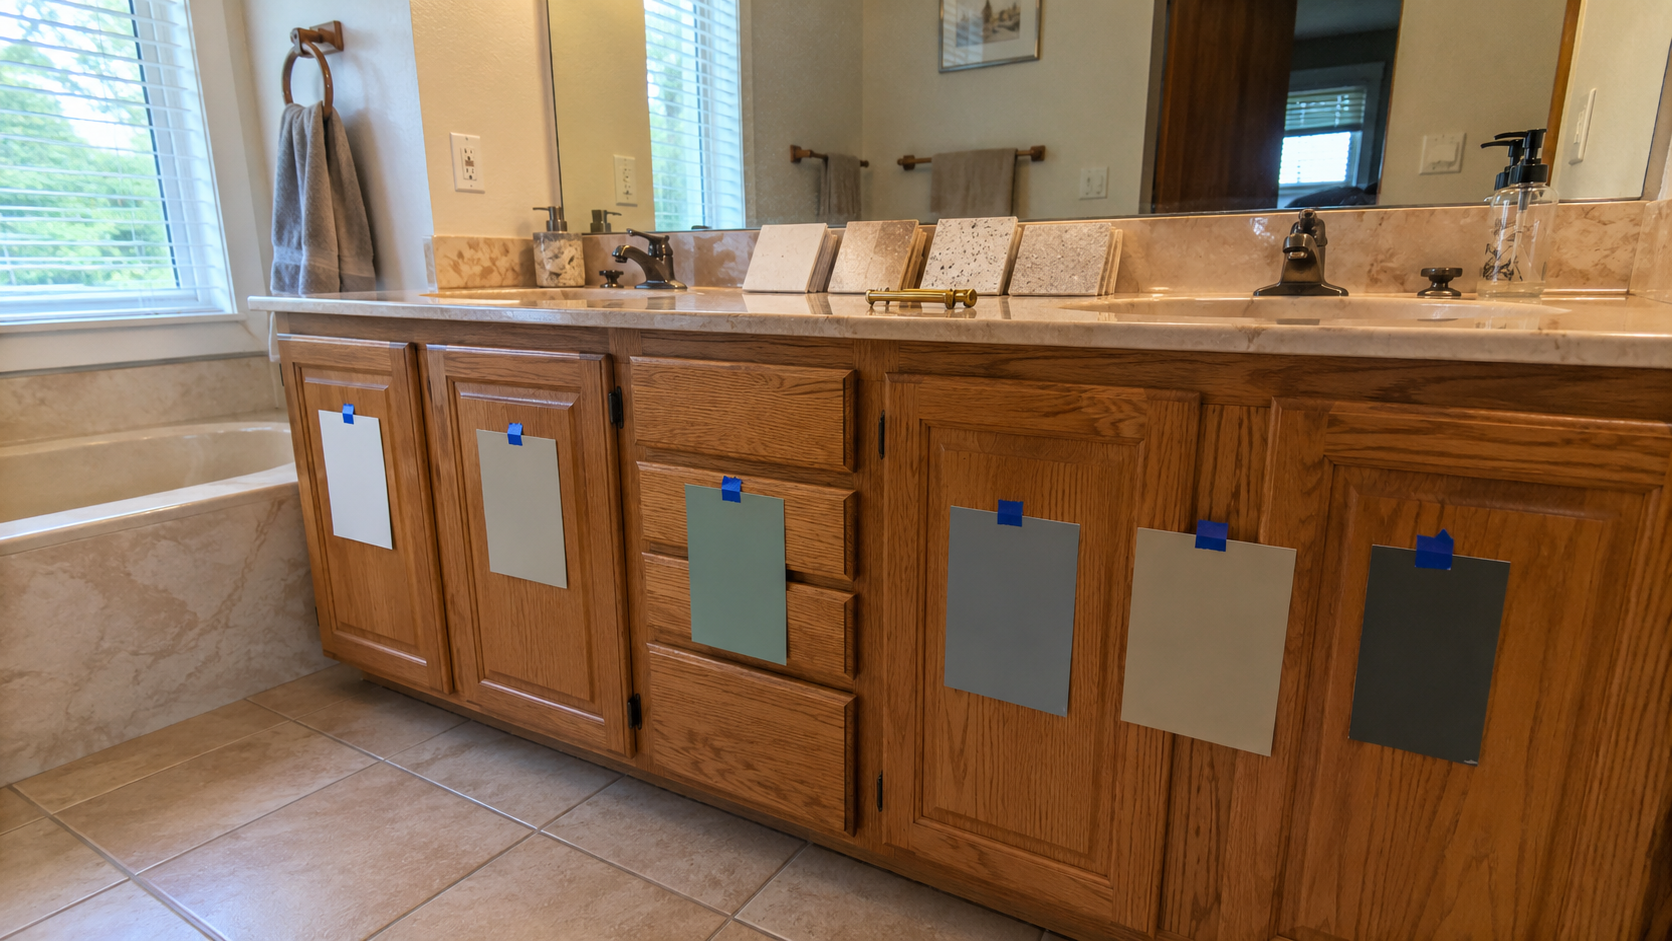
Warm white can brighten the room, but it may turn yellow beside old tile. Soft greige can calm beige. Muted sage can work well if the tile is warm and the room has daylight. Dusty blue-gray can cool the oak, but it can also look cold in a small bathroom with weak light. Taupe-beige keeps warmth without repeating the orange. Charcoal can work as an accent, but it is risky in a dark bathroom.
Tile Is Not Waterproofing
This is the bathroom section most homeowners learn too late. Tile is the finish. Grout is not waterproofing, and caulk is not a long-term waterproofing system. The real bathroom is behind the tile: backer board, waterproof membrane, seams, corners, curbs, pans, valves, drains, and the way water is directed back into the shower or tub.
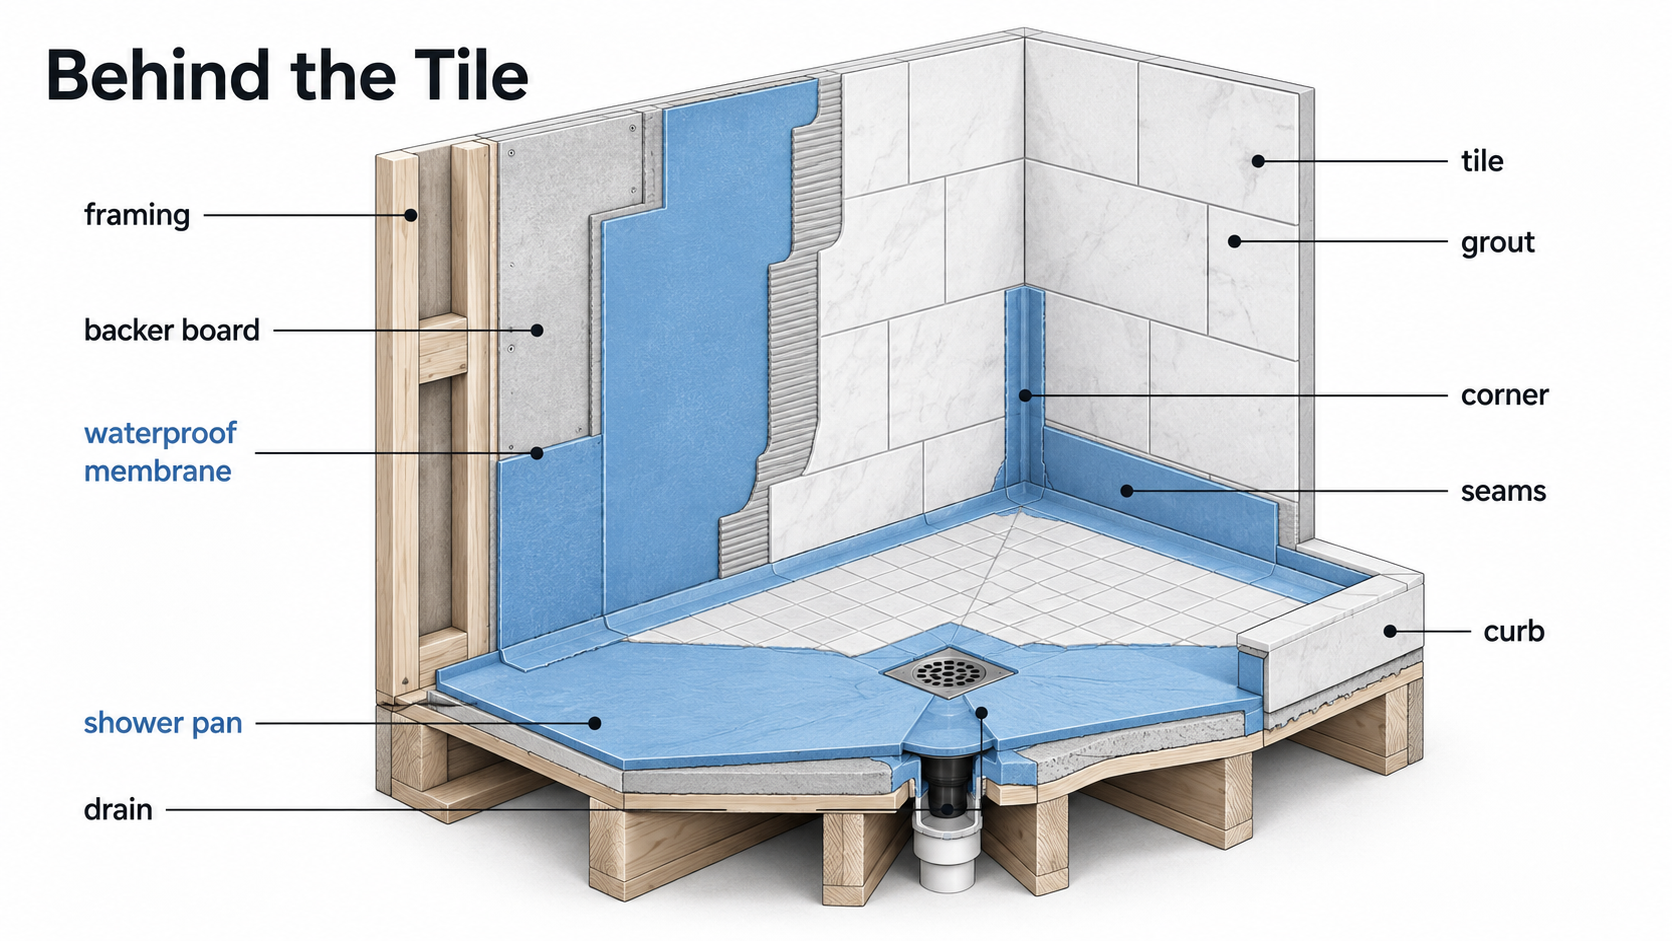
A 1990s shower may look only dated, but the real question is whether it still manages water correctly. Loose tile, cracked grout, a soft curb, moldy caulk, or a musty smell near the shower can mean the wall behind the finish is already involved.
A shower remodel should check:
- wall backing
- waterproofing method
- shower pan or tub-to-wall connection
- curb condition
- drain location
- valve depth and access
- fan capacity
- glass door swing and cleaning access
A pretty shower with weak waterproofing is not an upgrade. It is a delayed repair.
Ventilation Is Part of the Remodel
A 1990s bathroom fan may make noise and still do very little. That matters because bathrooms need to dry. If the fan is weak, dirty, badly ducted, or vented into an attic, new paint and tile will still live in a damp room. A better fan does not make the bathroom prettier in photos, but it can protect the entire remodel.
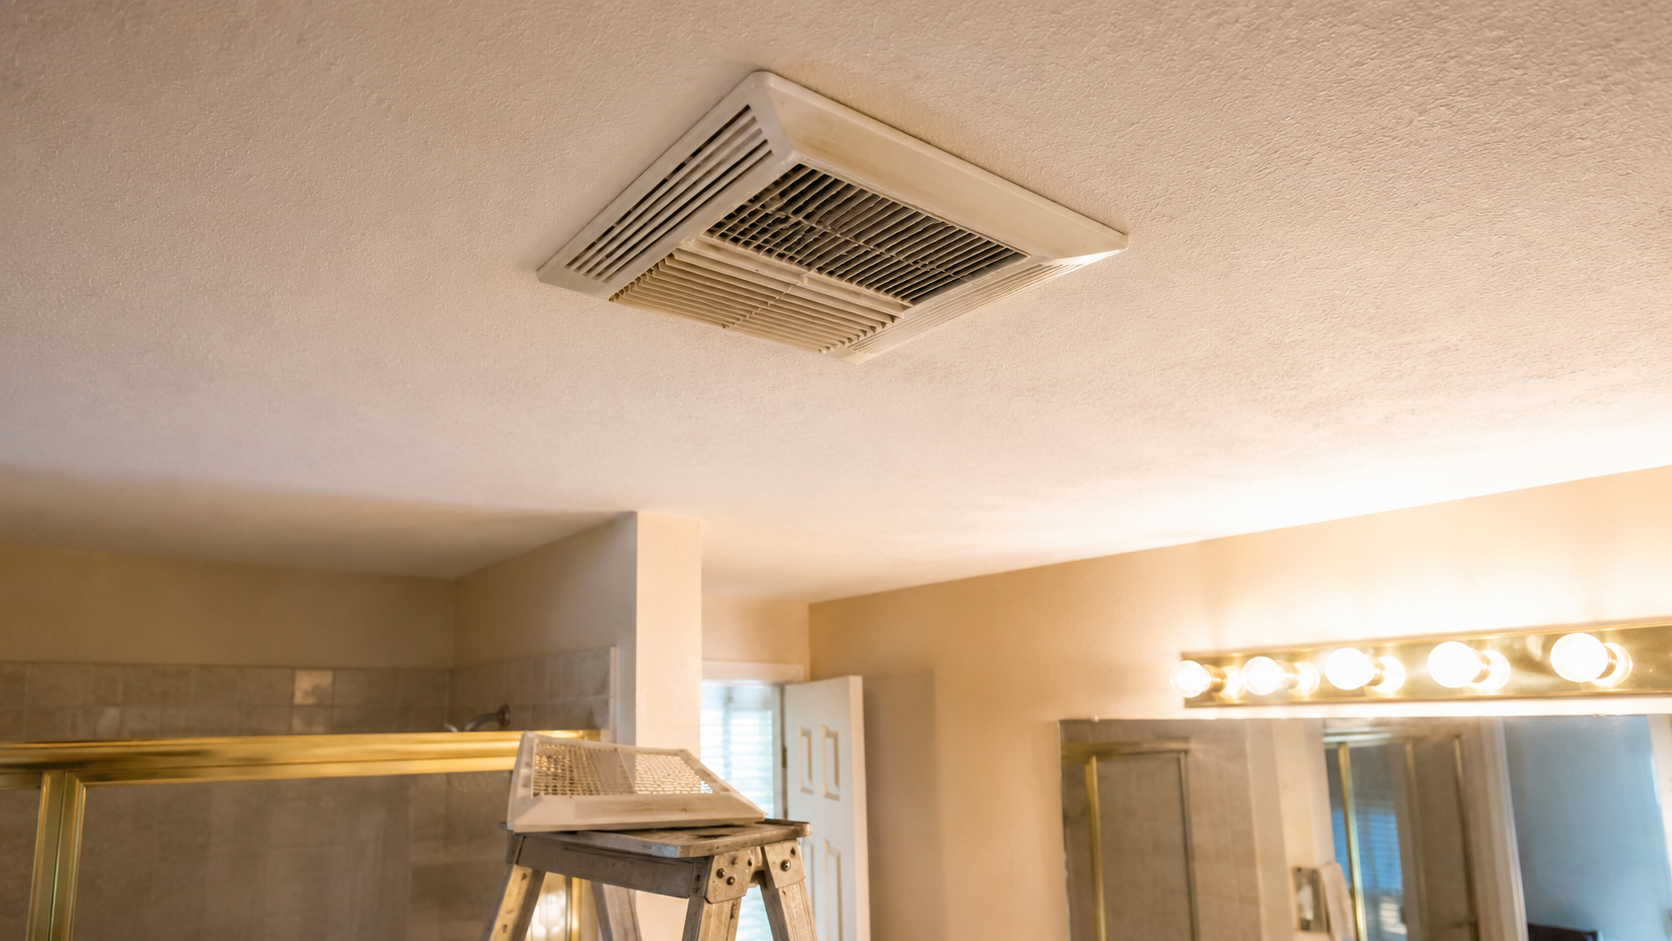
Check the fan before closing the budget
- Does the fan actually pull air?
- Is it loud because it is old, dirty, or undersized?
- Does it exhaust outdoors?
- Is the duct crushed, long, disconnected, or full of lint?
- Is the fan sized for the room?
- Would a timer or humidity-sensing switch help?
In many bathrooms, fan replacement is one of the least glamorous but most important updates. It should be planned before the ceiling is patched, painted, or covered with new lighting.
Flooring, Toilet, and the Edge Problems
Bathroom flooring usually fails at the edges: around the toilet, at the tub apron, beside the vanity, and near the shower curb. A 1990s bathroom may have ceramic tile, vinyl, sheet flooring, laminate, carpet, or older stone-look tile, but the material matters less than what is happening below it. A loose toilet, a failed wax ring, an old supply line, or tub splash can damage the subfloor while the floor still looks acceptable from the doorway.
Before replacing flooring, check:
- whether the toilet rocks
- whether the floor is soft near the toilet
- whether the vanity sits on top of the old floor or the floor runs around it
- whether tile cracks follow a subfloor movement pattern
- whether the tub or shower edge has old water staining
- whether transitions to the hallway will work with the new floor height
Do not treat the floor as only a color decision. In a bathroom, the floor is often evidence.
1990s Bathroom Remodel Cost
A 1990s bathroom remodel cost depends on the room size, the wet area, the condition behind the finishes, and whether plumbing or layout changes are involved. These are 2026 U.S. planning ranges, not quotes. Local labor, permits, material quality, tile work, plumbing access, and hidden damage can move the number quickly.
| Project level | Planning range | Best for | Main risk |
|---|---|---|---|
| Small refresh | $500–$3,500 | Paint, hardware, faucet, light fixture, mirror, towel bars, simple fan replacement | Cosmetic work may not fix moisture, bad ventilation, or a failing vanity. |
| Cosmetic update | $3,500–$10,000 | Vanity top, faucet, lighting, mirror, toilet, paint, accessories, minor flooring | New finishes can cover old leaks or lock in a poor layout. |
| Partial remodel | $10,000–$25,000 | New vanity, flooring, lighting, toilet, fan, fixtures, some tile work | Vanity removal, toilet work, and flooring can expose plumbing or subfloor damage. |
| Wet-area remodel | $15,000–$40,000+ | Shower, tub, tile surround, waterproofing, glass, valves, drain, fan upgrades | Once tile comes off, framing, plumbing, waterproofing, and drywall may expand. |
| Full primary bath remodel | $30,000–$80,000+ | Layout changes, larger shower, tub removal, new vanity, tile, lighting, plumbing, electrical | Moving drains, supply lines, doors, walls, and wet areas turns the job into construction. |
The visible change is not always the expensive part. A new vanity light is small; a new shower pan is not. A fresh mirror is simple; a moved drain is not. The cost question should be: what part of the bathroom are you actually touching?
What to Leave Alone
A good 1990s bathroom remodel does not need to erase everything.
Leave the layout alone if it works
Moving a toilet, shower, tub, or vanity can add plumbing, framing, flooring, and inspection work. If the layout already works, spend the money on the wet area, fan, lighting, and finishes.
Leave the tub if it is used and well placed
Not every tub needs to be removed. A useful tub in good condition can stay, especially in a hall bath or family bathroom.
Leave the mirror if it helps the room
A large mirror may look dated, but it can make a small bathroom brighter. Replace it only if the new mirror plan works with the sink layout and lighting.
Leave tile alone if the budget is better used elsewhere
If the tile is dry, secure, neutral enough, and not part of a failing wet area, it may be smarter to update lighting, paint, vanity, hardware, fan, and mirror first.
Best Update Order for a 1990s Bathroom
- Moisture: Check leaks, caulk, grout, vanity base, toilet area, tub edges, and shower walls.
- Ventilation: Confirm the fan works, is sized well, and exhausts outdoors.
- Layout: Decide whether tub, shower, toilet, and vanity locations are staying — and how much you can do without moving a drain.
- Wet area: Plan shower, tub, waterproofing, valves, glass, and tile before choosing surface finishes.
- Vanity: Decide whether to keep, paint, reface, or replace the cabinet and top.
- Flooring: Check toilet, tub, vanity, and transition edges before installing new floor material.
- Lighting and mirror: Fix poor light before judging paint, tile, or vanity color.
- Fixtures and hardware: Finish with faucets, towel bars, cabinet pulls, shower trim, and accessories.
- Paint and styling: Use these last, after the wet and mechanical problems are solved.
That order prevents the classic bathroom mistake: making the room pretty before finding out whether it is dry.
FAQ
Is it worth remodeling a 1990s bathroom?
Yes, if the bathroom has a useful layout and no major hidden moisture damage. Many 1990s bathrooms can be improved with better lighting, ventilation, vanity updates, fixtures, mirror changes, and calmer finishes. A full remodel makes more sense when the shower, tub, waterproofing, layout, or plumbing is failing.
What should I update first in a 1990s bathroom?
Start with moisture and ventilation. Check the vanity base, toilet area, tub edges, shower walls, fan, and any signs of leaks before choosing tile, paint, mirrors, or fixtures.
Do I have to move the plumbing to remodel a 1990s bathroom?
Usually not. Moving drains and supply lines is the most expensive part of a bathroom remodel, and 1990s drain locations are typically close to where modern fixtures want them. A walk-in shower often fits the old tub footprint, and a double vanity often reuses an existing drain, so you can transform the room without relocating plumbing in many cases.
Should I remove a 1990s corner tub?
Remove it if it is rarely used, takes too much space, crowds the shower, or has a failing deck or tile surround. Keep it if it is used, dry, well placed, and still supports the bathroom layout.
Can I update a 1990s bathroom without gutting it?
Yes. If the bathroom is dry and functional, a vanity update, new mirror, better lighting, a modern fan, a new faucet, paint, hardware, and simpler accessories can change the room without a full gut.
What is the biggest hidden problem in a 1990s bathroom?
Moisture is the biggest hidden problem. Old caulk, weak ventilation, failed grout, bad shower waterproofing, swollen vanity bases, toilet leaks, and a leaking tub deck can hide behind a bathroom that only looks cosmetically dated.
How much does a 1990s bathroom remodel cost?
A small refresh may stay under a few thousand dollars. A cosmetic update can run several thousand more. Partial remodels often move into the five-figure range, and full primary bathroom remodels with shower, tub, tile, plumbing, electrical, and layout changes can reach tens of thousands of dollars. Scope, not the decade, controls the cost.
Read This Next
- 1990s Houses: Styles, Features, and What to Update
- 1990s Kitchen Remodel: What to Update First and What to Leave Alone
- 1990s Oak Kitchen Cabinets: Keep, Refinish, Paint, or Replace?
- 1990s Kitchen Before and After: What Actually Makes It Look New