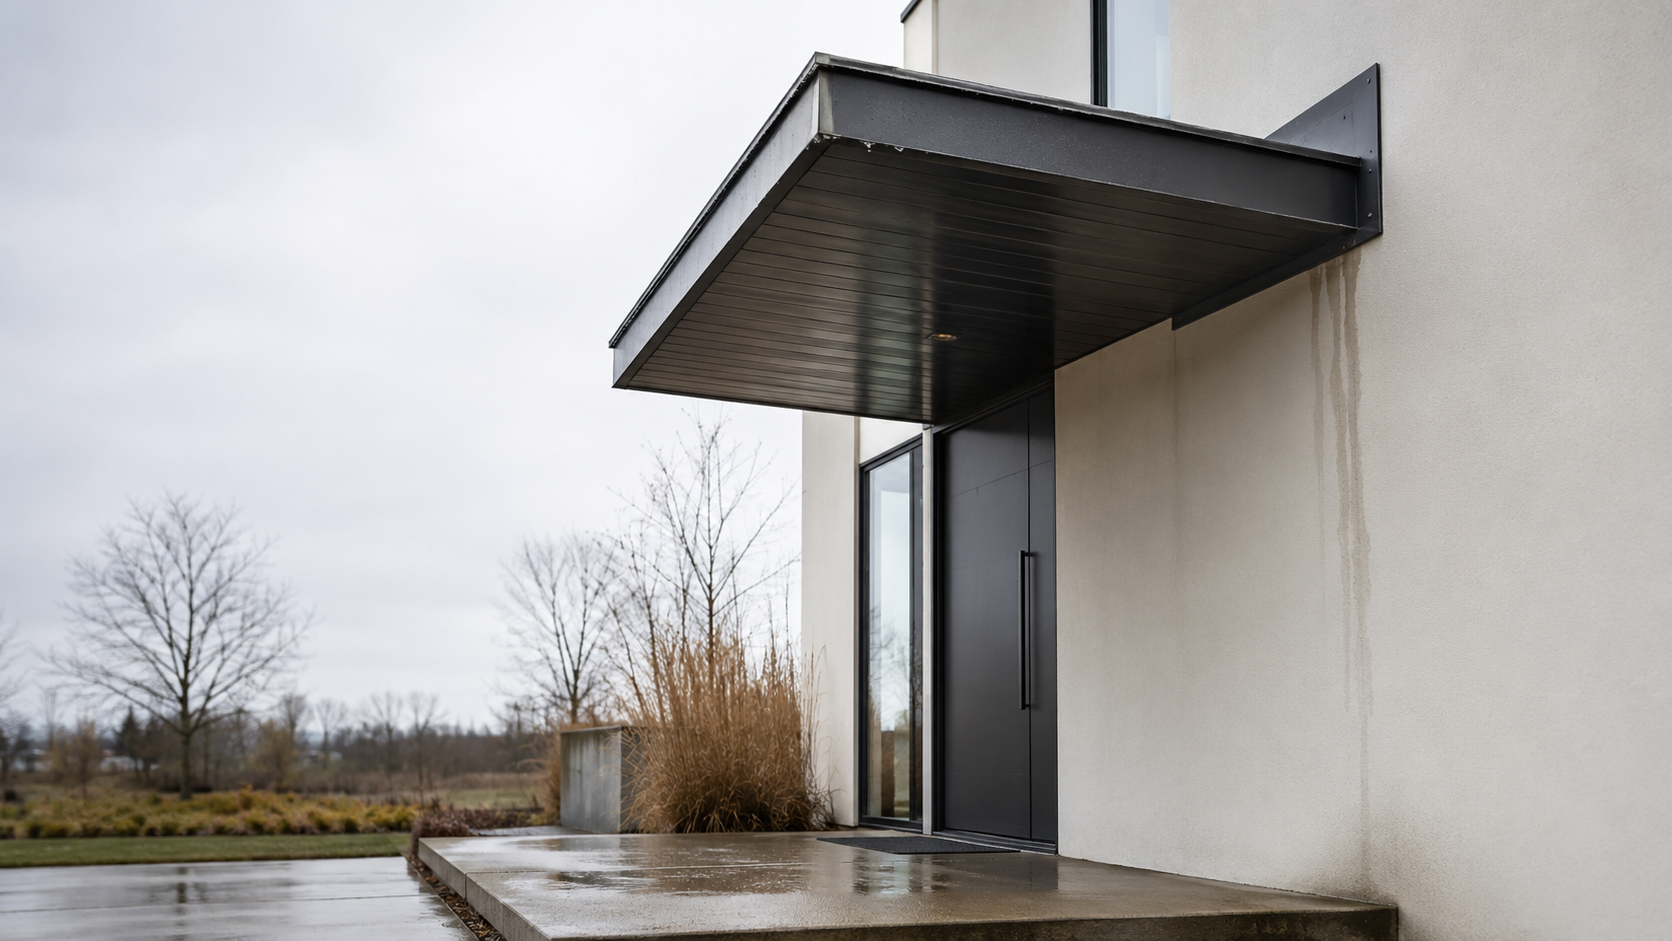
A canopy can improve a building fast. It can also cheapen the whole front if the proportions are wrong, the drainage is lazy, or the structure looks thinner than it should.
That is the real split. A canopy is never just a little roof. It changes the entry, the shadow line, the first impression, and the way water leaves the building. When it goes wrong, the failure is usually obvious: stained wall, dripping edge, rattling frame, sagging fascia, or water landing exactly where people have to stand.
I would treat it as a small piece of architecture, not an accessory.
Start with three questions
Before choosing a shape, a bracket, or a finish, I would ask three things.
- What is it doing structurally? If the answer is vague, stop there.
- What is it doing visually? It should help the facade, not look taped onto it later.
- What is it doing for the person under it? Shade, rain cover, glare control, wayfinding, or a clearer threshold.
Most bad canopy work fails one of those tests. Quite a few fail all three.
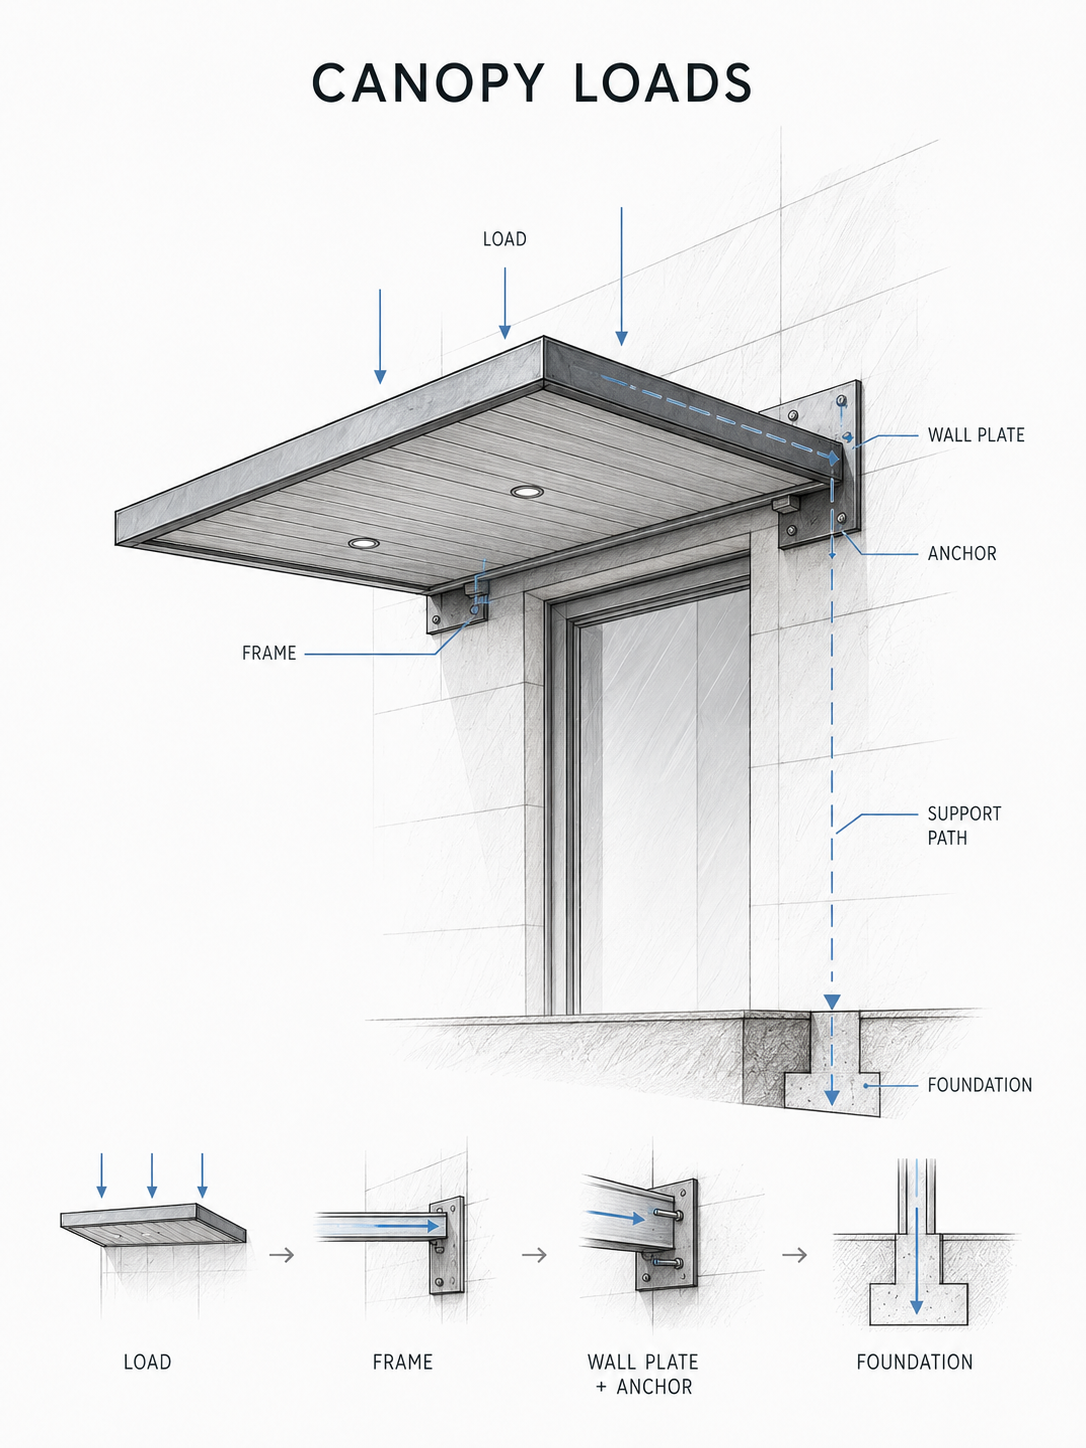
Illustration by ArchitectureCourses.org. A wall-mounted canopy needs a clear load path from the roof plane through the frame, wall plate, anchors, building structure, and foundation.
Before You Draw Anything
You do not need to turn this into a heroic design exercise. Most canopies work because the basics are right: span, slope, support, material, edge detail.
I would not start with the render. I would start with the water path and the support condition. If the canopy meets a wall, that junction matters more than the finish. If it cantilevers, the backspan and anchoring matter more than the thin floating look.
This is where money gets wasted. People spend on glass, powder coating, fascia trim, hidden lighting, and custom brackets before they have answered the dull question that controls the whole job: where does the load go, and where does the water go?
Keep it simple first
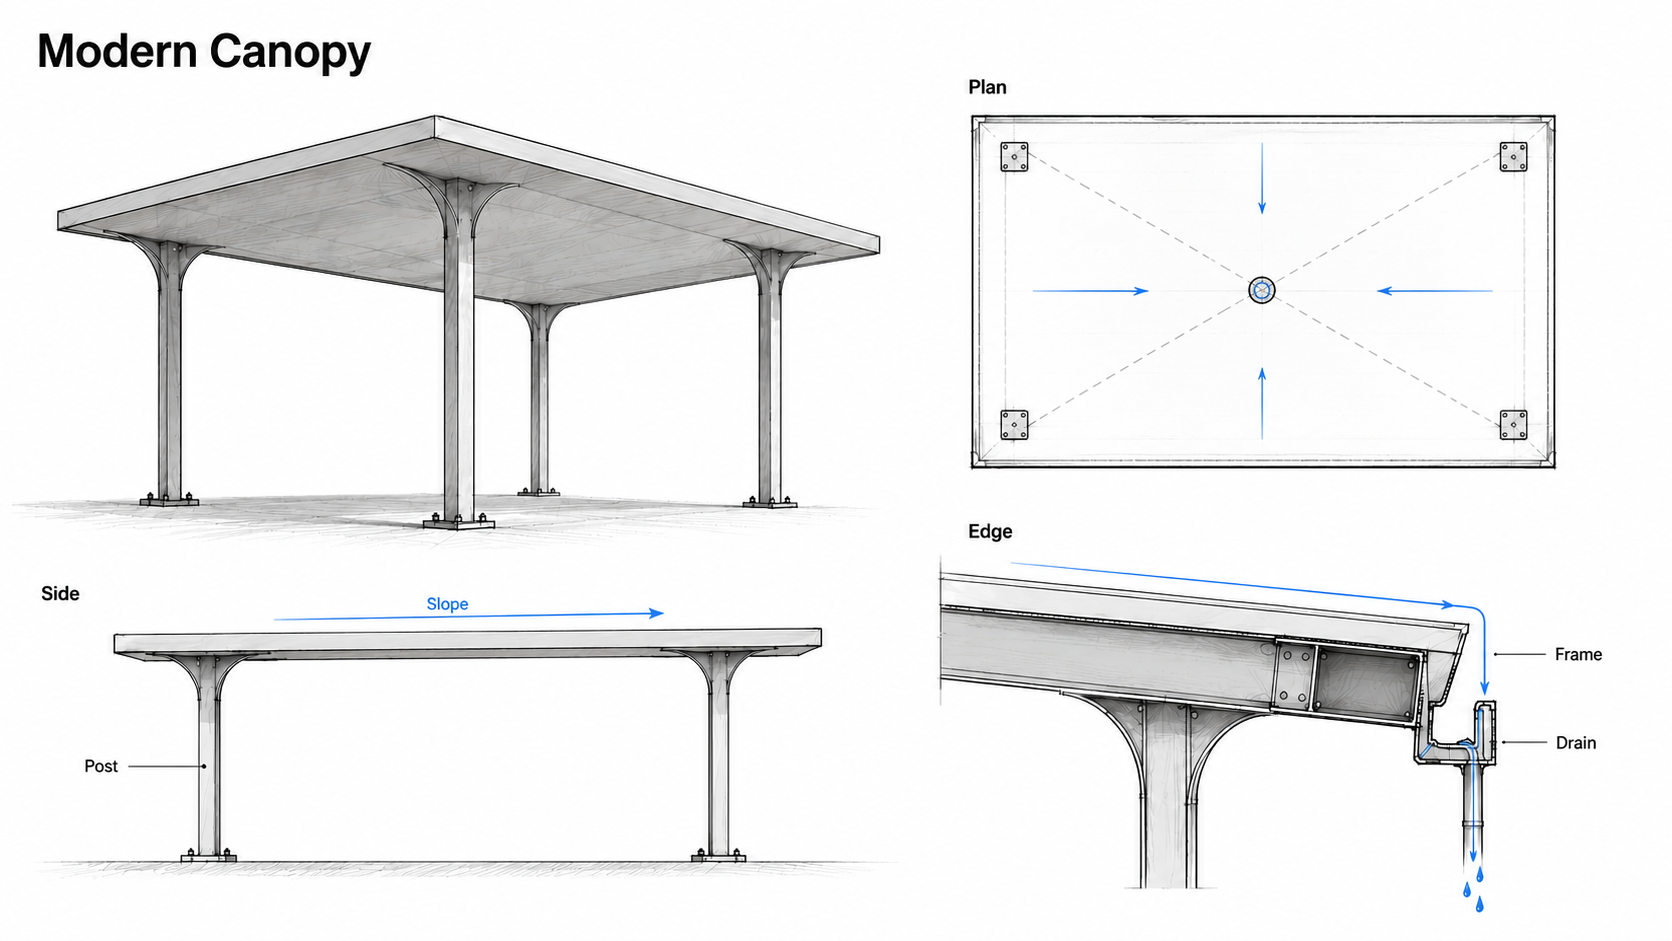
Illustration by ArchitectureCourses.org. A modern freestanding canopy works when the roof plane, posts, frame, slope, and drainage edge are designed as one system.
A canopy is usually just frame, cover, drainage, and connection.
That does not mean every canopy should look basic. It means the logic should stay readable. The best ones are often the easiest to repair because they do not depend on five hidden tricks and one overworked metal edge to survive winter.
If the canopy is attached to a building, spans far enough to create real leverage, or sits in a snow or wind-heavy location, I would not treat it as a DIY judgment call. That is when structural design stops being background information and starts controlling the job.
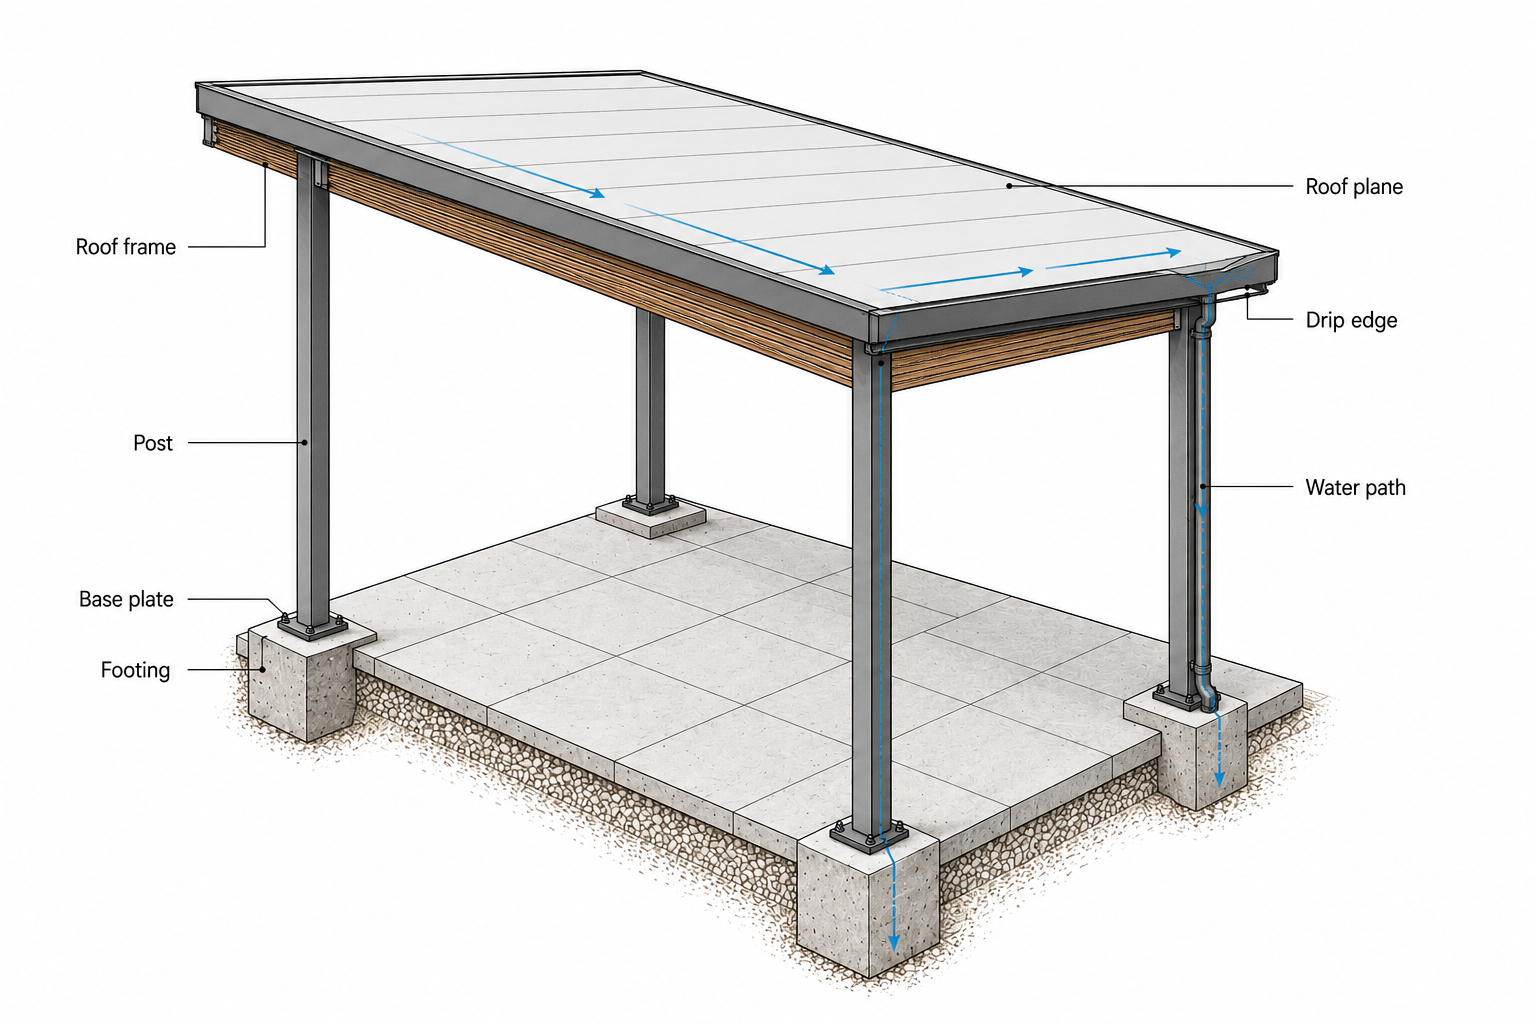
Illustration by ArchitectureCourses.org. A canopy works when the roof frame, posts, base plates, footings, drip edge, and drainage path are designed as one system.
What a Canopy Is Supposed to Do
A lot of canopy designs drift because the job is not defined clearly enough. The canopy ends up trying to be a sign band, a roof extension, a lighting tray, a facade feature, and a weather shield all at once.
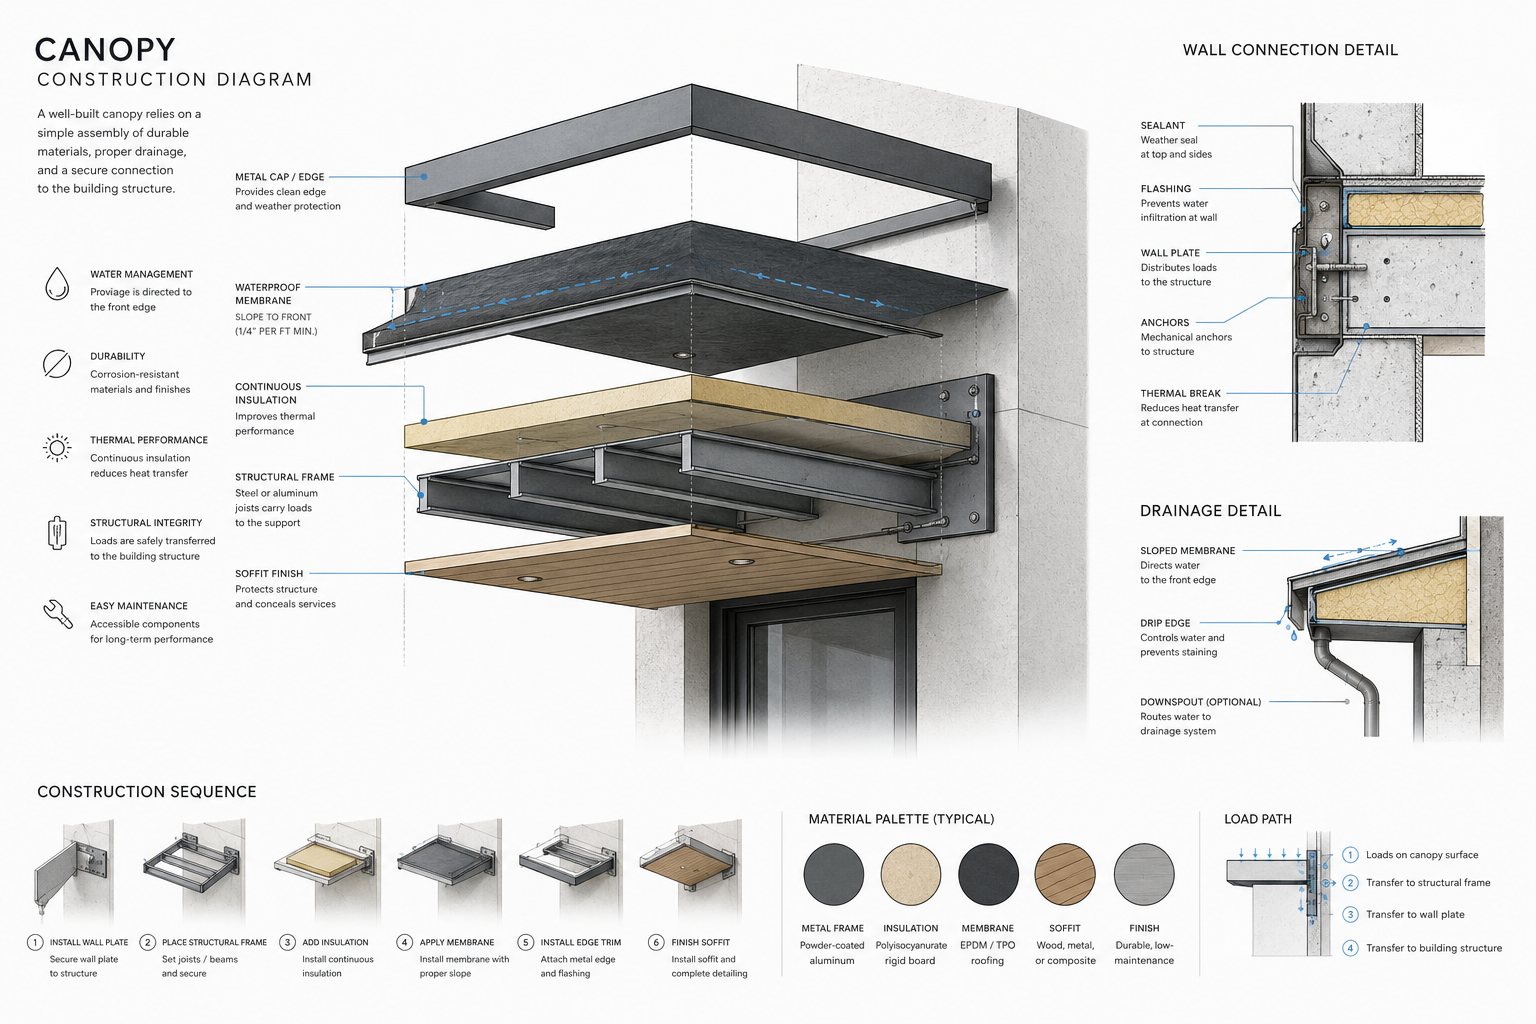
Illustration by ArchitectureCourses.org. A good canopy is not just a roof panel; it needs structure, slope, flashing, drainage, insulation, a finished soffit, and a secure wall connection.
Pick the main job first.
| Main job | What matters most | What usually gets ignored |
|---|---|---|
| Entry shelter | Projection, drainage, and clear headroom | Where runoff lands at the threshold |
| Window shading | Sun angle, projection depth, and light control | How it changes the facade rhythm |
| Storefront marker | Visibility, proportion, and nighttime presence | Wind uplift and messy edge detailing |
| Walkway or public cover | Structure, drainage, durability, and lighting | Maintenance access |
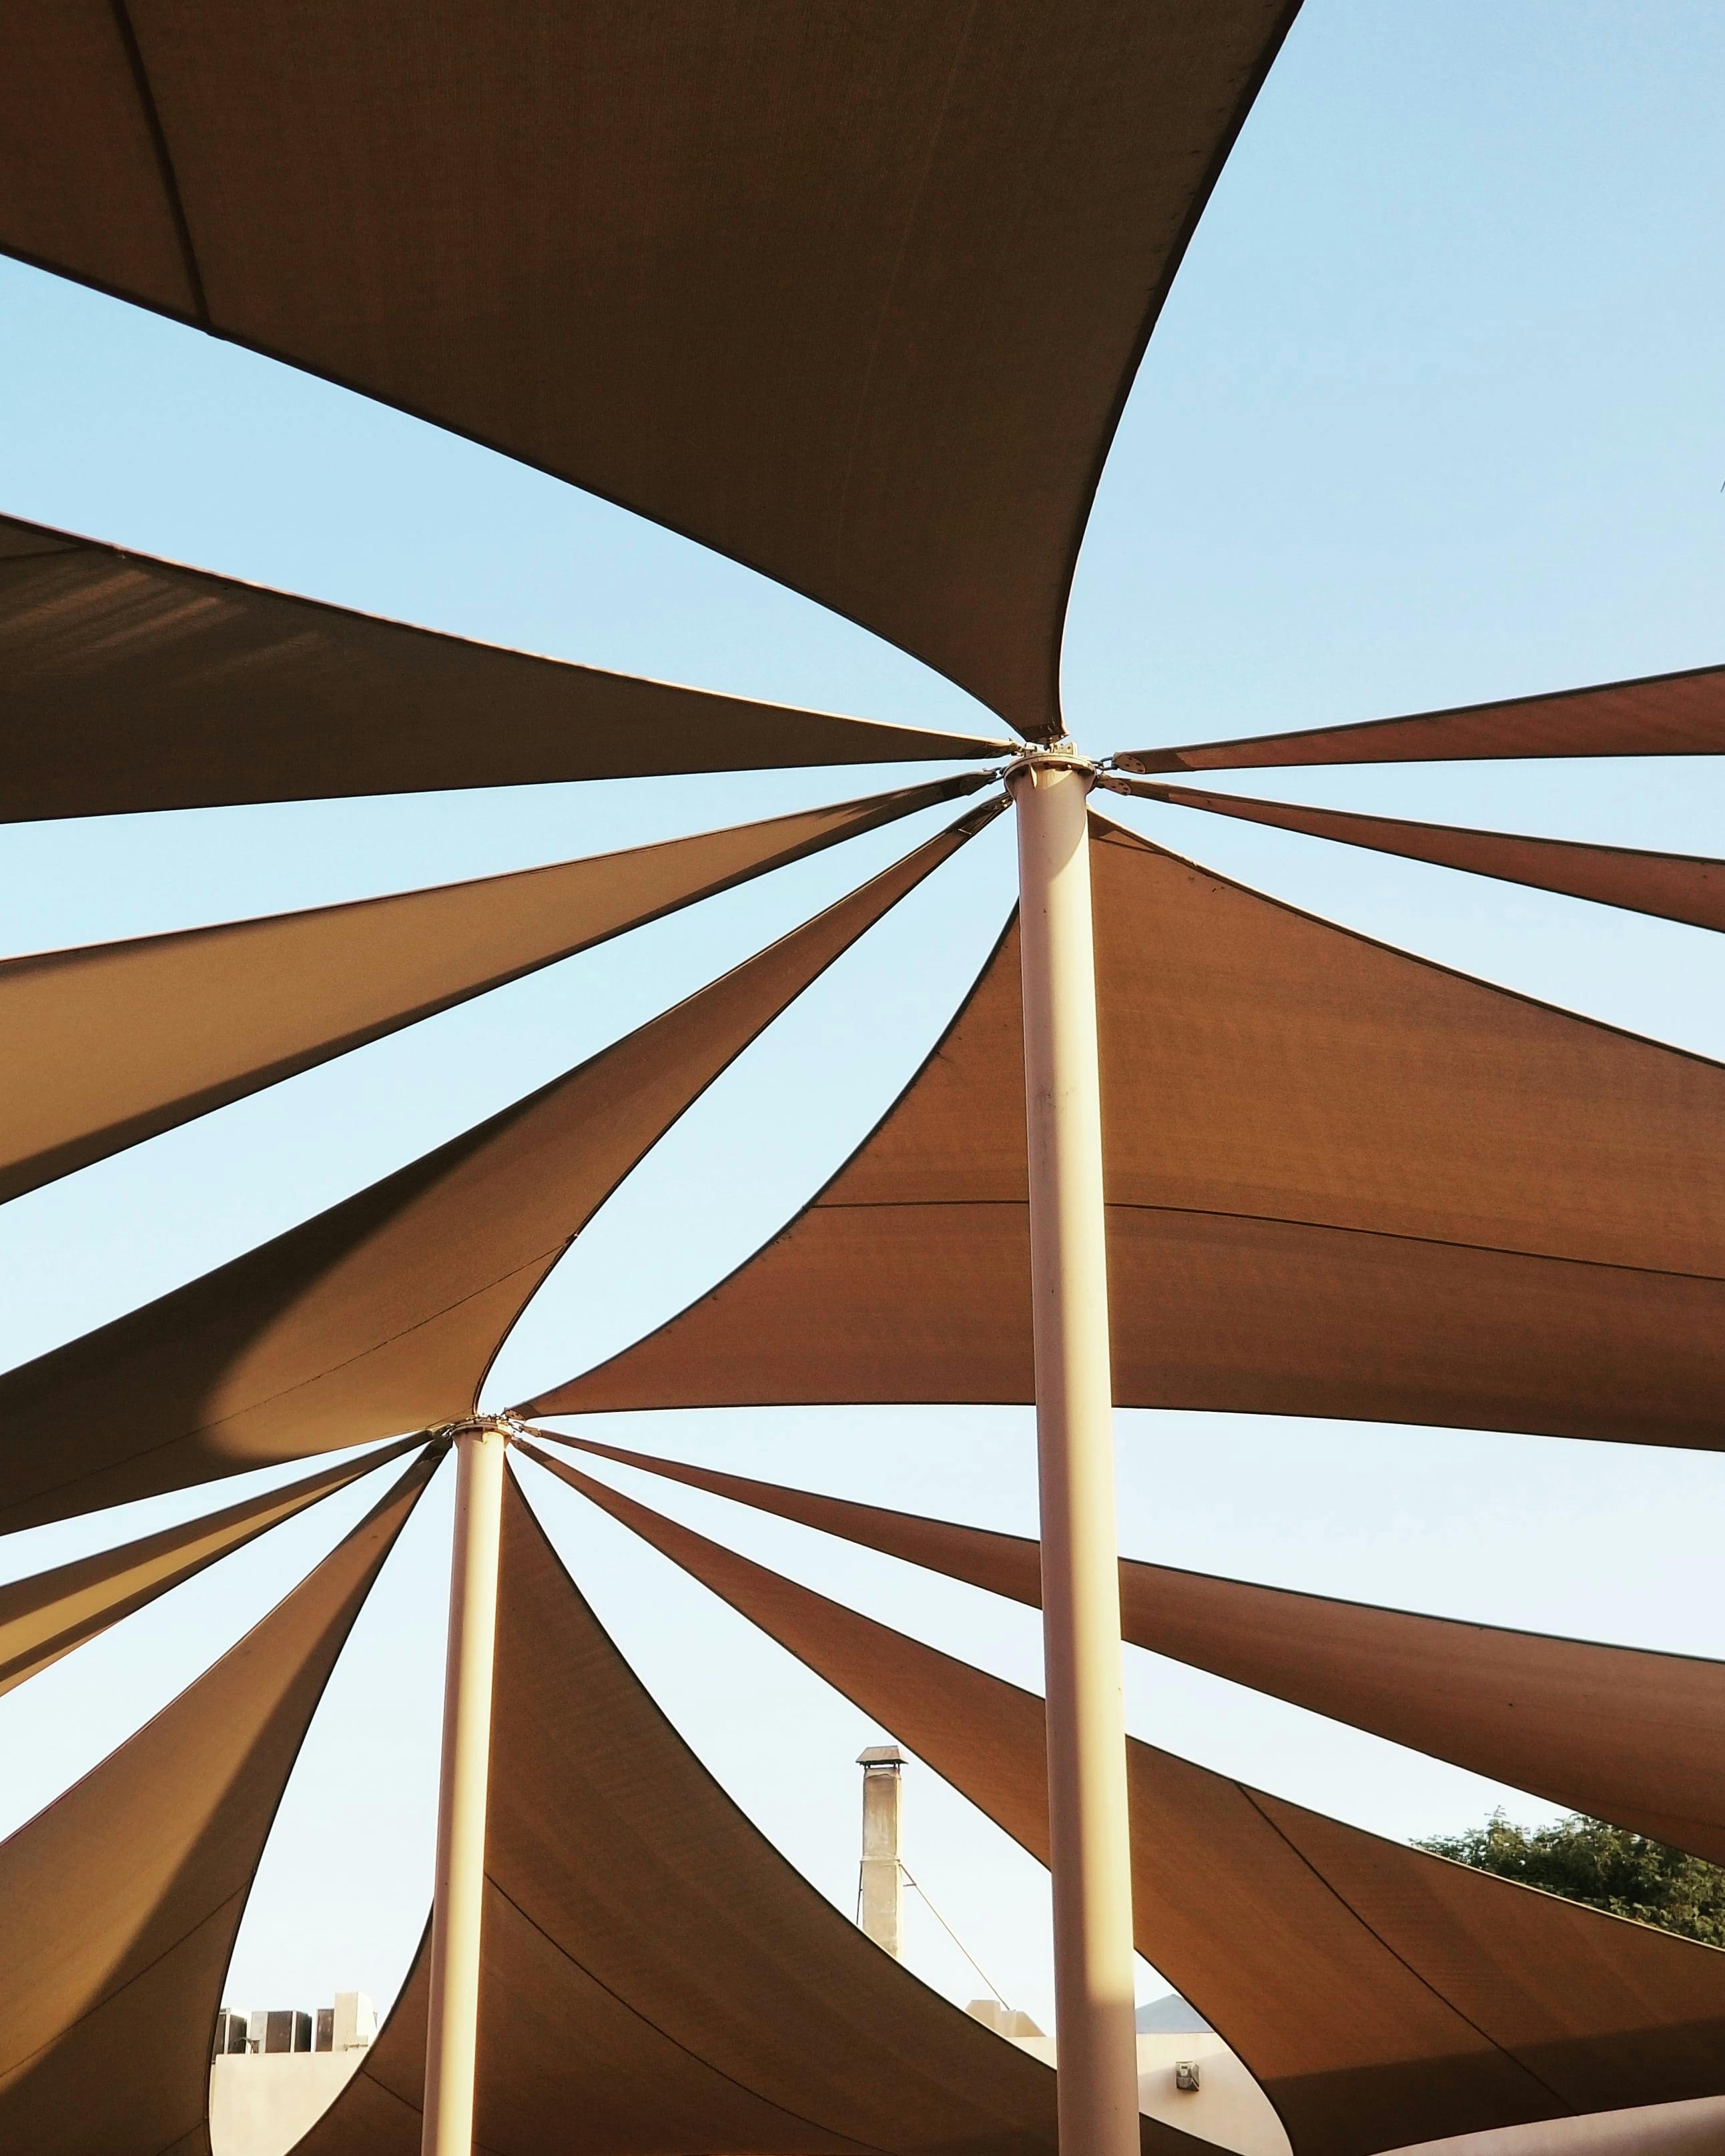
| Patio or terrace cover | Shade, weather protection, and buildability | How much the support posts interfere with use below |
Once that job is clear, the design gets easier fast.
Projection, Headroom, and Proportion
This is where residential canopies go wrong most often.
A projection that looks fine in elevation can still be useless in rain. A canopy that covers only the trim line or barely clears the door zone is often more decorative than functional. On a small entry, something around 24 to 36 inches can start feeling useful. A more exposed entry often wants more than that. But once the projection grows, the structure has to grow with it.
That is the trade-off people skip. More cover means more leverage. More leverage means stronger support, deeper frame depth, better anchoring, or front posts.
Headroom matters too. A canopy that drops too low feels mean and cramped. One that floats too high may stop very little rain. The better move is to judge all three together: projection, headroom, and thickness. Not one at a time.
FIELD TOOL
BOSCH GLM100-23 BLAZE Laser Distance Measure
Useful for checking canopy projection, headroom, and quick facade dimensions before you commit to spacing, overhang depth, or bracket layout.
If the canopy is tied to windows rather than doors, the sizing logic changes. That is a separate subject, and it fits better under Window Canopy Design Guide.
Materials
Material choice changes more than appearance. It changes span, stiffness, maintenance, noise, light quality, edge thickness, and how forgiving the build will be.
Steel makes sense when the canopy has to stay thin but still carry real load. It is the stronger answer for bigger cantilevers, heavier roof build-ups, and public or commercial spans. The trade-off is corrosion, finish damage, and weight.
Aluminum is lighter, cleaner in coastal or wet locations, and easier to live with on smaller residential work. The expensive mistake is assuming light means weak or that steel is always better. It depends on span, stiffness, and how the frame is actually detailed.
Polycarbonate is practical when you want light below the canopy but not full sun exposure. It works well on patios, secondary entries, and window canopies. Cheap polycarbonate systems age badly if they are undersupported or detailed with sloppy edge conditions.
Glass can look sharp, especially on commercial entries, but it needs stronger structure, cleaner drainage, and more cleaning discipline than the render usually admits.
Wood is still a good choice when warmth matters and the span is reasonable. But I would not use wood casually in wet exposure without a real plan for coatings, movement, and drip control.
If you are still sorting the material side more broadly, materials selection and roofing materials are the stronger next reads.

Commercial vs. DIY
The principles do not change. The consequences do.
A small residential canopy can still fail from bad slope, weak mounting, or the wrong cover material. A commercial canopy does the same thing, just with more money, more risk, more code pressure, and more people standing underneath it.
Small residential or DIY work
Usually lighter spans. Simpler anchors. Fewer layers. Less tolerance for overdesign because the budget is tighter.
The better move here is usually restraint. One clean frame. One roof material. One clear drainage direction. If it starts needing six custom brackets and a hidden gutter nobody can reach, the idea is probably getting worse, not better.
Commercial and public work
This is where canopies stop being just entry covers. They become part of circulation, signage, lighting, accessibility, weather protection, and sometimes energy strategy.
If the canopy stretches across storefront glazing or ties into a curtain wall condition, it overlaps with windows in construction much more than people expect.
Where Canopies Show Up
Residential

Front doors, patios, balconies, side entries, and windows. Residential canopies usually work best when they feel tied to the house rather than imported from another style.
Commercial and industrial
Storefronts, loading areas, hospitals, schools, warehouse doors, and drop-off zones. This is where canopies tend to pick up signage, lighting, and deeper structural demands.
Public infrastructure
Walkways, rail platforms, bus stops, and public entries. These are usually less forgiving because misuse, weather, and deferred maintenance are built into the life of the structure from day one.

Common Canopy Types
Steel-framed canopies handle longer spans and harder use. They are often the right answer when the canopy cannot look thick but still has to carry real load.
Glass canopies preserve light and keep the entry feeling open. They also ask for better edge detailing and more disciplined cleaning.
Cantilever canopies solve access problems well because there are no front posts. They also get expensive fast when the back support condition is weak.
Polycarbonate residential canopies are practical, lighter, and usually easier to install. They make sense when the budget is real and the design does not need to pretend it is a civic project.
What Makes One Hold Up
Plenty of canopies look fine on day one. The weak ones start showing themselves later.
Structure first

A canopy still carries dead load, live load, wind, and sometimes snow. The support point matters more than the face material. I would check the connection before I cared about the finish.
This is where bad jobs get expensive. Loads need to go into framing, steel, concrete, or another real structural element. Not cladding. Not trim. Not brick veneer treated like backup structure.
If the canopy feels too thin for the span, it usually is.
Material fit

Illustration by ArchitectureCourses.org. Canopy construction works when the frame, roof surface, flashing, wall plate, anchors, drainage edge, soffit, and material choices are designed as one assembly.
Pick the material for the climate and the use, not just for the rendering. Bare steel near the ocean is a maintenance promise. Cheap clear panels in brutal sun often look tired much sooner than expected. Wood at a wet entry can work, but only if the water is directed cleanly away from the vulnerable edges.
Buildability
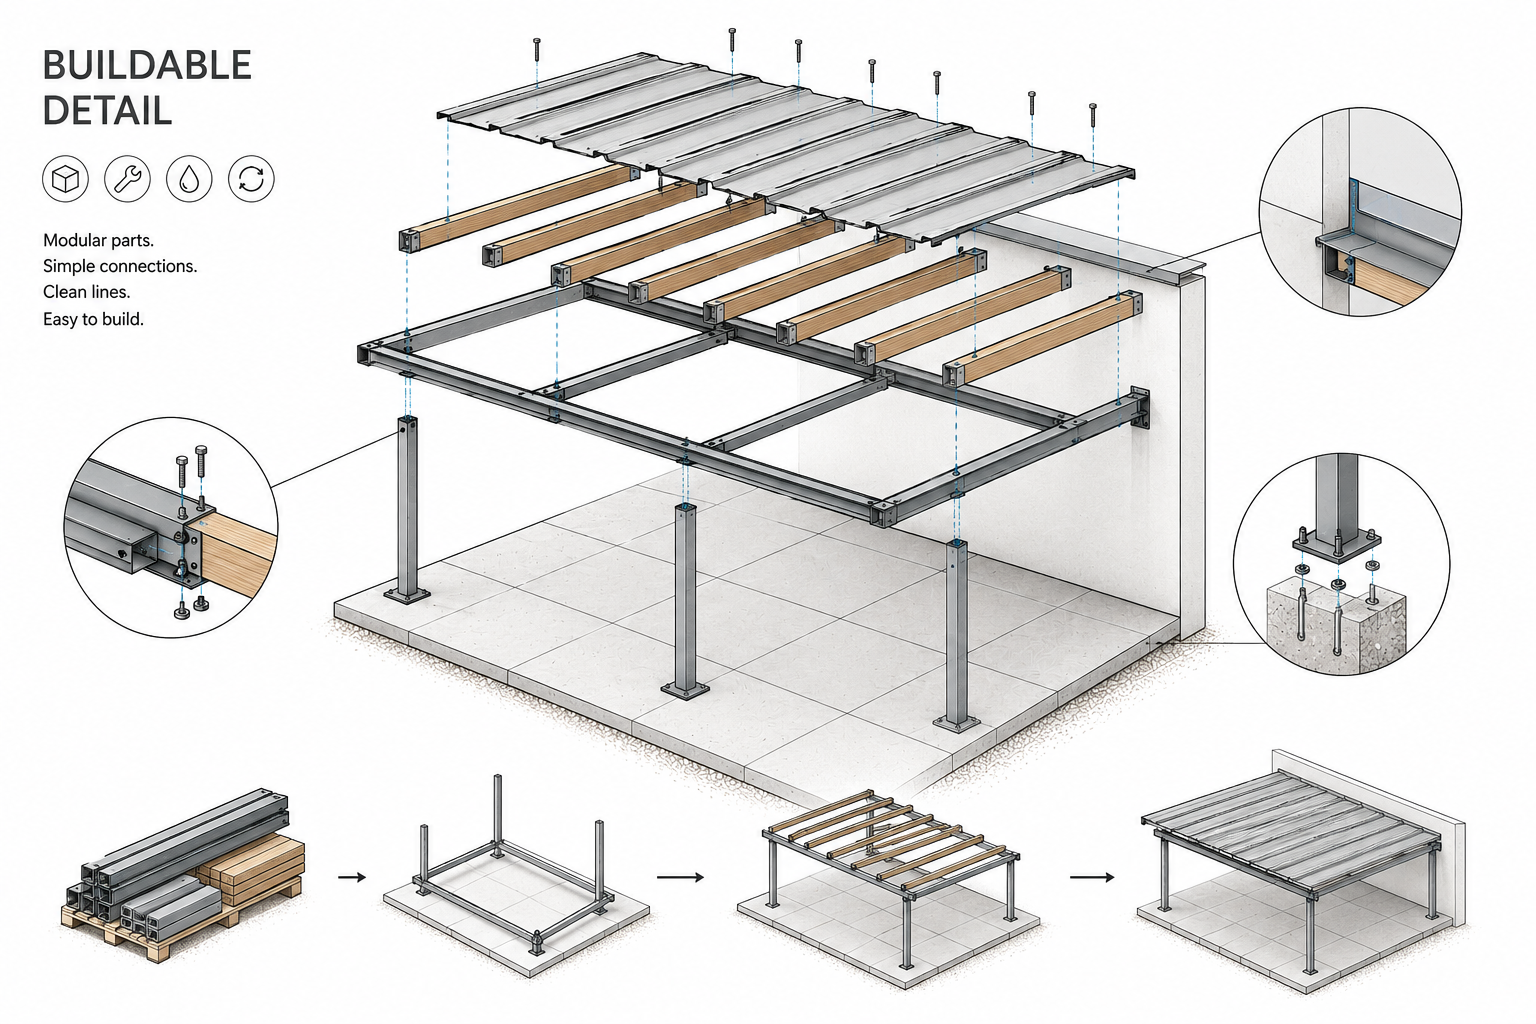
Illustration by ArchitectureCourses.org. A modular canopy system is easier to align, waterproof, assemble, and maintain when the frame, panels, and anchor points are designed as coordinated parts.
A good canopy detail should be buildable by someone who still has to carry the parts, align the frame, waterproof the wall line, and maintain the thing later.
Prefabrication can help. So can modularity. But the real advantage is not speed alone. It is fewer weird site fixes, fewer improvised brackets, and fewer chances to ruin a clean line at the last minute.
The mistakes that show up later

No slope. This is the classic one. The canopy looks flatter and cleaner in the image, then collects water in real life. I would not treat a flat-looking canopy as actually flat unless the drainage system is deliberately designed for it.
Thin frame, big projection. A canopy that wants to disappear visually still needs enough depth to stay stiff. If it flexes in wind, whistles, or oil-cans, the design was under-resolved.
No drainage plan. “Let it drip off the front” is not a plan when the water lands right at the entry, stains the facade, or splashes back onto the door zone.
Bad wall connection. This is where the leak usually starts. Not out in the middle. At the wall, the flashing, the counterflashing, the sealant line, the fasteners, or the movement joint.
Wrong mounting surface. Bolting a canopy into siding or veneer without backing is one of those mistakes that looks fine right until it does not.
MUST READ
Architectural Sheet Metal Manual (SMACNA)
Useful if you are drawing canopy edges, flashings, counterflashings, or drip details instead of just guessing them.
What the edge detail needs
- Slope away from the wall. Backfall is where water starts testing your optimism.
- Drip edge or flashing lip. Water needs a clear break point.
- A real movement joint. Different materials move differently.
- Visible drainage logic. If nobody can say where the water goes, the drawing is not done.

Illustration by ArchitectureCourses.org. A solar canopy is still a canopy first: the PV panels need a real frame, drainage edge, conduit path, inverter location, and footings that can handle the structure.
When the canopy starts doing more than shelter
This is where the page gets more interesting.
Some canopies are still just covers. Others start carrying lighting, signage, solar panels, or wayfinding. The moment that happens, the canopy stops being only a weather detail and starts acting more like a building system.
Lighting is usually the easiest upgrade to justify. It helps safety, helps nighttime presence, and can make a simple canopy feel deliberate instead of leftover. It also adds coordination work. Once lighting is integrated, the canopy is no longer just a framing and flashing question.
Signage makes sense on storefront and public work, but only if the fascia depth and support were designed for it early. Adding sign logic after the canopy is already fixed usually makes the front look patched together.
Solar is worth considering on larger walkway, parking, institutional, or campus work where the canopy already has enough area and exposure to earn it. It is much weaker as a decorative add-on.
What gets expensive fast
Not every canopy cost problem comes from size. A small canopy can still become an expensive one when the wrong detail is hidden in the wrong place.
Cantilevers get expensive fast if the wall cannot take the load cleanly.
Hidden gutters look neat in drawings and become annoying in service if nobody can reach them.
Custom glass raises cost twice: once in fabrication and again when something cracks or chips later.
Mixed metals can create a maintenance problem people do not notice until staining or corrosion starts.
Late lighting changes are another classic. The canopy gets approved first. The electrician gets asked to make it glow later. That is backward.
A fast review before you approve the drawing
If I had to review a canopy sketch in two minutes, I would check these first:
- Is the projection actually large enough to shelter anything?
- Can I tell where the water goes?
- Does the frame depth make sense for the span?
- Is the mount going into structure or just finish material?
- Does the canopy improve the facade, or is it only adding noise?
If two of those answers are weak, the drawing is not ready.
FAQ
What is a canopy in architecture?
A canopy is a structural cover that provides shelter, shade, or a clearer threshold at an entry, walkway, window, or outdoor zone.
What usually causes canopy failure?
Most failures start with bad drainage, weak anchoring, or a support condition that was never as solid as the drawing assumed.
What slope should a canopy have?
Usually at least enough to move water decisively. The exact number depends on material and detailing, but a canopy that looks flat should almost never behave flat.
Is aluminum better than steel?
For corrosion resistance and lighter residential work, often yes. For longer spans and harder structural demands, usually no.
Can a wood canopy still make sense?
Yes. But the wood needs protection, the drips need control, and the maintenance question has to be answered honestly.
Do I need an engineer?
For small simple work, not always. For attached canopies, longer spans, cantilevers, public use, or real snow and wind exposure, I would not skip it.
What is the difference between an awning and a canopy?
An awning is often lighter and sometimes retractable. A canopy is usually more structural, more permanent, and more integrated with the building.