
Cheap window canopies usually fail before they look bad.
The bracket misses solid framing. The top edge lets water behind it. The projection is too shallow to shade anything. Then the plastic yellows, the screws rust, or the whole thing starts to pull away from the wall.
A good window canopy is a small detail, but it still has to act like part of the building. It needs a load path, a water path, and a shape that belongs over that window.
Window Canopies Fail at the Wall First
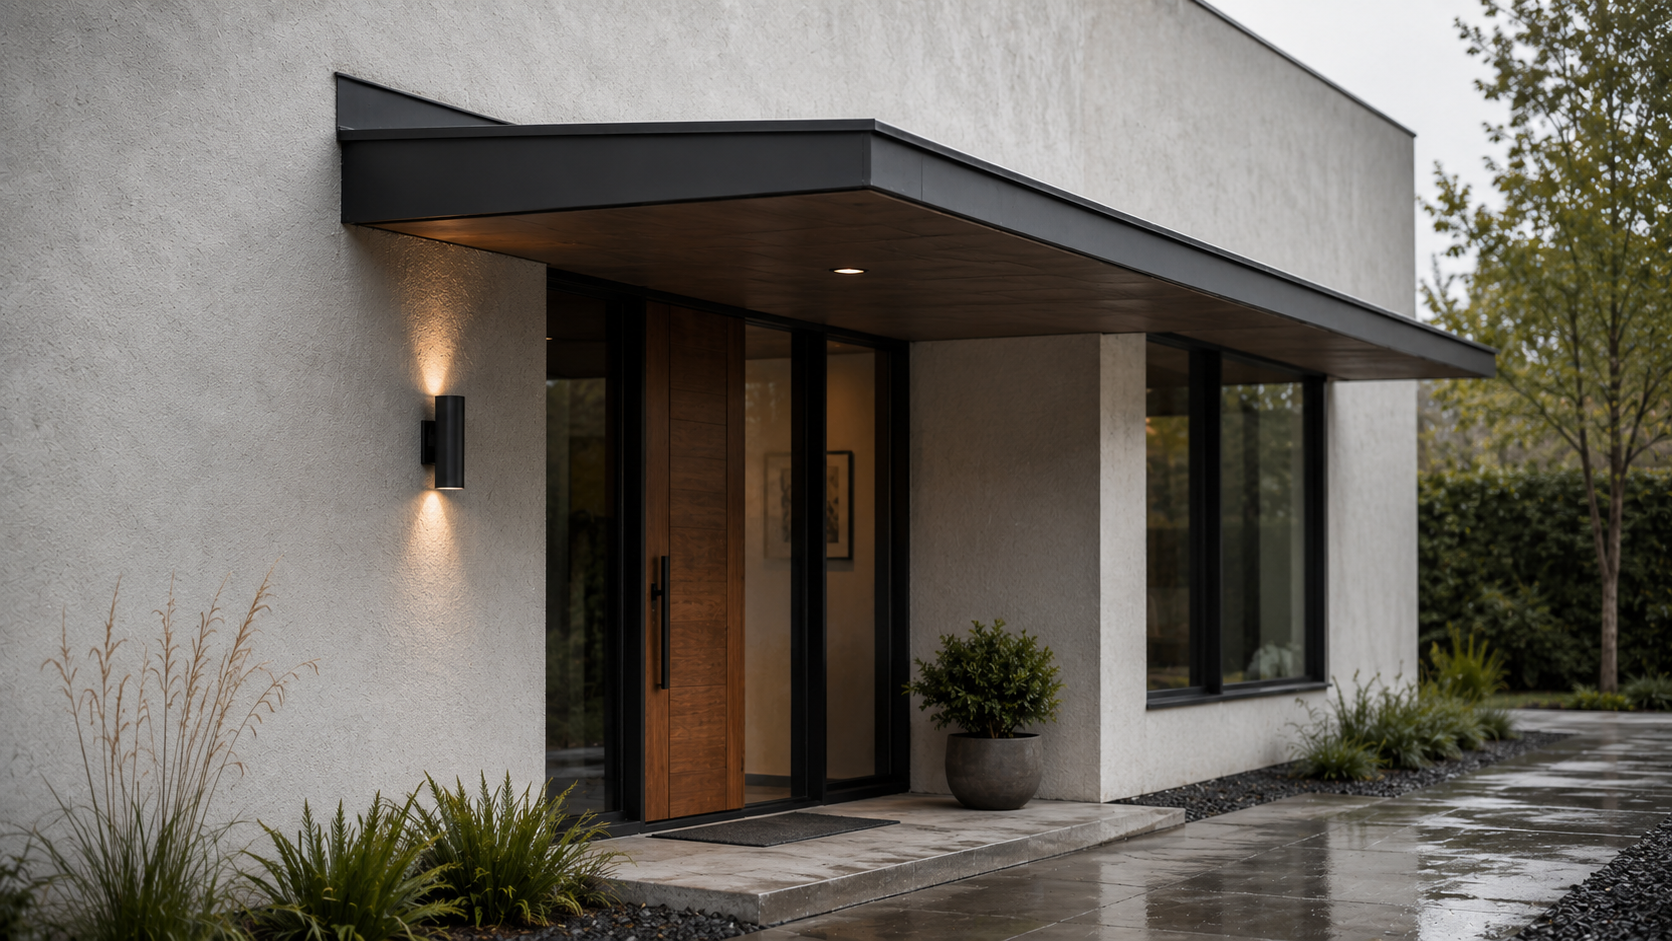
Image by ArchitectureCourses.org. A well-detailed entry canopy uses proportion, slope, wall connection, and a clean drip edge to shelter the door and move water away from the entry.
The wall decides more than the canopy style does. Brick, block, wood framing, stucco, vinyl siding, and storefront framing all take fasteners differently.
This is where many installs go wrong. The canopy gets treated like decoration instead of a small roof. Someone holds it up, marks the holes, drills through the finish, and hopes the screws find enough structure.
That is not a detail. That is guessing.
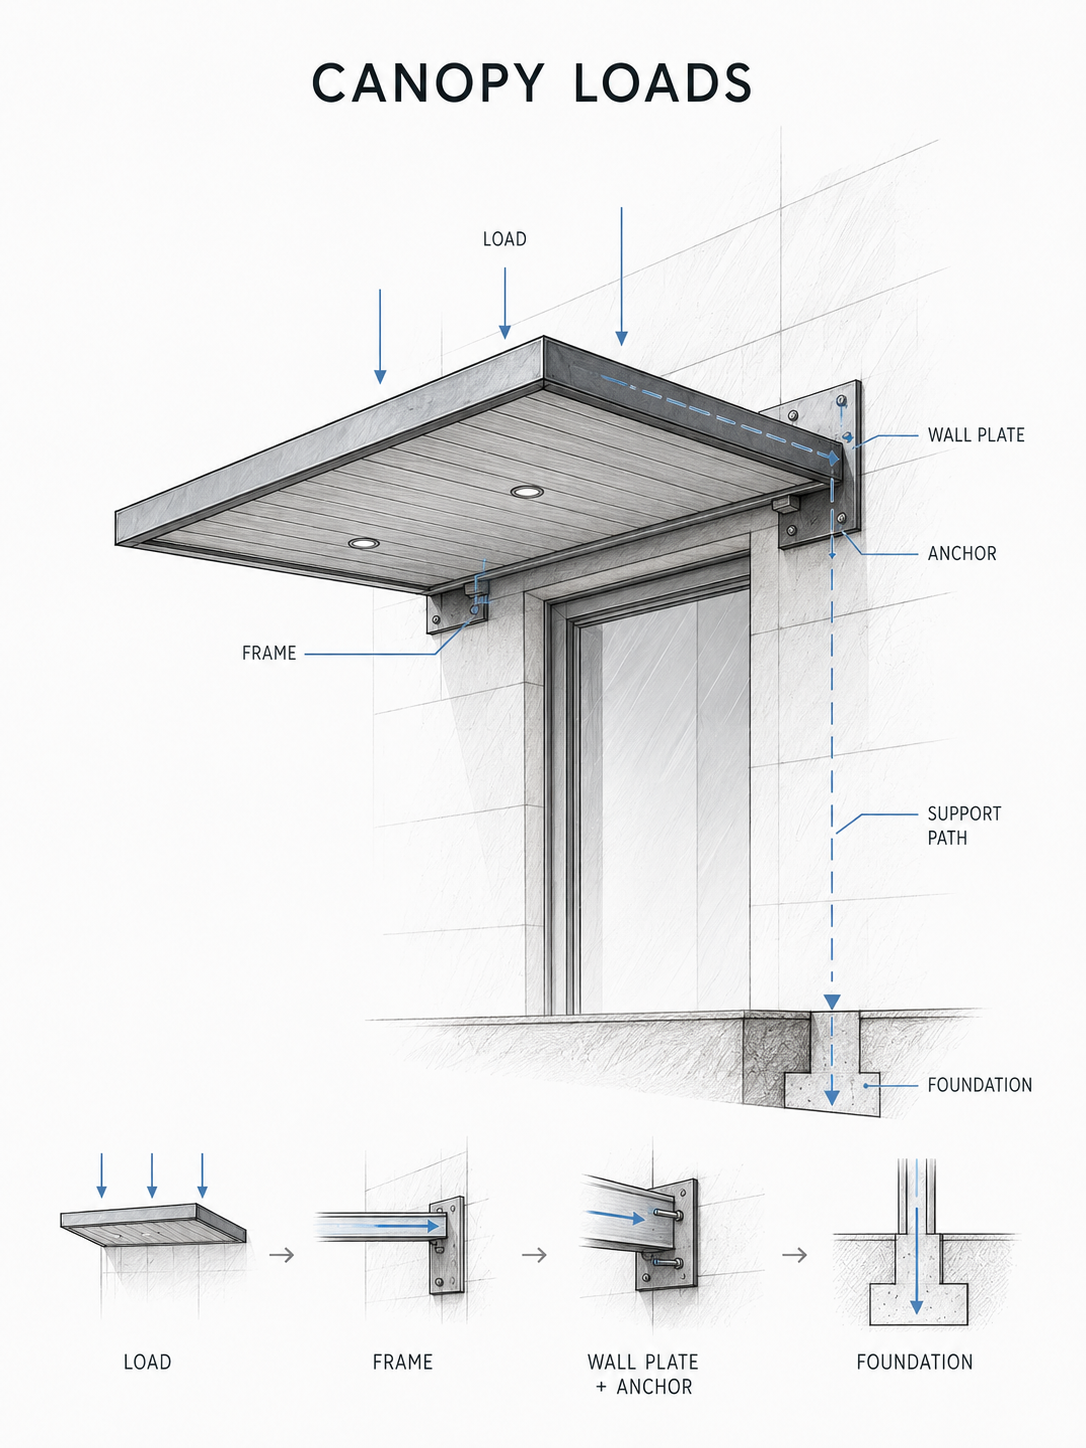
Illustration by ArchitectureCourses.org. A wall-mounted canopy needs a clear load path from the roof plane through the frame, wall plate, anchors, building structure, and foundation.
The load is not huge until the weather gets involved. Wind pulls. Snow stacks. Ice holds water at the edge. A canopy projects away from the wall, so even a light one can pry at weak fasteners. If the bracket is fixed only into siding, trim, brick veneer, soft mortar, or thin blocking, the failure has already started.
On a framed wall, the canopy should connect to studs, blocking, a header, or another solid member. On masonry, the anchor has to match the wall. Old brick and hollow block need more care than solid concrete. On stucco, fiber cement, vinyl, or metal siding, the fastener holes also need sealing. Otherwise the canopy becomes the leak.
This part matters: If the wall itself is part of the question, read Windows in Construction before treating the canopy as a separate add-on.
The Wall Decides What Works
| Wall Type | Better Move | Bad Move |
|---|---|---|
| Wood-framed wall with siding | Fasten into studs, blocking, or header framing | Screwing into siding or trim |
| Brick or block | Use anchors sized for the actual masonry | Trusting weak mortar or hollow block without checking |
| Stucco wall | Find backing and seal every penetration | Cracking the stucco and hiding the water entry |
| Storefront façade | Confirm frame or structural backing first | Treating the window frame as structure |
| Old house wall | Check framing, sheathing, and trim before layout | Assuming the framing is where modern framing would be |
The table is simple because the rule is simple: the canopy is only as good as what it is attached to.
Projection Gives Away the Cheap Ones
Projection is how far the canopy sticks out from the wall. It controls shade, rain cover, proportion, and bracket stress.
Too little projection and the canopy becomes trim. It may look like shelter, but the sill still gets wet and the glass still takes sun. Too much projection and the canopy starts to look heavy. It also asks more from the brackets.
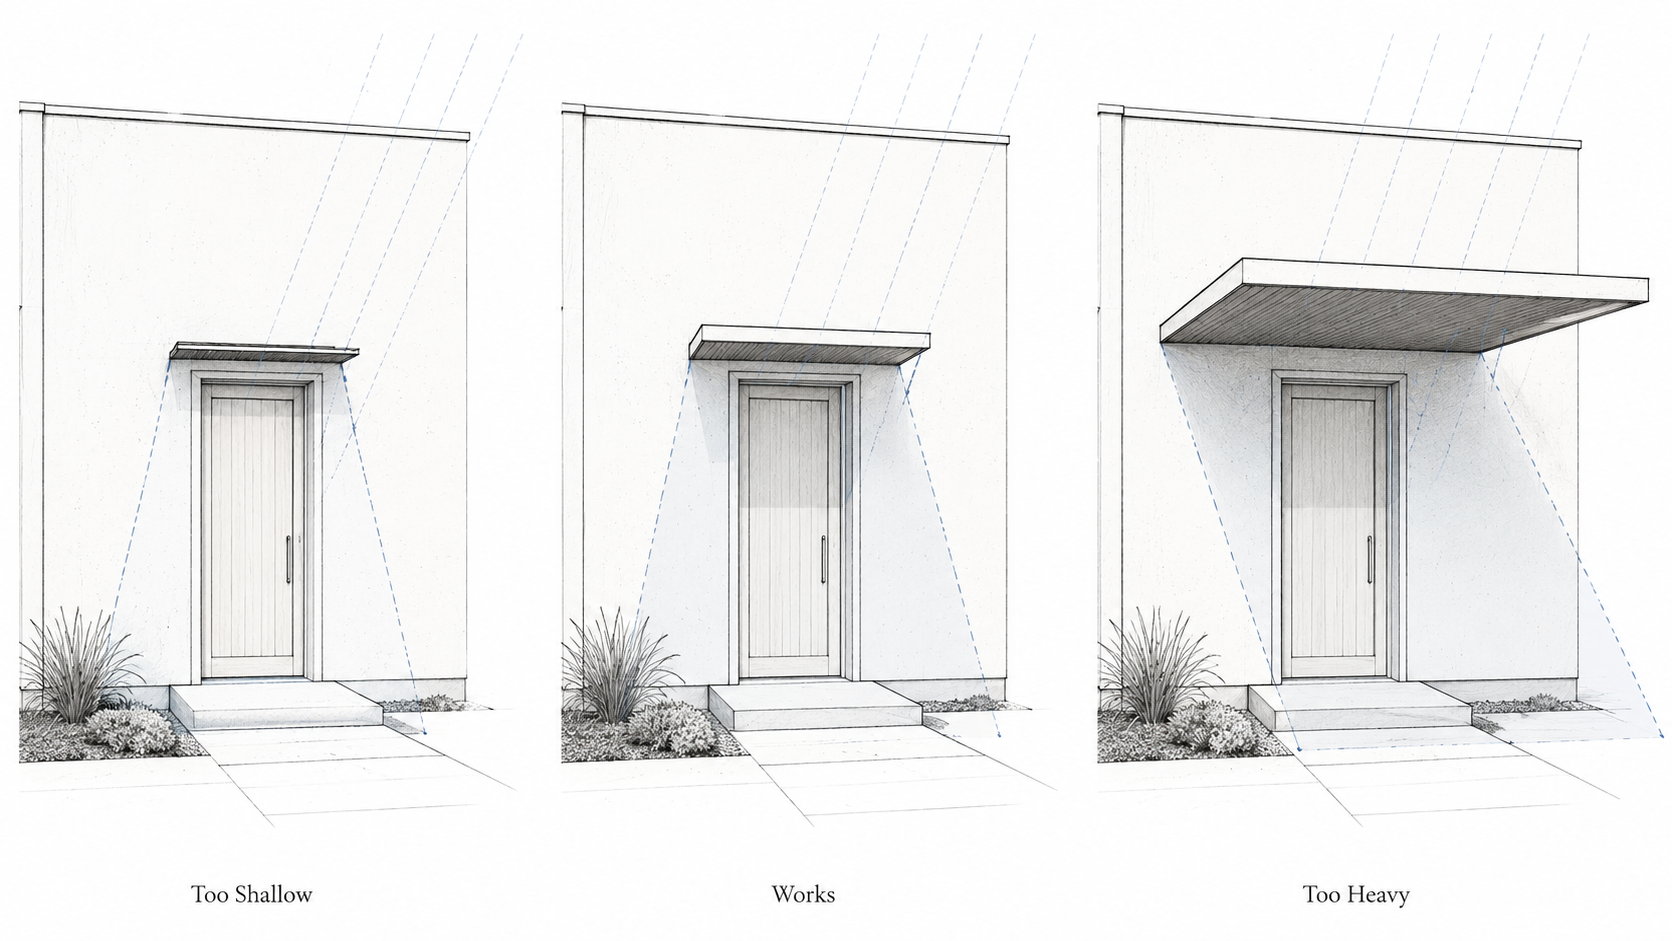
Illustration by ArchitectureCourses.org. Entry canopies work best when the projection shelters the door without becoming too shallow to protect the entry or too heavy for the wall below.
A small kitchen or bathroom window may only need 18 in. to 24 in. of projection if the goal is splash control. A normal house window often needs 24 in. to 36 in. if shade and wall protection matter. Storefront canopies can move into the 3 ft. to 5 ft. range, but then it is no longer a simple accessory. It is an exterior projection, and the structure matters more.
| Window | Starting Projection | What It Can Do |
|---|---|---|
| Small side window | 18 in. to 24 in. | Reduce splash and add a small shadow line |
| Standard house window | 24 in. to 36 in. | Shade glass, protect the sill, add depth |
| Wide picture window | 30 in. to 48 in. | Control sun and strengthen the elevation |
| Storefront window | 3 ft. to 5 ft. or more | Cover pedestrians, signage, and display glass |
Use those as planning ranges, not rules. The window height, sun direction, climate, and wall strength still decide the final answer.
Rain Needs a Clean Way Off
A window canopy should not hold water. It also should not send water back into the wall.
That sounds obvious until you look at how many cheap kits are nearly flat. The front edge has no drip break. The side edge dumps water onto trim. The top edge sits tight to the cladding with a bead of sealant doing all the work.
Sealant is not a drainage strategy.
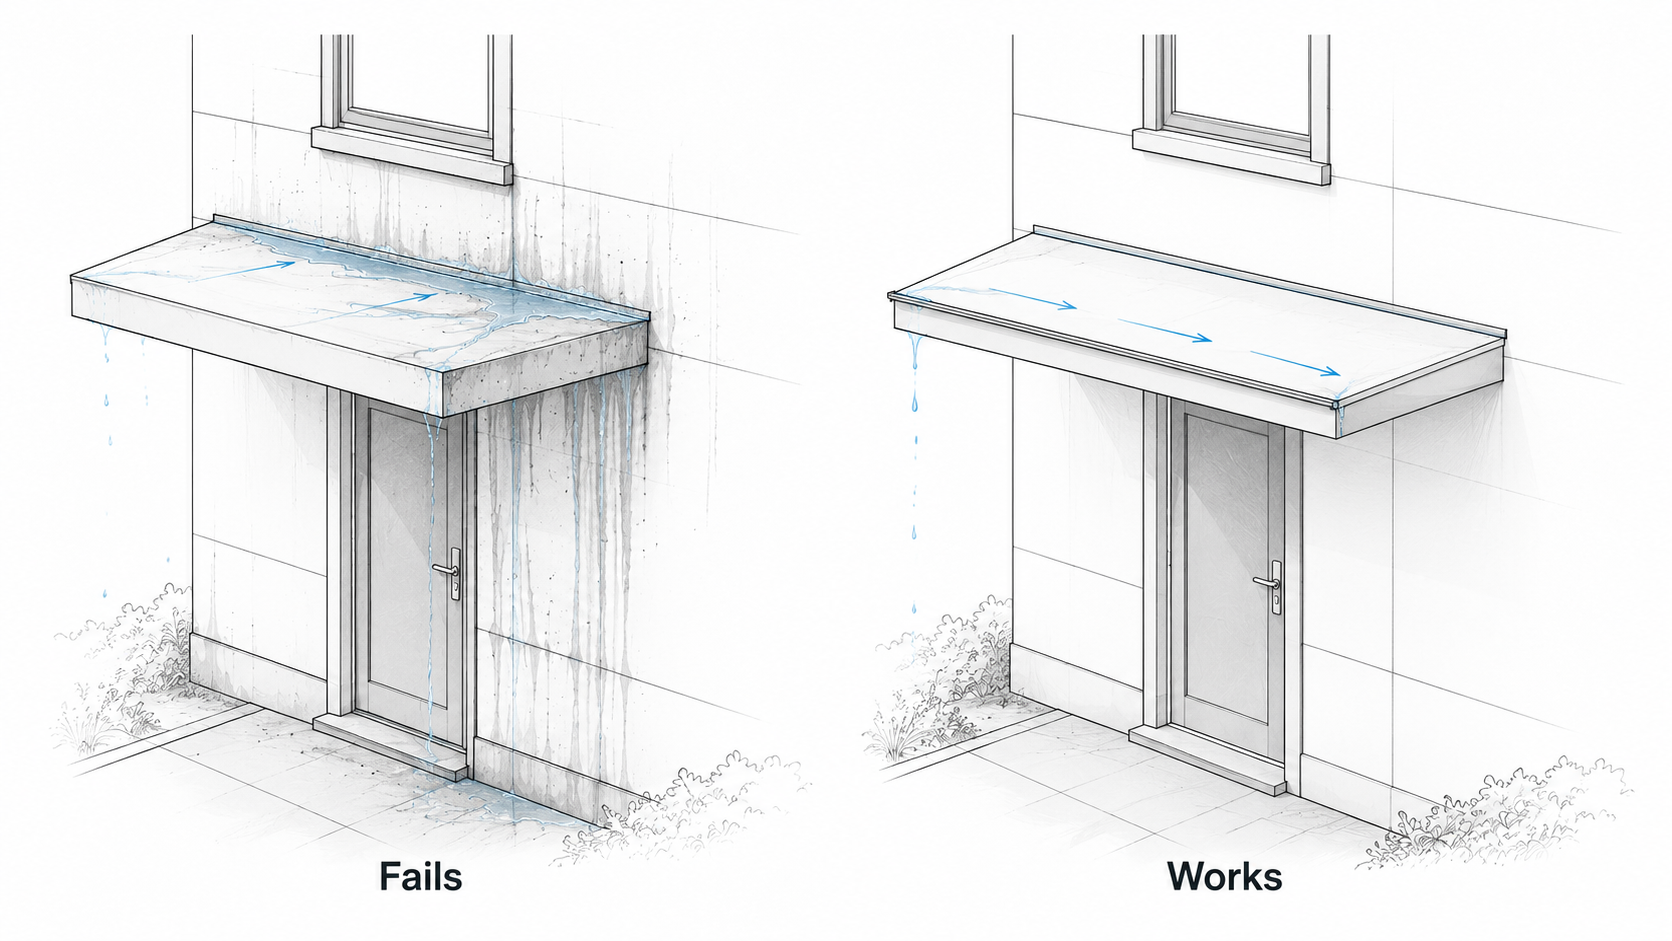
Illustration by ArchitectureCourses.org. A canopy needs slope, edge control, and a drip line so water moves away from the wall instead of staining the entry.
The canopy should slope away from the wall or be shaped so water has a planned path. The front edge needs a drip edge, gutter, or clean metal break. If the canopy drains sideways, that side discharge should not stain the wall, soak the sill below, or pour onto a walkway.
The wall line is the dangerous part. If water can run behind the canopy, the visible cover may be hiding a leak. This matters more on stucco, old siding, brick veneer, and any wall already showing staining near the window head.
Match the Window Before the Style
A canopy should relate to the window first. Not the catalog photo. Not the trend. The window.
Width is the easiest place to start. A canopy usually looks better when it is slightly wider than the window opening and trim. Too narrow looks weak. Too wide makes the window feel small underneath it.
Height is less forgiving than people think. Set the canopy too low and it makes the opening feel squat. Set it too high and it floats away from the window. On a plain wall, the canopy usually wants to sit close enough to read as part of the opening, while still leaving room for flashing and trim.
Material should repeat something already on the building. Black steel makes sense if the house already has black windows, railings, or metal trim. Wood makes sense if there are exposed rafters, porch brackets, or warm siding details. Polycarbonate can be useful, but it needs restraint. A clear panel with bulky plastic brackets can cheapen a good façade fast.
Kit Canopies Have a Place
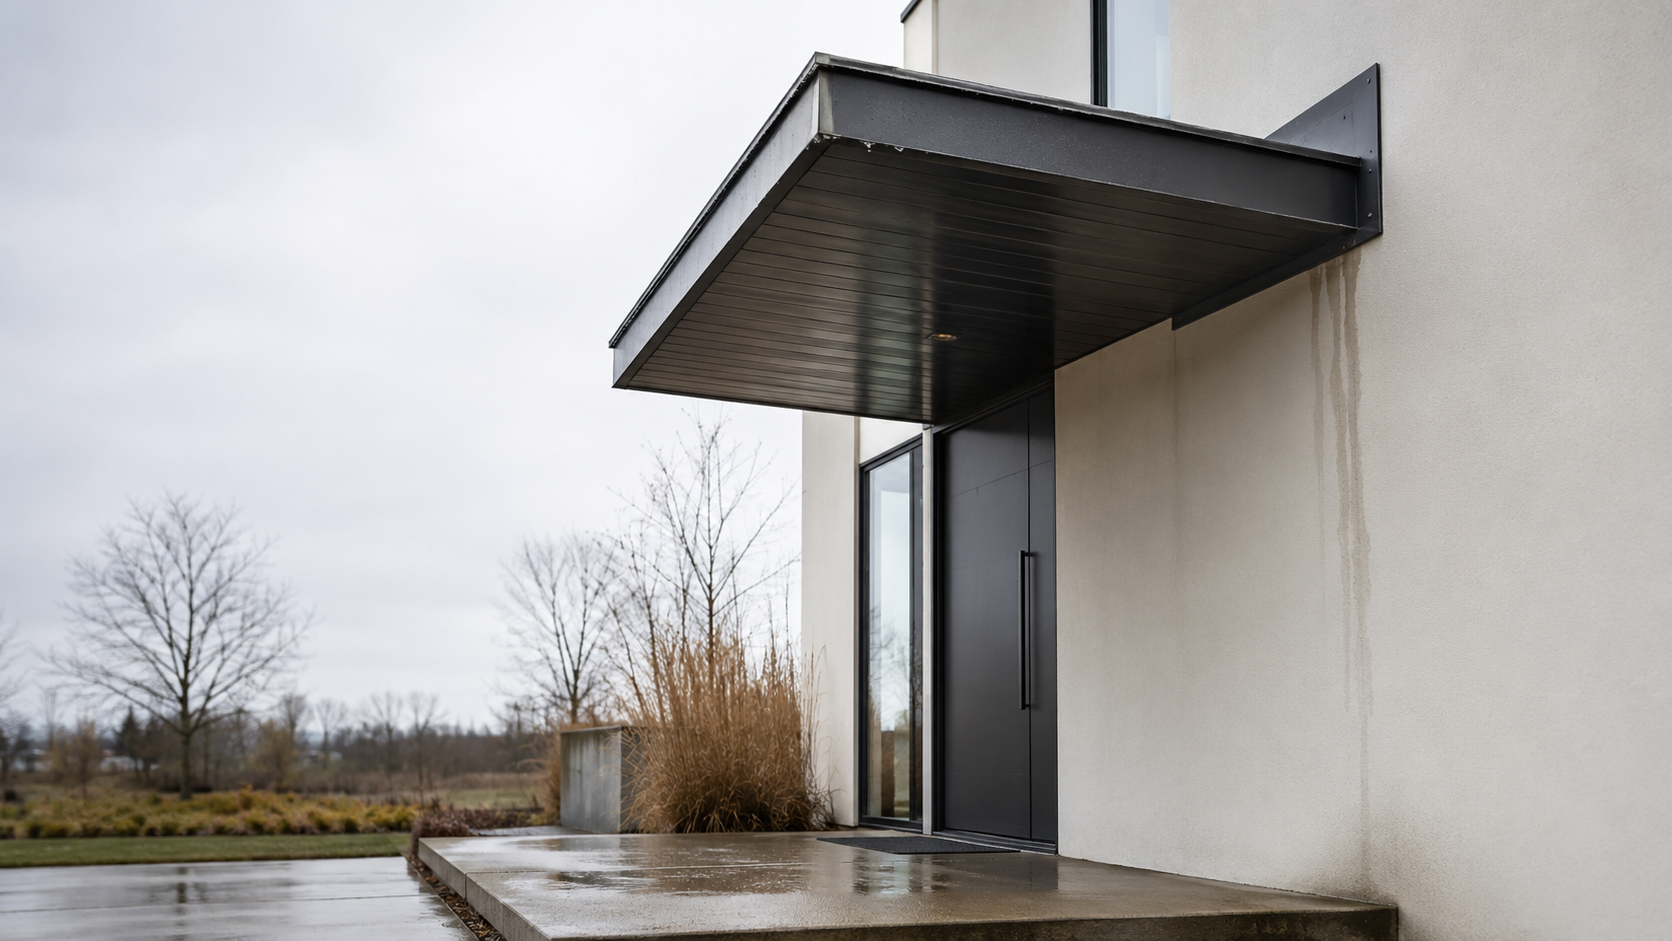
Image by ArchitectureCourses.org. A canopy can look clean and modern but still fail at the wall connection if slope, flashing, and drip edges are not handled correctly.
Kit canopies are not automatically bad. Some solve a small problem well. The trouble starts when the kit is used as if every wall, window, and climate is the same.
The usual weak points are not hard to see:
- brackets too thin for the projection
- panel edges with poor support
- fasteners that do not suit the wall
- no flashing plan
- no drip edge
- wrong size for the window
- plastic parts in strong sun, snow, or wind
A kit can make sense for a small side window, back entry, garden door, basement window, or utility area. It makes less sense on a front elevation where the canopy has to carry visual weight. It also makes less sense high on a wall or in a place where wind can get under it.
Small Product Note: A simple polycarbonate window awning kit can be useful for a back or side window when the wall is sound and the size fits. Check the bracket depth, panel support, and fasteners before treating it as a finished architectural detail.
What the Material Is Really Good For
This is where the page gets less polite.
Aluminum is useful when you want low weight and low maintenance. It works on modern houses and small commercial details. The problem is profile. Thin aluminum can look temporary even when it performs fine.
Steel is the better choice when the canopy needs to feel permanent. Welded brackets, clean plates, and a sharp front edge can make a small canopy look deliberate. Steel also handles a deeper projection better. The trade-off is finish. Bad coating, trapped water, and sloppy weld cleanup will show up later as rust streaks.
Polycarbonate is practical, especially when you want rain cover without making the room darker. It belongs on side elevations, back windows, garden doors, basement entries, and modest utility conditions. It can look wrong on a refined front wall unless the frame is very clean.
Fabric is a shade tool more than a canopy structure. It belongs on storefronts, cafés, older façades, and sunny windows where seasonal adjustment matters. It does not belong where the goal is permanent low-maintenance protection in snow, wind, or hard weather.
Wood can be the best-looking choice on the right house. Cottages, Craftsman houses, cabins, old brick homes, and warm renovations can take a wood canopy well. But wood has to be detailed like wood. End grain, fastener holes, and the wall joint need protection. If the canopy stays wet, it will punish you.
| Material | Use It When | Skip It When |
|---|---|---|
| Aluminum | You want light weight and low maintenance | The profile is too thin to look permanent |
| Steel | You need strength and a clean custom frame | The coating and drainage will be ignored |
| Polycarbonate | You want rain cover without losing daylight | The front wall needs a refined detail |
| Fabric | Sun control and softness matter most | Wind, snow, or low maintenance is the priority |
| Wood | The house already has warm trim or bracket language | The canopy will stay wet or get little maintenance |
Canopy or Awning
The words get mixed together, but the difference is useful.
A canopy is usually fixed. It acts like a small roof or projecting architectural element. An awning is usually lighter, often fabric, and sometimes retractable. It is better at adjustable shade than permanent weather protection.
| Choice | Better For | Main Weak Point |
|---|---|---|
| Fixed canopy | Rain cover, stronger detail, permanent protection | Bad attachment or poor drainage |
| Fabric awning | Sun control, storefront character, seasonal flexibility | Fabric wear, wind movement, fading |
| Retractable awning | Adjustable shade over patios or large windows | Mechanism, cost, wind limits |
| Polycarbonate kit canopy | Small-budget rain cover with daylight | Generic look and weak brackets |
If the main problem is rain hitting the wall, a fixed canopy usually makes more sense. If the main problem is sun at certain times of day, an awning or exterior shade may be the better move.
What to Use and What to Skip
| Situation | Better Move | Weak Move |
|---|---|---|
| Small back window | Simple metal or polycarbonate canopy with proper backing | Oversized decorative canopy |
| Modern front elevation | Thin steel or aluminum frame with a clean edge | Bulky plastic brackets |
| Older brick house | Modest metal, wood, or fabric detail that fits the façade | Glossy clear panel that fights the house |
| Hot west-facing window | Exterior shade or deeper angled protection | Shallow canopy that barely shades the glass |
| High wind area | Engineered frame and verified attachment | Light kit installed with generic screws |
When It Is Worth Adding
A window canopy is worth adding when it solves a specific problem.
It makes sense when a window takes hard sun, rain splash, glare, or gives a flat wall no depth. It can also help when a small opening needs protection but a porch, roof extension, or larger façade change would be too much.
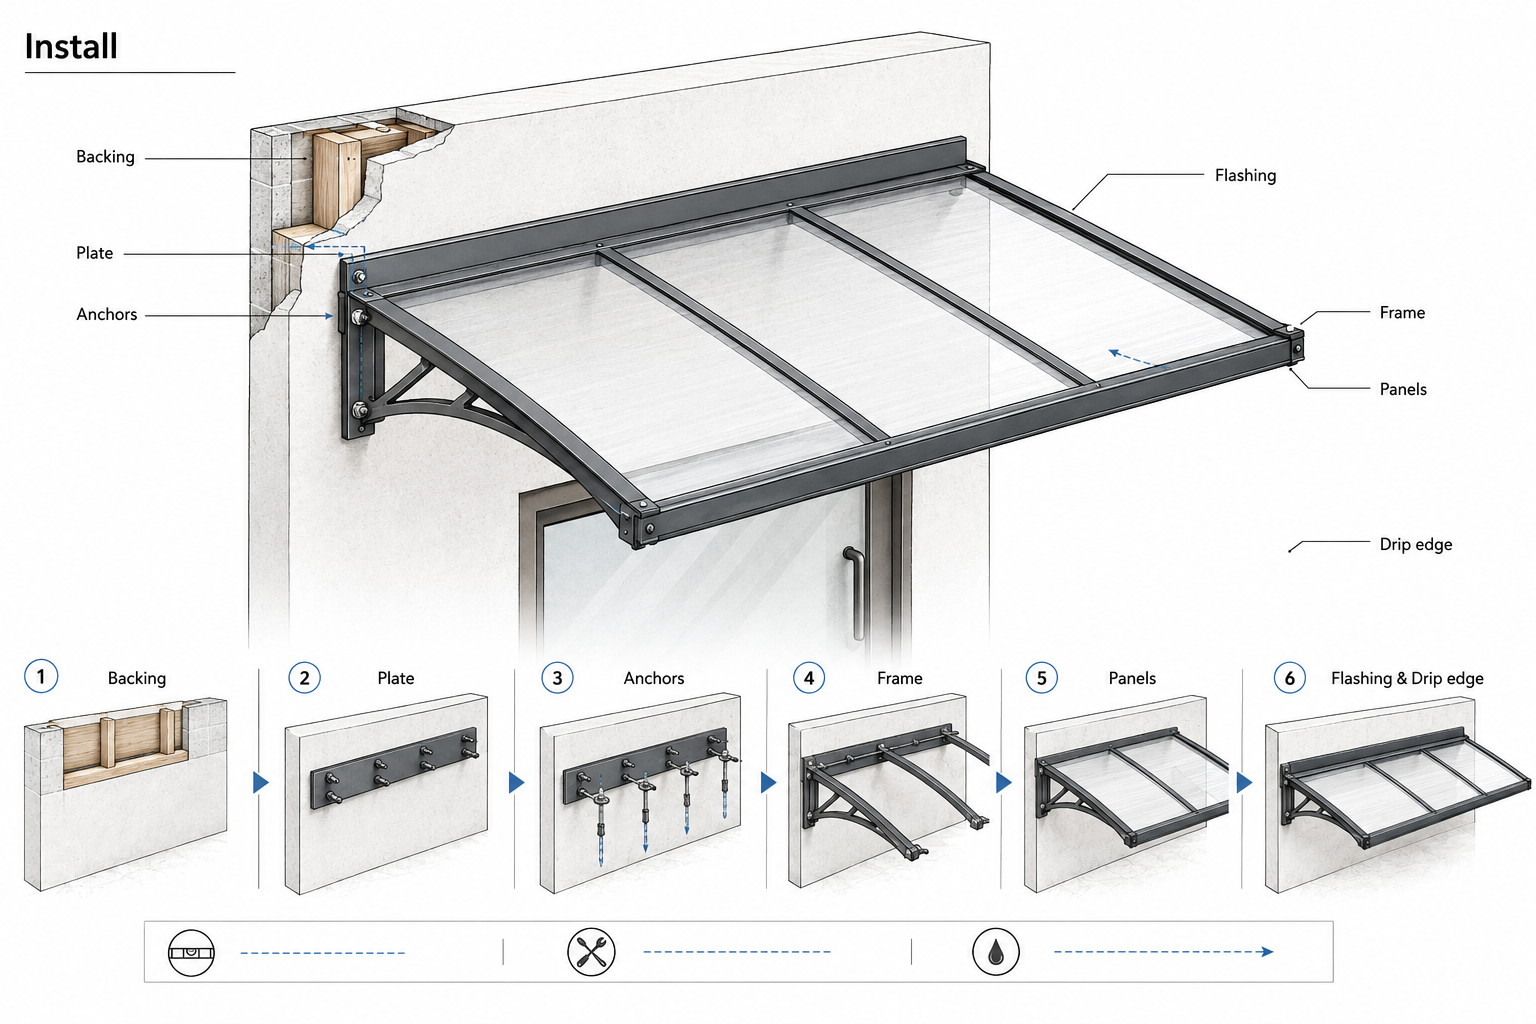
Illustration by ArchitectureCourses.org. A canopy installation works best when the backing, plate, anchors, frame, panels, flashing, and drip edge are planned as one sequence.
It is less useful when the window already sits under a deep roof overhang. It may also be the wrong fix if the real problem is a leaking window, rotted sill, failed flashing, or bad wall drainage. A canopy can reduce exposure. It cannot repair a bad window installation hiding underneath.
Worth Knowing: If the window already leaks, fix the window assembly first. A canopy may reduce future wetting, but it should not be used to hide a flashing problem.
The Load Is Small Until It Is Not
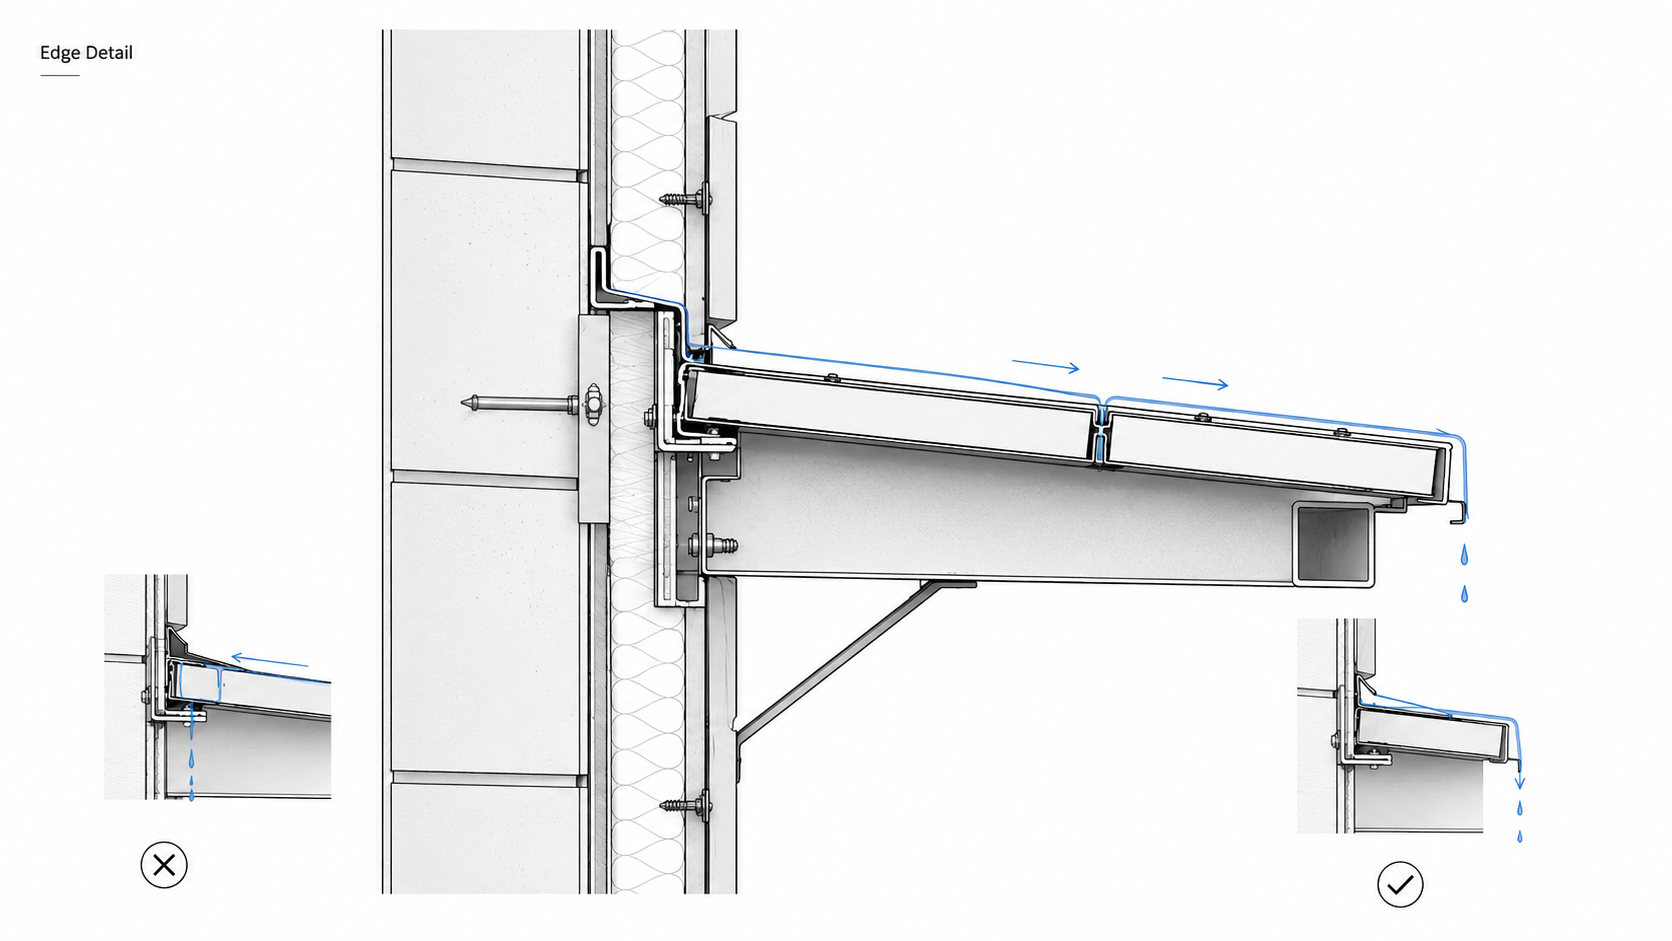
Illustration by ArchitectureCourses.org. A wall-mounted canopy needs slope, flashing, and a drip edge so water moves away from the wall instead of back into the assembly.
Window canopies look small, so they get underestimated.
The loads are still there. Dead load is the weight of the canopy itself. Live load can include snow, ice, maintenance load, or anything else the canopy has to carry. Wind can push down, lift up, or pull the canopy away from the wall.
The farther the canopy projects, the more the connection matters. A shallow cover over a small window is one thing. A deep cantilevered steel canopy over a storefront or entry is another.
If you are designing a heavier canopy, a second-story canopy, a canopy above a public walkway, or anything in a snow or high-wind area, treat it as a structural detail. That may mean an engineer, a proper bracket schedule, or a permit.
Field Pick: Why Buildings Stand Up by Mario Salvadori is still one of the clearest books for understanding loads without getting buried in engineering math. Useful if you want to understand why brackets, spans, and supports matter.
Questions Worth Answering
What is the best material for a window canopy?
For low maintenance, aluminum with a supported metal or polycarbonate panel is often practical. For a stronger custom look, steel works well if it is properly coated and detailed to drain.
Can I install a window canopy myself?
A small kit can be DIY-friendly if the wall is simple and the canopy is light. The hard part is not lifting it into place. The hard part is fastening it into something solid and sealing the wall correctly.
How deep should a window canopy be?
Small windows may only need 18 in. to 24 in. Larger residential windows often need 24 in. to 36 in. Storefronts and large openings may need more, but then the structure matters much more.
Can a canopy stop a window leak?
It can reduce rain exposure, but it will not fix failed flashing, bad sealant, rotted trim, or a leaking window unit. Fix the leak first.
Can I attach a canopy to vinyl siding?
Not to the siding alone. The fasteners need to reach framing or solid backing behind the siding, and the penetrations need to be sealed.
Do I need a permit for a window canopy?
Sometimes. It depends on size, location, structure, local rules, historic district limits, and whether the canopy projects over a public path.