
A roll-away nest box keeps eggs cleaner, safer, and harder for hens to peck.
The floor slopes just enough for the egg to move into a covered tray, away from the nesting area. That small change solves a lot: fewer dirty eggs, fewer cracked shells, and fewer bad egg-eating habits.
Start with how the system works, then move into planning, materials, build steps, and design ideas for different coops and flock sizes.
Want the basics? Chicken Nest Boxes: Size, Placement, and Types
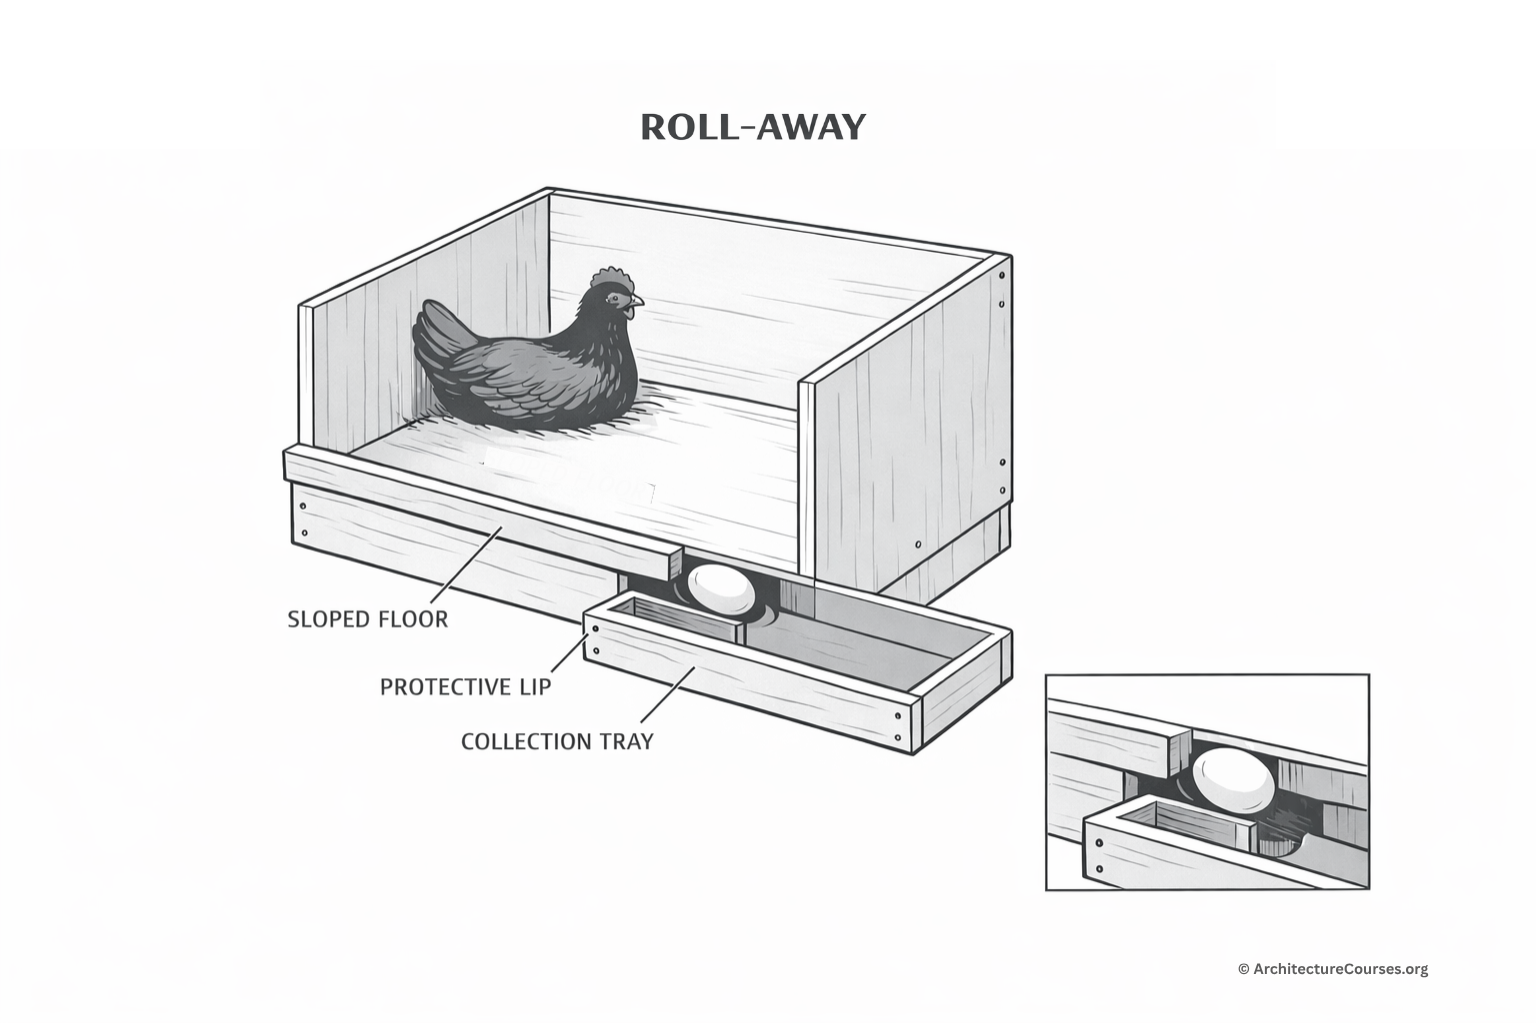
What a Roll-Away Nest Box Does
A roll-away nest box is a nesting box with a gentle slope under the bedding or laying surface. After a hen lays, the egg rolls into a protected collection area. That keeps it out of the main nest, away from droppings, scratching, and pecking.
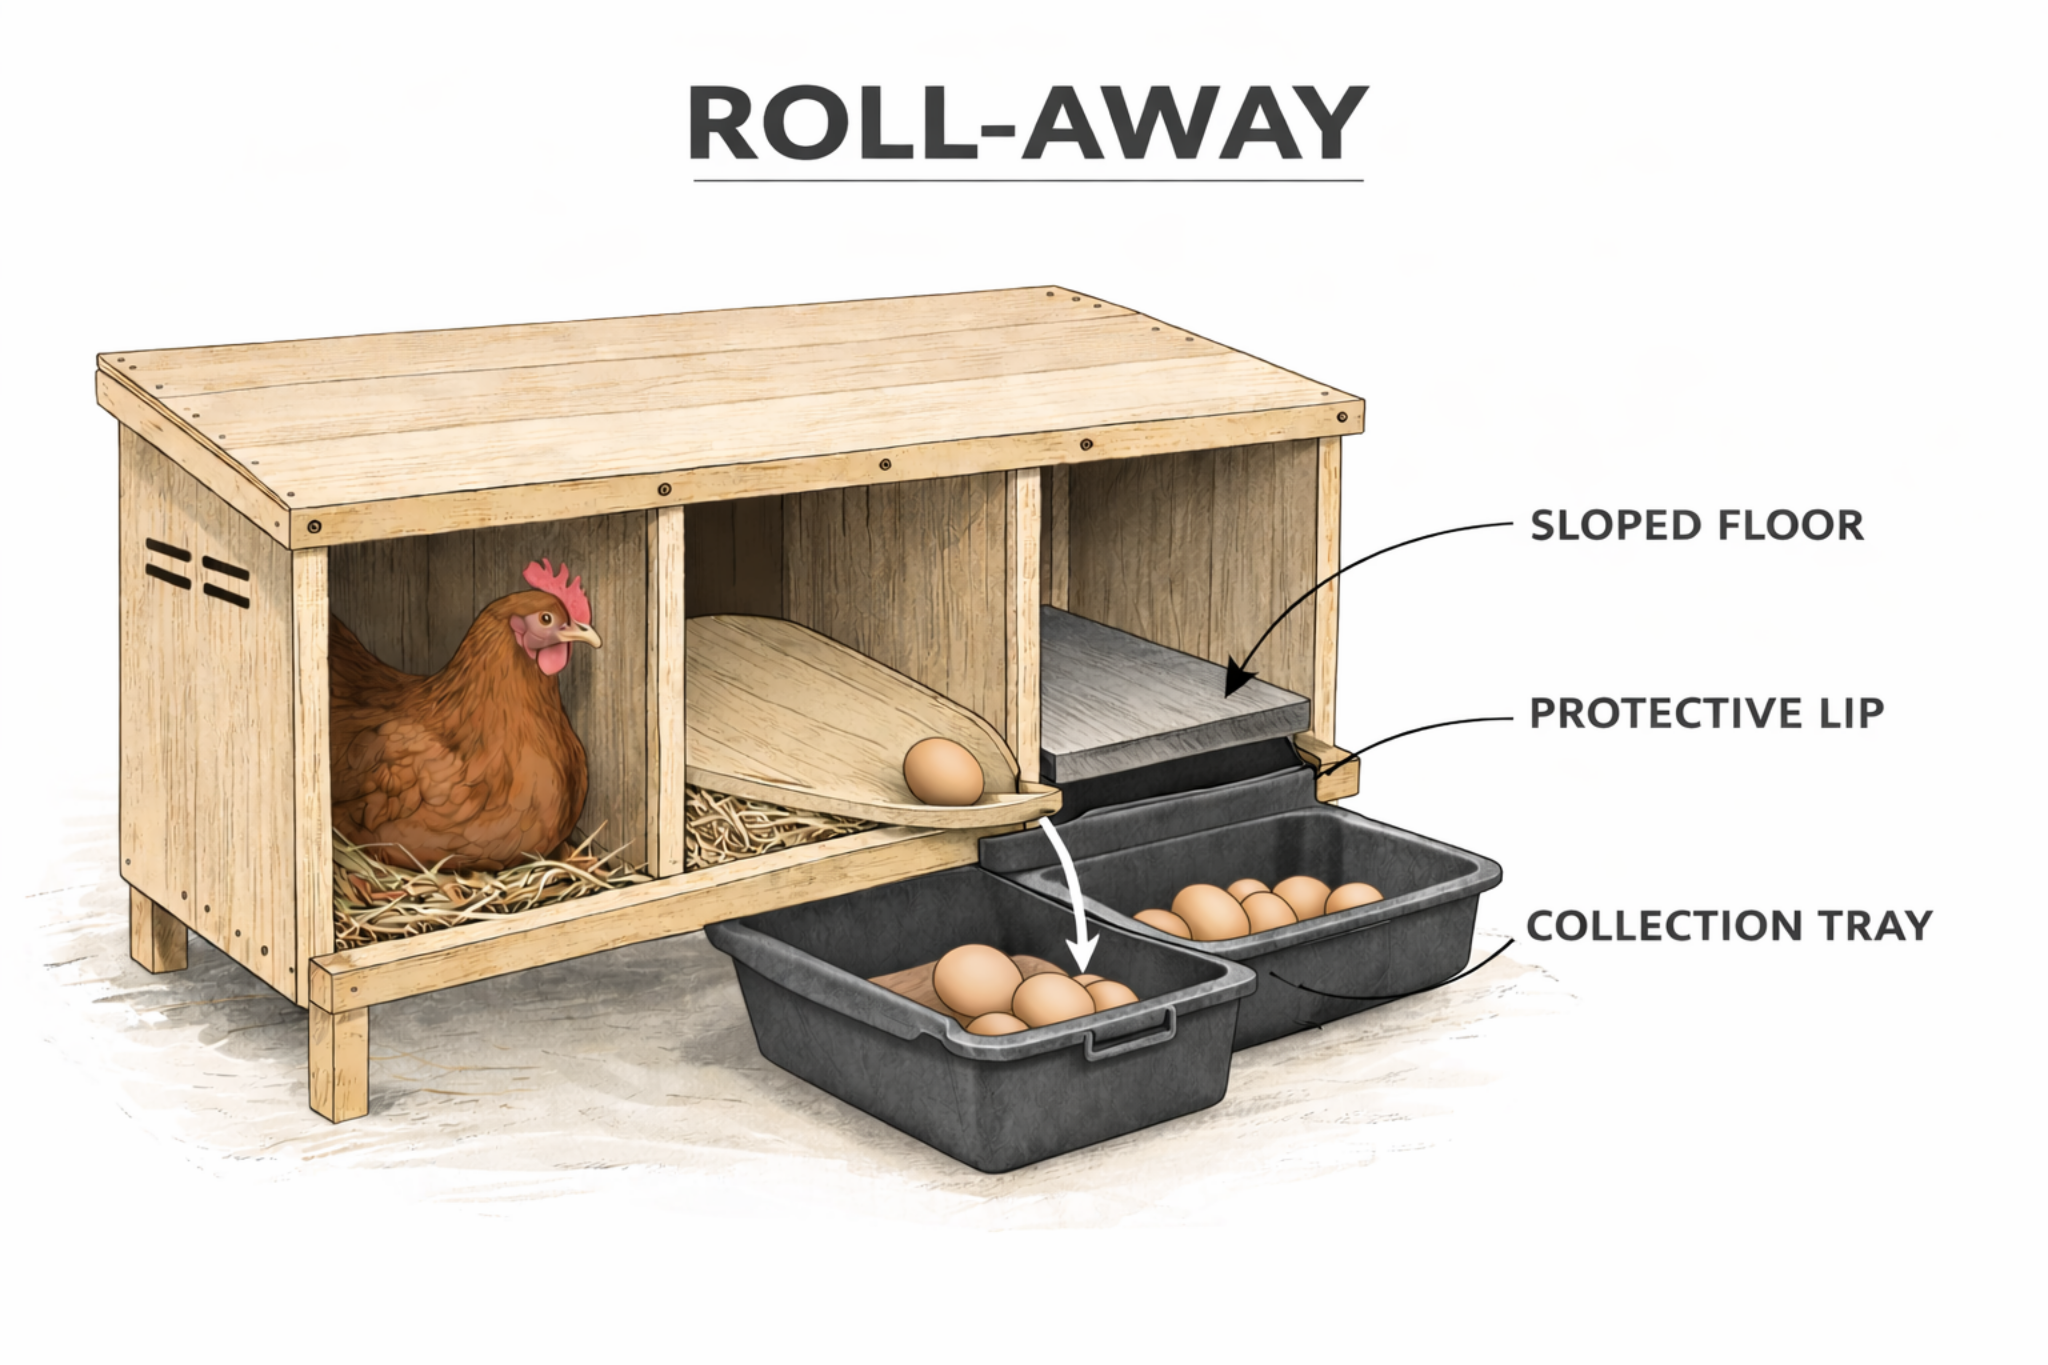
This diagram shows how a roll-away nest box works: eggs move from the sloped laying floor, pass under a protective lip, and collect in an outer tray away from the hen.
The idea is not complicated. The details are what matter. Too little slope and the egg stays put. Too much slope and it hits the tray too hard. Get that part right and the box becomes easier to live with every day.
Why Keepers Use Them
Cleaner Eggs
Fresh eggs move out of the nest area instead of sitting in bedding, manure, or damp corners. That cuts cleanup time and usually means fewer eggs need washing.
Fewer Broken or Eaten Eggs
Once eggs are out of sight, hens are less likely to step on them, crack them, or start pecking at them. That matters even more in small coops where birds crowd the nesting area.
Faster Collection
A good roll-away setup makes egg gathering faster, especially if the collection tray is reachable from outside the coop. You spend less time reaching into bedding and less time disturbing hens that are still laying.
Less Daily Mess
The system does not make a coop maintenance-free, but it does cut one of the messiest jobs down to size. That is usually the reason people stick with it.
- Less time cleaning eggs
- More eggs saved each day
- Fewer eggs hidden under bedding
- A quicker morning routine
Plan the Box First

Four DIY roll-away chicken nest box ideas, including a basic plywood box, a PVC-framed version, a repurposed furniture build, and a plastic tote conversion.
Most roll-away nest box problems start before the first cut. The size is off. The slope is wrong. The collection tray is hard to reach. Or the box ends up in the wrong part of the coop.
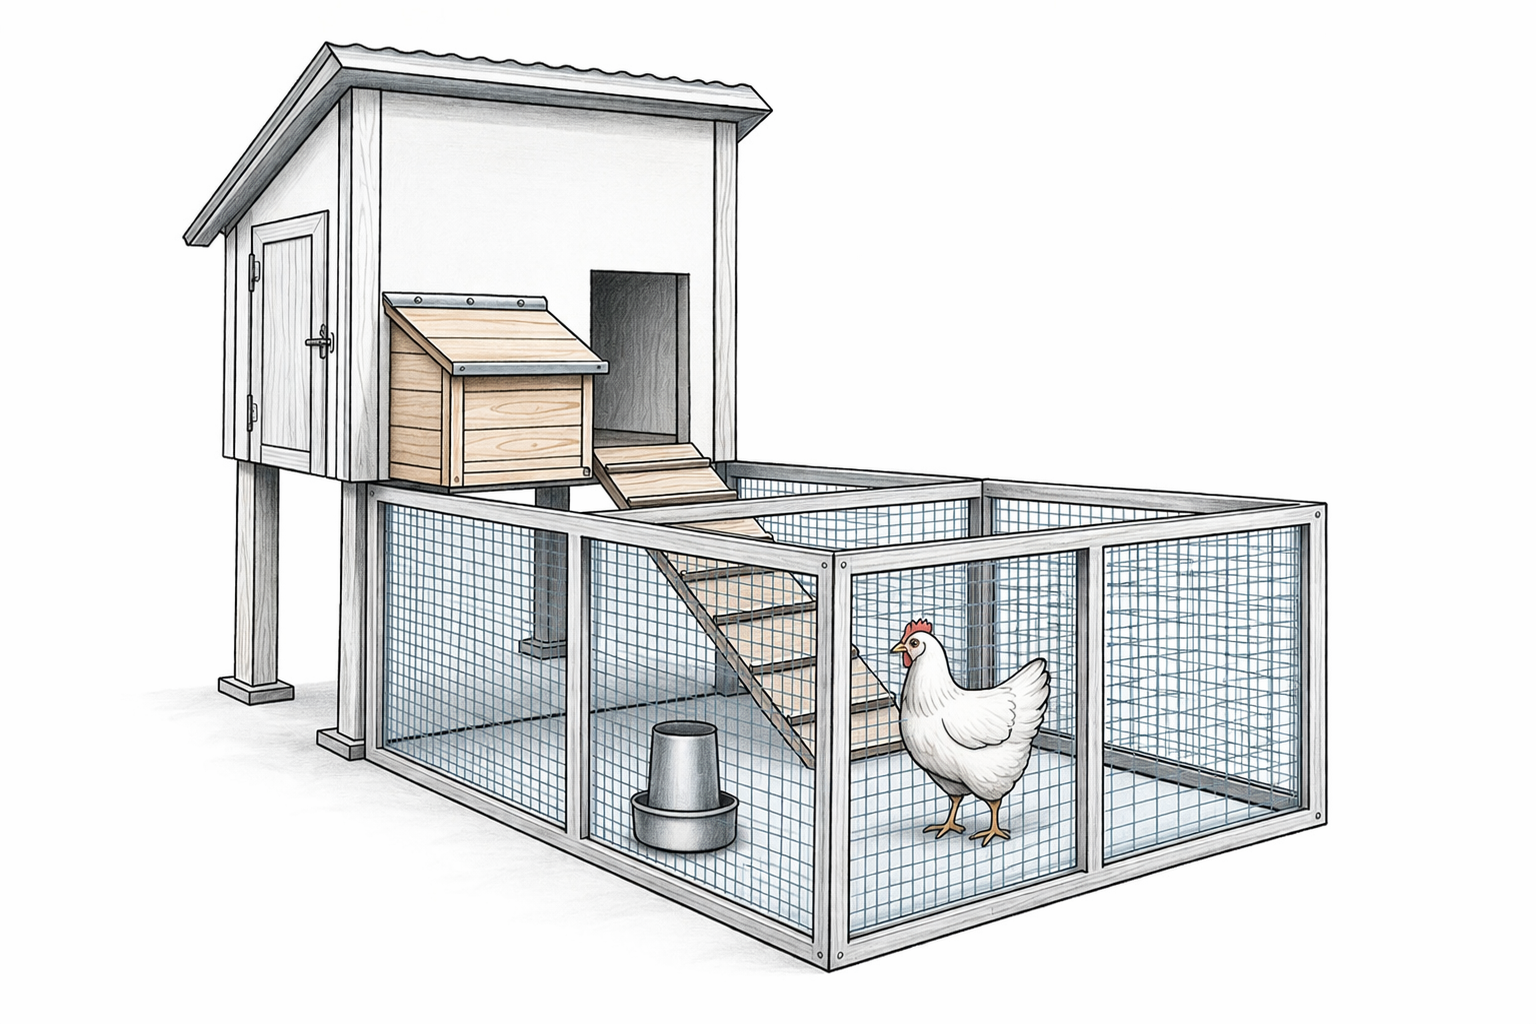
Illustration by ArchitectureCourses.org. Raised chicken coop layout with attached run, exterior nest box, ramp, and feeder, showing how nest box placement should be planned as part of the full coop design.
Spend a few minutes on layout first and the build gets much easier.
How Many Hens
A common rule is 1 nest box for every 4 to 5 hens. Birds share boxes more than people expect, so you do not need one per hen. What you do need is enough room so the boxes do not turn into a traffic jam during the busiest part of the day.
How Much Space
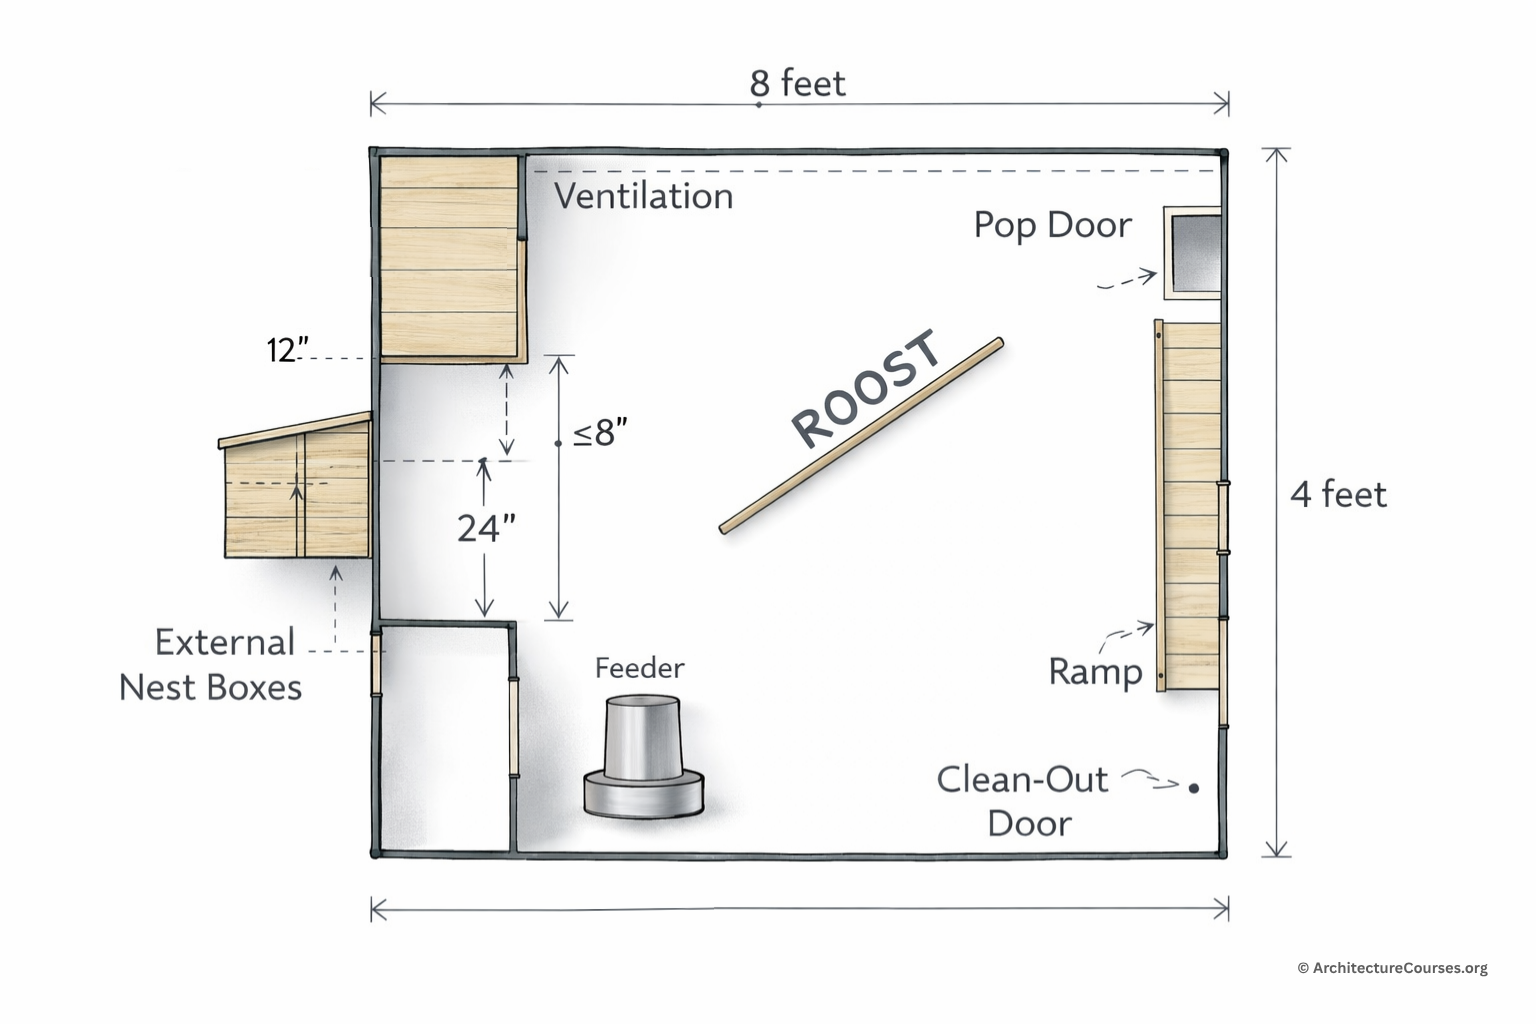
Simple 8-by-4-foot chicken coop floor plan showing external nest boxes, a roost, pop door, ramp, feeder, and clean-out access.
Measure the coop before you start. Leave room for roost bars, walking space, feeders, and access for cleaning. A good nest box is not just the right size for the birds. It also has to fit the coop without making the rest of the layout worse.
Inside or Outside Access
An inside box is simpler to build and protect. An outside-access box makes collection easier. If you go outside-access, the hatch needs to stay dry, close tight, and resist raccoons and other pests.
Climate
Hot, wet, and cold climates change the details. Metal is easy to clean but can heat up quickly in direct sun. Wood is easier to customize but needs sealing. In cold areas, protect against drafts without turning the nest box into a damp closed chamber.
Predators
If rats, raccoons, snakes, or weasels are a problem in your area, build with that in mind from the start. Tight joints, hardware cloth where needed, and proper latches matter more than fancy trim.
| Setup | Best For | Watch For |
|---|---|---|
| Single roll-away box | Small backyard flocks | Fastest to build, but limited capacity |
| 3-compartment box | Medium flocks | Needs more wall width and a clean tray layout |
| Outside-access box | Easy daily egg collection | Weatherproofing and secure hatches matter |
| Stacked or tower box | Tight coops with limited floor space | Needs solid anchoring and easy cleanout |
| Plastic or metal box | Fast cleanup | Can run hot or cold depending on climate |
If you are planning a multi-bird setup, Related reading: How to Build a 3-Compartment Roll-Away Chicken Nest Box.
Which Materials Make Sense Here
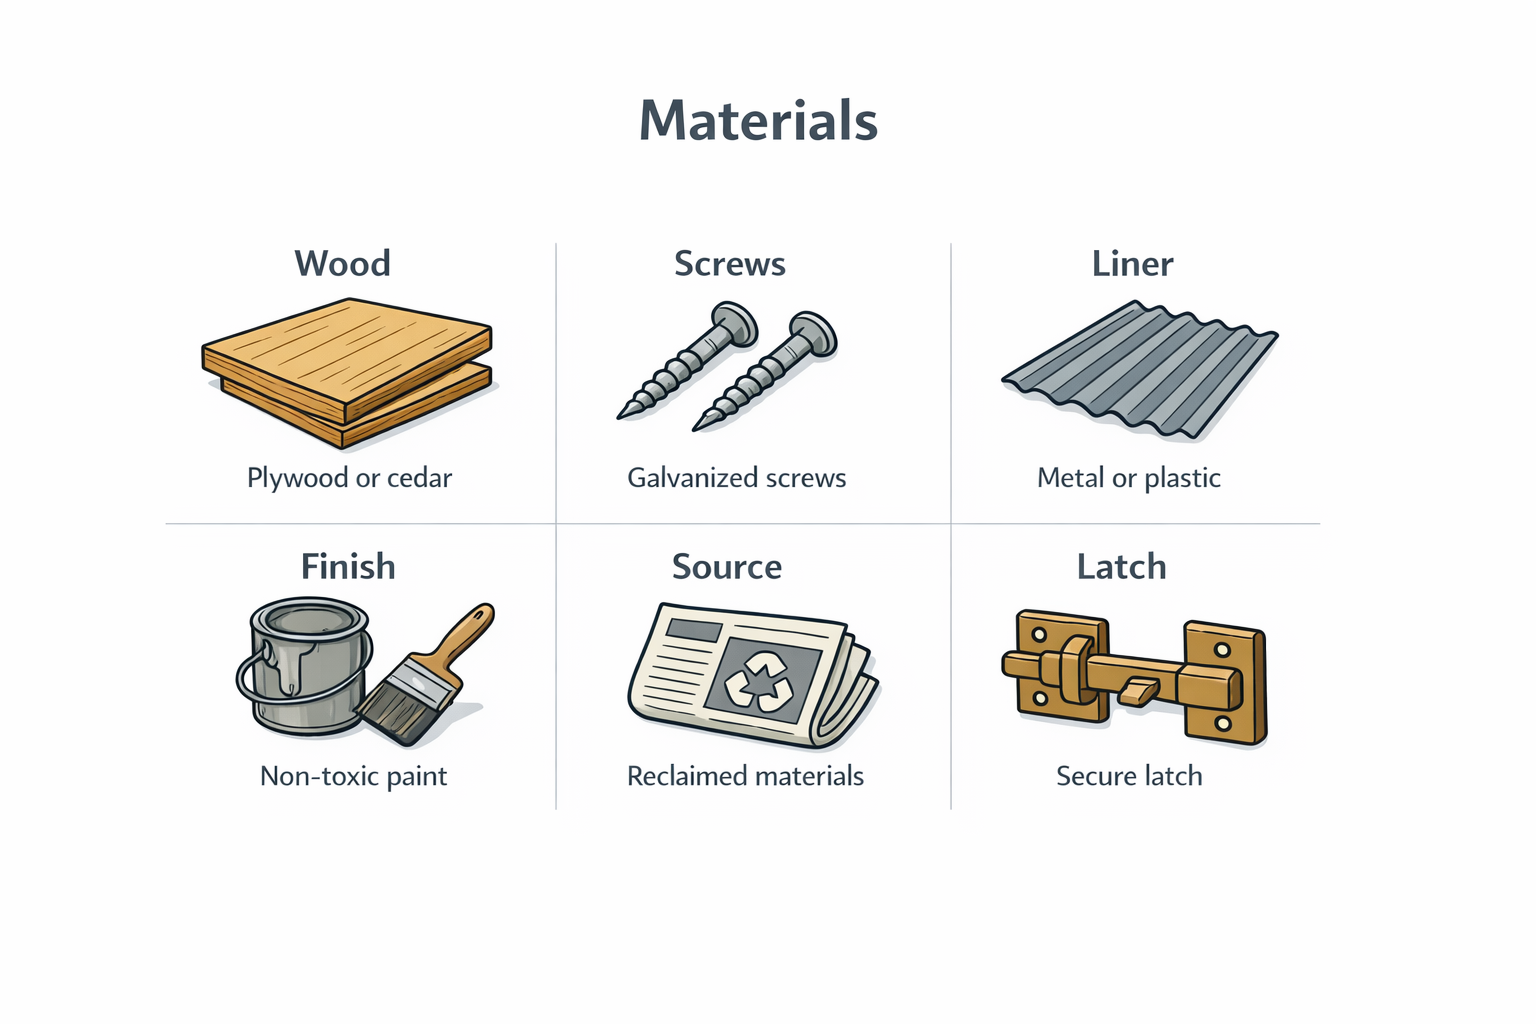
The material list for a DIY roll-away chicken nest box is not long, but the wrong choices create extra work later. This is one of those builds where cheap materials often cost more once the box starts warping, soaking up moisture, or becoming hard to clean.
Wood
Plywood is a practical default. It is affordable, easy to cut, and easy to fasten. Pine also works well. Cedar lasts longer and handles moisture better, but it costs more. Avoid thin panels that flex and avoid OSB where repeated moisture is likely. A nest box gets dirty fast. Build for wipe-down and durability.
Hardware
Use screws instead of nails wherever possible. They hold better, make repairs easier, and help keep the box tight over time. Use decent hinges and proper latches. Weak hardware is one of the first things that fails on a coop accessory that gets opened every day.
The Sloped Surface
The egg needs a smooth path. Sealed plywood, thin plastic sheet, vinyl, melamine-coated board, or carefully finished flashing can work. Avoid rough or absorbent surfaces. If the egg drags, catches, or hits a sharp edge, the whole system stops being useful.
Padding in the Collection Area
The egg tray needs a soft landing. A rubber mat, turf offcut, washable pad, or dense foam strip can work. The goal is simple: let the egg travel, then stop it without cracking.
Finish
Seal wood surfaces with a non-toxic, water-based finish that is safe once cured. The point is not decoration. The point is cleanup. A sealed surface does not absorb moisture and is much easier to disinfect.
Bedding or Nest Pad
Straw, pine shavings, and washable nest pads all work. The best choice depends on climate and how often you clean. The more complicated the bedding arrangement, the more likely it is to interfere with the rollout path.
How to Build Your Roll-Away Nest Box
Once the layout is set and the materials are ready, the build is straightforward. This is not fine furniture. It does need to be square, easy to clean, and gentle on eggs.
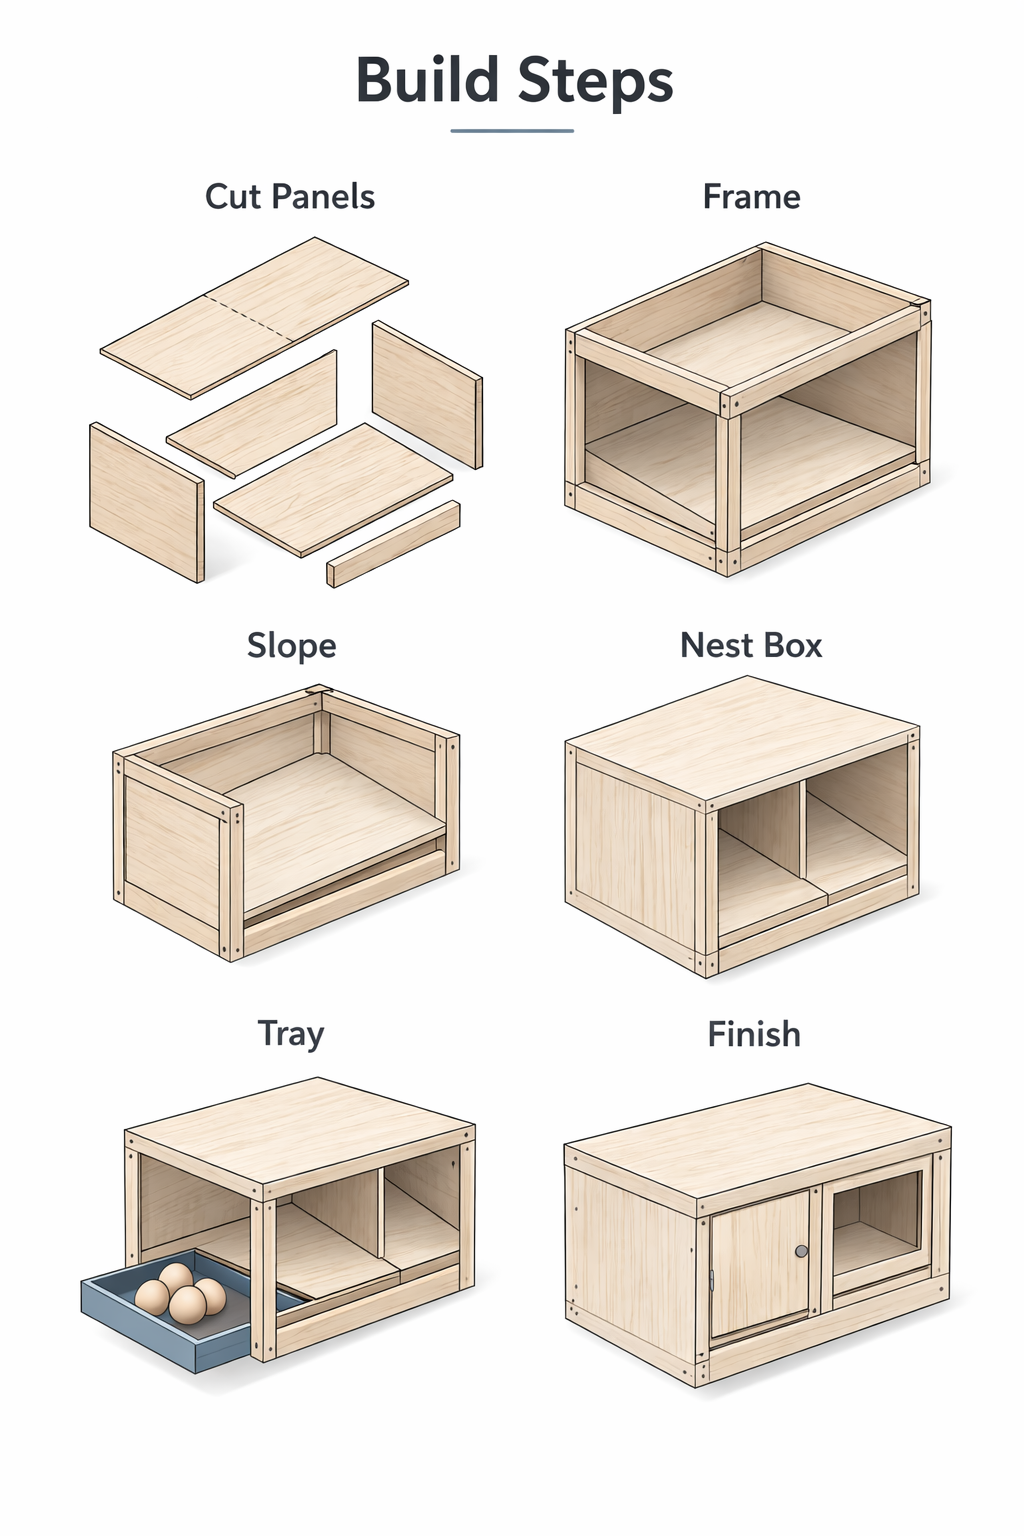
Step 1: Cut the Main Parts
Cut the sides, bottom, back, front, dividers, and collection tray pieces first. Mark everything before assembly. Clean, accurate cuts matter more than speed here.
Step 2: Build the Shell
Assemble the outer frame first. Keep it square. A twisted box causes trouble later when you try to set the slope or align a hatch.
Step 3: Set the Slope
For most DIY boxes, a 5 to 8 degree slope is the safe range. Test it before final fastening. Too flat and the egg does not move. Too steep and it reaches the tray too fast.
Step 4: Build the Nesting Surface
Add the laying surface and any side lips that keep bedding where it belongs. Keep the path smooth. The egg should roll without bouncing or catching.
Step 5: Form the Collection Tray
The tray should be easy to reach and soft at the landing point. A removable tray or a hinged access panel makes daily collection faster and deep cleaning easier.
Step 6: Add Access Panels and Latches
If the box opens from the back or side, fit the hatch carefully and add a latch that closes tight. This is one of the spots predators test first.
Step 7: Sand and Seal
Round over rough edges, remove splinters, and seal the surfaces that need it. The box will get dirty. Build for cleanup now instead of patching later.
Step 8: Add Venting if Needed
Small mesh-covered vents can help in humid or hot climates. Keep airflow controlled. Nest boxes should feel calm and sheltered, not drafty.
Step 9: Install and Test
Set the box at the right height, fix it securely, then test the rollout path with a real egg. This is the easiest time to correct the slope, tray padding, or bedding depth.
Where DIY Roll-Away Boxes Usually Go Wrong
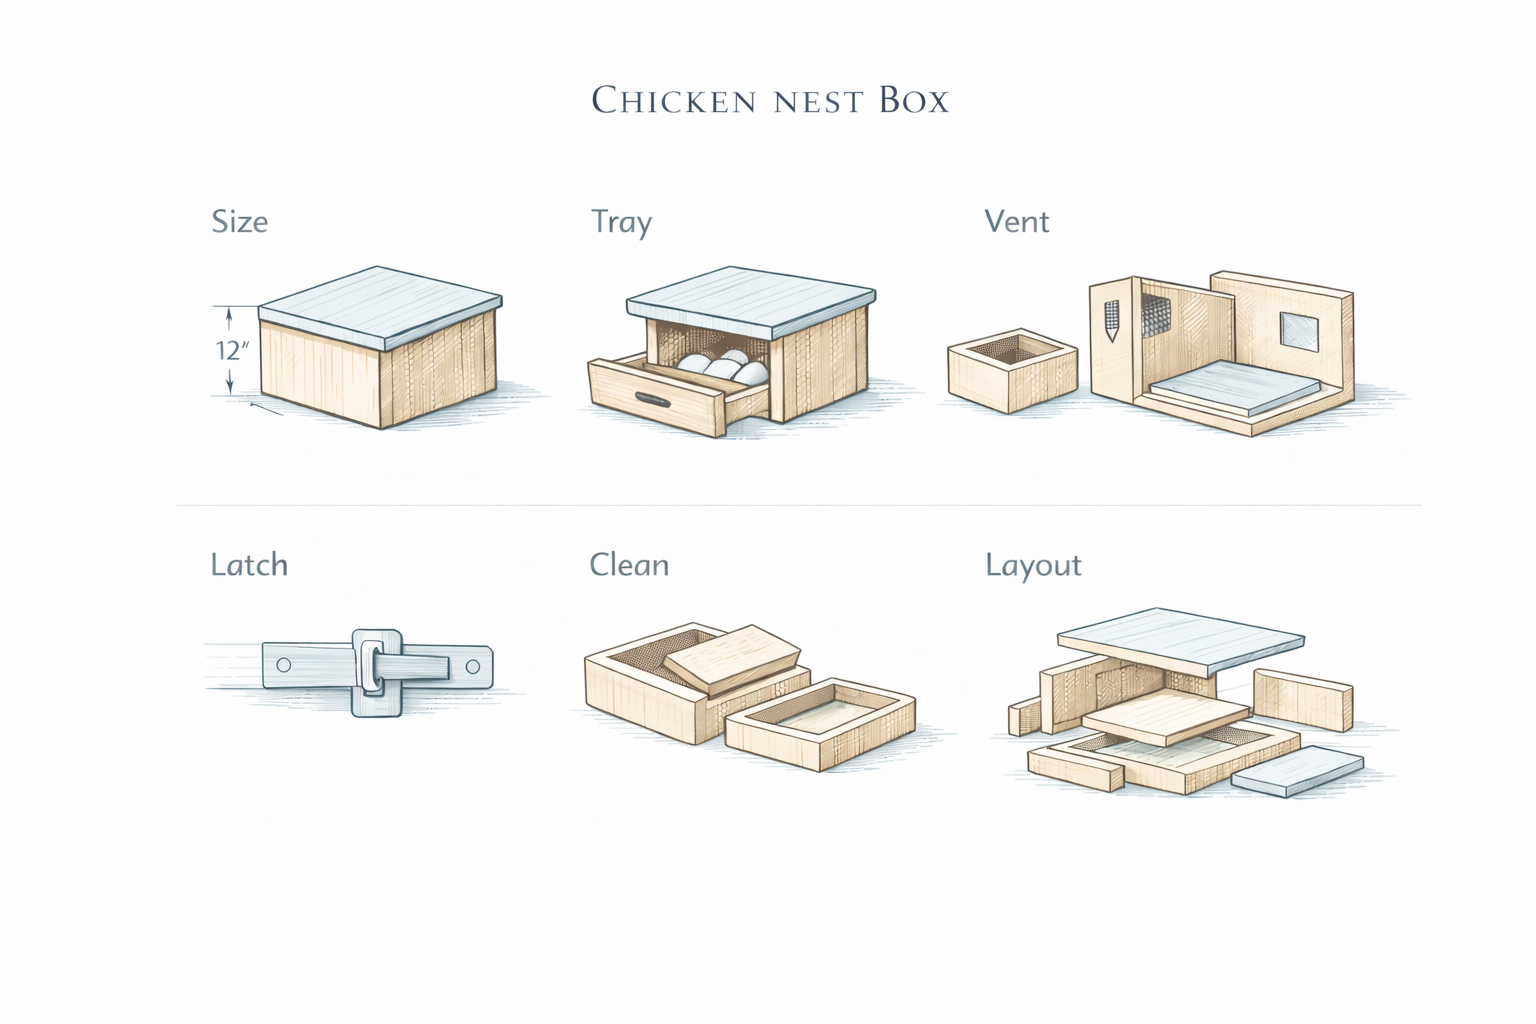
Diagram showing the main design features of a simple DIY roll-away chicken nest box, including box size, egg tray, ventilation openings, latch hardware, removable cleaning tray, and overall layout.
A roll-away nest box does not fail because the idea is bad. It fails because the details are off. These are the mistakes that keep showing up.
The Slope Is Wrong
This is the first check. If eggs sit in place, flattening is not the answer. If they crack at the tray, the slope is too aggressive or the landing is too hard.
The Surface Is Hard to Clean
Absorbent wood, rough fabric, and awkward corners turn into a hygiene problem quickly. Build with wipe-down surfaces and removable parts where it makes sense.
The Tray Is Hard to Reach
A roll-away box is supposed to save time. If collecting eggs means reaching through bedding, crouching into a corner, or opening a bad hatch, the design is working against you.
The Box Is Too Tall or Too Exposed
If the nest box becomes a sleeping shelf, expect droppings where eggs should be. If it sits in a bright, busy part of the coop, hens may avoid it. Nest boxes work best when they feel sheltered and slightly darker than the rest of the coop.
Predator Protection Was an Afterthought
A loose hatch, a weak latch, or an exposed gap can undo the whole build. A nest box is part of the coop system. It has to be secure like the rest of it.
Do This Instead of This
- Do this: Use a tested 5 to 8 degree slope. Not this: Guess the angle and hope the eggs roll.
- Do this: Build a soft, protected collection tray. Not this: Let eggs hit bare wood or metal.
- Do this: Use sealed plywood, vinyl, or other smooth surfaces. Not this: Use carpet, felt, or rough absorbent liners.
- Do this: Add a proper latch. Not this: Rely on a flimsy hook in raccoon country.
- Do this: Test with real eggs before final install. Not this: Assume it will work once it is mounted.
25 DIY Roll-Away Chicken Nest Box Designs

DIY roll-away chicken nest box ideas: a reused drawer, double-decker unit, predator-proof box, and removable-tray design.
The 25 designs below are not all trying to do the same job. Some are fast, cheap starter builds. Some solve tight-space problems. Others make more sense for cold climates, outside collection, or bigger flocks. That is the useful way to read this list.
Fast, cheap starter builds. These are the easiest ones to test because the materials are common and the mistakes are cheap to fix.
1. Basic Roll-Away Box
One compartment, one slope, one tray. This is the cleanest place to start if you want to learn the rollout geometry before building anything larger.
2. PVC-Framed Nest Box
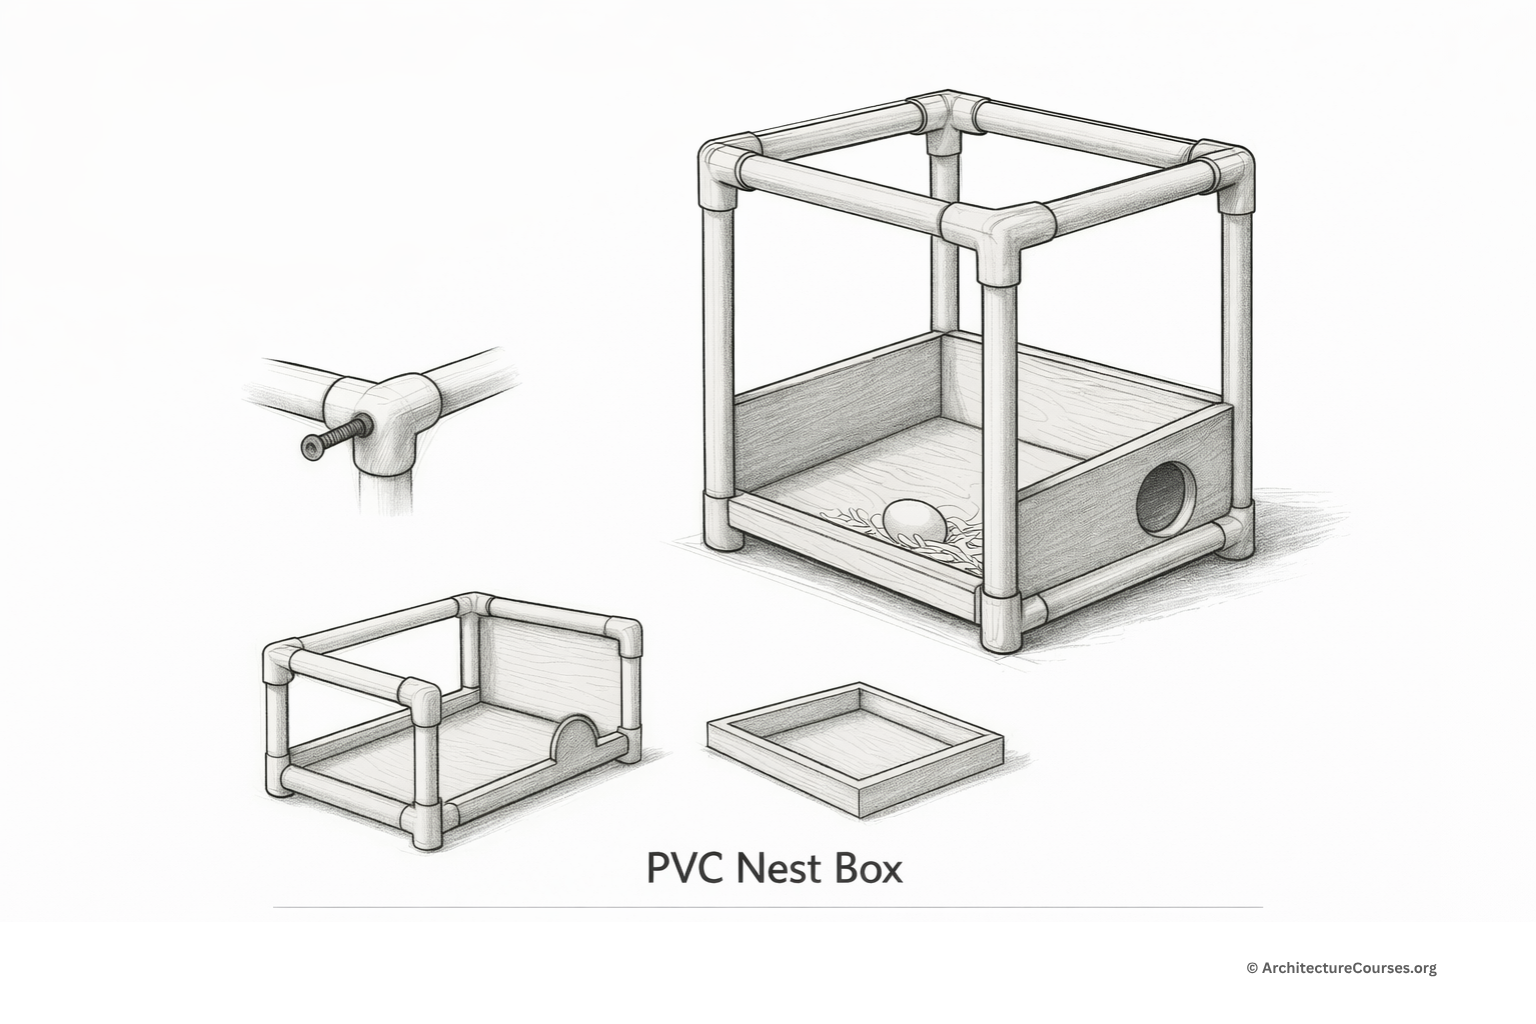
Lightweight, moisture-resistant, and easy to move. Screw the joints instead of trusting friction fit, or the frame will loosen over time.
3. Old Dresser Drawer Box
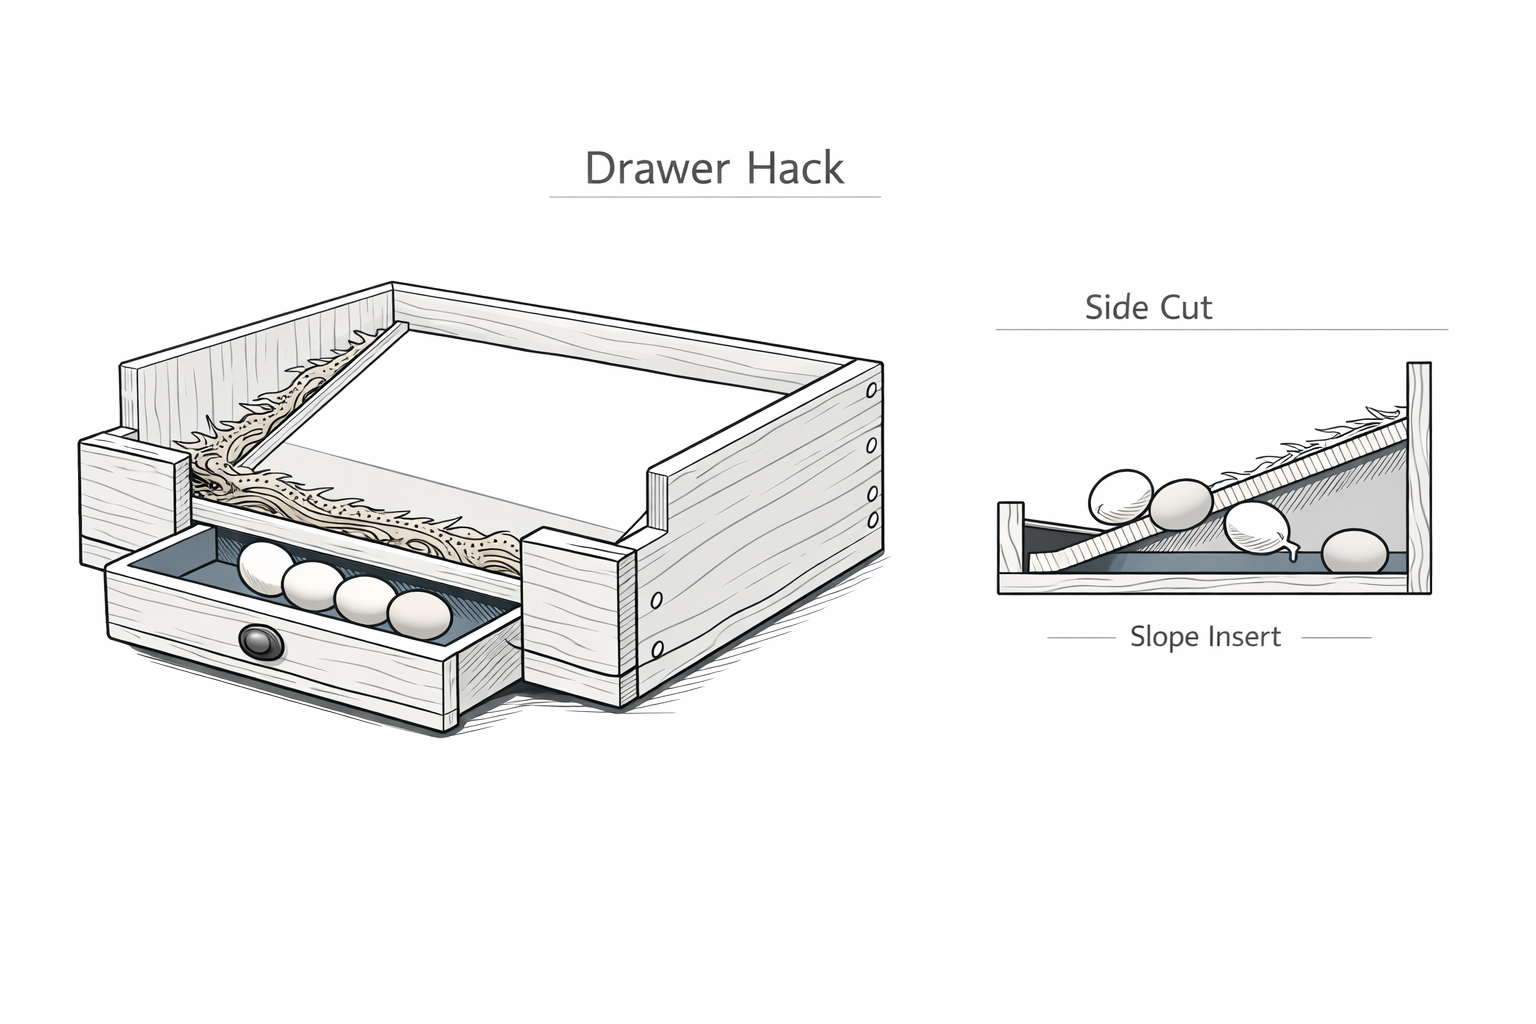
A good reuse build if the drawer is still square and the surfaces can be sealed. Add a sloped insert inside and keep the landing soft.
4. Plastic Tote Conversion
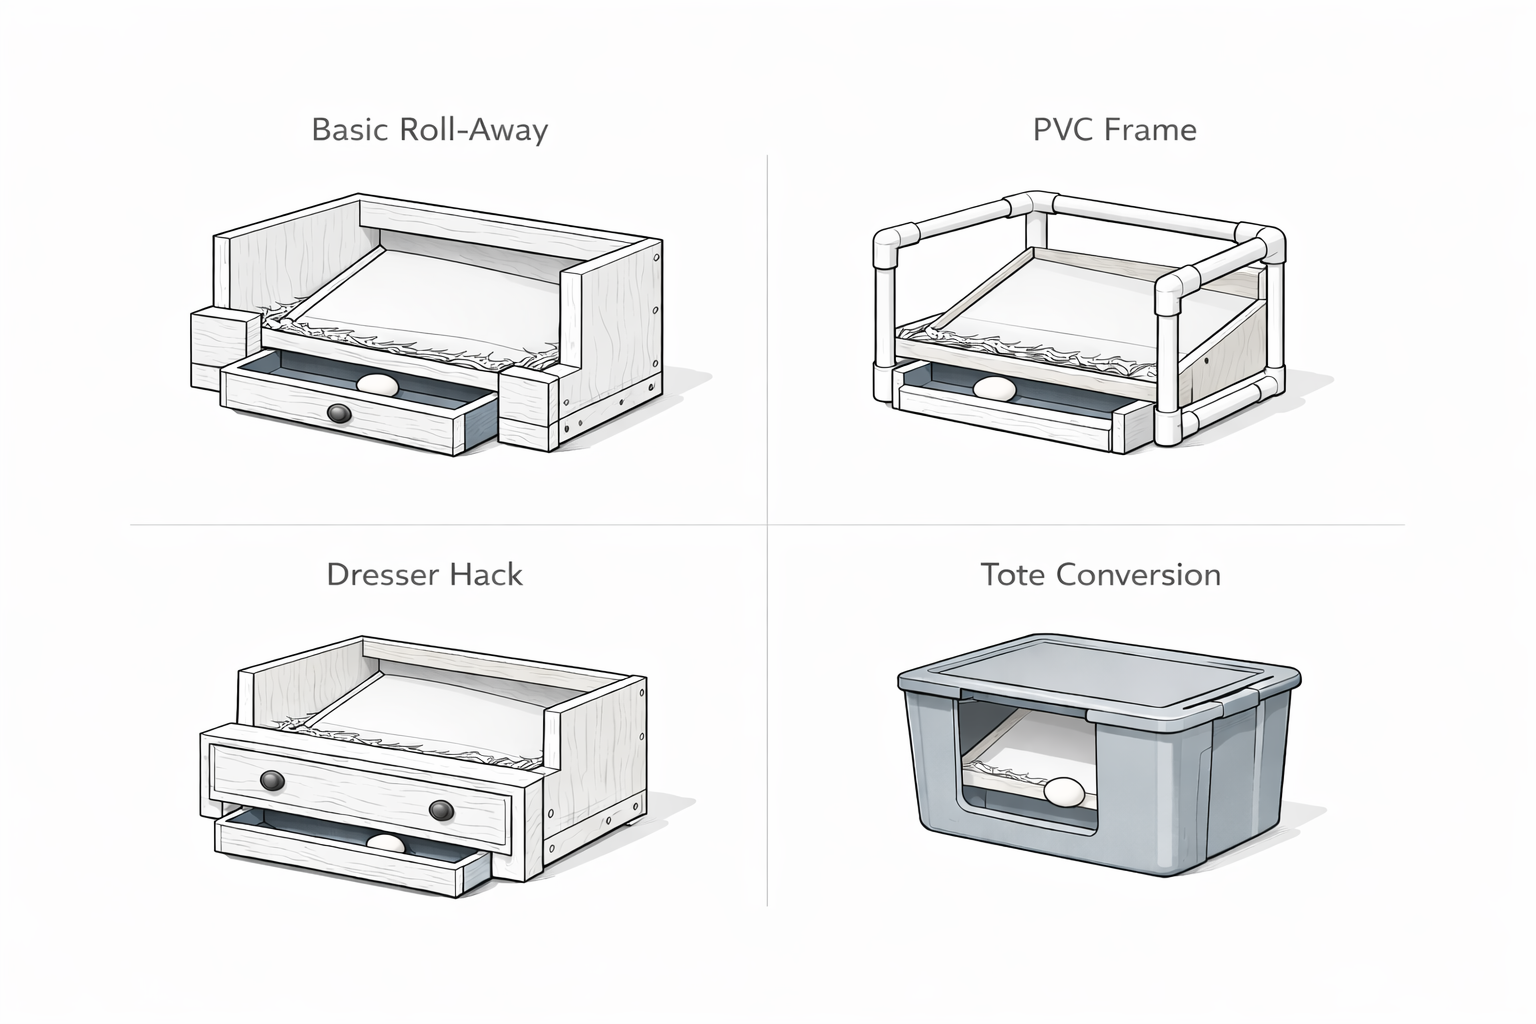
Cheap, fast, and useful for a trial run. It works best as a proof-of-concept build before you commit to a heavier permanent version.
5. Pallet Wood Nest Box

Worth doing only if the pallet wood is clean, dry, and not split to pieces. Sand it hard and seal the areas that will see moisture.
6. 5-Gallon Bucket Roll-Away
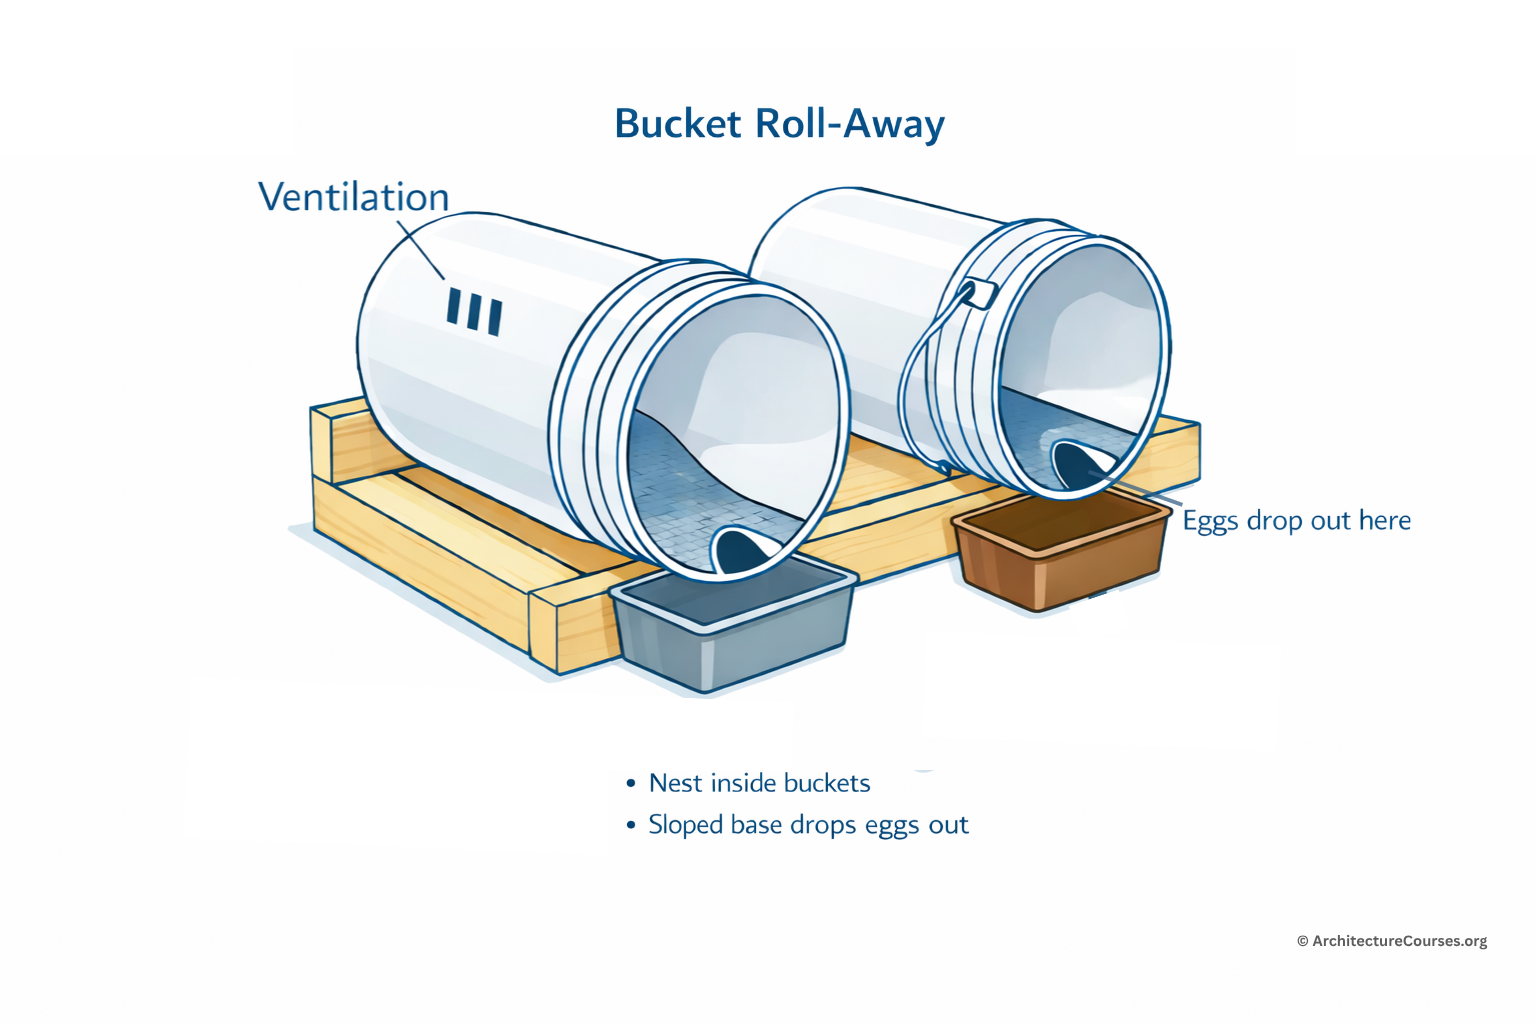
Bucket-based roll-away nest box concept with side ventilation and collection tubs placed below the egg exit openings.
A compact solution for very small flocks or temporary setups. It needs secure mounting and a tray detail that cushions the egg properly.
Tight-space and expandable layouts. These are better when the coop wall is crowded or the flock may grow.
7. Commercial-Style DIY Clone
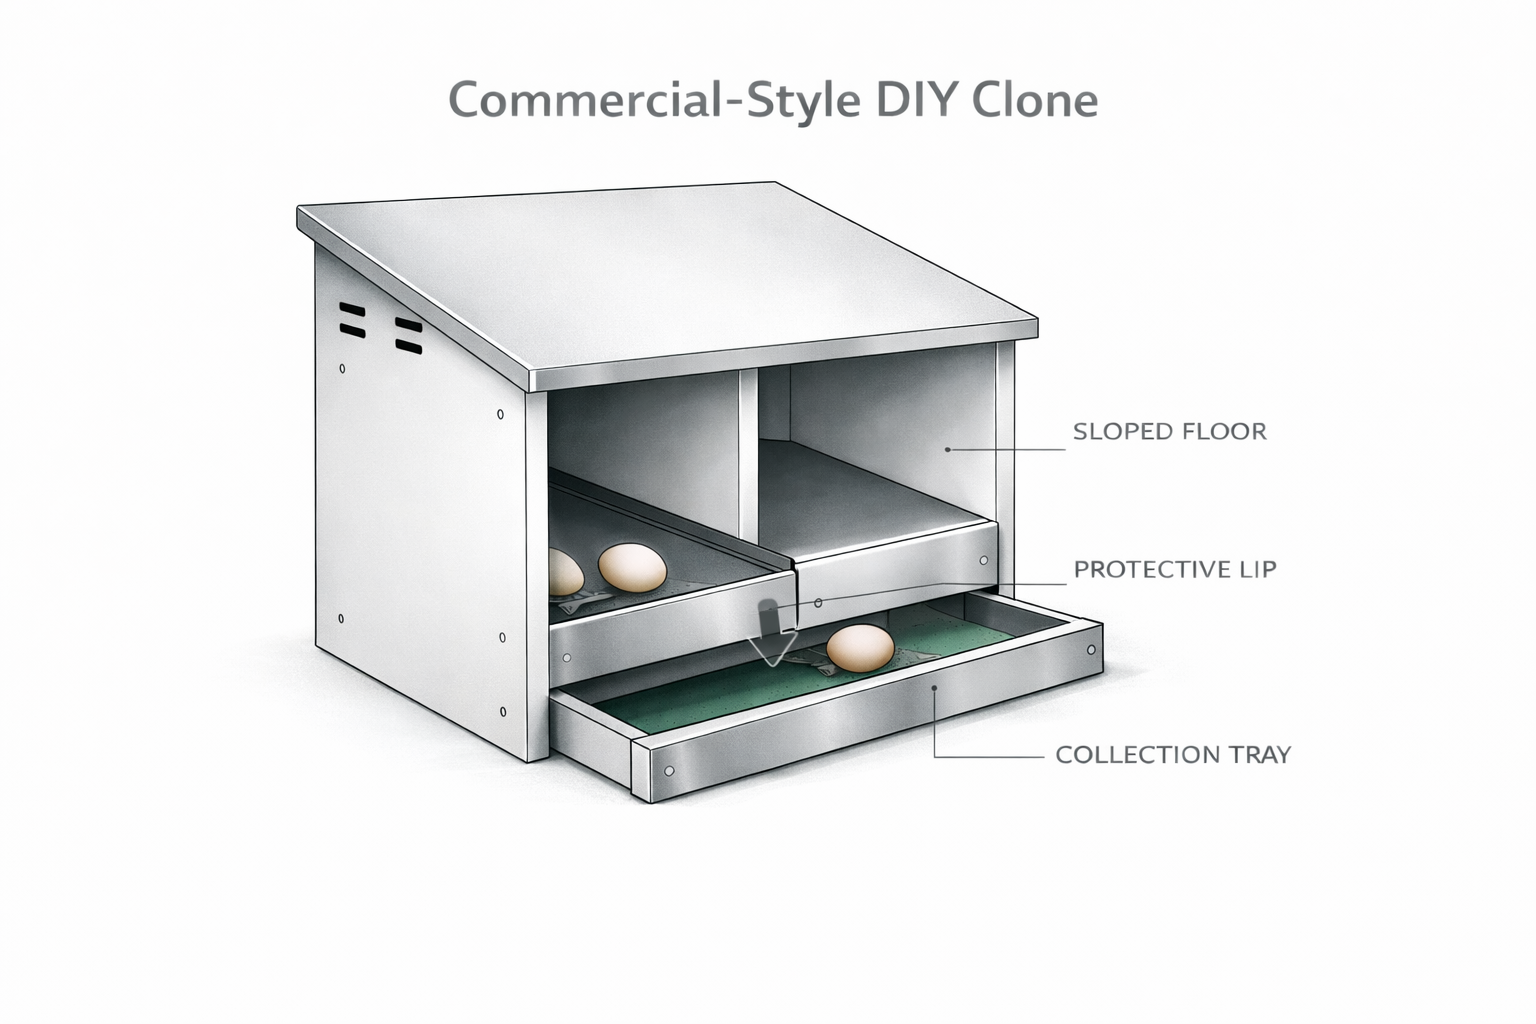
DIY roll-away chicken nest box modeled after commercial rollout units, with a sloped interior floor, guarded front lip, and protected front collection tray.
A home-built version of the familiar metal rollout box. Melamine-coated panels or smooth liners help it clean up more like a bought unit.
8. Community Roll-Away Box
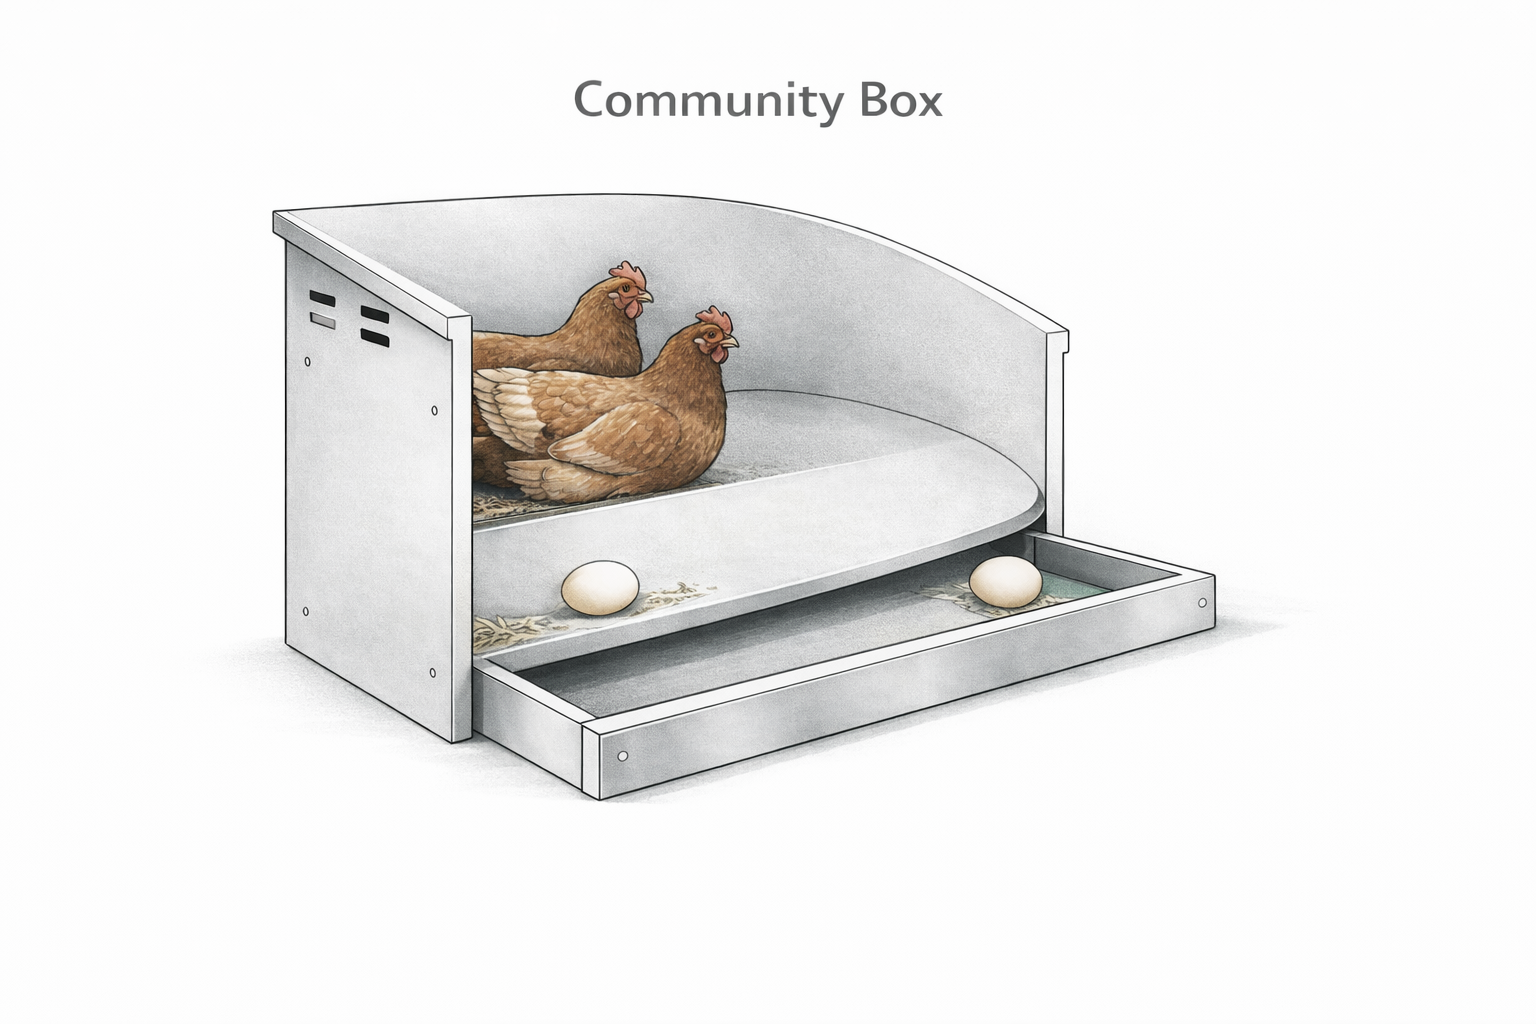
Community-style roll-away nest box with one shared nesting chamber, a curved sloped floor, and a protected front collection tray.
A shared nesting area for several hens. It works when the tray pulls eggs out of reach quickly and the space still feels sheltered.
9. Side-Ejecting Nest Box
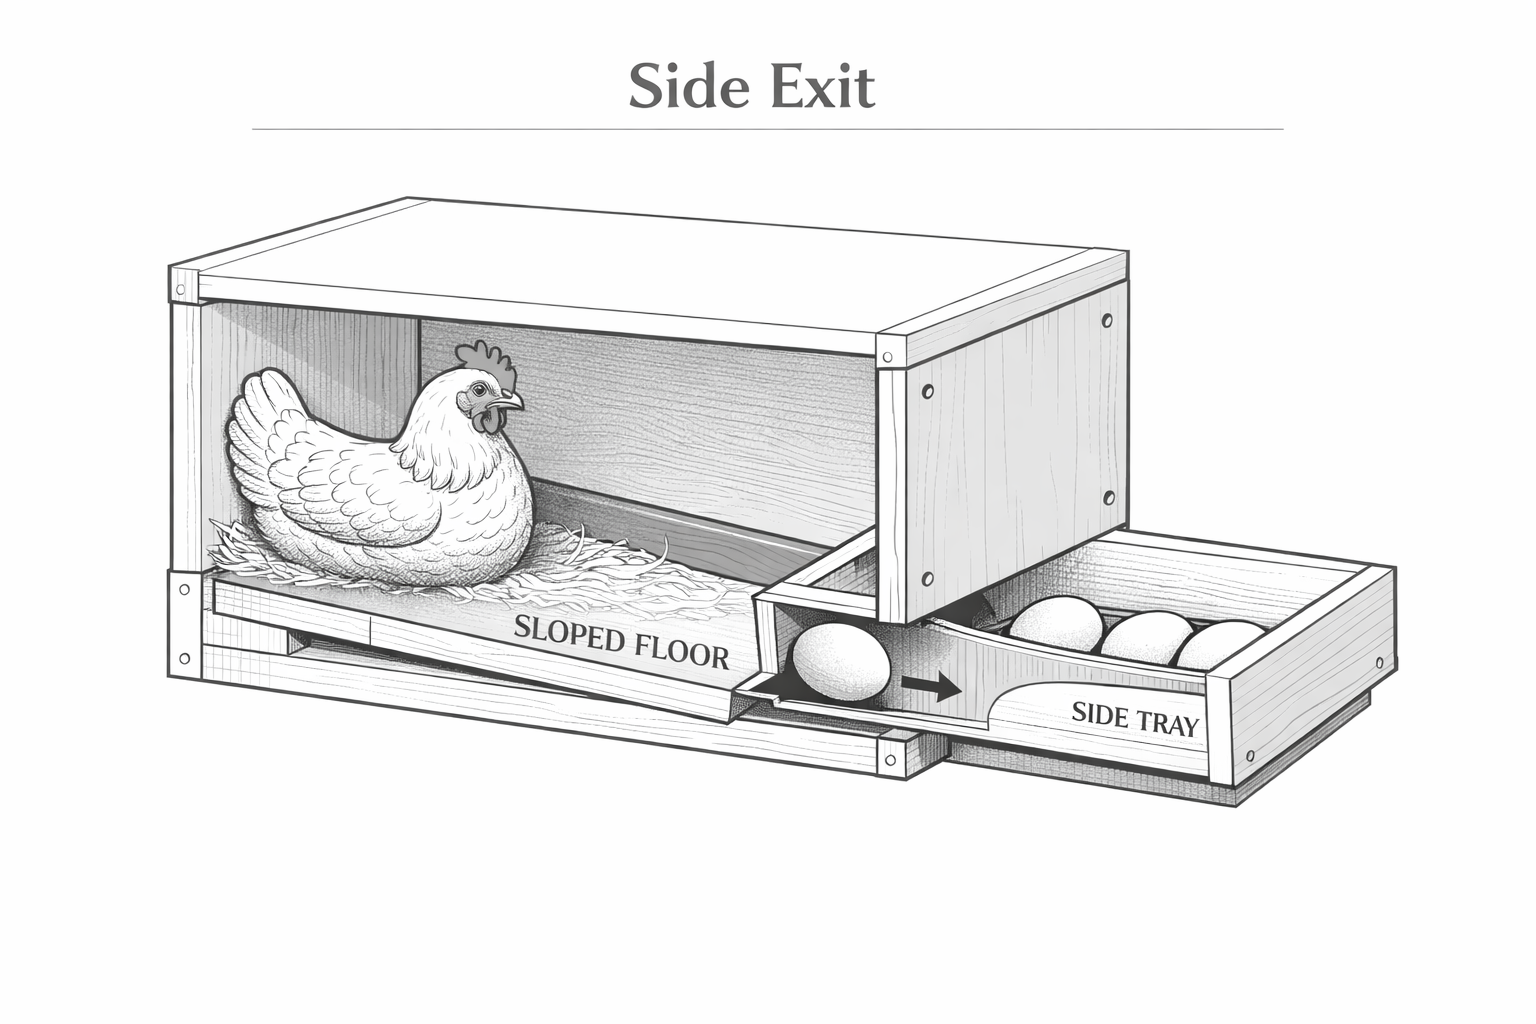
Cutaway diagram of a side-exit nest box with a sloped laying floor that rolls eggs into a protected side tray.
Good when rear access is awkward and the side wall is easier to reach. The tray design matters more here because the rollout path changes direction.
10. Wire Floor with Soft Pad Tray
This can work, but it needs careful detailing. The egg has to land softly and clear every hard edge on the way down.
11. Modular Stackable Box
Build one unit, then repeat it as the flock grows. It works best when every module shares the same dimensions and attachment points.
12. Under-Roost Nest Box
A space-saving move for tight coops. Add a droppings barrier or poop board above it, or the savings will not be worth the mess.
13. Slide-Out Tray System
Strong for daily use because collection and cleanup are both quick. If you hate reaching into a dark corner every morning, this is one of the better layouts.
Reuse and retrofit builds. These make sense when you already have a usable shell and just need to make it function like a rollout box.
14. Shelf-Unit Conversion
A shelf or storage rack becomes the frame. Add solid sides and a controlled rollout path so hens do not turn every opening into a nesting spot.
15. Milk Crate Box
Low-cost and easy to test, though not always the cleanest long-term finish. Best for experimenting with layout before building something better.
16. Office Drawer Conversion
File drawers and office drawers can work if they are shallow enough and easy to disinfect. Keep the slope modest so eggs do not pick up speed.
17. Polycarbonate Panel Box
Useful in damp climates because it is light and wipes clean fast. It also works when you want something that feels less absorbent than wood.
18. Vertical Nest Tower
A narrow stacked arrangement for coops with limited wall width. Anchor it properly. A tall box that shifts or leans is not worth having.
19. Brooder-to-Nest Conversion
An old brooder box can become a rollout nest with a removable slope insert. Good if you want one shell to do different jobs over time.
Access, weather, and upgrade-focused builds. These layouts solve daily handling problems more than material-cost problems.
20. Slanted Lid Collection Box
The eggs roll under a sloped cover before collection. That helps keep hens from roosting on top and keeps the tray area calmer.
21. Rolling Cart Nest Box
Useful for flexible layouts or easier deep cleaning. Lock the wheels or pin the cart once it is in place so the box does not shift under use.
22. Plastic Bin Slide System
Easy to wash and fast to assemble. Just make sure the liner and tray stay put when birds step in and out of the box.
23. Hidden Exterior Collection Box
Excellent for convenience if the coop wall allows it. The trade-off is weather detailing. If the hatch leaks, the convenience disappears fast.
24. Insulated Roll-Away Nest
Good for colder climates where hens stop liking a drafty box in winter. Keep insulation fully covered so birds cannot peck at it.
25. Simple Low-Budget Rollaway Build
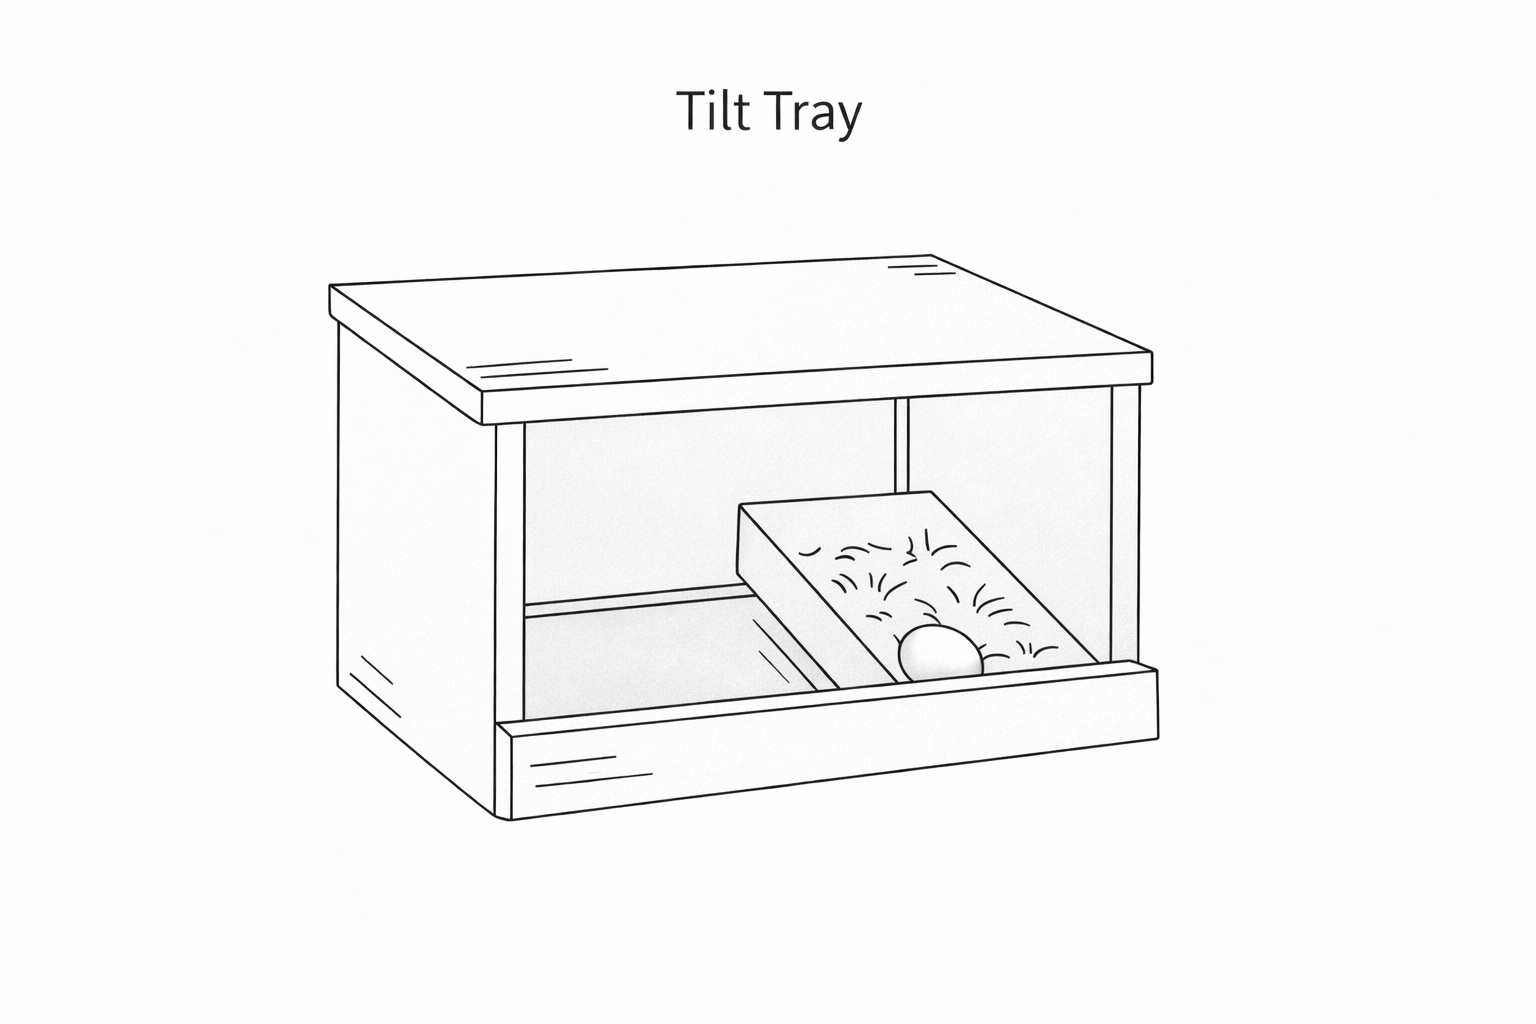
The Lazy Builder nest box uses a simple tilted tray so eggs roll forward without a more complex roll-away mechanism.
This is the stripped-down version: basic shell, basic slope, basic tray. Not pretty, but useful when you need a working box now and can refine it later.
Also useful: Cheap Chicken Coop Ideas That Actually Last.
Ready-Made Roll-Away Nest Boxes Worth Comparing
If you are not building from scratch, these two are useful reference points. They show what commercial rollout boxes tend to do well: protected trays, fast cleanup, and simpler daily collection.
6-Compartment Green Metal Nesting Box
Best for: Medium-sized flocks.
Why it stands out: Multiple nesting spaces, rollout protection, and a durable metal shell.
ASDJAKZP Roll-Out Nest Box with Perch
Best for: Small to medium backyard setups.
Why it stands out: Rollout design, added perch, and a layout that suits everyday backyard use.
If you are comparing bought options, focus on tray protection, latch quality, cleanout time, and whether the unit fits your coop without creating awkward access.
Maintenance and Upgrades
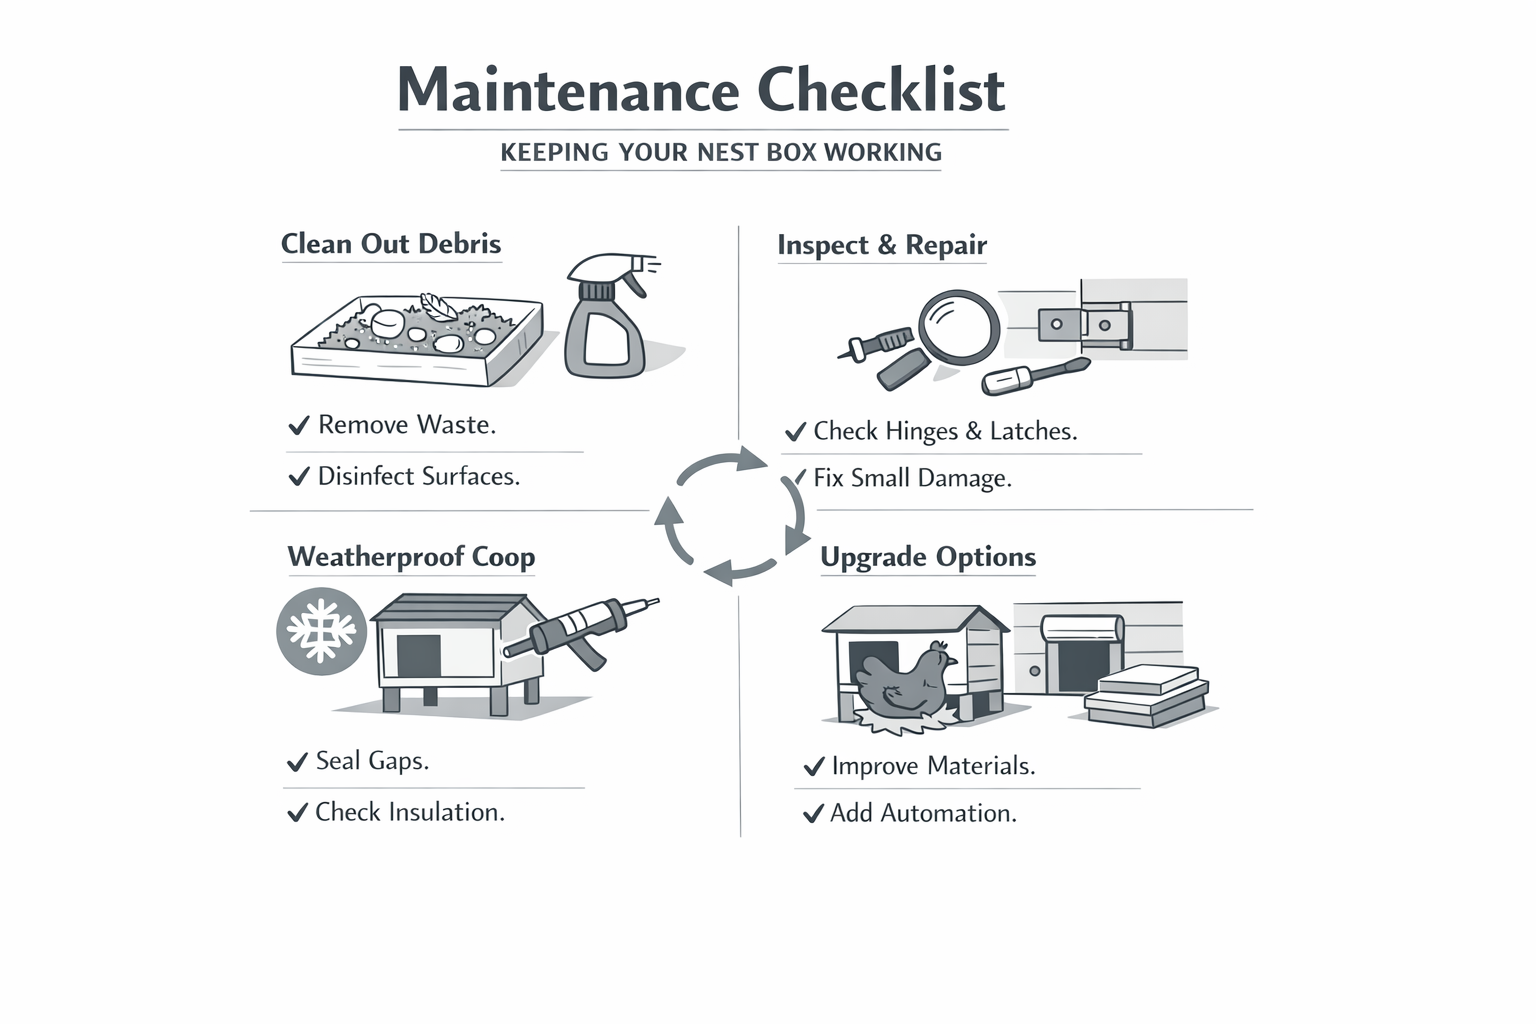
Simple maintenance checklist for keeping a DIY roll-away chicken nest box clean, weather-tight, and working properly.
A roll-away nest box stays useful when the rollout path stays clean, the tray stays accessible, and the hardware stays tight. That is the whole maintenance job.
Clean It Regularly
Remove bedding, wipe the rollout path, clean the tray, and let damp surfaces dry before reloading the box. The easier the parts are to remove, the more likely you are to keep up with it.
Check the Hardware
Look at hinges, screws, latches, and access panels every week or two. A loose hatch or sagging tray becomes a bigger problem fast.
Fix Small Problems Early
Tighten hardware, patch worn edges, replace cracked pads, and correct slope issues before they turn into broken-egg problems.
Do a Seasonal Check
Before winter or rainy weather, reseal exposed wood, check for leaks, and make sure any insulation is still covered. Before hot weather, make sure the nest area stays shaded and ventilated enough.
Upgrade the Parts That Slow You Down
If collection is awkward, change the hatch. If cleanup is slow, add a removable liner or tray. If the box is too exposed, add a better cover. The best upgrades are small fixes that remove daily friction.
Best Books for Chicken Keepers
If you want a few solid flock-care references beyond this build, these are the useful ones.
The Chicken Health Handbook by Gail Damerow
Best for: Health questions, disease prevention, and long-term flock care.
Storey’s Guide to Raising Chickens by Gail Damerow
Best for: Beginners who want one broad reference on breeds, housing, feed, and daily management.
Building Chicken Coops For Dummies by Todd Brock, David Zook, and Rob Ludlow
Best for: DIY builders who want clear coop and nest-box guidance.
Fresh Eggs Daily by Lisa Steele
Best for: Readers who lean toward natural, lower-chemical flock care.
FAQ
What is a roll-away chicken nest box?
It is a nesting box with a gentle slope that moves freshly laid eggs into a separate collection tray. That keeps eggs cleaner and harder for hens to peck or break.
Why build one instead of buying one?
DIY lets you set the size, materials, hatch style, and placement to match your coop. It can also cost less, especially if you already have useful materials on hand.
How much slope does a roll-away nest box need?
About 5 to 8 degrees is a practical range for most DIY builds. Always test with a real egg before final installation.
What material works best for the roll surface?
Use smooth, easy-clean materials such as sealed plywood, vinyl, thin plastic sheet, or carefully detailed metal flashing. Avoid rough or absorbent surfaces.
Can I use scrap wood or old furniture?
Yes, as long as the material is clean, structurally sound, non-toxic, and easy to seal or disinfect.
How many nest boxes do I need?
A common rule is 1 box for every 4 to 5 hens. Most birds will share boxes.
How do I keep the box clean?
Use removable liners or trays where possible, keep the rollout path smooth, and clean the box regularly with a mild animal-safe cleaner.
What if my hens will not use it?
Check the location first. The box should feel sheltered, slightly darker, and easy for birds to enter. You can also place a fake egg or golf ball in the nest to encourage use.
How do I keep predators out?
Use proper latches, close gaps, and use hardware cloth where needed. Chicken wire is not enough for many predators.
Can I upgrade the box later?
Yes. Many DIY setups improve over time with better trays, better hatches, insulation, liners, or a more durable rollout surface.