How to Install a New Window in an Existing Vinyl-Sided Wall
Here is how a clean install runs on a real house. You will frame the opening. You will protect the weather plane. You will set the unit square and tight. Then you will tie the siding and trim back in so it looks like it was always there. Read through once. Then stage your tools. If you need a quick refresh on wall parts and load paths, keep this open in another tab: Wall framing basics.
What you are building

A window opening is a small structure inside the wall. The king studs carry the load past the opening. The jack studs pick up the header. The header jumps the weight across the gap. The rough sill sets the bottom line for the unit and gives you a straight, level seat. The sill is not a beam. It is an anchor and a reference edge.

Everything you do after that lives or dies on water control. Keep the housewrap and flashing in the right order. Bottom first. Sides next. Head last. Use adhesives that work with your wrap and your tape. If you want a fast framing refresher before you start cutting, this plain guide helps: How to frame a new window in an existing wall.
Tools that save time
Keep the kit simple and reliable. Tape measure. Layout square. Level or laser. Stud finder that can see screws through drywall. Oscillating tool for clean interior cuts. Recip saw for studs. Shears or a zip tool for vinyl. Jigsaw with a sharp wood blade for sheathing. A good caulk gun. A roller for flashing tape. Stapler for housewrap. Safety glasses and hearing protection. If you are new to trim and sill details and want a desk reference, this book stays useful for years: MUST READ → Building Construction Illustrated.
Step-by-Step: Adding a New Window to a Vinyl Siding Wall
How Pros Cut and Frame a New Window in Vinyl Siding
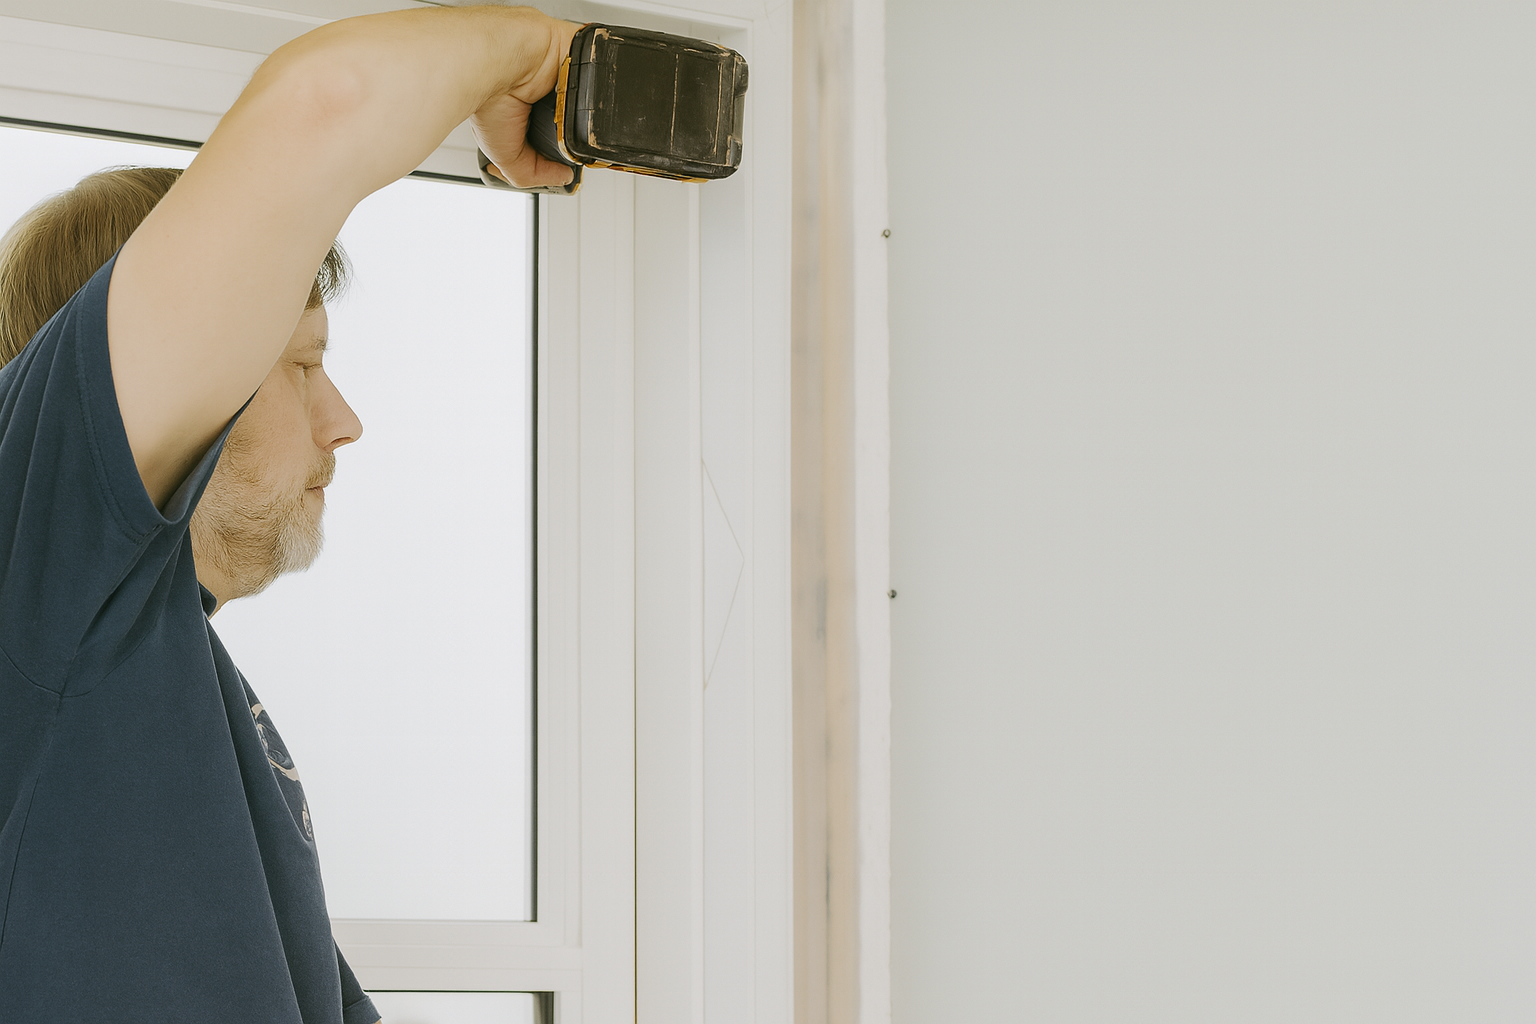
1. Open the inside and mark the real rough opening
Work from the room side first. Pull baseboard and any casing near the work zone. Score the paint line. Pop the drywall clean so repairs are easy later. Cut only enough to expose the stud layout and the wiring path. Vacuum the cavity so you can see every nail and plate line.
Measure the new window unit. Do not trust the box. Tape the jamb. Note the manufacturer rough opening width and height. Add the normal shim space that the spec calls for. Mark the sill height to match the other windows in the room if you have them. Thirty inches above finished floor is common in living spaces. Kitchens and baths vary. If you need a quick walk through on wood jamb anatomy, skim wooden window frame replacement.
Picking the framing to keep
Find two straight studs you can turn into king studs. They should flank the new opening and stay full height so the wall keeps its strength. The studs between them will get cut out and turned into cripples above and below. If the wall is bearing, plan two snug temporary props under the top plate before you make any cuts. A pair of straight two by fours works fine.
2. Cut only what you must
Strike level and plumb layout lines on the exposed studs. Measure up from the finished floor to set the top of the jack studs. That number is subfloor to underside of header. It comes from the window height, the chosen sill height, and the header size for the span. Mark clean lines on both faces and the edge of the studs so your saw can track true.
Make the cuts with a hand saw or a recip saw. Keep the shoe tight and follow your line. Pull the center pieces of the old studs. In older walls you may find board sheathing and a lot of nails pinning each stud. Do not pry the siding loose from inside. Leave any stubborn stud stubs in place. You will release them when you cut the exterior plug.
3. Build the opening square and solid
Stand the king studs plumb and fasten to the plates. Cut the jack studs to exact length. Set them tight under the header. Build the header to match the span and the loads above. Small spans under a single story often take two by eights. Wider or heavier loads may need two by tens or an LVL. Use your local table or ask your engineer.
Lift the header into place. Seat it on the jacks. Check level. Fasten jacks to kings with structural screws or nails. Fasten the header to the jacks and to the short cripples above as needed. Keep fasteners near the edges to leave flat faces for drywall.
Measure between the jacks. Laminate two straight two by fours for the rough sill. Set it dead level at the marked height. Fasten to the jacks. Add tight cripples under the sill down to the bottom plate. Add tight cripples above the header up to the top plate. Keep a clean layout so drywall seams and sheathing edges have backing. Check the diagonals of the rough opening. They should match. Tap and tweak now. Do not plan to pull a crooked frame into square with flange screws later.
If you want a second opinion on header and jack sizing, this primer on how walls work with structure is short and clear: How drywall works with framing and foundations.
4. Locate and protect services
Trace any electrical runs, plumbing, or low voltage in the bay. Reroute as needed before you open the outside. Add nail plates where cables pass near your future saw cuts. Make the cavity clean and safe. A mistake here costs hours later.
5. Cut the exterior plug clean without wrecking the weather plane
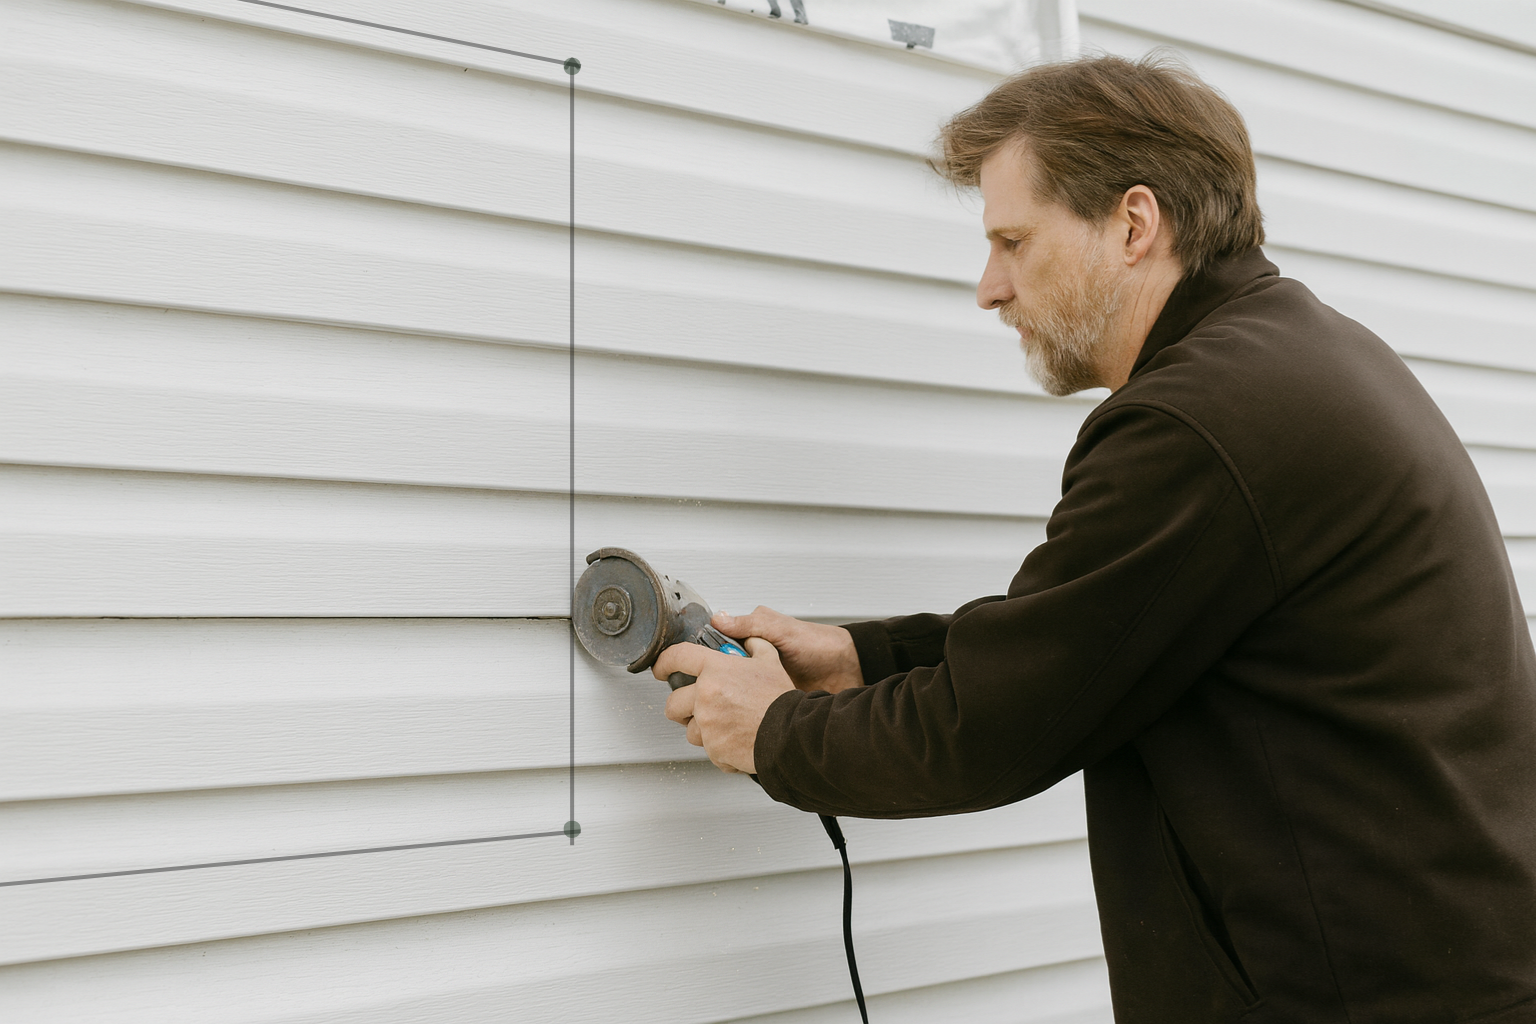
Drill a hole in each corner of the framed opening. Use a five eighths inch bit or larger. Go outside. Pull the vinyl clapboard panel seams apart with a zip tool near your layout. You do not need to strip the wall. You only need the field clear where you will cut and flash.
Find the housewrap. If it is intact, slice it along your layout and fold back flaps that you can tape later. If there is old felt, take your time and keep the pieces labeled so you can lap them back correctly. Snap a level line from hole to hole. Fasten a straight one by three as a fence where you can. Set the saw to the depth of the siding and sheathing only. Cut the plug along all four sides. Pull it out in one piece if you can. Save it. It can help you trace trim or patch siding later.
Clear any nails in the opening. Flush cut any leftover stud slivers at the edges. Vacuum the cavity. Run a quick check on your rough opening width and height. You want a smooth, square box with clean faces for tape and flashing.
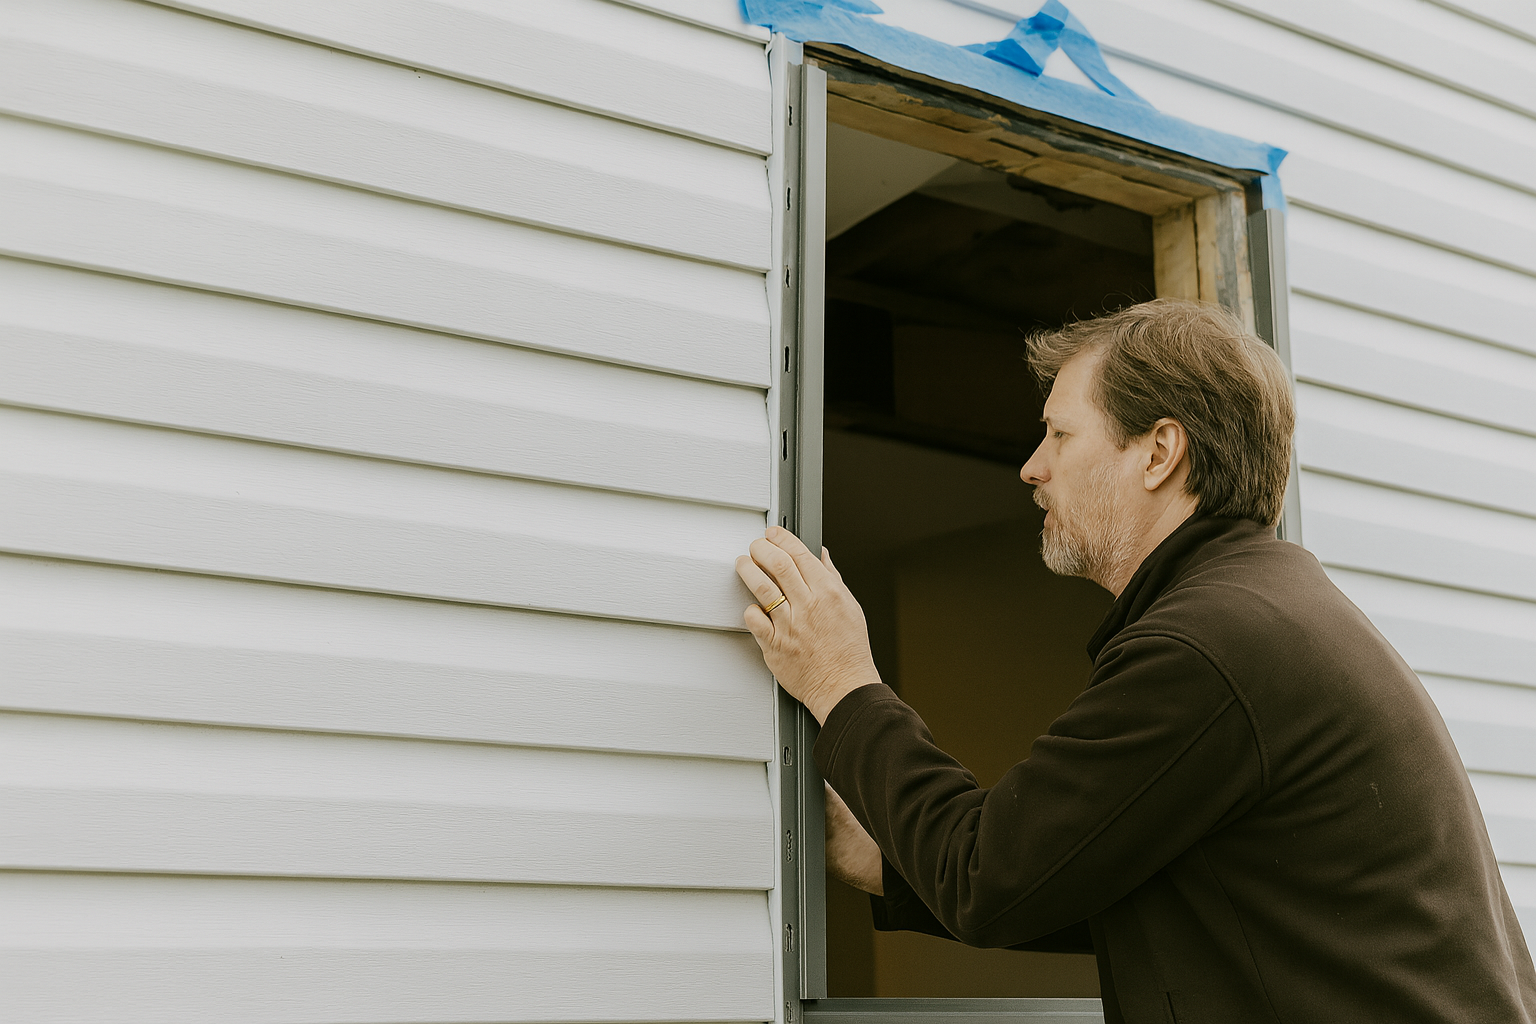
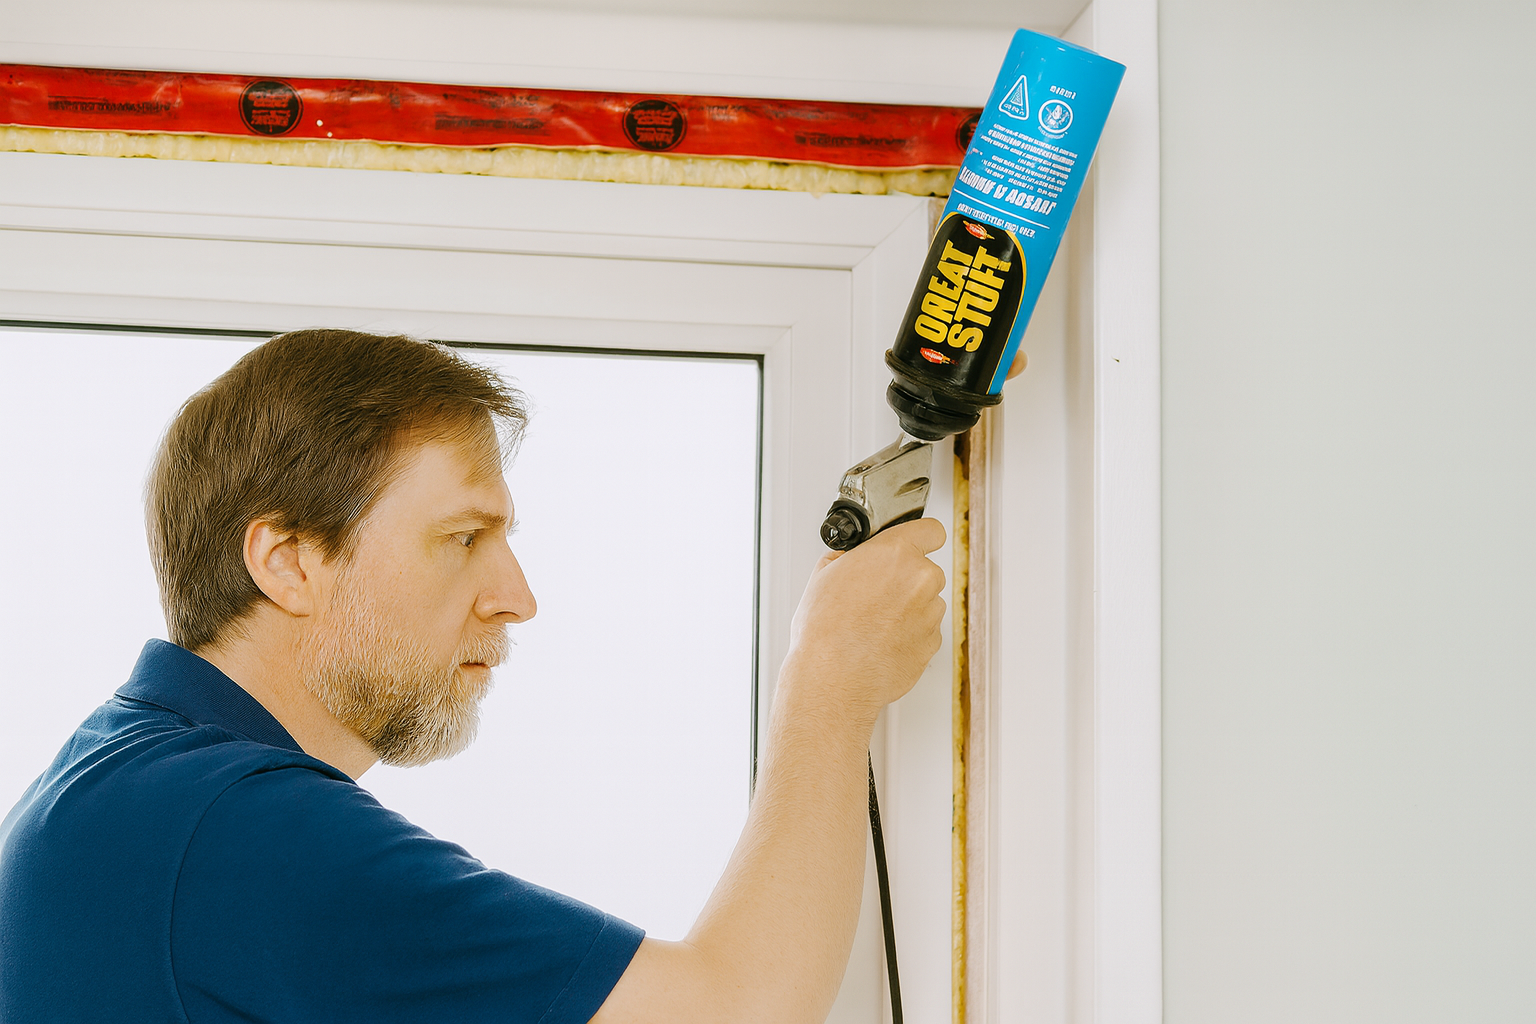
6. Flash the rough opening in the right order

How to protect a window rough opening from weather by installing house wrap, sealing seams, and applying flashing before window installation.
This is the step that decides if the window stays dry for twenty years. Make a sill pan first. You can form it with flexible flashing tape or use a preformed pan. If you are taping, run a wide piece across the sill and up each jamb a few inches. Fold a small dam at the interior edge so water cannot migrate inward. Roll the tape flat with a hard roller. No bubbles. No fish mouths.
Run jamb tapes next. Full height from sill to head. Press them down tight in the corners. Keep them proud of the exterior face so they will contact the window flange later. Leave the head for last. Cut a head flap in the housewrap above the opening. Tuck it up and tape it out of the way. You will set it back down after the head flashing goes on. If you need a broader wrap and sheathing refresher while you work, this piece on exterior wall sheathing is clear and simple: Exterior wall sheathing.
RECOMMENDED TOOL → A solid manual on detail logic helps on wet days. Architectural Detailing by Edward Allen. The sill and jamb sections are worth the price when you hit a tricky wall build.
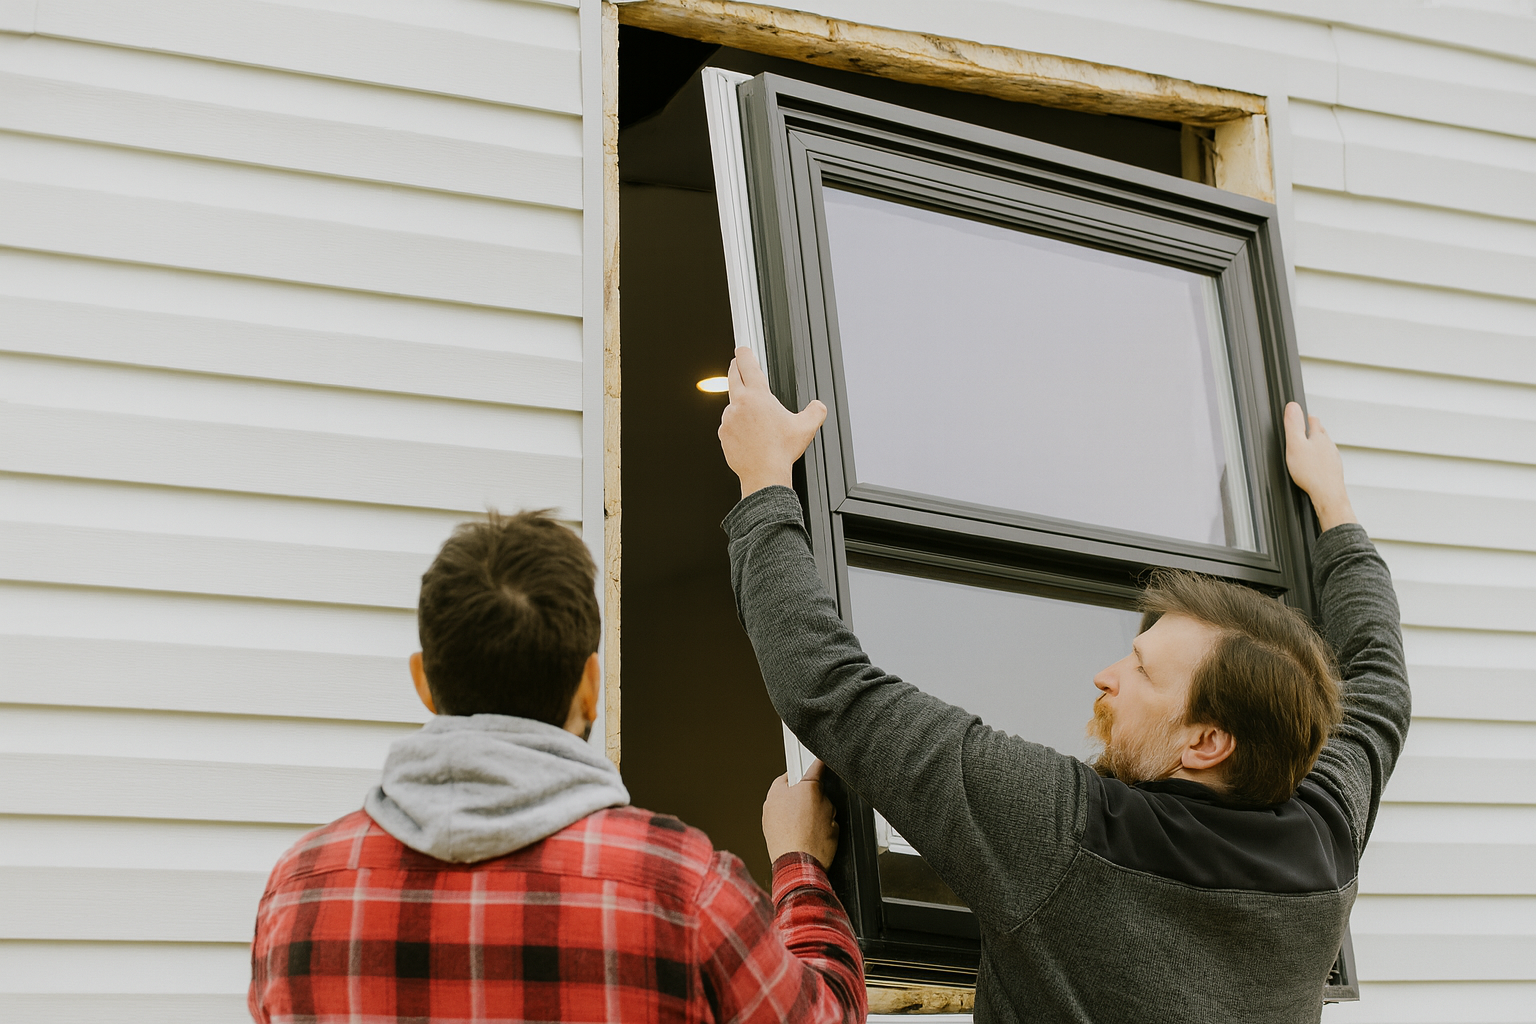
7. Dry fit the window and set shims

Bring the unit to the opening. Pull all transport blocks and bracing from the frame. Install sill shims now. One at each jamb about three inches in. One near center if the sill is long. A few more as needed so the sash plane stays flat. Keep the shim stack small and firm. You do not want a tall stack that can crush later.
Set the window in the hole without sealant to test the fit. Check the reveal around the frame. Check level at the sill. Check plumb on both jambs. Check square by comparing sash gaps or by measuring diagonals if the unit style allows it. Pull the unit back out. Wipe the face clean for sealant.
8. Seal and set the unit
Run a continuous bead of the sealant your manufacturer calls for along the exterior face where the flange will land. Do not block the drainage weeps on the bottom of the unit. Set the window in place. Seat it on the sill shims. Lightly pin the top two corners through the flange. Use pan head screws that match the flange holes. Do not drive them tight yet.
Check the level at the sill again. Adjust with shims if needed. Check plumb on both sides. Check the sash operation. The sash should travel smooth and latch without rub. Once the reveal is even and the sash works, drive the flange fasteners in the pattern the manufacturer gives. Start near corners. Work to the middle. Keep the torque even so you do not rack the frame. If the unit is a nail fin style and the spec allows nails, use corrosion resistant roofing nails with full heads. I prefer screws for control on remodels.
Fastener spacing matters for wind and water. Most units call for six to eight inches on centers at corners and twelve inches along runs. Follow the sheet that came with the window.
If you need a simple planning tour of window anatomy and design choices, this primer is easy to scan: Window design guide.
9. Tape the flange in the right order
Press sill tape first. It should run past the jambs a few inches. Roll it flat. Run jamb tapes next. They should cover the flange and overlap the sill tape. Roll them. Last comes the head flashing. Run it full width and lap it past the jamb tapes. Then drop the housewrap head flap back over the head tape and seal the diagonal cuts with small patches. This shingle order sends water down and out every time.
FIELD PICK → For clear joinery tips that carry into interior stool and apron work, this manual is plain and practical: Woodworking: The Complete Step by Step Manual.
10. Insulate the gap without bowing the frame
Use low expansion foam rated for windows and doors. Work in short passes. Let it rise. Add more as needed. Do not blast the cavity full in one go. Too much pressure will bow a jamb and ruin the reveal. Where the gap is small, use backer rod and a thin bead of sealant instead.
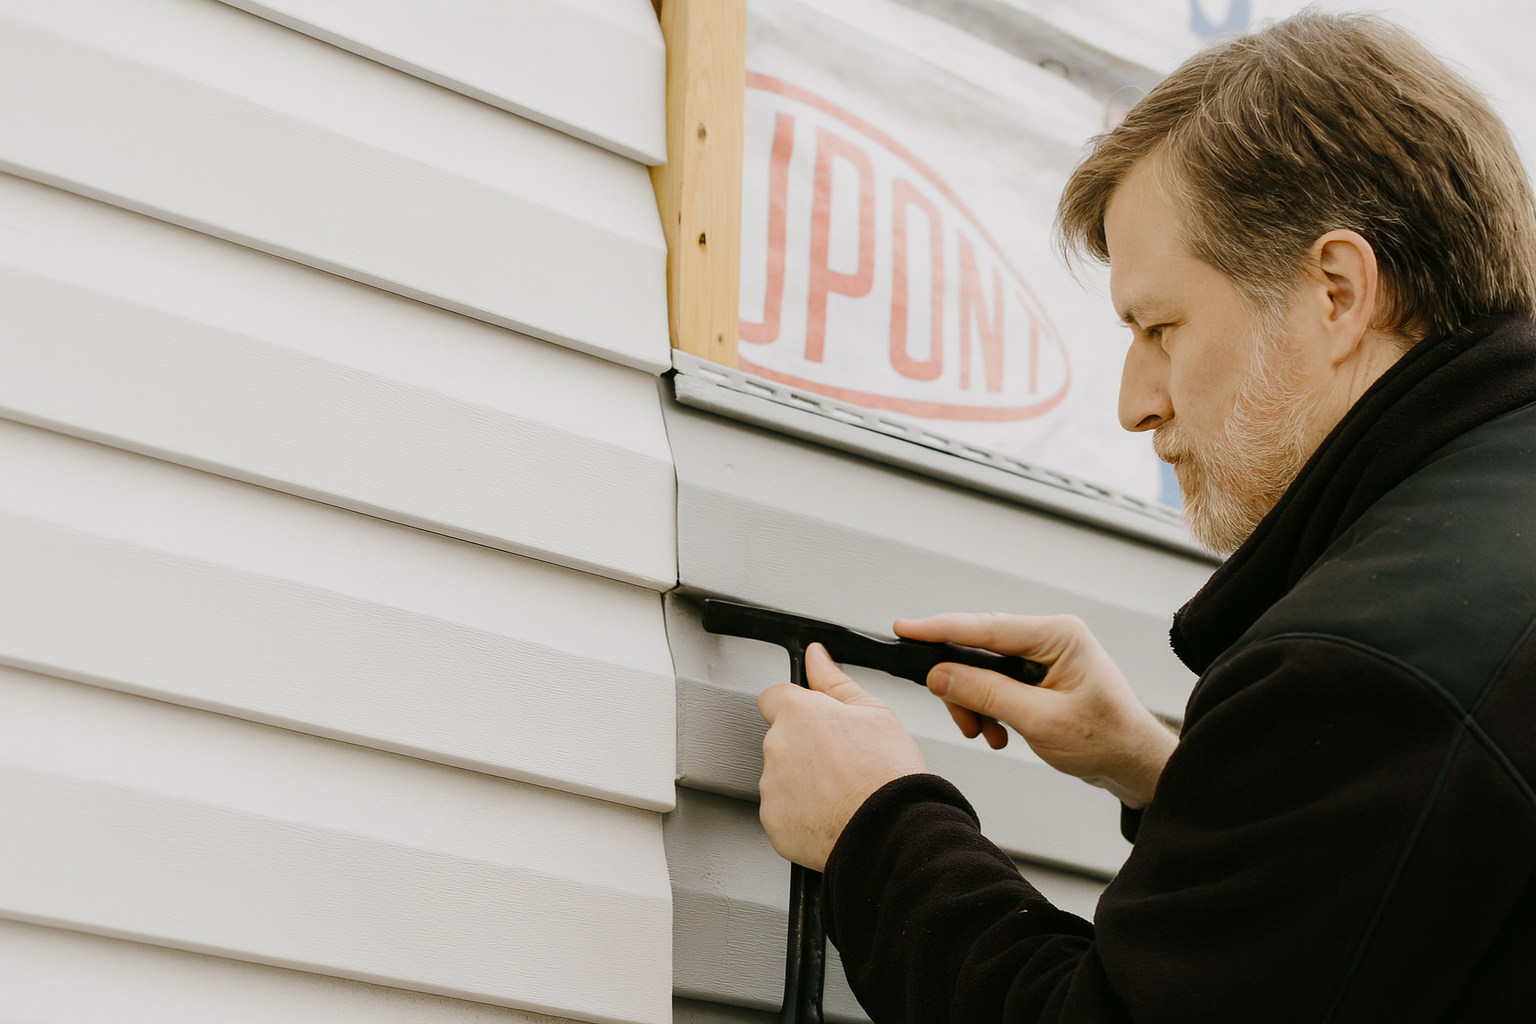
11. Rebuild the vinyl siding and the trim
Decide the exterior trim layout before you cut any more siding. A simple flat casing looks clean on vinyl. PVC or primed wood both work. Rip the head casing deep enough to hide the head flashing and give you a small drip edge. Pre assemble corner returns on a bench for speed if you like tight miters. Bed the trim in a thin bead of sealant and pin it with stainless finish screws. Leave small gaps at the ends for movement and seal those joints.
Cut the siding to fit tight to the new casing with a small gap for movement. Use a vinyl zip tool to re lock the courses you lifted. Keep nails centered in the slots and do not drive them tight. Panels should slide a little for temperature swings.
12. Interior air seal and returns
Back on the inside, run a continuous air seal between the drywall and the window frame. Backer rod plus a high quality sealant is clean and durable. If the wall is thick and you need extension jambs, rip them to a snug fit. Dry fit all four sides. Glue and pin in place. Plane or sand any proud edges before casing so the reveal stays even.
Set stool and apron if the room calls for it. Check level so the stool reads flat even if the wall is a little wavy. Scribe where needed. Nail the casing to the jack studs, not only to drywall. You want a solid bite at each corner and near the latch side.
13. Water test and function test
Run a light spray with a hose on the exterior for five minutes. Start low and work up. Do not blast straight into the seams. You are trying to mimic rain. Have someone watch inside with a flashlight. If you see moisture, stop and fix that joint now. Open and close the sash. Lock and unlock. Check the insect screen fit. If anything drags, adjust shims and fasteners while the interior is still open.
14. Clean up and close up
Replace insulation in any wall bays you opened. Hang drywall patches. Tape and mud as needed. If finish paint is going on soon, prime any fresh wood trim on the exterior and run a neat final bead of sealant at the trim to siding joint. Inside, run a tiny bead at casing to wall for a clean paint line. If you want a broader look at drywall repair sequence, this overview is handy: Drywall 101.
The one detail that stops leaks for years: a real sloped sill with a backdam and a weep map
Most window leaks start at the bottom. Not from bad tape. From a flat sill that lets water sit. Fix that and you fix eighty percent of failures. Here is the field trick that separates clean installs from callbacks.
What to build
Build a sloped sill pan with a small backdam and a planned weep map. The slope moves water out. The backdam stops water from rolling inside. The weep map tells you where water can leave and where you never block it.
How to do it
- Cut the slope first. Rip a straight 2× cedar or PVC shim into a long wedge. Aim for about 3 degrees. That is roughly a 1⁄8 in rise per 4 in of depth. Glue and pin the wedge to the rough sill so the high edge is inside and the low edge is outside. Check with a level. You should see the bubble just off center toward the exterior. If you cannot rip a wedge, use solid plastic shims in a tight line. No gaps that catch water.
- Make a true pan. Line the sill and 6 in up the jambs with flexible flashing. Fold a small dam at the interior edge. One quarter inch is enough. That tiny step is the backdam. It keeps any water on the exterior side of the air seal.
- Plan the weeps. At each lower corner, place a short piece of release tape or a plastic shim right at the outer edge before your sill tape goes on. About 3⁄8 in wide and 1 in long. When you finish the pan, pull those spacers. You have just made two clean weep paths that cannot be clogged by foam later.
- Leave a dry zone. Do not run sealant across the very front edge of the sill flange. Seal the sides and head. Keep a small dry path at the bottom so the weeps can do their job. If the manufacturer needs a continuous bead, stop that bead short of the weep spots you planned.
- Shim where it matters. Set two hard plastic shims on the pan before the window goes in. One under each jamb. Set them just inside the exterior flange line. That keeps the frame square and keeps the weep channels clear. Do not stack shims across the sill like a dam. Keep the center open so water can move out.
- Air seal on the room side only. After the window is fastened and taped, seal the interior perimeter with backer rod and a high quality sealant. That is your primary air seal. The pan is your water path. Keep those roles separate and the wall stays dry.
Why this works
Water follows gravity and edges. A flat sill lets it sit. A sloped sill makes it leave. The backdam catches wind-driven water that gets past the sash and turns it back toward the exterior. The weep map ensures foam and fasteners never block the exit. You are not hoping tape saves the day. You are giving water a way out every time.
Quick checks before trim
- Marble test. Drop a marble on the pan. It should roll to the exterior every time.
- Hose test. Spray the head and jambs for five minutes. Look under the sill from inside. Dry is the only answer. If you see a bead, check the weep spots and the head lap before you blame the unit.
- Operate the sash. Lock and unlock. Gaps should stay even. If the lock fights you, adjust shims at the jambs, not the sill. Keep the weep path open.
Common mistakes that kill the detail
- Foaming the entire sill cavity. Use low-expansion foam at the jambs. Keep the sill light and leave the weeps clear.
- Running a fat sealant bead across the bottom flange. Water needs an exit. Seal the sides and the head. Keep that front edge free where your weeps are.
- Shimming across the sill in three or four spots. Two shims at the jambs carry the load and protect the path. Add a tiny center shim only on very wide units and keep it back from the outer edge.
Where this saves you
Vinyl siding sheds most bulk water. Wind and pressure still drive water at the window. The sloped pan and backdam handle that pressure quietly. You avoid swollen stools, stained drywall, and callbacks after the first storm. On foam-over-sheathing walls, this is even more important. The slope moves water out faster so it never pools against the foam face.
If you want a short refresher on framing terms before you build the box, this is clear and plain: wall framing basics. For the full cut-in sequence with vinyl siding, walk through framing a new window in an existing wall next.
Notes that save you hours
- Mark from the real unit. Cartons can mislabel. Tape the jamb.
- Keep the king studs straight. Sister a straight piece if an old stud bows.
- Do not depend on flange fasteners to pull a crooked box into square. Fix the rough opening first.
- Plan trim coverage before you cut outside. Place any temporary screws where trim will hide them later.
- Run sill shims long so you can adjust or pull them after the set if needed. Cut flush when done.
Common mistakes and how to avoid them
- Foam that bows the frame. Use low expansion. Work in passes. Check the reveal as you go.
- Head flashing taped under the wrap. Always lift a head flap and lap tape over the flange. Then drop the wrap back down over the tape.
- Fasteners only in sheathing. Hit studs through the flange where the spec allows. The unit resists wind better and stays put during seasonal movement.
- Siding nailed tight. Vinyl needs to float. Center nails in slots and leave a paper thin gap under the head.
- Skipping the sill pan. Drips happen. A pan sends water out every time. It is cheap insurance.
Framing choices for different loads
Short openings in single story walls can use simple doubled lumber headers. Large openings or walls that carry heavy roof loads may need engineered lumber. When in doubt, ask for a quick header check from your supplier or engineer. It takes minutes and keeps inspectors happy. If you want a compact tour of header and beam logic, this page has clean diagrams: House framing 101.
DETAILING GUIDE → When you are unsure about metal head flashings, sill slopes, or sealant joints, flip this on the bench: Architectural Detailing. It has clear sections that match field practice.
Vinyl siding specifics that matter
Vinyl panels expand and contract a lot with sun. Always cut with a fine tooth blade or shears to keep edges clean. Warm panels cut cleaner than cold ones. On cold days, score and snap or work inside with a heater on the panel for a minute. Keep J channel joints tight at corners and set small weeps at the bottom so water exits. Leave small gaps where trim meets siding so sealant can flex without tearing.
Check your local rules for foam sheathing. Some houses have rigid foam over the sheath. That changes fastener lengths and the way the flange bears. In those cases, hit studs with screws and use longer trim fasteners so the exterior casing cannot drift.
When the wall is not flat
Old walls can be out of plane. If the exterior bows, set the window true to level and plumb first. Then fur the trim to land clean on the plane of the siding. Use back bevels on the casing where needed. Inside, plane the extension jambs to meet a wavy wall and keep a clean reveal at the casing. The goal is a square sash and a level sill even if the house is not perfect.
Cold climate and hot climate tweaks
In cold zones, keep the interior air seal tight. Foam lightly at the rough opening and finish with a high grade sealant to block interior vapor from reaching the cold side. In hot humid zones, mind the exterior seal so wind driven rain cannot get behind the flange. In both cases, never block the drainage path at the sill. Water needs an exit.
Retrofit fin versus new construction fin
Some windows ship with a flush retrofit fin that sits on the face of finished siding. You can use that on small upgrades where you do not want to cut back siding. On a full size cut in, a full nail fin with proper flashing is stronger and drier. Pick the system that matches the scope. For deeper design choices and frame materials, this primer is useful: Modern windows from frames to glass.
Step by step checklist you can print
- Measure the unit. Confirm rough opening size. Mark sill height to match the room.
- Open the interior. Expose studs and services. Set temporary props if needed.
- Cut the center studs. Keep the kings. Install jacks and header. Install sill and cripples.
- Drill corner holes. Cut the exterior plug from outside. Save the piece.
- Prep housewrap. Form a sill pan. Tape jambs. Cut a head flap.
- Dry fit the unit. Shim the sill. Test for plumb, level, and square.
- Seal flange line. Set the unit. Pin the top corners. Adjust. Fasten in pattern.
- Tape sill. Tape jambs. Tape head. Drop the head flap. Seal cuts.
- Low expansion foam at the gap. Backer rod and sealant where narrow.
- Trim outside. Re lock vinyl panels. Keep fasteners loose in slots.
- Air seal inside. Install extension jambs and casing. Set stool and apron if used.
- Water test with a hose. Function test the sash. Close up drywall. Paint and finish.
Costs, time, and what to expect
This is what a clean cut-in window looks like in the real world. One opening. Vinyl siding. No drama. A small two-person crew can frame, cut the exterior, flash, and set the unit in one long day. If interior drywall, casing, and exterior trim are part of the scope, expect a second day. Framing lumber is a small line item. The unit price, the trim package, and the labor drive the total.
Simple scope, realistic timeline
- Day 1. Open the wall. Frame the box. Cut the exterior plug. Flash pan, sides, head. Set and shim. Tape and integrate housewrap. Temporary weather seal if rain is close.
- Day 2. Interior: insulate the gap, foam judiciously, drywall patch or jamb extension, casing. Exterior: PVC or wood trim, back-caulk, final sealant, clean up.
If you need a quick refresher on framing anatomy before you price anything, keep this nearby: Wall Framing Basics. For wood unit considerations, this primer helps you judge quality vs. cost: Wooden Window Frame Replacement.
What drives the number
Three things move the price the most. The window itself. The labor rate in your city. The trim strategy. Vinyl replacement units with integrated flanges price lower. Fiberglass or aluminum-clad jump the budget. Trim can be painted finger-joint pine or cellular PVC. PVC costs more but saves paint cycles outside.
Current ballpark ranges by city
These ranges are per window and include a retrofit cut-in on vinyl siding with proper flashing. Numbers assume a mid-size unit around 36 × 48 in. Prices shift with size, access, and material. The sources shown are trade cost roundups and homeowner pricing guides. Use them for context, then get real bids.
| City / Region | Typical Installed Cost | Notes | Source |
|---|---|---|---|
| Seattle, WA | $850–$1,500 USD per vinyl unit | Higher labor. Weatherproofing time adds hours. Permit may be required if size changes. | Angi and similar guides show U.S. averages from ~$300–$2,100 per window with many jobs in the $800–$1,500 band. |
| Dallas, TX | $600–$1,100 USD per vinyl unit | Faster exteriors and lower hourly rates keep totals down for standard openings. | U.S. aggregate pricing ranges align with this band for Sun Belt markets. |
| Chicago, IL | $800–$1,400 USD per vinyl unit | Cold-weather detailing and interior patching push to the upper half of the range. | National cost summaries and cold-climate practice. |
| Toronto, ON | $900–$1,600 CAD per vinyl unit | City labor and disposal fees add up. Energy-rated glazing is common and raises unit price. | Canadian market roundups cite ~C$400–C$1,500+ depending on spec, with urban installs at the higher end. |
| Vancouver, BC | $1,000–$1,800 CAD per vinyl unit | Premium cladding and rain-screen exteriors increase flashing time and trim detailing. | Regional guides show elevated West Coast pricing for exterior envelope work. |
| London, UK | £600–£1,400 per uPVC casement | uPVC sits at the low end. Timber and aluminium cost more. Certification included in quotes. | UK guides list uPVC casements roughly £600–£1,400 installed. |
| Manchester, UK | £550–£1,250 per uPVC casement | Outside London the labor rate softens. Multi-window jobs price better per unit. | Same UK ranges, adjusted for regional labor. |
| Sydney, AU | A$900–A$1,800 per aluminium unit | Aluminium frames are common. Brick veneer exteriors add time for trim transitions. | Australian price guides show ~A$450–A$1,350+ supply only, with installs commonly above A$900. |
| Melbourne, AU | A$850–A$1,700 per aluminium unit | Similar to Sydney. Allow extra for double glazing and bushfire-rated screens where required. | Same AU guidance, adjusted for glazing spec. |
Unit price vs. the rest of the bill
The window itself carries most of the budget. U.S. homeowner guides show many installed jobs landing between about $800 and $1,500 per window for standard vinyl, with premium materials higher. Expect similar proportions in Canada, the UK, and Australia once you convert currency and account for local labor.
Line items that sneak up on you
- Flashing and sealants. A quality butyl or acrylic flashing tape in 6 in. width runs roughly $30–$60 per 75-ft roll in U.S. stores. You will use close to one roll per opening when you include pan, jambs, head, and overlaps. High-grade polyurethane or hybrid sealant is ~$6–$12 per tube. One to two tubes per window is typical.
- Exterior trim. Cellular PVC is more expensive up front than primed pine but saves paint cycles. Figure $60–$150 in materials for a simple picture frame on a standard window, more if you add a head cap or brick-mould profile.
- Interior patching. Drywall, corner bead, compound, and paint add time. Budget a half-day if you are also moving an outlet or repairing old plaster.
- Disposal. Old studs, the cut plug, drywall, and packaging fill more than you think. Small contractor bags and one dump run are common. Fees vary by city.
Permits and compliance
Rules change by city. Many U.S. jurisdictions allow like-for-like replacement without a permit but require one if you alter structure or enlarge an opening. In Ontario, permit fees are commonly calculated by area and fall in the ballpark of C$15–C$20 per square meter for renovation categories, which puts a single opening change in the tens of dollars once the city minimum applies. In the UK, a FENSA or Certass-registered installer self-certifies the work so you do not pay a separate approval fee; the certificate is included in the job price. Always check your local office before you schedule.
How long each task takes
- Layout and framing adjustments. 1–2 hours. Longer if you have to straighten old studs or sister a king stud to get a true plane.
- Exterior cut and clean-out. 45–90 minutes. Plan more time for thick sheathing or brittle vinyl that needs careful cuts.
- Flashing and set. 1.5–3 hours. Pan first. Sides next. Head last. Slow is fast here.
- Trim and seal. 2–4 hours. PVC trim with hidden fasteners takes longer but ages better.
- Interior finishes. 2–6 hours spread over dry time if you are mudding and painting the same day.
Where people overspend
It happens in the spec. A triple-glazed fiberglass unit looks great on paper, but if the wall insulation and air sealing are weak, you will not feel the benefit. Spend first on a tight flashing job and clean integration with housewrap. Then pick a solid vinyl or fiberglass frame that matches the rest of the house. If your exterior has deep profiles or rain-screen battens, budget extra time for trim build-out so the flange plane and cladding plane meet cleanly.
Quick owner math
Take your city’s range from the table. Add $60–$150 for a basic exterior trim kit. Add $30–$60 for flashing tape and $6–$12 for sealant. If the opening gets bigger and you need a permit, add your local minimum fee. If you are pricing multiple windows, expect the per-unit price to fall 10–20 percent because staging and cleanup get shared across openings. UK homeowners see a similar pattern: uPVC at the lower end, timber and aluminium higher, with multi-window quotes coming in better per unit.
When a “cheap” number is a red flag
- No written sequence for pan, side, and head flashing.
- Housewrap notched and taped flat instead of shingled over the head flashing.
- Interior spray foam with no backer rod and no flexible sealant at the trim line.
- Caulk only. No tape. No pan. Walk away.
If you are weighing materials, remember this simple rule. Unit price dominates the bill. Labor follows your city’s rates. Good flashing is cheap insurance. The rest is finish work and patience.
Pricing ranges above reflect recent homeowner and trade guides and typical bids. Always collect at least three local quotes with scope written in plain language so you can compare like for like. U.S. national averages cluster around a mid-band per window, with UK uPVC casements commonly £600–£1,400, and Australian aluminium installs often A$900–A$1,800 depending on glazing and access.
When to stop and get help
Stop if you find a point load in the wall that lands where your opening must go. Stop if you uncover rot that runs beyond the opening width. Stop if the wall carries a large beam without room to move the opening clear. In those cases, you want an engineer or a seasoned framer to adjust the layout. Everything else here is normal remodel work.
Extra reading and training
If you like to see the whole family of window parts and choices before you buy, this overview is fast and clear: Modern windows. If you want to build a better sense for header and jack logic, skim King and jack studs. For trim ideas and simple details that look right, this page has clean examples: Best door frame options. The parts cross over well.
Field notes from other installs
On one job the wall had rigid foam under the vinyl. The fin screws missed studs and the unit felt spongy at the corners. We pulled two courses of siding, laid out stud lines on blue tape, and reset with longer screws into studs. The frame went solid and the sash stopped binding. Small fix. Big change.
Another job had a perfect water test but leaked a month later. The head tape was right. The issue was one open nail hole above the head in a piece of old wrap. We patched with a small square of tape and set a tiny head flashing drip. Dry since. Expect one or two small surprises. Plan an hour for them.
Finish strong
A clean window install reads like it was always part of the wall. The sash moves with two fingers. The head is dry after a storm. The trim lines match the house. You get there by keeping the structure simple and square and by protecting the weather plane in the right order. Bottom first. Sides next. Head last. Take your time on those three and the rest is easy.