
Leave the tile alone until you know what is behind it.
In many 1960s bathrooms, the ugly part is still doing its job. The wall tile may be solid. The tub may be set well. The floor may only be bad near the edges.
Other parts are less forgiving.
The fan may be weak or vented wrong. The shutoff valves may be stuck. The toilet flange may be rusted or too low. The subfloor may be soft near the tub. The vanity may hide old plumbing, wall damage, or flooring gaps.
Do the first check with a flashlight, not a shopping list.
Look at the wet walls, tile base, fan, plumbing, floor around the toilet and tub, and clearances. Then decide what stays, what gets repaired, and what needs to come out.
Before you remove tile
Do not start by swinging at the tile.
Old bathroom tile can be ugly and still be sound. It can also look acceptable while the wall behind it is tired, wet, cracked, or ready to fail. You need to know which bathroom you have before demolition makes the answer more expensive.
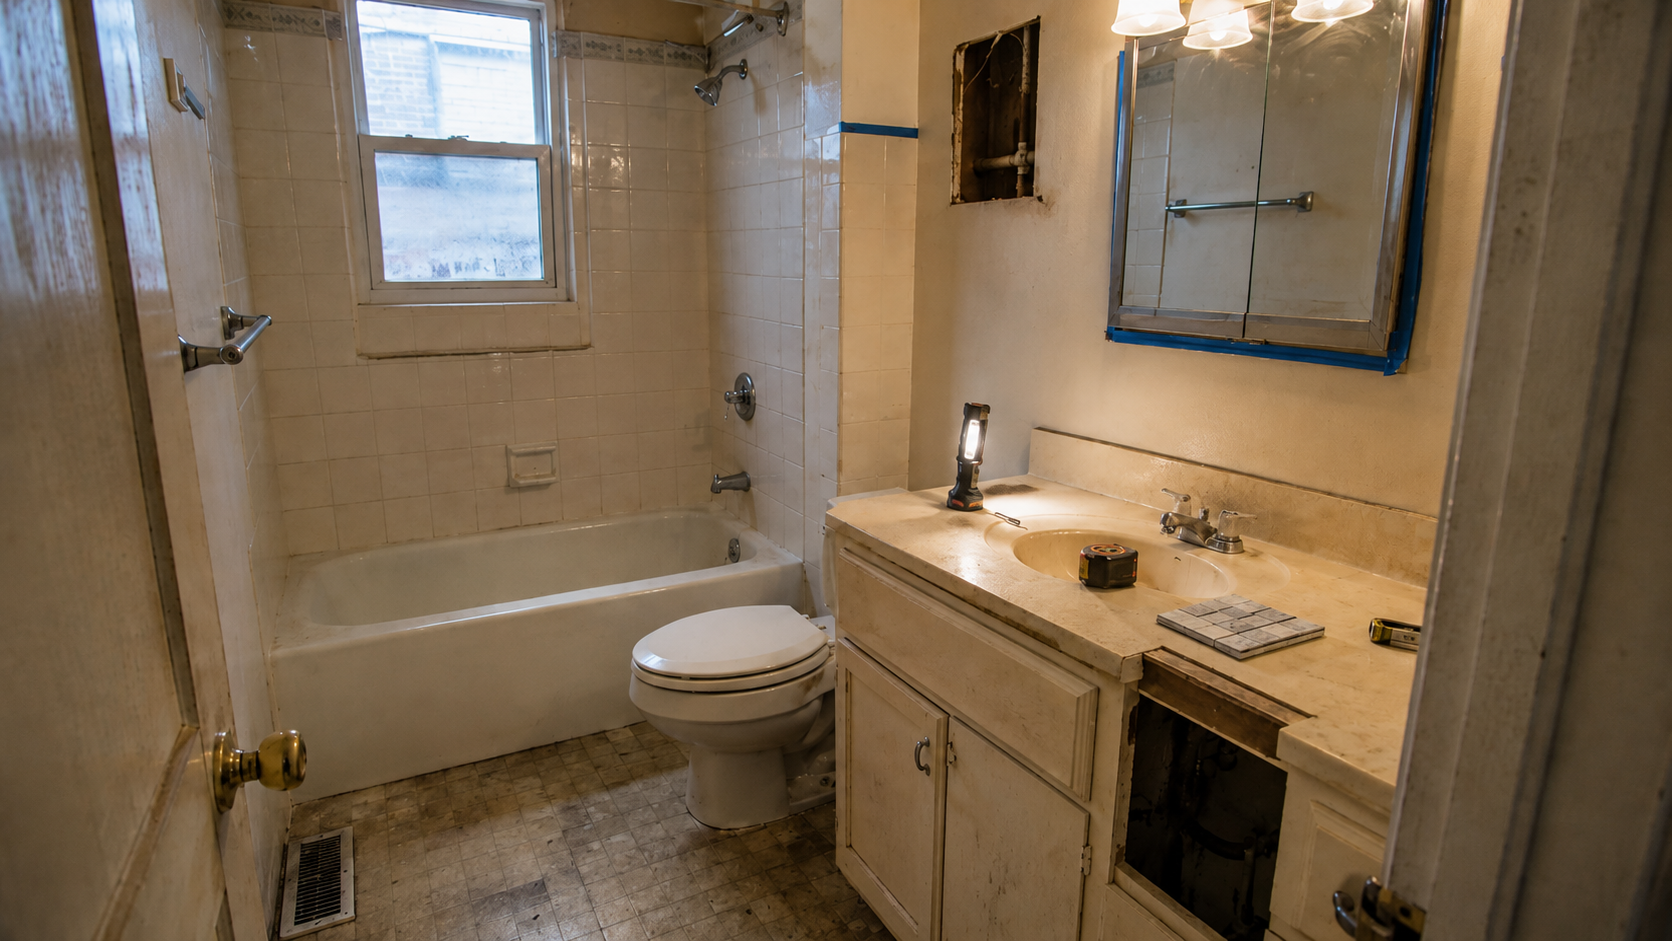
Check the tub edge first. Look for cracked caulk, dark stains, loose tile, swelling trim, soft drywall outside the tub, and flooring that feels different near the toilet or tub. Push gently around suspect areas. A wall that moves, a floor that flexes, or grout that keeps opening up is telling you something.
Look under the sink. Look behind the toilet if you can. Look at the ceiling below the bathroom if there is one. Look at the fan, the window, the attic above, and the wall on the other side of the tub valve. Small stains matter in old bathrooms because water has had years to travel.
There is also the old-materials question. A 1960s bathroom may include pre-1978 paint, older flooring, adhesive, ceiling texture, wall patching, or other materials that should not be disturbed casually. Testing and safe work practices belong before demolition, not after dust is already in the hallway.
Refresh, remodel, or gut rebuild?
The first decision is how deep the bathroom really needs to go.
A refresh keeps the room mostly intact. A remodel replaces larger pieces while keeping the same basic layout. A gut rebuild opens the bathroom enough that plumbing, waterproofing, subfloor repair, ventilation, and inspection start driving the job.
| Bathroom condition | Likely scope | Watch for |
|---|---|---|
| Tile is sound, layout works | Refresh | Caulk, grout, paint, fan, mirror, light, hardware |
| Vanity and fixtures are tired | Light remodel | Old shutoffs, wall patching, flooring gaps, mirror height |
| Flooring is worn but dry | Surface remodel | Toilet flange height, old adhesive, subfloor condition |
| Tub wall or shower wall is failing | Wet-wall rebuild | Valve access, supply lines, drain, waterproofing |
| Floor is soft near toilet or tub | Repair project | Rot, subfloor patch, flange repair, leak source |
| Everything is being opened | Gut rebuild | Plumbing, fan ducting, old materials, inspection, layout limits |
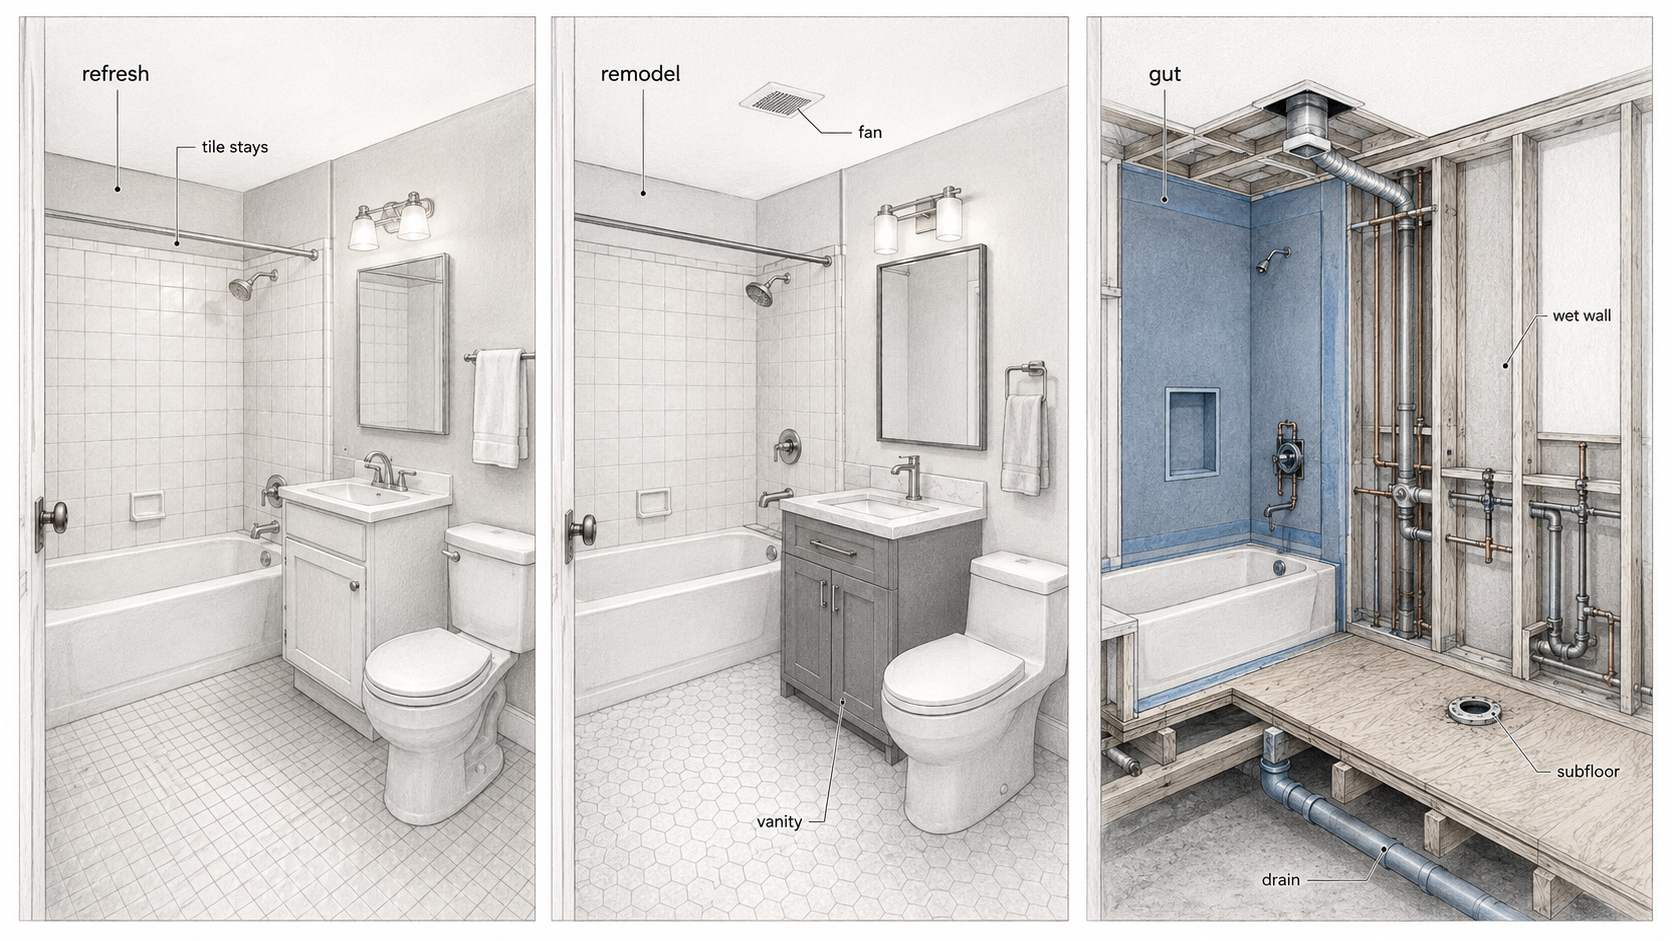
The mistake is treating all of those as the same bathroom remodel. They are not the same job.
Old tile: keep it or open it?
Old tile is not automatically the enemy.
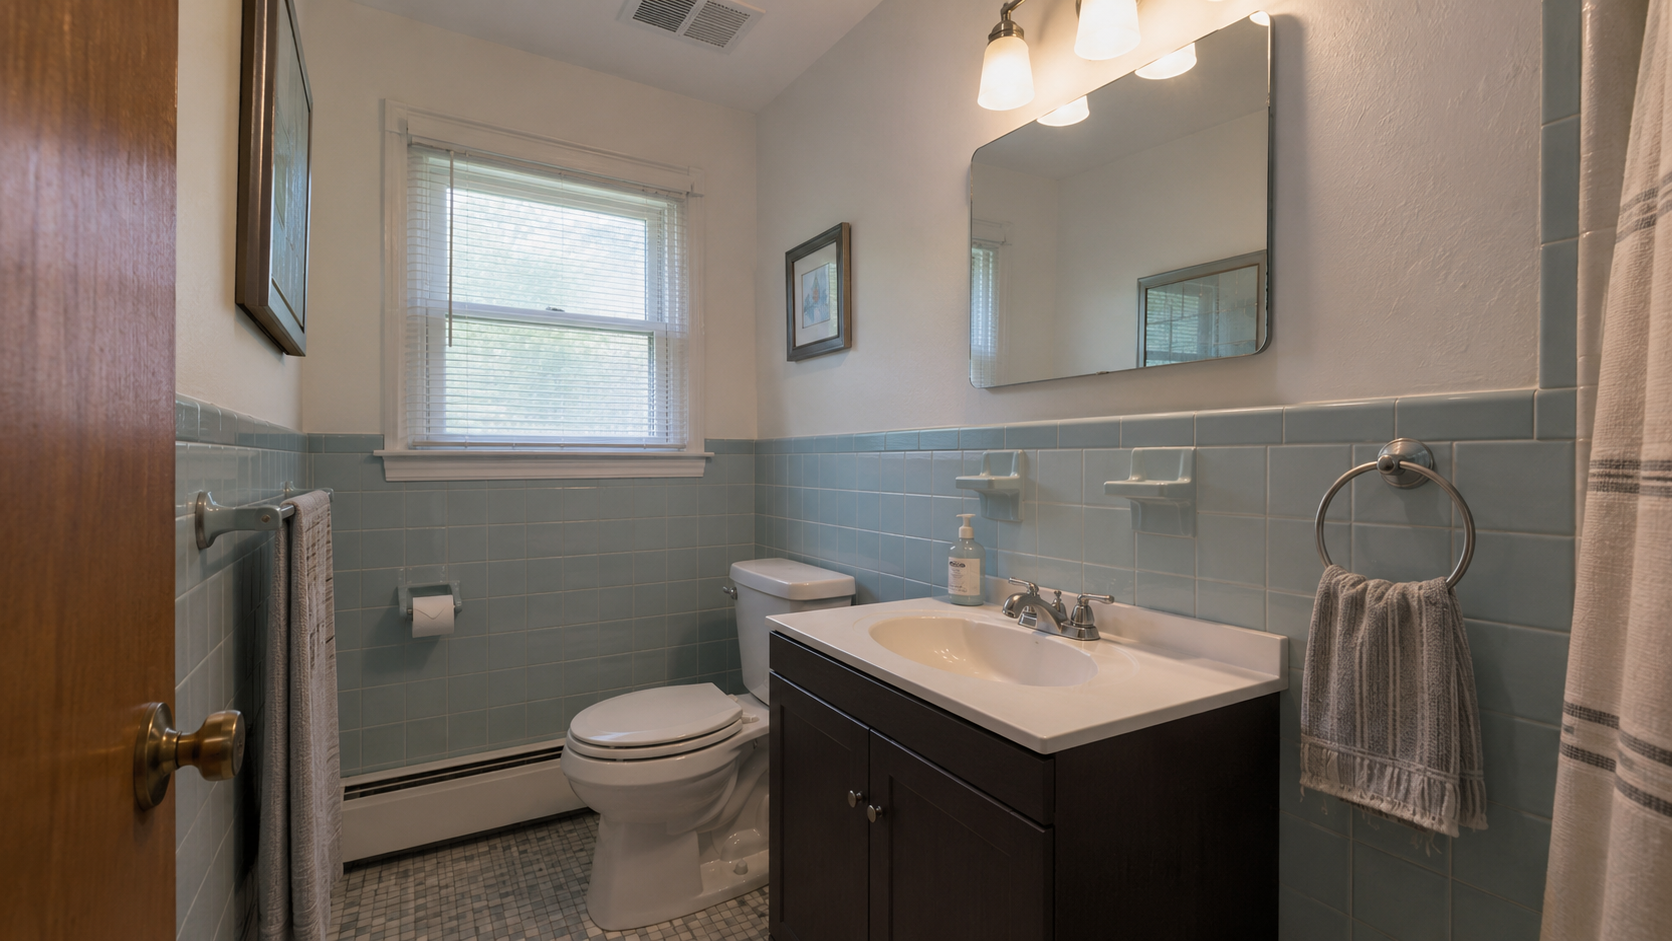
Some 1960s bathrooms have tile that is still well bonded, dry, and better installed than a rushed modern replacement would be. If the tile is sound, the tub edge is dry, the grout is stable, and the layout works, keeping it can save money and preserve some of the house’s character.
But tile can also hide a lot.
Loose tile, cracked grout that keeps returning, dark staining near the tub, a musty smell, soft wall areas, or movement in the floor are not style problems. They are inspection clues. The tile color may be annoying, but the real question is whether the wall and floor assembly still work.

The worst move is tearing out sound tile only because it is old, then discovering the replacement work costs more and performs worse. The second worst move is keeping tile that has already failed because the room looks mostly fine.
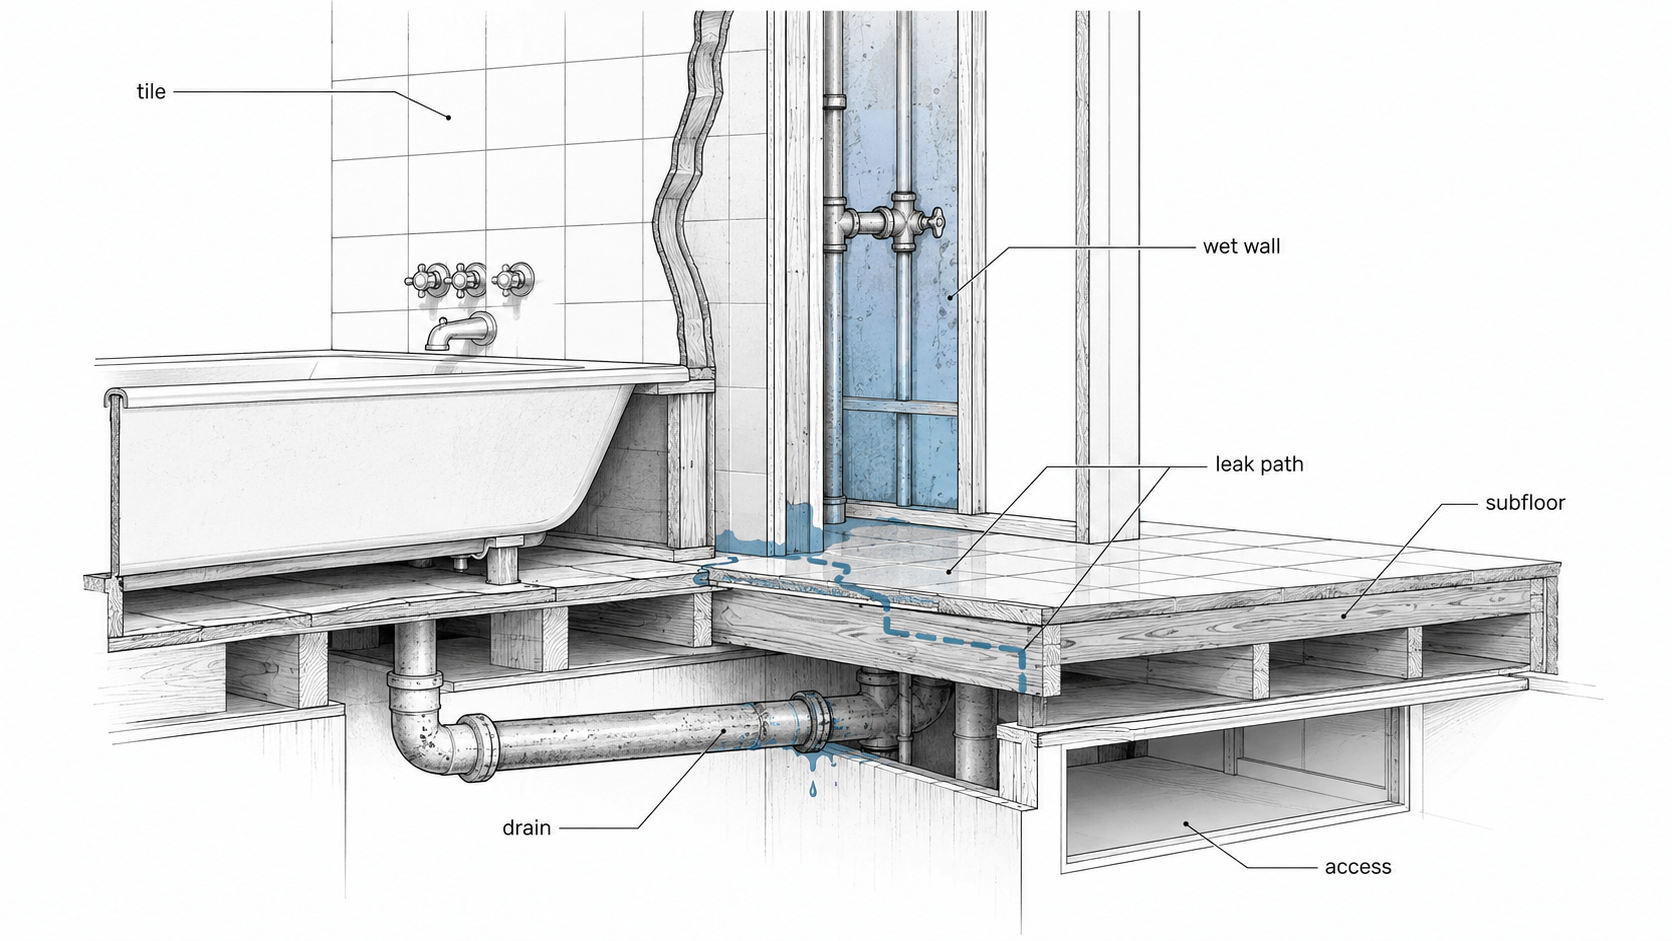
The wet wall decides the job
The tub and shower wall is the part to respect.
That wall may hold the valve, supply lines, shower riser, drain access, old patches, and years of small leaks. A new tile color does not fix a tired valve or a wall that has been wet too many times.
If the tub valve is being replaced, the wall may need to open. If the supply lines are corroded or poorly patched, the wall may need to open. If the tub edge has leaked into the floor, the wall and subfloor may both need attention. Once that happens, the bathroom moves from surface remodel to wet-area repair.
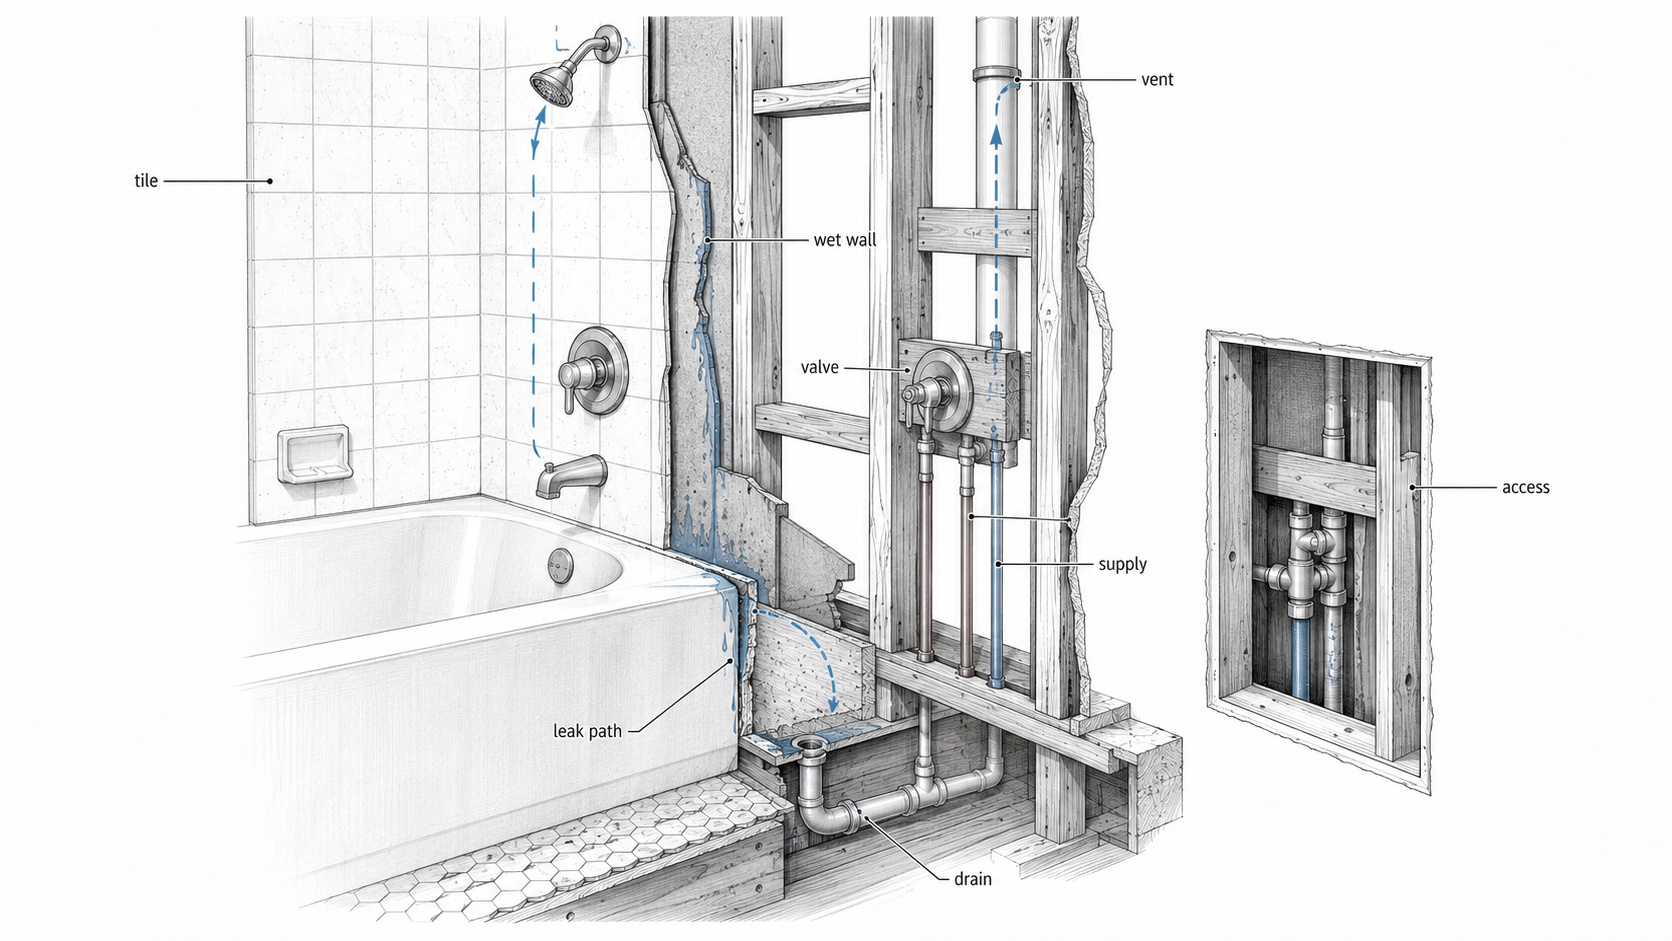
Access matters. Sometimes the back side of the wet wall is a closet, hallway, or bedroom wall. Sometimes there is no clean access. That changes the repair plan, the mess, and the cost.
Do not cover a known wet-wall problem with new surface work. It will come back.
The floor can change everything
A soft bathroom floor is not a finish problem.
Toilet leaks, tub-edge leaks, bad caulk, failed wax rings, old flooring layers, and poor ventilation can all show up underfoot. The floor may look passable until the toilet comes out or the vanity is removed. Then the subfloor tells the truth.
The toilet flange is one of the common trouble spots. If the new flooring changes height, the flange may need attention. If the old flange is damaged or the subfloor around it is soft, the toilet cannot simply be reset and forgotten.
Near the tub, floor damage can be worse because water often travels under finished flooring before it shows itself. A small stain outside the tub can mean a larger repair below the surface.
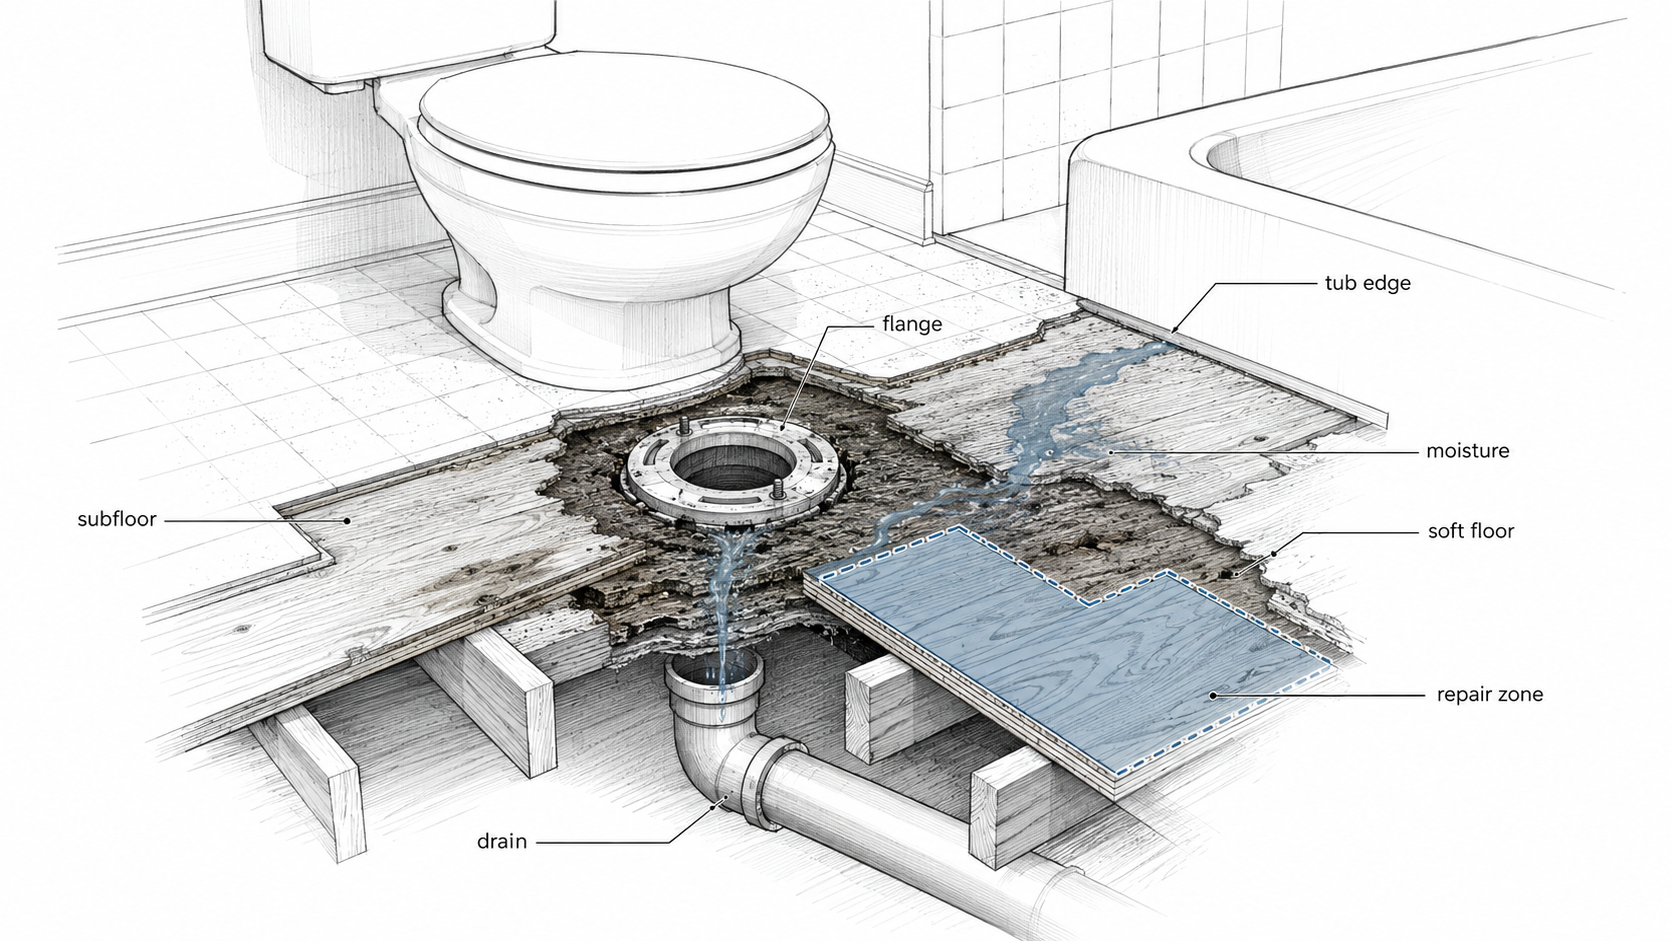
This is where a bathroom remodel gets less pretty and more important.
Small bathrooms punish bad layout decisions
Many 1960s bathrooms are small enough that one bad choice can make the whole room feel wrong.
A vanity that is two inches too deep can crowd the walkway. A door swing can hit the vanity. A toilet can feel squeezed against a wall. A medicine cabinet can land at the wrong height. A towel bar can block the best storage spot. A tub may stay because moving it would take over the entire budget.
This is not about making the room fancy. It is about making it usable.
Measure the door swing, toilet clearance, vanity depth, tub access, mirror height, and storage before buying fixtures. In a small bathroom, a pretty vanity can be a daily mistake if it blocks the room.
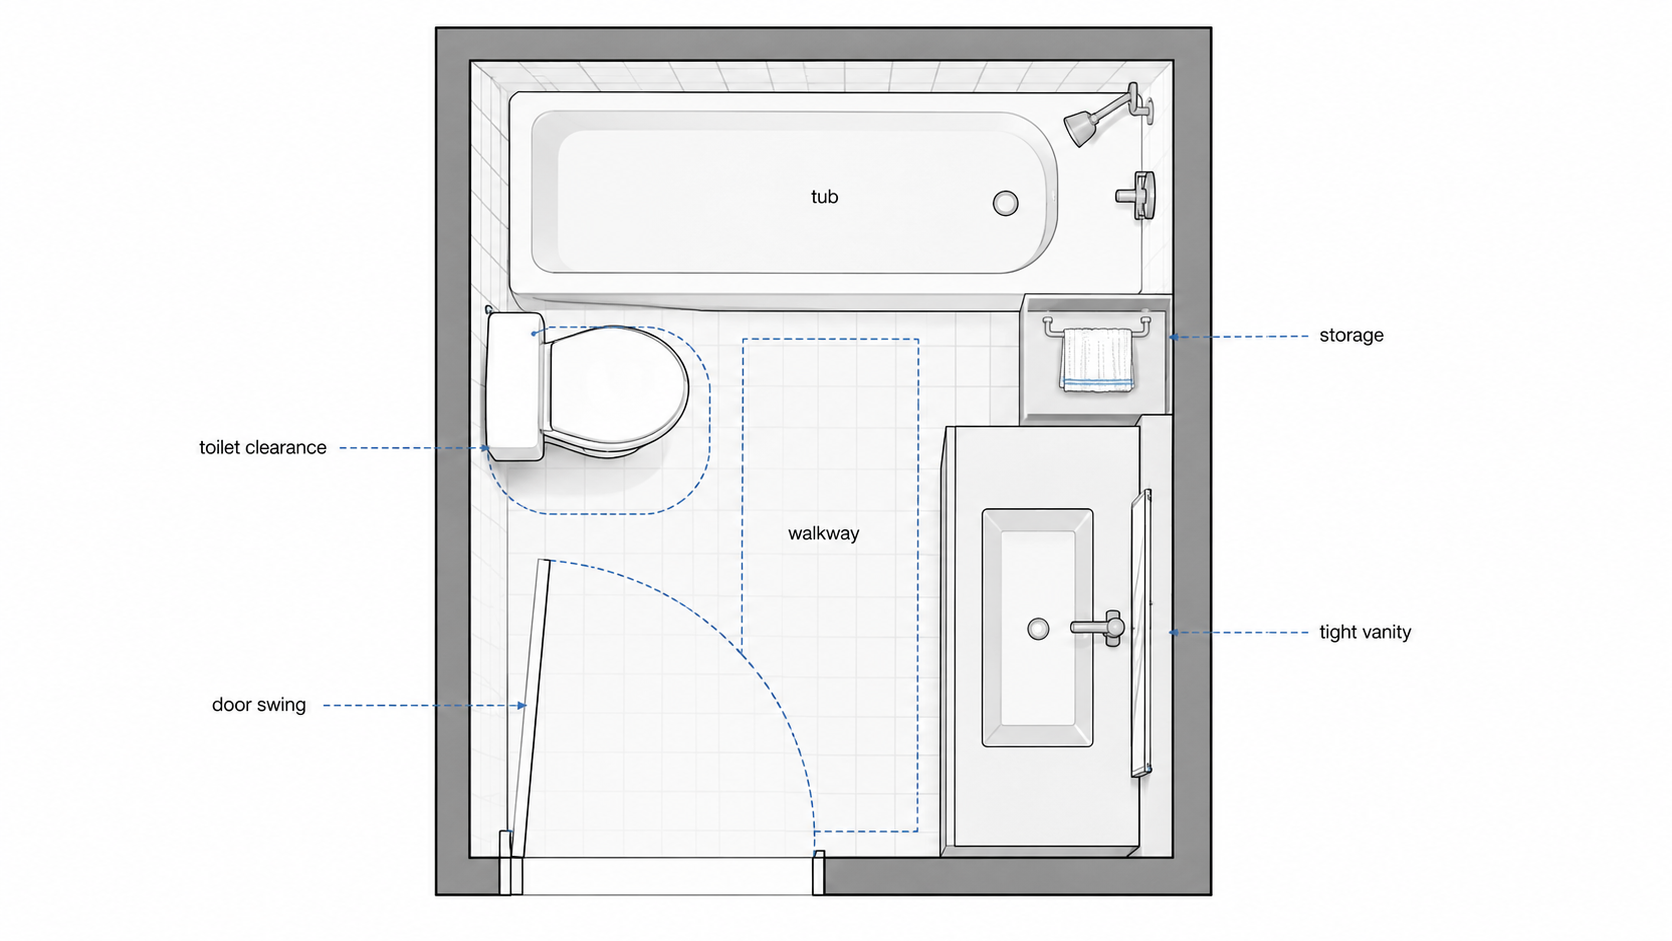
Older ranch bathrooms are especially tight because they often sit off a short hall with bedrooms nearby. The layout may not have room for big gestures. That is fine. Good small bathrooms are usually won by inches.
Ventilation is not optional
A bathroom fan is not there for noise.
It has to move moisture out of the room. If it only hums, vents into the attic, or barely clears steam from the mirror, the remodel is leaving one of the biggest bathroom problems in place.
Moisture damages paint, swells trim, feeds mold, stains ceilings, and shortens the life of new finishes. In a 1960s bathroom, years of weak ventilation may already be part of the story. New tile and paint will not fix that.
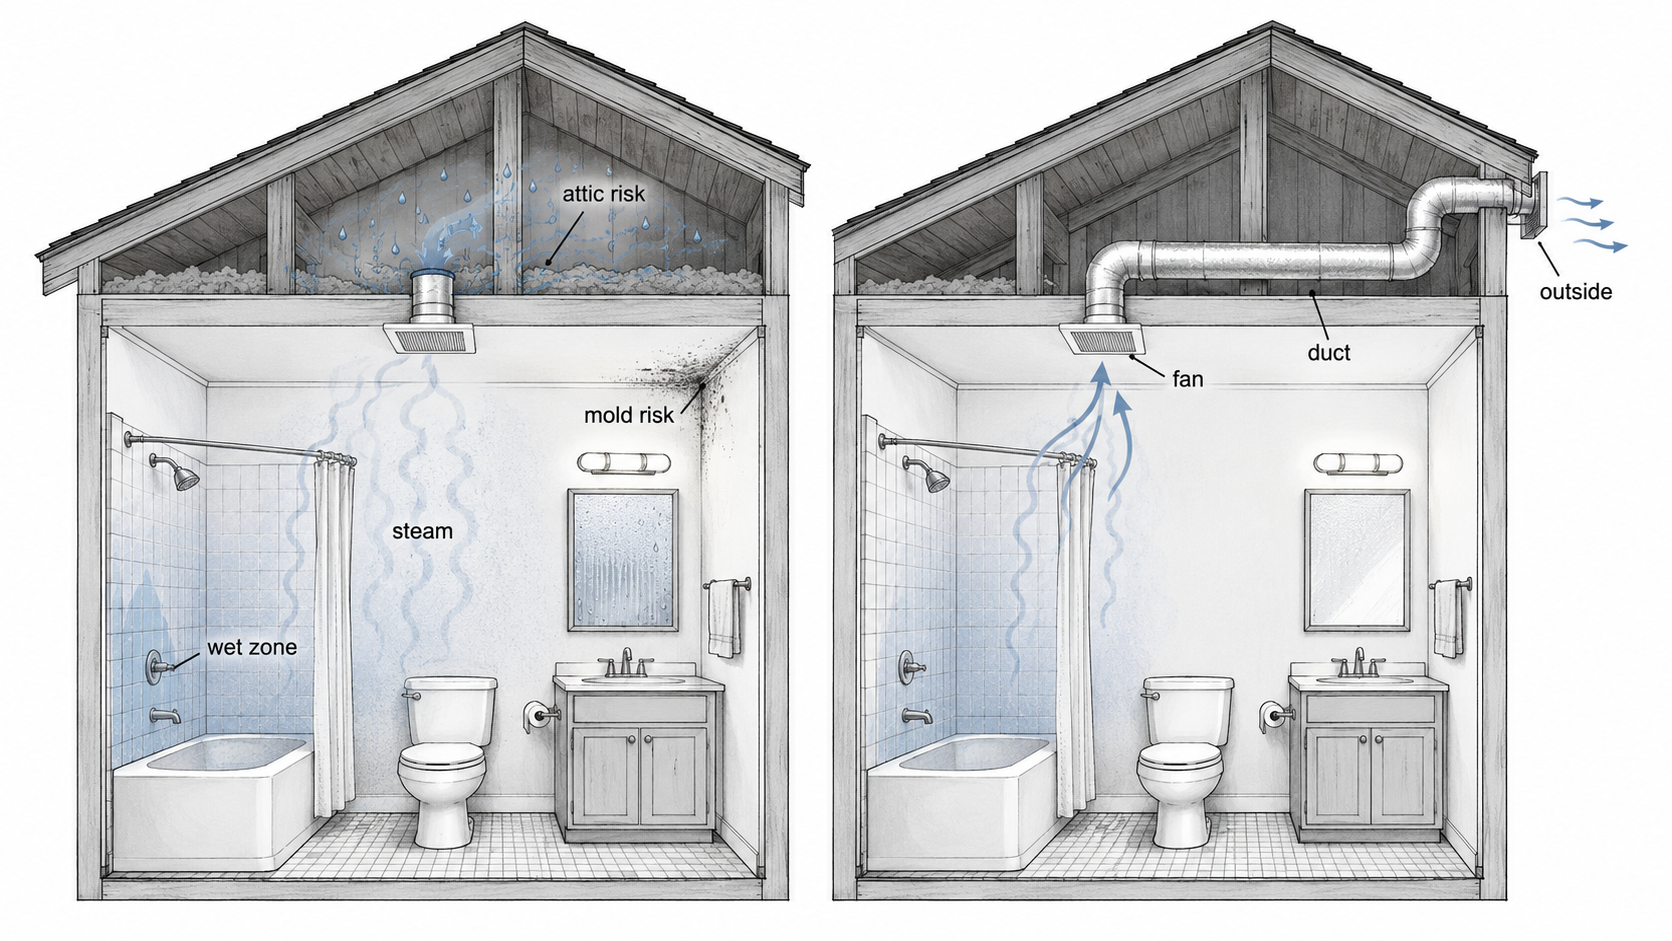
Check whether the fan actually exhausts outdoors. Check the duct route. Check the ceiling around the fan. Check the attic if there is access. If the bathroom has no fan, a window alone may not solve the moisture problem, especially in cold or humid seasons when nobody wants to leave it open long enough.
Ventilation should be planned while the ceiling and walls can still be worked on. Waiting until the end usually makes the fix uglier and more expensive.
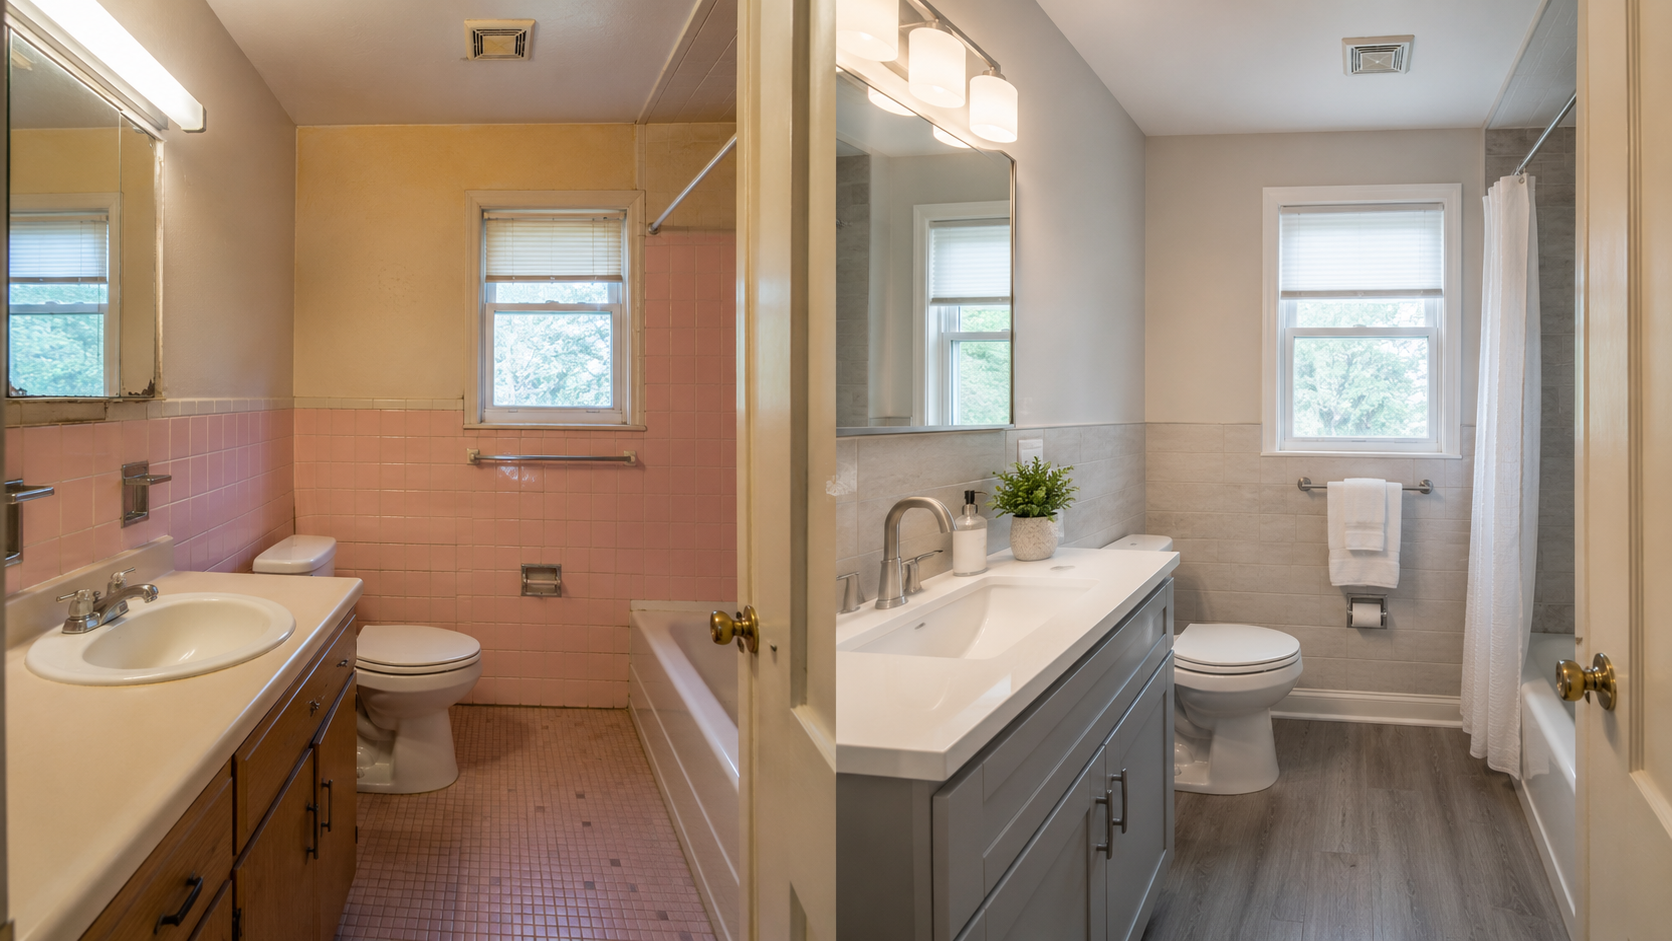
What to keep from a 1960s bathroom
A good remodel does not have to wipe the room clean.
Keep what is sound and useful. Original tile can stay if it is dry, well bonded, and still works with the room. A medicine cabinet can stay if it is solid and placed well. A tub can stay if it is in good condition and the layout does not need to change. A window can be one of the room’s best features if it gives daylight and privacy without creating moisture trouble.
Some 1960s bathrooms have a plainness that takes small updates well. Better light, a cleaner mirror, a repaired fan, fresh paint, new hardware, and careful caulk can make a sound bathroom feel much better without tearing open the wet wall.
Do not keep something because demolition is inconvenient. Keep it because it still works.
For whole-house decisions about what to inspect before opening old finishes, use 1960s house renovation as the parent guide.
Start in this order
Photograph the bathroom before anything comes out. Get the tub edge, tile, vanity, toilet, floor, fan, ceiling, window, plumbing wall, and any stains or soft spots.
Check suspect paint, flooring, adhesive, ceiling texture, and wall materials before disturbance. In a pre-1978 house, lead-safe work practices may apply, and some older materials may need testing before demolition.
Test the bathroom as a wet room. Run the shower. Watch the tub edge. Check the floor near the toilet and tub. Look below the bathroom if there is access. Listen to the fan and confirm where it vents.
Decide whether the tile stays or the wet wall opens. That decision changes the whole project.
Verify plumbing access before choosing fixtures. A vanity swap is easier than a tub valve replacement. Moving drains and supply lines changes the job.
Measure the room before buying anything. Door swing, toilet clearance, vanity depth, mirror height, and storage need to work before finishes matter.
Choose finishes after the wet areas, floor, fan, and layout are honest.
FAQ
Is a 1960s bathroom worth remodeling?
Yes, if the layout can be improved and the wet areas are handled correctly. Many 1960s bathrooms are small but workable. The risk is spending money on tile, paint, and fixtures before checking plumbing, subfloor, ventilation, and moisture damage.
Should I keep old 1960s bathroom tile?
Keep it if it is dry, well bonded, stable, and the layout works. Remove or investigate it if the grout keeps cracking, tiles are loose, the wall feels soft, the tub edge leaks, or the floor moves.
What makes a 1960s bathroom remodel expensive?
The cost usually changes when the project touches wet walls, plumbing, tub valves, drains, toilet flange repair, subfloor damage, ventilation, old materials, or layout changes. Tile is only one part of the price.
Should I replace the tub in a 1960s bathroom?
Replace it when the tub is damaged, the layout does not work, or the wet wall already needs to open. Keep it when the tub is sound, the drain works, and replacing it would force unnecessary wall and floor work.
Does a 1960s bathroom need a fan?
Most bathrooms need reliable ventilation to control moisture. A fan should exhaust outdoors, not into an attic or closed cavity. If the room steams up easily or paint keeps peeling, ventilation should be part of the remodel.
What should I check before replacing a vanity?
Check shutoff valves, drain alignment, wall damage, floor gaps, mirror height, light placement, and door swing. A vanity that looks good in a store can still crowd a small 1960s bathroom.
Can I remodel a 1960s bathroom without gutting it?
Yes, if the tile, floor, plumbing, and ventilation are sound. A refresh can work well when the room needs better lighting, paint, hardware, caulk, and fixtures rather than wet-wall or subfloor repair.
A 1960s bathroom remodel goes better when the order is right: check the wet wall, test old materials, inspect the floor, fix ventilation, verify plumbing access, then choose tile and fixtures.
References
Sources used for this article
- U.S. Environmental Protection Agency: Lead Renovation, Repair and Painting Program
- U.S. Environmental Protection Agency: Protect Your Family from Exposures to Asbestos
- U.S. Environmental Protection Agency: Remodeling Your Home and Indoor Air Quality
- U.S. Consumer Product Safety Commission: Repairing Aluminum Wiring