
If there’s one thing I learned after a decade of mostly framing work, it’s this: don’t underestimate the “simple” stuff—basement wall layouts, quick sketches, and basic sequencing.
Basement framing looks easy in a clean diagram. Then you meet the real basement: slightly out of square, concrete that’s never perfectly dry, pipes and wires in the worst possible spot, and a floor that slopes just enough to make you swear at your level.
This page is the overview and decision map: wood studs vs. metal studs vs. panels. Exterior walls vs. interior partitions. What actually matters, what’s just noise, and what to do first before you buy lumber.
What this covers
- Basement wall framing options, and where each one makes sense
- Layout decisions that decide whether the basement feels clean or cramped
- Stud spacing, plates, windows, doors, and the boring details that stop drywall problems later
- Moisture and water reality, and when you should not frame yet
- Fast decision rules you can use today
The most common misunderstanding
People treat basement framing like standard interior framing, just “downstairs.” Same studs, same approach, same sequencing.
That’s how you end up with moldy fiberglass behind a “finished” wall, or bottom plates that stay damp, or a wall that looks fine until winter when condensation shows up and starts feeding that old basement smell.
Basements are different because the exterior wall is a cold surface. Concrete holds moisture. And the air down there lives closer to dew point than your main floor does.
So the order matters. Water first. Then air sealing and insulation logic. Then framing. Drywall is the last domino.
What to do first, before you frame anything
1) Decide if you have bulk water or just humidity.
A basement can be humid and still be normal. A basement with puddles, wet wall bands, white crust at the wall base, or insulation that sags like it’s holding a drink is not normal. That is water. Don’t frame over it.
Quick tells that show up in real basements:
- After a heavy rain, you see dark damp lines at the slab edge or wall base.
- You get musty spikes in spring and fall, not just in summer.
- Cardboard stored on the floor softens or warps.
- The wall has that chalky white deposit or flaking paint near the bottom.
If any of that is happening, your first spending is rarely lumber. It’s usually drainage, gutters, grading, or wall water management. Start here if you’re chasing “leaks when it rains”: basement wall leaks in storms, what to check first.
2) Check the slab and rim joist area.
The rim joist is where basements often leak air. That air is cold in winter, humid in summer, and it loves condensing on cold surfaces. It also drags smells into the house. If you ignore it and only focus on “framing walls,” you miss the real source of discomfort.
3) Decide how you’re going to insulate, before you build a stud wall.
This is the part people regret. If you build a stud wall tight to concrete, then realize you needed foam, or air sealing, or a capillary break, you just trapped your own access. Framing is easy. Correct sequencing is the hard part.
Basement finishing sequence (the order that saves rework)
A lot of basement “framing mistakes” are really sequencing mistakes. People frame first because it feels productive. Then they realize the insulation plan doesn’t fit, wiring is awkward, or moisture control got skipped. The fix is always more expensive once drywall is up.
This is the clean A-to-Z order. You can adjust details, but don’t scramble the big moves unless you know why.
Step 0: Bulk water and dampness reality check
- Fix leaks, seepage, drainage, downspouts, grading. Basements don’t forgive “we’ll deal with it later.”
- If walls are wet after rain, stop and solve that first. Don’t bury it behind a new wall.
Step 1: Plan the layout on the slab
- Tape lines for walls, doors, and clearances. Mark the mechanical zone and soffit zones.
- Decide where you need access panels (shutoffs, cleanouts, junctions). If you hide it now, you’ll cut drywall later.
Step 2: Choose the exterior-wall assembly (before studs)
- Decide how you’re handling the concrete wall: foam-first, mineral wool, panel system, etc.
- This is also where “vapor barrier vs vapor retarder” gets decided. Don’t default to poly without understanding your climate.
Step 3: Rim joist + penetrations air seal
- Seal the rim area, sill plate transitions, and any obvious air leaks.
- This is where cold air and smells sneak upstairs. Fix it now while it’s open.
Step 4: Insulate (or at least install the first insulation layer)
- In many basements, insulation comes before stud walls so you don’t trap the cold concrete inside a cavity that can condense.
- Finish the “hard to reach later” insulation first (corners, behind future walls, band joist zones).
Step 5: Frame walls (exterior and partitions)
- Frame exterior stud walls to match the assembly you chose in Step 2.
- Frame interior partitions after you’ve confirmed doors, room sizes, and mechanical clearances.
- Add blocking now for TVs, cabinets, grab bars, railings, and anything heavy.
Step 6: Rough-in plumbing (if any)
- Bathrooms and bars drive layout. Run drains/vents/water lines before you close walls.
- Don’t frame tight where a plumber needs working room. They’ll cut your studs. Every time.
Step 7: Rough-in electrical + low voltage
- Run circuits, outlets, lighting, smoke/CO requirements, and any data/coax/speakers.
- Plan outlet locations based on furniture and doors, not “every 6 feet and hope.”
Step 8: Fire blocking and draft stopping
- Do it before insulation and drywall hides everything.
- Inspectors love to fail basements on this because it’s common, and it matters.
Step 9: Insulate the stud cavities (if your assembly uses them)
- Install batts/mineral wool only after wiring/plumbing is done.
- Keep insulation dry and fitted. Gaps = cold stripes = condensation risk.
Step 10: Vapor/air control layers (only if your assembly calls for it)
- This step is climate-dependent. Some basements need a smart vapor retarder. Some do not want interior poly.
- The goal is drying control, not “seal everything and pray.”
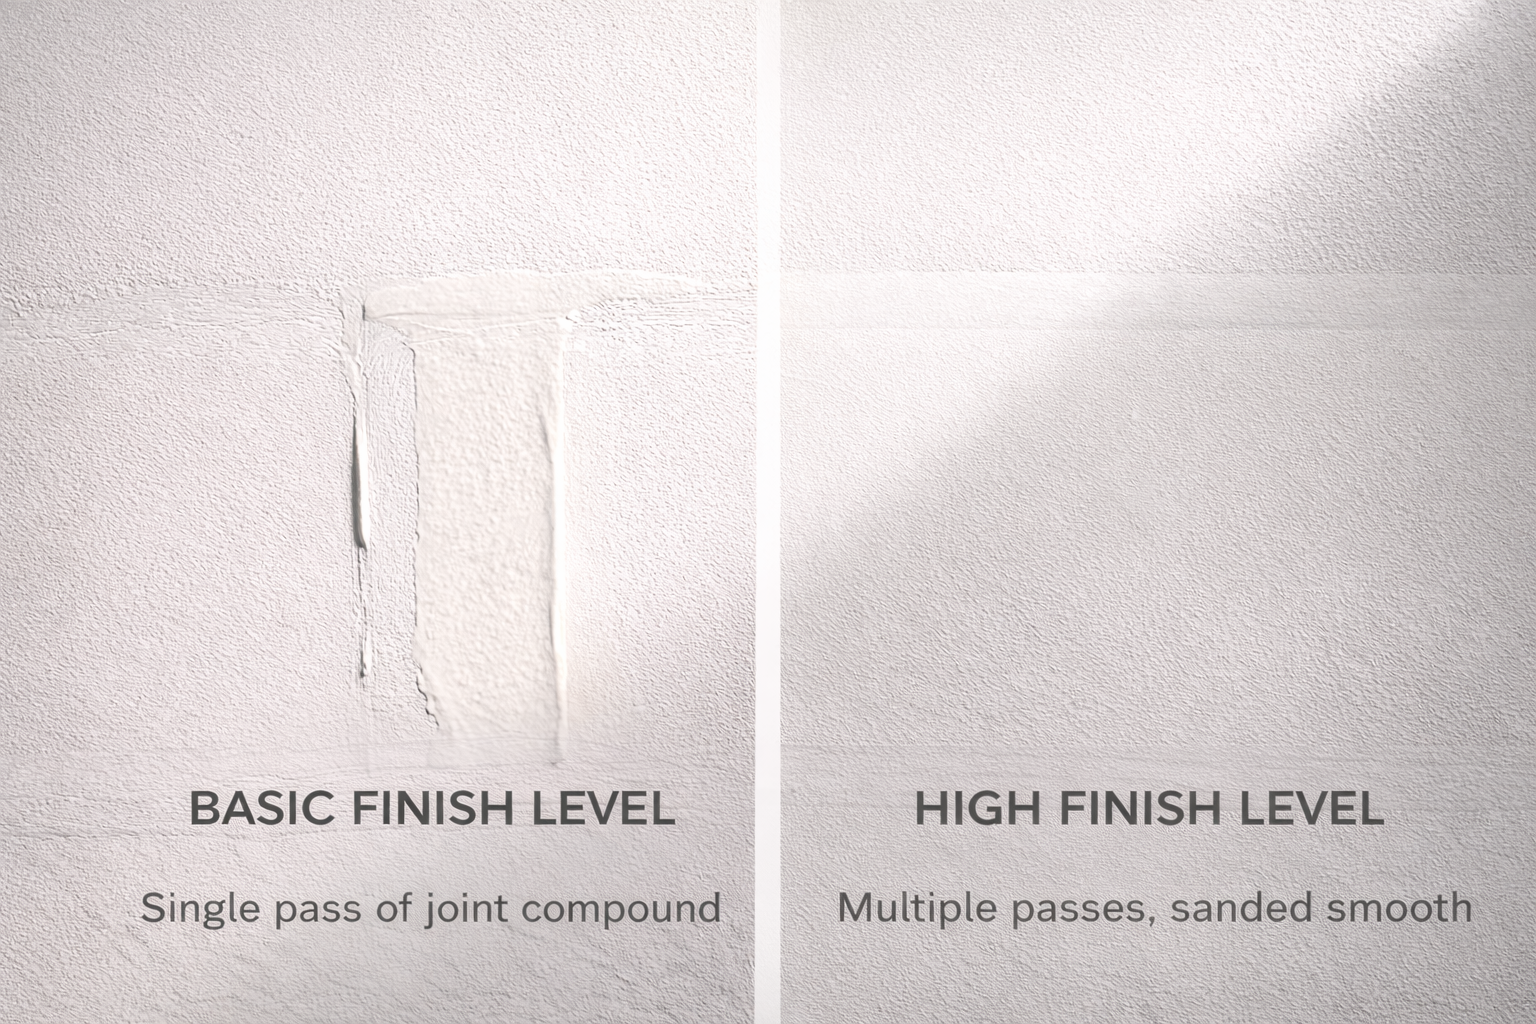
Step 11: Drywall hang + tape + finish
- Use moisture-resistant boards where appropriate (not everywhere blindly).
- Plan access panels and shutoffs before board goes up.
Step 12: Flooring, trim, doors, paint, fixtures
- Flooring choice should respect basement moisture reality. Basements punish the wrong flooring more than any other room.
- Final ventilation/humidity control (dehumidifier, supply air strategy) is what keeps it stable long-term.
Simple decision rule: If you’re not sure what comes next, the safe move is: water control → air sealing → insulation logic → framing → rough-ins → close walls.
See: Finish a Basement the Right Way: A Practical A-to-Z Build Order
Basement wall framing options
Three common paths show up over and over:
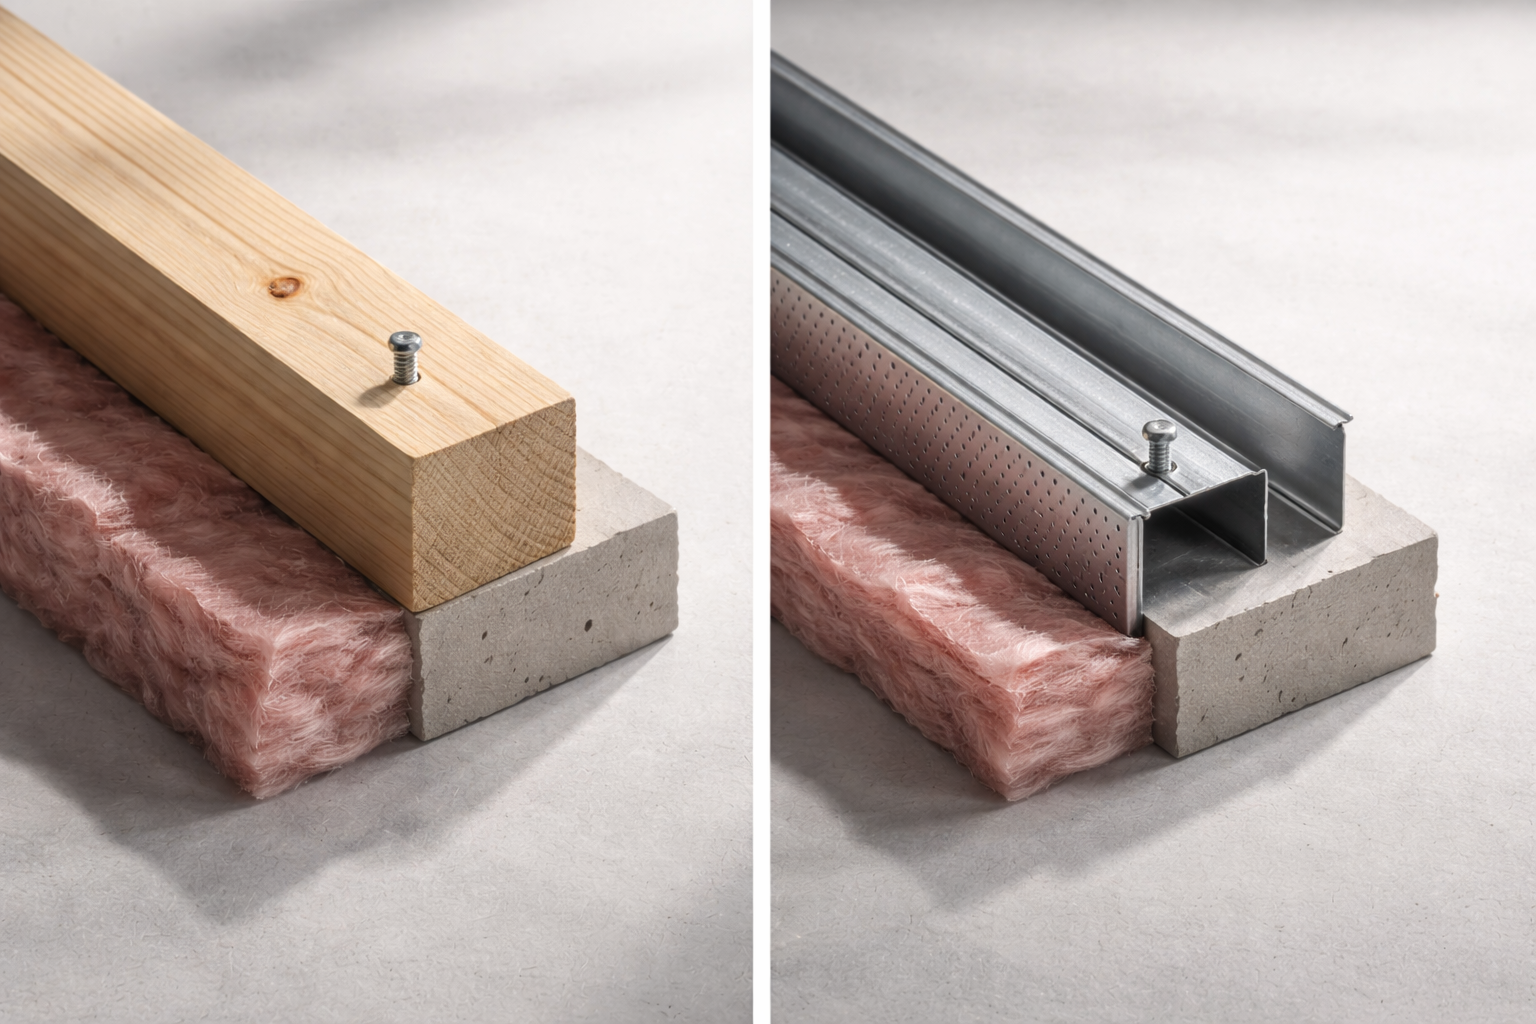
Option 1: Wood studs
Wood is forgiving. Easy to cut. Easy to shim. Easy to hang cabinets and doors on. If you’re doing most of the work yourself and your basement isn’t a perfect rectangle, wood is usually the least frustrating option.
The trade-off is moisture tolerance. Wood doesn’t like staying damp. If your assembly puts wood where moisture can live, it will eventually show you the receipt.
Wood stud walls make sense when:
- You want a robust wall for doors, trim, and cabinets.
- You need flexibility for uneven slab conditions.
- You are building interior partitions that are not against concrete.
Option 2: Metal studs
Metal studs are straight. Light. Consistent. You can carry a bundle by yourself. And you’re not feeding mold with wood inside the cavity.
But metal is not “moisture proof.” The paper facing of drywall still feeds mold. The insulation still holds moisture if your assembly is wrong. Metal studs also need correct fastening and bracing so the wall doesn’t feel flimsy.
Metal stud walls make sense when:
- You want dead straight lines for drywall finishing.
- You want to reduce wood contact near basement moisture zones.
- You’re building long partition runs where straightness matters.
Option 3: Panel systems
Systems like Owens Corning style wall panels exist because lots of people want a clean finished wall without the “framing, insulation, vapor mess” learning curve. They can be fast. They can also be expensive, and they can lock you into proprietary parts and layouts.
The trade-off is control. With a stud wall you can tune every layer. With a panel system you accept the system and hope your basement conditions match the assumptions.
Panel systems make sense when:
- You value speed, and you’re fine paying for it.
- You want a modular “open it later” approach for wiring and access.
- Your basement water conditions are already well controlled.
MUST READ: One framing reference that explains the basics without fluff.
It’s easier to make good basement decisions when you can picture how standard walls are supposed to behave.
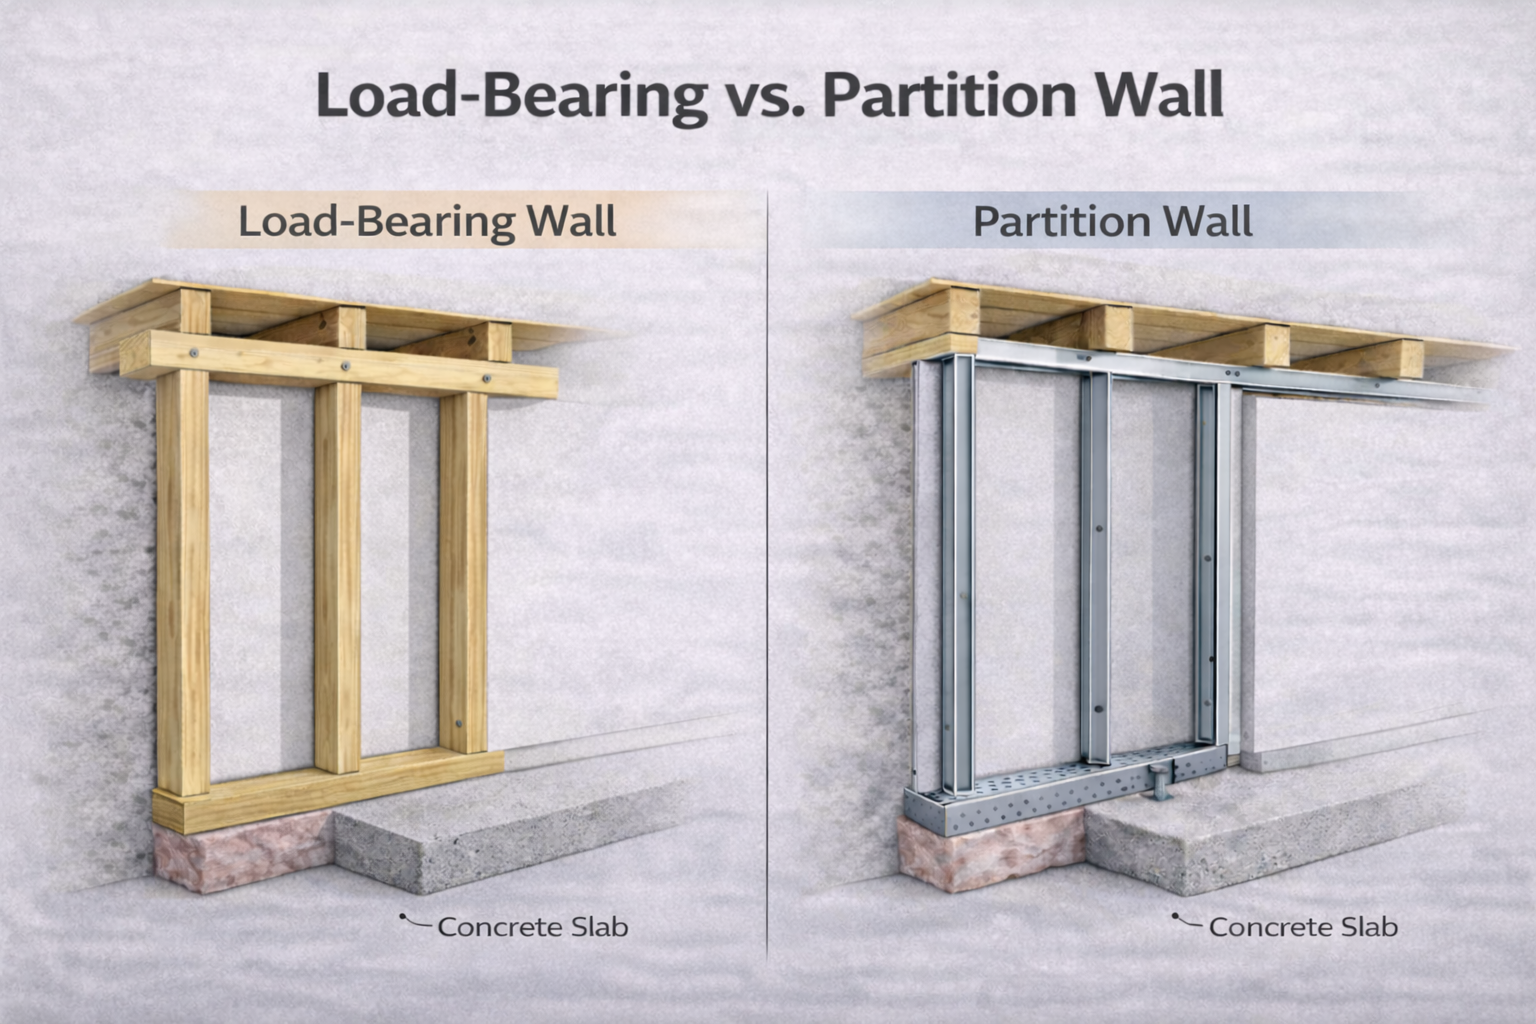
Exterior walls vs interior partitions

Basement framing splits into two different jobs that people mix together.
Exterior basement walls are moisture and thermal walls first. The framing is secondary. They touch concrete, which touches soil, which changes temperature and moisture all year.
Interior partitions are standard wall logic with basement constraints. They’re about layout, doors, sound, plumbing chases, and keeping the room proportions sane.
Exterior walls: keep the stud wall out of trouble
The “safe” idea is simple: don’t let your wood sit against damp concrete. Don’t trap wet air in a cold cavity. Don’t build a wall that cannot dry.
You will see lots of conflicting advice online about vapor barriers. That’s because the right answer depends on your climate, your insulation approach, and whether your basement is conditioned like the rest of the house. If you want the deeper assembly logic, that’s Pillar C in your plan: framing against concrete with the moisture control and fastening details.
One grounded rule that holds: if you’re not sure, prioritize air control and capillary breaks over interior polyethylene. Poly in the wrong place can trap moisture. It’s not “bad,” it’s just easy to misuse.
Interior partitions: don’t invent new rules
For interior walls, keep it simple.
- Frame like normal, but respect slab slope.
- Plan doors early so you don’t end up with weird clearance issues.
- Use blocking where you know you’ll hang heavy stuff.
If you’re unsure whether something is structural or just a divider, don’t guess. A basement can have load paths that run through posts, beams, and odd bearing lines. This is a clean refresher: load bearing vs non load bearing walls, how to think about it.
Layout: the stuff that makes basements feel bigger
The easiest way to waste a basement is to copy the floor plan upstairs. Basements don’t read like main floors. Windows are higher. Light is weaker. Ceiling beams and ductwork steal headroom.
A few layout moves that show up in basements people love:
- Keep the main path wide. Don’t pinch the stair landing or the first turn. It makes the whole basement feel tight.
- Group mechanicals. If you can keep the furnace, water heater, and main duct run in one zone, you stop building soffits everywhere.
- Don’t fight the lowest beam. Put storage, laundry, or mechanical under it, not the main lounge zone.
- Plan the bathroom early. Basement baths are plumbing projects that happen to include framing, not the other way around.
Decision rule: if a wall location depends on “we’ll see later,” it will land in the worst place. Mark it now. Even with tape on the slab. You’ll catch bad proportions before you buy materials.
Stud spacing & plates
(and the details that prevent drywall headaches)
Basement walls aren’t special because they use special numbers. They’re special because the floor and ceiling are rarely perfect references.
Stud spacing
Most basement walls run 16 inches on center. Some partitions can be 24 inches on center depending on loads and finishes, but 16 keeps drywall stiffer and makes mounting easier. It also gives you more forgiving screw patterns when the wall isn’t perfectly straight.
Decision rule: if you plan tile, heavy cabinets, or a TV wall, tighten the spacing or add blocking. Don’t pretend drywall anchors are the plan.
Top plate and bottom plate
For interior partitions, standard top and bottom plates are normal.
For exterior basement walls, bottom plate details matter more. Treated lumber rules vary by region and code interpretation. Some jurisdictions want pressure treated for any plate in contact with concrete. Others accept a capillary break. Don’t guess. If you need a general code refresher, keep it high level and official: residential code basics in plain language.
Fire blocking and draft stopping
Basements get flagged in inspections for missing fire blocking because the framing creates long hidden vertical cavities. The fixes are simple, but they’re annoying to do after drywall is up.
Think about it now. Any chase that runs from basement to floor system above deserves attention. Any soffit that connects to open cavities deserves attention. These aren’t “optional details.” They are inspection problems later.
Code reality check
(what inspectors actually fail in basements)
Codes vary by jurisdiction, but basement failures tend to rhyme. If you want to avoid the classic inspection rework, watch these:
- Fire blocking / draft stopping: long concealed cavities and soffits get flagged constantly because it’s easy to miss before drywall.
- Decay protection at bottom plates: depending on local rules, plates near concrete may need specific protection details.
- Egress window rules: if you’re adding bedrooms, window requirements become a project driver, not a footnote.
- Mechanical / electrical access: shutoffs, cleanouts, junctions — bury them and you’ll cut drywall later (or fail now).
Decision rule: if you’re building bedrooms or moving plumbing, treat permits and inspection requirements as part of the design — not an afterthought.
Wood studs vs metal studs: the trade-offs
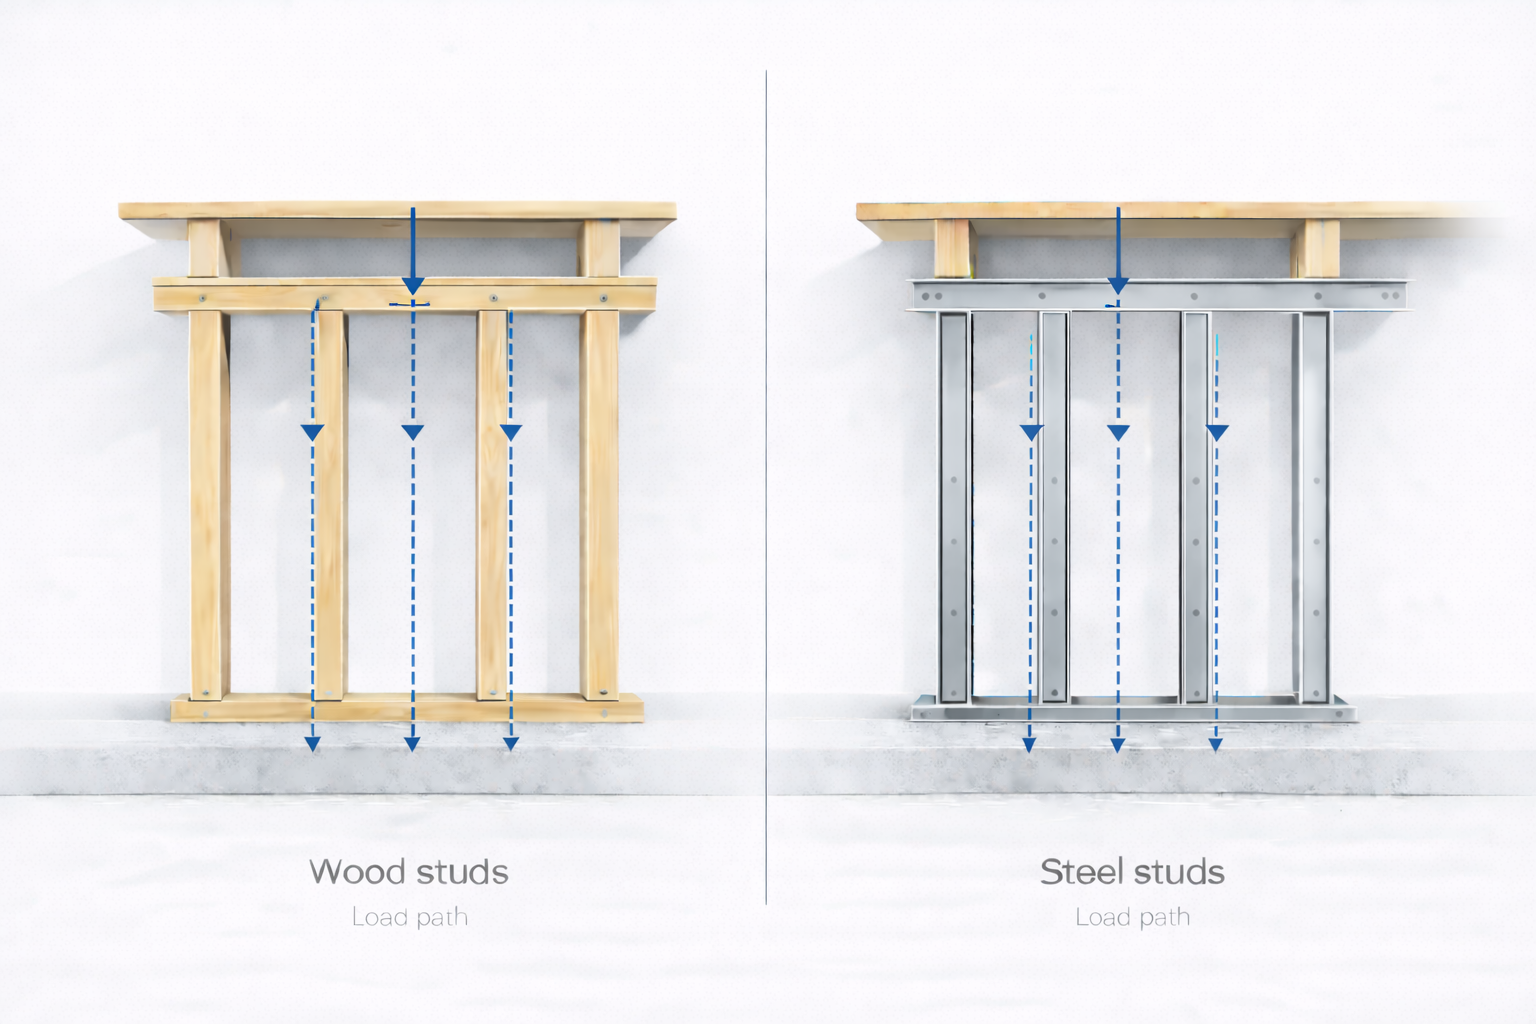
Here’s the honest version. People choose wood because it’s familiar. People choose metal because it feels “more professional.”
Neither choice saves you if your moisture plan is wrong.
Wood studs
- Wins: easy fastening, easy shimming, easier doors, easier built-ins.
- Loses: sensitive to moisture and repeated dampness, can rot, can feed mold in bad assemblies.
Metal studs
- Wins: straight, consistent, lighter, no rot, good for long runs.
- Loses: needs correct fastening and bracing, can feel flimsy if done sloppy, still vulnerable to mold on drywall paper if humidity is unmanaged.
Decision rule: if you need a wall that will take heavy loading and frequent fastening, wood is simpler. If you need long straight partition runs and you want predictable drywall finishing, metal has an edge. If your basement is damp and you are trying to “outsmart water” with material choice, you’re solving the wrong problem.
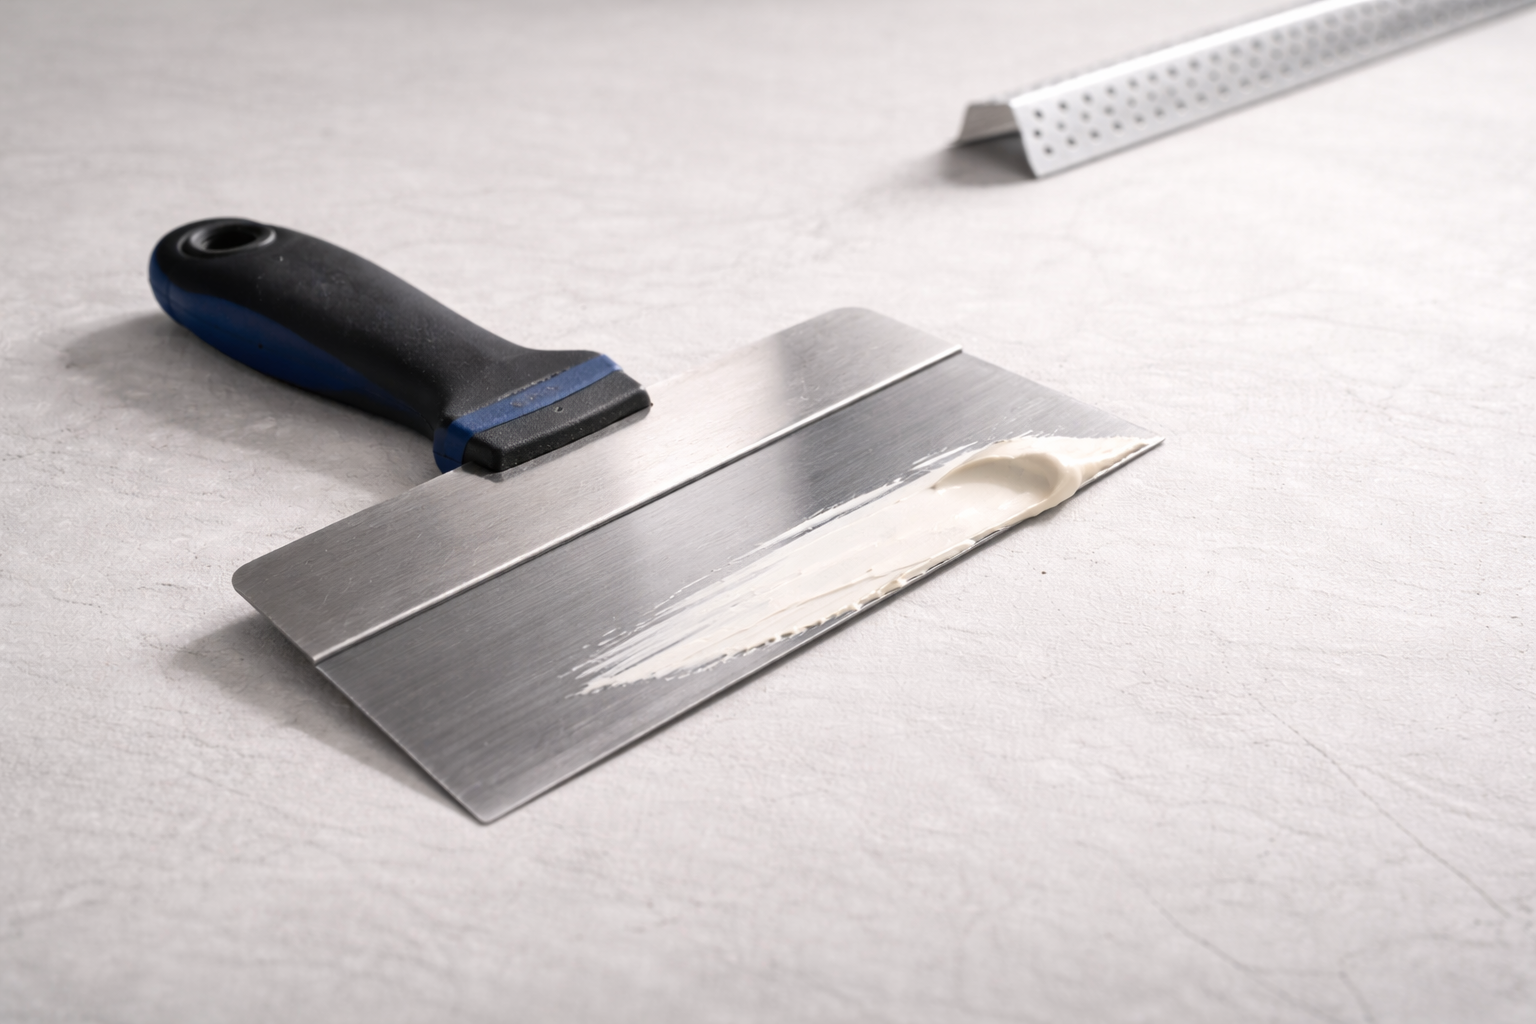
RECOMMENDED TOOL: A framing square, not the flimsy one.
Basements punish layout errors because everything compounds across rooms.
Framing against concrete
Framing against concrete is building science plus fastening plus moisture control. Half-baked advice creates expensive callbacks.
So here’s what you should take from this page:
- Don’t start with studs. Start with water and insulation logic.
- Assume concrete is a moisture reservoir. Plan accordingly.
- If you are unsure about vapor control, avoid interior poly as a default move.
If you want the bigger construction context on foundation walls themselves, not just stud walls, keep this handy: foundation wall construction basics, step by step.
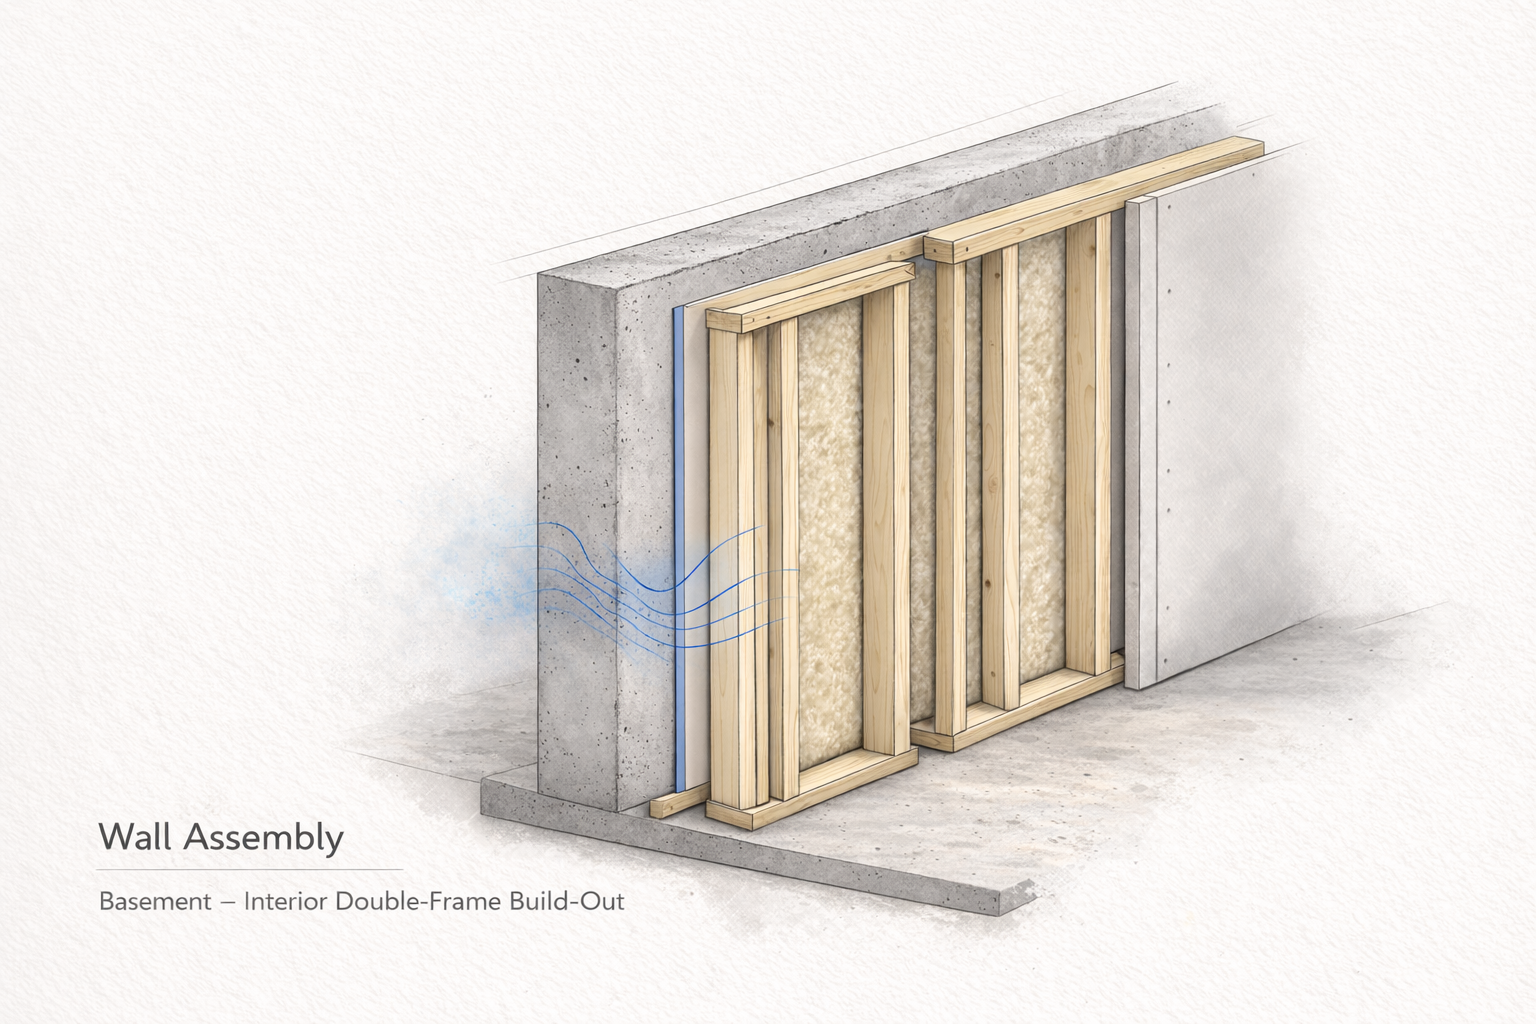
Gap between the concrete wall and your framing
(how much, and why)
People obsess over the gap like it’s a secret code detail. It’s not. The goal is simple: don’t let your stud wall become the wet layer, and don’t create a dead air pocket that never dries.
In most modern basement assemblies, you’re not “leaving a gap to the concrete.” You’re building to a control layer — usually sealed rigid foam or a finished insulation plane.
- If you’re doing foam-first: set the stud wall tight to the foam plane (not the bare concrete). The “gap” is basically the foam thickness, and you keep the cavity on the warm side.
- If you’re not doing foam-first (not my favorite): you still don’t want studs hard against concrete. You need a capillary break / decay protection strategy, and you need the wall to have a drying path.
Decision rule: a small intentional separation is fine. A big empty void is not. If you can stick your hand behind the wall and feel cold concrete, you’re probably building a condensation chamber.
See: Framing Basement Walls Against Concrete: The Right Gap (and the Wrong One)
Framing basement walls for spray foam
(what changes, what doesn’t)
Spray foam can work well in basements — but it changes the moisture behavior of the wall. Once you spray, you’ve basically committed to a specific drying direction, and fixing mistakes later gets expensive.
- Foam-first is usually cleaner: insulate/air-seal the concrete (and rim joist) first, then frame your wall inside that layer.
- Don’t “half-spray” and hope: thin, inconsistent foam coverage creates cold stripes where condensation shows up first.
- Plan wiring and backing early: once a wall is foamed and closed, fishing lines and adding blocking becomes a tear-out job.
Decision rule: if you’re using spray foam as your air seal, treat it like a real control layer. That means continuity at corners, rim zones, and transitions — not just “spray the big flat parts.”
Vapor barrier behind basement framing
(the fast answer)
This is where basement advice online gets people in trouble because “vapor barrier” gets used as a universal fix.
Basement reality: concrete is cold and often damp. If you install interior poly in the wrong assembly, you can trap moisture where it can’t dry.
- If you have sealed rigid foam against the concrete: interior polyethylene is often unnecessary and can be the wrong move.
- If you don’t understand your assembly: prioritize air sealing + correct insulation placement first. Air movement is the usual moisture delivery system in basements.
- If your inspector expects something: use a solution that matches local practice (this varies more than people want to admit).
Decision rule: don’t default to poly. Default to an assembly that can stay warm enough to avoid condensation and can dry in at least one direction.
Floating walls and basement movement
“Floating basement wall” shows up in searches because people hear it from a contractor or a neighbor and assume it’s some advanced trick.
The simple idea: some slabs move seasonally. Some soils heave. In some climates and regions, you don’t want your framed wall rigidly pinned to a slab that might lift. So you detail the bottom connection to allow movement.
This is not universal. Many basements never need it. Some do. It depends on local conditions, slab behavior, and how the foundation was built.
Decision rule: if your area is known for expansive soils or seasonal slab movement, learn the local practice before you lock walls hard to the slab. If your slab has been stable for decades and your foundation system is conventional for your region, don’t invent complexity.
Basement windows, doors, and openings
Basement openings are where clean framing turns messy fast. Concrete openings are rarely square. Window wells create awkward framing and insulation edges. And egress rules vary by jurisdiction.
A few practical moves that keep you out of trouble:
- Measure the opening in three places. Top, middle, bottom. Assume it’s not square.
- Plan your insulation edge. That window return is a cold spot if you ignore it.
- Don’t bury access. If you have shutoffs, cleanouts, or valves near openings, keep a plan for access panels.
If you’re building or modifying basement openings, treat it as a separate mini project. That’s where structure, water, and code collide.
When you should not frame yet
This deserves its own section because it’s where most regret lives.
Don’t frame yet if:
- You have standing water or recurring wetting at the wall base.
- You smell strong musty air and you haven’t solved the source.
- Your insulation plan is “we’ll figure it out after framing.”
- You have active foundation cracks that are moving or leaking.
The basement doesn’t care that you bought lumber. If water is active, your “finished wall” becomes a sponge behind drywall. It will still look finished from the couch. Then it fails quietly.
Decision rules that cut through noise
Use these like a checklist before you commit to a system.
- If the basement gets wet, spend money outside first. Framing comes later.
- If you need straight walls fast, metal studs can make finishing easier, but only if the moisture plan is solid.
- If you want built-ins and heavy mounting, wood studs make life easier. Add blocking early.
- If you are planning a bathroom, plan plumbing and venting first. Framing follows the pipes, not your mood.
- If you do not understand vapor control, don’t default to poly. Learn the assembly for your climate.
Framing basement walls cost (what actually drives it)
Basement framing cost isn’t just studs and plates. The price swings based on constraints: how crooked the slab is, how many soffits you’re hiding, how many openings you’re framing, and how much blocking you need for real life (TVs, cabinets, rails).
- Layout complexity: more corners, more doors, more bulkheads = more time.
- Moisture strategy: foam-first assemblies cost more up front but save you from “mold behind drywall” money later.
- Material choice: wood is usually faster for DIY; steel can add backing costs if you’re hanging heavy things.
- Labor reality: basements are slow work — low ceilings, obstacles, shimming, odd framing around ducts/pipes.
Quick estimating habit: don’t guess by square feet alone. Count linear feet of wall, then add a “pain factor” if the basement is out of square, packed with mechanicals, or you’re building rooms instead of one open perimeter wall.
See: Basement Framing + Drywall Cost: What It Really Adds Up To
Quick checklist you can use today
- Walk the basement after a heavy rain. Look for damp bands, puddles, and wall base staining.
- Check the rim joist area for drafts and condensation clues.
- Decide exterior wall assembly first, including insulation and air sealing strategy.
- Mark wall layout on the slab with tape and live with it for a day.
- Locate shutoffs, cleanouts, panels, and electrical runs before walls go up.
- Choose wood vs metal based on finishing needs, not “moisture proof” myths.
- Plan doors and furniture clearances early so rooms don’t feel cramped.
- Think about fire blocking and chases before drywall hides everything.
- Budget time for shimming and correcting slab slope. It’s normal.
Conclusion
Basement wall framing is not hard because studs are complicated. It’s hard because basements are moisture and temperature systems. Get the water plan right, pick a wall approach that fits your layout and finishing needs, and don’t lock yourself into an assembly you don’t understand yet.
FAQ
What’s the best way to frame basement walls?
Start with moisture and insulation strategy, not studs. Figure out if you have bulk water (leaks/seepage) or just humidity, then pick a wall assembly that keeps the concrete from becoming a cold wet surface inside your finished wall. After that, choose wood, metal, or panels based on layout and how you plan to use the space. The “best” wall is the one that stays dry and can be serviced later without ripping drywall apart.
Should basement studs touch concrete?
In many assemblies, no. Direct contact can pull moisture into the framing and create cold-surface condensation problems. Some regions allow contact if you use treated material and specific details, but it’s not a default move. Treat “framing against concrete” as its own assembly problem, not standard interior framing.
How much space should I leave between the concrete wall and framing?
Don’t think of it as “a magic air gap.” Think of it as building to a control layer. If you’re doing rigid foam (sealed) against the concrete, your stud wall typically sits just inside that foam plane. The “gap” is basically the foam thickness, and you’re keeping the stud cavity warm and dry. What you don’t want is a big dead void behind the wall that stays cold and never dries.
Simple rule: frame to the insulation plane, not to bare concrete. If you can reach behind the wall and feel cold concrete, you’ve probably created a condensation zone.
Wood studs or metal studs for a basement?
Wood is easier for doors, trim, blocking, and heavy mounting, and it’s more forgiving when the slab is out of level. Metal is straighter and more consistent for drywall finishing, and it reduces rot anxiety in damp-prone basements. Neither choice fixes a wet basement. Pick based on how you’ll finish and use the wall, then keep humidity controlled and the assembly correct.
Do I need a vapor barrier behind framed basement walls?
It depends on climate and insulation type. The common mistake is installing interior polyethylene in the wrong assembly and trapping moisture where it can’t dry. In many foam-first basement walls, interior poly is unnecessary (and sometimes counterproductive). Prioritize air sealing and correct insulation placement first, then choose vapor control that matches your region and local practice.
How do you frame basement walls if you’re using spray foam?
The clean approach is usually foam-first: air-seal/insulate the concrete (and rim joist) first, then frame your wall inside that layer so the stud cavity stays on the warm side. The mistake is “half-spraying” or spraying inconsistently and leaving cold stripes—those are where condensation shows up. Also: plan wiring and backing early. Once foam and drywall are in, “we’ll add it later” turns into demolition.
What stud spacing is normal for basement framing?
16 inches on center is common because it keeps drywall stiffer and gives you more fastening options. You can sometimes go 24 inches on center for non-load-bearing partitions with the right finishes, but 16 is the safest default for most basements—especially if walls aren’t perfectly straight or you plan heavy finishes.
Do I need treated lumber for the bottom plate?
Often yes, especially where local code or inspector practice requires it for concrete contact. Some assemblies rely on a capillary break and dry conditions instead. Because this varies by jurisdiction, don’t guess—check what’s expected where you are before you frame.
What does code typically require for basement wall framing?
Codes vary by jurisdiction, but the common failure points are predictable: fire blocking/draft stopping, required clearances around mechanicals, proper treatment/protection where wood is near concrete or damp locations, and (if you’re creating bedrooms) egress requirements. The fastest way to avoid rework is to confirm what your local AHJ/inspector focuses on before you close walls.
What is a floating basement wall and do I need one?
It’s a framing detail that allows slab movement without crushing the wall. It shows up in areas with slab heave or seasonal movement. Many basements never need it. If your region talks about it a lot (or you’ve seen slab movement), learn the local method and why it exists before you anchor walls rigidly to the slab.
How much does it cost to frame basement walls?
It depends less on “basement size” and more on constraints: linear feet of wall, number of rooms/corners/doors, how out-of-level the slab is, soffits and mechanical obstacles, and how much blocking/backing you need for real use (TVs, cabinets, rails). Material prices swing, and labor speed matters a lot in basements because access is awkward and shimming is normal.
If you want a useful quote, measure linear feet of wall, note how many doors/openings you have, and tell contractors your insulation plan (foam-first vs stud-cavity). Then get local quotes—basement framing pricing is very regional.