Here is my own order. I’ve used it for over a decade. It hasn’t changed, and I don’t see it changing—because it matches how the good books sequence it anyway. It just makes sense.
Here’s why the order matters. Basements don’t fail because the studs were “wrong.” They fail because the concrete stays cold, the air stays humid, and somebody traps that combo behind a nice new wall.
If you frame before you decide the moisture/insulation strategy, you end up forcing materials into a cavity that shouldn’t exist. Or you leave the rim joist leaky because it’s annoying to reach later.
Then wiring gets run like spaghetti because the wall depth wasn’t planned. Drywall goes up, and the basement starts “smelling like basement” again six months later.
Nothing should be mysterious. Base everything on physics, and don’t let bad sequencing create problems you’ll be stuck living with.
If you keep only one idea: water control → air sealing → insulation logic → framing → rough-ins → close walls. Any time you flip that, you’re betting against the building.
If you want the complete layout + moisture plan (so you’re not guessing once studs are up), go here: How to Frame Basement Walls: Layout, Clearances, and Moisture-Safe Details.
Order of Operations for Basement Finishing: The Sequence That Prevents Rework

STOP: the two questions you answer before you buy a single 2x4
1) Do you have bulk water? (leaks, seepage, puddles, efflorescence, damp spots after rain)
2) Do you have a humidity problem? (musty smell, condensation on cold pipes/walls, RH living above ~50–60% in summer)
If you have bulk water, you’re not “finishing” a basement. You’re doing water management first. Finishes come later.
Step 0: Plan + permits (boring, but it saves you)
Decide what this basement is supposed to be: storage, family room, bedroom, rental, office, gym. The moment you add a bedroom, egress and smoke/CO alarms become a bigger deal, and your layout choices narrow fast.
Pull local requirements early. Codes vary by city, province/state, and sometimes by inspector mood. Don’t guess.
Step 1: Bulk water control (outside beats inside)
Start outside because it’s cheaper than ripping out drywall later. The goal is simple: keep liquid water away from the foundation.
- Downspouts discharged far from the house (not dumping right at the wall).
- Positive grading away from the foundation (no “bowl” around the house).
- Sump pump actually works (and has a plan for power outages if your area floods).
Messaging check: if you still get water after rain, you are not allowed to move to insulation. Not yet.
Step 2: Air sealing (this is where “basement smell” starts)
Air leaks feed humidity problems. The rim joist area is usually the worst offender: it’s messy, full of penetrations, and easy to ignore.
Focus your air-seal effort on:
- Rim joist + sill area: seal cracks, joints, and penetrations.
- Utility penetrations: pipes, wires, vents through the foundation wall.
- Top-of-wall leaks: the joint where foundation meets framing.
If you do this early, insulation works better and the space holds temperature without fighting you.
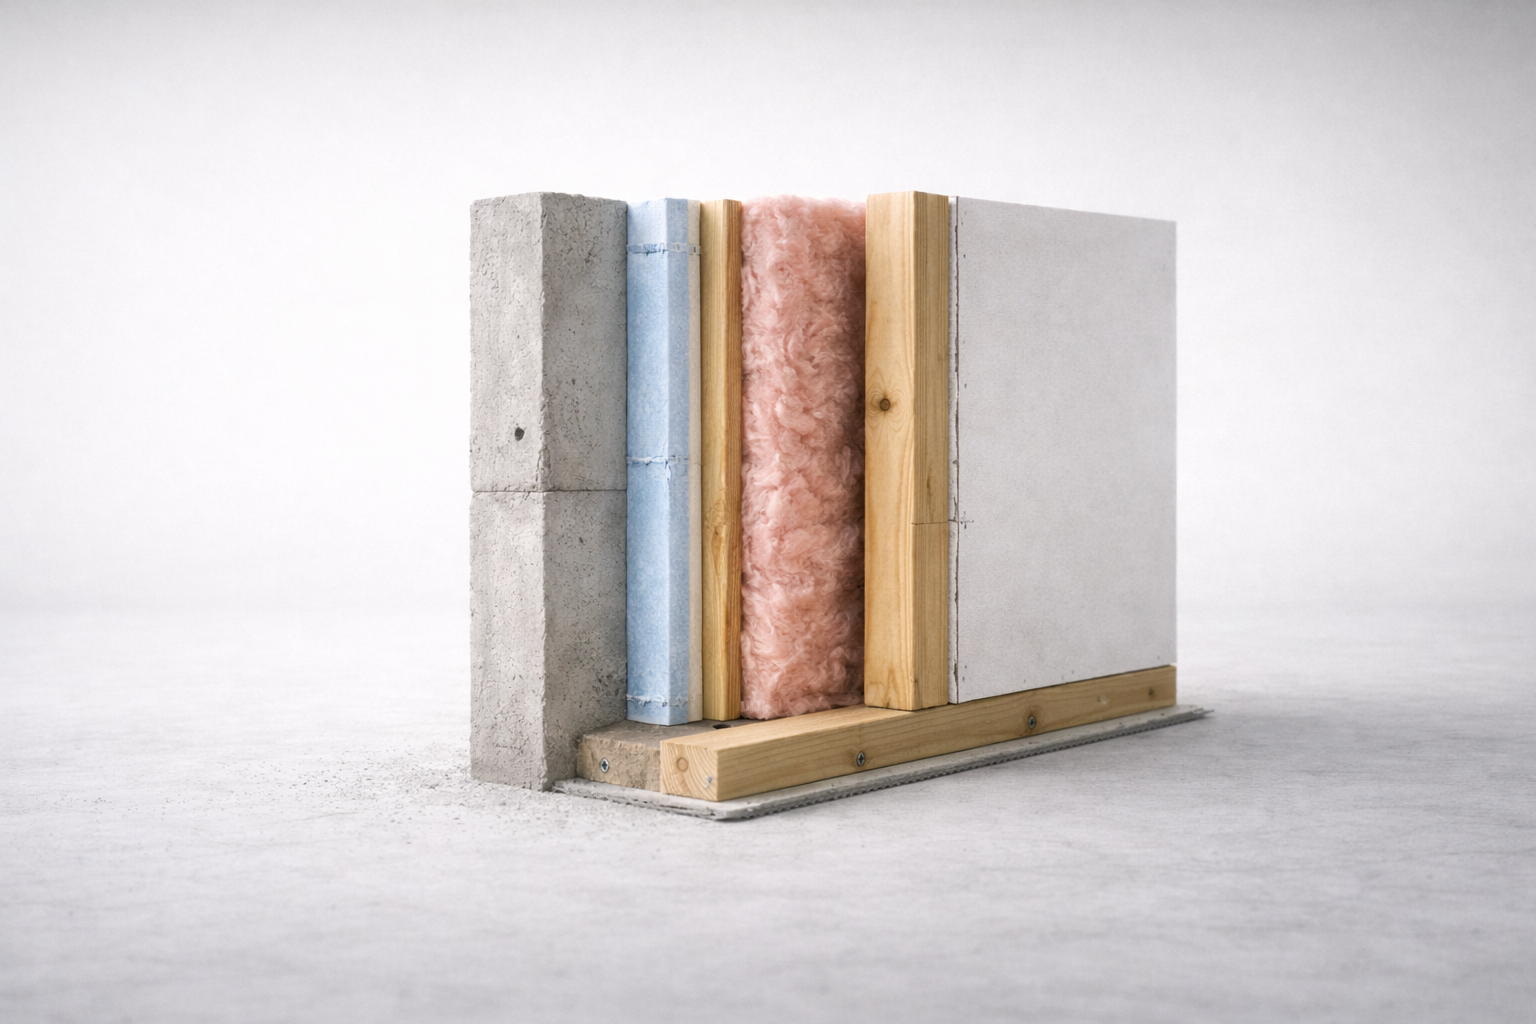
Step 3: Insulation strategy (pick one that doesn’t trap moisture)
Concrete is cold. Warm indoor air hits it and wants to condense. Your job is to stop warm, wet air from reaching cold concrete.
The common, reliable approaches are:
- Continuous rigid foam on the wall (then frame a service wall inside).
- Closed-cell spray foam in tricky areas (rim joists, irregular stone walls).
- Hybrid: rigid foam for continuity + batts inside the stud wall (only if the foam layer is doing the condensation control job).
Big warning: don’t default to interior poly sheeting just because someone did it in 1998. In many climates, that plastic can trap moisture and create the exact mold farm you’re trying to avoid. Build to your local code and climate logic.
Step 4: Floor decisions (you can’t “decorate” a cold slab)
If the slab is cold and you lay finish flooring straight on it, you’re inviting condensation and discomfort. You don’t always need a full raised subfloor, but you do need a plan.
- Simple route: a floor system designed for basements (dimple mat or insulated panels, depending on risk and budget).
- If you’re adding a bathroom or laundry: plan for drains, cleanouts, and access before you bury everything.
Messaging check: comfort matters. People avoid “finished” basements that still feel cold and wet.
Step 5: Layout with reality (headroom, mechanical, and the ugly plumbing truth)
This is where nice drawings go to die. Your plan has to respect beams, ducts, cleanouts, electrical panels, and where the plumbing can actually run.
If you’re adding a bathroom, confirm the plumbing path early. Toilets, vents, and ejector pumps do not care about your symmetry.
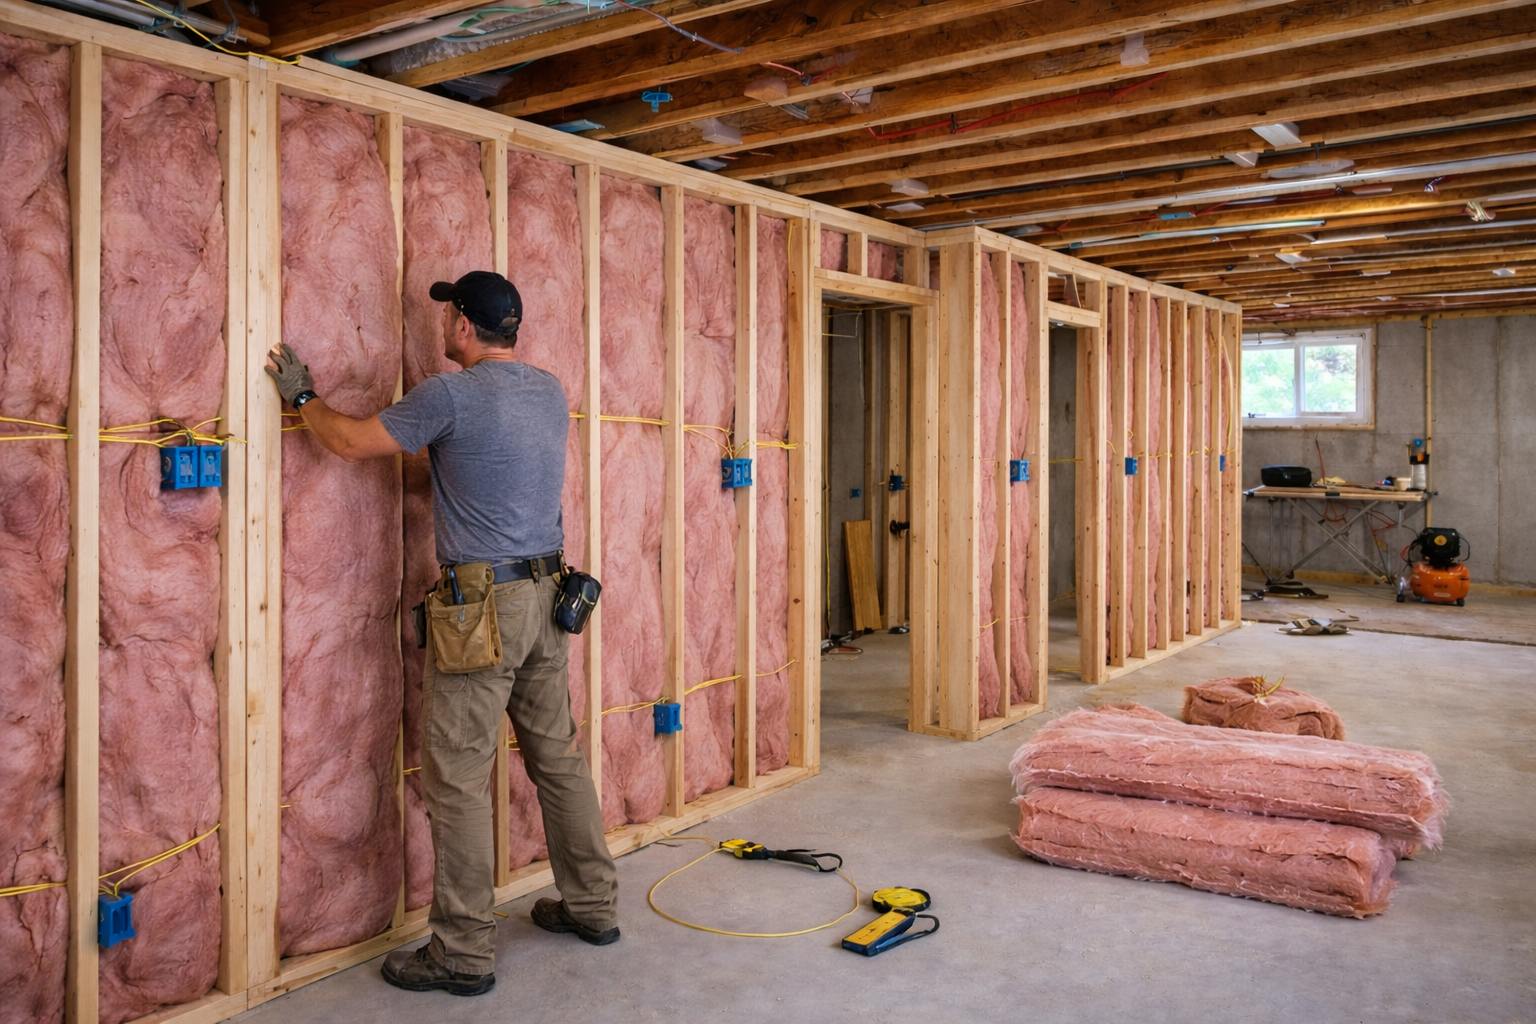
Step 6: Frame second (yes, second)
Once water control, air sealing, and insulation strategy are real—not “later”—then framing becomes straightforward.
- Bottom plates: use the right material where required (many jurisdictions require pressure-treated in contact with concrete).
- Don’t trap a wet wall: leave the right gap/approach per your insulation system.
- Plan wall depth: so wiring and insulation don’t get improvised.
Add blocking now for TVs, handrails, cabinets, wall-mounted vanities. Future-you will thank you.
Step 7: Rough-ins (electrical, plumbing, HVAC, ventilation)
Rough-ins go clean when the wall assembly is planned. They go ugly when you frame first and “figure it out.”
- Electrical: outlets, lighting zones, dedicated circuits for dehumidifier/sump if needed.
- Plumbing: venting routes, cleanouts, shutoffs, access panels where you’ll need them.
- HVAC: don’t assume the basement “just gets air.” Confirm supply/return strategy and keep humidity in mind.
Basements usually want a dehumidification plan. Not optional in a lot of houses.
Step 8: Fire blocking + safety (do it while the walls are open)
Fire blocking is one of those things people “leave for inspection week” and then regret immediately. Do it while you can still see what you’re doing.
Also: smoke/CO requirements and egress rules depend on use. If you’re creating sleeping rooms, treat this as serious life-safety work, not a checkbox.
Step 9: Close walls (only after the basement proves it can stay dry)
Before drywall, confirm:
- No active leaks or seepage.
- Humidity is stable (not creeping up every warm week).
- Insulation and air sealing are complete (not “we’ll add foam later”).
In moisture-prone zones, use materials that forgive a little (and detail them properly). Then keep access where you’ll need it: shutoffs, cleanouts, pumps, junctions.
Step 10: Finish + “commission” the basement (yes, like a building)
Once it looks done, you still have one job: make sure it behaves.
- Run the space through a summer humidity cycle and a winter cold cycle.
- Adjust ventilation/dehumidification.
- Watch the usual problem corners (behind furniture, near rim joists, around laundry/bath).
Messaging check: a basement is successful when it stays boring. No smell. No sweating pipes. No mystery dampness.
Common sequencing screw-ups
(the ones that waste weekends and money)
Framing first, thinking you’ll “add insulation later.” Later becomes impossible in corners and rim areas, so the cold stripes and condensation show up exactly where you can’t fix them without opening walls.
Skipping the rim joist air-seal. It’s the leakiest part of most basements. If it’s not sealed early, you’re paying to heat/cool outdoor air and wondering why the space never feels stable.
Hiding bulk water behind a new wall. You don’t “finish” a leak. You hide it until it gets worse. Fix drainage and seepage first, always.
Building a bathroom layout before confirming plumbing reality. Toilets, drains, vents, and ejector pumps don’t care about your room symmetry. If the plumbing path is ugly, the layout needs to adapt.
Forgetting blocking and backing. TVs, handrails, cabinets, wall-mounted vanities—if you don’t add backing now, you’ll be hunting studs later and swearing at anchors.
Leaving fire blocking “for inspection week.” That’s when you realize half the cavities are already closed, and now you’re cutting drywall to do something you should’ve done with a handful of scraps.
Mini-checklist: before you close the walls
- Water: no leaks, no seepage, downspouts/grade handled.
- Air: rim joist and penetrations sealed.
- Insulation: continuous strategy that won’t trap moisture.
- Rough-ins: plumbing/electrical/HVAC planned with access points.
- Safety: fire blocking and life-safety requirements addressed.
FAQ
Do I need a vapor barrier in a finished basement?
“It depends” is the honest answer, because the wrong vapor control can trap moisture. Many basement systems rely on continuous foam (or spray foam) and a wall assembly that manages vapor in a climate-appropriate way. Follow your local code and choose an assembly that prevents warm interior air from reaching cold concrete.
Can I just put fiberglass batts against the concrete wall?
That’s a classic way to grow mold if you don’t have the right condensation control layer. Batts can work as part of a system, but concrete needs a strategy first (usually continuous insulation and air control).
Why is the rim joist such a big deal?
Because it leaks air like crazy in most houses, and it’s usually a cold surface. Air leaks + cold surfaces = condensation risk and comfort problems. Seal and insulate it early while it’s still accessible.
My basement is “dry” most of the time. Can I skip water work?
If you only get water during heavy rain or spring melt, that still counts. Finishing makes failures more expensive. The safer move is to handle drainage and water management first, then build.
How do I stop the basement from smelling musty after finishing?
You remove the drivers: humidity and air leakage. Air-seal the rim/penetrations, choose an insulation approach that prevents condensation, and control indoor humidity (often with a dehumidifier and sane ventilation).
Do I need a permit to finish a basement?
Often, yes—especially if you touch electrical, add bedrooms, modify egress, or add plumbing. Local rules vary, so check before you close walls.
What’s the fastest way to ruin a basement build-out?
Framing first and “figuring out moisture later.” That one decision creates most of the long-term failures: moldy cavities, cold stripes, and a basement nobody wants to use.
References & Resources
- Canada’s building codes hub (CBHCC) — where the national model codes live
- National Building Code of Canada (NRC / Codes Canada) — official code reference entry point
- Health Canada — moisture and mould guidance for homes
- U.S. EPA — mold cleanup guidance (useful baseline for homeowners)
- International Code Council (ICC) — overview and access path to the I-Codes
- Oak Ridge National Laboratory (U.S. DOE) — basement insulation basics (technical but practical)