
Fixing a Leaky Foundation? These 5 Materials & Tools Will Help
Fix your leaking foundation without the contractor markup. This no-BS DIY guide covers real solutions to stop water damage and keep your basement dry.
The Contractor’s No-BS Guide to Fixing Your Leaking Foundation—DIY Edition
Listen, if your foundation is leaking, cracking, or letting in water, you’ve got a problem that won’t fix itself. Ignoring it? That’s a one-way ticket to mold, structural damage, and a whole lot of money down the drain later.
Now, can you fix it yourself? Hell yes—if you do it the right way. But don’t waste money on cheap sealers, weak patch jobs, or useless paint-on waterproofing that peels off in a year. You need contractor-grade solutions that actually work.
Here’s the proven list of the best materials and tools to seal, reinforce, and waterproof your foundation—for good.
Top 5 Must-Have Materials & Tools for DIY Foundation Repair
Complete Guide to Foundation Waterproofing Membranes
Common Causes of Foundation Leaks

Before you start patching, let’s get real about what causes foundation leaks so you can prevent future damage:
- Poor Drainage: Water pooling around your foundation is the #1 enemy. If your gutters and downspouts don’t direct water away, you’re asking for trouble.
- Cracks & Gaps: Even hairline cracks let water seep through. Over time, they widen and lead to structural damage.
- Hydrostatic Pressure: If water has nowhere to go, it pushes against your foundation, forcing moisture inside.
- Aging Concrete: Concrete naturally absorbs water over time, making it prone to cracks.
- Basement Window Leaks: Cheap or improperly installed windows let water sneak in.
- High Water Table: If you live in an area with a high water table, your foundation is under constant attack from below.
Step 1: Fix Drainage Issues First
Before sealing anything, make sure water isn’t collecting around your foundation. Here’s what you need to do:
- Clean & Extend Downspouts: Water should be directed at least 5-10 feet away from your foundation.
- Install a French Drain: If you’ve got constant standing water, this is a must.
- Regrade Your Yard: The ground should slope away from your house, not toward it.
Best Seller: Amerimax Flex Grate Downspout Extender Check Price on Amazon
5 Proven Materials & Tools to Stop Water Leaks in Your Foundation
- Fixing Your Leaking Foundation: A No-BS DIY Guide
- DIY Foundation Repair: The 5 Best Tools & Materials for the Job
The 5 Best Materials & Tools to Fix a Leaking Foundation (DIY-Style)]
Everything You Need to Know About Foundation Waterproofing Membranes
These are contractor-approved solutions that actually work. No fluff, no gimmicks, just results.
1. Liquid Rubber Concrete Foundation and Basement Sealant
✅ Best for: Waterproofing foundation walls, basement walls, and footings
Why This Works & How to Use It
This is not some weak, paint-on sealer that flakes off. This forms a flexible, waterproof membrane that stretches with temperature changes, so it won’t crack.
How to Apply:
- Clean the wall – Remove dust, grease, or loose material with a wire brush.
- Apply first coat – Use a heavy-duty brush, roller, or sprayer.
- Let it dry (about 24 hours).
- Apply a second coat – Two coats make it bulletproof.
- Let it fully cure before backfilling – At least 48 hours.
✔ Pros:
- Forms a seamless waterproof barrier
- Easy to apply (DIY-friendly)
- Non-toxic, low fumes
❌ Cons:
- Needs multiple coats
- Not for active leaks (apply to dry concrete)
📌 Pro Tip: Fix foundation cracks before applying waterproofing.
👉 Best Seller: Liquid Rubber Concrete Foundation Sealant Check Price on Amazon
2. RadonSeal Concrete Foundation Crack Repair Kit
✅ Best for: Sealing cracks in poured concrete before they get worse
Why This Works & How to Use It
If water is leaking through cracks in your basement walls, don’t just patch it—seal it from the inside out. This kit injects polyurethane deep into cracks, expanding to seal every tiny gap.
How to Apply:
- Clean the crack – Use a wire brush and vacuum.
- Install injection ports – These let you force the polyurethane deep inside.
- Seal the crack’s surface with epoxy.
- Inject the polyurethane foam – It expands to fill every gap.
- Wait 24 hours, then remove the injection ports.
✔ Pros:
- Seals cracks permanently
- Expands to fill every gap
- DIY-friendly
❌ Cons:
- Only for poured concrete walls (not cinder block)
- Takes patience (don’t rush it)
Pro Tip: For larger cracks, use a 40' Contractor Polyurethane Kit.
Best Seller: RadonSeal Crack Repair Kit Check Price on Amazon
3. 40' Contractor Polyurethane Foundation Crack Repair Kit
✅ Best for: Bigger cracks and multiple leaks
Pro Tip: If you have block walls, you need an epoxy mortar system.
Best Seller: Contractor Polyurethane Crack Repair Kit Check Price on Amazon
4. Rain Guard Water Sealers Concrete Sealer
✅ Best for: Protecting driveways, slabs, and exterior foundation walls
Pro Tip: Apply this before winter if you live in a freeze-thaw climate.
Best Seller: Rain Guard Concrete Sealer Check Price on Amazon
5. Liquid Rubber Waterproof Sealant
Best for: Waterproofing basement walls, footings, or retaining walls
Pro Tip: Use this on exterior walls before backfilling for max protection.
👉 Best Seller: Liquid Rubber Waterproof Sealant Check Price on Amazon
Final Contractor’s Advice
✔ Fix cracks first before applying waterproofing.
✔ Use proper drainage – Even the best waterproofing won’t help if water pools at your foundation.
✔ Don’t rush the drying process – Curing time matters.
When to Call a Pro
If your foundation has major structural issues (like shifting walls or huge cracks wider than ¼ inch), get an expert. DIY can save you thousands, but some problems need a pro.
Best Seller: Basement Watchdog Sump Pump Check Price on Amazon
Follow this guide, and your foundation will stay leak-free for decades. Save your house. Save your wallet. Get it done right.
In-Focus: The Foundation Waterproofing Mistake That Will Cost You Thousands
Most homeowners (and even some contractors) get foundation waterproofing wrong—and it’s not just about using the wrong product. The biggest mistake? Waterproofing without fixing drainage.
You can have the best sealant, the strongest crack repair kit, and the thickest membrane, but if water is constantly pooling against your foundation, your efforts will eventually fail.
Let’s break it down:
Why Drainage Is More Important Than Waterproofing Alone
Imagine you’re in a boat, and there’s a small hole in the bottom. You can patch the hole, but if water keeps rising, you’re still in trouble. The same logic applies to your foundation.
Waterproofing products block moisture, but if water is being forced against your foundation day after day, eventually, pressure finds a weak spot. And trust me—concrete is strong, but it’s not invincible.
Here’s How Water Wrecks Your Foundation Over Time:
✅ Hydrostatic Pressure Builds Up – Waterlogged soil pushes against your foundation walls. If there’s no way for it to drain, it forces water into microcracks, eventually leading to leaks.
✅ Soil Expands and Contracts – Clay-heavy soil swells when wet and shrinks when dry. This constant movement causes foundation cracks.
✅ Water Wicks Up Through Concrete – Ever seen a basement with damp walls even when it’s not raining? That’s capillary action pulling moisture from below.
✅ Freeze-Thaw Cycles Crack Foundations – If water gets into cracks and freezes in winter, the expansion makes the cracks worse.
The Fix: Drainage That Keeps Water Away for Good
1️⃣ Install a Proper French Drain (The Right Way)
A French drain is your foundation’s best friend. But most DIYers install them wrong—here’s how to do it properly:
✔ Dig the trench deep enough – It should go below the foundation’s footing, not just sit at surface level.
✔ Use perforated pipe – Get a 4-inch perforated PVC pipe, not cheap corrugated tubing. The solid side should face up, so water enters from below and drains out.
✔ Surround it with clean gravel – At least 6 inches around the pipe to allow proper drainage.
✔ Wrap it in filter fabric – Stops dirt from clogging the pipe over time. Skipping this step ruins the system within a few years.
✔ Slope it away from the house – A 1% slope ensures water actually moves instead of sitting in the trench.
2️⃣ Extend Your Downspouts (Most People Get This Wrong)
A huge percentage of foundation leaks are caused by rainwater dumping next to the foundation.
Most homes have downspouts that barely extend past the foundation. Water should be moved at least 6 feet away. Here’s how:
✔ Use a downspout extension – Attach a flexible extension or solid PVC pipe and route it away from the house.
✔ Bury the pipe – If you want a clean look, run the pipe underground and out to daylight (a pop-up emitter works great).
✔ Slope the land away from the foundation – If your yard slopes toward your house, water will always find a way inside.
3️⃣ Use a Drainage Board with Your Waterproofing
If you’re applying Liquid Rubber Sealant or a waterproof membrane, take it a step further with a drainage board.
✔ What It Does: Keeps water off the foundation by creating a gap between the wall and the soil.
✔ Best Type: Dimpled plastic drainage boards (like Delta MS) allow water to flow down to your French drain instead of pressing against the foundation.
✔ How to Install:
1️⃣ Attach the drainage board to the outside of the foundation before backfilling.
2️⃣ Ensure it overlaps the waterproofing layer so water flows downward.
3️⃣ Secure it at the top with a termination bar.
Key Takeaways
- Waterproofing without drainage is a temporary fix.
- A French drain should go BELOW your foundation footings.
- Downspouts should extend at least 6 feet away.
- A drainage board protects waterproofing layers and prevents soil pressure damage.
Final Thought: Get Drainage Right First, Then Waterproof
Too many people waste time fixing leaks without addressing what’s causing them. Start with drainage first, then apply waterproofing products.
Do it right, and your foundation will stay dry for decades. Do it wrong, and you’ll be patching leaks forever.
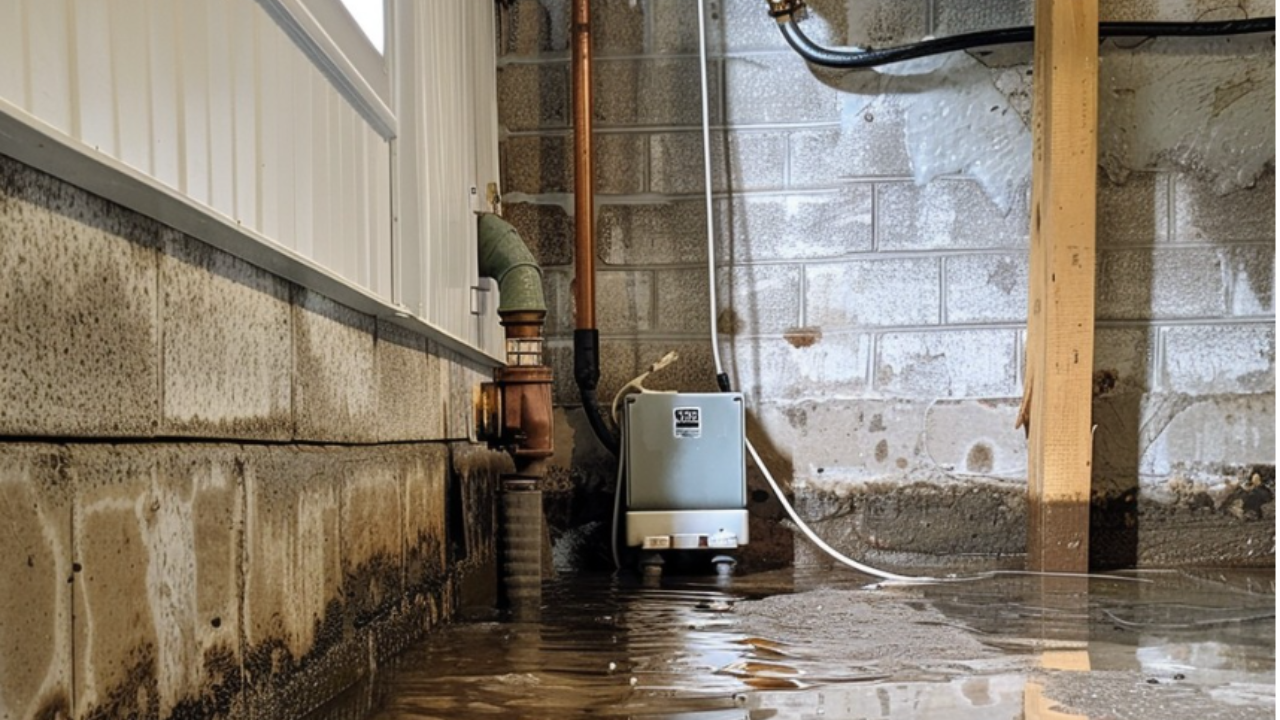
The Real-Life Cost of Doing It Wrong
You’ve seen the DIY videos. Maybe even read a few blogs that say "just patch it with some sealer and you’re good." But here’s what those posts don’t show you: what happens when you cut corners and try to fix a leaking foundation without understanding what you’re doing.
Real Case: The $35,000 Basement Mistake
We got called to inspect a house in Ontario that had been leaking for months. The homeowner had tried three different store-bought waterproofing paints and even hired a handyman to "plug the cracks." The result? Mold on the insulation, water-damaged studs, and foundation walls crumbling behind the drywall.
The bill? $35,000 for full interior gutting, mold remediation, external excavation, proper waterproofing membrane, and drainage replacement.
And it all started with a few small hairline cracks and a $20 tub of waterproofing goop.
Why Most DIY Fixes Fail
- Wrong Products – Paint-on waterproofers don’t hold up to pressure.
- No Drainage Fixes – Water pressure keeps coming if you don’t reroute it.
- Skipped Crack Sealing – Covering a crack doesn’t seal it. It needs injection or proper fill.
- No Surface Prep – If you don’t clean and prep the surface, nothing will stick.
What You Actually Need
- Contractor-grade sealants – Like polyurethane or Liquid Rubber.
- Proper crack repair kits – That inject, expand, and seal from within.
- Drainage correction first – French drains, slope fixes, downspout extensions.
- Waterproofing membranes AND a drainage board – Not one or the other.
When to DIY vs. Call a Pro
DIY works when:
- Cracks are under 1/4 inch
- There’s no standing water or bulging walls
- You can trace the problem to poor drainage
Call a pro when:
- Your basement floods repeatedly
- You have structural shifting or walls bowing in
- You see white powder (efflorescence) or mold growing deep
Bottom Line? If you’re not fixing the real cause (usually drainage), you're just kicking the can down the road—and it’ll come back twice as expensive.
Don’t just ask "what can I use to seal the wall?" Ask: "What’s letting water in—and how do I stop it for good?"
Dos and Don'ts of Foundation Waterproofing
DOs:
-
Do ensure proper grading around your home: The soil should slope away from the foundation to prevent water accumulation.
-
Do clean and maintain gutters and downspouts regularly: This ensures effective diversion of rainwater away from your foundation.
-
Do fill foundation cracks with appropriate sealants: Using hydraulic cement can effectively seal cracks and prevent water ingress.
-
Do install interior drainage systems if necessary: Such systems can help manage water that enters the basement, directing it away from the foundation.
-
Do consult professionals for persistent or severe issues: Expert assessment can provide tailored solutions to complex problems.
DON'Ts:
-
Don't ignore signs of moisture or leaks: Early intervention can prevent extensive damage and costly repairs.
-
Don't rely solely on interior waterproofing solutions: Addressing exterior issues is crucial for comprehensive protection.
-
Don't make repairs when there's standing water present: Always ensure the area is dry to reduce risks and ensure effective application of repair materials.
-
Don't use generic sealants for significant cracks: Specialized products like hydraulic cement are designed for such purposes and offer better protection.
-
Don't overlook the importance of proper drainage: Without adequate drainage, waterproofing measures may eventually fail.
Related: Best Exterior Foundation Waterproofing Products for 2025
FAQ on Foundation Waterproofing
Q1: What are the common signs of a leaking foundation?
A: Indicators include visible cracks in walls or floors, damp spots, peeling paint, mold growth, and a musty odor in the basement. Efflorescence, a white powdery residue on walls, also suggests water intrusion.
Q2: How can I determine if water is entering my basement from the interior or exterior?
A: Conduct a simple test by drying a section of the wall and attaching a 1-foot square piece of aluminum foil with duct tape. After 24 hours, if moisture appears on the foil's underside, water is seeping from outside. If the top is wet, interior humidity is the culprit.
Q3: What immediate steps should I take if my basement floods?
A: First, identify the water source. If it's from plumbing, shut off the main water supply and contact a plumber. For water entering through walls or floors, remove standing water using a utility pump and ensure the area is dry before assessing and addressing the cause.
Q4: Can I waterproof my basement myself, or should I hire a professional?
A: Minor issues like small cracks can often be handled with DIY solutions. However, extensive problems, persistent leaks, or structural concerns warrant professional assessment to ensure effective and long-lasting repairs.
Q5: How long does basement waterproofing last?
A: The longevity of waterproofing solutions varies based on the method and materials used. High-quality exterior waterproofing can last 10 years or more, while interior solutions might require maintenance every 5 to 7 years.
Q6: Will homeowners insurance cover basement waterproofing?
A: Coverage depends on your specific policy. Many standard policies don't cover damage from groundwater seepage but might cover sudden incidents like burst pipes. It's essential to review your policy details or consult your insurance provider.
Q7: How often should I inspect my basement for potential water issues?
A: It's advisable to inspect your basement at least twice a year, preferably during spring and fall, to identify and address potential problems before they escalate.
Q8: What is hydrostatic pressure, and how does it affect my foundation?
A: Hydrostatic pressure refers to the force exerted by standing water in the soil against your foundation walls. Over time, this pressure can cause cracks, leaks, and structural damage if not properly managed.
Q9: Are there any health risks associated with a damp basement?
A: Yes, a moist environment promotes mold growth, which can lead to respiratory issues, allergies, and other health problems, especially in individuals with compromised immune systems.
Q10: What's the difference between dampproofing and waterproofing?
A: Dampproofing is designed to resist soil moisture and is typically used where groundwater conditions are mild. Waterproofing, on the other hand, provides a stronger barrier against liquid water and is essential in areas prone to heavy rainfall or high water tables.
Resources
For comprehensive and authoritative information on foundation maintenance, waterproofing, and related topics, consider consulting the following official resources:
-
U.S. Environmental Protection Agency (EPA): Offers guidelines on mold prevention and control in basements.
-
Federal Emergency Management Agency (FEMA): Provides resources on floodproofing and basement water management.
-
International Association of Certified Home Inspectors (InterNACHI): Features articles on basement moisture intrusion and prevention.
-
American Society of Home Inspectors (ASHI): Offers insights into foundation maintenance and waterproofing best practices.
For localized advice and services, consider consulting reputable basement waterproofing professionals in your area.