A crawl space can be sealed and still not be conditioned. That difference matters.
Encapsulation usually means the crawl space is sealed against ground moisture and outside air. Conditioning means the crawl space is treated more like part of the home’s controlled environment, with humidity control, air exchange, insulation strategy, or HVAC connection handled on purpose.
The mistake is treating both words as the same upgrade. A contractor may say “encapsulation” when they mean plastic on the ground. Another may say “conditioned” when they only mean the vents were closed. Neither is enough if water, air leaks, insulation, ducts, and humidity are not handled as a system.
Conditioned crawl space vs encapsulated crawl space at a glance
An encapsulated crawl space and a conditioned crawl space can overlap, but they are not identical. Encapsulation is usually the sealing layer. Conditioning is the active control layer.
| Crawl-space type | What it usually includes | What can still go wrong |
|---|---|---|
| Vented crawl space | Open foundation vents, floor insulation above, exposed or lightly covered ground | Humid outdoor air, cold floors, mold, pests, wet insulation, and condensation |
| Vapor barrier only | Plastic or membrane over the soil | Open seams, uncovered wall edges, humid vents, and no active humidity control |
| Encapsulated crawl space | Sealed ground vapor barrier, sealed seams, sealed vents, wall coverage or wall insulation, air sealing | Humidity can still rise if water, ducts, leaks, or air exchange are not handled |
| Encapsulated plus dehumidifier | Encapsulation with active humidity control | Drainage, sizing, condensate discharge, maintenance, and power still matter |
| Conditioned crawl space | Encapsulation plus planned air or humidity control, often with wall insulation and sealed vents | Bad HVAC connections, poor sealing, unbalanced air, or ignored water problems can create new issues |
The simple version: encapsulation separates the crawl space from the ground and outside air. Conditioning controls the air and humidity after that separation is made.
What crawl-space encapsulation actually means
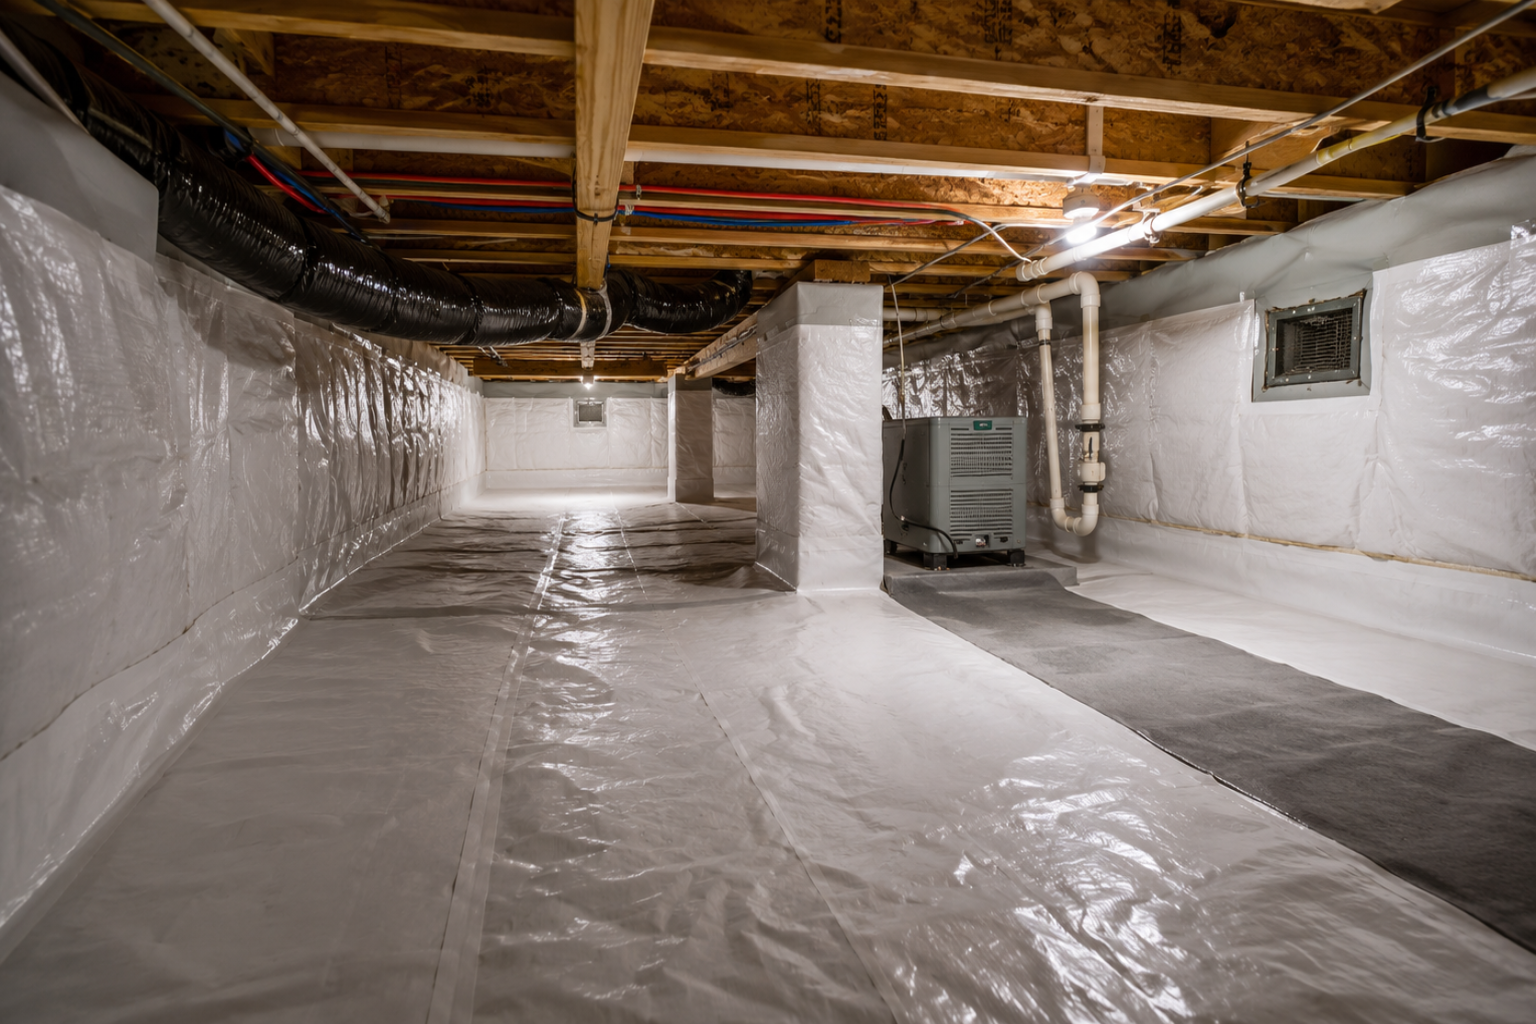
Real encapsulation is not just plastic tossed on dirt. It usually includes a continuous ground vapor barrier, overlapped and taped seams, sealed edges, sealed or closed vents, wall treatment, rim-joist air sealing, and a plan for moisture that enters from plumbing, grade, ducts, or the foundation walls.
A weak encapsulation job often looks clean on day one and fails later because the edges were not sealed, the wall was ignored, the vents still leak, or water keeps entering under the membrane.
Good encapsulation should deal with:
- ground vapor from exposed soil
- open seams in the vapor barrier
- barrier edges at foundation walls and piers
- crawl-space vents
- rim-joist and band-joist air leakage
- wet insulation
- standing water before the membrane goes down
- plumbing leaks and duct condensation
- access door sealing
If the crawl space gets wet after rain, solve that first. See water in a crawl space after rain before paying for a clean vapor barrier over an active drainage problem.
What conditioning adds after encapsulation
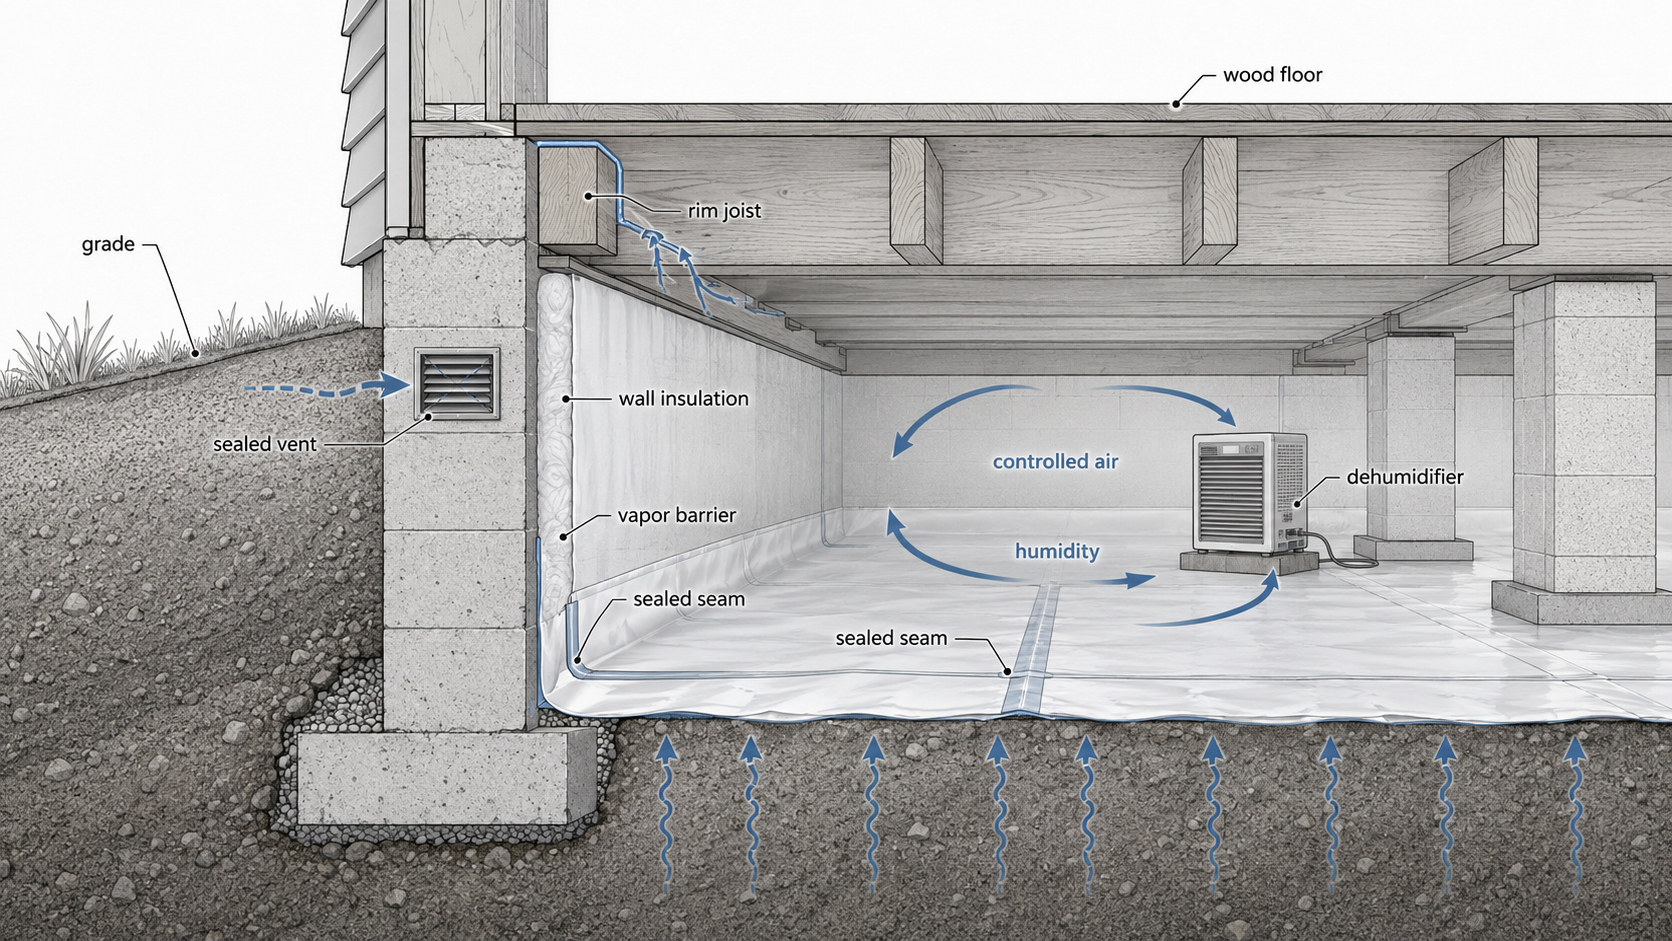
Conditioning adds control. That control may come from a dehumidifier, a small amount of supplied air, controlled return air, dedicated ventilation, or another code-accepted strategy. The exact method depends on the house, climate, local code, HVAC design, and crawl-space conditions.
The important point is that a conditioned crawl space is not just closed. It is managed.
Conditioning may involve:
- keeping crawl-space humidity within a controlled range
- moving the insulation layer from the floor to the foundation walls
- air sealing the rim joist and access points
- sealing or abandoning traditional crawl-space vents
- adding a crawl-space-rated dehumidifier
- adding controlled supply air where allowed and designed correctly
- protecting ducts and plumbing from damp crawl-space air
- making the crawl space easier to inspect and service
A crawl space that is sealed but has no drying path can still become damp. A crawl space that is connected to the HVAC system without proper design can create pressure, odor, comfort, or moisture problems.
Encapsulation is usually the first layer
Most conditioned crawl spaces start with encapsulation. That is because you cannot control crawl-space air well while the ground is still releasing moisture and vents are still bringing outdoor humidity inside.
Think of it in layers:
- Stop bulk water first. Fix drainage, grading, downspouts, plumbing leaks, and standing water.
- Control ground vapor. Cover the soil with a sealed vapor barrier.
- Control outside air. Seal vents, access gaps, rim leaks, and obvious air paths.
- Control temperature surfaces. Use the right insulation strategy for the crawl-space approach.
- Control humidity. Add dehumidification, conditioned air, or another approved drying method where needed.
Skipping the first layers makes the final layer work harder. A dehumidifier cannot make up for water pooling under the barrier. HVAC air cannot fix an open vent beside wet soil.
When encapsulation may be enough
Encapsulation may be enough when the crawl space is basically dry, drainage works, the soil is covered well, seams are sealed, vents and access leaks are controlled, and humidity stays in a safe range after the work.
That does not mean the crawl space becomes perfect. It means the crawl space no longer has enough moisture load to require more active control.
Encapsulation alone is more likely to work when:
- there is no standing water
- the house has good exterior drainage
- the ground vapor barrier is continuous and sealed
- vents and access gaps are controlled
- wood moisture stays reasonable
- ducts are not sweating
- there is no persistent musty odor
- humidity stays controlled through the wet season
For homeowners tracking the space after work, a simple wireless crawl-space hygrometer can help show whether humidity is staying under control. Treat it as a monitoring tool, not proof that the crawl space was designed correctly.
When conditioning makes more sense
Conditioning makes more sense when the crawl space is part of the home’s air and thermal system, or when humidity stays too high after sealing.
It is especially worth discussing when:
- ducts or air handlers run through the crawl space
- the crawl space affects indoor odor or comfort
- floor insulation has failed repeatedly
- humidity remains high after encapsulation
- wood moisture stays elevated
- the crawl space is in a humid climate
- the home has recurring mold or musty air
- the space needs regular service access
A crawl-space-rated dehumidifier may be the cleaner answer in many homes, especially when adding HVAC supply air would create pressure or design problems. If one is used, it needs proper sizing, drainage, service access, and maintenance. A crawl-space dehumidifier is useful only when it fits the space size, moisture load, drain setup, and service access.
The vented crawl-space problem
Traditional crawl-space vents were meant to let moisture escape. In many climates, they also bring humid outdoor air into a cooler crawl space. That air can condense on wood, ducts, pipes, insulation, and foundation surfaces.
A vented crawl space can fail quietly. The house above may only show musty air, cold floors, high humidity, cupped flooring, rusted ductwork, fallen insulation, pests, or soft wood near the sill and joists.
This is why many crawl-space upgrades start by asking whether the space should remain outside the house or be brought inside the home’s air and moisture control boundary. The halfway version is the risky one: open to outdoor humidity but still connected to the house above.
Insulation: floor or crawl-space walls?
Insulation location changes with the crawl-space strategy.
In a vented crawl space, insulation often belongs in the floor above the crawl space because the crawl space is treated as outside the conditioned area. In an encapsulated or conditioned crawl space, insulation often shifts to the foundation walls so the crawl space is pulled closer to the home’s controlled environment.
That shift matters. If the vents are sealed but the wall insulation, rim joist, ground vapor barrier, and humidity control are not handled, the crawl space may become a damp closed box.
Common insulation mistakes include:
- leaving wet fiberglass between joists
- sealing vents without changing the rest of the moisture strategy
- insulating walls while leaving ground vapor uncontrolled
- ignoring rim-joist air leakage
- using materials that cannot handle crawl-space moisture exposure
- blocking inspection access to wood framing and utilities
Bad encapsulation can trap moisture

Bad encapsulation can make a crawl space look improved while moisture is still active underneath or around the edges.
The common failures are simple:
- plastic laid over wet soil without drainage repair
- seams overlapped but not sealed
- vapor barrier stopped short of walls and piers
- vents left leaky
- access door still leaking outside air
- rim joist left open
- wet insulation left in place
- duct condensation ignored
- no way to control humidity after sealing
Plastic on the ground may reduce soil vapor, but it is not a full crawl-space system by itself. If the crawl space already has structural damage, see crawl space foundation repair before treating the project as only a moisture upgrade.
Which one should you choose?
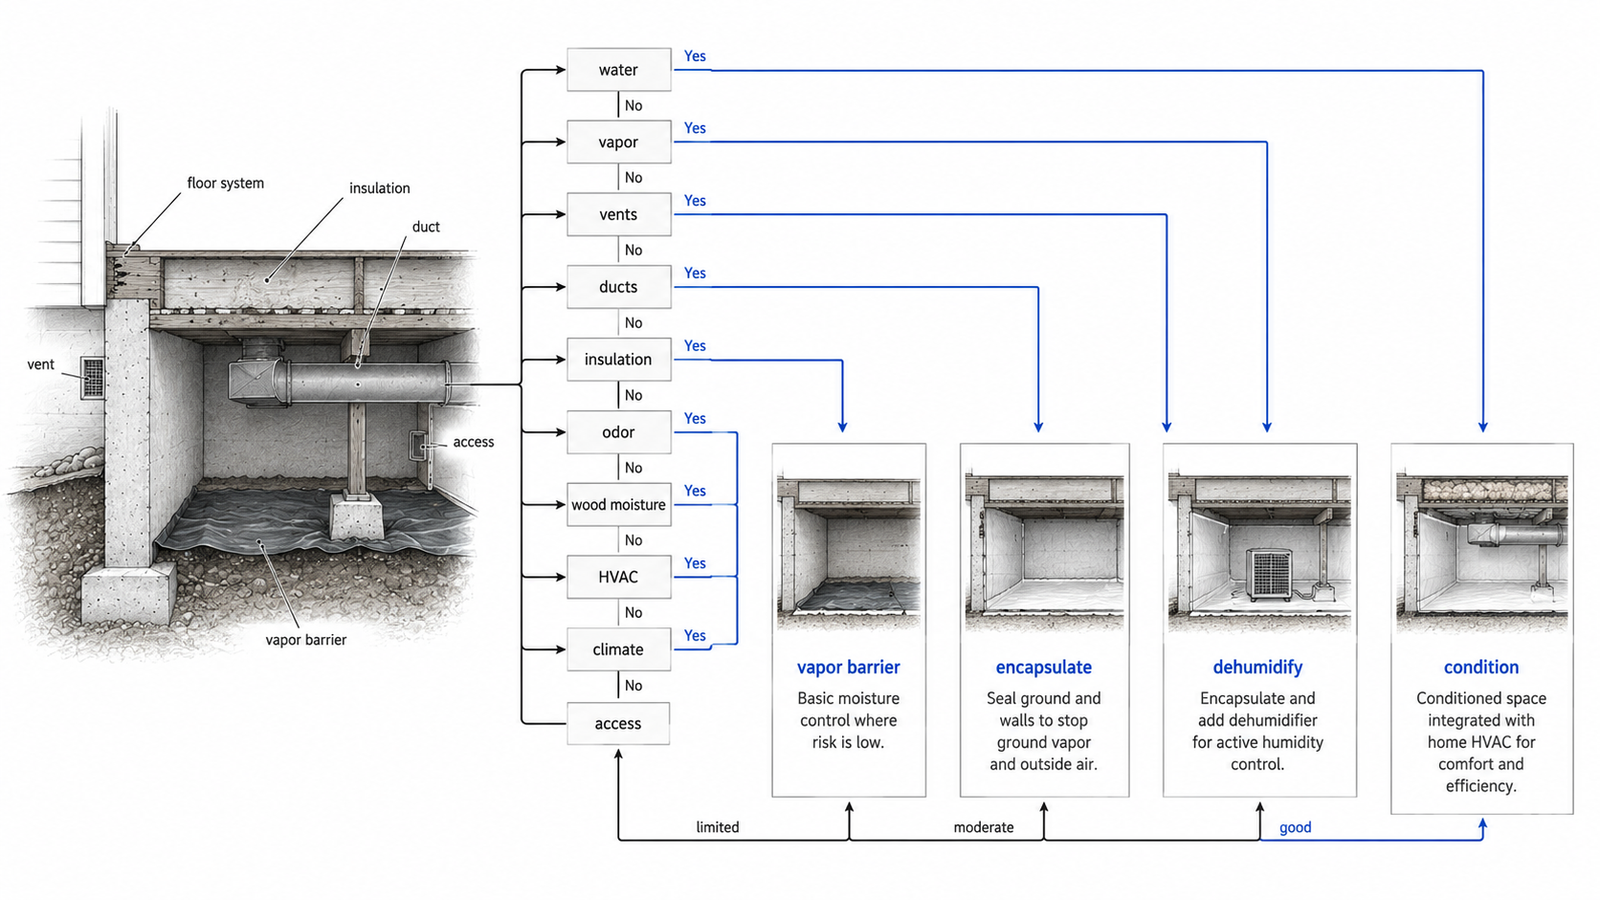
Start with the crawl space you actually have, not the label a contractor uses.
| Condition | Likely direction | Why |
|---|---|---|
| Dry crawl space with bare soil or weak ground cover | Vapor barrier or encapsulation | Ground moisture should be controlled before bigger upgrades. |
| Wet crawl space after rain | Drainage repair before encapsulation | A membrane should not hide an active water-entry problem. |
| High humidity after sealing | Encapsulation plus dehumidification or conditioning | The space still needs a drying/control method. |
| Ducts or equipment in crawl space | Conditioned or carefully dehumidified crawl space | The crawl space affects energy use, comfort, and indoor air. |
| Rotten beams, joists, or bad supports | Structural repair first | Moisture control helps, but it does not replace damaged load-bearing wood. |
| Musty odor and damp wood | Moisture diagnosis, encapsulation, and humidity control | Odor often means the crawl space is still part of the home’s air problem. |
The safest order is usually: fix water, repair damaged structure, seal the crawl space, insulate correctly, then control humidity.
What contractors often blur together
Homeowners get confused because crawl-space contractors use the same words differently. One contractor may call a ground vapor barrier “encapsulation.” Another may use “conditioned” to mean sealed vents and a dehumidifier. Another may mean the crawl space is connected to the HVAC system.
Before approving work, ask exactly what is included:
- Will standing water or drainage be fixed first?
- How thick is the vapor barrier?
- Are seams taped or sealed?
- Does the barrier run up the wall and around piers?
- Are vents sealed?
- Is the rim joist air sealed?
- Where is the insulation layer?
- Will humidity be controlled after sealing?
- Is there a dehumidifier, HVAC supply, or other drying method?
- How will condensate drain?
- Can the crawl space still be inspected and serviced?
- What does the warranty exclude?
The answer should describe the system, not only the material.
Cost traps homeowners miss
The cheapest crawl-space quote may leave out the work that makes the upgrade last.
Watch for missing scope around:
- drainage and downspout correction
- removal of wet insulation
- mold cleanup where needed
- wood repair before sealing
- rim-joist air sealing
- wall insulation
- dehumidifier sizing and drainage
- access door replacement or sealing
- service paths for plumbing, wiring, and HVAC
- monitoring after installation
For broader foundation pricing, see foundation repair cost. For encapsulation-specific pricing, use crawl space encapsulation cost.
What homeowners discover after the job is done
The job is not finished just because the crawl space looks cleaner. Homeowners often discover the real quality of the work weeks or months later.
Look for:
- humidity readings after rain
- condensation on ducts or pipes
- musty odor returning through floors or registers
- loose seams or pulled barrier edges
- standing water trapped below the membrane
- dehumidifier drainage problems
- new pest entry points
- service access blocked by barrier or insulation
- wood that still feels damp
A good crawl-space upgrade makes the space boring: dry, accessible, sealed, serviceable, and easy to monitor. A bad upgrade only makes it white and shiny.
When foundation repair comes first
Do not encapsulate over a structural problem and call it done.
If the crawl space has sagging beams, rotten joists, sinking piers, bad shims, soft floors, wet supports, or temporary jacks, the foundation and framing need to be inspected before the moisture upgrade hides the clues.
For raised-floor structural work, see pier and beam foundation repair. For the foundation-type difference behind slabs, basements, crawl spaces, stem walls, and pier-and-beam houses, see types of house foundations.
FAQ
Is a conditioned crawl space the same as an encapsulated crawl space?
No. Encapsulation seals the crawl space from ground moisture and outside air. Conditioning adds active humidity or air control so the space behaves more like part of the controlled house environment.
Can a crawl space be encapsulated but not conditioned?
Yes. A crawl space can have a sealed vapor barrier and closed vents but still lack dehumidification, HVAC connection, or another active drying strategy.
Is encapsulation enough for a crawl space?
Sometimes. It may be enough when the crawl space is dry, well drained, sealed correctly, and humidity stays controlled after the work. It may not be enough in damp, humid, duct-filled, or poorly drained spaces.
Does a conditioned crawl space need a dehumidifier?
Not always, but many sealed crawl spaces need active humidity control. A dehumidifier is often simpler than connecting the crawl space to the HVAC system incorrectly.
Should crawl-space vents be open or closed?
It depends on the crawl-space strategy and local code. Leaving vents open can bring humid outdoor air into the space. Closing vents without sealing, vapor control, insulation planning, and humidity control can also create problems.
Should insulation go in the floor or on the crawl-space walls?
Vented crawl spaces often use floor insulation above the crawl space. Encapsulated or conditioned crawl spaces often move insulation to the foundation walls so the crawl space becomes part of the protected volume.
Can encapsulation hide foundation problems?
Yes. Encapsulation can cover wet soil, pier movement, rotted wood, poor shims, plumbing leaks, or drainage trouble if those problems are not inspected first.
References
Sources used for this article
- Building Science Corporation: BSI-115 Crawlspaces — Either In or Out
- Building Science Corporation: Conditioned Crawlspace Construction, Performance and Codes
- U.S. Department of Energy: Moisture Control
- U.S. Department of Energy: Where to Insulate in a Home
- International Code Council: 2024 IRC R408.3 Unvented Under-Floor Spaces
- U.S. Environmental Protection Agency: Mold Course Chapter 2
- U.S. Environmental Protection Agency: Mold Course Chapter 9