A 1980s split-level can feel wrong before you even get inside the main room.
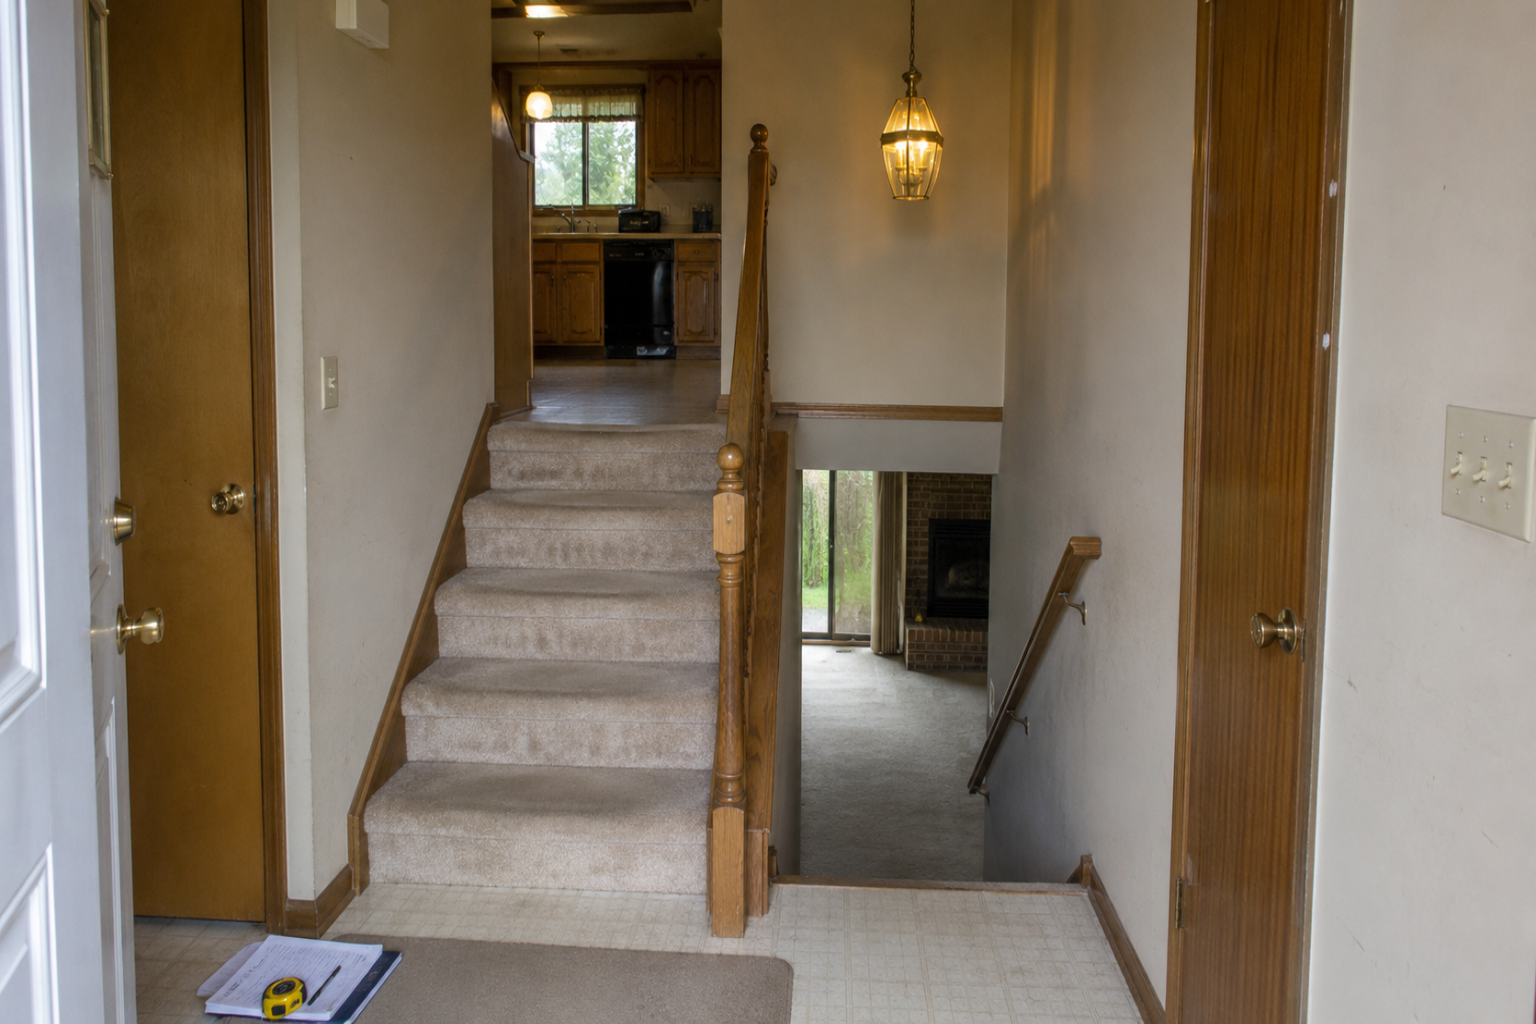
You open the front door and land between two stairs.
Up to the living room. Down to the lower level. Oak railing in your face. Beige carpet on the treads. A brass light above your head. A tight entry with no real place to stand.
That is the house telling you where the remodel starts.
Do not begin with paint colors, cabinet doors, or flooring samples. Start with the entry, stairs, railing, light, and how people move through the house.
For the full 1980s house sequence, see renovating a 1980s house without making it worse. If the same oak, brass, carpet, and mirror problems run through the house, use 1980s house interior to connect the split-level work to the rest of the finish plan.
The split entry is usually the first problem

The split entry is small, but it controls the house.
It controls how guests arrive. It controls how groceries move in. It controls what people see first. It controls whether the house feels open or chopped up.
In many 1980s split-levels, the entry has four problems at once:
- The landing is tight.
- The stair rail feels heavy or dated.
- The light is weak.
- The flooring changes too many times in a small area.
Fixing the entry does not always mean moving walls.
Often, the first improvements are simpler: better stair light, safer railing, cleaner flooring transition, brighter door glass, calmer wall color, and a rail design that opens the view without weakening safety.
The entry should be planned before the kitchen, because any flooring, railing, stair, or lighting decision may run into the main level.
What makes a 1980s split-level feel awkward
The awkward feeling usually comes from the shape of the house, not one bad finish.
A split-level has short stair runs, half levels, lower rooms, low ceiling areas, small entries, attached garages, and sometimes a kitchen that feels cut off from the living space.
The house can work well when the levels are connected clearly.
It feels awkward when every level has a different floor, different trim, different light level, and different update history.
| Problem area | What it causes | What to check first |
|---|---|---|
| Split entry | Tight arrival, weak first impression, poor movement | Landing size, stair rail, lighting, door swing, flooring transition |
| Stair railing | Dated look, blocked view, possible safety issue | Guard height, handrail condition, spacing, attachment points |
| Kitchen wall | Closed-off main level or risky open-concept plan | Load path, beam/header need, electrical, HVAC, ceiling repair |
| Lower level | Basement feeling, cold rooms, leftover finishes | Moisture, ceiling height, egress, lighting, flooring, insulation |
| Exterior | Garage-heavy front, hidden entry, dated curb appeal | Drainage, siding, garage door, entry visibility, exterior lighting |
The remodel gets cleaner when those parts are treated as one system.
Fix the entry before you open the kitchen
The kitchen gets the attention, but the entry usually sets the limit.
If the floor changes at the stairs, the kitchen, and the living room, a new kitchen floor may create a bad transition at the landing. If the railing stays dark and heavy, an open kitchen may still feel boxed in. If the entry light is weak, the main level may still feel dim after new cabinets.
Start at the front door and walk the path.
- Step into the landing.
- Go up to the living room.
- Walk into the kitchen.
- Go back down to the lower level.
Every flooring edge, railing line, light fixture, switch location, and trim change on that path needs a decision.
This is where split-level remodels go sideways. The kitchen is updated, but the entry still feels like 1984.
Stairs and railings can make or break the remodel
The stair rail is one of the biggest visual pieces in a split-level.
Old oak rails, turned balusters, half walls, dark caps, and bulky posts can make the entry feel smaller than it is. Replacing or changing them can help, but the rail is also a safety component.
Do not treat it like decoration.
Any stair guard, handrail, opening, or post change may need to meet current local code. The exact rule depends on jurisdiction, stair type, height, spacing, and whether the work is repair or alteration.
Before changing the rail, check:
- How the posts are attached.
- Whether the rail is acting as a guard.
- Whether the stair needs a graspable handrail.
- Whether the new design changes opening size or fall protection.
A cleaner rail can change the whole entry.
A weak rail can fail inspection or become a real fall hazard.
Kitchen walls need a load check first
Opening a kitchen wall is the move people want most.
It is also the move that needs the most caution.
In a split-level, the kitchen wall may carry roof load, floor load, ceiling joists, ductwork, plumbing, or electrical runs. Sometimes the wall is only a partition. Sometimes it is doing work.
You do not know by looking at the drywall.
Before removing a wall, confirm the load path. That may mean attic inspection, basement or lower-level inspection, joist direction, beam location, and a contractor or engineer review when the wall may be structural.
If the wall is load-bearing, the remodel may need a beam, posts, footings, drywall repair, ceiling patching, electrical relocation, HVAC changes, and inspection.
That does not mean the wall cannot open.
It means the wall opening belongs in the real budget, not the wish list.
For kitchen-specific decisions, use 1980s kitchen remodel and 1980s kitchen cabinets.
Low ceilings need better light, not fake drama
Some 1980s split-level rooms feel low because they are low.
Others feel low because the light is bad.
A heavy ceiling fan, dark trim, beige walls, weak bulbs, and shadowed corners can make a normal ceiling feel lower than it is. Before adding decorative beams, bold ceiling paint, or recessed work everywhere, fix the light plan.
Start with the rooms people use most:
- Entry light at the split landing.
- Stair lighting for both runs.
- Kitchen task lighting.
- Lower-level family room lighting.
If ceilings are already being opened for electrical, fan work, or wall removal, plan lighting at the same time.
Do not patch the ceiling twice.
The lower level has to feel finished, not leftover
The lower level is where many split-level remodels fail.
The upstairs gets new paint, kitchen work, better flooring, and cleaner light. The lower level gets whatever is left.
That makes the house feel unfinished.
A lower-level room needs three things before finishes: moisture control, light, and a clear use. If the room smells damp, feels cold, has old paneling, or has a low ceiling with weak light, new flooring alone will not fix it.
Check the lower level for:
- Musty smell after rain.
- Staining near baseboards or exterior walls.
- Cold floors or drafty corners.
- Low windows, egress limits, or poor daylight.
If moisture is present, fix that first. Otherwise the lower-level remodel can trap dampness behind new flooring, drywall, or trim.
Bathrooms and laundry rooms hide scope fast
Split-level lower levels often carry bathrooms, laundry rooms, utility spaces, or rough-ins.
Those rooms can hide scope fast.
A bathroom update can expose fan venting, old shutoff valves, subfloor damage, wet drywall, and drain alignment problems. A laundry update can expose dryer venting, floor drain issues, supply valves, and electrical limits.
Do not treat those rooms as finish-only updates.
If the split-level remodel includes a bathroom, use 1980s bathroom remodel before choosing tile, vanity, or flooring.
Exterior updates should calm the garage and entry
Many 1980s split-levels have a garage-heavy front.
The garage door is large. The entry is tucked to one side. The stairs make the interior entry tight, and the exterior entry may not announce itself clearly.
Exterior work should improve the front hierarchy.
Usually that means calming the garage and strengthening the entry, not adding random trim.
Good exterior updates often include:
- A better garage door with simpler panels.
- Clearer entry lighting.
- Improved house numbers and path lighting.
- Trim color that makes the front door easier to find.
Before painting brick, replacing siding, or changing windows, check drainage, rot, flashing, and any water issues at the lower level.
For exterior-only planning, see how to update a 1980s house exterior.
Flooring has to solve the split-level transitions
Flooring can make a split-level feel connected.
It can also make it feel chopped into pieces.
The problem is not only the material. It is the transitions.
A split-level may have flooring at the entry, upper stairs, lower stairs, living room, kitchen, hallway, bathroom, and lower family room. If each one is different, the house feels patched.
Use fewer flooring changes where possible.
But watch height.
A 1/4 inch flooring change can affect stair noses, door clearance, kitchen appliance openings, bathroom thresholds, and trim. Stair areas need extra care because small height changes can create trip points.
Plan flooring before cabinets, railings, and finished trim.
When open concept helps
Open concept can help a split-level when the main level is dark, chopped up, and poorly connected.
A wider kitchen opening, better sightline to the living room, or a partial wall removal can make the main level feel less trapped.
It helps when:
- The wall is not structural or can be opened cleanly.
- The kitchen still has enough cabinet space.
- The floor and ceiling transitions can be repaired cleanly.
- The entry and stair rail are improved at the same time.
The best open-concept split-level remodel usually does not remove every wall.
It removes the right obstruction and fixes the light.
When open concept makes the house worse
Open concept can also make a split-level worse.
It can expose a low ceiling, remove useful cabinet walls, create awkward floor patches, leave a beam in a bad place, or make the entry feel like it opens straight into kitchen clutter.
It can also turn one room problem into a whole-level remodel.
Before opening a wall, ask what the wall is giving you now:
- Cabinet storage.
- Electrical runs.
- HVAC path.
- Visual separation from the entry.
If removing the wall creates more problems than it solves, widen an opening, improve lighting, or adjust the doorway instead.
For more on this mistake, see open concept kitchen mistakes.
The cost trap: one wall becomes five trades
The split-level cost trap is simple.
You think you are changing one thing.
Open the kitchen wall. Replace the rail. Change the flooring. Move the vanity. Finish the lower level.
Then the work spreads.
A kitchen wall can need structure, electrical, ceiling repair, flooring patch, cabinet adjustment, and inspection. A stair rail can need guard compliance, post blocking, handrail changes, drywall patching, trim repair, and refinished stair treads.
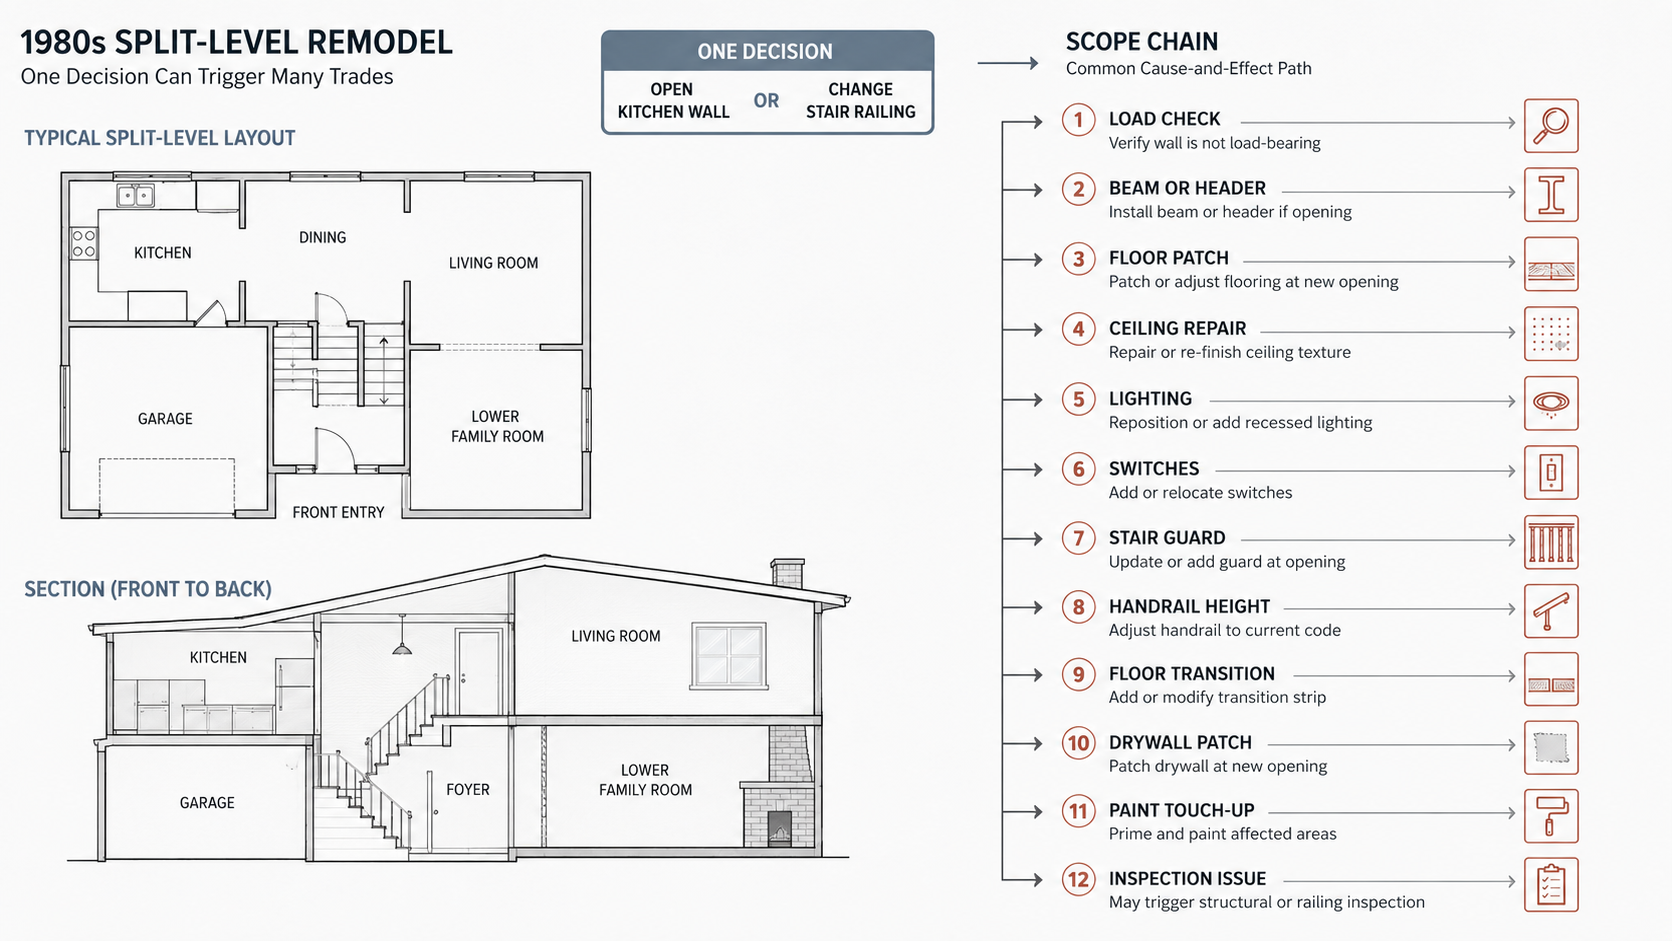
The protective move is to price the chain, not the first task.
If one wall needs five trades, it belongs in the real scope.
Best remodel order for a 1980s split-level
A good split-level remodel follows the path through the house.
| Step | Decision | Why it matters |
|---|---|---|
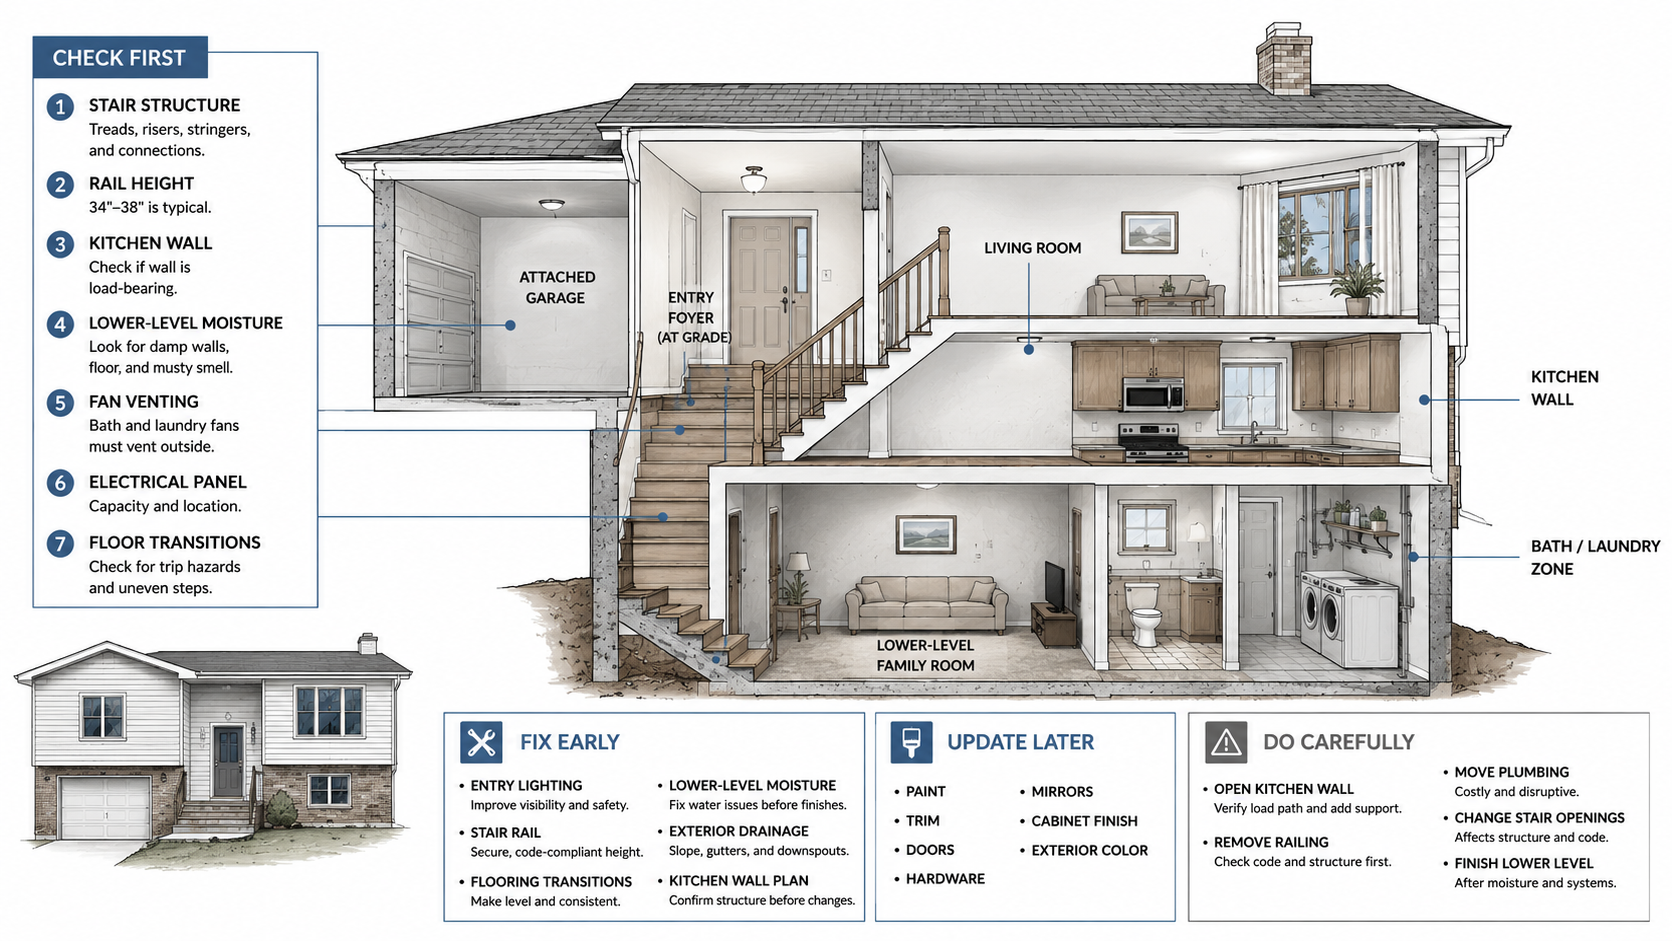
| 1 | Inspect entry, stairs, railings, lower level, exterior drainage, and kitchen wall | Finds structural, safety, moisture, and flow problems before finishes |
| 2 | Decide whether walls or railings change | Controls structure, inspection, flooring, lighting, and drywall scope |
| 3 | Plan flooring transitions across both levels | Prevents trip points, stair height issues, and patched-looking floors |
| 4 | Handle lighting, electrical, fan, and lower-level moisture work | Fixes hidden function before visible finishes |
| 5 | Remodel kitchen, bathrooms, and lower-level rooms | Improves the main money areas after the layout is settled |
| 6 | Finish paint, trim, doors, hardware, exterior accents, and touch-ups | Keeps final details from being damaged by rough work |
This order is not glamorous.
It keeps the project from becoming a pile of disconnected upgrades.
1980s split-level remodel decisions
| Decision | Best when | Watch out for |
|---|---|---|
| Keep the layout | The entry works, the kitchen has enough space, and levels connect clearly | The house may still feel dated if railings, lighting, and flooring stay old |
| Open the kitchen wall | The main level is dark and closed off, and the wall can be opened safely | Structure, beams, ceiling repair, electrical, floor patches, and lost cabinets |
| Change the stair railing | The rail blocks light, feels heavy, or fails safety expectations | Guard height, handrail rules, post blocking, spacing, and inspection |
| Finish the lower level | The space is dry, warm, and useful | Moisture, egress, low ceilings, ductwork, lighting, and floor comfort |
| Update the exterior | The garage dominates and the entry feels hidden | Drainage, siding condition, flashing, rot, and lower-level water issues |
FAQ
How do you remodel a 1980s split-level house?
Start with the entry, stairs, railing, kitchen wall, lower-level moisture, flooring transitions, and exterior drainage. Then handle kitchens, bathrooms, lighting, finishes, and curb appeal after the layout decisions are clear.
What is the biggest problem with 1980s split-level homes?
The split entry is usually the biggest problem. It can feel tight, dark, and awkward because the front door opens between stairs instead of into a full room.
Can you open the kitchen in a split-level house?
Sometimes. The wall must be checked first. It may be load-bearing or may contain electrical, ductwork, plumbing, or other hidden work. A safe opening may need a beam, posts, ceiling repair, and inspection.
Should I remove the stair railing in a split-level?
Do not remove it without a replacement plan. Stair railings and guards are safety components. Changing them may affect handrail height, guard height, spacing, attachment, and inspection requirements.
How do I make a split-level entry feel bigger?
Improve the light, simplify the railing, clean up flooring transitions, use calmer wall color, make the front door feel brighter, and avoid heavy trim or dark stair finishes that close the space down.
Is open concept good for a split-level?
It can help when the main level is dark and chopped up. It can hurt when it removes useful cabinet walls, creates awkward beams, exposes low ceilings, or makes the entry open straight into kitchen clutter.
What should I fix first in a split-level remodel?
Fix entry function, stair safety, lower-level moisture, kitchen wall structure, lighting, and flooring transitions before cosmetic finishes.
How do you update the exterior of a 1980s split-level?
Calm the garage, strengthen the entry, improve lighting, simplify trim colors, check drainage, and repair siding or flashing problems before picking paint or decorative accents.
Why does my lower level feel unfinished?
Lower levels often feel leftover because they have weaker light, lower ceilings, older flooring, moisture problems, paneling, or no clear use. Fix moisture and lighting before finishes.
Is a 1980s split-level worth remodeling?
Yes, if the structure is sound and the layout can be improved without forcing the house into a shape it cannot support. The best remodels make the entry, stairs, main level, and lower level work together.