Pull the base cabinet off the sink wall for a quick swap and you find the galvanized supply line running up through the plaster, nothing behind it but lath and cold air. The cabinet came off in an afternoon. What's behind it won't.
A 1920s kitchen was a small work room. The dining room, the pantry, the back porch, the basement stair — each did part of the job one kitchen is now asked to do alone. So the budget isn't in the cabinets. It's in the plumbing runs, the floor, the door swings, and the old work worth keeping. Order the cabinets first and you find that out the hard way.
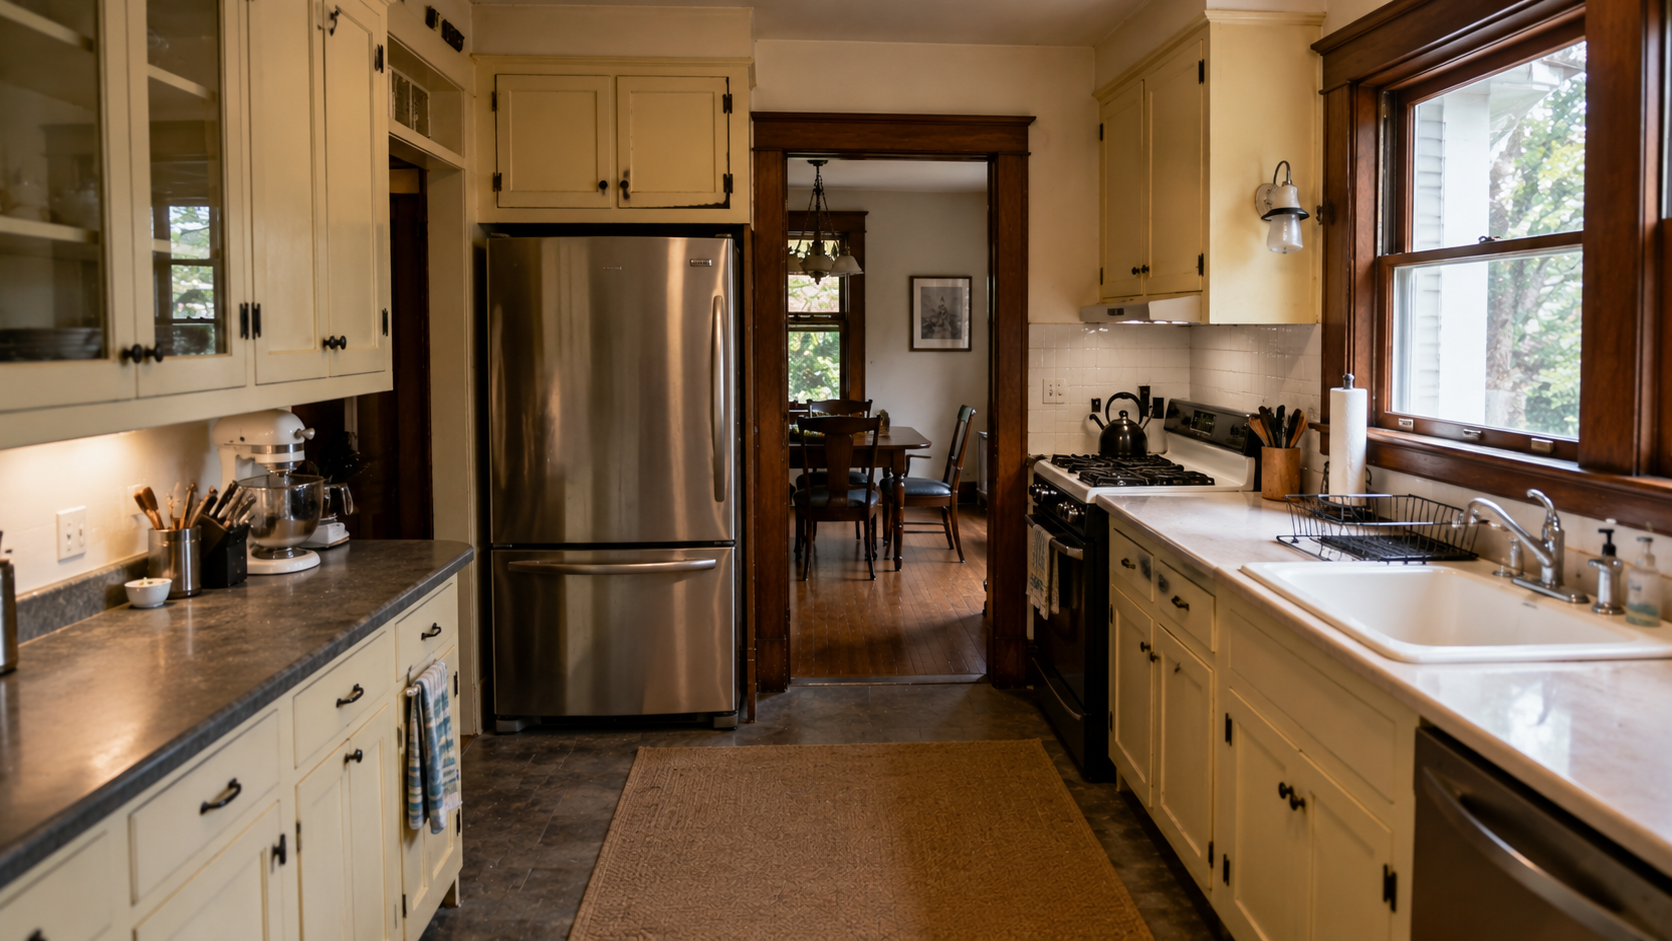
This page is the kitchen-specific step after the whole-house 1920s house renovation guide.
Look at the Kitchen You Have First
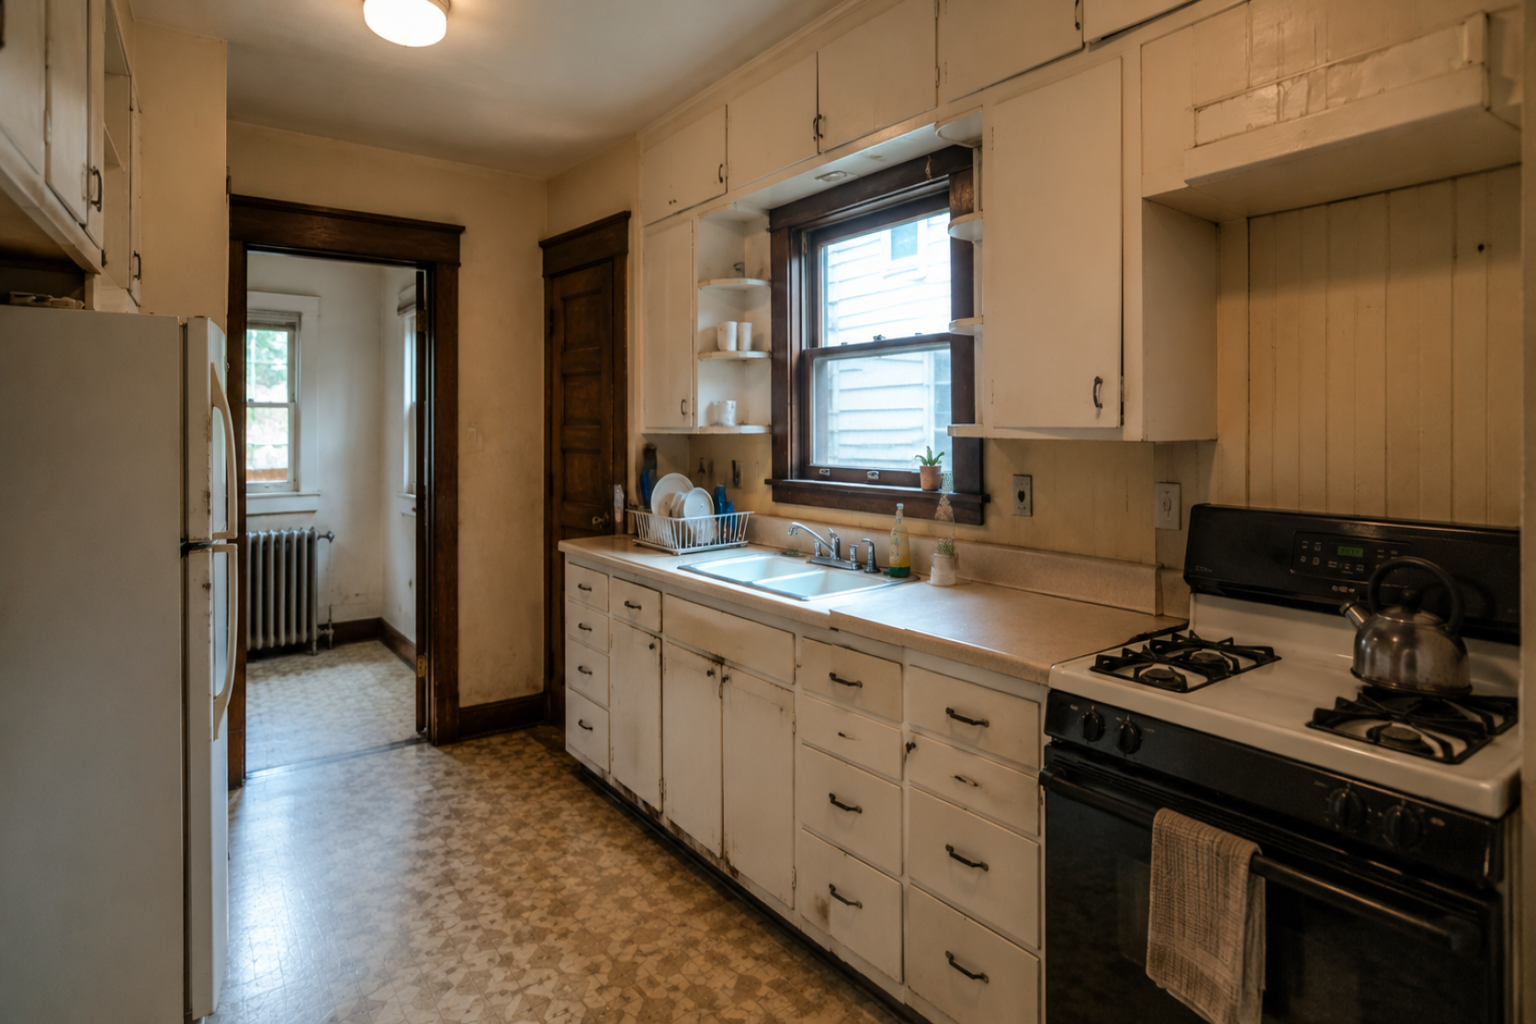
Before any cabinet catalog comes out, spend time with the room as it stands. A 1920s kitchen tells you what will change easily and what is going to fight back, but only if you read it before demolition rather than during.
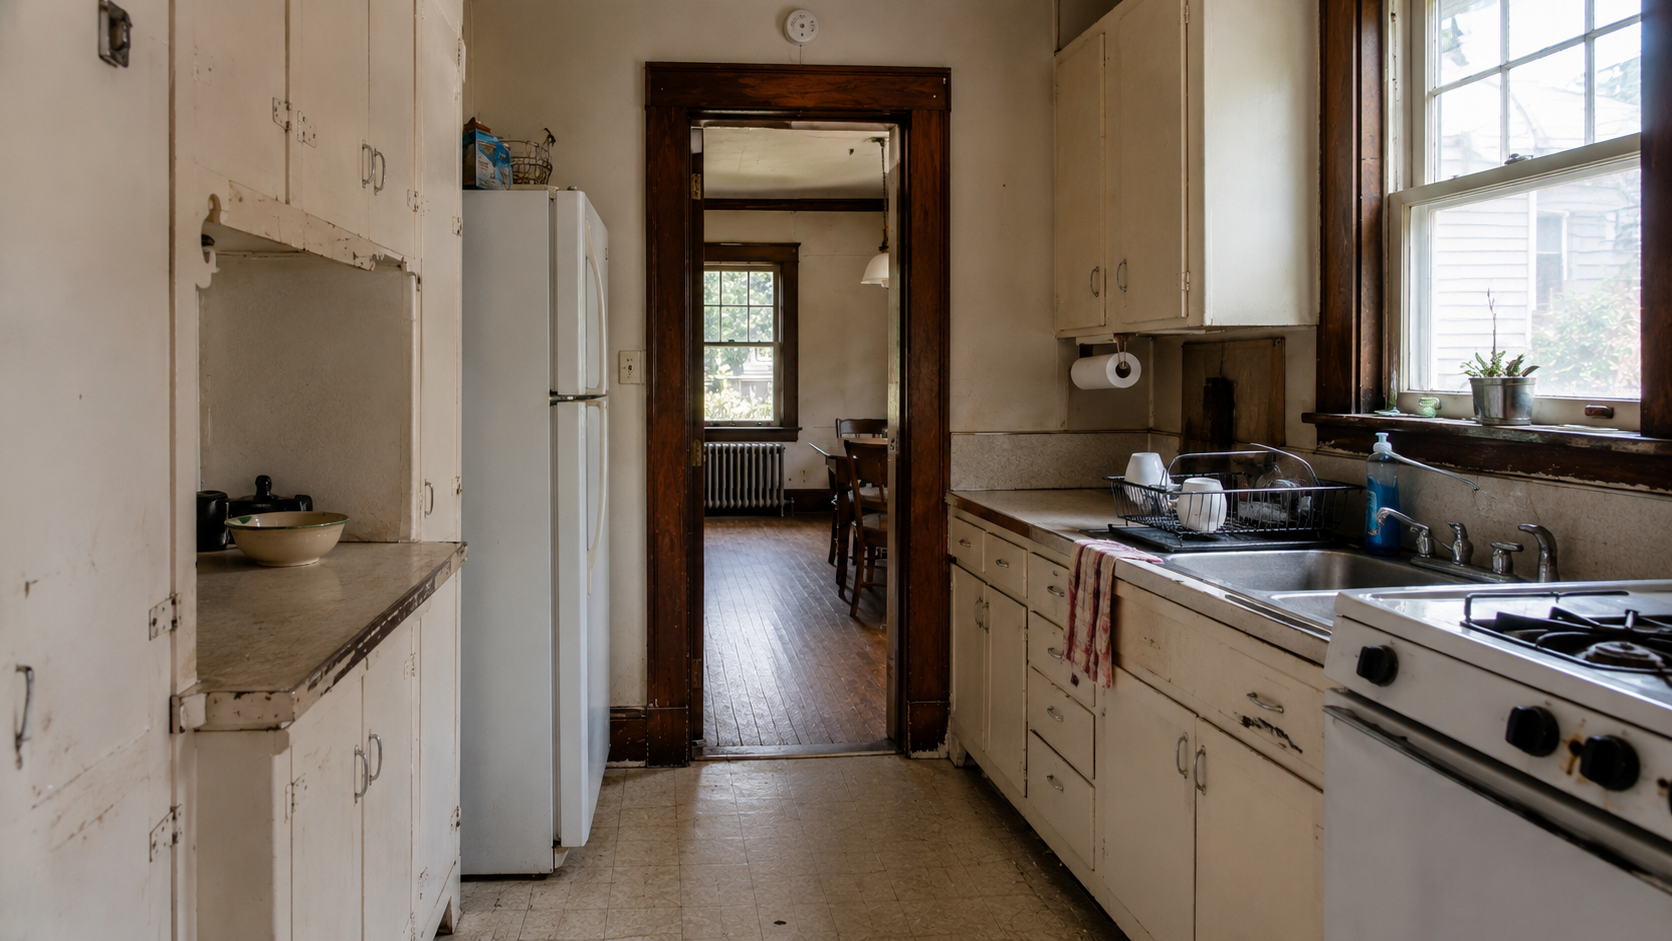
A few things decide more than the rest. The sink almost always sits where it does because the plumbing stack is close, so moving it is rarely free. The main window may hold the best light in the room but the worst spot for an upper cabinet. The doors into the pantry, basement, and back entry swing into space the layout needs. The floor you can see may sit on two or three older floors underneath. And somewhere along a wall there may be a radiator, a pipe chase, or a masonry mass that quietly controls everything around it.
A kitchen can look dated and still have sound room logic. It can also photograph fine while hiding bad clearances, soft framing, and wiring that will not carry a modern range. Learn the room before you decide to replace it.
The Brick Flue Still Hiding in the Kitchen Wall
Here is the one no remodel article tells you about, and it is specific to houses of this age. A 1920s kitchen was often built around a coal, wood, or early gas cookstove, and that stove vented into a small brick flue. In many older houses, that flue may run up inside or near the wall between the kitchen and dining room, because cooking happened on one side and heating or service equipment may have used nearby masonry paths. That detail appears in many older houses built before modern kitchen ventilation became standard.
The stove is long gone. The flue usually is not. It is still in the wall, plastered over, often forgotten, and it is wider than people expect, sometimes a full twelve to sixteen inches of brick. You cannot run a cabinet bank or set a range across it. You build the layout around it, or you take it out.
Taking it out is often worth doing. These small cooking flues rarely carry any structural load, so removing one usually does not call for new framing, and it can hand back a real strip of floor and wall, enough to straighten a cabinet run or fit the range where you actually want it. I have opened a kitchen wall to move a sink eighteen inches and found a brick flue I had to design the entire run around instead.
The catch is the part you cannot see from the kitchen. Old brick flues, especially unlined ones, can go soft where decades of flue gas have eaten the mortar, which is its own reason to deal with them. But before anyone swings a hammer, the whole stack has to be traced from the basement to the roof, because a water heater or a furnace may still be venting into it. Pull a live flue blind and you can back combustion gas into the house. You will not know its real condition, or whether something downstairs still depends on it, until the plaster is open and someone has followed it end to end. Plan for the flue, and plan for the chance that it changes the layout once you can finally see it.
Layout Comes Before Cabinet Style
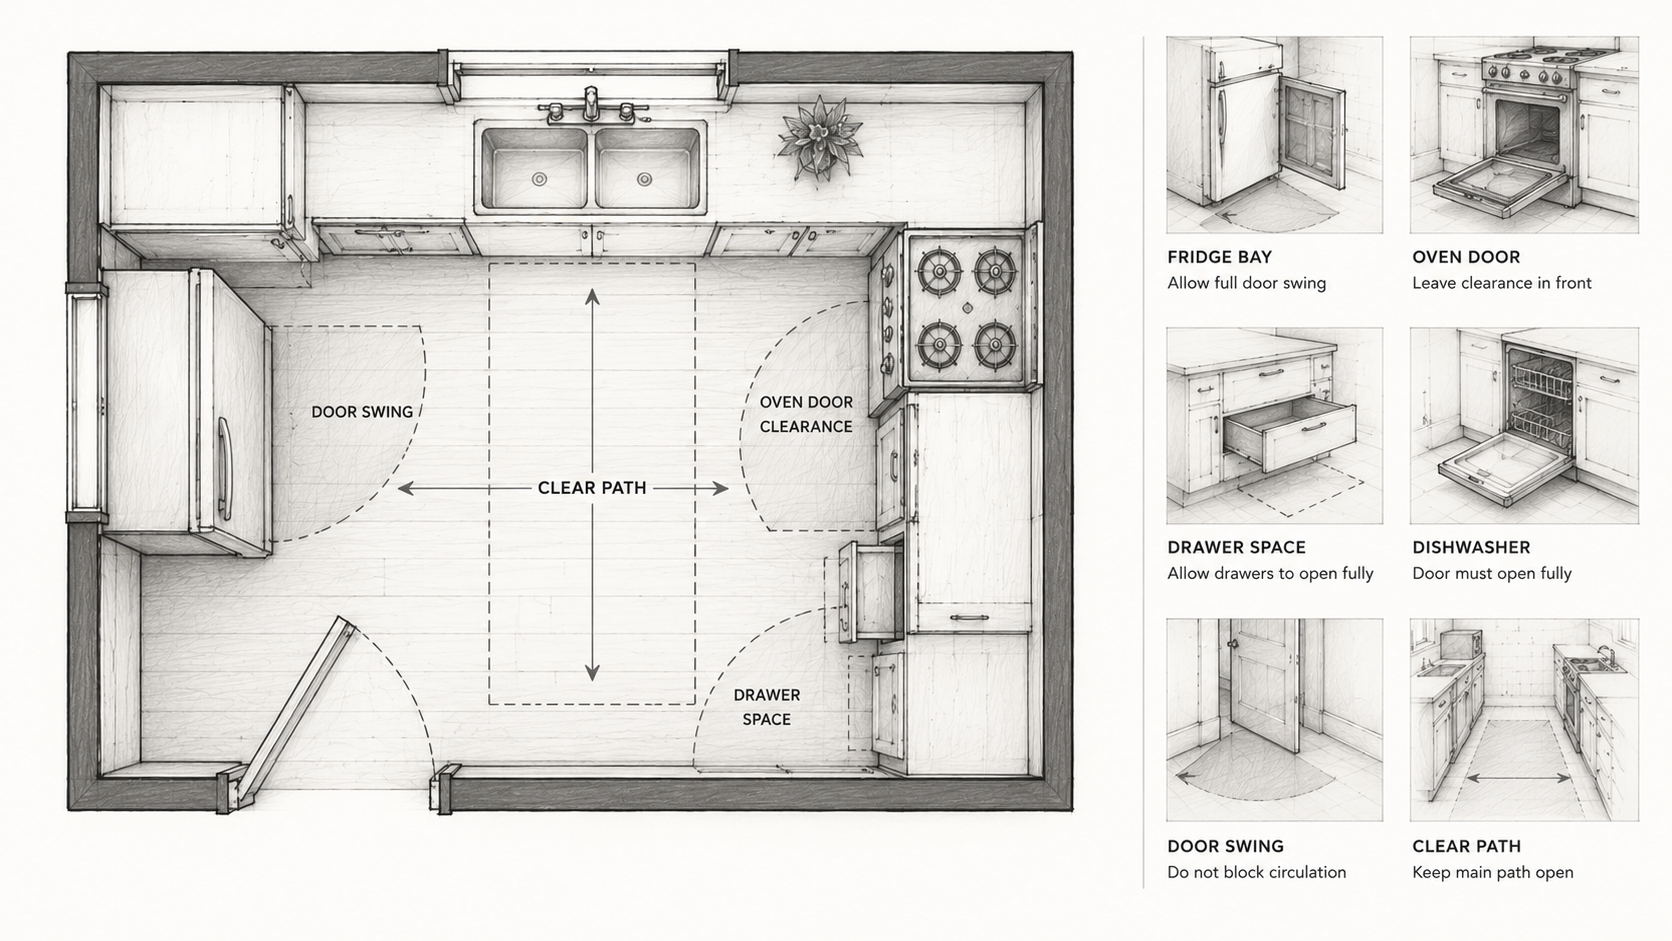
Cabinets are expensive, but a layout mistake is worse, because good finishes cannot rescue a plan that fights the room. In a compact 1920s kitchen the plan has to answer real questions before anything is ordered: whether two people can pass through the work zone, whether the refrigerator and oven doors can open without blocking the path, whether a drawer still pulls out when the dishwasher is down, and whether the cabinet run respects the windows, doors, and casing instead of cutting across them.
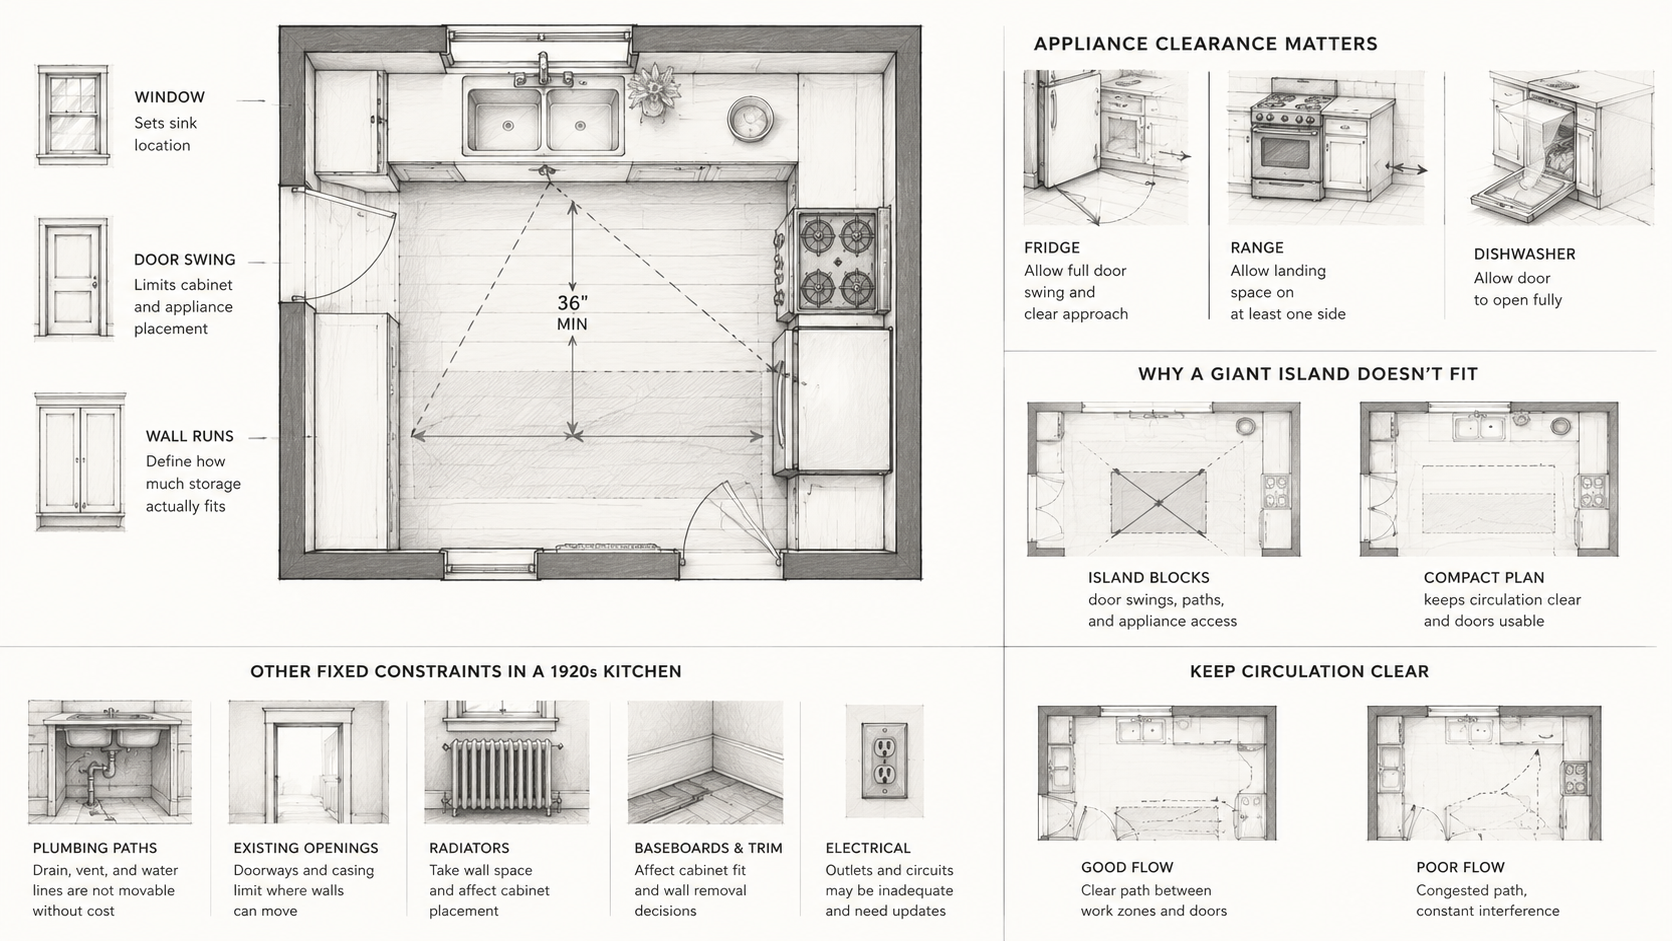
Most kitchens of this size work better as a tight galley, an L, or a compact U than as a forced open plan. A big island can make the room look current in a rendering and then eat the only clear walking space the room had. The sink wall usually earns the most attention, since it tends to carry the main window, the original trim, the plumbing route, the counter run, and the best daylight all at once. Do not block a good old window with uppers just to gain a little storage; deeper drawers or a pantry cabinet on another wall almost always pay back better.
What's Worth Keeping
The room does not need to become a museum. Some cabinets are cheap later replacements, some floors are past saving, and some wiring and plumbing should go for safety alone. But the parts that make the kitchen belong to the house are usually the cheapest character you will ever buy back.
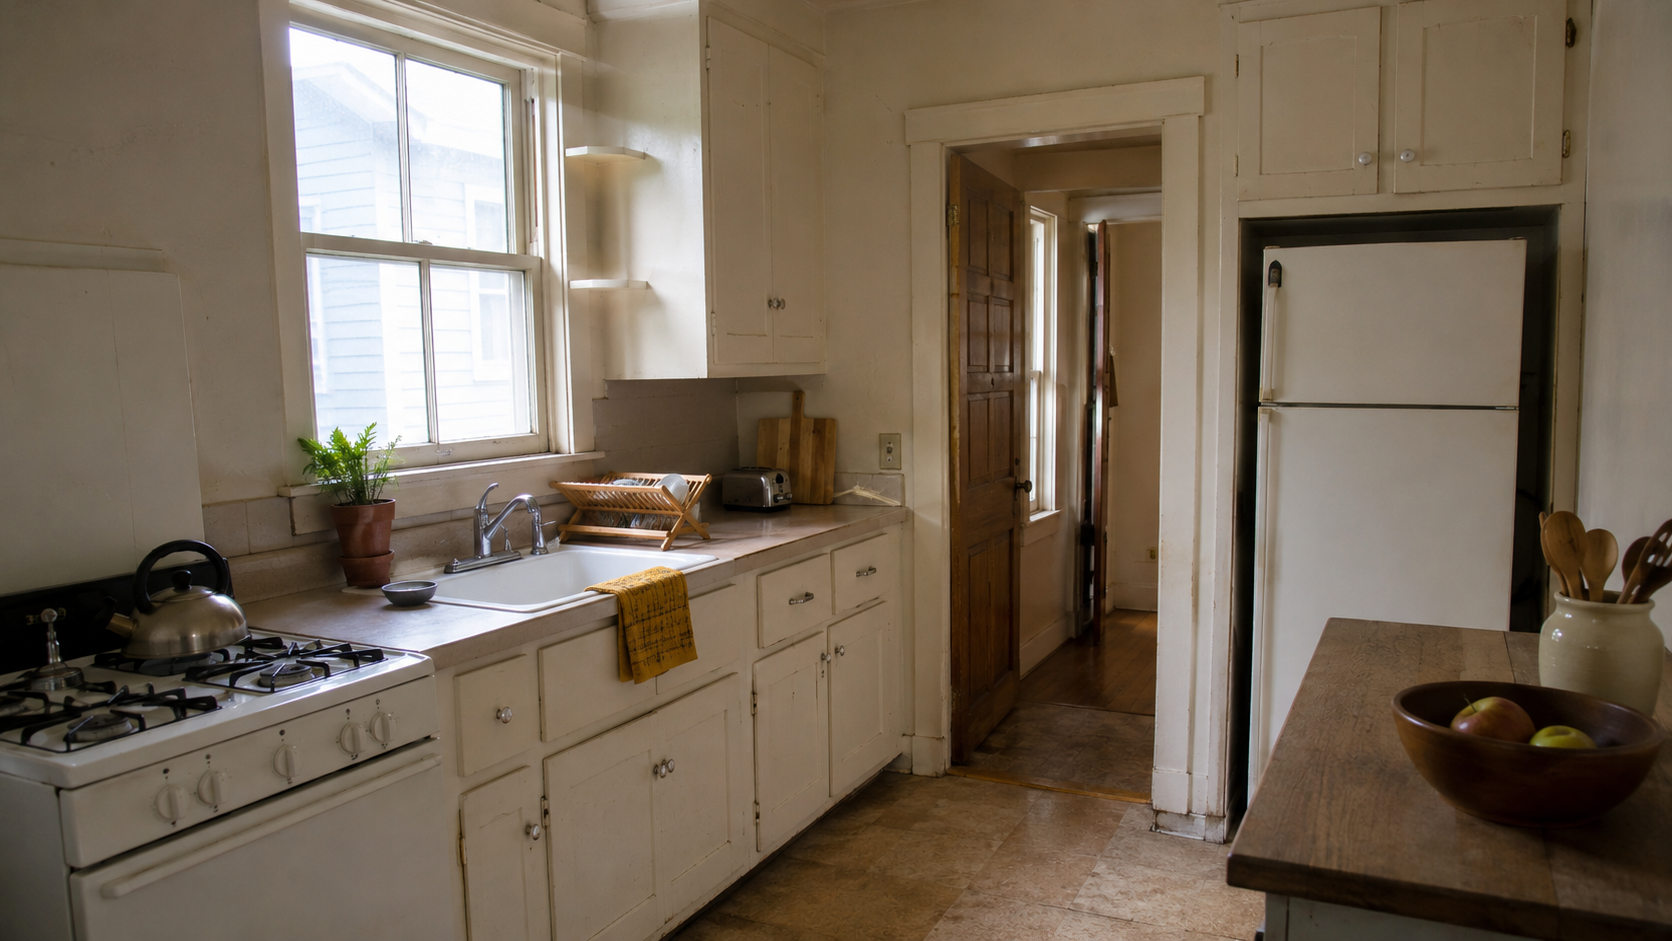
Look hard at the original window casing and stool trim, the door casing between the kitchen and the rooms around it, any built-in pantry or storage wall, and wood flooring that can be patched or feathered in. Keep the ceiling height and the room's proportions in mind too, since those are the things a stock-cabinet plan tends to flatten without anyone deciding to. Preservation here is not about inconvenience. It is about not throwing away useful character because a catalog was easier to follow.
Measure the Old House Before You Order Cabinets
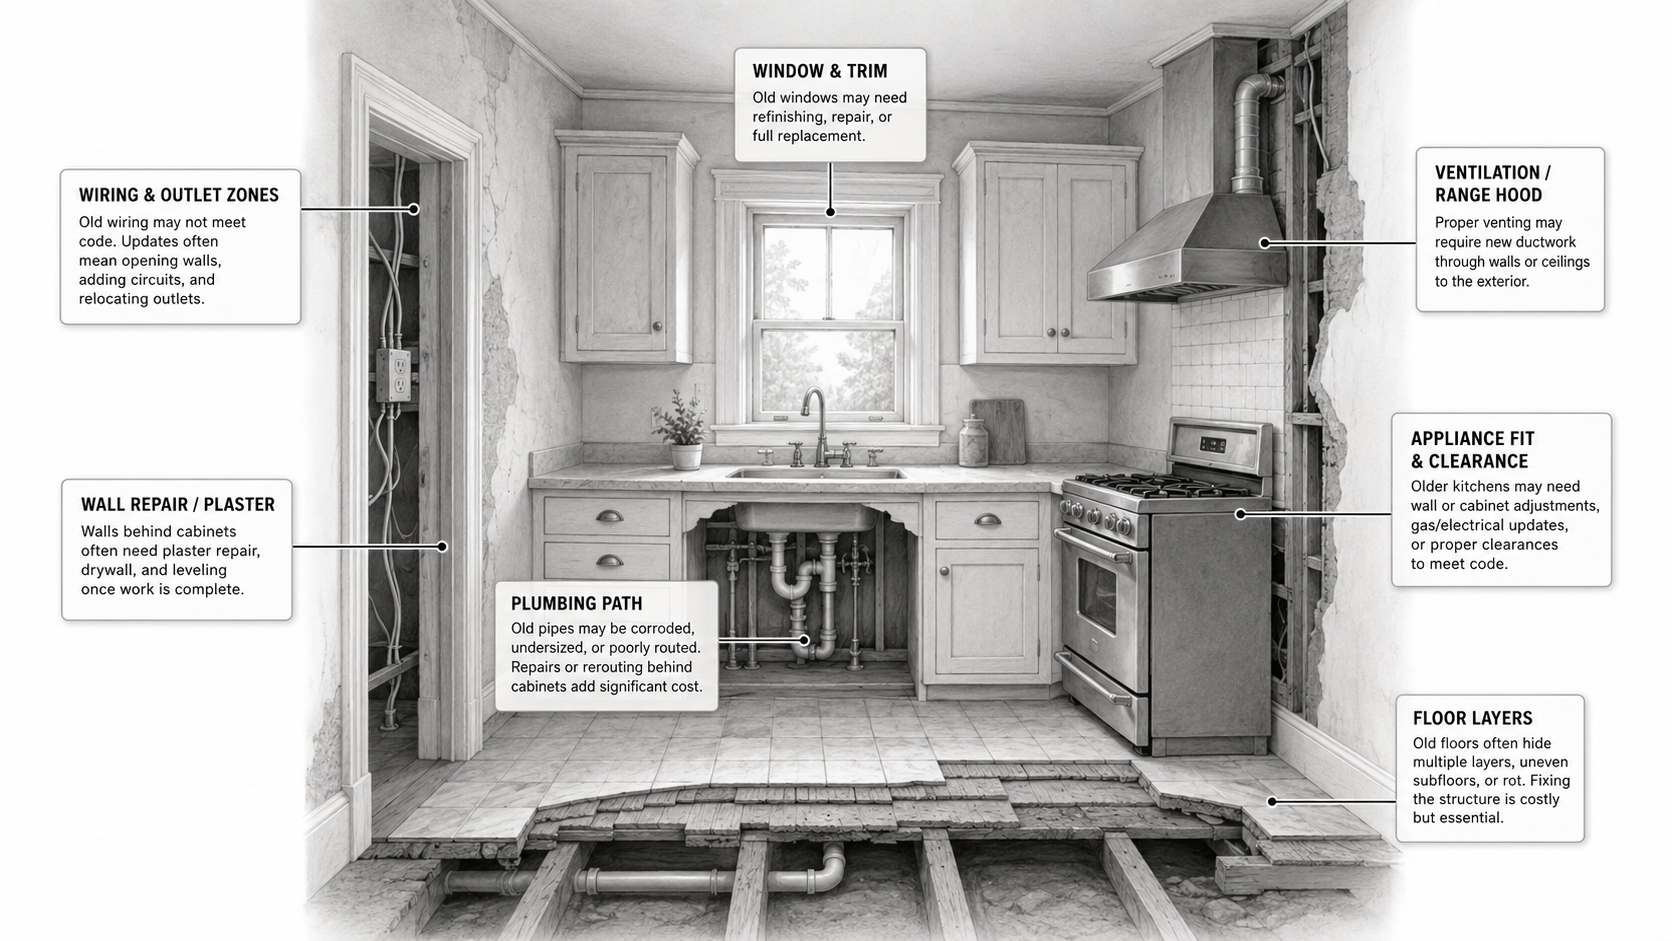
This is where remodels fail quietly. The cabinets fit on paper and then do not fit in the room. A 1920s kitchen has walls that are not square, floors that slope a little, plaster that changes thickness from one wall to the next, and trim that stands proud of where a cabinet installer expects it. A refrigerator slides into its opening and then will not open its own door. A drawer clears the box beside it and catches the stove handle. A dishwasher opens straight into the only walkway.
By the time the cabinets arrive, none of that is a small planning note anymore. It is a change order, a filler panel, a delayed countertop, or a finished kitchen that never quite sits right. So before the drawings are final, confirm the actual wall length at both counter height and upper-cabinet height, the floor slope and how much leveling the bases will need, how far the window and door casing project, and the exact appliance specs including handles and door swing. I have measured a wall at eleven feet on the plan and eleven feet and three-quarters at the floor, because the plaster was not the same thickness top to bottom, and three-quarters of an inch is the difference between a clean run and a scribed-in filler.
Do not trust a rendering for any of this. Tape the cabinet and appliance footprints onto the floor and open a cardboard stand-in for the refrigerator or dishwasher door if the room is tight. An hour with painter's tape and a box catches the mistakes a 3D model hides.
The Hidden Work Behind the Cabinets
The cabinet finish is the part you see, and it is rarely the part that drives the budget. Once cabinets, counters, tile, and appliances are in, the work behind them gets harder and far more expensive to reach, so it has to be settled first.
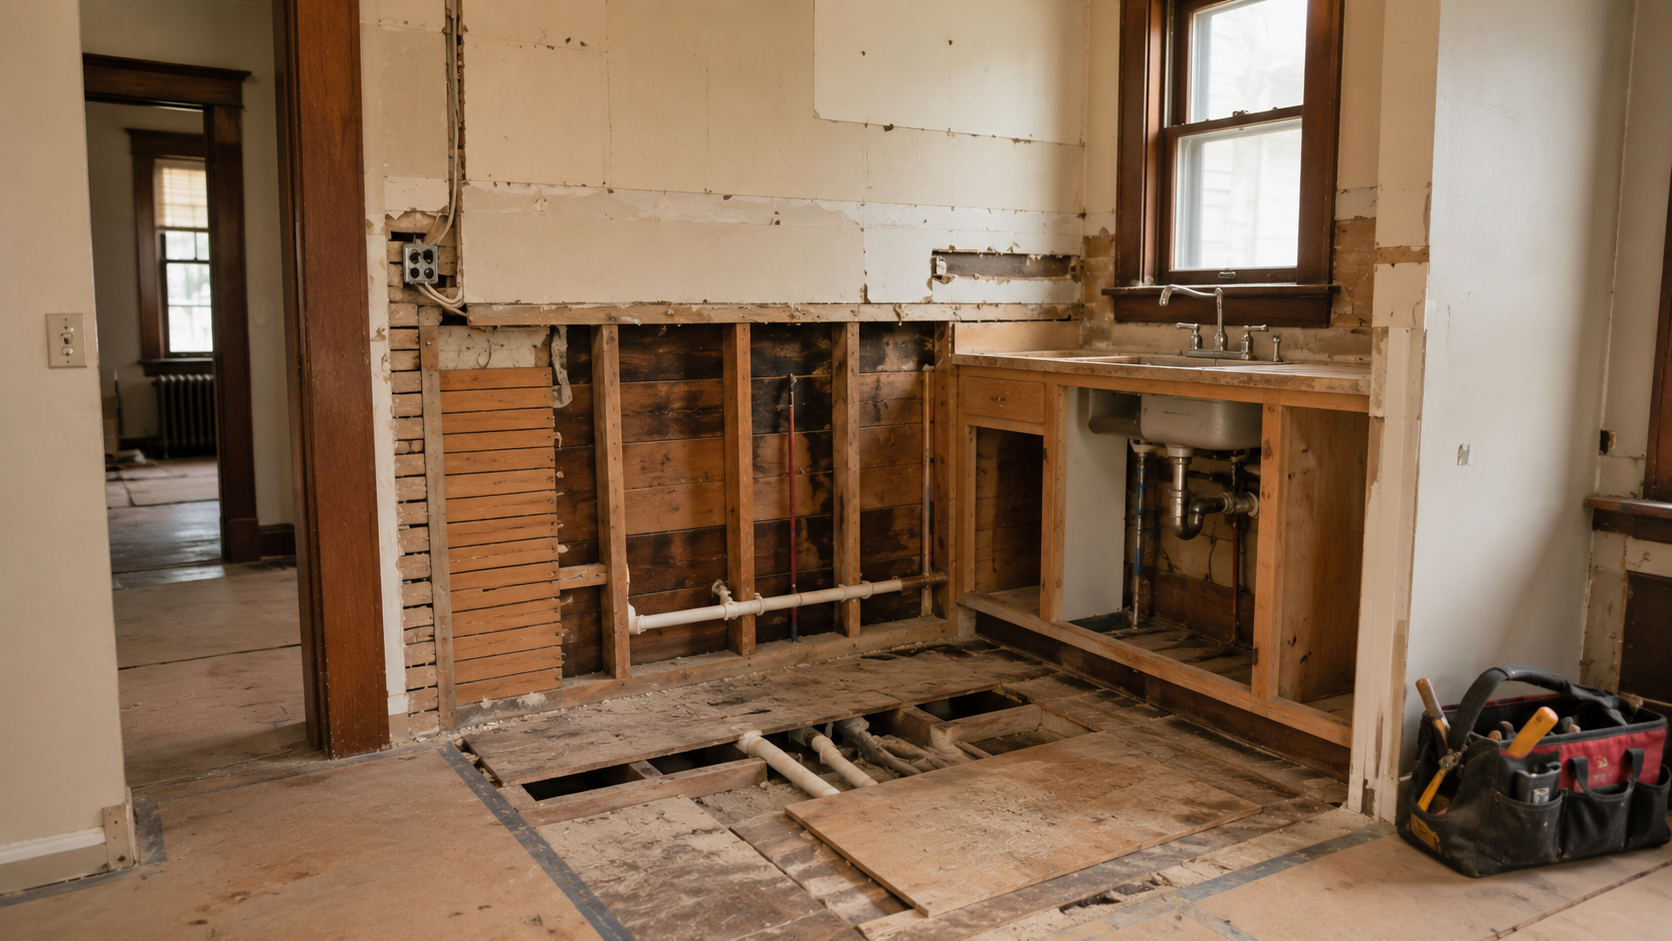
Four things deserve a hard look before the cabinet order closes. The plumbing: old galvanized supply lines that may be choked with corrosion, the drain and sink location, the dishwasher connection, and clean shutoff access. The electrical: whether the kitchen still runs on knob-and-tube, whether the panel has room, and the dedicated appliance circuits and GFCI protection that current code may require. The walls: plaster condition, old lath, abandoned pipe chases, and patches left by past remodels. And the floor: soft spots, uneven framing, the height jumps at doorways, and the layers of vinyl, plywood, and old linoleum hiding the original boards. Settle the wall and floor plan as part of the kitchen plan, not on installation day when the cabinet crew finds the surprise for you.
What a 1920s Kitchen Costs in 2026
Cost is where this kind of kitchen breaks from the averages, so start with the averages and then add what the old house brings. Angi's 2026 kitchen remodel figures put the typical kitchen remodel near $27,000, with many homeowners landing between roughly $14,600 and $41,600. HomeGuide places many kitchen remodels around $15,000 to $50,000, with larger redesigns going higher. Treat all of these as starting points, not quotes; a real number depends on your scope, your market, and what the walls give up.
The old-house work is what the published ranges often leave out, because per-square-foot math does not always include plumbing moves, electrical upgrades, plaster repair, old floor layers, or hidden chimney work. Angi places knob-and-tube replacement in the five-figure range for many whole-home projects, and HomeGuide gives a similar broad range. Plumbing can also move from a small repair to a major cost when old galvanized, lead, or failing supply lines need replacement. HomeGuide's plumbing-cost guide shows how quickly whole-line replacement can grow. And plaster does not patch like drywall; Angi notes that plaster repair can cost far more than common drywall patching because of labor and skill.
| Cost driver | Why it grows in a 1920s house | Check before ordering |
|---|---|---|
| Plumbing | Corroded galvanized lines, awkward drain routes, sink moves, new dishwasher supply | Confirm pipe condition and sink location early |
| Electrical | Knob-and-tube, no spare panel capacity, missing dedicated circuits and GFCI protection | Have the panel and kitchen circuits assessed first |
| Plaster and walls | Plaster and lath repair can cost far more than ordinary drywall patching; hidden chases and patches add time | Open small test areas before locking the plan |
| Floors | Multiple old layers, soft spots, uneven framing, height jumps at doorways | Probe layers and level before flooring decisions |
| The stove flue | Buried brick chimney that blocks the layout and may need careful removal | Trace the stack basement to roof before touching it |
| Appliances | Clearance, venting, dedicated circuits, door swings in a tight room | Use exact specs before cabinet approval |
The expensive surprise is almost never one problem. It is the chain. Move the sink and you have touched plumbing, cabinets, counters, wall repair, flooring, and sometimes the basement ceiling below. The kitchens that ran over budget on me were never the ones with expensive cabinets. They were the ones where a $4,000 plan to open one wall turned into rewiring, repiping, and replastering the moment that wall came down.
What to Keep, Repair, and Replace
The useful question is not old versus new. It is keep, repair, or replace, decided item by item.
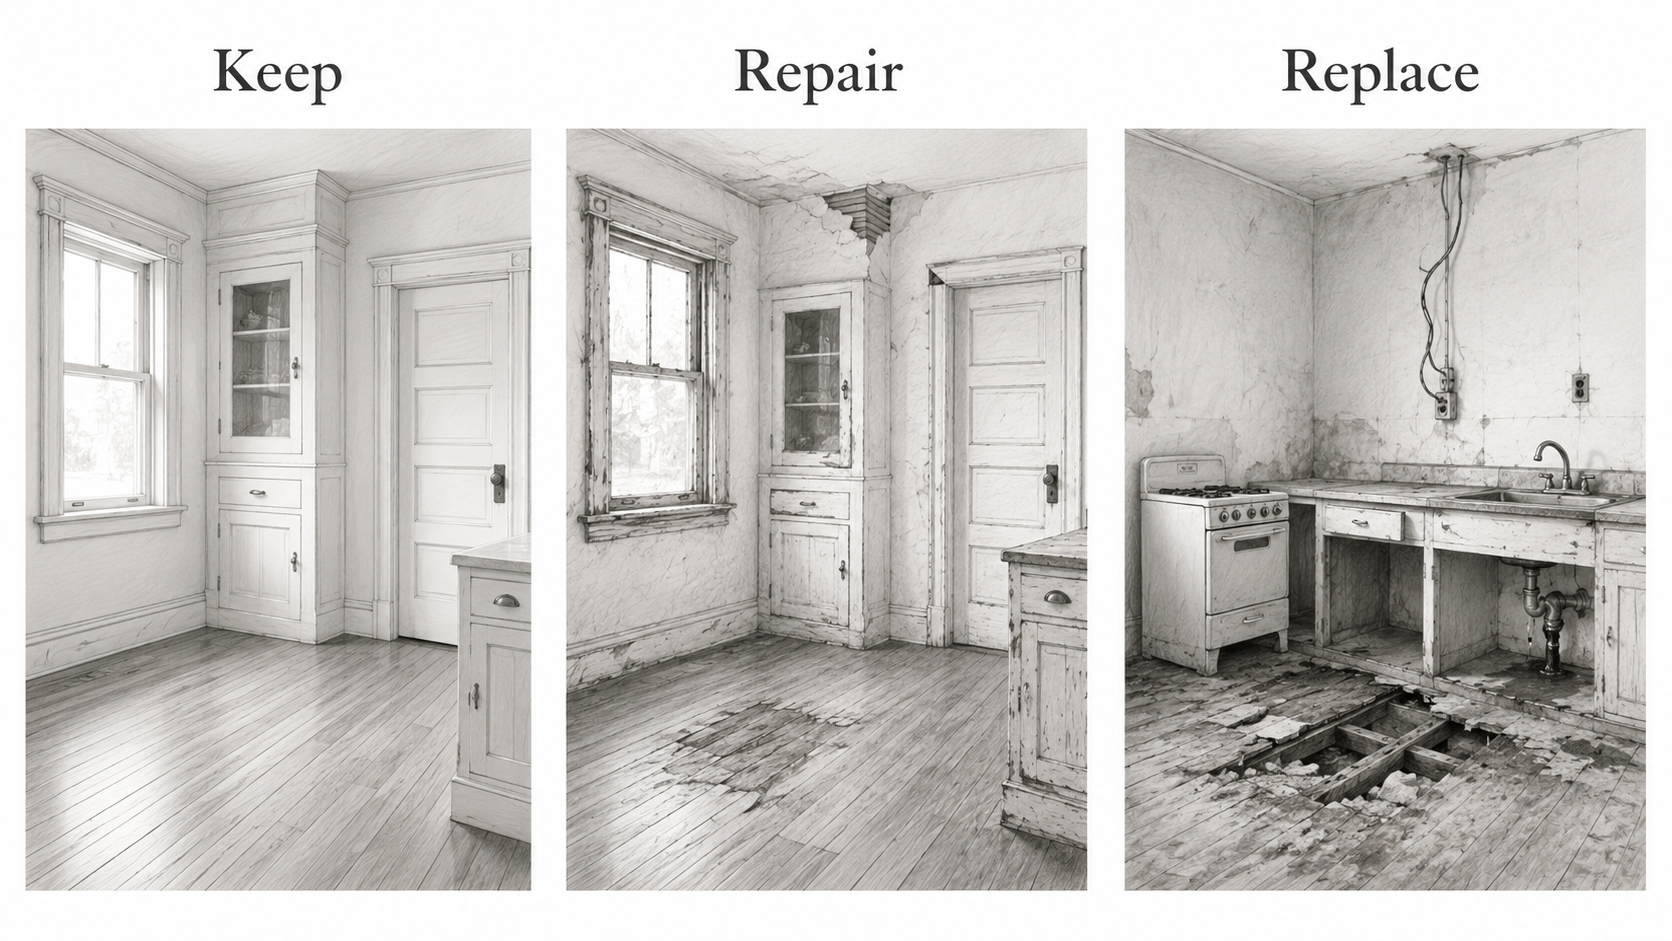
| Keep when possible | Repair when practical | Replace when needed |
|---|---|---|
| Original window trim, door casing, room proportions, pantry built-ins, sound wood floors | Worn floor sections, plaster damage, loose trim, sticky windows, salvageable pantry storage | Unsafe wiring, leaking or galvanized pipe, failed subfloor, bad appliance locations, low-grade past-remodel cabinets |
That keeps the room from going either too precious or too careless. A 1920s kitchen takes new cabinets, better light, and modern appliances without complaint. It just needs those changes to respect the openings, the trim, the daylight, and the scale that were there first.
Cabinets, Flooring, and Light
Cabinets do not have to be fake-vintage, but they do need the right scale. Simple inset or shaker fronts, restrained paint colors, modest wood where it suits the house, and uppers that do not crush the old windows tend to sit right. What usually looks wrong is not "modern" by itself; it is the mismatch of oversized boxes, thick waterfall counters, and flat gray surfaces in a room with old plaster, small openings, and modest proportions.
Floors need a probe before a decision. The surface you see may sit over vinyl, plywood, linoleum, and patching, so check whether there is original wood underneath, whether the floor is level enough for cabinets, and whether new flooring would trap a height jump at a doorway. A handsome new floor is still a bad call if it hides soft framing or builds a trip edge. As for light, a 1920s kitchen tends to look best when the lighting works in layers: a clear ceiling fixture for the room, task light at the counters and sink, real light at the range, and nothing theatrical fighting the space.
What Not to Do
A bad remodel of one of these kitchens usually makes it look newer and work worse. The recurring mistakes are forcing a large island into a room that needs its walking space, stripping old trim before deciding whether it defines the room, blocking a good window with uppers, and moving plumbing without checking what changes below the floor. Ordering cabinets before the appliance clearances are tested belongs on the list too, and so does over-opening the wall to the dining room until both rooms lose their shape. The goal is a kitchen that is easier to use, not one that is harder to recognize as part of the house.
Best Approach by Kitchen Type
| Kitchen type | Best direction | Watch for |
|---|---|---|
| Narrow galley | Improve the cabinet runs, lighting, appliance fit, and storage depth | Too many uppers, a blocked walkway, poor fridge placement |
| Kitchen open to the dining room | Keep a controlled cased opening or widen it carefully | Over-opening the wall and losing the room's proportion |
| Kitchen with a pantry or back entry | Use the pantry and service zones instead of fighting them | Removing useful storage to make the kitchen look larger |
| Kitchen with original trim and windows | Design the cabinets around the trim and the daylight | Blocking windows or cutting casing for stock cabinets |
| Kitchen with a bad past remodel | Strip the bad layer without erasing the good original room logic | Assuming every old-looking part is original or worth saving |
How to Plan the First Phase
Start with an investigation, not a shopping list.
- Photograph the kitchen before any work starts.
- Measure the walls, windows, doors, trim, and appliance locations.
- Check the floor level and probe the floor layers.
- Have the plumbing and electrical assessed before cabinet planning.
- Trace any old stove flue from basement to roof.
- Decide what trim, floors, windows, and built-ins should stay.
- Test the appliance door swings and drawer clearances.
- Choose the cabinet style after the layout and systems are settled, and leave room in the budget for what the old house turns up.
If the whole house is still being planned, go back to the main 1920s house renovation article before locking the kitchen scope, since these decisions depend on the wiring, plumbing, floor structure, and the rooms around the kitchen.
What to Read Next
A 1920s kitchen comes out best when the room is understood before it is redesigned. Keep the character that makes it belong to the house, fix what is hidden before the finishes go on, and make the layout work before the cabinets arrive.